
8. Organizing Your Research
Every writing project has certain similarities. If you are writing a novel, you collect information about characters, settings, occupations, and other details to enhance your story. If you are writing an academic thesis, you collect data and published works to support your thesis. Lawyers collect information about a case, their clients, and case law. Cooks collect information about techniques and ingredients. Yes, the common element we cover in this chapter is research.
Scrivener can keep all of your research together with your project. This makes it easy to find exactly what you need. As you learned in Chapter 4, “Writing in the Editor,” you can even view a research file in one pane in Split Screen mode while you work on a document in the other pane.
The Research folder is one of the default root folders added to every Scrivener project (as if you needed further proof that research is a key element of any form of writing). You can rename the folder or create additional folders to hold research, as you require. If you are gathering a lot of research on various topics, you might want to create subfolders for each topic within the Research folder.
![]() Tip
Tip
When working on a novel, I create a root folder called Reference in addition to my Research folder. The Reference folder holds worksheets and notes I’ve collected from writing workshops and books on writing that I tend to refer to with every project. The Research folder is where I collect research information specific to the work in progress.
Importing Research Files
The easiest way to add most types of files to your Research folder is simply to drag the file from Finder or Windows Explorer and drop it into the location you want in the Binder.
 Caution
Remember, the Draft folder only holds text files. You cannot add other file types to this folder.
Using File Import
You can also import files using the menu. To import a file into your Research folder:
1. In the Binder, select the Research folder or another folder into which you want to import the file.
2. Choose File, Import, Files from the menu or press Cmd-Shift-I (Ctrl+Shift+J in Windows). This opens the Import Files dialog box.
3. Select the file you want to import.
4. Click Import on the Mac or Open in Windows.
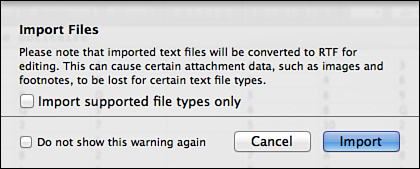
When you import, you see a warning about possible loss of footnotes and images if converting a text file, as shown in Figure 8.1. On the Mac, this warning also offers the option to only import supported file types. If you select this option, Scrivener only imports files that can be viewed within the application. If you intend to import files that require viewing in another application, do not select this option. Click the check box beside Do Not Show This Warning Again to disable the warning for future imports.
![]() Note
Note
Chapter 3, “Organizing the Binder,” explained the different file types and default icons that appear in the Binder when you import nontext files.
Opening Files in an External Editor
Scrivener can display many file types directly within the application. You can read PDFs, listen to audio files, and view videos and images. Some formats, such as spreadsheets, are unsupported by Scrivener, but can still display a Quick Look view of the file on a Mac.
![]() Note
Note
If you are using Mac OS X 10.6 Snow Leopard or earlier, you must click the Quick Look icon in the Footer bar to open a Quick Look panel. In OS X 10.7 Lion or higher, the Quick Look automatically opens in the Editor. You also still have the option of opening a Quick Look panel in Lion or higher.
If Scrivener cannot open a file, the Editor displays an icon representing the application in which the file was created, as shown in Figure 8.2. In Windows, the Editor displays a link to open the file in the default application associated with that file type, as shown in Figure 8.3.
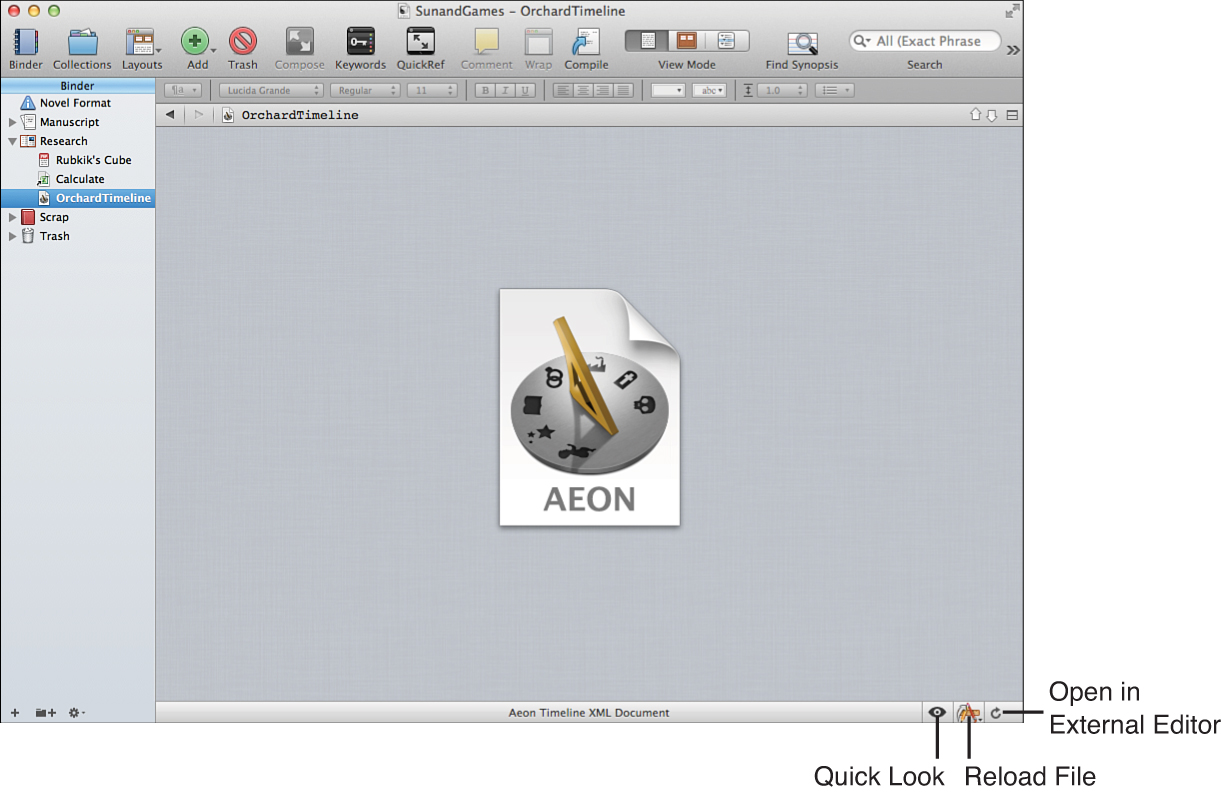
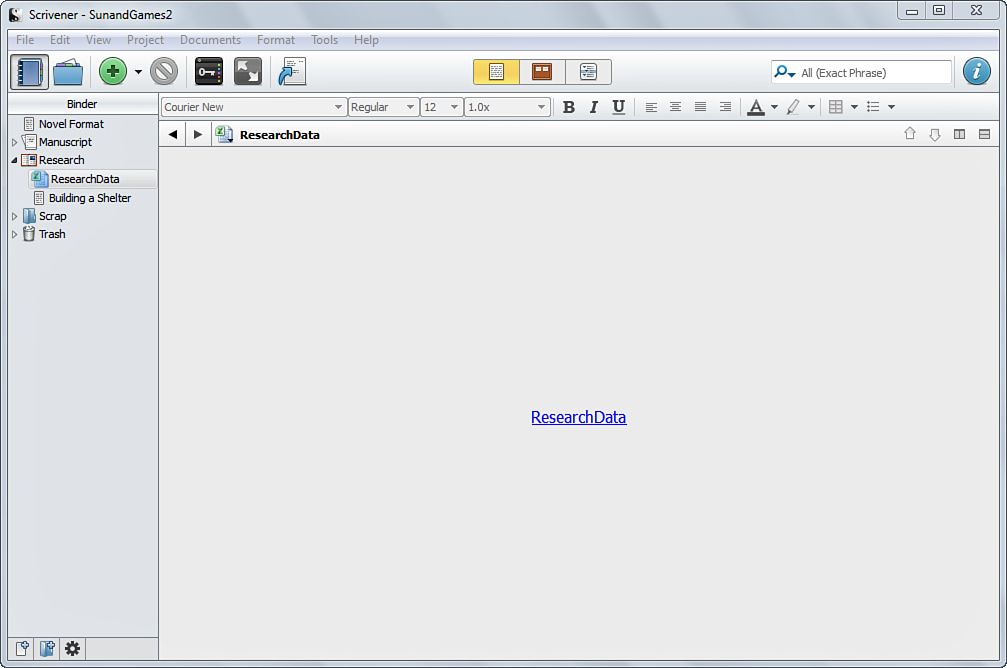
Figure 8.3 Scrivener cannot display an Excel file in Windows, so it provides a link to open the file in an external editor, namely Microsoft Excel.
![]() Tip
Tip
You may also want to open a file in an external editor in order to make changes to the file. You can open an image file in a graphics package, for example, to crop the image or add a callout to a figure.
To open a file in an external editor, choose one of the following options:
• In Windows, click the link in the Editor.
• On the Mac, click the Open in External Editor button in the Footer bar to open the file in the default application for that file type. Alternatively, click and hold or right-click the Open in External Editor button to choose the application with which you want to view the file.
• Choose Documents, Open, Open in External Editor in the menu.
• Right-click on the file in the Binder and then select Open, In External Editor (Open, Open In External Editor in Windows).
• Press Control-Cmd-O on the Mac or Ctrl+F5 in Windows.
![]() Note
Note
If you edit a file in an external editor on the Mac, click the Reload File button in the Footer bar when you return to Scrivener so the file is updated in your project. In Windows, switch to a different item and then back to the file to refresh the display.
Linking to an Alias
Sometimes your research material is itself a work in progress. When you import a file into Scrivener, a copy is made that becomes an inherent part of your project. If you make changes to the original file, those changes are not reflected in the copy that resides in Scrivener.
Some of your research files may also be quite large. Importing these items significantly increases the file size of the project, which could slow down automatic backups and even fill up your backup storage with multiple copies of such large files.
If you face either of these challenges on the Mac, you can link to the file as an alias rather than using the standard import options. To do this, select File, Import, Research Files as Aliases from the menu. When you link to a file as an alias, the icon for the item in the Binder displays a small arrow on the lower left to indicate that the file is stored externally. Whenever you access that item in your project, Scrivener checks for the most recent copy of the external file. If you move or rename the file, Scrivener can locate it, but if you move your Scrivener project to another computer, your links will not function on that computer.
Caution
If you obtained your copy of Scrivener from the Mac App Store, you may see an error message when you try to open files linked with an alias. This is due to security limitations on file access that Apple has put on apps sold through the Mac App Store. If you want to grant Scrivener access to these files, choose Scrivener, Authorize Directory Access from the menu, and then click the Add Directories button. In the Open dialog box, select the directories to which you want Scrivener to have access.
![]() Note
Note
You can only link to a nontext document as an alias. You cannot link to a text document or supported word processor file, such as a Microsoft Word document.
In Windows, the process is a bit different. Rather than creating an alias within the Binder to link to a source file, Scrivener for Windows requires using the References table in the Inspector to create an external reference. References are covered in detail in Chapter 11, “Digging into the Inspector.” But, briefly, to use this feature specifically for use in linking to your research files:
1. Create a new file in the Research folder.
2. Open the Inspector, if it is not already visible in your Scrivener window. Click the Inspector icon in the toolbar (the italicized i in a blue circle), or select View, Layout, Show Inspector from the menu, or press Ctrl+Shift+I.
3. Click the References button at the bottom of the Inspector.
4. Click the Add (+) button at the top of the Document References pane of the Inspector.
5. Select Look Up & Add External Reference from the drop-down menu, shown in Figure 8.4.
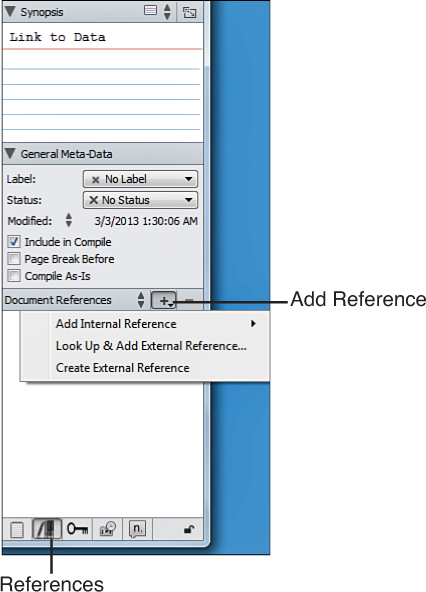
Figure 8.4 In Windows, create links to external documents using the Document References pane of the Inspector.
![]() Note
Note
You can also drag files from Windows Explorer into the Document References pane in place of steps 4 and 5.
6. Select the file in the Add References dialog box, and click Open.
To open a reference, double-click it in the Document References pane of the Inspector. You can also right-click it and choose Open in Default Editor from the context menu.
As with many other procedures in Scrivener, there are several ways to approach this. Instead of creating a file just to hold a reference, for example, you can click the toggle to the right of the Document References heading in the Inspector and switch to Project References. Then you can attach a reference to the project as a whole rather than one document. This does not give you a point of reference within your Research folder, however, making it easy to forget the link is available.
![]() Tip
Tip
Although on the face of it, this process may seem more convoluted than the Mac method of linking to external files, there are actually several advantages to it. You can add notes to the document you create to hold the references. You can also add references to multiple external files from that document. Thus, this approach can serve as a way to collate and organize your research material. Mac users may want to take note, as this trick works on both platforms!
Using PDFs
Portable Document Format (PDF) is a popular way to save files so they can be accessed on multiple platforms while preserving the formatting of the document.
You can view PDF documents directly in Scrivener. Zoom in and out using the View, Zoom menu or the Cmd-> and Cmd-< keyboard shortcuts (Ctrl+= and Ctrl+- in Windows). You can also control the appearance of PDF documents from the View, Media, PDF Display submenu. The options on this menu are as follows:
• Automatically Resize: Mac only. Automatically resizes the document if you adjust the Editor window. In Windows, the Size to Fit option works the same way.
• Actual Size: Mac and Windows. Displays the document in its actual size.
• Size to Fit: Mac and Windows. Sizes the document to fill the Editor window. In Windows, this option automatically adjusts the size of the document if you change the Editor width.
• Single Page: Mac only. Displays a single page of the document at a time.
• Facing Pages: Mac only. Displays two pages of the document side by side.
• Continuous: Mac only. Displays the document as a continuous page.
• Page Breaks: Mac only. Displays the document with page breaks.
The Footer bar of the Editor changes when viewing PDFs. In Windows, the sizing controls appear in the Footer bar in addition to the PDF Display submenu. Use the arrows on the left side of the Footer bar to move forward and backward through the pages of the document. The center of the Footer bar displays your current page as well as the length of the document.
Click the Open in External Editor button in the Footer bar to open the document in another application. You can highlight selections of text in a PDF from within Scrivener for Mac by selecting Format, Highlight, Highlight Text or pressing Shift-Cmd-H. To add comments or make any other changes to a PDF, however, you need to use an external editor such as Adobe Acrobat.
![]() Tip
Tip
PDFs are not meant to be edited. You can highlight sections in Scrivener and make comments or add other annotations in Adobe Acrobat or Preview, but the document itself is meant to remain formatted as is. If you need to quote a block of text from a PDF, you can copy and paste it into a text document in your Draft folder. On the Mac, you can choose Documents, Convert, PDF File to Text from the menu to convert the document, and then copy and paste. If you’re viewing the PDF in another application on the Mac, use the Services submenu in that application to create a clipping for Scrivener, as described in Chapter 2, “Customizing Your Work Environment.” This converts the pasted or clipped selection into text, which you can then format to suit your project. If the content of the PDF document is not your original work, however, be sure to attribute the source in your project.
Accessing Media Files
Scrivener uses a multimedia view to play movie and sound files. When you select an audio or video file in the Binder, a control panel appears above the Footer bar in the Editor window, as shown in Figure 8.5.

Figure 8.5 The media control panel in Scrivener provides a typical set of tools to control the playback of audio and video files.
Most of the controls should be familiar, as they control the volume, play/pause the file, and fast-forward or rewind. In the lower-right corner of the control panel, the Rewind by a Few Seconds on Pause toggle instructs Scrivener to automatically rewind whenever you pause. The number of seconds for the rewind is set in the Navigation tab of the Preferences/Options window. This feature is useful if you are transcribing the audio or video file. When you are transcribing or taking notes on a media file, you do not have to leave the document editor to pause the playback. Use Cmd-Return (Ctrl+Enter) to pause and resume playback in the other editor.
Importing Web Pages
Importing a web page requires a slightly different process than importing other types of research. When you import a web page, any links on the page open your default web browser. If you click the Reload File button on the right side of the Footer bar, the web page view is updated to reflect any changes to the page. The Footer bar also displays a link to the page so you can quickly open it in your default web browser.
To import a web page:
1. Click File, Import, Web Page from the menu. This opens the Import Web Page dialog box, shown in Figure 8.6.

Figure 8.6 To import a web page, enter the URL in the Import Web Page dialog box. The title you supply appears in the Binder.
2. Enter the URL for the page.
3. Enter a title for the page. The title appears in the Binder.
4. In Windows, click the Import As drop-down menu and choose the format in which you want to import the web page. On the Mac, web pages are imported in .webarchive format by default. You can choose to import web pages as text in the Import/Export tab of the Preferences dialog box.
![]() Tip
Tip
If you are working on a project on both Scrivener platforms, it is best to convert imported web pages on the Mac to text, as Windows does not support the .webarchive format. You can convert web pages on import using the Import/Export tab of the Preferences dialog box or after importing by choosing Documents, Convert, Web Page to Text from the menu.