
20. Creating E-Books
The publishing world is changing rapidly, as is the technology that allows a reader to access thousands of books from a device smaller than the average paperback. If you are one of the many venturing into the world of online publishing, this chapter explains the details of how to create an e-book from your Scrivener project.
The overall compile process for an e-book is the same as what you learned in Chapter 19, “Compiling Your Completed Work.” There are certain details that are specific to compiling an e-book, however. Unlike compiling a Rich Text Format (.rtf) file in order to open and fine-tune your compilation in another application, an e-book is a final product intended for a wide audience. It requires cover art, copyright and ISBN information, and a table of contents. Your e-book is a public face for your work, so you want it to be perfect.
![]() Tip
Tip
If you need to fine-tune a compiled e-book, compile it in .epub format and then use Sigil, an ePub editor. You can find it at http://code.google.com/p/sigil. If necessary, you can then open the edited .epub file in Kindle Previewer to automatically convert it to .mobi format.
Preparing Your Front Matter
Before you begin the compilation process for your e-book, you need to make sure your project as a whole is prepared. The table of contents for your book stems from the structure of your project, so be sure you have your chapters organized as you want them to appear in the e-book. The most common approach is to organize your chapters as folders or file groups, with scenes (or sections, in the case of nonfiction) as text items within each chapter. You can, however, organize your project as a flat series of text items. Just be consistent.
If you are on a Mac and your project template created a non-Draft folder for Front Matter, that is your next stop. Figure 20.1 shows the Front Matter folder for a project. If your project does not contain such a folder, I highly recommend you create one. Using a separate folder for your front matter keeps it separate from the rest of your project. Consider some scenarios that may require you to format your project differently:
• You want to sell your book in different e-book formats.
• You want to sell your book through different e-book distributors, each of which has different submission requirements.
• You want to use a service like Lulu or CreateSpace for print-on-demand (POD).
• You want to submit the manuscript to a publisher to sell your print rights.
• You want to post an excerpt on your website with copyright and other info.

Figure 20.1 The E-Book subfolder of the Front Matter folder contains a cover and a title page, as well as other supplemental pages.
Those situations may each require different cover art, ISBN numbers, copyright page, or other elements. If you store these pages in the Draft folder, you need to manually revise them or swap them out for each different compile scenario. If you use a Front Matter folder, however, you can prepopulate a subfolder for each scenario with exactly the materials required for that format. This will speed up your compile process later.
Adding Cover Art to Your Project
Success in the e-book world is all about discoverability and marketing. If the public doesn’t notice your book, they won’t buy it. If they notice your book but don’t think it looks like a professional work, they not only won’t buy it but may be less inclined to purchase future books from you as well. One critical element to both discoverability and marketing is cover art.
It is beyond the scope of this book to instruct you in how to create or obtain cover art, but here are some basic specifications and tips. You may need to create multiple sizes of the art for different distribution channels, as noted below. Also keep in mind that your cover is viewed as a thumbnail on the bookshelf or description of most e-readers, and too much detail can make the thumbnail look muddled.
To ensure the widest compatibility with the fewest number of images, you should format your cover art with the following specifications:
• Image size: 1400×2100 pixels for most publishers; 1267×1900 for Barnes & Noble
• Image resolution: 72DPI
• File size: <2MB
• Image type: .jpeg, .jpg, or .png
You should also create a 300DPI resolution image for POD or use on printed promotional materials.
Import your cover art into the Front Matter folder of your project before you compile. See Chapter 8, “Organizing Your Research,” to learn how to import nontext materials into non-Draft folders.
Formatting Other Front Matter
Prepare your other front matter before entering the Compile dialog box. Enter your ISBN information on the Copyright page, as shown in Figure 20.2. Your e-book distributor, such as Smashwords, may have specific instructions for a title page and copyright format, so follow its requirements. Add Dedication and Acknowledgment pages or an About the Author page.

You can use placeholder tags for some of the information in your front matter materials. In Windows, the <$projecttitle> tag gets replaced during the compile process, so you can use this in place of the title on a title page.
On the Mac, you can use placeholders to access project meta-data entered into the Project Properties tab of the Meta-Data Settings dialog box (Project, Meta-Data Settings on the menu). You can also use the <$year> placeholder tag for the year on the copyright page.
Compiling an E-Book
The compile process itself follows the same routine as for any other project. See Chapter 19 to learn more about this process. For an e-book, follow these steps:
1. Open the Compile dialog box using one of the following:
• Click the Compile button on the toolbar.
• Choose File, Compile from the menu.
• Press Option-Cmd-E on the Mac or Ctrl+Shift+E in Windows.
2. Click the All Options tab in the Compile dialog box if it is not already selected. In Windows, click the expansion button if the dialog box is not already expanded.
3. In the Format As drop-down menu, choose E-Book (Figure 20.3).

Figure 20.3 The Compile dialog box displays Compilation Options specific to formatting e-books when you select an e-book format from the Compile As drop-down menu.
4. In the Compile For drop-down menu, choose one of the following:
• ePub eBook (.epub): Select this format for the Barnes & Noble Nook, Sony Reader, and most other e-readers, with the exception of the Amazon Kindle. You can also read .epub format on your computer or on iOS or Android devices using an app.
• Kindle eBook (.mobi): Select this format for the Amazon Kindle series of devices. You can also read Kindle e-books on your computer or on iOS or Android devices using the Kindle app for that platform.
5. Use the Compilation Option tabs to format your e-book, as explained in the remainder of this chapter and Chapter 19.
6. Click the Compile button.
7. In the Export (Save As in Windows) dialog box, enter a name for the e-book file and click Export (Save in Windows).
Adding Front Matter to the Contents Tab (Mac Only)
If you are on a Mac and you utilize the Front Matter folder, select the Add Front Matter check box at the bottom of the Contents tab and choose the appropriate subfolder from the drop-down menu. The Front Matter pages appear in the compile group, with the As-Is check box selected by default. If you want a page break before any of your front matter, select the Page Break Before check box for that item.
![]() Note
Note
The Front Matter folder only adds text documents to the Contents. Add your cover on the Cover tab, as explained in the next section.
If you are using Windows or you elect to not use a Front Matter folder, be sure your front matter is included in the compile group pane.
Proceed to the Formatting tab to configure your structure and content table and set up your Layout Options and Section Layout, as explained in Chapter 19.
Adding a Cover
When you select an e-book format as your output (Compile For) format, some extra tabs appear in the Compilation Options. One of these is Cover. To add the cover to your e-book:
1. In the Cover tab, shown in Figure 20.4, click the Cover Image drop-down menu. The drop-down menu lists any images you added directly to the Binder.

![]() Note
Note
On the Mac, you cannot use an image you added to a synopsis or embedded within a text document. If you want to choose one of these images, you need to import it directly into your project as a standalone item. In Windows, images you add to a synopsis appear in the Cover Image drop-down menu, but it is still easier to locate an image imported directly into the project as a standalone item.
2. Choose your cover image. A preview of the image appears below the drop-down menu.
3. In the Cover Page Title field, enter how the cover page should appear in the book’s table of contents. I suggest using the default option, Cover.
 Caution
Do not enter the title of your book in this field. The title is only used on the table of contents page to help readers navigate your book. It is not used to identify the book as a whole.
Generating an E-Book Table of Contents
E-books have a table of contents that allows readers to quickly navigate to a specific chapter or subsection of the book. On the Kindle, the table of contents serves as the foundation for the navigation dots on the progress bar as you read. Each top-level section is represented by a navigation dot.
On the Mac, the Layout tab, shown in Figure 20.5, has options to allow Scrivener to automatically generate a table of contents so you do not have to manually create one. The options for generating a table of contents are as follows:
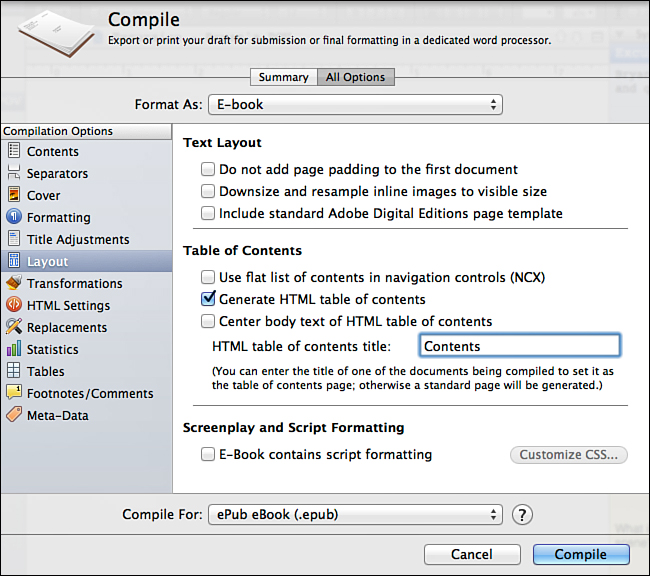
• Use Flat List of Contents in Navigation Controls (NCX): The table of contents generated by Scrivener is nested by default. Subsections are indented and listed below their parent sections. Because the Kindle only uses top-level items on the progress bar, if you want the navigation dots on the Kindle to reflect subsections of your e-book, you must flatten the list of contents so each item is at the same level in the table of contents.
![]() Note
Note
If you prefer the nested table of contents and are willing to sacrifice some of the detail on the Kindle progress bar, do not select this option.
• Generate HTML Table of Contents: Most e-readers provide a software-based table of contents to navigate to key elements in the current e-book. If you want to generate a separate table of contents into the text of the book, select this option.
• Center Body Text of HTML Table of Contents: If you opt to generate an HTML table of contents, this option centers it on the page. If you deselect this option, the table of contents is left-aligned.
• HTML Table of Contents Title: You can also create your own table of contents using Scrivener (internal) links. If you have done this, specify the title of that document here so it is picked up by the e-reader’s navigation tools.
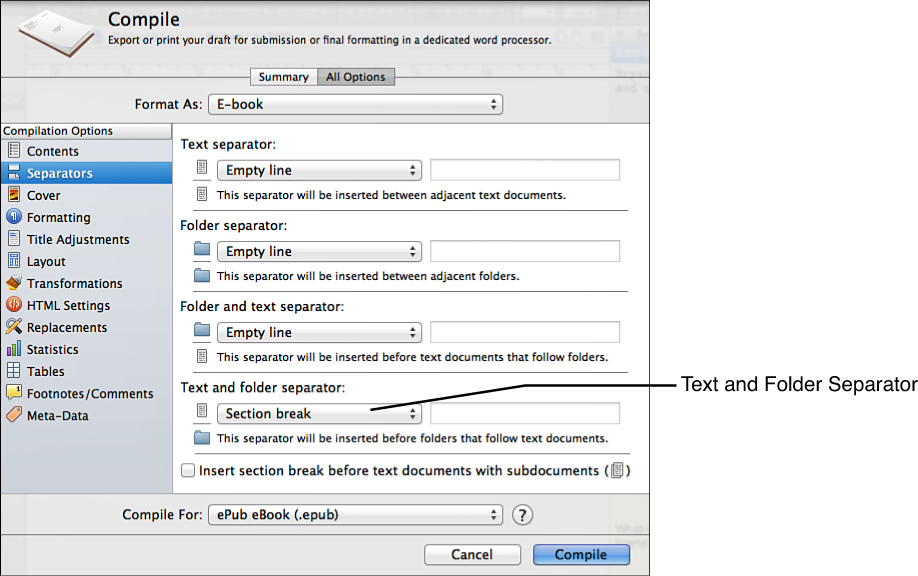
Scrivener generates the table of contents based on section breaks in your Compile settings. Section breaks are established in the Separators tab, as shown in Figure 20.6. The Text and Folder Separator option is set to create a section break by default. This is referred to as a page break in Windows, but functions as a section break. If your project is organized in the common manner with chapters in folders and scenes or sections in files within each chapter, this option means that if a scene/section (file) is followed by a chapter (folder), a section break is inserted. In the text of the book, the new chapter begins on a new page, whereas in the table of contents, the section break instructs Scrivener to add the folder title to the list.
![]() Tip
Tip
If you format your project with file groups rather than folders, click the Insert Section Break Before Text Documents with Subfolders option in the Separators tab.
Scrivener also generates a section break if an item is marked with the Page Break Before tag in the Inspector and the Contents tab of the Compile dialog box. Use this to your advantage when adding front matter to the Contents tab so those pages appear in the table of contents.
![]() Note
Note
In Windows, the table of contents is generated automatically based on the settings in the Contents and Separators tabs. There are no options to modify how the table of contents is generated.
Reviewing HTML Settings (Mac Only)
If you’re on a Mac, the HTML Settings tab, shown in Figure 20.7, appears in the Compilation Options when you elect to compile in .epub or .mobi e-book format. Use the settings here to convert Scrivener (internal) links to HTML links in your e-book. If the link refers to an item that is not included in the compile group, it is removed from the compilation.

Figure 20.7 The HTML Settings tab is used to convert Scrivener (internal) links to HTML links for use in e-books.
![]() Note
Note
If you have footnotes in your project, they are converted to endnotes in your compiled e-book, as you can see in the Footnotes/Comments tab. These notes also use internal links to cross-reference from the footnote marker to the text in the endnotes.
Links are not underlined by default. If you want your links to be underlined when converted to e-book format, select the Underline Links check box. Otherwise, links will not be underlined in your e-book.
Adding Document Properties to E-Books
The meta-data associated with an e-book is used to generate the description of the book online and in the e-reader. Enter the properties of your e-book in the Meta-Data tab, shown in Figure 20.8.
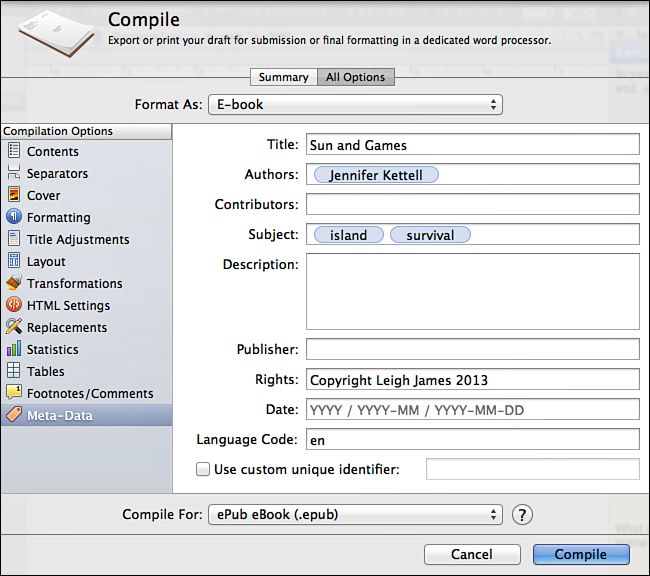
At a minimum, fill out the Title, Author, Date, and Description fields, but ideally you should fill out all of the fields. Although some e-readers cannot make use of the full meta-data properties, others can. The Meta-Data tab contains the following fields:
![]() Note
Note
Calibre is a free, open source, multiplatform e-book management application. Many readers use Calibre to manage their e-book libraries, search for new books, access e-book distributors, and convert e-books to different formats. To aid in many of these processes, Calibre makes full use of an e-book’s meta-data. You can download Calibre from http://calibre-ebook.com.
• Title: The title of your book, as you want it to appear on distribution sites and in e-readers.
• Authors: The name of each author, as it should appear in e-book store listings and in e-readers. Separate author names with a semicolon in .epub format or with a comma in Kindle .mobi format.
• Contributors: The name(s) of contributors to the work. Use the Contributors field if you compiled and edited the work of others (with permission, of course) instead of directly authoring the work.
• Subject: The keywords by which your book can be searched in Calibre and other apps. The Subject field is not used by all e-readers or stores. Separate each subject term by a comma. On the Mac, these terms are converted to tags. Subject terms can use phrases as well as single words, but keep in mind that the more detailed it becomes, the less likely people will stumble upon your e-book when they’re searching for books.
![]() Tip
Tip
Do not add subjects that are unrelated to your e-book. As tempting as it may be to add twilight to your subject terms, if your e-book is about being stranded on a deserted island, readers will punish you with 1-star reviews when they are misled.
• Description: A brief blurb about your book. Think of it as marketing copy, the e-book version of a dust jacket or back cover blurb, not a complete plot summary.
• Publisher: The publisher of the e-book. This can be your own name or your company name if you are self-publishing.
• Rights: The copyright information. Because the copyright symbol (the c in a circle) does not always render properly in all e-readers, spell out the word Copyright.
• Date: The publication date for the book. The grayed-out placeholder information shows the format for this information.
• Language Code: The two-letter ISO standard language code. In Windows, click on the Language drop-down menu and select the language; Scrivener generates the proper code. On the Mac, you must manually enter the code. The complete list of Codes for the Representation of Names of Languages can be found at http://www.loc.gov/standards/iso639-2/php/code_list.php. The code for English is en.
• Use Custom Unique Identifier: A unique code to distinguish your e-book from other books. Select the Use Custom Unique Identifier check box and enter the ISBN, if you have one. If you do not enter an ISBN, Scrivener creates its own identifier based on the author, title, and date fields.
![]() Tip
Tip
If you are compiling a Kindle .mobi e-book to sell through the Kindle Store, you can use the ASIN code assigned to the book in place of an ISBN number. This code is unique to Amazon, however, so I recommend using ISBNs to track your books.
Using KindleGen for Kindle MOBI Files
The Amazon Kindle dominates the e-reader market. Not only can you read a Kindle-formatted e-book on a dedicated Kindle e-reader, but you can also read it on almost any computer platform, mobile device, or tablet using a Kindle app. The only downside to a Kindle is that it uses its own proprietary file. If you want to tap this e-reader market, you need to compile a separate e-book for the Kindle format.
Before you can format a Kindle e-book, you must download the KindleGen app from Amazon. Go to http://www.amazon.com/kindlepublishing to download the KindleGen file for your Mac or Windows platform. Unzip the file and store the KindleGen folder in a safe place on your computer.
When you select Kindle eBook (.mobi) from the Compile For drop-down menu, a KindleGen tab is added to the Compilation Options. In this tab, click the Choose button and navigate to the folder you decompressed. Select the executable file in the KindleGen folder and click Open. The Choose button becomes a Change button, as shown in Figure 20.9.
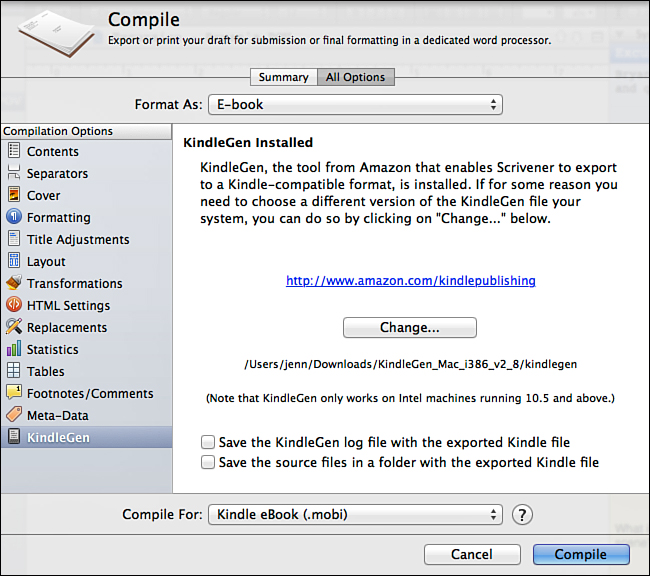
Figure 20.9 The KindleGen tab only appears if you select Kindle eBook (.mobi) as your output format.
As long as this file remains in the same location on your computer, this tab remains set. You can then proceed to set the other tabs in the Compile dialog box and compile your project as described earlier in this chapter and in Chapter 19.
Compiling an E-Book for iBooks (Mac Only)
If you want to create an e-book for use in iBooks on the iPhone or iPad, you must take additional steps. The iBooks format is proprietary, and Apple does not authorize third-party applications such as Scrivener to create an iBooks Author format file directly. Instead, you must save your project as a series of individual files for each chapter or section of the book and then import them all into the iBooks Author app on your Mac.
To begin this process, choose iBooks Author Chapters (.docx) as your output format from the Compile For drop-down menu. This format automatically breaks up your compile group into separate .docx files where there is a section break in the compilation. As with generating a table of contents, section breaks are based on the options in the Separators tab and the Page Break Before settings in the Inspector. In the Text and Folder Separator drop-down menu in the Separators tab, select Chapter Break. This option replaces the Section Break option the other e-book formats use.
After you adjust the other Compile settings and compile the project, open iBooks Author and drag the entire folder of compiled files into the app. Use iBooks Author to complete the process of preparing your project for iBooks.
Previewing Your E-Book File
Before uploading your e-book to Amazon, Barnes & Noble, and other e-book stores, you should ensure that your e-book is properly formatted. View .epub files in an e-reader such as Adobe Digital Editions. To preview your Kindle e-book, download the Kindle Previewer app from http://www.amazon.com/ kindlepublishing. When reviewing your e-book file, inspect the following items for problems:
• Cover art
• Front matter
• Chapter names and numbering
• Table of contents formatting
• Section breaks
• Endnote formatting, if your project contained footnotes that were converted to endnotes