
11. Digging into the Inspector
All of the chapters so far have focused on getting you up and running so you can write. Now that you know how to get your words on the screen, it’s time to dig deeper into what Scrivener can do. Many of the prior chapters have mentioned being able to use data from the Inspector. This chapter explores the Inspector properly.
Navigating the Inspector
To begin this exploration, open the Inspector pane in Scrivener using one of the following methods:
• Choose View, Layout, Show Inspector from the menu.
• Click the Inspector icon on the toolbar (the italicized i on the far right).
• Press Option-Cmd-I on the Mac or Ctrl+Shift+I in Windows.
The Inspector sidebar, shown in Figure 11.1, consists of a series of panes. By default, the Synopsis, General, and Notes panes are visible. As you work with the Inspector, it remembers the pane settings you last used and automatically reopens those panes.
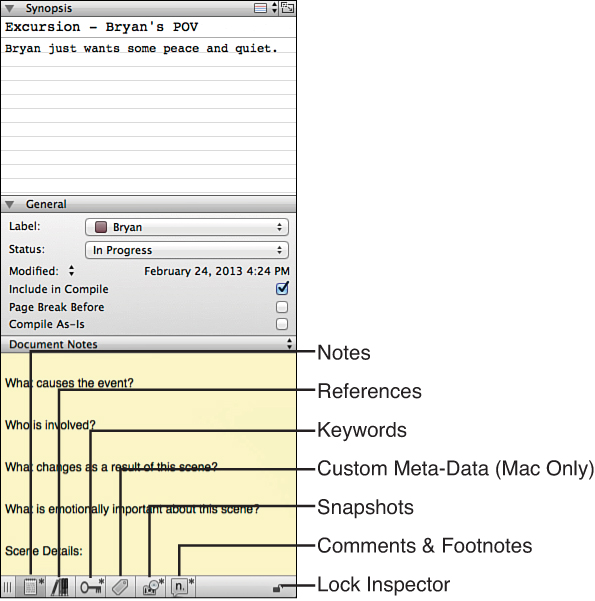
At the bottom of the Inspector is a Footer bar containing icons to access additional panes. If an asterisk appears with the icon, the pane contains data pertaining to the selected item.
The Inspector reflects the meta-data for the item in the Editor window. If you are in Split Screen mode, you can lock the Inspector to always display the data for a particular Editor screen, which is explained later in this chapter. Otherwise, the Inspector displays the data for the active Editor screen, as follows:
• If you are in the Corkboard or Outliner views, the Inspector shows the meta-data for the selected index card or Outliner item.
• If you load a container in the Corkboard or Outliner but do not select an index card or row, the Inspector shows the meta-data for the container.
• If you select multiple items in the Corkboard or Outliner, the Inspector displays the Project Notes and References.
• If you are in Scrivenings view, the Inspector displays the meta-data for the document that currently has the focus in the session.
![]() Note
Note
The three root folders—the Draft, Research, and Trash folders—do not have meta-data associated with them. If you select one of these folders, you see only the Project Notes and References, as those are associated with the entire project.
Adding a Synopsis in the Inspector
In Chapter 6, “Storyboarding with the Corkboard,” you learned how to enter a synopsis on an index card. The synopsis also appears on a similar index card at the top of the default Inspector panel. The Synopsis pane, shown in Figure 11.2, consists of a title, which is the same as the item’s title in the Binder, and the synopsis itself. The disclosure triangle to the left of the Synopsis pane header can be used to open and close the pane.
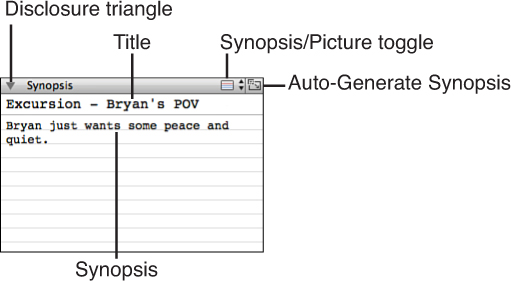
Figure 11.2 The Synopsis pane contains the document’s title and a synopsis describing the contents of the document.
![]() Note
Note
If you have been following this book chapter by chapter in your copy of Scrivener, the Inspector may open in the Snapshots or Comments & Footnotes pane, both of which fill the entire Inspector. Click the Notes button at the bottom of the Inspector to open the Synopsis, General, and Notes panes.
 Caution
Remember, the synopsis is not the same as the document text. Enter the content of your document in the Editor window. The synopsis is purely meta-data to help you organize your work.
To change the title of the document, select the current title and type over it, then press Return/Enter. The title immediately changes in the Binder as well as in the Inspector. If you have the Corkboard or Outliner open, you can view the title change there, as well.
To add or edit the synopsis, click in the text area below the title. You can enter as much text as you want, but it’s generally best to keep it brief, as the text you enter here also appears on the index card in the Corkboard and in the Title and Synopsis column (the Synopsis column in Windows) in the Outliner.
![]() Note
Note
You cannot format text in the synopsis; thus you cannot use bold, italic, or bullets. You can, however, use asterisks or hyphens to emphasize text or make a bulleted list. On the Mac, press Alt-8 to create a round bullet using the standard keyboard layout.
Automatically Generating a Synopsis
If you don’t want to manually enter a synopsis, Scrivener can automatically generate one for you based on text in the Editor. If you want to use specific lines of your document as your synopsis, select that particular text in the document and then click the Auto-Generate Synopsis button at the upper right of the Synopsis pane in the Inspector.
You can also click the Auto-Generate Synopsis button without preselecting any text. Scrivener uses the shorter of the first 500 characters or up to the first paragraph break of your document as the synopsis. On the Mac, you can select multiple documents in the Binder, Corkboard, or Outliner and choose Documents, Auto-Generate Synopses from the menu to generate synopses for all of the selected documents at once.
Caution
The Auto-Generate Synopsis feature overwrites text that you have already entered into the Synopsis pane. This is a good way to update the synopsis if you have made changes to your document since you last used the Auto-Generate Synopsis tool, but be careful not to use this feature if you have manually entered a synopsis.
![]() Tip
Tip
The Auto-Generate Synopsis feature is best used in nonfiction and academic work, where it is more likely that the first few lines of text will contain an introduction and possibly even a thesis statement about what follows in that section. In a fiction setting, the first few lines of your text are not likely to give you much of a clue of the purpose of the document.
Adding an Image to the Synopsis
As mentioned in Chapter 6, the synopsis can hold text or an image. In fact, the index card can serve double duty. You can add a text synopsis and also add an image to the “other side” of the index card. To add an image to the Synopsis pane:
1. Click the Synopsis/Picture drop-down menu at the top of the Synopsis pane to switch to the Picture view. You can also press Cmd-7 on the Mac. A black box appears in the Synopsis pane.
2. Drag an image from the Binder, desktop, Finder (on the Mac), or Windows Explorer (in Windows) and drop it in the Synopsis pane. On the Mac, you can also drag an image that has been inserted into a text document in your project.
![]() Tip
Tip
On the Mac, right-click on the image after adding it to the index card to open a pop-up menu with options to scale and align the image.
When you are in the Picture view of the Synopsis pane, the Auto-Generate Synopsis button changes to a Clear Picture button. If you want to delete the image, click this button.
Although you cannot view synopsis text and an image at the same time, both are preserved on the index card. Use the Synopsis/Picture toggle to switch the view between the synopsis and the image. The Outliner always displays the synopsis text, whereas the Corkboard displays either the text or the image depending on which view you used the last time you viewed that item in the Inspector.
Toggling the Created and Modified Date
Below the Synopsis pane, you see the General pane, shown in Figure 11.3. See Chapter 12, “Putting Keywords and Meta-Data to Work,” to learn about the Label and Status fields. The Modified field displays the date the document was last edited. Click the drop-down arrows to the right of the Modified field name and select Created if you would prefer to see when the item was created.
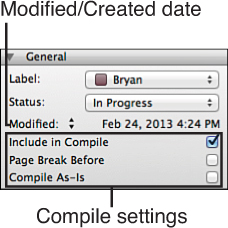
Figure 11.3 The General pane contains information about the creation/last modification date for the file and the Compile settings.
Selecting Compile Settings
The General pane contains three options to control how Scrivener handles the document when you compile your project to export or print it. They are as follows:
• Include in Compile: By default, when you add a file to the Draft folder, it is marked for inclusion when you compile. If you do not want to include the file, deselect this check box.
![]() Tip
Tip
Using Scrivener to prepare a presentation with handouts would be an example of when this may be useful. Deselect any files in the Draft folder that contain your speaking points and notes so you can compile the handouts, then return to the project and select the Include in Compile option for those files, and then recompile the project so you have a working copy of the presentation for yourself.
• Page Break Before: When selected, this option inserts a page break before the document when it’s compiled.
![]() Tip
Tip
Use this option to add a page break before a document that would otherwise use a different separator in the compile settings. For example, you can set your compile settings to separate files in the same folder by a line break. If you have a title page followed by a dedication page, however, you want them each to appear on a different page. The Page Break Before option ensures that happens. For routine separations between files, file groups, and folders, use the Separators tab in the Compile window, as you learn in Chapter 19, “Compiling Your Completed Work.”
• Compile As-Is: Select this option to preserve the formatting and layout of the file instead of using any text and notes formatting settings in the Compile window. See Chapter 19 for more information about formatting options in the Compile window.
These settings can be changed at any time. Thus, if you are compiling and printing a draft of your project for editing purposes, you may want to deselect the Page Break Before check box to save on paper and then reselect it before compiling the final version.
Adding Project and Document Notes
The Notes pane, shown in Figure 11.4, provides space for you to enter notes and ideas about the document or the project as a whole. The Notes header has a toggle button to switch between Document and Project Notes. Document notes are attached to a specific document and are only visible when that document is selected in the Editor, Corkboard, or Outliner. Project notes apply to the entire project and can be viewed at any time.

Figure 11.4 The Notes pane provides space for you to enter notes about the project as a whole or a specific document.
To enter a note, simply click in the pane and type. Although the Synopsis pane does not allow formatting, the Notes pane is more flexible. Format notes using the Format bar, menus, or keyboard shortcuts, just as you do in the Editor. You can also add an image to a note, either alone or along with text.
Caution
Just as with the synopsis, the text you enter in the Notes pane is meta-data, information about your work rather than the work itself. Enter the actual text of your project in the Editor, not in the Inspector.
Adding Images to Notes
When you add an image to the Synopsis pane, you are forced to choose between viewing the image and viewing your synopsis text (if you have chosen to enter any). In the Notes pane, you can view both text and images together. This allows you to either view both a Synopsis pane image and the Notes image in the Inspector at the same time, or to keep your Synopsis pane in text view while adding images to the Notes pane.
To add an image to the Notes pane:
1. Select either the Document or Project Notes pane.
2. Position the insertion point in the note in which you want the image to appear.
3. Choose Edit, Insert, Image from File from the menu or drag an image from the Binder, desktop, Finder (on the Mac), or Windows Explorer (in Windows). On the Mac, you can also drag an image that has been inserted into a document in your project.
4. Drop the image into the Notes pane. The image is added at the insertion point.
On the Mac, images are automatically scaled. In Windows, you should scale the image before inserting it into a note.
To delete an image, position the insertion point after the image and press the Delete/Backspace key.
Managing Project Notes (Mac Only)
Project notes are both limited and extensive in their use. As mentioned in the sidebar above, you cannot compile project notes, so unless you manually cut and paste them into a document, they are not of any use outside the Scrivener interface. On the other hand, if you do all your work within Scrivener, this limitation does not matter because the information is exactly where you need it. On the Mac, you can also expand the Project Notes to a separate, resizable notepad window so that you can enter more extensive notes and create additional Project Note sheets.
To open project notes in a window, choose one of the following options:
• Click the Notes header to open the drop-down menu and select Manage Project Notes.
• Choose Project, Project Notes from the menu.
• Press Option-Cmd-P.
The Project Notes window, shown in Figure 11.5, can be repositioned and resized. To add a new note:

Figure 11.5 The Notes pane provides space for you to enter notes about the project as a whole or a specific document.
1. Click the Add (+) button.
2. Enter a title for the new note.
If you want to rename a note, including the default General note, double-click the title and enter a new name. To delete a note, select it in the sidebar and then click the Delete (−) button at the bottom of the window or press Cmd-Delete. A warning pops up to remind you that you cannot undo this action.
Once you have created additional notes, they are accessible even when the Project Notes window is closed. To switch between notes, click the drop-down menu in the Notes pane header in the Inspector. Your new notes are automatically added to this menu. You can also press Cmd-6 and Control-Cmd-6 to cycle forward or backward through the available document and project notes in the Notes pane.
Using Reference Links
As you are working on a document, you may refer to the same supporting material again and again. You may be writing a scene in a novel and keep referring back to an earlier scene to get the details correct. You may refer to specific pieces of research or data in each section of an academic paper. Perhaps you access the same website repeatedly while working on a project. In any of these or similar situations, rather than browsing through the Binder in Scrivener, Finder or Windows Explorer on your computer, or the bookmarks in your web browser, you can add reference links to these relevant resources in the Inspector.
Reference links provide access to material relevant to your document or project without cluttering the project itself. Reference links appear in the References pane of the Inspector and can be attached to either a single document or available on a projectwide basis. To access the References pane in the Inspector, click the References button at the bottom of the Inspector. The References pane header acts as a toggle between Document References and Project References.
![]() Tip
Tip
On the Mac, you can also use Cmd-6 to switch between Document References and Project References when the References pane is open.
There are two types of reference links, as follows:
• Internal references: Link to an item within the Scrivener project
• External references: Link to items outside the Scrivener project, either stored on your computer or on the Internet
Adding Internal References
It may seem counterintuitive to link to an item within your project, but there are several reasons why internal references can be helpful. Internal reference links are particularly useful document references, as they can help you link the vast amount of items in your Research folder to the documents where that material is pertinent. This makes it easier to quickly access this material instead of repeatedly searching for the item you need.
Link related items within your Draft folder in order to make it easier to refer back and forth. If you write mysteries, for example, adding reference links to the scenes where you plant red herrings can help you quickly access those scenes when writing the villain’s denouement in order to tie up all the loose ends.
To add an internal reference link:
1. Click the References header and choose between Document References and Project References. Most internal reference links are created as document references because all internal items are already available on a projectwide basis from the Binder.
2. In the References pane, click the Add (+) button at the top of the pane.
3. Hover over Add Internal Reference, then select an item from the submenus that appear, as shown in Figure 11.6.
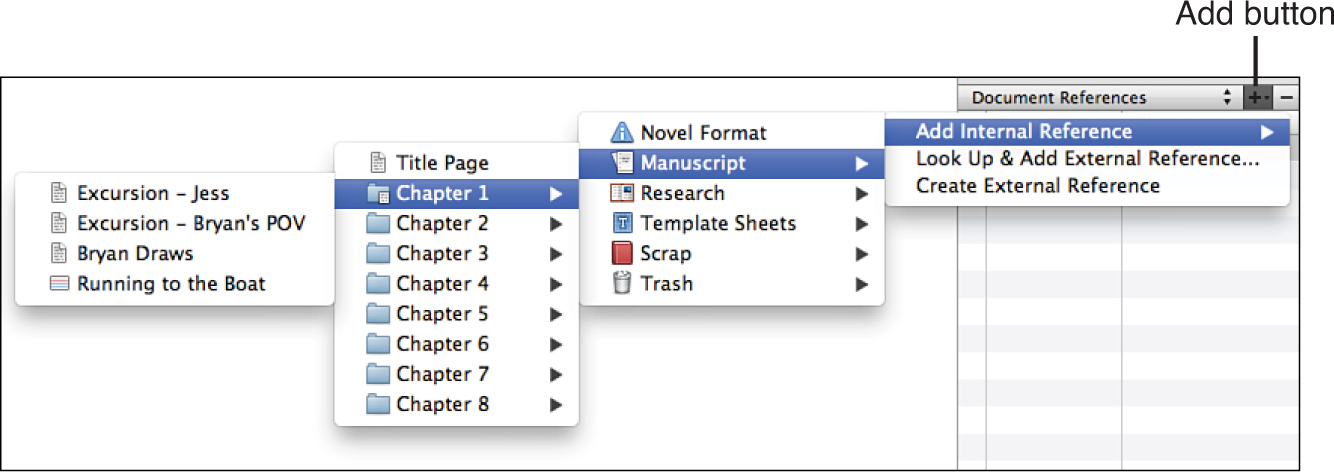
Figure 11.6 The Add menu of the References pane provides options for linking to internal and external references.
![]() Tip
Tip
You can also drag and drop an item from the Binder into the References pane in place of steps 2 and 3. If you are adding multiple items to the References pane, Cmd-click (Ctrl+click in Windows) or Shift-click to select them all at once and drag them to the References pane. You might want to lock the Editor when dragging items to the References pane to avoid accidentally switching the active document.
The internal reference link appears in the References pane, as you can see in Figure 11.7.

![]() Tip
Tip
In Windows, the URL appears as a tooltip when hovering over the reference rather than in a URL column.
![]() Note
Note
On the Mac, internal reference links are automatically cross-referenced. Thus, if you are working in a document titled “The Villain Gets His,” and create an internal link to a document titled “Mr. Smith Is Poisoned,” a similar link is added to the References pane for “Mr. Smith Is Poisoned” linking back to “The Villain Gets His.”
Adding Internal References to the Item Icon Menu (Mac Only)
Scrivener for Mac has a trick that can add internal references to the Item Icon menu in the Header bar of the Editor. This provides access to the internal reference link when the Inspector is closed. To add internal references to the Item Icon menu:
1. In the References pane, double-click on the words [Internal Link] in the URL column.
2. Type an asterisk (*).
3. Press Return.

When you open the Item Icon menu, you see a link to the reference at the top of the menu, as shown in Figure 11.8.

Figure 11.8 Replacing the [Internal Link] URL in the References pane with an asterisk adds an internal reference to the Item Icon menu.
Adding External References
External references link material outside your project, whether you’re using computer storage, the Cloud, or the web. Although you can import research material into your project, as you learned in Chapter 8, “Organizing Your Research,” doing so can potentially explode the file size of the project. You also have to ask yourself if there’s a reason to add everything to your project if it is readily available elsewhere. When researching Victorian clothing, for example, it is just not practical to import dozens of images when you can simply link to a website that has already compiled and organized those resources.
External references are also convenient for linking files created in other applications, such as spreadsheets and timelines. You can add these files to the Research folder of your project, but such items function solely as a link to open an external editor (the original application). Adding an external reference link in the Inspector is often a more practical and space-saving approach to such files.
Caution
If you move a file or access your project from a different computer, your links will be broken. If you need to access information from multiple computers or if the path of the file may change, import the material into your project, instead.
There are three ways to add an external reference link, two of which are accessible from the Add (+) menu:
• Look Up & Add External Reference: Used to link to a file in Finder or Windows Explorer. Select the file to which you want to link, and then click Open.
• Create External Reference: Used to link to web pages. Enter a title for the reference in the Description field. Copy and paste the URL from your web browser into the URL field. You can also use this option to link to a file on your computer if you know the path.
You can also add an external reference link by dragging and dropping a file from Finder or Windows Explorer to the References pane. For web pages, drag and drop the URL icon from your browser’s address bar to the References pane. Figure 11.9 shows both internal and external reference links.

Figure 11.9 Here is an example of a populated References pane, containing a mix of internal and external links.
![]() Tip
Tip
On the Mac, if you have created an external reference link for a file or web page and decide you want to import it into your project, drag and drop the link from the References pane into the Binder.
Viewing References
Once you’ve added a reference link, view the item by double-clicking the icon to the left of the description in the References pane. Scrivener displays the reference differently depending on the type of reference link:
• Internal reference links open in the other editor of the Split Screen view. On the Mac, if you right-click on the icon in the References pane, you can opt to open the link in the Current Editor, Other Editor, or as a QuickReference. You can also change the default settings in the Navigation tab of the Preferences window.
• External reference links open in the application in which the file was created or in your default web browser. Right-click on the icon in the References pane to open a pop-up menu with options to locate the file in Finder or Windows Explorer or to view the item in a QuickLook pane (Mac only).
Editing and Deleting References
As you add links, the References pane may need some organization. To sort links alphabetically, click either the Description or URL heading. On the Mac, a triangle to the right of the heading tells you which column is the basis of the sort order, and the direction in which the triangle is pointing designates if the sort is ascending or descending. You can also manually drag entries to a new position in the References pane.
If you move a file to which you created a link, you need to update the URL in the References pane. Double-click the URL for the reference and enter the new path or URL. In Windows, the URL appears in a tooltip. To edit the title or URL in Windows, double-click on the title. A pop-up field appears below the title allowing you to change the URL, and the title itself becomes editable.
![]() Tip
Tip
To change the title of a reference on the Mac, double-click it. Changing the title of an internal reference does not affect its title in the Binder or elsewhere.
To delete a reference, select it in the References pane and then click the Remove (−) button at the top of the pane or press Cmd-Delete on the Mac or Delete in Windows.
![]() Tip
Tip
If the path or URL of a reference has changed, you can delete the original reference and drag and drop an updated reference to save time.
Locking the Inspector
When you are in Split Screen mode, you can lock the Inspector to the current Editor pane so even if you switch the Editor focus to the other pane, the Inspector remains focused on the first document. This can be helpful when you are creating internal references and need to review the contents of several files to determine which ones should be linked to a particular document. To use this feature in this manner:
1. Open the document in which you want to create internal references.
2. Split the screen.
3. Click the Lock Inspector button at the bottom of the Inspector, as shown in Figure 11.1.
4. In the other pane, open an item you want to review. You can select items from the Binder or the Item Icon menu in the Editor.
5. When you find an item you want to link to the original document, choose View, Reveal in Binder from the menu or press Option-Cmd-R (Ctrl+Shift+8 in Windows) to see where in the Binder hierarchy the item appears.
6. Drag the item from the Binder to the References pane.
Caution
The Inspector is locked to the Editor pane, not specifically to the document itself. If you change documents in that Editor pane, the Inspector shows the meta-data of the new loaded document.
The Lock Inspector button is a toggle. When the Inspector is locked, the lock icon appears closed. In Windows, the lock button also appears depressed. To disable the lock, click the button again or close the split screen.