
10. Editing Your Manuscript
No matter what you write, first drafts generally consist of descriptions that need to be fleshed out, topics that need more research, citations that require verification, or scenes consisting completely of dialogue without any narrative. As you write, you need tools to mark up these areas so you can find them easily later.
Unless you are the perfect first-draft writer of legend—and I think they’re almost as mythical as unicorns—your writing process likely involves two or more drafts. When you’ve worked so hard to craft a paragraph, a page of dialogue, or a legal argument, however, you may hesitate to delete what you have in the hopes that your revisions will actually improve on the original.
Scrivener has tools to address the need to mark up your project as you work and to track revisions and preserve your documents along the way. This chapter introduces annotations, comments, Revision mode, and Snapshots.
Using Inline Annotations
Inline annotations are notes inserted into your document text. As Figure 10.1 demonstrates, they appear surrounded by a colored bubble to make them stand out from the document text itself.
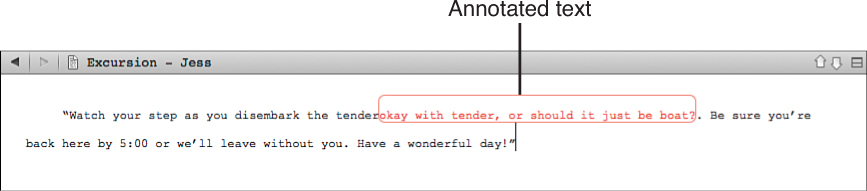
Because annotations don’t warrant opening a separate sidebar or dialog box, they are quick to add and don’t disrupt the flow of your work. They can be used to mark spots where you want to find a better word, as in Figure 10.1, or to remind you to weave a key plot element into a later scene. The key is to add these notes on the fly and forget about them so you can continue working unabated.
You can optionally remove annotations from your compiled project so they do not appear in the compilation. You can also use the compile settings to format inline comments as margin comments in Rich Text Format (.rtf) and the two Word formats (.doc and .docx). See Chapter 19, “Compiling Your Completed Work,” for details on how to change the formatting of comments and annotations.
Adding Annotations
To add an inline annotation:
1. Position the cursor where you want to add the inline annotation.
 Caution
Do not add extra spaces before or after the annotation, as they will appear in your compiled project even if you remove the annotations themselves. If you want to create whitespace between your document text and the annotation, enter extra spaces within the annotation bubble.
2. Choose Format, Inline Annotation from the menu or press Shift-Cmd-A on the Mac or Ctrl+Shift+A in Windows.
![]() Tip
Tip
This is a keyboard shortcut worth memorizing as it enables you to add your annotation without lifting your fingers from the keyboard and continue typing.
3. Type the content of your annotation.
4. Choose Format, Inline Annotation from the menu or press Shift-Cmd-A (Ctrl+Shift+A in Windows) to close the annotation. You can also just click outside the annotation bubble.
If you want to convert existing text into an annotation, select the text and use the keyboard shortcut or menu command listed in step 2. This command acts as a toggle, so if you select an annotation and then use the keyboard shortcut or menu command, the annotation converts to regular text.
Your annotation does not have to consist of text. You can add hyperlinks, bulleted lists, tables, and even images to an annotation, although these may be stripped out when you compile to certain output formats. Anything you type or insert in step 3 above appears within the annotation.
Editing Annotations
Edit annotations just as you would any other text in your document. Position the cursor within the annotation and type to add text. Select text and type over it to modify the annotation. To replace the complete text of the annotation:
1. Position the insertion point within the annotation.
2. On the Mac, choose Edit, Select Annotation from the menu. Alternatively, right-click to bring up the context menu, and choose Select Annotation. In Windows, select the full text of the annotation with your mouse or keyboard as you would select regular text.
3. Type over the selection.
If you paste text into an annotation, the original formatting of the text is pasted, as well. Thus, if you paste document text into the middle of an annotation, it splits the annotation and inserts the document text between the two annotations. Similarly, if you paste text from an annotation into your document text, it creates a new annotation. If you want to paste text within an annotation and have it formatted as an annotation, copy or cut the source text and then select Edit, Paste and Match Style from the menu or press Option-Shift-Cmd-V (Ctrl+Shift+V in Windows). Use this same procedure to paste text from an annotation into your document text while removing the annotation formatting.
To delete an annotation, select the entire annotation as you saw in the step-by-step above, and press Delete or the backspace key.
Changing the Appearance of Annotations
Annotations appear as red text with a red bubble by default. In Windows, change the default color in the Appearance tab of the Options dialog box (Tools, Options). Choose Editor in the Colors list and then select Annotation Text and choose a new color. Both existing and new annotations appear in the new color.
To change the annotation color on the Mac:
1. Position the insertion point within an existing annotation.
2. Choose Format, Font, Show Colors from the menu or press Shift-Cmd-C.
3. Select a color from the Colors dialog box.
4. Click the Close button to close the Colors dialog box.
When you change annotation colors on the Mac, only the annotation you selected changes. Other existing annotation colors retain their original color. New annotations use the new color. You can take advantage of this behavior in interesting ways. If you are editing your work in a group setting, assign each contributor a color for his or her annotations. You can also use different annotation colors for different types of comments, such as red when you can’t think of the proper word and purple when you’re skipping over writing a portion of a scene, and so on. Although it is a manual process to change the annotation color every time you switch, the following trick will help you remember the purpose of each color choice:
1. Position the insertion point within an annotation.
2. Choose Format, Font, Show Colors from the menu.
3. In the Colors dialog box, select the Color Palettes option, as shown in Figure 10.2.

Figure 10.2 Use the Color Palette tool to create a custom color palette for your annotations and comments.
4. Click the gear button to open the Action menu, and choose New. A new palette called Unnamed is created.
5. Open the Action menu again, and choose Rename.
6. Enter a descriptive name for your new palette, such as Scrivener Annotations.
![]() Note
Note
If you obtained your copy of Scrivener from the Literature & Latte website or on CD, you can add your custom colors to the Scrivener palette instead of taking steps 4–6. To do this, click the palette drop-down menu and choose Scrivener. If you obtained Scrivener from the Mac App Store, however, you must create a new custom palette as described in steps 4–6 to preserve your colors.
7. Click the Color Wheel option, as shown in Figure 10.3.

8. Select a color for your annotations from the color wheel. The color appears in the swatch above the wheel.
9. Drag the color from the swatch into an empty position in the color well. If the color well is not open in your Colors dialog box, click and drag the Expose Color Well bar.
10. Repeat steps 8 and 9 to select other colors for your new palette.
11. Click the Color Palette icon to return to your new palette.
12. Click on a color in the color well.
13. Click the Add Color (+) button below the palette.
If you inadvertently add the wrong color, click the Delete Color (−) button.
14. Click the name automatically assigned to the color and enter a unique name, such as Word Choice or Write Later. This reminds you of the purpose of the annotation color.
15. Repeat steps 12–14 to fill your palette.
16. Close the Colors dialog box.
Once you have created your custom palette, whenever you need to change annotation colors, select Format, Font, Show Colors from the menu, and then choose the appropriate color from your custom palette in the Color Palettes tab.
Adding and Reviewing Comments
Comments serve the same purpose as inline annotations, but they appear separately in a sidebar instead of within the document text, as shown in Figure 10.4. You can use comments and annotations interchangeably, and each has its advantages. Comments can be tucked out of the way so as not to distract from your work, but entering them in the Comment text box requires using the mouse and can pull you out of the moment. Annotations are easy to enter, especially if you use the keyboard shortcut, but they can leave your Editor window looking like a battlefield.
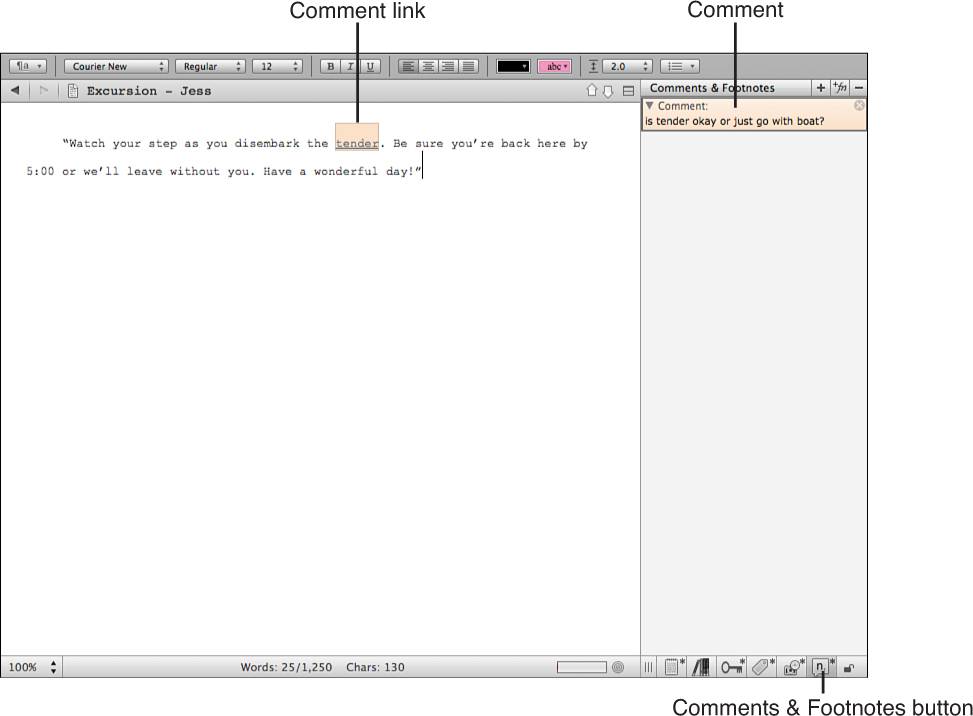
Figure 10.4 Comments create links from your document text to the Comments & Footnotes pane in the Inspector.
Adding Comments
To add a comment:
1. Select where in your document text you want to link a comment. You can select a single word or multiple words.
![]() Note
Note
If you do not select text, Scrivener automatically links the comment to the word just prior to the insertion point.
2. Choose Format, Comment from the menu. You can also press Shift-Cmd-8 (Shift+F4 in Windows).
3. Type the content of your comment. You can add formatted text and hyperlinks to comments. The project author name and current date and time automatically appear in the comment box. They are highlighted so you can type over these items. If you want to retain them, press the right-arrow key before adding your comment.
4. Click outside the Comment box. You can also press the Esc key to exit the comment and return to the Editor window.
The comment link appears highlighted in the document text. If you click the link, the Comments & Footnotes pane opens in the Inspector. Although the comment link no longer has the same appearance as the document text, it serves double duty as text and comment link.
Just as you can click a comment link to view the comment, clicking on a comment jumps to the link in the Editor window. You can use this behavior as a navigational tool when revising your project, moving down the list of comments and addressing each in turn.
Editing Comments
Edit comments in the Comments & Footnotes pane of the Inspector. If this pane is not open, click the Comments & Footnotes button at the bottom of the Inspector, as shown in Figure 10.4. You can also click a comment link to open the pane.
![]() Note
Note
An asterisk to the right of an icon in the Inspector Footer bar indicates the presence of content in that pane, such as a comment or footnote in the Comments & Footnotes pane.
To edit a comment, double-click in the comment box, shown in Figure 10.5, and then make the changes.
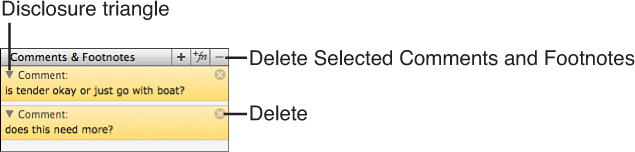
If you have multiple comments in a document and want to focus on one or more at a time, toggle the disclosure triangle in the upper left of each comment box to minimize their appearance.
To delete a comment, click the X in the upper right of the comment box. Deleting a comment box also deletes the comment link. The document text to which the comment was linked returns to its original formatting.
You can also delete multiple comments by selecting the comments and then clicking the Delete Selected Comments and Footnotes button at the top of the pane.
Changing the Appearance of Comments
The comment link is highlighted in yellow by default, and the background of the comment text box in the Comments & Footnotes pane matches it. To change the highlight color, right-click on the comment box and select a new color from the context menu. Scrivener remembers this color choice for new comments. Both the Mac and Windows versions allow for comments to appear in multiple colors.
![]() Tip
Tip
If you created a custom palette for annotations on the Mac earlier in this chapter, you can use the same colors for comments. Select Show Colors from the context menu to open the Colors dialog box, and then choose a color from your palette.
Moving Comments
As you revise your project, you may want to move a comment to a different word in a paragraph so you can view a particular sentence without the distraction of the highlighted comment link.
To move a comment to a new comment link on the Mac:
1. Select the text to which you want to link the comment.
2. Right-click the comment you want to move in the Comments & Footnotes pane.
3. Choose Move to Selection from the context menu.
Removing All Document Notations
As your document comes closer to completion, you may no longer have a use for any of the comments and annotations you made along the way. Instead of deleting notations individually, you can remove them from the entire document in one fell swoop.
Caution
This process removes all notations in the document, including footnotes. If you need to preserve your footnotes, which are covered in Chapter 22, “Using Scrivener for Academic Writing,” do not use this procedure!
You should also consider taking a Snapshot of your document before stripping the notations. If you realize you removed an important comment, you will then have the means to retrieve it.
To remove all comments, annotations, and footnotes:
1. In the document text, choose Edit, Select All from the menu or press Cmd-A (Ctrl+A in Windows).
2. Choose Edit, Copy Special, Copy Without Comments or Footnotes.
3. Choose Edit, Paste from the menu or press Cmd-V (Ctrl+V in Windows).
What you have just done is copied and pasted the entire document without notations over the document that contained notations.
Converting Annotations to Comments (and Vice Versa)
Comments and annotations are essentially interchangeable in their usage, so it is a simple matter to convert from one to the other. If you begin working on a document using annotations and then find them too distracting, convert them to comments to get them tucked away in the Comments & Footnotes pane. To convert annotations to comments:
1. Open the documents you want to convert in the Editor. If you want to convert a series of documents, save time by using Scrivenings mode to open all of them together instead of converting each document separately.
2. Click anywhere in the Editor window.
3. Choose Format, Convert, Inline Annotations to Inspector Comments.
The converse also works. If you are working on a small display and find the Comments & Footnotes pane takes up too much screen real estate or you don’t like going back and forth between the Editor and sidebar, convert your comments to annotations by choosing Format, Convert, Inspector Comments to Inline Annotations.
![]() Note
Note
Although you can use a combination of annotations and comments in your documents, the Convert options cannot be applied to an individual notation.
Caution
If you are using a custom palette to mark your comments and annotations, you may find that the conversion process changes these colors. Scrivener recognizes that each notation has a unique color, but it does not necessarily retain the same color you applied.
Searching for Annotations and Comments
The advantage of using annotations and comments is that you can make a note for yourself while you write, such as “Pick up this thread again in Chapter 6,” and continue working. When you get to Chapter 6, however, you may have a vague notion that you were supposed to mention something but can no longer remember what it was or where you made that note. The solution for this problem is to search your notes.
To find a notation in your project:
1. Choose Edit, Find, Find by Formatting in the menu. This opens the Formatting Finder dialog box, shown in Figure 10.6.
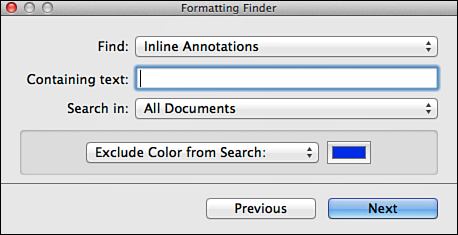
2. In the Find drop-down menu, select either Inline Annotations or Comments & Footnotes.
3. Enter the text you seek in the Containing Text field.
4. In the Search In drop-down menu, select where to search. You can choose to search All Documents to search your entire Draft folder or Selected Documents to search documents selected in the Binder.
5. Mac users, in the drop-down menu to the left of the color swatch, choose from the following options:
• Any Color: Searches all notations
• Limit Search to Color: Searches only for notations that contain the search term and match the selected color
• Exclude Color from Search: Searches for the search term in all notations except for those formatted with the selected color
6. If you chose to Limit or Exclude the search by color, click the color swatch and select a color from the Colors dialog box.
7. Click Next to begin the search.
![]() Note
Note
Windows users cannot use color to limit the search. After step 4, continue directly to step 7.
Exporting Annotations and Comments
If you use notations to mark areas where you need to do more research or locate a source to validate a statement, you may want to be able to view your notes as a complete research list. If you print the list, you can then use it as a reference for offline research.
To export your comments and annotations into a document that can be edited and printed outside Scrivener:
1. Scrivener exports notations from your entire Draft by default. If you want to limit the export to specific documents, select them in the Binder.
2. Choose File, Export, Comments & Annotations.
3. In the Save As dialog box, enter a name for the file and navigate to the folder in which you want to save it.
4. If you selected documents in the Binder to limit the export, click the Selected Documents Only check box.
5. If you want the notations listed underneath the title of the document in which each is located, click the Include Titles check box.
6. Click Export.
The exported document is saved in Rich Text Format (.rtf), which can be opened in almost any word processor. When you open the file, inline annotations are indented while comments are not. If you opted to see the titles of each document, these titles appear in bold.
Using Revision Mode (Mac Only)
Mac users have an additional editing tool in their Scrivener arsenal. As you edit your document, you can use Revision mode to track added and modified text. You can use different colors for each revision pass or assign a color to each member of a work group or writing team.
Caution
Although Revision mode has its uses, it is not comparable to the Track Changes feature in Microsoft Word or Apple Pages. You cannot compare versions, accept or reject changes, or mark where text was deleted. Use caution and understand the limits of Revision mode before using it.
Although Revision mode is limited to essentially color-coding passes through your document, it does provide a couple of advantages. You can search for revision levels to quickly locate all changes made to a document. You can also strip all of your revision markings with one command when you have finished editing the project.
Marking Text
Revision mode works as a toggle. When it is on, any new or modified text appears in the selected revision color. When it is off, text appears in the normal color.
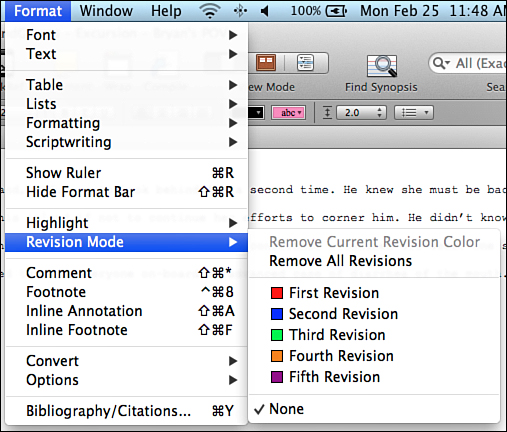
To turn on Revision mode, select Format, Revision Mode from the menu, then select a revision level from the submenu, as shown in Figure 10.7. Although these levels are labeled First Revision, Second Revision, and so on, you can use them for different purposes. If you work with a writing partner or on a project team, for example, one of you can edit using First Revision and the other using Second Revision so you can differentiate between each contributor’s changes.
The first time you enter Revision mode, a warning appears to ask if you’re sure you want to proceed. Once you enable Revision mode, any additions or changes you make in the document are marked with the selected revision level color, as shown in Figure 10.8. If you paste text into the document, use the Edit, Paste and Match Style command to mark the text.


![]() Note
Note
The Paste and Match Style command matches all of the pasted text to a uniform style, eliminating bold, italic, and underlining.
To change to another revision level, choose Format, Revision Mode, and then select a different revision level from the submenu.
![]() Note
Note
Any revision level can be used to overwrite another. If you or a writing partner makes changes in the document using the First Revision level, you or a different contributor can add to or modify the original text or the First Revision–marked text with your own changes. Scrivener does not track layers of changes, so there is no way to revert to the original or a prior revision level once the text has been modified. If you need this level of control, use the Snapshots feature, either on its own or in conjunction with Revision mode, as explained later in this chapter.
To exit Revision mode, choose Format, Revision Mode, None. You can also choose the revision level currently selected to toggle it off.
Marking Text for Deletion
Revision mode only marks text you add or modify. If you delete text—including deleting a word or phrase to replace it with another—that text is lost without a trace. If you need to track deleted text, you can work around this issue by formatting text with a strikethrough typeface instead of deleting it. Select the text you want to format, then choose Format, Font, Strikethrough from the menu or press Shift-Cmd--. This draws a line through the text, colored to match the current revision level because it is a modification of the text.
This workaround does not actually delete any text. It remains in your document unless you later manually remove it. You can, however, use the transformation options when compiling your work to remove text that’s been marked for deletion. Details on this process can be found in Chapter 19, “Compiling Your Completed Work.”
Customizing Revision Mode
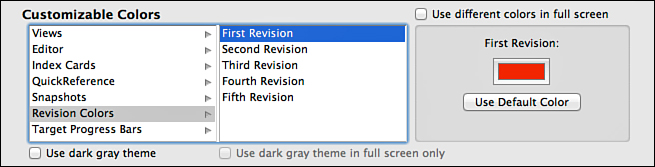
The colors assigned to each level in Revision mode are set in the Appearance tab of the Preferences dialog box, shown in Figure 10.9. To change the assigned colors:
1. Choose Scrivener, Preferences from the menu.
2. Click on Appearance.
3. In the Customizable Colors pane, select Revision Colors from the left column.
4. Choose the revision level you want to modify from the middle column.
5. Click the color box on the right to open the Colors dialog box.
6. Select a color.
7. Repeat steps 4–6 for each revision level you want to modify.
8. Close the Preferences dialog box.
There is an important caveat to changing revision colors. If you have previously applied revision markings using a different color, they will no longer be associated with that revision level when you search or remove revisions. This also affects sharing a project with other contributors. If their revision colors are set to different preferences, Scrivener will not see them as revisions. If you are working with others, be sure all of you are using the same color palette and preference settings.
Finding Revisions
Earlier in this chapter, you learned how to use the Find by Formatting feature to search for comments and annotations. To search by revision level using the Find by Formatting feature:
1. Choose Edit, Find, Find by Formatting from the menu to open the Formatting Finder dialog box, shown in Figure 10.10.
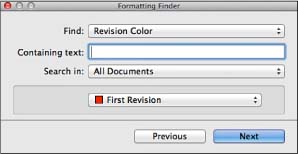
2. In the Find drop-down menu, select Revision Color.
3. Enter a search term in the Containing Text field. If you simply want to search for all of the revisions at a particular level, leave this field blank.
4. From the Search In drop-down menu, select to search for All Documents in the project or only Selected Documents in the Binder.
5. In the Revision drop-down menu, choose which level of revisions you want to search.
6. Click Next.
Removing Revisions
If you use Scrivenings to view your entire Draft folder or multiple documents at once, you can remove the revision colors when you finish revising your document(s) or project(s). You can remove each revision level individually or all at once. When you remove revision colors, Scrivener changes all of the text back to regular text. To remove a specific revision level:
1. Open one or more documents in the Editor. Use Scrivenings mode to view multiple documents. Click in the Editor if you are not already working in it in order to place the focus on this pane.
2. Choose Format, Revision Mode, and then the revision level you want to remove.
3. Select Format, Revision Mode, Remove Current Revision Color from the menu.
4. Choose Format, Revision Mode, None to turn off Revision mode or select a different revision level to work in that mode or to repeat step 3 on a different level.
To remove all revision levels at once, click in the Editor to make it active, and then choose Format, Revision Mode, Remove All Revisions from the menu. You can also select a block of text and remove all revisions from within the selection using the Format, Revision Mode, Remove Revisions command from the menu.
Keep the following in mind when removing revision colors:
• If you choose to remove each color individually, any revisions you made in a different color before changing the Revision mode color preferences will remain in that color.
• If you remove revision colors, any text marked for deletion with strikethrough formatting is formatted in the default text color. The strikethrough typeface remains.
• If you remove an individual revision color, any other text in the same color, even if used for other purposes, returns to the default text color.
![]() Note
Note
For this reason, you should use unique colors for your revision levels that you do not need for any other purpose in your project.
• If you choose to remove all revision colors at once, all text, including any other text you may have formatted in a different color for other purposes, returns to the default text color.
Taking Snapshots
As you can see throughout this chapter, there are many tools to aid you in the revision process. Some, particularly the Revision mode, come with a level of risk that text may be deleted without your awareness if co-workers edit the project. Even when you’re working independently, the notion of making extensive changes to text already on the page can cause anxiety. After all, the new version may be better than the original, but you may find you preferred your first draft. The best way to leave your options open and create a virtual paper trail throughout the revision process is with the use of Snapshots.
A Snapshot is essentially just a copy of a document. Rather than forcing you into the multistep process of copying, pasting, and then moving the copied document to a different folder, however, the Snapshots tool stores the copy within the document itself, hidden from view until you call upon it. A Snapshot preserves all of the formatting in the document, including revision marks and notations.
In short, Snapshots have your back so you can revise with impunity.
Caution
Snapshots are not a substitute for backing up your entire project. See Chapter 17, “Backing Up Your Work,” to learn how to perform a complete project backup and set automated backup preferences.
Creating Snapshots
To create a Snapshot, choose one of the following options:
• Select a document or multiple documents in the Binder, Corkboard, or Outliner, and then choose Documents, Snapshots, Take Snapshots of Selected Documents from the menu.
![]() Note
Note
In Windows, if only one item is selected in the Binder, Corkboard, or Outliner, the menu option is Take Snapshot.
• Click inside a document in the Editor window, then choose Documents, Snapshots, Take Snapshot.
• If the Snapshots pane of the Inspector is open, click the Take Snapshot (+) button at the top of the pane to take a Snapshot of the active document.
• Press Cmd-5 on the Mac or Ctrl+5 in Windows to take a Snapshot of the active document.
Snapshots are untitled by default. You can store multiple untitled Snapshots or sort through them later and give them proper titles, if you want. If you wait, however, it can be difficult to find exactly what you seek or remember why you took a particular Snapshot. Another approach is to create a Snapshot with Title. This option prompts you to name the Snapshot as you take it, so you can remind yourself that you changed a paragraph or used a particular Revision mode.
To save a Snapshot with Title, choose one of the following:
• Select the item or items you want in the Binder, Corkboard, or Outliner and then choose Documents, Snapshots, Take Titled Snapshots of Selected Documents. Enter a title in the Snapshot Title dialog box.

• From an active Editor window, choose Documents, Snapshots, Take Snapshot with Title. Enter a title in the Snapshot Title dialog box.
• Press Shift-Cmd-5 (Ctrl+Shift+5 in Windows).
After you take a Snapshot of an item, its icon bears a folded corner to signify that it contains a Snapshot, as was explained in Chapter 3, “Organizing the Binder.” This icon also appears in the Header bar of the Editor, on index cards in the Corkboard, and to the left of the document title in the Outliner. You can also see an asterisk appear next to the Snapshots button at the bottom of the Inspector. Thus, you can tell if a document contains Snapshots from any of the major interface elements.
Viewing Snapshots
To access your Snapshots, click the Snapshots button at the bottom of the Inspector. If the Inspector is not open, select Documents, Snapshots, Show Snapshots from the menu. On a Mac, you can also press Control-Option-Cmd-K.
The Snapshots pane, shown in Figure 10.11, lists all of the Snapshots for the selected document. The list is sorted by date and time. Click the Date heading to invert the sort order (from newest to oldest instead of the default oldest to newest). If you created Titled Snapshots, you can click the Title heading to sort by title.
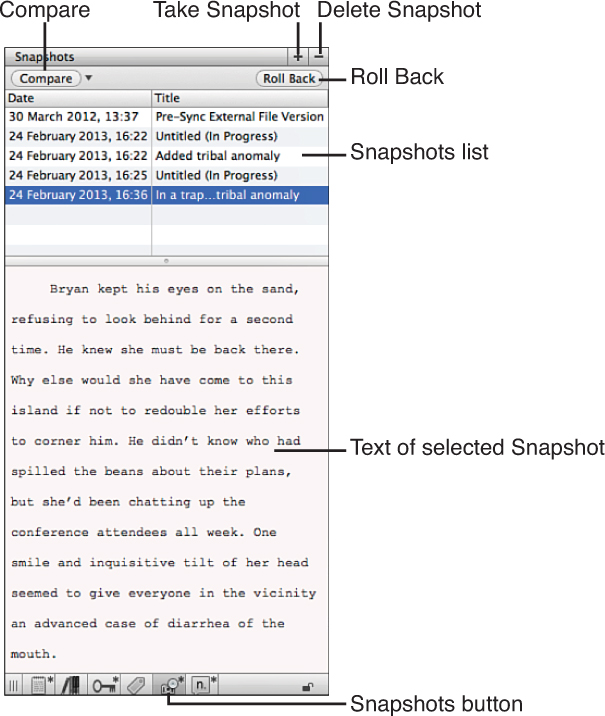
Figure 10.11 The Snapshots pane in the Inspector displays a list of all the Snapshots for the document and the contents of the selected Snapshot.
The Windows Snapshots pane does not have a Compare button, as that feature is not available in Windows.
If you have untitled Snapshots in the list, double-click the title to rename the Snapshot. To delete a Snapshot, select it and then click the Delete (-) button at the top of the pane. On the Mac, you can also press the Delete key.
Select a Snapshot from the list to view its contents in the lower portion of the Snapshots pane. You cannot edit this text, of course, but you can select and copy it. If you are simply looking to recover content you deleted in a prior revision, copy the text in the Snapshots pane, then paste it into the document in the Editor window.
![]() Tip
Tip
Drag the splitter between the Editor and the Inspector to the left to widen the Inspector pane to view more of the Snapshot at once. If you do this frequently, consider saving a workspace layout with the widened Inspector.
Comparing Snapshot Versions (Mac Only)
On the Mac, Snapshots afford you the opportunity to compare different versions of your document. To compare the current version of your document with a Snapshot:
1. Select the Snapshot you want to compare with your current document.
2. Click the Compare button.
3. View the differences in the lower portion of the Snapshots pane, as shown in Figure 10.12.
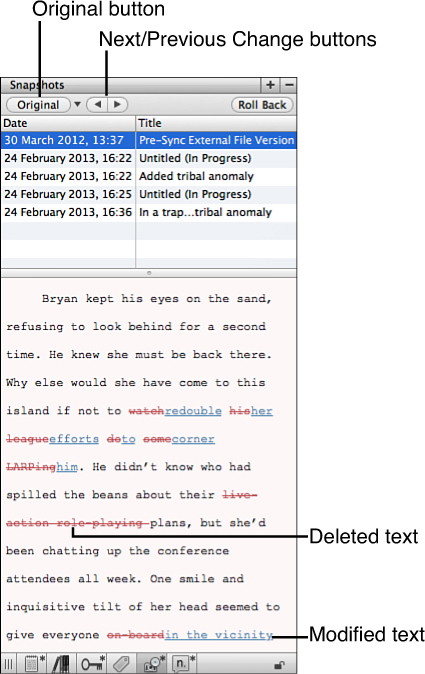
Text that appears in the Snapshot but is no longer in the current document is displayed in red with strikethrough typeface, indicating that it was deleted between the Snapshot and the current version. Text that appears in the current document but was not in the Snapshot version is blue and underlined, indicating it was added between the Snapshot and the current version. Click the Next or Previous Change buttons at the top of the pane to navigate through the comparison one difference at a time. You can also navigate to the next or previous change by choosing Documents, Snapshots, Show Changes from the menu and selecting from the submenu or pressing Control-Cmd-] or Control-Cmd-[.
![]() Note
Note
You can also compare two Snapshots with each other. Cmd-click two Snapshots in the list, then click the Compare button.
Scrivener can compare documents on three levels of granularity. By default, comparisons are made word by word. If you want a broader view of the changes, click the down arrow to the right of the Compare/Original button or choose Documents, Snapshots, Show Changes, Comparison Granularity and then select one or more of the following options from the submenu:
• By Paragraph: If anything within a paragraph has changed, the entire paragraph is marked. For example, if you add a word anywhere within the paragraph, the entire paragraph is marked in blue. If you delete anything within the paragraph, the entire paragraph is marked as deleted and then the current paragraph is marked as new.
• By Clause: If anything within a clause has changed, it is marked. For example, if you add a word within a sentence or clause within a sentence, that clause is marked in blue. If you delete anything within the clause, the clause is marked as deleted and then the current clause is marked as new.
• By Word: Marking is done word by word, as was shown in Figure 10.12.
The Compare button changes to an Original button when you are comparing versions. To turn off the comparison, click Original at the top of the pane. When you are comparing versions, the Snapshot appears in plain-text, but the actual formatting of the text is preserved.
Reverting to a Prior Snapshot
During the revision process, you may find yourself going off on quite a tangent. You completely change the staging or motivation of a scene or decide to argue an obscure point of a supporting element of your thesis, and suddenly you realize that you’re going nowhere. The best solution to undo the damage is to simply revert to a prior version of the document.
![]() Tip
Tip
Before you begin revisions on a document, take a Snapshot. You may think you have an idea of where your writing will take you that day, but until you see the changes on the screen, you can’t be sure you’ll be happy with the results.
To roll back to a prior Snapshot, select the version to which you want to revert from the Snapshots pane, then click the Roll Back button at the top of the pane.
Caution
Snapshots are stored with the document, not as a separate element in the Binder. If you delete a document, any Snapshots of that document are also deleted.
Scrivener asks if you want to take a Snapshot of your current document before rolling back. You should always take a Snapshot of the current document, warts and all. Even in madness, there may be a few glimmers of brilliance, and having a Snapshot gives you the opportunity to tease out those bits and pieces later. If nothing else, you’ll have a record of the carnage to laugh at later!