
23. Discovering New Uses for Scrivener
Throughout this book, you’ve seen examples of how to use Scrivener’s features for a wide range of writing projects. Using the preinstalled project templates, as well as others you can download from the Internet or create yourself, you can write everything from legal briefs to a recipe manager.
This chapter provides a few final examples of ways to extend your use of Scrivener. Whether you’re trying to coordinate an entire multibook series of novels, write blog posts, or create a database, Scrivener can become your go-to tool for many tasks.
Writing a Complete Series in Scrivener
When you set out to write books in Scrivener, you probably think of each book being contained in its own project. This is certainly the most common usage and works well in many situations. But what if you are creating a multibook series with considerable overlap in characters, settings, and plot threads? In that situation, a single project for the entire series allows you to utilize the same research and resources for each book without having to drag material between projects.
One advantage of writing an entire series in a single project is that you can take a big-picture view of the series and plan for overarching plots and then position the twists and turns of that plot throughout each book in the series. If your hero spends all of book one battling the über bad guy, then finds out that villain is his father in book two, you want to be able to look back on the two books to ensure that you’ve seeded your clues well or at least not contradicted yourself.
![]() Note
Note
Although this section refers to works of fiction, this information also applies to screenplays, TV series, and nonfiction.
Using Multiple Draft Folders
Projects in Scrivener only recognize one Draft folder at a time. If you are using a single project for multiple books, you can use the Draft folder in two different ways:
• Create a folder within the Draft folder for each book, as shown in Figure 23.1. You can then add chapters and scenes for a book within its parent folder. When you compile, you can select that folder as the compile group and proceed from there.

• Write each book in turn in the Draft folder, then choose Documents, Group from the menu or press Option-Cmd-G on the Mac or Ctrl+G, G in Windows to create a new folder containing all of the documents. You can then move this folder out of the Draft folder. In other words, the current book is always in the Draft folder, while completed books are stored in non-Draft folders. Although this leaves your Draft focused on one book at a time, you must manually move subfolders in and out of your Draft folder.
![]() Note
Note
If you need to return files to the Draft folder, drag the folder back into the Draft folder and then select the folder and choose Documents, Ungroup from the menu. Then delete the empty container.
Using Scrivener Links Within a Project
When working on a large project, you can easily lose track of where you put a key bit of research or where in a previous book you mentioned a key story element you need for another book. In Chapter 11, “Digging into the Inspector,” you learned about adding internal and external reference links. Those are extremely useful in this scenario.
You can also link directly from one document to another using Scrivener links. These internal links appear and function in the document like website hyperlinks. The source document opens when you click on the link. In Windows, Scrivener links open the Split Screen mode in the Editor and display the linked document in the other pane. On the Mac, the behavior of Scrivener links is controlled in the Navigation tab of the Preferences dialog box. Click the Open Clicked Scrivener Links In drop-down menu to choose whether to open Scrivener links in one of the following three locations:
 Caution
Scrivener links only connect to an entire document. You cannot link to a specific position within a document.
• Other Editor: As with Windows, this option splits the Editor, if it is not already split, and opens the linked document in the inactive Editor pane.
• Current Editor: This option opens the linked document in the current Editor pane.
• QuickReference Panel: This option opens the linked document in a QuickReference panel.
To add a Scrivener link, either position the insertion point where you want the link to appear or select text in the document to use as the anchor for the link. Then use one of the following options:
• Choose Editor, Scrivener Link from the menu and then select the item you want to link in the submenu.
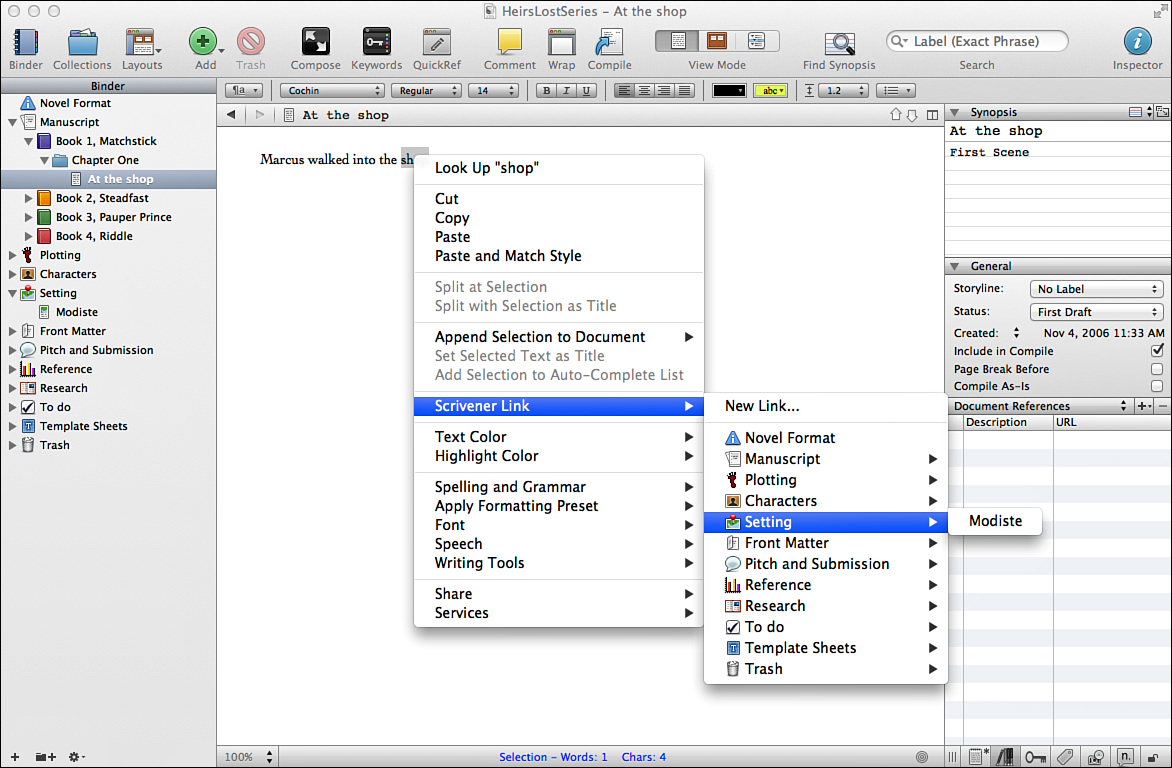
• Right-click to open the context menu, then choose Scrivener Link and select a document from the submenu, as shown in Figure 23.2.
• On the Mac, select an item in the Binder and then choose Edit, Copy Special, Copy Documents as Scrivener Links. Then paste (Edit, Paste or Cmd-V) the link into another document. This option is useful if you want to create a link to the same source document in several other documents. You can also use it to create a list of links, such as when creating a custom table of contents for an e-book.
• On the Mac, select an item in the Binder and begin dragging it into the current document in the Editor, pressing and holding down the Option key while dragging and dropping the item. Release the item where you want to position the Scrivener link. You can also preselect text in the current document and use the Option-drag method to drop the source item over the selected text to turn that text into the hyperlink.
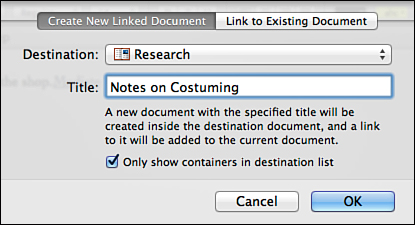
• On the Mac, choose Edit, Scrivener Link or open the context menu and choose Scrivener Link, and then select New Link from the submenu. You can also press Cmd-L. In the New Link dialog box, shown in Figure 23.3, choose a Destination folder from the drop-down menu and enter a title to create a new document and add a link to it inside the current document. The new document is opened in a QuickReference window, ready for you to edit.
• On the Mac, open the New Link dialog box and click the Link to Existing Document tab, shown in Figure 23.4, to navigate through the menu to locate a source document. This option is similar to using the Scrivener Link submenu, but you do not have to keep your finger on the mouse button or trackpad to navigate. If you have preselected text in the document that matches the title of an item, Scrivener adds Suggestions to the menu. If you have marked documents as Favorites (Documents, Favorites, Add to Favorites from the menu), they are listed in the New Link dialog box as Favorites.
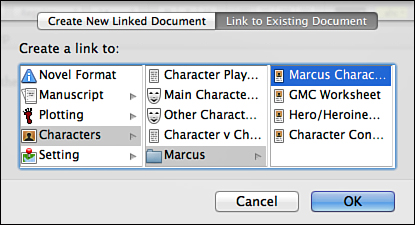
Figure 23.4 The Link to Existing Document tab of the New Link dialog box makes it easier to browse to the item you want to link as a source document.
To remove a link, you can simply delete it from the document text. If the link is anchored by document text, select the text and then choose Edit, Unlink from the menu.
![]() Tip
Tip
In most cases, Scrivener links do not appear in a compiled project, so you can safely add them to your documents for your personal use. When compiling to a Rich Text Format (.rtf) or HTML file, both of which support linking, go to the Transformations tab of the Compile dialog box and select Remove All Hyperlinks if you do not want your links included in the compilation. Although the links themselves do not compile, the text anchoring the links will appear in your compiled document. If you want to add links anchored to text that should not appear in the compilation, place the Scrivener link inside an inline annotation. These can then be removed from the document when you compile.
Blogging with Scrivener
In addition to its many other uses, Scrivener can serve as an organizational tool for your blog. You can set up your Draft folder in myriad ways to organize your posts, such as by date or category. Use the Label field to note the nature of the post—whether it is a review or commentary or personal insight—or use it for the category of the post so you can create collections for each category. Use the Status field to note its stage of development—researching, writing, queued for posting, or posted. The word count in the Footer bar of the Editor keeps you on track if you try to keep your posts to a certain length.
Although Scrivener cannot directly interface with WordPress, you can compile your post in HTML so your formatting is preserved. You can also use MultiMarkdown to format your posts, but this is a topic beyond the scope of this book. If you want to learn more about MultiMarkdown, visit http://fletcherpenney.net/multimarkdown/.
Creating a Cookbook Database
Scrivener comes with a preinstalled Recipe Collection project template, located in the Miscellaneous tab of the Project Templates dialog box (New Project dialog box in Windows). As you can see in Figure 23.5, a recipe collection created using this template provides many of the same organizational features as an expensive recipe app. This project makes use of Scrivener’s features beyond a basic writing project. The Recipe Collection makes use of the following features:
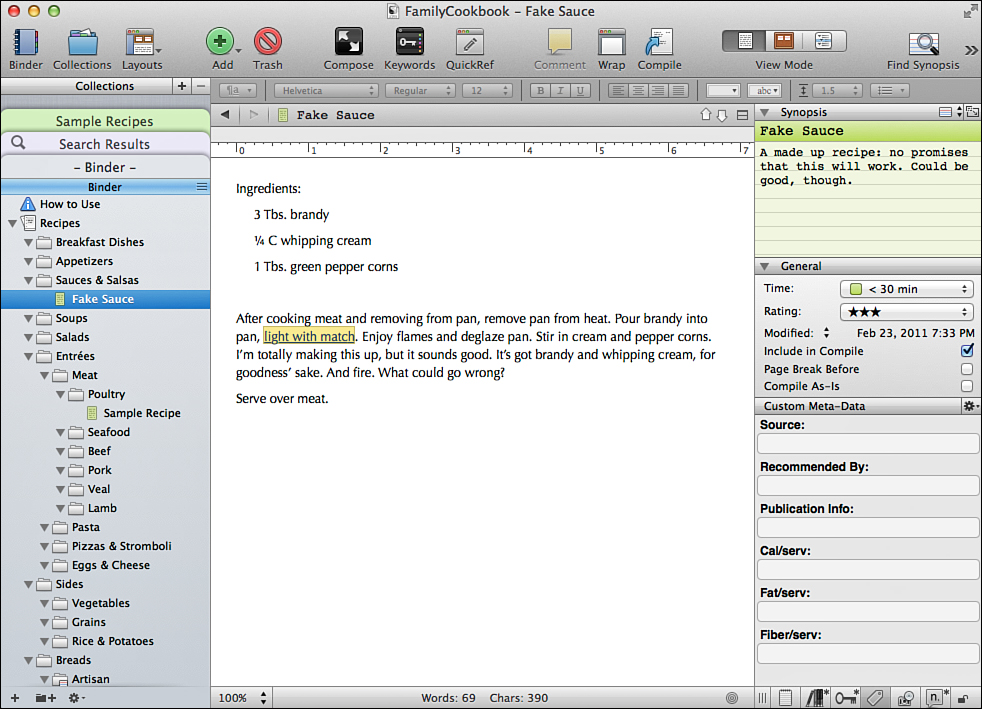
Figure 23.5 The Recipe Collection project template takes full advantage of Scrivener’s collections and meta-data features.
• The Draft folder is renamed to Recipes.
• The Label field has been renamed to Time and uses values to note approximate cooking times.
• The Status field has been renamed to Rating and uses stars to rate the recipe.
• The Sample Recipes collection demonstrates how you can create collections of recipes. You can create a standard collection of recipes you want to use for a dinner party, for example, or create a collection based on a search for all recipes that take less than 30 minutes to prepare.
• The Resources folder contains general cooking tips and references, such as a document of measurement conversions.
• The Compile settings are configured to print a basic cookbook.
• On the Mac, custom meta-data fields prompt for information about the recipe source and nutritional info.
Even if you don’t have any interest in creating a cookbook, this project serves as an example of how to turn Scrivener into a database. You can apply these concepts to create a home inventory system, a database of books or other collectibles, or similar projects.