Chapter 11. Chris Nichols

Chris Nichols

“Tortoise.”

About the Artist

Upon graduation from high school in Vancouver, Canada, I did three years of graphic design and was introduced to digital art. I learned Photoshop and a bit of Cinema 4D, and I knew I wanted to get more involved in 3D. In 2004, I did a year of animation at the same college, but the course was underdeveloped, and we had to source outside help to come in and teach us. We tried to make a faux episode of Animatrix as a year-long project, but the class shrank to me and another guy by the end of the year. The two of us set up my apartment like a small studio and worked day and night. I learned a lot about modeling and texturing from him and my work on the film.

We never finished the film, but we had enough material to create a sort of trailer, so we flew over to Sydney, Australia, and showed our work to several studios. We had a good response and received some helpful critiques. We even got to do some short-term work at Digital Pictures. From there, we were hired closer to home to work on a short film called Ironbird for almost a year before we decided to move to Vancouver to look for work. In 2007, I ended up working as a modeler at Bardel Entertainment, and my friend was hired at Blur in Venice. After four years, I’m still in Vancouver, having worked at Bardel, Spin VFX, Method/CIS, and now Digital Domain as a modeler/ texturer and concept artist.

Artist’s Statement

Artist’s Statement

It’s important to have a solid foundation in visual art. Taking three years of design prepared me for my career in visual effects (VFX). Understanding shape, form, and color is vital to being a successful modeler or texturer in this industry. The real secret to getting better is practice. Ever since I began professionally five years ago, I’ve been working on my own projects to help me become a faster, more expressive, and better-skilled artist.

Techniques

Technique 1: How to Sculpt Wrinkled Skin

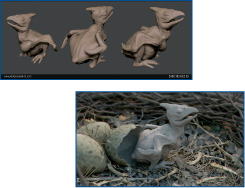
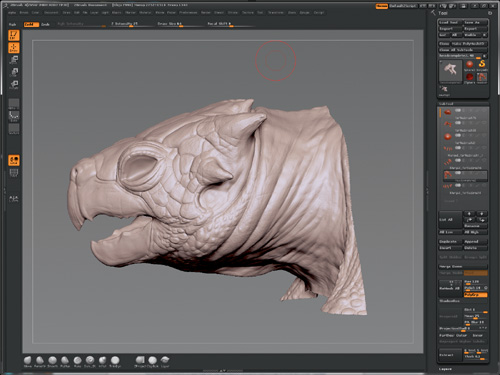
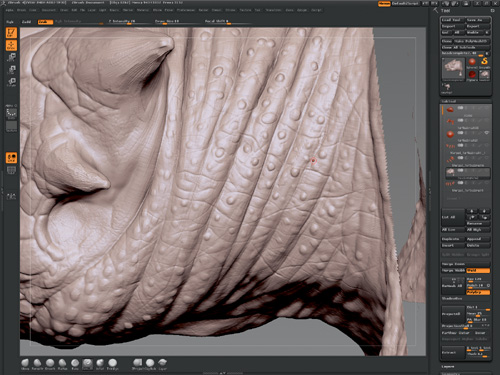
  1. I like to start by turning off all the SubTools in the scene except for the piece I’m about to detail. In this case, I begin detailing the neck, sculpting in skin folds and wrinkles/scales. I like to have a reference handy, so on my other screen I have several close-up images of turtle and tortoise skin so I can get an idea of what to strive for. See Figure 11.1.

    Isolate area of ZTools before sculpting.

    Figure 11.1. Isolate area of ZTools before sculpting.

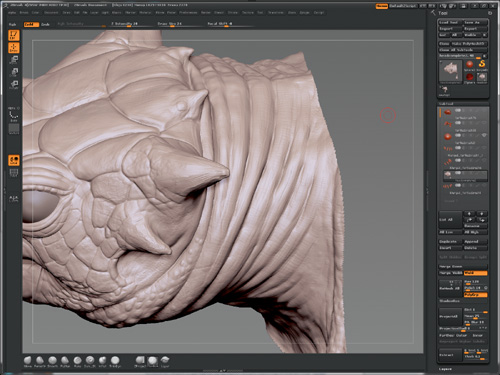
  2. Once I’ve isolated the area using the Hide tool (Ctrl+Shift drag on area), I block in the broad strokes with the Clay Buildup Brush. I’m only interested in building up my forms, not putting in any real detail or skin texture. I set the brush intensity to 10–15 and the focal shift to −8, and I start blocking out skin detail.

    The trick to this is zooming in and out of the sculpt and analyzing how the forms are working with the overall area. I sculpt in shapes with a focus on the direction of their flow and then build up those areas until I’m getting some nice wrinkles happening. Then I lightly smooth it all out using the Shift key. See Figure 11.2.

    Start blocking in forms with the Clay Buildup Brush.

    Figure 11.2. Start blocking in forms with the Clay Buildup Brush.

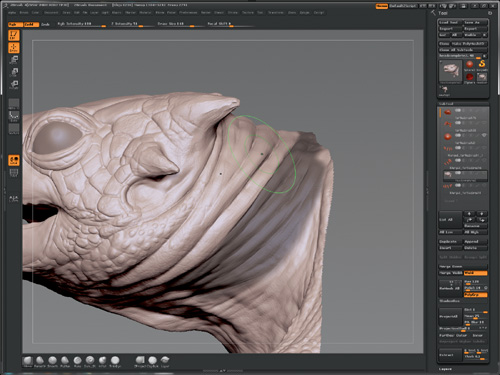
  3. Another technique I like to work into my process is masking off where wrinkles intersect by holding down the Ctrl key and painting a mask. I hold down Shift and click on the area to soften the mask. Then I switch to the Move Brush, setting my intensity to something low like 5–10 and then gently pushing the unmasked area closer to the masked-off part. I Ctrl-click the background to reverse the mask and then move that unmasked area closer to the mask. This creates a nice crease where the wrinkles meet, adding to the wrinkle effect. See Figure 11.3.

    Mask off an area starting at the crease and use the Move Brush to push wrinkles closer to each other.

    Figure 11.3. Mask off an area starting at the crease and use the Move Brush to push wrinkles closer to each other.

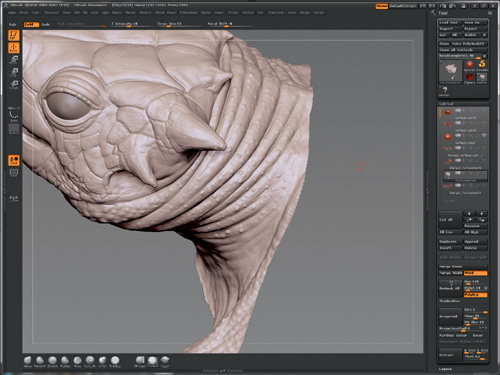
  4. I’m happy with how the skin folds are working, so I start to sculpt in some of the bumpy surfaces using my Clay Buildup Brush again. I set it to a fairly low intensity and work up little bumps all over the surface, diversifying them in scale. I use the Shift key to smooth them out and integrate them into the wrinkle. I repeat this over and over until I get a nice uneven surface that looks organic. See Figure 11.4.

    Add rough details with the Clay Buildup Brush.

    Figure 11.4. Add rough details with the Clay Buildup Brush.

  5. For some of the final detailing, I switch to the Dam Standard Brush and set the intensity to 7. With a smallish scale, I draw random lines over the wrinkles, starting from the crease and ending a few wrinkles over in a horizontal fashion. I like to draw from one side to the other—whatever looks good.

    Then I switch back to the Clay Buildup Brush and lightly sculpt up the areas close to the lines, in random areas. That seems to enhance the shapes and add contrast to the lines. After that, I draw circles around some of the bumps with the Dam Standard Brush to refine the shapes a bit. See Figure 11.5.

    Use the Dam Standard Brush to draw in fine wrinkles and outline bumps for definition.

    Figure 11.5. Use the Dam Standard Brush to draw in fine wrinkles and outline bumps for definition.

  6. I like to go over the area with the Clay Buildup Brush until all the shapes are working nicely together from a distance, smoothing out some areas of detail so they don’t stand out so much.

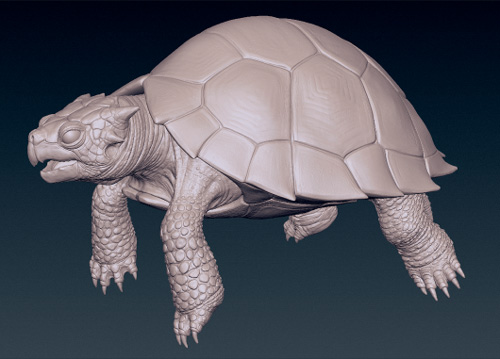
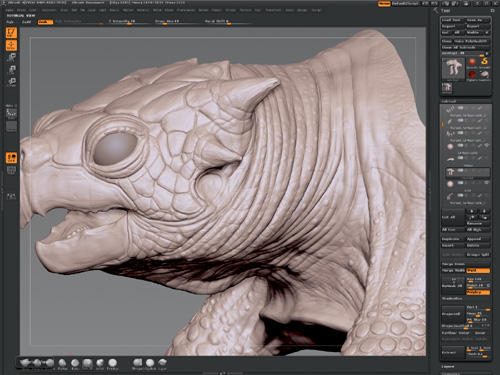
    Also at this point, I might see which area I want to focus on to bring out even more detail, as long as it reads well as a whole. See Figure 11.6 for the final image.

Smooth out areas and refine until the surface looks good.

Figure 11.6. Smooth out areas and refine until the surface looks good.

Technique 2: How to Sculpt Scales

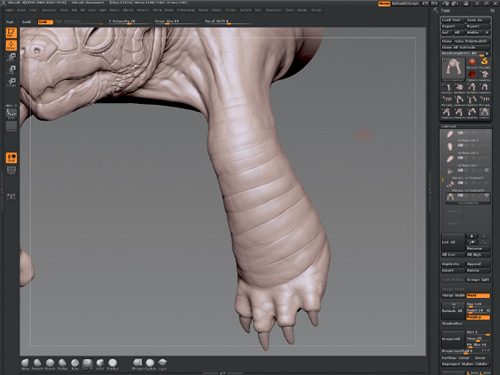
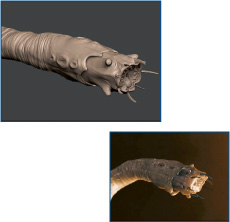
  1. Starting with the detailing of the leg, I roughly block out where the scales are going to fit in the sculpt, using the Dam Standard Brush to draw lines across the surface and then inflating the inside shapes with the Clay Buildup Brush. Again, I’m referencing photos of different tortoise scale structures for inspiration. See Figure 11.7.

    Use the Dam Standard Brush to draw a guide for where the scales will flow.

    Figure 11.7. Use the Dam Standard Brush to draw a guide for where the scales will flow.

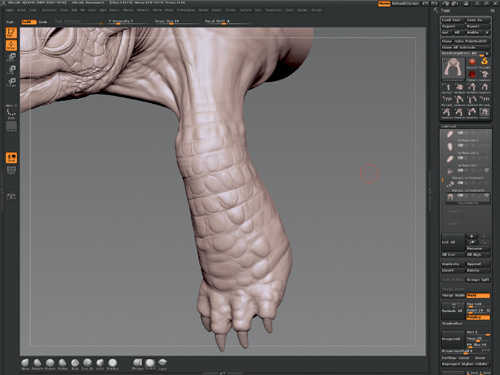
  2. I use the Dam Standard Brush to draw in where I’m going to sculpt out the scales on the surface. I don’t spend a lot of time on this; I just want a rough guide of where to place them, and then I can zoom in and out to see how they’re working together. An irregular offset pattern works quite well. See Figure 11.8.

    Draw in a guide for where scales will sit on the surface.

    Figure 11.8. Draw in a guide for where scales will sit on the surface.

  3. Now I really block out the scale structure. Using my Clay Buildup Brush again, I go over the area where I outlined scales to give them volume. I often switch over to my Move Brush to pull the scales out slightly and give shape to the silhouette. See Figure 11.9.

    Use the Clay Buildup Brush to rough in the scales. Switch over to the Move Brush to pull the forms out.

    Figure 11.9. Use the Clay Buildup Brush to rough in the scales. Switch over to the Move Brush to pull the forms out.

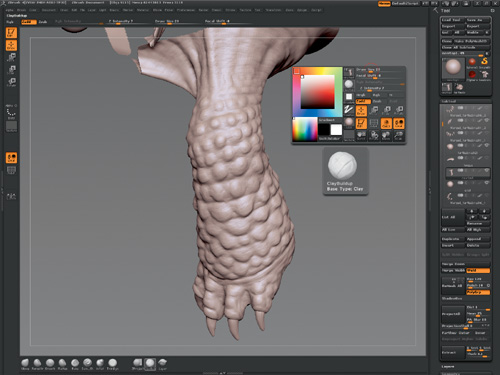
  4. Once the scales are in place and I’m happy with the layout, I refine them slightly by using my TrimDynamic Brush to flatten out the scales and define the edges. Using my Dam Standard Brush, I outline the scales so they are bolder and feel slightly disconnected from the leg skin. See Figure 11.10.

    Start to refine the scales using the TrimDynamic Brush to flatten out the scales and give them a harder edge.

    Figure 11.10. Start to refine the scales using the TrimDynamic Brush to flatten out the scales and give them a harder edge.

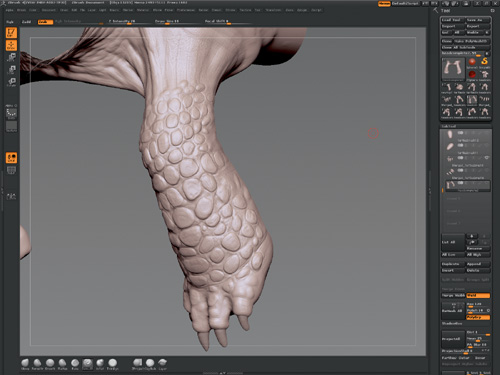
  5. I continue to use my Dam Standard and Clay Buildup Brushes to add bits of detail to the scales by sculpting the interior in a circular pattern in relation to the scale shape. I like to spend time refining each scale and the surrounding skin to create a distinct separation between the surfaces. See Figure 11.11.

Define the scales with the Dam Standard Brush and use the Clay Buildup Brush to roughen up the surfaces a bit.

Figure 11.11. Define the scales with the Dam Standard Brush and use the Clay Buildup Brush to roughen up the surfaces a bit.

Insights

Q&A

Q1:

What motivates you or your work?

Reality inspires me. When I feel nothing interesting is being created anymore, I return to nature photography for inspiration. I really love surface textures and details, so anything amphibian or reptilian gives me ideas and inspiration for my own projects.

Q2:

Who/what are your inspirations and influences?

I love psychedelic stuff. Films like 2001: A Space Odyssey and Enter the Void have trance-like imagery that stimulates my mind.

Q3:

Which artists do you admire? Why?

I admire the art of Carlos Huante and Zdzislaw Beksinski. Lately I’ve been getting into Warhammer 40,000 and can’t get enough Adrian Smith and John Blanche art. Expressive artists who can tell a story with their work are so interesting.

Q4:

When did you start using ZBrush?

In 2004, a friend showed me some videos of Martin Krol making an angler fish in ZBrush 2.0, and we started using it on our short film at school. Initially, I used it only to paint textures, but later I did the bump maps and sculpting in the package. Now I work 80% of the time in ZBrush.

Q5:

Describe your creative process and workflow. How does ZBrush fit?

I usually start modeling in Maya. I create a basic shape with fairly clean topology and take that into ZBrush and start blocking out the basic forms with the Clay Buildup Brush. After I get my general shapes, I refine them to a point where I’m fighting against the mesh and need to retopologize my model. I either use ZBrush’s Topology tools for this or export an object to TopoGun. Having retopologized the surface, I import that as a new SubTool into ZBrush and use projection to transfer all the details from the old SubTool to the new one. I refine further, possibly adding more levels to the SubTool and defining with the Clay Buildup, Dam Standard, and Move Brushes. When I’m at my highest level and all my large- and mid-frequency shapes are finished, I sometimes use Lightbox and different alphas to paint on finer details. Once the model is complete, I generally use the UV Master plug-in to create my UVs and then Decimation Master to create a detailed yet lighter model, ready for texturing.

Q6:

What’s your workflow? Do you create from scratch with ZSpheres or import geometry from another package to work on/develop?

I generally start from a mesh I made in Maya unless it’s something simple, in which case I start from a sphere or cube in ZBrush. Sometimes I also use ZSpheres for things like branches or trees.

Q7:

What are some of your favorite ZBrush features? How do you use them?

With every new version of ZBrush, my techniques change slightly. I began using the Clay Buildup Brush constantly in ZBrush 4, and now it’s my main brush for blocking out shape. I love the way it gives the surface an uneven, organic surface, so it’s particularly useful for sculpting creatures. Decimation Master is also essential in both my personal and professional pipeline. Being able to export a light mesh with all the sculpting details and my UVs intact is extremely useful when it comes to texturing in other packages like Mari, or even the final render in Maya.

The ProjectAll feature in ZBrush is such a powerful tool when it comes to extracting detail from a cyberscan or transferring details from one mesh to another. Both are huge parts of my pipeline.

Q8:

How are you using TimeLine?

I like to use TimeLine to set up my sculpting or rendering cameras. This allows me to snap back to it when I need to.

Q9:

Are you using SpotLight to texture or for sculptural details?

Yes, I’m using SpotLight for sculptural details; it’s intuitive and fast. It’s a great way of painting details onto a surface using alphas. I love the way the textured images are organized to keep the screen space clear but my options visible.

Q10:

Are you using any of the new brushes in ZBrush, like the Move Elastic Brush?

I swapped over the Inflate Brush for the Clay Buildup Brush, which I use for almost everything.

Q11:

What are you using for hard edge modeling?

The TrimDynamic Brush is my favorite for this. I never use the Flatten Brush anymore.

Q12:

Which ZPlugs do you use? How?

I use Transpose for posing the model and Decimation Master for exporting high-res meshes with UVs intact for textures and rendering. Also, the Multi Map Exporter is perfect for baking out displacement maps with multiple UV shells.

Q13:

What are your favorite new sculpting tools?

Clay Buildup Brush is my favorite. It really feels like sculpting with clay.

Q14:

What advice do you have for artists working with ZBrush?

My advice would be to really explore what’s possible with the brushes. Fantastic effects are within reach by experimenting with the Flakes and Fracture Brushes together. Try to get as much detail out of each subdivision level before you up the resolution.

Q15:

What do you wish someone had told you when you started with ZBrush?

I wish someone had told me not to worry about bringing in an animation mesh to ZBrush. I’ve found it’s best to just bring in a simple mesh with edge loops where I need them for sculpt resolution.

Resources

Links

Gallery

Gallery

“Cthulhu.”

Gallery

“Cthulhu Final.”

Gallery

“Gentleman.”

Gallery

“Gentleman Final.”

Gallery

“Hatch.”

Gallery

“Revulsion.”

Gallery

“Gunslinger.”

Gallery

“Merc.”

..................Content has been hidden....................

You can't read the all page of ebook, please click here login for view all page.
Reset
3.139.66.195