
NINE
Creating Images in the Field
So far we've considered many of the individual components of visual intensity that go into making a successful shot, and we've looked at some successful shots, pointing out how they employ the various concepts that were covered. Now it's time to get practical and take all the pieces and focus on putting them together to help you find the best shots in the field. That's what really counts! We're going to suggest a series of steps to take, and questions to ask yourself, to help you make images that have impact.
Initial Approach and Choices
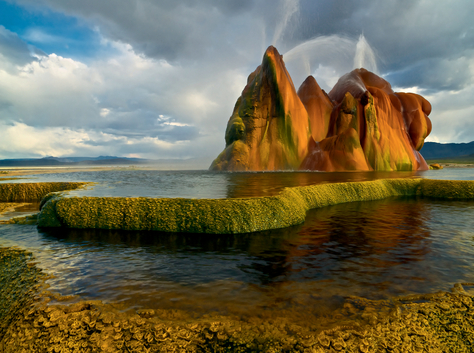
Sometimes it’s difficult to take a bad picture because the environment you’re in is so stunning. It seems like no matter where you point your camera you’re going to get a great image. That was the case at Fy Geyser, where we created the opening image for this chapter.
In reality, those situations are few and very far between! What we want to focus on are those times when it seems likely there’s a shot—indeed, if you walked up with an iPhone, there’s a shot you would take—but we want to help you go beyond the handshake of that first impulse shot.
One thing that will help, no matter whether you’re a nature photographer, a travel photographer, a pet photographer, a photojournalist, or whatever other type of specialist, is to be as familiar as possible with your subject. The more you know about your subject, the better prepared you will be, so that when the right moment happens, you’ll be in position and ready. It’s so easy to do a search on the Internet and get at least basic information about places, species behavior, and events, that this should become a routine part of your preparation before you go out shooting. Sometimes there’s more in-depth information about locations and events in some of the photography forums. A bonus is that they’re interactive, so you can ask specific questions. That way you’ll know where to go, what lenses to take and what time of day might be best. Sometimes you’ll have a chance to scout out a situation in person ahead of time so that you can plan where to stand, at least initially. Other times you’ll want to be shooting as soon as you arrive. But knowing at least some basics about what you’re shooting gives you a head start.
First Steps
Photographic experts are divided as to the first thing to do when you get to a promising location or situation. We know some who insist that you put your camera down, walk around, get familiar with the setting, and take some time before you ever pick up your camera. That usually doesn’t work for us. (The one exception would be when arriving at a location to photograph people. Then it’s often helpful to remember your manners. Be gracious enough to first talk with the people and help them understand why you’re pointing your camera at them. This will give you time to get a sense for who is willing to be photographed and who is not, as well as to understand a little about their culture and activities. You may miss some initial candid shots, but people are likely to be more cooperative and may create opportunities that never would have existed otherwise.)
Our usual approach is to have a camera ready when we first get to a location and follow our instinct to photograph whatever it is that we first saw, particularly if the light is good. All too often a moment is fleeting and doesn’t exist for long, whether because the light changes or because the subject changes in some way. We take that first shot to capture what caught our eye and make sure that we don’t miss it. Sometimes it’s a winner. Other times it winds up looking like a snapshot. But for us, we have to take that shot. Otherwise, it keeps intruding in our thought process like a refrain from a piece of music that you can’t get out of your mind. The mistake is to think that you’re done after taking that shot. In fact, you’ve only just begun!
We took the close-up shot in Figure 1 when we first arrived in Tuscany, excited at the prospect of spending several days photographing this beautiful field of poppies. We were so excited that we hardly knew where to begin, and so we took the close-up shot we’d been thinking about. The next morning, to our horror, we watched as a tractor plowed them under. You can imagine how much we wished that we had taken more shots of the whole field!
After you take that first shot, the next step is to connect with the situation. Take a breath and look around. What sounds do you hear? Are there sounds of traffic and sirens, or birds, or leaves or crickets, or children playing, or is there silence? Rarely are we in silent places even though often we may not be aware of “background sounds.” What do you feel on your skin? Is it cold, hot, windy, dry, or damp? What do you smell? Are there scents of woods or flowers or pollution or what?

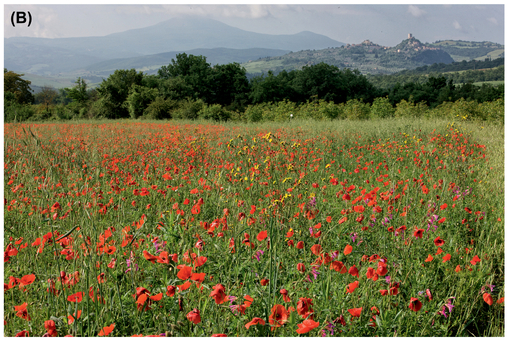
FIGURE 1 When you see a shot, don’t assume it will be there another day. You never know what may happen. (A) Close-up shot. (B) Field of poppies in Tuscany.
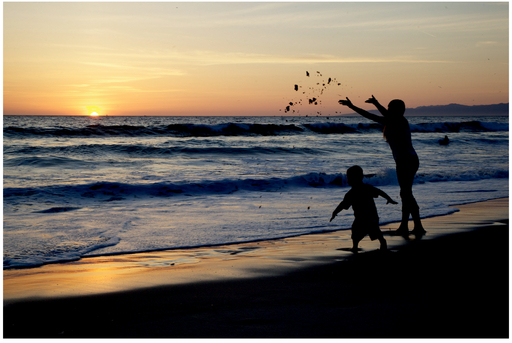
FIGURE 2 We went down to the beach hoping for a spectacular sunset that didn’t materialize, but because we tuned in to what else was going on, we captured a fun shot of a mother playing with her young child.
Did you notice that we didn’t yet mention what you see? That was deliberate! Because the point is to slow down and immerse yourself in the situation. Sometimes this takes a minute or two, sometimes it takes much longer. But letting yourself clear out other thoughts and tune into your various senses will enable you to more fully be aware of what’s around you and help open up the world of photographic possibilities. Too often we take a shot that’s similar to one we’ve seen and/or expect to see and miss other magical shots because we’re in such a hurry to move along with our busy lives. Slowing down will enable you to discover things you might not see at first. That’s how we happened to capture the whimsical shot of the mother and child at the beach in Figure 2 even though we had initially hoped for a dramatic sunset.
Now it’s time to look and think about what it was that caught your eye. What are you trying to photograph? The more specifically you can identify what it is that captured your attention, the better the image you’re likely to make! You may think that the subject is obvious. And sometimes it is. For example, you might say that you’re trying to photograph a bird catching a fish such as in Figure 3. The bird is obviously the main subject. But some element of the fish must be there too, whether it’s diving for the fish, the fish in its beak, or the fish in the process of being swallowed. If you continue thinking about what you reacted to in the situation, you might realize that you are intrigued by the size of the fish relative to the bird, or the light playing on the bird, or other birds trying to steal the fish, and so forth.
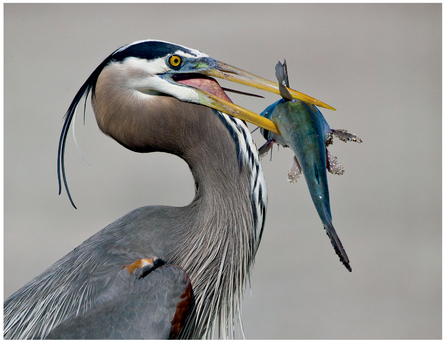
FIGURE 3 We were captivated by the size of the fish this heron caught and hoped he would try to swallow it in front of us. Unfortunately, he turned and walked off with his prize!
Similarly, you might be tempted to photograph a scenic location. Your first thought might be that it’s pretty. You need to force yourself to dig a little deeper to determine what grabbed your attention. Is it the colors, the play of the light, the shapes, the detail that makes it seem like you can see forever, the mood, the serenity, or something else? When you figure that out, you know what it is that you need to emphasize and can then make choices accordingly.
Walk around the subject (when appropriate) to determine where to stand. Consider getting higher or lower, as we did for Figure 4. Some people find it helpful to look through the camera without using a tripod to see the view they want. We rarely do that because it can be difficult to recreate the exact position after you attach the camera to the tripod. We walk around the subject first to get a preliminary sense of potential shots, and then we get set up with our gear. Sometimes we do this looking through the camera with a particular lens, but in that case the camera is loosely mounted on a ballhead on our tripods. That way it’s very easy to fluidly move the camera. When we find a shot, it’s easy to tighten the controls on the ballhead and we’re ready to go. For example, in Figure 4 the first shot captures the triangular pattern of the orange poppies and the openness of the area. The cloud formation seems to mirror the poppy formation. By getting lower with the wide-angle lens, we increased the energy associated with the poppies but lost a little of the sense of the overall location. Both shots work but convey different aspects of the scene.

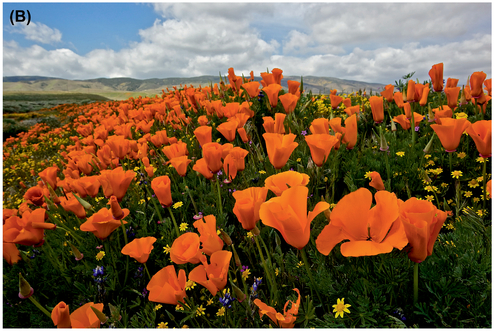
FIGURE 4 We used a wide-angle lens to capture (A) and (B), but by getting down to ground level for (B), we created images that convey different aspects of the scene.
Once you clearly identify what caught your attention and where to stand, you still have a lot of choices to make in order to create an image that captures what you’re seeing and feeling. If it were simply a matter of capturing just what you were seeing, it might be a lot easier, because you could just leave your camera on some version of a P (program) setting that would make a best guess of settings and shoot for you. Once you add the goal of capturing what you’re experiencing in that moment, in addition to what you’re seeing, it becomes imperative that you make at least some of those choices yourself. You can’t simply rely on a best-guess pre-programmed setting included in the camera that was developed using nice snapshots with some characteristics similar to the scene in front of you. You have a lot of decisions to make, and those choices will come together to determine the impact and message of your image.
Choices
1. Choose a Lens/Focal Length
In Chapter Five we considered how the different lenses portray the same subject differently due to differences in the field of view and apparent depth in the image. Now is the time to put that knowledge into action. If you want to replicate a scene similarly to the way you see it with your eyes, you’ll want to use a lens with a focal length that’s close to 55 mm, for a full-frame 35-mm sensor. (With sensors that have a multiplication factor, you’ll need to be wider, and for medium format cameras you’ll need to be a little longer.) But often we turn our heads quickly and take in more of a scene, mentally merging the views, so that our mental concept of the scene before us is more of a wide angle. Similarly, you may be visually honing in on a particular part of the scene and ignoring the remainder of what’s in your field of view. In that case, mentally you’re using a telephoto lens! Ask yourself whether you want to show the context of the subject, in which case you’ll lean toward a wide angle, or whether you want to isolate a particular detail, in which case you might at least start with a longer telephoto lens. Your lens choice will also be affected by how close you can physically get to your subject. Keep in mind that in many situations, a wider lens creates more visual intensity right off the bat. In Figure 5, we convey the beauty of the overall surroundings with a wide-angle lens, but use a telephoto lens to capture the drama of a single crane in flight.
With practice you’ll recognize what focal length will translate to the view you’re mentally capturing, but initially you may have to make a guess and look through the viewfinder. That’s one reason that zoom lenses are so popular—you zoom until the image in the viewfinder is in sync with the one in your mind! Sometimes you may realize you’ve selected the wrong lens. Although you may be able to work with that “wrong” lens, if your initial vision for the shot is different, we recommend changing the lens to match the image in your mind. Later you may try that “wrong” lens again and come up with an image you like even better, but initially, if you have something in mind, follow it through.
Having said that, we admit that there are times when serendipity strikes, and when we look through the viewfinder with the “wrong” lens, it becomes the “right” lens as we are struck by a slightly different rendition of the image. If you go “Wow!” when you look through the viewfinder, by all means stick with it! But if your reaction is “Oops, that’s not what I had in mind,” then change the lens.
2. Think Carefully About the Composition
You need to consider how large you want the subject to be in the frame. It’s not a given that everything will be small with a wide-angle lens or large with a telephoto. Your distance from the subject is also a key factor. The subject may be quite large and dominant if you’re quite close to it with a wide angle and much smaller if you’re farther away. The same thing holds no matter what focal length you use. Part of this decision has to do with the role you want the background to play. Sometimes the background plays a more important role than at others. Sometimes it’s important to include the subject in the context of its surroundings in order to tell the story, while other times the background needs to just provide support for the subject without calling any attention to itself. Thinking about the role of the background will help you determine how much of the frame to fill with the subject.

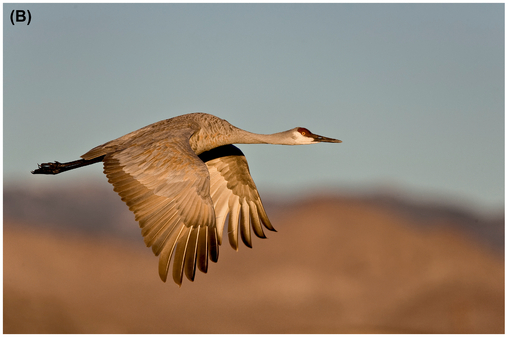
FIGURE 5 (A) The wide-angle lens conveys the environment and has a high degree of visual intensity due to the amount of detail and subject matter included, whereas (B) the telephoto shot gets its energy from the detail within the specific subject and the lighting on it, while the background consists of only vague shapes and colors.

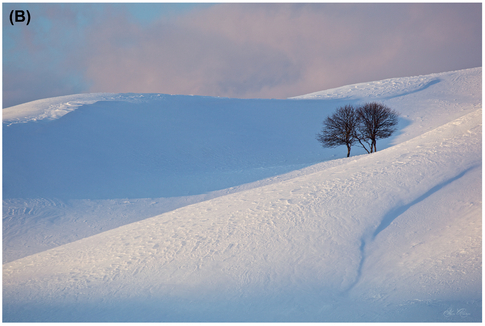
FIGURE 6 (A) The egret needs no additional energy from placement so it can be centered, whereas (B) the trees benefit from the additional energy due to being placed off center to draw attention to them.
Next, you’ll need to make an active choice about where to place the main subject in your image. Recall from Chapter Five that certain positions are more energetic than others. If the subject is large in the frame and the background unimportant, you may want to center it, or put it close to center. Doing so will limit the visual intensity from the position, but if there is a lot of detail, texture, or other sources of energy in your subject, that may be exactly what the image needs. With a small subject, chances are you’ll need to place it closer to an edge.
Figure 6 shows two different subject placements. The egret is large in the frame and centered because the visual intensity comes primarily from the feather detail, shapes, and luminosity contrast. We placed the trees in the other image far off center to add importance and energy to them, since they are small.
In addition, the oblique lines of the snow-covered hill lead to the trees and they are framed by the end of the shadow area—all of which adds energy to the trees.
Similarly, if there is a horizon in your image, you need to think about where to place it. If the image is primarily foreground with just a thin band of sky, you’re communicating that the sky plays only a small supporting role and what’s important is the foreground. That will feel different than if you include no sky at all, which focuses attention on particular elements in the foreground as the subject, and other elements become background.
If you place the horizon near the bottom of the image, you’re drawing attention to the sky. If you place the horizon in the middle, you’re saying that the sky and foreground are equally
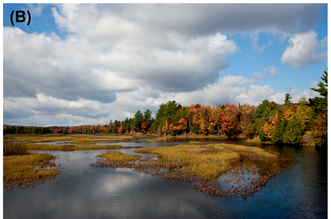
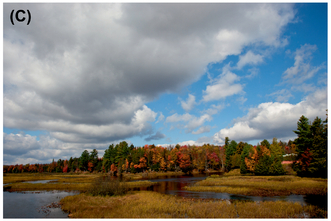
FIGURE 7 Placing the horizon at different levels causes us to look at different aspects of the image.
important. That works in the case of some reflections, although sometimes even with reflections an off-center horizon may work well.
In the series of images in Figure 7, we changed the horizon placement to enable you to compare the results. Although we think the version with the high horizon works, we also like the centered horizon. In the first version, the viewer’s eyes goes go to the land, which has more visual intensity by virtue of its placement near an edge. The final version, also off center but with the horizon near the bottom, emphasizes the sky and the land no longer looks nearly as interesting. When the horizon is in the middle we look at both the sky and the land. Since the shape of the clouds seems to almost mirror the shape of the land, and there is interest within the clouds, this composition is also successful.
Horizon placement is important whether you’re shooting a shot of a landscape or you’re shooting a particular subject outdoors. You can control the placement of the horizon by your position and/or the camera angle at which you’re shooting. Even if you opt to shoot wide open so that the background becomes a blur, changing your position may make the difference between the background being an out-of-focus texture that’s semi-identifiable and its being a blue sky. And that can alter the energy level of the background significantly, perhaps changing it from distracting to complementary.
Tilting the camera up or down, as opposed to just raising or lowering it, can change not only the horizon placement but may also add a sense of depth. Depth added by tilting the camera increases the visual intensity of the image. In Figure 8, we tilted the camera toward the ground to exaggerate the sand patterns. This dramatically increased the visual intensity and sense of depth in the image.
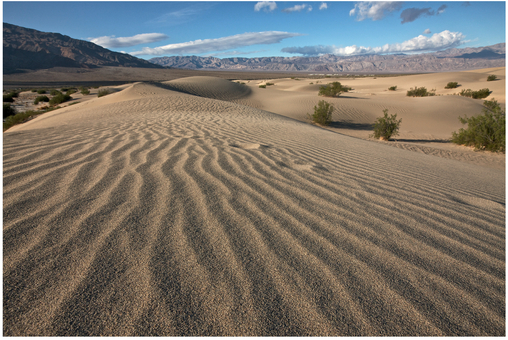
FIGURE 8 The illusion of depth in this image is a major component of its visual intensity.
3. Decide on the Depth of Field
Do you want everything seemingly in focus or do you want to direct the viewer to a specific subject or area of the image? Images with selective focus—those with very limited depth of field—create something that looks very different from what we see with our eyes. We see most things, from moderately near to moderately far, in reasonably sharp detail, with items that are either very near or very far blurring somewhat. So when we see an image that is mostly blurred with a very defined area that’s in focus, we tend to concentrate on the area that’s in focus. That area becomes the figure. The out-of-focus areas (the ground) then contribute to a mood, such as mysterious, soft, peaceful, isolating, and so forth. While selective focus may decrease the visual intensity of the image due to less texture/detail contrast, often this is balanced by the fact that what we see is different from what we initially expect. We have to use our imaginations to determine what those blurred shapes and colors might be, and that engages us with the image. That engagement means that the visual intensity has been maintained at a pleasing level. Of course there are also instances where the visual intensity would be far too high if everything were in focus, so using selective focus to reduce overall visual intensity is important. Use depth of field to control both where the viewer looks as well as the energy contributed by the background.
In Figure 9, the very limited depth of field in the flower forces us to notice the details that are in sharp focus and similarly enables the owl to separate from the background. With more depth of field, the owl would blend in with the background and the entire image would be too visually intense. We shot those wide open. With the swan, we wanted to retain some sense of
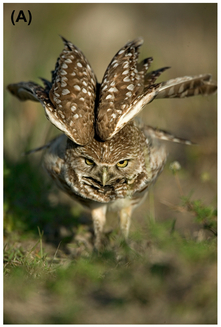


FIGURE 9 Shooting wide open can help separate the subject from the background (A) or help direct you where to look (B). In (C), we stooped down slightly to retain some serve of background but deliberately left it out of focus so as not to compete with the main subject—the swan.
FIGURE 10 Using a very small aperture for maximum depth of field increased the energy and impact of this image.
the background to provide a sense of place, but also wanted it to be out of focus enough to avoid competing with the subject, so we stopped down slightly to f/8.
On the other hand, you might be struck by all the details of the scene before you and want to capture as much as you can. In fact, we are often quite captivated by images that show us everything in minute detail from foreground to background. That was some of the appeal of using large format cameras for landscape photography—the resulting images actually had more detail than we were aware of when in the same location. If you have a chance to view an Ansel Adams image such as Tenaya Creek, Spring Rain, the longer you look at it, the more you see individual leaves and other such details.
Today’s high-resolution, digital-medium format images come close to that amount of detail, and 35-mm DSLRs can capture truly impressive amounts of detail. The image shown in Figure 10 has minute detail visible throughout the image, which increases its visual intensity. Had we used a shallower depth of field so that the distant buildings gradually blurred away, there would be less visual intensity.
As discussed in Chapter Five, if you want to render nearly everything sharp in an image you’ll need to choose a small aperture for maximum depth of field, and then set your focus at the hyperfocal distance.
The risk when using maximum depth of field and hyperfocal distance is that the image may feel chaotic and overly busy. In other words, it may become too visually intense. In some cases, it may be difficult to distinguish the subject from the background. In fact, typically you’ll want to use this approach only when your subject is the entire scene in front of you. You won’t normally want to use maximum depth of field with a portrait, for example.
There was an old adage that basically said to take good images, use f/8 and be there. We certainly agree with the being there part! But use the moderate aperture settings carefully and with deliberate thought. How much depth of field do you need to render the subject sharp, but the background softer to help the subject stand out? The answer will depend both on how far away you are from the subject and on the focal length of the lens you’ve selected.
Rather than try to memorize a set of rules, many cameras have a depth-of-field preview button. Use this button to see the effect of the aperture setting you’ve selected. When you initially look through the viewfinder of an SLR camera or at the liquid crystal display (LCD) on most cameras, the image you see is with the aperture wide open. That’s to let as much light in as possible to make it easier for you to compose and focus the image. But it can be misleading when you’re shooting using smaller apertures. When you use the depth-of-field preview button, the image in the viewfinder on an SLR will get noticeably darker unless you’re shooting wide open. That’s because the amount of light getting to the viewfinder is now reduced due to the smaller aperture. After your eyes get used to the decrease in light in the viewfinder, you’ll be able to see how much of the image will be in focus using that particular aperture. You’ll be able to get a feel for the overall energy level of the image. That way you will know if you need to increase or decrease the aperture. If you have a live view option with your camera as well as a depth-of-field preview button, you’ll have the advantage of being able to preview the effect on the image without it getting darker as the aperture decreases. Not all cameras have a depth-of-field preview button, but since it’s such a helpful feature, double check your camera manual to be sure. Then, if your camera does have it, take advantage of it!
Alternatively, after you’ve taken a shot, you can use the LCD to review it, zoom in, and see whether your entire subject area is in focus and whether the background separates and softens as desired.
Sometimes it’s difficult to determine the best f-stop based on a small preview, so at times we bracket our apertures, shooting at several apertures. Once on the computer, it’s often easy to see which approach is best, but even there the difference between two settings, such as f/2.8 and f/4, may be subtle.
4. Choose the Shutter Speed
Even if you opt to shoot in aperture priority mode most of the time and let the camera choose the shutter speed automatically, you still need to be aware of the shutter speed. And in some cases, notably those involving motion of any kind, you may want to exercise more control over the shutter speed by using shutter priority or manual mode.
With any subject matter you’re intending to render sharp (without a motion blur), you need to determine how fast a shutter speed to use. In some cases, such as birds in flight or sports or with aerials such as in Figure 11, you may need to use 1/500 or 1/1000 a second to freeze the action. If your subject isn’t moving, then you need to use a shutter speed fast enough that there isn’t camera movement, or you need to use a tripod. Some people can handhold a short lens, particularly one that has image stabilizing (IS) technology at 1/15 to 1/30 per second. The slowest shutter speed that you can successfully use while handholding the camera depends on the weight of the lens, the focal length of the lens, and your steadiness. A general rule of thumb is 1/focal length (35-mm equivalent) is the slowest that you can handhold. IS gives you extra room, and some people are steadier than others (especially if you’ve just stopped at Starbucks!). When in doubt, use a tripod, or alternatively choose a higher ISO that will enable you to use the same aperture and a faster shutter speed. Whenever possible we use a tripod so that we don’t accidentally introduce camera movement, but of course there are situations where using a tripod is not feasible.

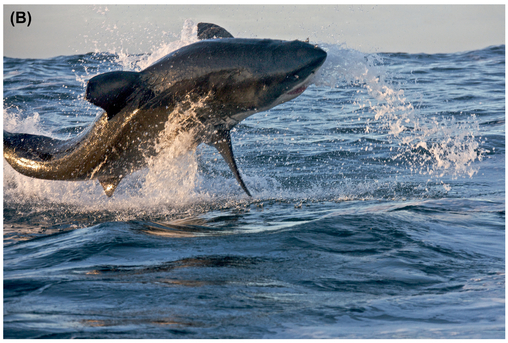
FIGURE 11 With aerial shots (A) and rapidly moving critters such as great white sharks (B), shutter speeds of 1/500 or faster are helpful.


FIGURE 12 Holding the camera steady with moving subjects such as birds (A) and water can sometimes create images that capture the feeling of motion better than simply freezing the action. The little girl (B) is also moving slightly, and the slight blur adds to the impression of her pushing against the undertow.
It’s certainly possible that you may not always want to freeze the action. You may want to add a sense of motion to the image by using a slower shutter speed. That way the subject will move during the exposure, creating a blur if you hold still. Sometimes these blurs are artistic and exciting, and sometimes they’re just plain misses! With this approach, often the background is sharper than the subject, and that can be tricky, particularly if people are the moving subject matter. Waterfalls often work well this way. As you can see in Figure 12A, birds blasting off can create interesting designs. For this approach to work you have to be careful to maintain the visual energy of the subject and not let the background have most of the energy. Often that may mean making sure there is a lot of shape energy on the subject, with the possibility of energy from color, luminosity, and so forth.
Another approach with subjects that are in motion is to pan with the subject, meaning that you frame it in the viewfinder and then smoothly move the camera with it, depressing the shutter after you’ve already begun moving the camera. This takes some practice, but ideally you can render the subject sharp or at least identifiable, while the background becomes blurred in a way that we clearly interpret as motion, as shown in Figure 13. Often lines appear in the background in place of details due to the movement, and these lines add their own energy.
This creates an image with some similarities to those with selective focus discussed earlier, in that the viewer’s eyes will be guided to the subject matter where there is more detail and texture energy, as well as possibly luminosity and color energy. The viewer is engaged because he or she has to imagine what those blurred colors and shapes might be in the background. This approach is particularly useful for separating the figure and ground when there is a distracting background, and concentrates the image’s energy on the
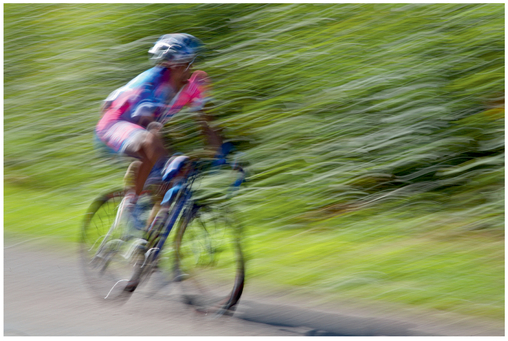
FIGURE 13 Panning with a moving object blurs distracting backgrounds and can capture impressionistic but recognizable renditions of the subject; or if you pan at the same speed as the subject is moving, the subject may be sharp.
subject and the motion. With many subjects, panning and using a shutter speed of 1/10 to 1/30 per second creates some pleasing images. (Don’t be frustrated if you think most of your images done this way are terrible. It takes time to get good with this technique. And finding a gem this way can be very exciting because you know that your image will be different from that of anyone else who was there at the same moment.)
If you want to venture into completely creative, more abstract imagery, you may opt to add camera movement with static subjects such as trees, as shown in Figure 14. To do this you choose a longer shutter speed—we use from 1/15 to 2 seconds or more—and then either move the camera, zoom the lens, or both. Again, many images will be destined for the delete bin, but occasionally some are magical. The beauty of these images is that you are no longer relying on details to convey your subject matter. Color, shape, and tone become the important sources of energy to convey what you’re feeling. The lack of detail forces viewers to engage their imagination to fill in the missing information.
Keep in mind that although blurs (be they pan, zoom, or just motion) lose some energy from the lack of detail and texture, the blur itself creates shapes and lines that have their own visual energy, which that may help render a pleasing overall level of visual intensity.
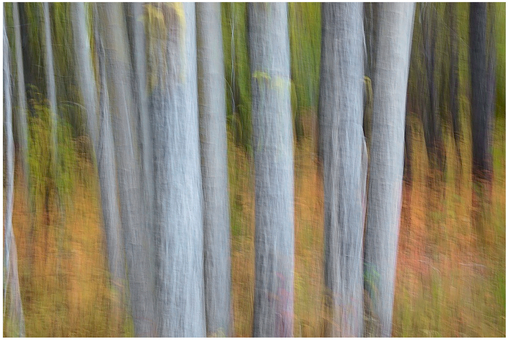
FIGURE 14 Moving the camera vertically retained the sense of trees, but reduced the other vegetation to colors and vague shapes.
5. Choose the ISO
This is normally pretty straightforward. Usually we keep the camera set to an ISO of 400 to enable fairly fast shutter speeds with a variety of apertures. With older digital cameras that were more prone to noise, we used ISO 200 as our default setting, or even 100. Keep in mind that if you want to create a blur during daylight, you’ll likely need to use a slow ISO like ISO 50 or 100. (You can also add a neutral density filter that reduces the amount of light getting to the sensor so that you can use longer shutter speeds.) If you want to create tack-sharp images in low light and don’t have a tripod, you’re going to need a high ISO. The specific ISO depends on your camera model. Some of the latest cameras give excellent results at amazingly high ISOs, whereas cameras made just a few years ago show bothersome amounts of noise at ISO 800.
Selecting where to stand, the lens, ISO aperture, shutter speed, and depth of field are the fundamental choices. Next come choices that will further improve the artistic aspects of the image.
6. Check Your Framing
Carefully look through the viewfinder and be sure that there are no unintended distracting objects creeping into the frame. You may need to modify your position or focal length slightly. In Figure 15, our first shot was too visually intense, as the viewer’s eye goes to the bright sky at the top and the detail work near the top of the bridge. What we had intended to
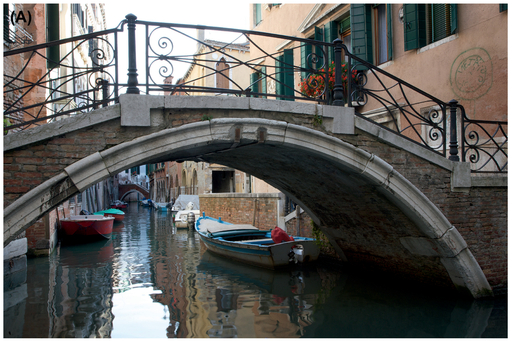
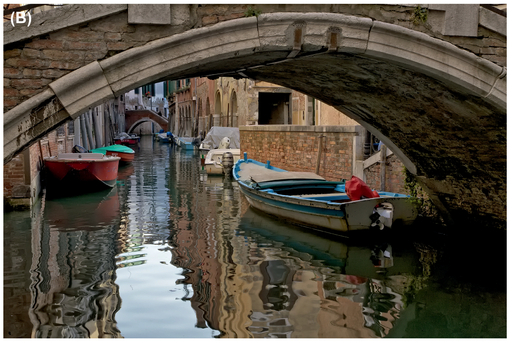
FIGURE 15 The initial shot (A) is too visually intense, so we chose a longer focal length to remove the distracting elements. Shot (B) has a more visually pleasing level of energy and guides the viewer’s eye along the canal.

FIGURE 16 We were so thrilled to be photographing these penguins at such close range that we didn’t notice the triangle form in the background. The result is that the eye is pulled toward the background, because of the energy from the triangular shape as well as the intensity of the blue sky. The image could have been far stronger had we taken a couple of steps to the side.
show was the pathway down the canal under the bridge and the reflections, so we then chose a longer focal length and eliminated the distracting details in the top third of the image. This focuses the eye on the parts of the scene we wanted to portray and creates an image with a more pleasing level of visual intensity.
Similarly, make certain that the background is not interacting with your subject in unintended ways as happened with the image in Figure 16. The classic example of this is that you want to be certain not to have telephone poles or trees growing out of someone’s head. In addition to concerns about telephone poles and trees, you want to be sure the subject aligns with the background in a flattering way. Moving a step or two to the right or left or moving the camera up or down can make a huge difference. You also need to be certain that the background doesn’t have too much energy. Keep in mind that actually moving changes the perspective slightly, which is what you need. Just tilting the camera up/down/left/right will not change the alignment of objects in the image.
As you look through the viewfinder, double check that the subject matter is clear. Initially you may be concentrating so hard on the subject that you mentally remove distracting objects. In addition, many viewfinders don’t show you 100 percent of what will be captured—most range from 93 to 100 percent. This means that although you’ve done your best to carefully frame the subject, when you see the image later there may be some unfortunate surprises along the edges. For that reason it can be helpful to check the LCD after you’ve taken a shot. Often it’s easier to see the image more objectively that way, plus you can see the entire image including the edges. Then you can take whatever steps are necessary to capture what you intended without having to crop the image later or spend a lot of time cloning something out. You might need to move a step or two or use a different focal length. It might even be that you need to wait until a cloud moves into a better position and complements your subject rather than competes with it.
As you look carefully at the edges of the frame, check to see whether they’re open or closed, as discussed in Chapter Five. Think about how the image would look with more space around the subject or with less. How would it look if you deliberately cut off part of the subject? One trick with doing this is to be sure to cut off enough that it’s obvious this was a deliberate choice rather than an accident. A subject that just touches the frame edge or is just barely cut off is often distracting and makes it feel crowded into the frame. As shown in Figure 17, you either need enough space so that the subject feels comfortable or you need to make it clear that you’re choosing to show only part of the subject.
A trap that many people fall into when they first get a long lens is that they’re so excited to capture a small subject large in the frame that they literally stuff the frame. You need to give subjects some breathing room. The classic advice is to leave more space in front of the subject (if it’s heading across the frame) than behind it, so that it has somewhere to go. However, you can break this rule at times to convey a different message. Doing so will be unexpected and will add to the visual energy of the image.
7. Check the Lighting
As discussed in Chapter Six and shown in Figure 18, it’s not just the quantity of light that matters, but also the quality and direction of the light. If you’re outdoors, pay attention to the patterns of light and shadow. Sometimes you need to wait until a cloud rolls by to diffuse the sunlight. Sometimes you need to augment the light with a reflector or fill-in flash, or change your position slightly. Sometimes you realize that you need to come back later. If the lighting isn’t ideal, the first shot you take might be just for reference, and the shot you take later when the lighting is right will be the magical one.
8. Consider a Filter
If you’re shooting outdoors, consider whether using a filter would help. The two types of filters we use frequently are polarizers and split neutral density. Polarizers filter scattered light so that it appears to be coming primarily from one direction. They not only deepen colors such as a blue sky and emphasize cloud detail, they can also reduce distracting reflections as shown in Figure 19. The increased depth in the sky, in cloud detail, and colors will increase visual intensity, but any decrease in reflections may reduce intensity. So the final effect on visual intensity—an increase or decrease—will vary according to the specifics of the image.
In some outdoor scenes, the sky is considerably brighter than the ground, as seen in Figure 20. This is true of shots that include water and reflections as well as shots at sunrise or sunset, and sometimes at midday as well. In such cases you have two choices. The first is that to use a split neutral density (ND) filter—a rectangular filter containing clear and darker parts. The transition between the light and dark areas can be gradual or abrupt. The dark area is commonly one, two, or three stops darker. Most people choose to carry one or two of these combinations, for example a two-stop graduated neutral density rather than an entire set.
Some finesse is required to accurately place a split ND filter with a hard-edge transition, but when the luminosity transition in the scene has an abrupt boundary, these filters can come in handy. Most of the time we prefer the forgivingness of graduated edge filters. Using a split ND in the field will even out the exposure so that the visual intensity remains similar throughout the image, rather than having a faded portion or a part that’s too dark.
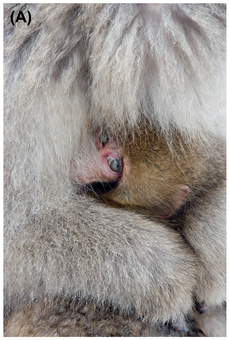


FIGURE 17 (A) There is no doubt that we deliberately excluded most of the mother and part of the baby snow monkey. (B) However, when a subject just barely fits in the frame, it can be overly energized and overwhelm the composition, as it does here with the crane silhouettes. (C) When more space is included around the birds, the visual intensity is far more pleasing.
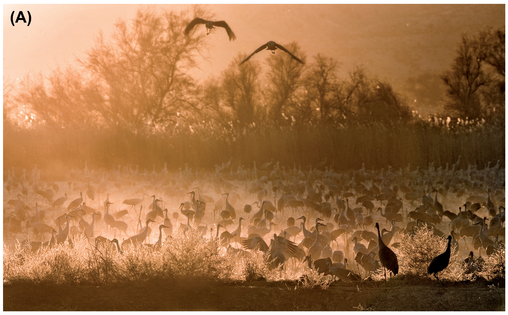
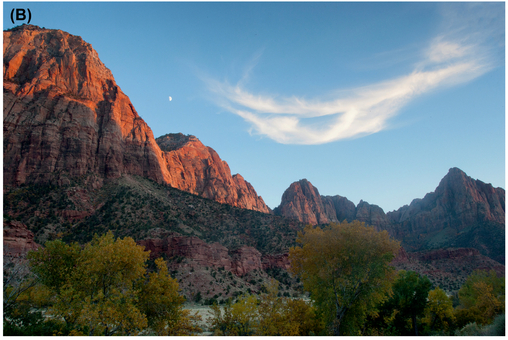
FIGURE 18 (A) Just as the sun fell to the horizon, it backlit the dust in the cornfield where the cranes were gathering. The result was striking, whereas only a few minutes earlier it had been a totally boring scene. Waiting until the lighting was right increased the luminosity contrast and overall visual intensity. (B) Similarly, waiting until the cloud was just right in this landscape scene increased the visual intensity to give a dramatic image. Without the cloud, the visual intensity would be too low to be interesting.
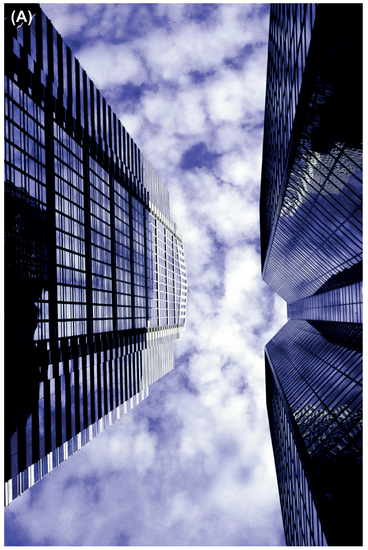
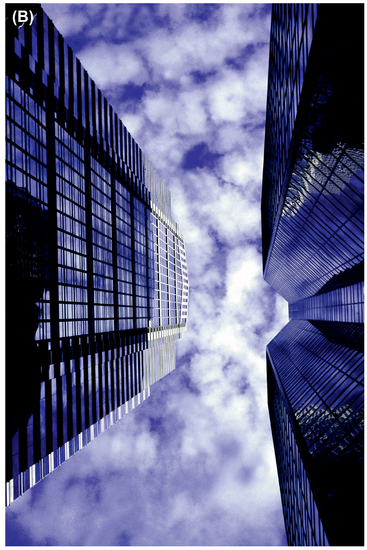
FIGURE 19 (A) Image before using polarizer. (B) Using a polarizer not only deepens the blue of the sky, it emphasizes the clouds and reduces reflections on the buildings. Image courtesy Art Becker.
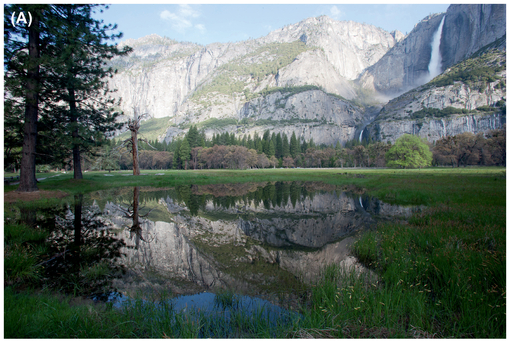

FIGURE 20 Initially in this scene the reflection was noticeably darker than the sky and mountain (A). By using a split ND filter we corrected the exposure in shot (B).
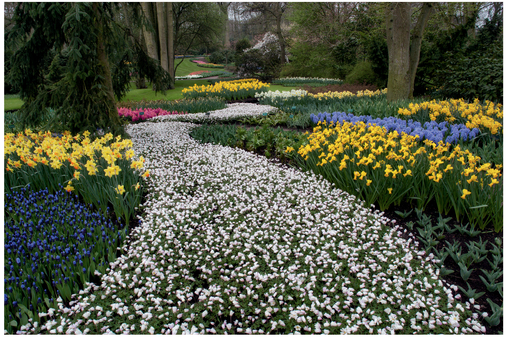
FIGURE 21 Including a meandering path is an excellent way to add a three dimensional feel to an image.
If the areas in the scene that are bright do not follow a roughly linear division, then a split ND filter won’t be helpful. In that case you’re better off using the second option, which is taking multiple shots to create a high dynamic range (HDR) image. You expose one for the bright area and one for the darker area and combine them later. Of course, you can also use that approach if you don’t have a split ND filter. We’ll talk more about that in the last chapter of the book.
9. Depth Cues
While you’re composing an image, take note of whether you’re incorporating any depth cues. The image in Figure 21 includes strong depth cues including the meandering path and the decreasing site of the flowers. On the other hand, if you’re shooting a bird against an out-of-focus background (such as in Figure 6A), you’ll have very few depth cues.
If you’re shooting with a medium to wide lens, consider adding elements to create the sense of depth. The best landscape images have elements in the foreground, mid-ground, and background to create a sense of depth. Sometimes, but by no means all the time, the subject may be in the foreground, as in the racing rocks picture (Figure 22A). Other times you may have an out-of-focus or inconsequential element in the foreground that exists to create depth, while the story is about what’s in the mid-ground. For example, you can
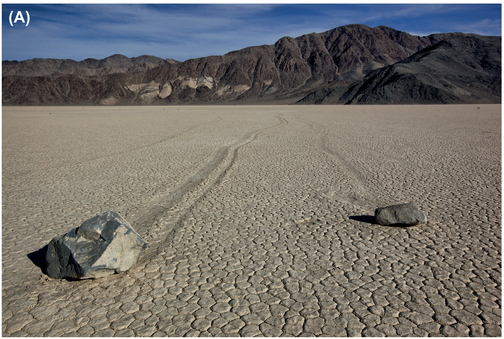

FIGURE 22 Including depth cues in your image will increase its visual intensity. (A) Racing rocks has the subject in the foreground whereas the mountain reflections scene in shot (B) has the subject in the mid-ground and uses the branches as a depth cue in the foreground.

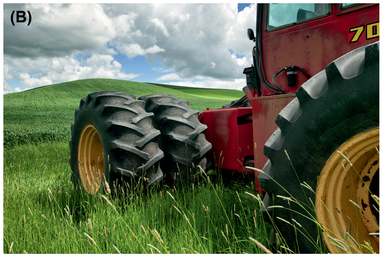
FIGURE 23 The head on tractor shot in (A) has less sense of depth than the partial side angle shot (B) which includes depth cues such as converging lines as well as changes in the relative size of the wheels.
add leaves or branches from an overhanging tree that is clearly much closer than most of the scene (Figure 22B). The branches or leaves act as a doorway that you visually enter through to see your subject. Depth cues such as this add to the intensity of the image. You have to be careful that they don’t have too much energy and overpower your subject, though. They exist to complement, not compete with the subject.
Another way to add depth to an image is to shoot near a wall, fence, or relatively tall structure so that there are converging lines. In some cases, as in Chapter Five, Figure 4 (page 118) with the example of buildings on a street, the converging lines may be quite obvious; in others they may be more subtle, but equally important to the image. Consider the images of a tractor in Figure 23. Because we used a moderately wide-angle lens and the camera-to-tractor distance was greater than the depth of the subject, there’s not much sense of depth in the head-on view. By moving around to the side and getting low with a wide-angle lens, we’ve created a sense of depth, as the front tractor wheels are so much larger than the rear ones. If you imagine lines extending from the top and bottom of the front wheel to the rear wheel you’ll see that they converge. That sense of depth adds to the visual intensity of the image. (Note, however, that the word “Versatile” on the tractor in the more static view adds considerable subject energy and it also has more energy from the background clouds, so that version also has a pleasing level of visual intensity.)
More Than One Shot?
Now that you’ve captured the shot that first caught your eye and any that are obvious to you, it’s time to pause for a minute and look around. Chances are that there may be more good shots to be had, though initially they may not be as apparent. As Dewitt Jones

FIGURE 24 We had been photographing sunset at low tide with beautiful colors and wonderful reflections, when all of a sudden someone walked into the frame with a metal detector. Suddenly we had a very different image. It would have been easy to be annoyed with him, but instead we got a little closer and made him an element of the image.
says, it’s time to find the “next right answer” as you consider the possibilities. Even if you love the first shot you took, don’t assume that it’s the only one, or even the best one. You need to look for what else is there.
Sometimes you just need to wait and watch for a little while. Maybe the lighting changes a little, maybe the subject changes in some way, or maybe something new appears as shown in Figure 24.
As you look around wondering what image to create next, consider what would happen if you used a very different lens. Sometimes we get in the habit of always using a particular focal length for a certain type of shot. For example, perhaps you often photograph a garden with your 24–105 lens. What could you do if you got out a macro lens, or used close-up filters and/or diopters to let you get much closer? Similarly, if you often use a macro lens in a certain situation, what would it look like if you shot it with a wide-angle lens and put the lens right up to the subject?
One of the best ways to get a shot that breaks out of a rut is to change your position—move yourself higher, lower, more to the side, closer, farther away. And the one tip that you should never forget is to always turn around and check what’s going on behind you. You may think you’re aiming at the best subject, only to discover that there’s something even better behind you. That often happens at sunrise and sunset, when it’s tempting to point the camera toward the sun. But in reality the color behind you may be even more dramatic! Or if you’re photographing wildlife in front of you, be alert to what might have gathered behind you. We were once photographing penguins in the Falklands, and Ellen was concentrating on photographing some penguins at close range with a wide angle. When she turned around she discovered she was inadvertently standing in what the penguins used as a primary travel path and they had queued up, patiently waiting for her to finish!
If it’s obvious to shoot the scene at sunset, consider staying and shooting with stars in the sky and long exposures. If it’s obvious that you need to get everything in focus, try using selective focus and highlighting a particular detail. If it’s obvious the horizon should be straight, tilt it. If it’s obvious that you need a fast shutter speed to freeze the action and get everything sharp, try a long shutter speed where subjects may become blurred and abstract suggestions rather than documentations. If it’s obvious you need to shoot using a wide angle, consider using a longer focal length and isolating part of the scene, and so forth. The point is that you need to question all the automatic choices you make and the assumption that there is one right way to photograph the subject before you. Chances are there are several “right” ways that may have very different impacts, styles, and looks.
As you try each new approach, consider how it alters the overall visual intensity of the image and what else you may need to do to maintain a pleasing level of energy.
Sometimes the key is to wonder “what would happen if I…” and then find out! In Figure 25 we were photographing a sunset on the beach that was nice, but not spectacular. We wondered what would happen if we used a slow shutter speed and moved the camera horizontally, rather than keeping the camera as still as possible, so we tried it. Suddenly the sunset took on the appearance of a watercolor. It captured the feeling of the beach and sunset with few of the details visible. We placed the horizon slightly above the center line so that the yellow we decide is the sun is in a more energetic place. The variety of colors contributes some energy, as do the lines that result from the horizontal motion. Most of the energy in the image comes from the abstract shapes and bands of color that require the observer to participate and imagine the details. By doing something unusual with the camera, the rather ordinary sunset became special.
Next we aimed the camera down and played with what was happening at the water’s edge, with the various patterns and colors (Figure 25B). We looked up to see an older couple walking by, enjoying the moment even though the woman needed a cane (Figure 25C). It felt like we shared in an unexpected special moment. If our only thought had been to capture a wide-angle view of a spectacular sunset, we would never have seen any of these shots.
Special Tools and Techniques
In addition to all the choices we’ve covered so far, there are some other options to consider. If you’re in a situation with a lot of luminosity contrast and you can’t return at a time when the lighting is better (or perhaps no matter what it will always be too contrasty for a camera to capture full detail), then consider creating an HDR image. We’ll talk more about that in Chapter Eleven. In addition there are some specialty lenses that you may want to consider using, such as macro, tilt-shift, fish-eye, and Lensbaby.
Macro
Definitions of macro vary slightly but we’re referring to lenses that let you capture your subject at life size or larger. When we view something at life size, most of the time we start to see details that we’d never noticed before. When we increase the magnification beyond life size, we not only see details that may not have been obvious to our eyes, but eventually the


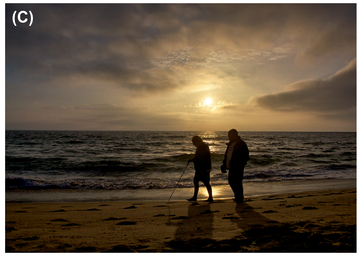
FIGURE 25 By moving the camera during a long exposure we created a painterly rendition of a sunset (A). We looked down and played with the water’s edge (B), and looked up to see an older couple passing by (C), all of which added interest to what was a rather ordinary sunset.
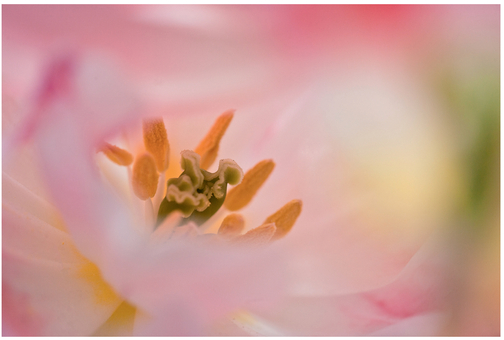
FIGURE 26 Macro images often give us new ways of seeing familiar objects.
subject ceases to be readily identifiable and becomes instead a series of shapes, textures, details, and colors marked by the lighting that defines highlight and shadow areas. We lose the quick and convenient label attached to the subject and instead examine the components of what is an abstract design rather than a documentary photo.
Initially at life size, when the subject is still identifiable, seeing more detail may increase the visual intensity of the image. However, by making the subject larger in the frame (often completely filling the frame with only a portion of the subject, as happens when it’s viewed at life size), there may be no background at all and that may keep the overall image energy within a pleasing range. As the image becomes more abstract, its energy will be determined by the elements that are visible and their organization within the frame. For example, rather than thinking that the image in Figure 26 is a picture of a flower, it’s a picture of parts of the flower that are now a design. The visual intensity of the image then depends on colors, shapes, luminosity contrast, and the need to make sense of something that you almost, but don’t quite, recognize.
You can opt to buy true macro lenses that let you focus from life size to infinity, and if you love macro this is a great solution. But there are less expensive options you can try. You can add magnifying filters (called close-up diopters) to the front of a lens, or extension tubes between the lens and the camera
FIGURE 27 By adding a 2 × tele-extender to our macro lens, we captured this water droplet at twice life size.
body that will let you capture life-size images. You can also add tele-extenders that will effectively magnify the focal length of the lens you’re using. In Figure 27 we combined a tele-extender and a macro lens to get a twice life size view of a droplet of rain on a flower. It’s also possible to use an adapter to reverse mount a lens so that it becomes a macro lens.
If you are an abstract lover and a Canon user, you can buy a special macro lens that lets you capture an image at up to five times life size! It’s even possible to use a microscope with a camera and capture images at a level of magnification you couldn’t even imagine existed without a microscope. These images at unusually high magnification are not what we’re accustomed to seeing, and as such engage our curiosity. That adds energy to them. Beyond that, their visual intensity depends on the design elements and the energy of the components. Chances are that this type of composition is beyond your control and involves an element of chance.
Another issue with extreme macro is that depth of field is quite limited. This can be distracting when looking at something like a fly’s eye, where you hope to see the entire thing in focus, and can cause the image to lack visual intensity. To increase it to a pleasing level, you may need to combine multiple shots of a subject after focusing at different distances. You can then combine them into a single image using Photoshop, or a program such as Helicon focus. The final image may then have dramatic impact, since it will show exquisite detail we can’t often see.
Tilt-Shift
Tilt-shift lenses were originally the territory of large-format cameras, and later a few versions became available for medium and 35-mm formats. These lenses move in ways other lenses can’t. Shifting is moving the lens parallel to the image plane and is used to alter the position of a subject, such as a building, in the image without needing to angle the camera back. Tilting involves changing the angle of the lens’s focal plane relative to the sensor’s imaging plane, which alters the plane of focus.
Tilt-shift lenses are often used by architectural photographers to avoid the illusion that a building is falling away. That occurs when people angle their cameras upward to get the entire building in the shot and as they do so the building’s sides appear to converge at the roof. The bottom of the building appears to be closer than the top because in fact, it is closer to the camera due to the position of the camera. If you hold your camera parallel to the building, you won’t see that type of distortion.
The image your lens creates is circular, but our sensors use a rectangular region within that circle (see Chapter 5, Figure 13). The shift function in these lenses changes what part of that circular image the sensor is capturing. This lets you adjust your framing of a building, for example, without angling your camera up at the building.
Shifting can also help you capture shots to stitch into a panorama. It can be preferable to panning the camera because you maintain the same focal plane and avoid distortions, as shown in Figure 28.
When you tilt the lens, what is in focus may change, as shown in Figure 29. You’re not actually changing how much is in focus—you can only change that by setting your aperture. However, because you’re changing the plane of focus (it’s not parallel to your lens anymore), you might mistakenly think that tilting your lens changes how much is in focus.
For example, imagine you’re standing up high, looking down on a field of flowers. If you want to take a picture of the field of flowers where everything is crisply sharp with a normal lens, you could set the camera to a small aperture such as f/22, but you’d need a relatively long exposure. Chances are that there may be some wind that will create movement within the flowers. Using the tilt part of the lens to angle the optics so that you’re counteracting the angle from looking down at the flowers will correct the distortion, putting most of the flowers into the same focal plane, and letting you use a larger aperture (and faster shutter speed). Conversely, you could use the tilt feature to blur most of the field of flowers to direct your eye to a specific spot, by making it so that all the other flowers are in a different focal plane. Tilting this way is sometimes done in portrait photography for a trendy look.
Architectural photographers sometimes combine both functions, tilting and shifting, to reduce unwanted distortions when photographing buildings. Note that rendering the building rectangular instead of somewhat triangular and distorted does decrease the visual intensity of the image, which may or may not be what you want creatively. However, for those who regularly photograph architecture and don’t want that distortion, tilt-shift lenses can be lifesavers.
Tilt-shift lenses tend to be fairly expensive and some of their effects can be replicated with other techniques, such as combining several shots of a subject in order to expand focus. In addition, some tilt-shift lenses can be a bit more demanding to use since many do not enable full auto-exposure, when the tilt or shift portions are engaged, and may not offer autofocus.
A creative and far more affordable alternative for selective focus is the Lensbaby series of lenses. These are small aftermarket lenses and optics that allow for selective focus with the ability to move the lens so that you can choose any point to be in focus and progressively blur the rest of the image, not just according to distance to the camera, but also distance to the lens (given that it may be angled away). This allows for some quite creative effects that significantly reduce energy from detail or texture, but emphasize lighting, color, and shape energy, as seen in Figure 30. In addition, because the effect is visually unexpected it adds energy. The lens can also be used to increase what’s in focus by matching the lens angle to the subject angle.
Fish-Eye Lenses
A fish-eye is another type of specialty lens. Lenses that are quite wide, 15 mm or wider for 35-mm cameras and even shorter for some of the smaller formats, are often (but not always) fish-eye lenses. Fish-eye lenses deliberately produce a convex effect and are not rectilinear. There are some ultra-wide lenses, such as the Canon 14-mm lens, that are ultra wide and rectilinear, which limits the amount of distortion they create. Such lenses tend to be more difficult to design and manufacture, which in turn makes them more expensive. Most of the more affordable ultra-wide lenses are fish-eyes.
Fish-eye lenses may be full frame, or they can create a circular image with the remainder of the rectangular image appearing black. Their distortion significantly increases the visual intensity of images due to the unexpected shapes and
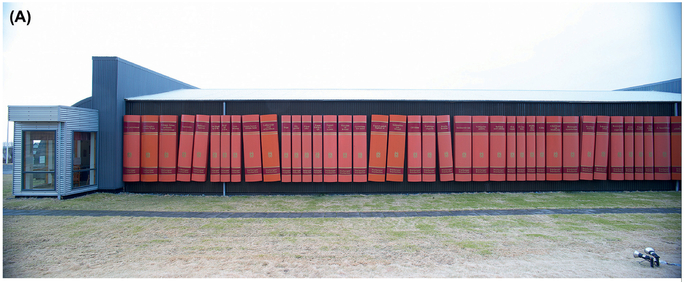
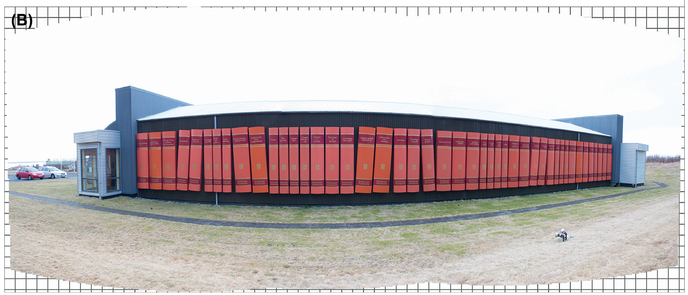
FIGURE 28 (A) Shifting the lens enabled us to capture this building as a panorama without distortion. (B) Same building photographed as a panorama without shift.

FIGURE 29 In this image we used the tilt function to help straighten the side of the building (A). Without the tilt (B) you can see the distortion caused by angling the camera.
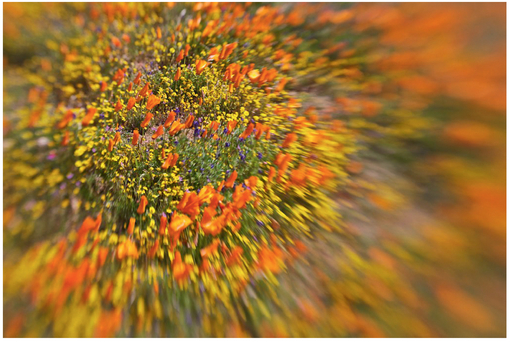
FIGURE 30 A Lensbaby enables you to adjust the focus point such that other parts of the image have an exaggerated blur.
angles, in addition to a 180-degree field of view (measured horizontally for a rectilinear fish-eye and vertically for a circular one). When held quite close to the subject, the subject will become distorted, as in Figure 31 showing the interior of a dilapidated house. Using a lens like this to take a portrait of a friend is not a very friendly thing to do! However, the same distortion can be beneficial as seen earlier in this chapter in Figure 22A, when we placed the camera and ultra wide angle lens down low near the rocks to make them more imposing.
Some of the impact in fish-eye images comes from the surprise element of the distortion and as such, if you see an entire portfolio of fish-eye shots, you may find that you lose interest. What’s happened is that the energy from the surprise component has decreased, and you are left searching for other components that make it worth continuing to look. If the images are well composed or funny or varied in other ways, the visual intensity will remain pleasing, but if they are too similar conceptually, the visual intensity will dip too low to hold the viewer’s interest. Of course, the same is true of any specialty technique or tool.
Multiple Exposures
A fun technique for creating an abstract, artsy image in a variety of situations is to create a multiple exposure, as seen in Figure 32. A few cameras have this feature built-in, so you
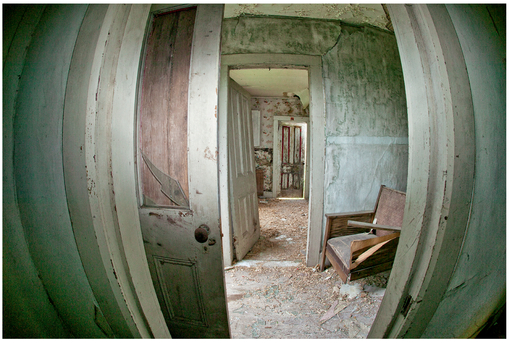
FIGURE 31 Wide-angle distortion adds visual energy as familiar objects take on unfamiliar shapes.
can set the number of exposures to take, often up to nine, and then the camera will determine the exposure if you’re using a programmed mode with aperture or shutter priority. You simply hold the camera and take a series of shots, moving the camera slightly between shots. It only takes a tiny movement to work. Most people suggest moving the camera in the direction that the subject grows and/or moves, but you can experiment to see what works in a particular situation. You can even rotate the camera in a slight circular motion and zoom the lens slightly between exposures, or move back and forth. There is no right or wrong technique. Some people do this handholding the camera, while others prefer to have the camera on a tripod with a somewhat loose setting so they can easily move it. The results are impressionistic, simultaneously having more texture but less recognizable detail. Colors and edges often become softer. Overall the visual intensity is often decreased. Many times it helps if the subject matter is still identifiable. This approach is somewhat similar to a single long exposure where you move the camera, but this technique creates more detail and edge contrast.
Infrared Filter
Infrared (IR) cameras have become quite popular in recent years, partly because it’s possible to convert a digital camera you’re no longer using to IR by using a company such as Life
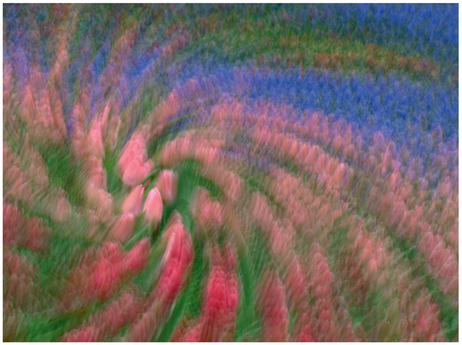
FIGURE 32 Multiple exposures simultaneously create slightly more texture but less detail to create an unusual rendition of familiar objects.


FIGURE 33 Infrared images, both traditional (A) and false color (B), often have significant visual intensity from the high levels of luminosity contrast as well as unexpected tonalities such as light to white leaves.
Pixel (www.lifepixel.com) or Max Max (www.maxmax.com). It’s also possible to use a filter with some cameras to allow the camera to capture the IR portion of light. Digital IR is far easier than film IR because with film you needed to use a filter that blocked all visible light. That made it impossible to compose or focus when the filter was on. With a converted digital camera, you compose as you normally would. The focusing distance may be slightly different, but many companies that convert digital cameras also modify the focusing so that you focus as you normally would.
Infrared images can be monochromatic or color. When monochromatic, blue skies often become nearly black, and green grass or leaves become nearly white. Color IR is considered false color because much of it is distorted, but by swapping the red and blue channels you can create a blue sky. That way you have an image with something that appears the way you expect, though other components, such as leaves, clearly do not. Often, there is a tremendous amount of luminosity contrast in IR images. The unexpected intensity of skies, leaves, and grasses adds to the visual energy of the images. The result is that IR images have tremendous impact and people tend to look at them longer.
We’ve covered a lot of ways to approach a situation and tools that you can use to create an image. All of them are designed to help you go beyond a quick snapshot and create an image that’s more than a mere documentation of the objects or people in front of you. The goal is to create an image that clearly expresses what caught your attention and hopefully the feeling it evoked in you. By no means is this an exhaustive list of all the possibilities! It’s up to you to look and truly see what’s possible. Take the time to… SEE IT!!!!
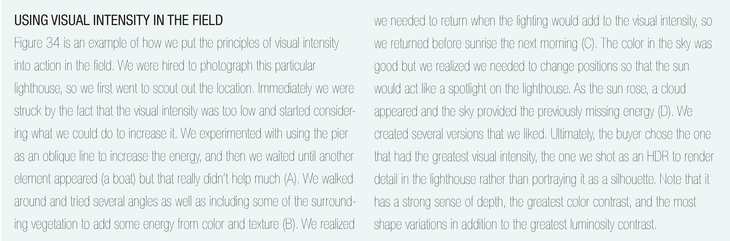


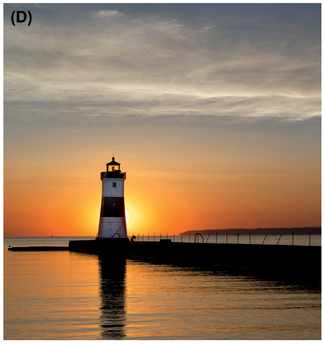
FIGURE 34 We employed the basics of visual intensity to create a dramatic image of a subject that initially had little impact.
