ELEVEN
Going Beyond with Creative Digital Techniques

Today's digital darkroom enables us to go far beyond making basic exposure adjustments to our images. There are all sorts of techniques that we can use to make each image more expressive of our individual vision. Many of these tools maintain the realistic look of the image, whereas others are more creative and venture into an area that combines photography and digital art. Keeping the principles of visual intensity in mind when applying these techniques helps create "WOW!" images, rather than images that just look over-processed.


FIGURE 1 (A) Some scenes that are beautiful to our eyes have too much contrast to be captured in a single shot by a camera. (B) When you view the histogram, you’ll see that it appears to be cut off at both ends. That means you’re missing details in both highlights and shadows.
In the last chapter we covered applying the principles of visual intensity to guide your game plan for optimizing each image and making basic adjustments. Now we’re going to look at techniques that go beyond the basics to add impact to your images. You should consider these techniques jumping-off points rather than rigid rules. In many cases, you can achieve similar results using other software programs. We strongly recommend that you download trial versions of the various programs that we mention and take them for a test run before you buy them. Then take our ideas and grow with them, individualize them, and make them work to express your vision!
Extending Dynamic Range
One of the issues that we face when translating what we see into a photograph is that our eyes see far more luminance values than even the best camera can. Nearly every novice has had the experience of thinking that a brightly lit scene looks quite impressive, reaching for a camera and taking a shot, expecting it to reflect the drama of the lighting, only to discover that the camera rendered the shadows as deep dark blacks and the highlights as blown-out whites. All too often, a situation that looks dramatic and spectacular to our eyes can look either too contrasty or too flat as a photograph. As discussed in Chapters Two and Six, a scene can have a huge dynamic range, but your camera can only capture about ten stops. It’s fairly well known that subtle details in shadows and highlights may be lost because of this, but what’s less frequently considered is that subtle mid-tone differences may be less apparent as well. Restoring details to the highlights and shadows, and/or enhancing the visibility of details and texture in the middle of the tonal range can increase the energy of an image by converting an area that’s just one shade, or black or white, into one with more tonal gradations. This gives your eye more to look at and emotionally react to, which adds to the visual intensity.
Consider a scene like the one in Figure 1. Your eyes see potential for a good image; in fact, you may be quite taken with the beauty of the moment, but your camera captures something quite different. The image has large areas that are too light and others that are too dark. Although the overall level of energy in the image is moderate, it’s unpleasant. When you ask what components are contributing to that energy, you quickly see that most of it comes from luminosity contrast and not enough from detail, texture, and/or color. We need to decrease the luminosity contrast by extending the dynamic range in the image and then consider increasing the energy from other components such as color and/or detail to make sure the intensity doesn’t become too low. Creating a high dynamic range (HDR) image will decrease the extreme luminosity contrast and increase the detail, texture, and color information.
To extend the dynamic range of an image, you can either combine data from several images captured at different exposures or you can work with a single image in a variety of ways.
Combining Multiple Images
If you check your histogram while shooting and see that there are spikes at one or both ends and that the graph appears to be cut off, in many circumstances you can take a series of images at different exposures that you will combine later on with your computer. (A few cameras, including the iPhone, are capable of combining the shots immediately in-camera.) Ideally, you’ll take one shot that is exposed so that you capture all the highlight detail, even though the rest of the image may be far too dark (meaning that there’s no spike on the right side of the histogram), one exposed so that you capture all the shadow detail, even though the rest of the image may be far too bright (there’s no spike on the left side of the histogram), and one or more in between. Use your meter or histogram to determine the dynamic range of the scene, and then take images that are about a stop apart. It’s best to vary the shutter speed rather than the aperture so that the depth of field remains the same and the images can be easily combined. It’s also a good idea to keep the white balance the same by using a specific white balance setting rather than “auto,” and switch to manual focus so that you maintain the same focus point.
There are numerous programs capable of creating HDR images. Adobe Photoshop even has a built-in tool, Merge to HDR Pro, that will quickly turn a group of images into an HDR image. Another option is to stack the images as layers in Photoshop or Elements and then combine them manually using layer masks. This can be a painstaking process, but in some cases offers the most control. We sometimes use that approach when creating semi-transparent flower images photographed on a light box. Our current favorite programs are Nik Software’s HDR Efex Pro and HDR Soft’s Photomatix Pro. We find that Photomatix is sometimes faster and easier, but that we have far more control over the results when using HDR Efex Pro since it lets you drop control points, which automatically mask parts of the image and let you choose which algorithm to use to combine the images.
No matter which program you prefer, the overall process is quite similar. Information is taken from each of the exposures as shown in Figure 2 and combined into a single image with increased visibility of details in the highlights and shadows, as you can see in Figure 3. Thus, the foundation of visual intensity is based less on an over-abundance of luminosity contrast and more on increased detail, texture, and color information.
All HDR processes run the risk of adding too much information and altering the expected balance of luminosity contrast so that there is too much energy in the final result. Depending on the settings you pick, you can create very different looks when creating an HDR image. While some people prefer a natural looking result and others a more stylized grunge effect, you must be vigilant to not create chaos! When you increase the tonal gradations in an area of the image, you increase the energy associated with that area. So if you apply strong HDR settings to both your subject and the background, you may unintentionally cause the background to fight with the subject for attention or even to overshadow it.


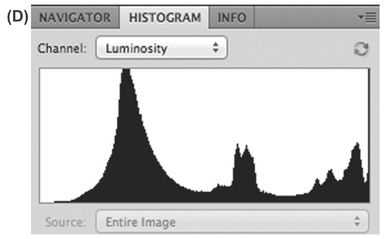
FIGURE 2 In addition to the shot in Figure 1, we also took two other exposures, (A) and (C), to capture highlight and shadow detail. Their respective histograms show that one (B) captures all the highlight information, and one (D) all the shadow information. We’ll combine all three images to create a single image with more detail through the entire tonal range.
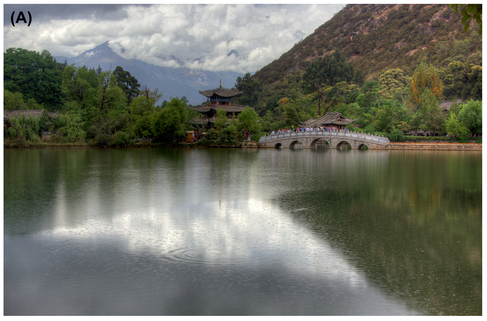

FIGURE 3 (A) This version of the image looks like what we saw with our eyes. (B) Note how the data have been redistributed throughout the histogram so that it tapers off toward both ends. Its visual intensity is higher than any of the components due to the increase in detail and color information even though the luminosity contrast has been reduced.

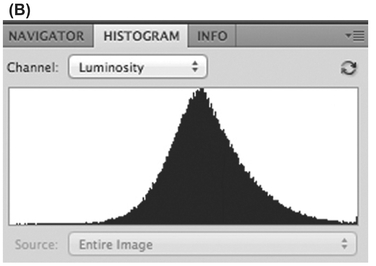
FIGURE 4 By over-processing the HDR image (A), we no longer use enough of the tonal range to provide good luminosity contrast (B). What should be background elements (the clouds) now have far too much energy, and they compete for attention. The image is chaotic.
The other major issue with many HDR processed images is that the shadows no longer look like shadows, and highlights may not look like highlights. As discussed in Chapter Two, we are accustomed to seeing certain amounts of luminosity contrast. Just as the initial single image from the camera in Figure 1 doesn’t reflect what we saw with our eyes, many HDR images go too far and create images with far less contrast range or tonal variation than we expect to see, and so they look unnatural and over-processed.
We have deliberately gone way too far with the HDR processing in the version in Figure 4 to emphasize the potential risks. We have revealed more details (and halos and saturation) but decreased the luminosity contrast too much. Note that the image now uses too little of the tonal range—there are very few pixels in the darker third of the tonal range or in the lightest quarter. That means that we’ve lost a great deal of mid-tone contrast. Although the luminosity contrast is too low, the detail/texture contrast is too high. In addition the clouds are far too intense and draw your attention away from the subject. The overall energy of the image is too high and it also looks unnatural because the areas we expect to see as shadows are mid-tones, we can’t see enough difference within the mid-tones, and the bulk of the image looks flat. Too much of a good thing is often not a good thing at all! Use HDR wisely so that it’s not overdone.
Single Image Processing
There are a variety of techniques available that help bring out the details and that may alter the luminosity contrast in a single image. One approach is to convert a single RAW file multiple times using different exposure settings and then combine those versions using software as described previously for multiple images. Alternatively, many HDR programs, including
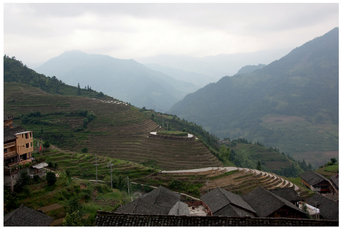


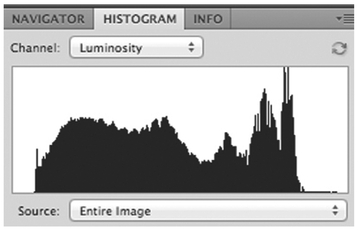
FIGURE 5 It’s possible to use HDR programs with a single image to increase the visibility of details in the highlights and shadows. Doing so will often increase the visual intensity of the image.
Photoshop (Image > Adjustments > HDR Toning), as well as Nik’s HDR Efex Pro and Photomatix Pro will process a single image. Just as for combining multiple images, the trick is to keep an eye on the overall energy level of the image as you use the software so that the final energy level doesn’t accidentally creep up too far and/or you don’t lose your shadows totally. You want to create impact, but not so much that your audience feels like they’ve been hit over the head with a baseball bat.
Look at the original image in Figure 5. It’s fairly bland and lacks energy. Further, there’s very little detail in the sky. The foreground details, the textures and the various shapes all contribute some energy to the image, but it needs more. In order to improve its visual intensity, we need to brighten some of the darker details so that they stand out and reveal more detail in the sky. We used HDR Efex Pro to increase the saturation and the perceivable details, particularly in the mid-tones, as well as slightly in the highlights and shadows, thus increasing the overall visual intensity of the image. Single image toning often works well when there is a fair amount of data near the ends of the histogram but most, if not all, of the information has been captured in the single shot.
Increasing or Decreasing Details
Adobe Camera Raw (ACR), Nik Software, Topaz Labs, and various others offer filters that claim to increase (or decrease) the perceived details within an image. These differ in the extent to which they modify the original luminosity contrast of the image while enhancing the details. The results can be similar to single-image toning from an HDR program, but on the whole these tools tend to retain the sense of shadows and highlights more readily than single image toning. Most increase the localized contrast to give the impression of increased detail and are applied more selectively by the software than single-image toning, which is applied equally to the entire image. The more detail, the more energy the image will have. These filters can often yield impressive results, but regardless of which program you use you do have to be careful not to create artifacts.
Similarly, if the initial energy level of an image is too high, one way to decrease it is to use these tools to decrease the amount of detail so that other elements, such as color, lines, and shapes, become the prominent aspects of the image. We’ll take a closer look at some of these tools because we find that these are often key adjustments in taking your images up a notch.
Nik Color Efex Pro Tonal Contrast
One of our favorite approaches to expanding the visible detail in an image is to adjust the tonal contrast separately for the highlights, mid-tones, and shadows. This could be done using a series of intricate curves, but we find it far easier and faster to use Nik Software’s Color Efex Pro 4 (CEP) Tonal Contrast filter. By adjusting the sliders, you quickly determine how much tonal contrast to reveal in each segment of the tonal range. That way you can directly control how the highlights, mid-tones, and shadow areas are affected. In addition, you can choose among several different types of contrast (standard, high pass, fine, balanced, and strong) for slightly different results. We find this often makes a huge difference in the impact of the image, even when using subtle settings. It usually gives the impression of increasing the amount of detail, which thereby increases the visual intensity, while maintaining a believable, natural image. (Note that in our opinion the default settings are almost always too strong.) Of course you wouldn’t want to use this filter on someone’s skin in a portrait, but applied selectively to their hair or eyes it may be impressive. As always, the key is to be very aware of how much energy you’re adding to the image.
Clarity Slider
The Clarity slider in Adobe Camera Raw and Lightroom, and the Definition slider in Apple Aperture increase mid-tone contrast, meaning that light tones get lighter and dark tones get darker but the effect is modulated so that pixels don’t become pure white or pure black without detail. You can see this by watching the histogram change as you pull these sliders from one extreme to the other. The distribution of pixels will change so that pixels are slightly shifted away from the mid-tones toward the extremes, but not so that any clipping is created. Visually these tools often add a sense of slightly


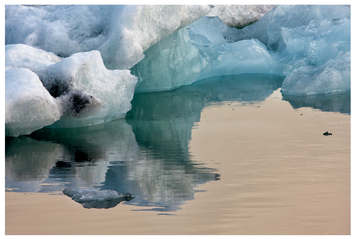
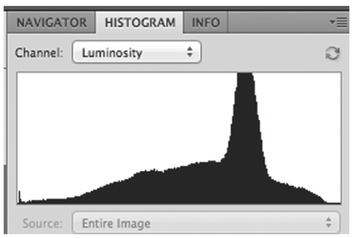
FIGURE 6 Using the Tonal Contrast filter, we selectively increased the visibility of details within the highlights, mid-tones, and shadows. Doing so increased the visual intensity of the image by increasing the amount of detail and texture perceived.


FIGURE 7 (A) Initial image. (B) By using the Clarity adjustment in ACR, we revealed more mid-tone contrast energy and mid-tone details. It’s often a subtle effect, which can make a huge difference.
increased sharpness and/or detail, as well as slightly increasing saturation. Used to an extreme, these sliders may create artifacts, but used gently they can seem almost magical as they gently increase mid-tone contrast. By creating the impression of more detail, they increase the energy in an image. When done carefully, these tools can add just enough energy to make an image pop.
Let’s consider the image in Figure 7. It’s a good image, and the overall energy level is moderate. But it feels just a little bit bland. Looking at it leaves you with the sense that there’s nothing obviously wrong with the image, but it probably won’t hold your attention for too long (unless you were looking at it trying to figure out what’s wrong!). That’s often the sense you’ll have when the mid-tone contrast of an image needs to be increased. The image will seem “nice,” but you want to quickly move on. In fact, it needs more mid-tone contrast to emphasize some of the mid-tone details.
At times you may want to emphasize details or mid-tone contrast just in your subject, to help draw attention to it. To apply Clarity locally in ACR or Lightroom, use an Adjustment Brush and set the strength as desired. Note that you can set a negative value for the slider and this will reduce the detail. If you brush in negative clarity in the background areas, by comparison, the areas you don’t brush over (the subject) will appear even more detailed. If you’re concerned about adding too much energy, subtly reducing the amount of detail in the background may work well to help draw attention to the subject without making the image too busy.
In Aperture you can achieve similar results by brushing in the Definition adjustment wherever you want to increase detail. To decrease detail in areas, click the Brushes icon, choose Blur, and brush over the areas you wish to blur.

Nik Color Efex Pro Detail Extractor
Sometimes you’ll want to make more dramatic changes, with more controls, than are possible with the Clarity and/or Definition sliders. CEP’s Detail Extractor filter is one of our favorite ways to increase the visibility of details. As the name implies, it emphasizes details throughout the image, and it does this by striving to balance the tonality of each area. If you have an image with uniform tonality, applying the Detail Extractor won’t change the overall luminosity contrast of the image significantly. However, if you have an image in which there are some areas with considerable tonal variation, applying the filter will rebalance all of the tonal levels within that area, which will then affect the overall luminosity contrast. As the luminosity contrast is changed, its contribution to the overall visual intensity may decrease while the energy coming from details may increase. It becomes important to be aware of which parts of your image now have more visual intensity and which parts have less.
As shown in Figure 8, when using the Detail Extractor, set the Effect Radius controls to Fine to bring out as many details as possible, Normal for a moderate amount of detail, and Large to emphasize just the larger details. The best setting depends on the particular image. The Detail Extractor (DE) slider is the main control, or the “throttle” determining how much detail is emphasized (and how much luminosity contrast is adjusted). By adjusting the Contrast slider, you can increase or decrease the overall luminosity contrast, which can mitigate some of the loss of luminosity contrast introduced with the DE slider. It’s convenient that Nik includes a Saturation slider in the interface, since you can use it to boost (or lower) the amount of energy coming from color saturation within the image to maintain a pleasing overall level of visual intensity. We also find it quite helpful that you can use the Control Points to apply the Detail Extractor just to localized areas or to temper its effects elsewhere. In this way you can ensure that you’re creating the desired level of intensity for your subject and background so that they readily separate from one another.
Topaz Detail 2
Topaz Labs’ Detail 2 is a plug-in devoted to detail enhancement or suppression. As you can see in Figure 9, there are numerous presets for emphasizing or smoothing out details that serve as good starting places. On the right side of the interface there are six sliders to control the strength of the detail adjustments. The Small, Medium, and Large Detail sliders allow you to determine which areas are considered small, medium, or large details. A quick pull of the sliders to the extremes lets you see what this means for your particular image. The associated Boost slider then accentuates (or suppresses) these details. Often a very light hand is helpful with the Boost sliders. Be particularly careful with the Small Boost slider because it can aggravate any noise issues present when pulled to the right—of course moving it to the left can reduce some noise, but it may remove details as well. Topaz Detail 2 contains additional sliders to let you modify the overall brightness and white balance, as well as to protect highlights and/or shadows and modify saturation and de-blurring. Thus, you can control the overall luminosity contrast as well as color contrast while increasing or decreasing the apparent details in the image.
Although the adjustments in Topaz Detail 2 are applied to the entire image, as you can see in Figure 9 it’s possible to increase details selectively—as with the raccoon’s fur—by adjusting the detail size sliders. Alternatively, you can use this adjustment on a new layer and then use a layer mask to reveal the adjustment only in certain areas.

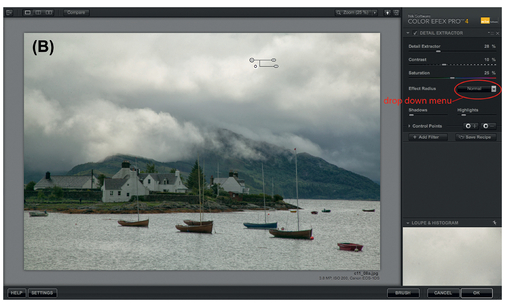
FIGURE 8 (A) Initially the image was of low visual intensity, lacking enough detail, color saturation, and/or luminosity contrast. (B) We used the Detail Extractor to bring out the details throughout the image as well as to add some contrast and color saturation. Now the image has more energy and is more interesting to view.

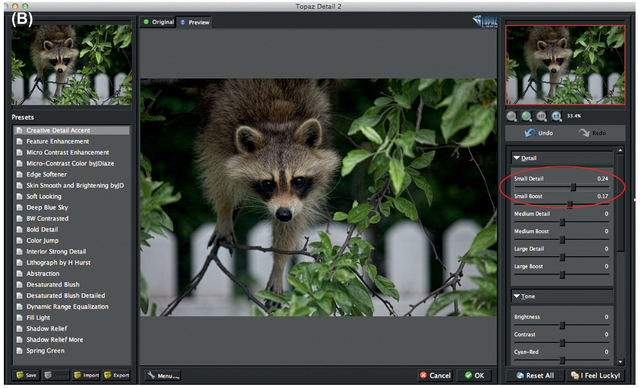
FIGURE 9 (A) Initial image. (B) By adjusting the Small Detail slider in Topaz Detail 2 we were able to emphasize the details in the raccoon’s fur without adding distracting details to the background. This adds visual intensity to the subject and helps it to stand out from the background.
We suggest that you experiment with the various ways to add detail and decide which you prefer. When increasing detail in your images, be careful not to let the overall visual intensity of the image creep up too high. In addition, be certain that you don’t energize the background with so much detail that it competes with the subject for attention.
Adding Texture
Sometimes you’re faced with an image that’s nice but which has relatively large areas that lack significant texture or detail. Increasing the detail in the subject alone may not be enough. One option is to add a texture, particularly to the background. Although this will obviously increase the energy level coming from texture in the background, surprisingly it may decrease the contrast between the amount of texture in the subject and the amount in the background. Sometimes this helps make your subject feel more integrated into the background, rather than an isolated object, while maintaining a pleasing overall level of visual intensity. In addition, it tends to give the image a painterly feel.
Adding a texture is not a new technique. The Victorians also purchased glass plate textures that they used in their darkrooms. Masters of film photography such as Freeman Patterson often stacked two slides—one a photograph of the subject, the other of a specifically chosen texture—to create a final image that was often mystical and far beyond the ordinary. Since the two slides were sandwiched together, in essence doubling their density, each slide needed to be over-exposed. The trick was to determine how much to over-expose each image, which made for a lot of trial and error to prevent the texture from overpowering the subject, while still remaining visible. And of course you had to carefully consider the color of the “texture” slide, as it would greatly impact the visual intensity of the final result as well. These hurdles limited the popularity of the technique.
Creating a texture composite is much easier in the digital darkroom since you can modify the exposure of the individual images after the fact and precisely control the way in which they are blended together. You can balance the intensity of the texture effect with the energy of the subject and opt to apply it just to the background areas if you wish. Keep in mind that adding a texture changes not only the energy from texture contrast but the relationship between the subject and the background. It may also alter color characteristics, thereby changing the energy coming from color, and it can alter the luminosity contrast by filling in very light areas with texture, but darkening dark areas still further. Knowing this means that, as you apply a texture, you need to reassess these sources of energy and make modifications (such as applying a layer mask) to retain an overall level of visual intensity that you find pleasing.
With some images you may wish to experiment with additional textures and/or filter effects such as glows and lighting. At this point you are an artist painting with pixels and the final appearance of your image depends on your vision. The key is to reassess the image and be certain that you’re heading in the right direction. Compare the original image and the processed version. Do you prefer the original? If so, try to figure out where you went wrong. For instance: have you added too much texture? Is it in the wrong place? Does the color cast fight with the image?
When experimenting with textures, it can be very easy to get so involved with the process that you lose sight of the image. We suggest that you take a break and physically walk away from the computer after you’ve been working for a while, but leave the image up on full screen. Then when you return, immediately rate the overall energy of the image. Is it good or does it need to be adjusted?
Done carefully, adding textures is a way to modify the energy within an image while maintaining the focus on your subject matter. You can create your own textures (as we describe in the sidebar on page 318) or search the Internet for both free textures and others that are for sale. Some sources that we currently like are www.shadowhousecreations.blogspot.com and www.flypapertextures.blogspot.com.


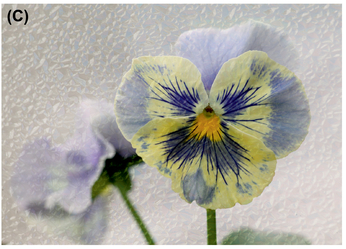
FIGURE 10 (A) Initial image. (B) Texture. Adding a texture to the background increased the overall energy of the image but simultaneously helped integrate the pansy with the background. (C) Adding a texture often creates more of a story and that adds visual interest to the image. We think the version with the added texture is a lot stronger.
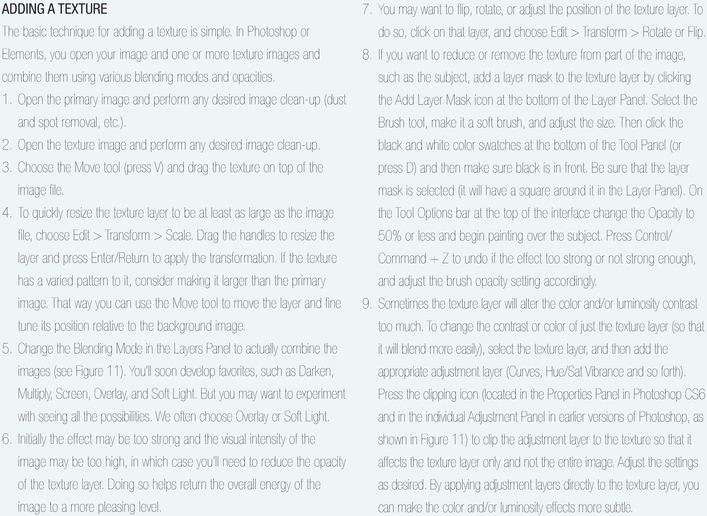

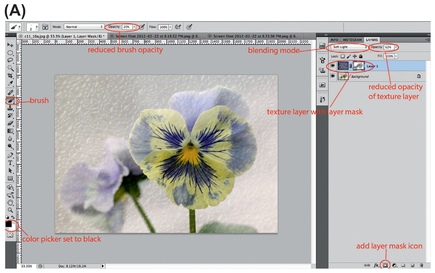

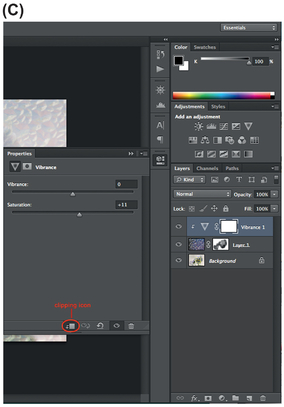
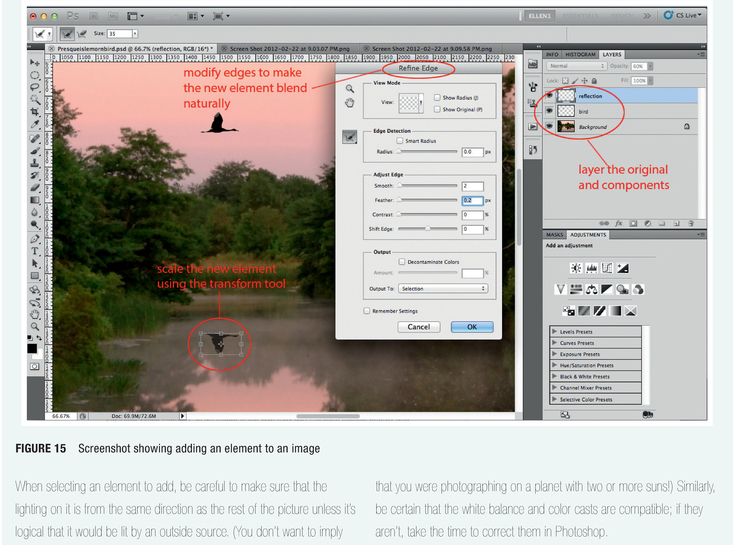
FIGURE 11 Screenshots for Adding Textures in Photoshop.
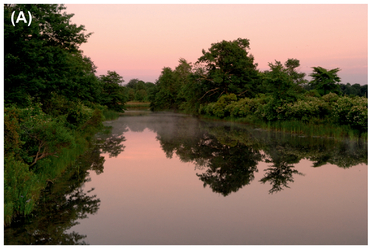
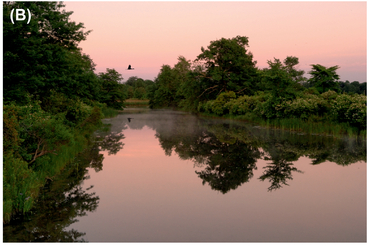
FIGURE 12 (A) Without the bird, the image is boring and lacks a story. (B) With the bird, we have a story and a comfortable level of visual intensity.
Combining Elements
Before we even start this section we are going to acknowledge up front that some people are not comfortable with adding elements to images, and that’s perfectly fine. You might still want to read through the section so that if you’re in the field creating a similar image you know what circumstances you’re hoping will occur naturally or can take steps to make it happen. Obviously with forensic, natural history, or photojournalism images you won’t be adding elements in the digital darkroom. But in the field you could position yourself and time the image to take advantage of existing elements.
Sometimes you capture an “almost” image. You look at it and there are lots of aspects of it that you like, but something seems to be missing. It’s a little boring. The overall visual intensity feels just a little bit too low, but when you look at the basics—the luminosity contrast, texture, detail, and color contrast—they all seem to be fine. What may be missing is a place for your eyes to land—that is, a clear subject to complete the visual story. We’ve noticed this particularly with landscape images where the background is lovely but there’s not an obvious subject. In such cases, it’s the energy from a clear visual story that’s missing, or if it’s not completely missing it needs to be increased.
For example, consider the image in Figure 12. The photographer, Jack Anon, was captivated by the beautiful soft early morning light reflecting in the stream and the lovely framing provided by the vegetation along the sides of the water. The trees and water form great leading lines and somewhat triangular shapes and lead us into a point in the image. But when we get there, there’s nothing. Visually we’re let down. Something’s missing. The design of the picture led us to expect something there but didn’t follow through.
When we added a bird to the image—small and silhouetted—in keeping with what you might have seen naturally if you were there — the image becomes far stronger. That small silhouette increases the visual intensity of the image by adding a subject to give us a visual story. Tons of birds everywhere might have been too much, but a single flying bird and its reflection maintain the calm, serene mood while preventing the image from being boring. It adds the story to the sunrise.
At times an image will have subject matter and background, but the background (or the subject) needs something to help with the story that the image is telling. It might be what seems like a minor detail, such as a moon or clouds in the sky, but it adds to the completeness of the story, and as such it increases the visual intensity just enough by giving us a little more information. Consider the image in Figure 13. Although we have enough energy (luminosity, detail, color, form, and story) in the foreground, the image with a detail-less sky is just a little low in visual intensity. We don’t need to add a blue sky and cumulus clouds or a vivid sunset — that would be inconsistent with the lighting in the image. Rather we can just add a different gray sky that has some interest to it, with more luminosity contrast and shapes. The sky remains a background element but enhances the overall energy of the image.
Similarly, the moon adds to the impact of the image in Figure 14. However, this couldn’t exist in reality, so it’s important to make it clear that this is not a photojournalistic shot. We sometimes slightly exaggerate the size of the moon in such cases to add to the surrealistic feel. You can opt to add a moon as realistically as possible or you can exaggerate it for effect. But when you add a component, be honest about it!
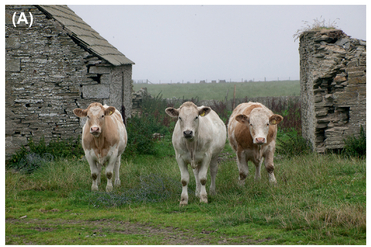
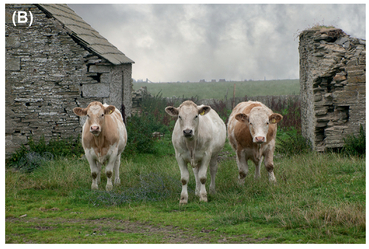
FIGURE 13 Without the clouds the image is okay (A), but with the clouds (B) the story is more complete and the image is more dramatic. The clouds provide a small but vital increase in the visual intensity.

FIGURE 14 We added the moon because the leading lines of the bridge carried our eye across the image, but there was nothing there. It seemed to ask for a moon, so we added one, knowing that for some people this crosses the line. For us, it’s an artistic rendition, not a documentar y shot.
Clearly, every image doesn’t need a bird, a moon, or puffy white clouds added. But when the initial visual intensity of an image is too low, such elements can increase subject energy and make all the difference. We suggest maintaining a file of elements that you might want to add to other images. Shoot full moons and crescent moons, all sorts of clouds, and anything you can think of that you might add to the type of images that you take.

Relighting an Image
As we covered in Chapter Six, lighting is critical to the success of an image. It may make or break it as well as influence the story and the mood. Obviously, it’s important to do your best to use and capture perfect lighting while taking the image in-camera. But sometimes you realize after the fact that the lighting is not quite what it needs to be. Perhaps the lighting on the subject is just subtly darker than elsewhere in the image or perhaps the lighting was flat and the subject just doesn’t stand out enough from the background. When you look at the image, you see the subject, but your eye wanders elsewhere to background elements.
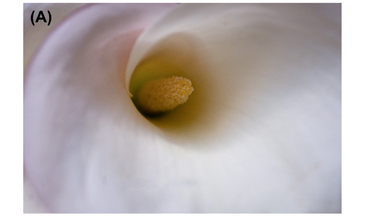
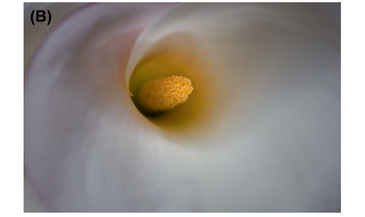
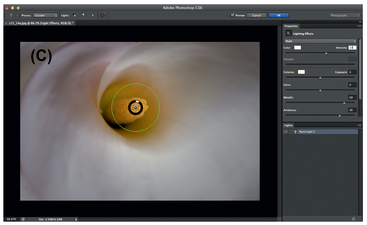
FIGURE 16 (A) Initial image. (B and C) A point light adds the necessary energy for the image to go from blah to pleasing and directs our attention to the center of the flower.
One way to adjust the energy associated with the subject is to make it slightly brighter than the background.
There are some basic tools that we covered in Chapter Ten, such as dodging and burning or making targeted exposure adjustments using a layer mask, that can help adjust the lighting. But one of the most impressive tools we’ve found is the Lighting Effects filter found in both Photoshop and Photoshop Elements 10. The difference between adding lighting effects and the other more basic tools is that the appearance of the light falloff is often far more natural than you can easily achieve with the other tools. In Photoshop, you access this filter from Filters > Render > Lighting Effects. Adobe extensively revised this tool in CS6, and for us, it’s a major reason to consider upgrading.
You have the choice to add various types of lights to the image, much as you might use in a studio (with the exception of backlighting). For example, the flower image in Figure 16(A) lacks visual intensity because the part of it that holds the most promise to be interesting, where there’s some color and texture, happens also to be in shadow. By adding a point light to the flower, we change the balance of the lighting, which helps keep the viewer’s eye on the interesting part of the image and increases the associated energy by making it brighter.
When using the Lighting Effects filter, we find point lights to be easier and more intuitive to use initially, but you may find spotlights quite helpful for more dramatic effects, as shown in Figure 17. (The different styles of lights have different falloffs and spreads.) Every time you click on one of the three lighting icons near the top of the interface, you add a light. You can then reposition each light by clicking and dragging it. There are on-screen controls to resize, reposition, rotate, and modify the intensity of each light. That way you control the angle and intensity of the light, where it originates, and the ending point. There are additional sliders on the right side of the interface that allow you to adjust other parameters, including the color of the light. That way you can tint the light to emulate sunlight, or any other type of light. We often choose a subtle yellow to add a warm tone, but you can use whatever color would be consistent with the existing lighting in the image.
The Lighting Effects filter is a powerful tool that can be used to add subtle or dramatic lighting modifications, adjusting the overall visual intensity of the image by altering the relative brightness of an area as well as the mood of the image. In addition, they can help focus the viewer’s eye on the subject as in Figure 16 and Figure 17. Keep in mind that since you can’t recreate depth with a flat photo, you have to be careful to make sure that things appear to be lit naturally with this filter. Use layer masks to help create additional natural falloff and give the illusion of depth.
Blurs and Reducing Details
There are two general approaches to using blur tools; these will affect the overall visual intensity of the image in very different ways. A blur can be used to reduce the texture and detail throughout the image, to create the more painterly effect mentioned in Chapter Ten, or to reduce the energy associated with a specific element such as the background.
Adding a blur to the background is a powerful option for drawing attention to the subject. Doing so reduces the energy in the background due to the decreased texture, detail, and contrast. By comparison the
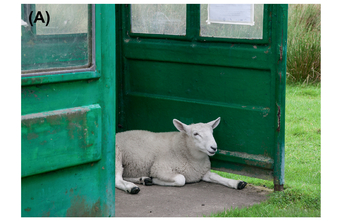

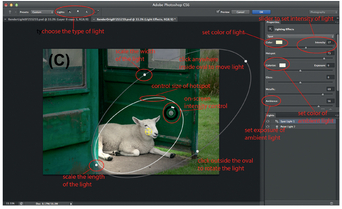
FIGURE 17 (A) Initial image. (B and C) We used Lighting Effects to slightly darken the background while creating the illusion of light striking the lamb and part of the doorway. This adds visual intensity to the lamb while decreasing intensity slightly in the background drawing your eyes to the subject.


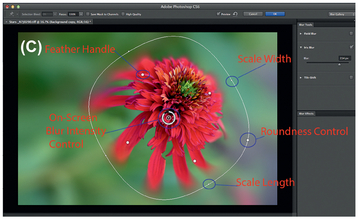
FIGURE 18 (A) Sometimes you need to stop down slightly to render an entire flower sharp, but doing so captures more definition in the background than you want. (B and C) An iris blur can blur the background as if you’d been shooting wide open and decrease the background distractions.
subject has more detail and/or texture, and therefore visual intensity, so our eyes naturally tend to land on the subject. This is the same principle that we use when we opt to use a large aperture in-camera to blur out the background.
Iris Blur Filter
Photoshop CS6’s Iris Blur (Filter > Iris Blur) is part of the Blur Gallery. Iris blur is a powerful tool for adding blurs to specific parts of an image while retaining the original sharpness in others, without needing to manually create a layer mask. (Unfortunately, the new blurs can’t operate on smart filter layers, so we suggest that you duplicate the background layer of your image before accessing this tool.) Once you open the tool, it’s quite intuitive to use. You set the overlay circle over the part of the image that you want to remain sharp and adjust the intensity of the blur that’s applied elsewhere, either on the on-screen circular overlay or via the intensity slider on the right, as shown in Figure 18C. You can position the sharp area anywhere it needs to be and you have the option to add pins that will maintain other sharp areas that are auto-masked. Click the square handle on the outer circle to make its shape more square or one of the small circular handles to resize or rotate it. Click one of the inner four dots to expand or contract it and place them over the area that needs to remain sharp. Add additional pins as needed to protect other areas. It’s quick and easy. By applying this filter on a separate layer you can adjust the opacity of the layer later, to reduce the effect if you were a little heavy handed, and you can add a layer mask to further tweak the visibility of the effect.
Applying an Iris blur, whether it’s subtle or more obvious, is another tool you can use to rebalance the energy toward the subject.
Paint-Simulating Software
While blur tools can be used over the entire image to create a painterly effect due to the decrease in detail, there are other tools that add a texture to simulate paint while also blurring details. Although the reduction in energy due to the blur might reduce the overall energy of the image, the visual intensity of the image may stay virtually the same or even increase due to the bristle/paint texture, depending on the settings you choose. In order to maintain some separation of subject and background, you may need to apply different settings to the blur for the subject and background.
There are far too many programs available for us to cover all the options for creating painterly effects. Instead we’ll show examples of Photoshop CS6’s Oil Paint filter and Topaz Simplify. No matter which program you use, keep thinking about both the overall intensity of the image and which components are contributing to the energy. Since you’re altering the detail energy, you may need to adjust color and/or luminosity energy accordingly to compensate.
Let’s first look at the image of farmhouse steps in Figure 19A. It’s a pleasant image that seems as if it could have been a painting, so we used the Oil Paint filter in Photoshop CS6 to create the final version. Note that, although we’ve reduced the details, we’ve also added texture and shape contrast; thus the overall visual intensity remains similar. Adjust the sliders to determine the amount of brush texture and how much detail is removed, as shown in the screen-shot in Figure 19D.
We used Topaz Simplify on a false-color infrared original of an old schoolhouse in Figure 20. Initially the image lacked impact and didn’t convey the feeling we had when we saw the old schoolhouse. Converting it to monochrome didn’t help. We swapped the blue and red channels in Photoshop by opening the channel mixer and changing the red output channel to have values of red = 0, green = 0, and blue =100, and modified the blue output channel to have values of red =100, green = 0, and blue = 0. That way the bluer color appears in the sky. We then experimented with Topaz Simplify and created a version that captures the feeling of the old schoolhouse and has more visual intensity than the original. As you can see, the details and colors are far different than the original photograph and the image is now closer to what we’d call photo-art. But we rather like it!
Adding Glows
The last option for reducing details that we will mention is to create a glow. Glows often add a dreamy mood to an image that affects the story it conveys. In the days of slide film, this was called the Orton technique, created by taking one shot that was tack sharp and over-exposed by one stop and another shot of the same thing defocused to be a blur, and also over-exposed. The two slides were then combined in a single mount and had a dreamy feel to them when projected. It was challenging to get both the exposures and the amount of blur correct.
Some digital cameras are able to create in-camera multiple exposures. This allows you to create results similar to the Orton technique in-camera with the advantage that you can preview the results and tweak your technique accordingly. You can also create similar effects from a single shot in the digital darkroom, and this has the advantage of being far more forgiving and controllable in terms of amount of blur and exposure. We often use Nik CEP’s Glamour Glow for this (See Figure 21 ), although you can create a similar effect manually in Photoshop. The effect that a glow has on the overall visual intensity of the image will vary depending on the settings and technique that you use. In general, a glow will increase luminosity contrast while decreasing the energy from texture and details. If initially the visual intensity is too high due to detail or texture contrast, the overall visual intensity may decrease slightly. In other cases the visual intensity may remain similar, although luminosity contrast will play a more dominant role as the texture and details become less important.


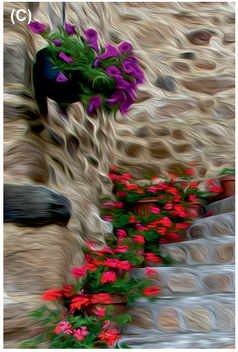
FIGURE 19 (A) Initial image. (B) The Oil Paint filter gives this image the illusion of having been painted. (C) A magnified section shows the brush texture and softer swirl shapes.
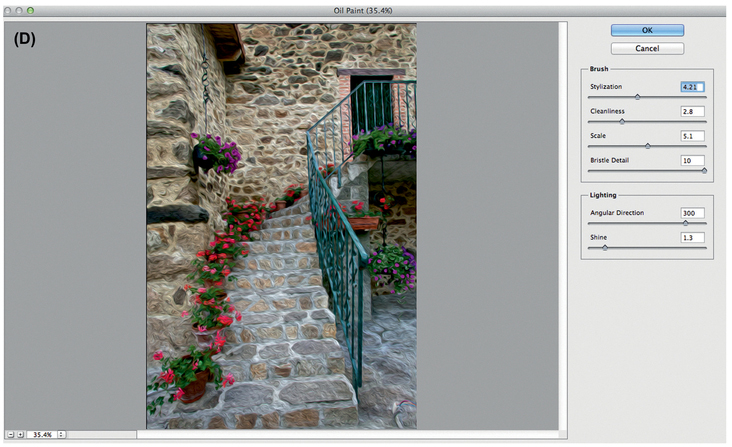
FIGURE 19 (D) We used strong settings to be able to show the brush strokes and oil painting effect clearly in this example. You may prefer more subtle settings.
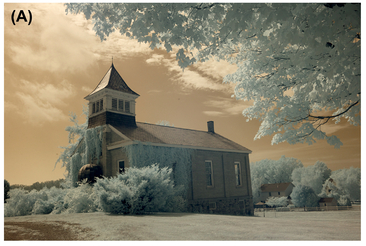

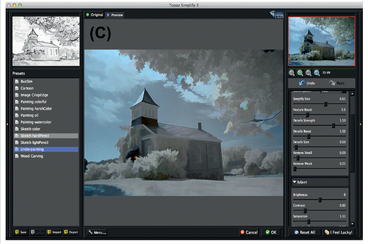
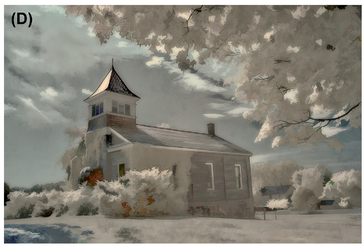
FIGURE 20 (A) Initial image. (B and C) We used Topaz Simplify to convert this infrared image of an old schoolhouse into (D) a painterly version with less detail but more shape contrast, luminosity contrast, and color contrast.
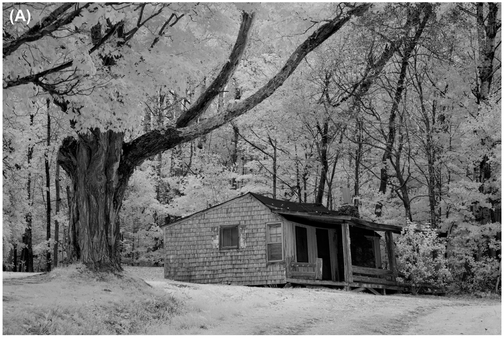
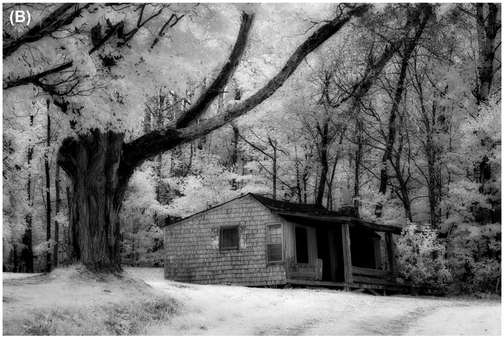
FIGURE 21 (A) Even though the luminosity contrast was too low in the original image, the overall visual intensity was too high because there were too many lines and details. (B) We used the Glamour Glow filter to reduce the texture and detail contrast, while simultaneously increasing the luminosity contrast. This adds a dreamy feel and the overall visual intensity becomes more pleasing.

No matter which approach you use, adding a blur reduces the detail but may increase saturation and contrast. You need to be vigilant that the overall amount of energy associated with the image remains pleasing.
In this chapter we’ve just touched the tip of the proverbial iceberg of digital darkroom tools altering the visual intensity of your image. New techniques and tools appear frequently letting you modify images in ways that were previously unfathomable. Experiment and see how you might incorporate them into your images. Don’t limit yourself to just the techniques we’ve discussed. Use anything and everything out there to create images that show just how you See It!
We hope that you will continue to use our approach of considering the amount of energy your image has and noting where your eye goes as the foundation for making adjustments to guide your viewers’ eyes to your subject and to create images with the WOW! factor. We think you’ll find that once you get accustomed to evaluating the location and amount of energy in the various parts of an image, and which components are creating that energy, efficiently optimizing your images will become far easier.
