
SEVEN
Visual Storytelling

Images have the power to make us laugh, to make us cry, and to make us stop and think. They can show us something new that we've never seen before or something old that we'd forgotten about. They do so by telling stories, in which characters, plot, and a point of view combine to express an idea. Visual stories are part of our existence, and cameras let anyone tell a story. Ultimately, the story we're trying to tell affects and determines the visual intensity of our image.
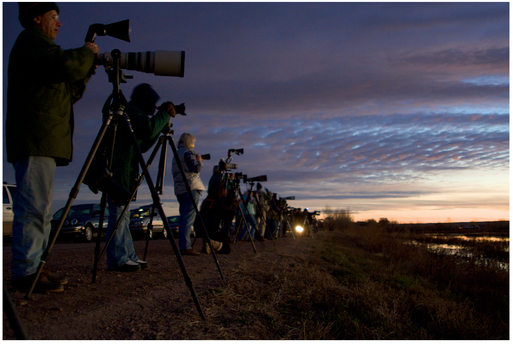
FIGURE 1 Sometimes the story isn’t the thing that everyone else thinks is the story!
One of the biggest reasons people are unhappy with their photos, even when they’re technically correct and have good visual intensity within the components, is because the image doesn’t capture our attention or imagination. This is because the subject and story of a photo are what dominates the visual intensity of the image. Visual storytelling is important to every image you take. Even with abstract images, as we discussed in Chapter Three, we will try to find the story.
Identifying the story of a photo and its visual intensity helps us figure out the appropriate visual intensity to aim for with the components of an image. If we have a subject and story with a lot of visual intensity (whether it’s because of past knowledge of the story or because of its uniqueness), then the other components of the image should have lower visual intensity. Similarly, if we have a less engaging story, perhaps a shoe on a sidewalk (this is a fairly common sight in cities), then the story contributes less visual intensity and we need to have higher visual intensity in the other components to create a pleasing image. Understanding how we will perceive the subject in an image is the first step in analyzing our visual storytelling skills.
Perceiving Subjects
As seen in earlier chapters, science and art are intertwined, and science can help us understand how we find and perceive subjects. Past experiences and our memory of them are key to our perception of a subject.
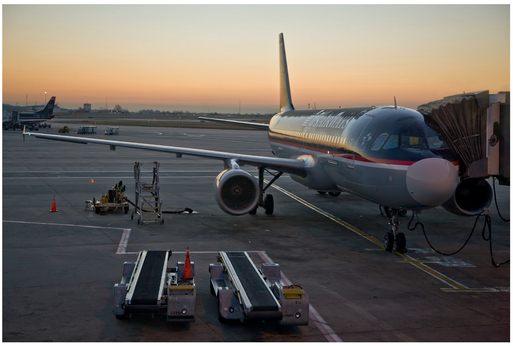
FIGURE 2 What memories does seeing this airplane trigger in your mind? Do planes make you think of business travel? Your last vacation where the airlines lost your luggage? Maybe a fear of heights?
It used to be that we thought our memory worked a bit like a computer’s—we record all of our experiences, and the more we recall something, the stronger that memory becomes. The memories we don’t recall, we might forget.
Our understanding of memory has since changed (and is constantly evolving). We now know that memory isn’t passive like this; instead it’s dynamic and, in some ways, more efficient. But memory can also be surprising. For instance, think about when a particular smell triggered all sorts of associated memories the last time you smelled it.
What’s especially interesting is that our visual memory is very fast. We can quickly recognize our parents or an actor, and we can tell if a painting is a Picasso or Da Vinci (assuming we know who those painters are). When people look at photographs, assuming they know what that subject is they will quickly recall their experiences associated with that subject, and that affects their perceived visual intensity of the image. If you show a photo of a dog to someone who was bitten when she was young, she’ll have a very different reaction to the photo than someone who works as a dog walker. How do you react to the airplane in Figure 2?
Obviously, then, learning is important to how we perceive photographs. One theory of learning is called concept (or category) learning. The idea here is that we mentally categorize what we experience. Learning involves judging how similar or dissimilar something is to what we’ve experienced and figuring out where to classify it.
There is currently debate about how we categorize concepts. One view says that we use more rule-based categorization. For example, we might know that one type of bird is a juvenile because its coloring is different than an adult’s, with the rule being that coloration determines age.
Another theory about how we categorize is that we come up with a “prototype,” or representative example of a category, and then have more precise definitions beyond the prototype. For example, using the previous example, we might have a “bird” prototype and then have specific “juvenile” and “adult” examples. This theory is interesting to photographers because the similarity between our subject and our prototype affects our perception of how common or uncommon the subject is and therefore how visually intense it is.
For example, draw a house. Chances are that you drew something like Figure 3. You’ve probably never seen or lived in a house like this, but we all recognize it as a prototypical house.
Do any particular feelings or emotions come to mind when you look at this very common, prototypical house? Chances are that nothing strong does. Now imagine the house you grew up in. What emotions come to mind? For most Americans, it’ll be a memory of a comfortable, reasonable-sized house. How do you feel when you look at the houses in Figure 4, from El Alto, Bolivia? If you grew up in the suburbs in America, you might

FIGURE 3 A drawing of a prototypical house.
be shocked at the small size and density of these houses. This subject will have a higher visual intensity for you because it’s so different from your prototype and your specific experience with houses. Yet if you grew up in a shantytown in an impoverished country, this image might remind you of home, and your emotions will be different. The image could also have less visual intensity because this sight is more common for you.
Prototypes are also interesting to photographers, and artists in general, because they’re similar to a concept called “archetypes.” Archetypes are universally common themes, patterns, or symbols that represent fundamental prototypes. Many stories, from plays to movies, have archetypal themes, such as death and rebirth (a central theme in some religions), journey underground, heavenly ascent, search for a parent, sacrifice, loss of innocence, journey home, apocalypse, and hero quest. Star Wars has great popularity because it covers many of these themes (hero quest, loss of innocence, etc.).
Those are not the only archetypal themes, however, and there are other kinds of archetypes, such as character archetypes. We often see characters who are damsels in distress, mentors, wise old persons, heroes, and so on. The movies Avatar and Dances with Wolves are fundamentally the same story, despite big differences in setting and budget, because they have the same archetypal themes and characters—awaiting a messiah figure, a hero who “goes native,” and human versus nature.
The psychologist Carl Jung coined the phrase “collective unconscious” to describe these universal archetypes, as he believed they emerged out of how the mind organizes itself, and that the appeal and existence of these prototypes are the result of our genetics rather than our experiences. This theory is appealing to artists, including photographers, because it means that our images can be universally understood and lead to a collective observational experience. If we create an image with a subject and theme that are close to archetypal, then many viewers are likely to perceive it with a similar level of visual intensity, rather than having a huge variation in visual intensity, depending on their experience.
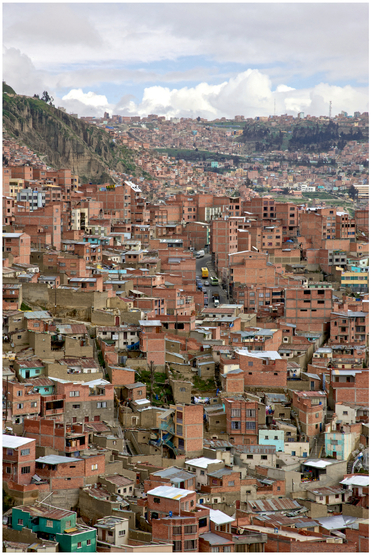
FIGURE 4 The densely packed houses of El Alto, a city adjacent to La Paz, Bolivia.
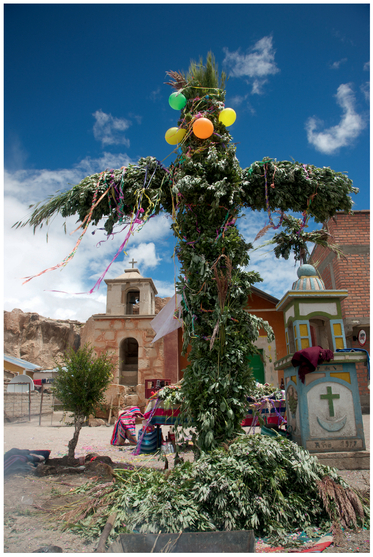
FIGURE 5 The up angle in this image from Carnival in South America helps emphasize the heavenly ascent themes associated with the Catholic symbolism in the image.
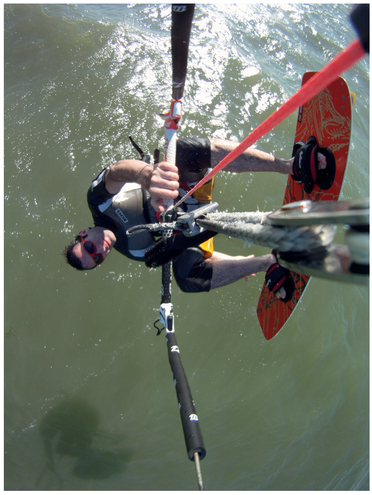
FIGURE 6 By attaching a small GoPro camera to his kite lines, Josh was able to bring the viewer right into the action while kiteboarding. The shadows and angles relative to the water give clues as to where he is and in what position, and this image most likely makes you go “whoa” more than you would when viewing an image of someone sitting on a bench.
Interestingly, some parts of how we perceive a subject also come down to our genes. Pretty much universally, we have a preference for larger pupils in subjects’ eyes. There’s a correlation between pupil size and emotion: something exciting causes pupils to dilate, and something unpleasant or scary causes them to get smaller. We react to that. There are also specific shoulder-waisthip ratios for men and women that cause us to say someone has an attractive body—or not.
In 1959, Herman Witkin found, while doing research into how we perceive things to be upright, that our genes can even affect how we perceive tilted images (tilted cameras are referred to as “dutched” cameras in the movie world, and they’re often used in horror movies and film noir for the strong oblique lines and uneasy feeling they create). People who use their vision system rather than sense of gravity for balance find tilted images to have more tension. While tilting an image can create diagonal lines and increase the visual intensity, it can also change our perception of a subject.
Mirror neurons, a concept discussed in Chapter Two, also affect how we perceive a subject, like in Figure 6. We can imagine ourselves in the subject’s place— especially with human subjects—and doing what the subject’s doing. If it’s something simple, such as sitting on the bench, the subject’s action has low visual intensity. But if the subject is doing something thrilling, such as rock climbing on a high cliff, it will have a higher visual intensity and perhaps even make our palms sweat. Have you ever seen a movie where, even though you were safe in your seat, you were holding your breath watching the action on-screen? That same phenomenon can happen with still images.
Including a person in an image often makes the image more relatable, too, and it becomes a story about interacting with the environment or how people react to things in the environment rather than just about the environment itself, such as in Figure 7.

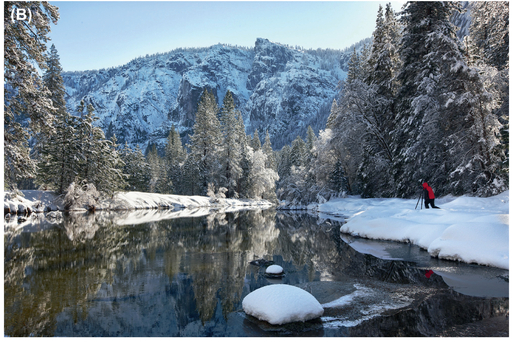
FIGURE 7 Compare these two similar images. One is a story of a peaceful scene (A), and the other is about the photographer capturing the scene (B).
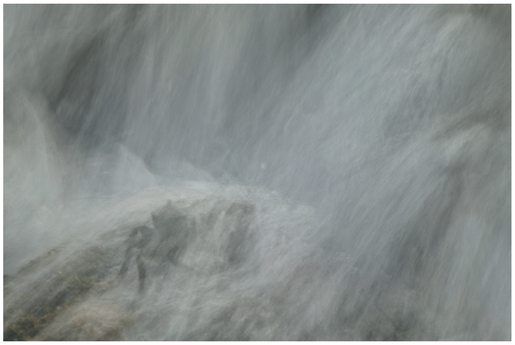
FIGURE 8 Do you see the crab in this image? Because the overall visual intensity of this image is lower, if the crab had been completely obvious, it wouldn’t have been interesting. Hiding the subject a bit increases the visual intensity, since it takes a second to see him, and makes it into a good image. You might recognize this example from Chapter Two, as hiding the subject makes the “what” system have to work harder.
If a viewer has to work slightly to discover what the subject is (can you see the subject in Figure 8?), she’ll usually be more satisfied, and this also increases the visual intensity of the image. But as the subject gets more abstract, you need to provide more context to the image as a whole so that the viewer doesn’t get frustrated and give up trying to determine what the subject is, because the image is completely different from anything she’s seen before.
While our perception of subjects and the intensity they contribute to an image is quite complex (and varies from person to person), we can sum up how the subject affects the visual intensity choices you’ll need to make in the rest of the image fairly simply. If you have an unusual subject that creates strong emotion, then the rest of the components in the image need to have lower visual intensity. If you have a subject that’s close to an archetype or just more common in general, then the rest of the components need to have higher visual intensity (keep in mind that, while you want to boost components in the whole image, you will want to emphasize them more in the subject than in the background so that the subject has more energy than the background).
Keep in mind that these choices might need to change over time, too. Images of lions in Africa used to be uncommon and the lion alone created strong emotion. But photos from safaris are common enough today that the visual intensity from the subject has decreased and the rest of the image needs higher visual intensity to compensate.
This same advice holds true for the image’s overall story.
Creating Stories
What we choose to put into the frame automatically becomes connected together, meaning that your subject(s) will become connected with the background. The interaction between the things within the frame creates relationships (and if your subject is looking at or interacting with something out of frame that we can’t see, it creates a mysterious ambiguity). These relationships, along with our past experiences related to the subject matter, create the story of an image.
Every image has a story, whether you realize it or not. Even if you’re trying to create the most straightforward, documentary shot possible, there’s no such thing as a “pure” documentary shot. The scene and subject we see will always be slightly biased, based on our past experience, mood at the time we’re shooting, and desires for the future. We can use this to our benefit! Our technical editor, Lou Lesko, even attributed some of his success as an advertising photographer to always coming up with a story for the shot, no matter how simple it might be. Here’s how he developed the story and the scene shown in Figure 9 .
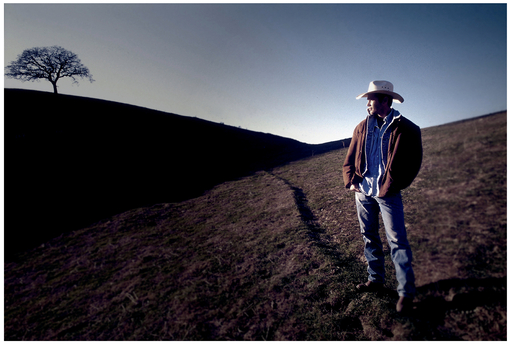
FIGURE 9 An image that portrays remoteness because of the landscape and tree, but an American identity because of the cowboy. Image courtesy Lou Lesko.
This image was going to be used for a Qwest Communications ad. At the time they were focusing on the extraordinary reach of their products. I needed to convey a remote location while maintaining an American identity. So I utilized the cowboy archetype. The story is about how an individual in the middle of nowhere can still be connected. So it was important that the path not have an endpoint. The lone tree in the distance adds to the remote feeling by playing on a prototype that we are exposed to as children—the lone tree on the African plain or in the middle of the desert.
Styling and stature were absolutely key here. Even though the story I was building took place in a lonely, remote location, the actor had to be connected to it. And that occurs in the way he stands and the clothes he’s wearing. He’s not dressed like a traveler, but rather in his everyday clothes. His hands in his pockets and general look of confidence suggesting that he’s been there many times before convey that he is on his own land.
It can be tricky to create stories, though! This section contains some helpful tricks. Before determining the story
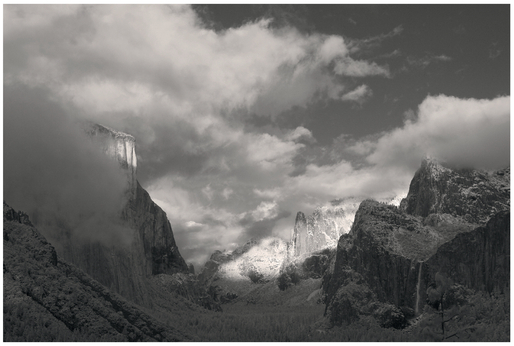
FIGURE 10 Even though this was taken with an infrared-modified camera, it’s from a very common viewpoint for Yosemite Valley, and the weather is similar to the Ansel Adams Clearing Winter Storm shot. That similarity makes it a decent stock image of Yosemite, perfect for a postcard, as it’s what people expect to see and instantly says, “I was in Yosemite,” to the person who receives the card.
you want to tell, think about who your audience is going to be. This can sometimes make your life easier because it creates constraints on the images you’re taking, as there’s a preset expectation of what people want, such as with the image of tosemite in Figure 10. For instance, if you’re taking a photo of a puppy for a calendar, then your audience is probably people who want to see the whole puppy (perhaps in an unusual pose or doing something that most haven’t seen a puppy do before so that it’s not just another puppy photo) and not just one of the puppy’s eyes or a shot of the puppy’s fur. In this case, just set out to tell a great story with your shot, one that gives your audience exactly what they want. The ideas discussed previously about the right visual intensity still apply.
The first approach to finding a story is to think about the scene. Try asking an introspective question—what does the scene say to you? Conversely, if you have a story in mind, ask yourself about the type of scene you want to find to convey that story. Sometimes you’ll have a clear answer, which helps set you on the path for determining the story (and visual intensity) you want in the image. Other times, we need to dig deeper.
In the previous section, we discussed memory and association a bit. One theory for how our brain organizes concepts involves neural networks and connections between concepts. The more often we experience something with similar connections, the more reinforced those connections become in our mind. For example, Americans often have pumpkin pie around the Thanksgiving holiday, and we see many images on television and in the movies of people having pumpkin pie for Thanksgiving. Because this connection between pie and Thanksgiving is reinforced over and over, we automatically associate the
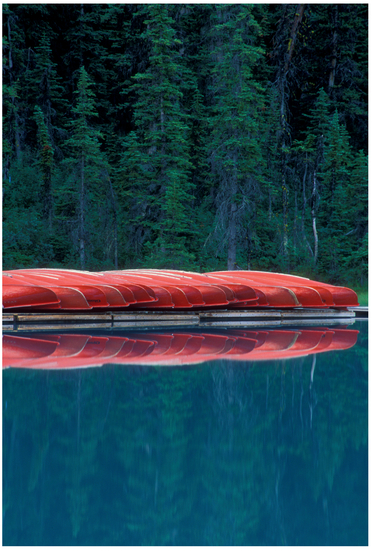
FIGURE 11 Early in the morning, this Canadian mountain lake was very calm, almost waiting for people to come enjoy it. To convey a sense of serenity and place, I found these canoes lined up. We know that canoeing is a sport, so there’s a sense of anticipation seeing them waiting to be used, and because there are so many canoes, we can infer that a lot of people will be active in this lake. The reflection on the still water and blue colors add a sense of serenity, and the red in the canoes adds visual intensity. The overall intensity is lower, though, as this image has a calm story.
two, even if only one of them is present. We can use these associations to help determine the stories we want to tell. Here’s how to do this yourself:
- Look at a scene and write down a few keywords that come to mind. It’s fine if some of them are literal words for the subject and others are more abstract ideas.
- Each word from step one is now going to be a primary word. Look at each primary word and think about what words you associate with it.
- Try taking the secondary words from step two and go into even more detail, finding more associated words for each one.
This approach mixes two techniques, called word association and word clustering, to help inspire you. Chances are that, as you were coming up with words in step three, you were thinking about various shots you could take to tell the right story. Some will need images with higher visual intensity, especially if you had more active words like “exciting,” and others will need images with lower visual intensity, if you had words like “serene,” for example.
You can use this approach in two ways. The first is when you’re struggling to think of what to shoot before going to a location. Use this to help pre-visualize the type of shots you want to take to create the stories you want to tell. For example, if you knew you were taking a photography trip to Hawaii, what images might you want to take (this can also help you pack for a trip if you have a lot of gear)?
Second, when you’re on location and have framed up a shot, you can also use this technique to make sure the shot is telling the story you want to tell. Use this technique while focusing on the framed image, such as with the word cluster and image in Figure 12, rather than looking at a scene in general or thinking about an abstract concept. If the words you end up with on your word cluster match the story you’re trying to tell, then you have the right shot. If not, think about how they vary and how you can change your frame to adjust the concept.
Another aspect of your shot to think about is its semiotics. Semiotics is the study of signs and communication. Signs are a way of referencing something, whether an actual object or a general concept, that may or may not be in the photo, like the llama in Figure 13. They’re a common way of quickly adding concepts to a story (e.g., a sign in a foreign language can help give a sense of place). Since these concepts can affect the visual intensity of your story, you need to be aware of what signs might be in your shot.
Charles Peirce was a philosopher, logician, and mathematician who studied signs extensively. He came up with the idea that there are three primary types of signs, which we can apply to photography. The first is that a sign can be an icon, such as an icon of a deer on a “deer crossing” sign. These icons are as close as possible to the prototype we have for the object and provide a very simple visual reference to it.
The second way a sign can reference an object is with an actual connection. For example, if we see smoke coming from a structure, we know there’s fire inside the building, even if we can’t see the fire in the image. The sign of smoke literally adds fire to our story for this image.
Finally, a sign can be a symbol for an image. For example, if we see a Ferrari logo in the image, we automatically think about fast, stylish cars with loud engines, even if there isn’t a car in the shot.
An object in a frame can be both a literal object and a sign (or metaphor) for a different object. A snake in an image can be both a snake and a reference to the story of Adam, Eve, and original sin. This type of dual meaning is common in advertising photography, when advertisers want you to associate complex ideas with their product through a single image.
While signs are great because they can be simple ways to express very complex ideas in an image, they also create problems because people can read something as a sign that wasn’t intended that way. As such, do be aware of everything in your frame and the meanings it can create!
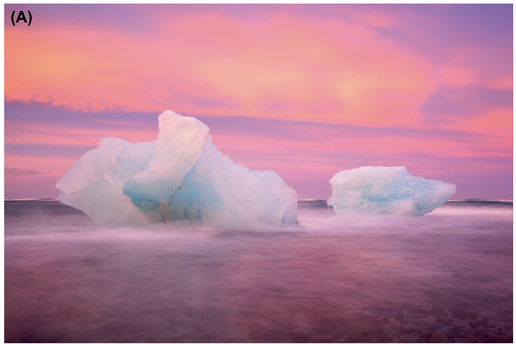
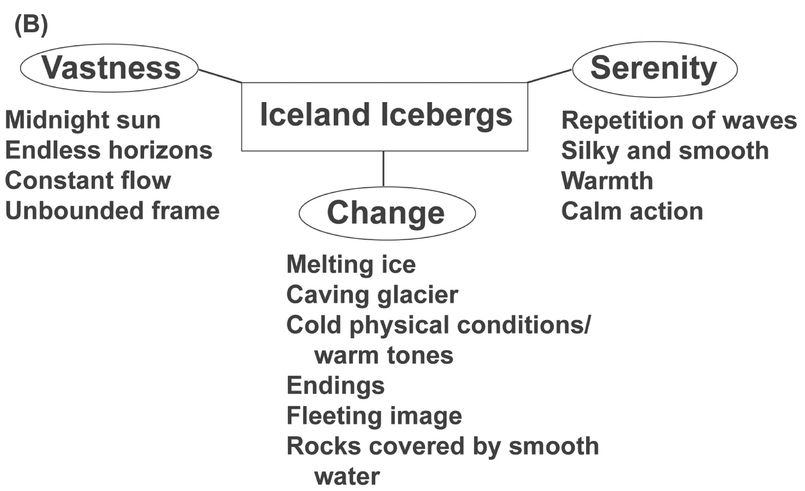
FIGURE 12 An image of icebergs on a beach in Iceland (A) and sample word cluster (B).
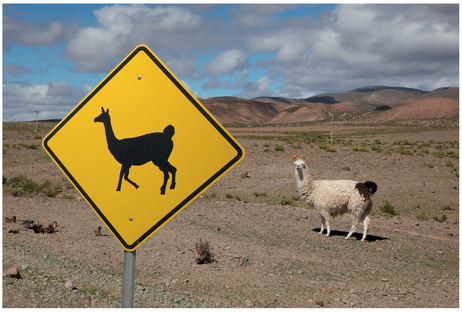
FIGURE 13 Many people find this image funny because it contains a reference to an object, a llama, as well as the llama itself in a similar pose to the icon on the street sign.

FIGURE 14 Cars are such a part of American culture that, even if we don’t recognize the specific symbol, we probably recognize that this is a hood ornament; and from the style, which we’re exposed to in many movies and television shows, we can infer that it is a classic 1950s or 1960s car (it’s from a Hudson Hornet).
Fortunately, especially with the digital darkroom, it’s easy to add, remove, and replace the signs in an image, as we will discuss in Chapters Ten and Eleven.
Pre-Visualizing and Finding Images
Photographs tend to fall into two categories: ones we pre-visualize and ones we find while shooting. Finding images while shooting can be quite challenging, especially if the subject is moving quickly, and it takes lots of practice to be able to quickly frame a compelling thought with the right visual intensity. Some of the exercises from previous chapters, such as learning what your lenses do (Chapter Five) and the effects that different types of light create in an image (Chapter Six) help you become a faster photographer. Practicing pre-visualizing shots will also help you become faster at finding shots, as it’ll give you a mental arsenal of what you like and don’t like in an image.
The amount of pre-visualization photographers do can vary significantly. When we travel to a location, we often have one or two images in mind that we want to try and achieve. Those goals can come from something concrete, such as having been to the location before and having not quite gotten the shot we wanted, or from something abstract, such as an expectation for the location. Looking at images online will help you pre-visualize in a concrete way. Be careful that it doesn’t bias you into thinking that these images are the only types of images you can shoot of a scene—find your own shots and don’t just copy someone else’s! Techniques like word clustering will help you pre-visualize in an abstract way.
When you get to your shooting location, a technique that works quite well is to imagine that the scene is a big stage, waiting for actors and lighting. Find a spot that you like a lot for the set design (and you might need to do your own set design, moving objects around). Then, determine who your actors are going to be. Are they the bride and groom at a wedding? A flock of birds flying through the stage? Last, determine the lighting you want for your stage. Sometimes you’ll need to wait for the right time of day to get the shot you
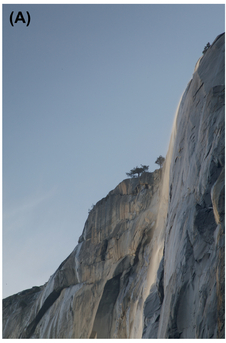
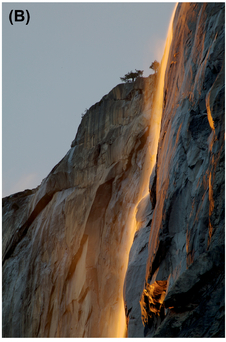
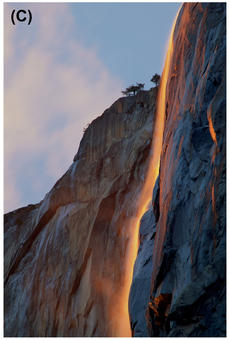
FIGURE 15 This is a shot of the “firefall,” a backlit, seasonal waterfall called Horsetail Fall in Yosemite Valley, that happens in February some years, when there’s enough snow. We set up a frame we liked (A) upon imagining what the light was going to do, waited for the right light and adjusted our frame a tiny bit once we saw the actual light (B), and then waited for a cloud to come into the frame to add some texture and visual intensity to the sky (C).
want, or if you’re in a controlled situation you can set up your strobes to get the look you want. When all the pieces come together, press the button. Figure 15 is an example of this style of pre-visualization with a landscape image.
It’s very easy to practice pre-visualization with street photography, as Figure 16 demonstrates. Go wander around, find a setting that you like, and wait for the right light and actors to show up. You could even ask someone to move or stand a particular way if you really want to direct your actor, although sometimes candid shots are more compelling because people automatically pose if they’re aware of the camera and look stiff. If you find this freedom to shoot anything too overwhelming, try creating a plan of a specific thing you’re going to try and find before you go out shooting, such as we have you do in this chapter’s exercises.
Of course, as you pre-visualize, think about how much visual intensity your image will need and how to create it. If you’re creating a depressing, sad scene, you’ll want less visual intensity than in a happy image. Think about the pre-existing knowledge of the subject that your viewer will have, and also think about the secondary emotional aspects of each component that we’ve talked about previously in this book. A sad image will read more clearly as “sad” if it has a lot of blue rather than yellow, for example. However, not all sad images
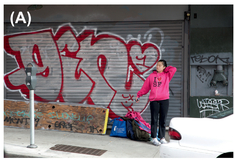
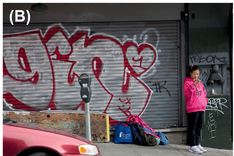


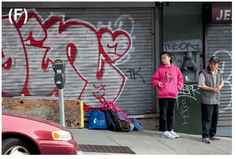
FIGURE 16 While walking around Chinatown, we found this garage door with graffiti and saw the bags on the ground. We knew that someone would come by to grab the bags at some point, and the pink bag made us decide to stop and see what type of person would show up. A young Asian woman with distinctive white iPod headphones and an “I love San Francisco” sweatshirt came to watch her bags (A). The juxtaposition of the graffiti, headphones, sweatshirt, and girl created a scene that really expresses San Francisco’s unique culture. With our “actress” in place, we took a variety of shots, not knowing how long she would stay there and how long cars would stay clear of the shot (B, C, D, E). Because we were shooting in between a car on the street and a trash can, we were limited in how much we could move. Furthermore, there was a man standing to screen right, and adding him in (F) changed the shot from a story about the girl, which we wanted to tell, to a story about the relationship between the girl and the man (also interesting as a young-and-old story, but not what we were shooting). A minute later, she picked up her bags and left.
will have low visual intensity. For example, images of the Post-It notes left on Apple store windows after Steve Jobs’s death are sad for many people, but these images have higher visual intensity because of how powerful the subject was.
Over time, try delaying your pre-visualization for a shot until you see the setting, lighting, and acting that appeal to you, so that you have to focus more on shooting than planning. Then start visualizing shots and figure out where you need to move and what you need to do to achieve them. This will force you both to be faster as a photographer and to work the subject, taking multiple different shots of the same subject to find the story you’re trying to tell, as we discuss in Chapter Nine.
The Decisive Moment
Henri Cartier-Bresson was a famous French photographer who helped define the street photography style and is considered to be a master of the candid. The English title for one of his books of images, Images à la Sauvette, was The Decisive Moment, a title created by his publisher.
“The decisive moment” has taken on its own life as a concept, based on what Cartier-Bresson told a Washington Post reporter in 1957:
Photography is not like painting . . . . There is a creative fraction of a second where you are taking a picture. Your eye must see a composition or an expression that life itself offers you, and you must know with intuition when to click the camera. That is the moment that the photographer is creative . . . . Oop! The moment! Once you miss it, it is gone forever.
The decisive moment represents the point when everything in an image comes together to show the story you’re trying to tell. It might be when the child playing with a toy looks right at the camera or when the baseball player hits the ball. As you frame a shot, you need to be aware of what the decisive moment will be for the story you’re creating.
With slower film cameras, it could be challenging to wait for the decisive moment to press your shutter button, as sometimes they happened so fast they were easily missable. Fortunately with digital cameras and the ever-increasing frame rates these cameras let you shoot at, it’s much easier (and less expensive) to capture the decisive moment. Find out how many pictures you can take in a row if you hold your finger on the shutter button and how long it takes your camera to capture those shots (e.g., maybe your camera can capture six frames per second for five seconds before it pauses to write to the card). Then, when you feel the subject’s close to the decisive moment, if you’re worried about missing it, press the shutter and keep holding it down until after the moment has passed. Figure 17 shows why there’s nothing wrong with taking more than one shot and using your motor drive, since it will help you get the shot you want!
Settings for Storytelling
In Chapter Nine we discuss in greater depth using all aspects of visual intensity in the field to create compelling images, but this section will cover some specific settings as they relate to visual storytelling.
One of the easiest elements to think about is where you focus. We automatically assume that the sharpest part of the image is the subject. If you focus on something that’s not the subject, and your subject’s out of focus, then it will be harder if not impossible for the viewer to understand what you’re trying to convey.
Related to focus is your depth of field, demonstrated in Figure 18. If you shoot with a small aperture (f/16, f/22) and have a lot of the image in focus, then there will be more potential subjects and parts of the frame that contribute to the story. If you have a large aperture, then the soft background will only contribute to the image based on its components (e.g., how the colors influence the emotion of the image). If you have a mid-range aperture (f/8, f/11), then while some of the background will blur out and only contribute via its colors, pay close attention to the part that’s just slightly blurry. If the viewer is still able to identify objects there (and faces are easy to identify), these items will contribute to the story—though since they’re blurred the viewer will perceive them as less important.
A specific focus point and limited depth of field might not be a storytelling tool for too much longer, though. A company named Lytro has developed what’s called a lightfield camera which captures the rays of light themselves rather than red, green, and blue values at different pixels. This new type of camera lets a viewer focus a picture after it has been shot. This enables you to capture a decisive moment faster, since you don’t have to focus, but it makes it so that a viewer can re-focus on anything he chooses in the photo. You really have to be aware of what’s in your frame with these cameras!
Shutter speed also has an effect. A slow shutter speed like in Figure 19 can imply motion in a frame because moving objects become streaks (motion blurred). In addition to the visual intensity component this creates, as discussed in Chapter Three, the length of these streaks can convey how quickly objects are moving, and fast motion can create a more intense


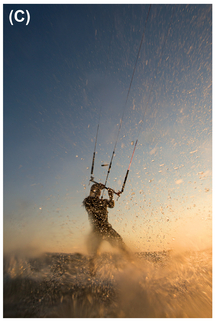
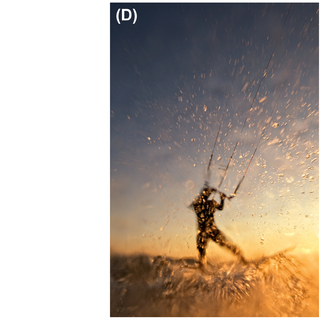
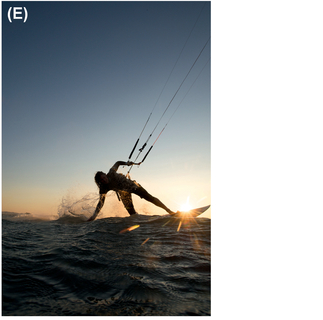
FIGURE 17 We were in the water, aiming for side or front lighting on this kiteboarder (A), but she came close enough to the camera that we were following her just to see what happened. The sunset lighting was actually fairly pretty, and it created an interesting silhouette (B). The spray from the surfboard’s wake created a very neat image and sprinkled the lens (C), and we kept pressing the shutter button, waiting for the decisive moment (D). Trying to recreate this shot later (E) didn’t lead to such good results as this singular, unintended moment.
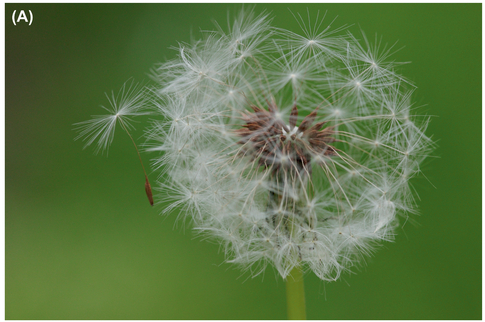
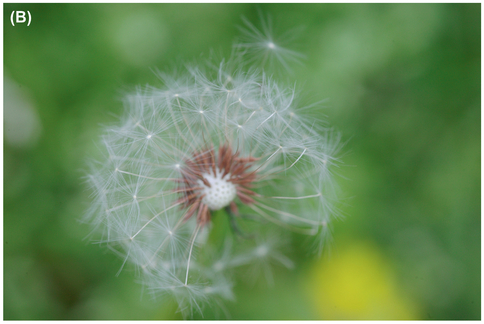
FIGURE 18 In the first image (A), we used a very wide aperture to completely blur the background out. The second image (B) has a slightly narrower aperture and different focal point, which lets enough of the background come into focus that it draws our attention and becomes part of the image. Perhaps the yellow area is another dandelion, in full bloom.

FIGURE 19 A slower shutter speed, while panning with the birds, lets us see motion in their wings and the sky.
story. However with some subjects, such as running water, the streaks might be smoother and less detailed than if you’d used a fast shutter speed, creating a more peaceful image. Our prior knowledge also comes into play, as we perceive running water as peaceful and a fast-moving car as exciting.
Conversely, a fast shutter speed such as in Figure 20 can freeze action and capture something unusual that our eyes typically don’t detect, such as how a dog’s face distorts when he shakes water off his body. This can create a more visually intense story because it shows something we don’t normally see.
Other components, as discussed in previous chapters, also affect our perception of the relationship between parts of the story. For example, if we have a shot of two people, and person A is much closer to the camera than person B, person A will be much larger in frame than the second person. We automatically assume that person A is more important, such as the monkey in Figure 21. Or if one person is in the light and the other is in shadow, we perceive the person in the light as more important and the person in shadow as less important, perhaps even mysterious and creepy.
The colors and lighting in the image can also affect the overall mood. If you’re trying to create a happy image, then a black-and-white, high-key image is less effective than a saturated image taken at golden hour.
Finally, don’t forget to look at the basic shapes and lines in the image and use what you learned in Chapter Three to think
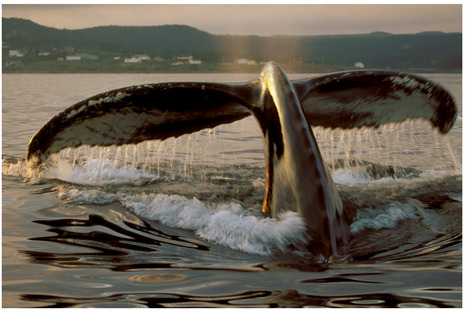
FIGURE 20 A faster shutter speed lets us capture the water droplets falling from this whale as it disappears under the water.
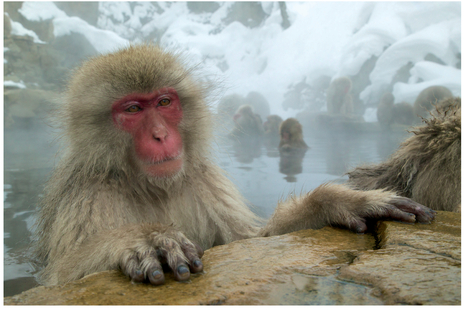
FIGURE 21 We perceive the monkey closer to the camera as being more important than the other, smaller monkeys in the distance.
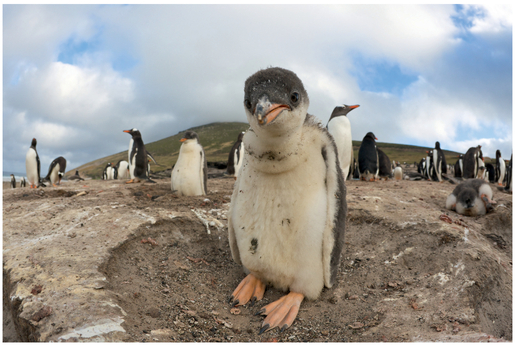
FIGURE 22 This photo of a baby gentoo penguin could be an interesting opening shot. Babies are always cute, there’s a lot of depth, and it establishes that this is a story about penguins while giving a different context (a colony instead of the ocean) from the one that appears in the next few shots.
about their relationships and what emotions they create. If it’s not what you want, try shifting your position to change your perspective and the perceived shapes and lines!
Multi-Picture Stories
We’ve been focusing thus far on single-image visual stories, as that’s the most common form of presentation. You see a single printed image in a frame, you look at a single image full-screen on your computer, and so on. However, multi-picture stories, where you have space for more than one image and perhaps even some text, can help you create a more compelling and complete picture. Since it’s so easy to create your own blog with multiple images or to show multiple images with slideshows and digital photo frames, multi-image stories are becoming more common. Multi-picture stories are also how images are typically laid out in newspapers and magazines, whether it’s National Geographic or Life.
Rather than trying to show everything happening in an environment in a multi-picture story, there are a few key image types— images that tell specific stories—that you’ll want to look for.
Typically, you’ll want an opening shot like Figure 22 that captures the viewer’s attention. This will be an image with more visual intensity and a clear, strong emotion. This shot might not explain the broader context and is really more about engaging the viewer. It’s the hook to your story, somewhat like the first five minutes of a movie or first five pages of a book.
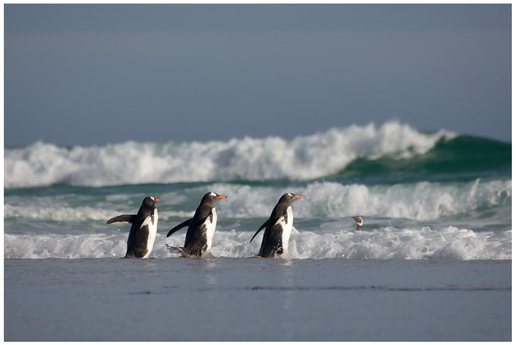
FIGURE 23 By using a low camera angle, the waves appear much bigger than the penguins, creating a visual story about the danger from the water that these penguins face each day. You wonder how the fuzzy, cute baby from Figure 22 will fare in this environment!
Next, find a shot that explains the context of the story. How does it relate to the wider world? For example, if your opening shot is a dramatic shot of a penguin, is the penguin by itself or part of a group of penguins? Is there a particular theme you want to portray in the story? This context shot can be a good place to show that theme. Ask yourself how Figures 23 and 22 interact when you look at them next to each other.
Shots that show relationships between images can help connect pieces of the story, such as with Figure 24.
Continuing our penguin story, adding in a shot of a penguin’s predator, especially if there’s a supporting caption or paragraph, creates a hero/villain relationship in the story.
Showing the experience of your story’s protagonist (Figure 25) is also useful, as these will be the shots you pick from to create the body of your story. What does the penguin go through as he faces the predator? These shots might be wider, of the penguin and its predator, or more focused on the penguin’s reaction. One way of approaching these shots is to ask a question visually and then answer it.
Is there something unusual about what you’re capturing? Perhaps our penguin has gotten lost and ended up in Rio de Janeiro rather than South Georgia. Showing that context will help keep the viewer interested.
If your story involves an important moment for the subject, especially if it involves change, make sure to show what happened before, during, and after that moment! For instance, imagine a photo essay about a politician. You might pick an image from the campaign, an image of the election victory, and then images that define key points in the politician’s career. You would also pick a few images of just the politician, in private, to help make him more sympathetic for the audience. The change from before the election to after it is much more visually interesting than simply preelection or post-election images.
Lastly, what type of image and impression do you want to leave the viewer with? That feeling should define what you look for in a closing shot such as Figure 26. This shot doesn’t always have to be a wide context shot. For example, the last shot in a wedding album might be just the clasped hands of the newlywed couple featuring their rings, leaving the viewer with a sense of togetherness.
On a final note, if you have the option of using text when you present your images, go for it! Simple captions can help make clear the story you’re trying to tell and prevent misinterpretation based on people’s past experiences.
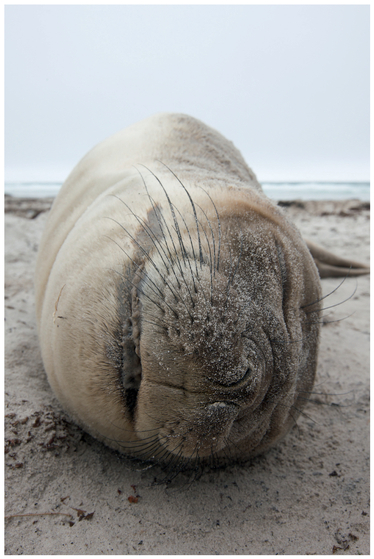
FIGURE 24 While we were hoping to get a photo of a predator and penguin together, to show the scale difference, this shot of a sleeping seal was the closest we found (we guarantee that he was breathing and alive, despite how still he looks!).
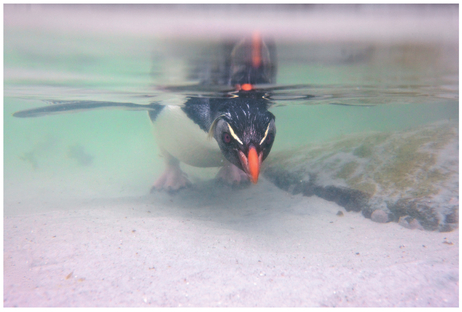
FIGURE 25 Penguins are awkward on land but graceful in the water. Here’s a penguin in its favorite place.

FIGURE 26 This last shot of a penguin in beautiful grass, looking at the viewer, seems peaceful, and the eye line creates an interaction between the penguin and the viewer which would be especially powerful if the last paragraph or caption discussed how the penguin’s habitat or food is at risk, for example.