SIX
Light

Without light, there would be no photography. Light determines the entire look of a photograph and can make or break it. It can reveal or hide detail, emphasize or hide shape, deepen or flatten an object, and more. Some people wait hours or even days for just the right light for an Image! Understanding light and how it affects a photograph is a key part in your journey to becoming a better photographer.
Light is one of the hardest parts of photography to understand because we take it for granted. Unless we’re out in the middle of nowhere on a moon-less night without a flashlight, there’s always a little bit of light to help us see. While you’re usually aware of things like a beautiful sunset, how often are you aware of where the sun is in the sky, or whether a scene will look better in the morning or afternoon, or whether you need to get out a flash to get the shot you want? To keep things simple, we’ll focus most of the chapter on a single light source, be it a natural light source such as the sun or an easy-to-understand artificial one such as a light bulb or flash. Although we’ll mention more complex studio setups here or there, more complex setups with multiple strobes and light modifiers are beyond the scope of this book. Strobist. com is an excellent resource for learning about more complex lighting setups! Before we can begin to discuss shooting with light, though, we need to discuss some attributes of light.
Quality of Light
When photographers discuss light, they often talk about the general quality of light. For instance, you might hear a photographer say the light’s great as he runs for his camera bag. He’s not talking about what the sun itself looks like. Instead, he’s talking about the light the sun (or other light source) is creating in the world at this particular moment. Furthermore, there are a number of specific attributes of the light that make it seem “great.”
The first attribute, the brightness of the light source, is called illuminance, and it refers to the amount of light from an emitting light source (like the sun) that reaches a physical surface (also called incident light ). It’s often measured in units of lux. There is enormous variation in light in the natural world. Full moonlight provides about 0.1 lux of illumination, and sunlight on a clear day at noon provides over 100,000 lux. Amazingly, our eyes can see in both of those lighting situations and every situation in between!
Typically, we don’t take a picture of a light source itself. Instead, we take pictures of things that are being illuminated by a light source (e.g., we take a photo of a friend at the beach being lit by the sun, not of the sun itself). Not all of the light landing on the subject reaches our lens. Luminance is the measure of how much light bounces off a surface and reaches our sensor (or eyes), and it depends on many factors, such as the subject’s material and our viewing angle to the subject. For example, imagine that we’re taking a photo of a girl in a dress outside on a clear day. If she’s wearing a black dress, the luminance will be fairly low, as the dress won’t reflect much light. If she’s wearing a white dress, the luminance will be fairly high, as the dress will be reflecting a lot of light into the camera.
When light bounces off an object, it can change quite a bit! Over the years, much of the software that manufacturers have added to cameras has actually been designed to calculate how that light changes. Specifically, to help you determine the proper exposure for a scene, your camera has a built-in light meter that measures luminance. These meters were built on the assumption that, when you mix the luminance of all objects in a scene together, they measure out to a neutral, 18% gray value, and they base their calculated exposure around that assumption. Each time a camera manufacturer promotes a more sophisticated auto-exposure system, it’s really just an improvement to deal with the cases where not everything averages out to neutral gray. However, reflective meters still don’t work all the time, for example if you try to take a photo of a white dog in the snow. Your camera will assume that these white objects are really 18% gray, and they’ll be underexposed. Chances are you’ve learned to use exposure compensation to adjust for these conditions, but there’s another way to deal with these situations. If you use an incident light meter, rather than measuring the light bouncing off your subject, you measure the light illuminating the subject and are able to pick the proper exposure value, without compensation and regardless of your subject matter (for the most part—you will still have to adjust your settings based on how reflective the subject is).
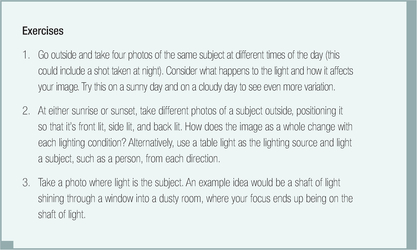
When we combine illuminance and luminance, we get the total amount of light in a scene. As the amount of light in a scene increases, and the scene gets brighter, it causes slight changes in how we perceive an image. Specifically, there are changes in how we perceive luminance contrast and color. First, the Stevens effect occurs when our perception of luminance contrast increases as the light becomes more intense, which lets us perceive fine detail more clearly. This is also the reason we associate seeing the light with an idea becoming clear! Figure 1 shows how contrast appears to change as we increase brightness.
A similar effect is called the Hunt effect. As the luminance in an image increases, our perception of colors in the image also increases. Put simply, colors appear more vibrant and more visually intense in brighter images.
Although brighter light increases our perception of contrast, the truth is that brightness (sometimes called key) and contrast are two separate components. It’s possible for an image to be very bright (have a high key) but have very low contrast, and it’s possible for an image to be very dark but have high contrast, such as in Fugre 2. Understanding and controlling light in an image is often about controlling these two components.
From a visual intensity standpoint, increasing brightness increases visual intensity, as colors and tones appear more energetic. Increasing contrast also increases visual intensity, and in fact luminosity contrast is one of the strongest contributors to the image’s overall visual intensity. Also, as we discussed in Chapter Four, if you convert your color image to black and white, a quick way to add back some visual intensity to your image is to increase the luminance contrast. People often prefer high-key black-and-white shots, but high-key color shots often have too much visual intensity.
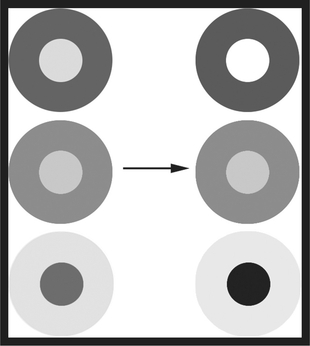
FIGURE 1 This is an example of how the Stevens effect comes into play with different luminance values. The left column contains different scenarios of the contrast between the subject and background, and the right column is an approximation of how we perceive that contrast as the scene gets brighter. Our perception of contrast changes when the subject is significantly lighter or darker than its surround, and the relationship stays about the same when the subject has a lightness similar to the background.
Soft and Hard Light
Describing a light as “soft” or “hard” indicates whether the shadows cast by the light have soft edges or hard edges, not how bright or dim the light is—although hard light is often very bright. Hard light tends to be very directional, often coming from a small, point light. Moving a light source closer to the subject also creates harder light. Hard light creates very dark shadows with sharp edges, and it also creates very bright, specular highlights on shiny surfaces. For example, imagine turning on a bright flashlight in a dark room and pointing it at someone’s face. It will look very unnatural, with the nose casting a dark shadow on the upper lip, and the eyes
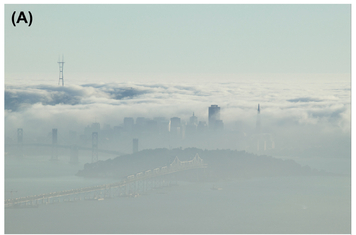
FIGURE 2 Examples of images with a high key but low contrast (A) and a low key but high contrast (B).
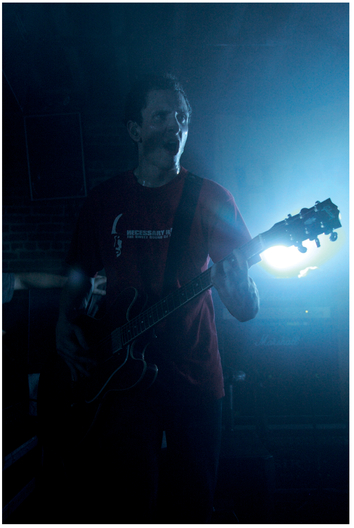
FIGURE 3 Hard light creates depth and a sense of intrigue due to the very bright and very dark areas in this concert photo.
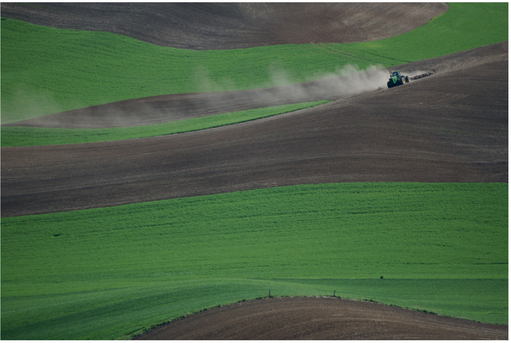
FIGURE 4 Soft light creates a very even illumination across this landscape, emphasizing each part equally.
appearing deeply shadowed and recessed; but sometimes this look is mysterious and alluring, as it was in advertisements for the movie Black Swan. Because hard light tends to create a lot of luminance contrast in an image, creating very bright and very dark areas, it leads to a higher visual intensity.
Soft light comes from either very large light sources or from multiple light sources combined together. It can also be created by moving the light source farther away from the subject. The shadows created by soft light sources have very blurry edges, if there’s even a visible shadow at all. For example, when you walk outside on an overcast day, the light is very soft because the sun is illuminating the clouds spread across the sky, which in turn illuminate you. You might only see the barest hint of your shadow on a cloudy day. Soft light often has less visual intensity because it has less contrast overall.
Have you ever been in a photographer’s studio? If so, chances are you’ve seen special light modifiers that are designed to make light softer or harder. For example, umbrellas and softboxes, seen in Figure 5, are light modifiers that cause a strobe’s light to be spread out over a larger area, creating a softer light. These are often very useful for creating simple portrait images, especially for someone with imperfect skin. On TV and movie sets you’ll sometimes see large scrims—panels covered in a diffusing cloth—placed over an area to create softer light on bright, clear days, preventing harsh shadows making the actors look unattractive. Macro photographers also use similar setups, called diffusers, to reduce the luminance contrast in a scene when shooting outside.
Conversely, light modifiers such as beauty dishes are parabolic metal reflectors, which look like semi-shiny dishes placed around a light. They create a light that’s harder than a soft light
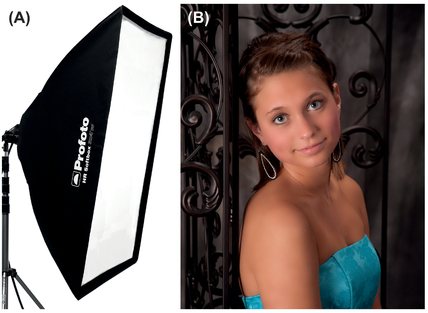
FIGURE 5 Soft light modifiers include umbrellas and softboxes, such as this Profoto model (A). Their goal is to create a large, illuminating surface from your flash or strobe. They don’t create deep shadows on your subject and are helpful when creating a very evenly lit image (B). Figure 5A courtesy Profoto, and Figure 5B provided by Country Setting Portraits, Fairview, PA.
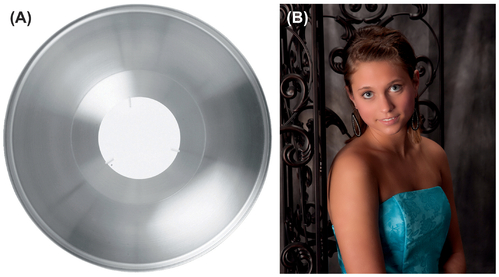
FIGURE 6 Beauty dishes, such as this Profoto Softlight Reflector (A), create a harder light than a softbox, although it’s still a soft light since it’s a larger light surface than a bare strobe. Although the light in this image (B, provided by Country Setting Portraits, Fairview, PA) is still fairly soft, it’s harder and more directional than the lighting in Figure 5.
but still softer than a bare flash ( Figure 6A). These can be useful as a primary (or key) light for people with smooth skin, as it creates a more intense, contrasty light, and if you have smooth skin, it doesn’t emphasize unattractive features. It’s also possible to create harder light with a softbox by using a silver lining instead of white, and a thinner front diffusion panel. Putting the softbox closer to the subject helps create harder light, too.
While a full discussion of these light modifiers and studio lighting is beyond the scope of this book, the take-away point is that both types of light have their uses—you shouldn’t look exclusively for one or the other.
Warm and Cool Light
Not all light has the same color, as different light sources have their own unique mixtures of different wavelengths of light. Daylight, for example, has a fairly equal mixture of each wavelength. Tungsten light bulbs give out almost no blue light components, slightly more green light, even more yellow light, and lots of red light. This bias towards the red/yellow end of the spectrum gives tungsten light a yellow/orange appearance. Fluorescent light is slightly odd because it has very strong peaks at certain wavelengths, and different types of
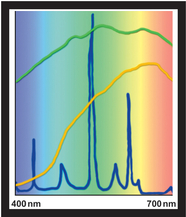
FIGURE 7 Approximate emission spectrums of daylight (green line), tungsten lights (orange line), and fluorescent lights (blue line). The y-axis represents the approximate relative intensities of each wavelength. You can clearly see that daylight contains many frequencies of light, tungsten light is biased toward red/orange/yellow light, and fluorescent light has distinct peaks at each hue but doesn’t contain a full spectrum.
fluorescent bulbs have different numbers of peaks. There are even fluorescent bulbs that claim to look like daylight, as they have many peaks at the major colors, but because they don’t contain every wavelength of light, some people find that they cause eye strain and headaches.
For photographers, these various light sources have two main impacts. The first one is how we perceive the color of various objects under each type of light. As we discussed in Chapter Two, the white balance setting on our cameras and RAW converters lets us adjust for this. The second impact is how the light’s color affects the overall scene.
In Chapter Four, we discussed warm and cool colors, and when light has a certain color, we use those same terms to describe the light. For example, when we take a photo of something in shadow or on a cloudy day, it often takes on cooler hues. If we take a photo right after sunrise on a clear day or inside under a tungsten light, the image will take on a warm hue. Chapter Four also gives a more detailed explanation of the energy levels these various colors contribute.
Something slightly confusing is that you’ll occasionally see a temperature listed for light. The science behind this approach, using temperature instead of frequency, is that if you have a perfect black-body radiator (an object that absorbs all light falling onto it completely and radiates energy completely evenly), as you heat that black body up, it starts emitting electromagnetic radiation at different frequencies. Eventually, that emitted electromagnetic radiation will fall into the visible light spectrum, and we can measure what temperature each hue appears at. What’s confusing is that the hues we refer to as warm light (reds, oranges, etc.) actually have a lower temperature measurement (2,700 to 3,000 K—color temperature is measured on the Kelvin scale) than cool light (over 5,000 K). It’s just like with a fire, where the blue area towards the heart of the fire has a higher temperature than the outer, red flame.
Direction of Light
The direction of the light can have a tremendous impact on a shot. By moving yourself relative to the light source (or by
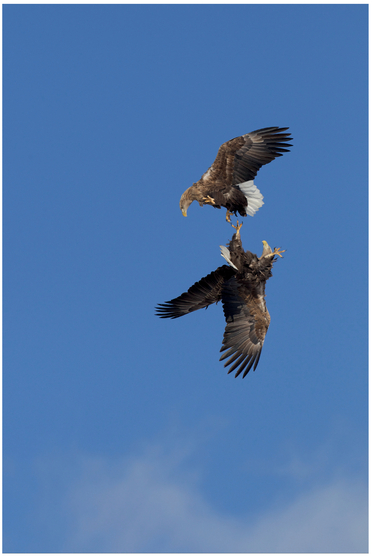
FIGURE 8 These fighting eagles are front lit, and you can see details of their feathers.
moving the light source if possible), you can change how the subject’s lit, which creates very different images of the same subject.
Front lighting, or pointing your light at the subject like in Figure 8, reveals the most detail about an object because it reduces the amount of shadow. All shadow ends up behind the subject, and if the subject’s brighter than the background, it’ll really draw attention and help ensure that your subject has more visual intensity than the background. This type of lighting works very well for wildlife shots when you want to see all the detail on an animal. Unfortunately, front lighting can remove depth from an image, lowering its intensity, because the lack of shadows makes it harder to see an object’s three-dimensional shape.
However, be careful with the visual intensity in the rest of the frame! Since there are very few shadows, most of the scene will be lighter, creating a lot of areas to pull our attention. Try reducing your depth of field or finding a foreground and background that interact (remember that figure/ground relationship?) to make your front-lit shots work. If you’re trying to create a very three-dimensional image, you probably want to avoid front lighting because the lack of shadows reduces the apparent depth in the shot.
To get the most three-dimensional feel from your shot, side lighting, seen in Figure 9, is your best friend. The shadows and highlights created from light entering from the side really create contrast and texture in an image, increasing the overall visual intensity. They do so because the taller points in the image, even very subtle variations in a material, cast shadows.
The side opposite the shadow tends to be brighter, making it stand out more in our brains. Additionally, bigger shadows become lines and shapes in our composition, with all of the implications we discussed
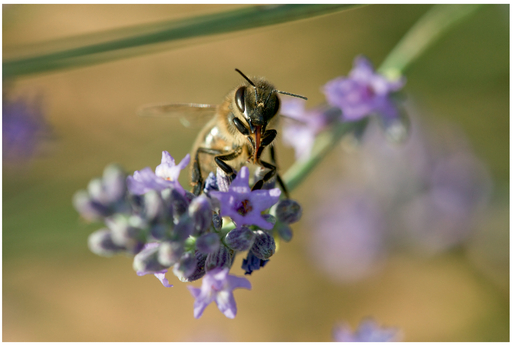
FIGURE 9 This honeybee is side lit. Note how one side of his face is much brighter than the other, but you see the texture and dimensionality in his head and body.
in Chapter Three. If you pay close attention to your favorite movies, you’ll see that nearly every shot has at least some side lighting in it to help add depth to the frame and make the subject stand out from the background. Furthermore, cinematographers usually put the camera on the same side of the subject as the shadows to get the most depth and shape.
If you really want to emphasize shape, potentially to the point of hiding detail, then back lighting like in Figure 10 will help you. Light from behind the subject creates a rim around it, a sharp barrier between light and dark that naturally pulls our eye. Furthermore, the light from behind the subject tends to be brighter than the rest of the background, such that it will cause very little detail to be visible in the rest of the background. If you’re metering so that you retain some color in that light, your subject will usually go black, and you’ll get a silhouette. By hiding detail in the subject, backlighting can help reduce the overall visual intensity in the shot, but a strong, contrasty rim light will put intensity back in.
There are also a few non-silhouetted subjects that look better with backlighting, such as leaves. In general, objects that transmit light are more appealing with backlighting because they have more saturated colors and it’s easier to see some of their hidden details.
Something else to note about when the sun (or any other light source) is shining directly on an object is that direct
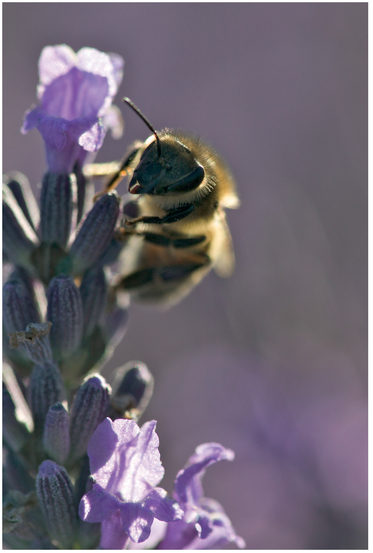
FIGURE 10 This bee has a strong back light from the sun, creating a highlighted rim around his body and the flowers. However, although his body is a bit underexposed and less detailed than the bee in Figure 9, it’s not a complete silhouette, and you can still see detail.
illumination emphasizes luminance contrast and has a higher visual intensity. Indirect diffuse light, such as you get on a cloudy day (rather than the sun being a smaller point light, it illuminates the clouds, which become a large light source, sort of like putting a lamp shade over a light bulb), emphasizes luminance similarity.
Indirect light softens and feathers shadows and it lowers a scene’s dynamic range, all of which lower an image’s visual intensity. Cloudy days might not be the best for landscape shots that include the sky, as the sky will often become solid white, but they’re great for macro photography or types of photography with a strong, clear subject, because your subject’s details will all be clearly visible and free of harsh shadows. Furthermore, colors like you seen in Figure 11 often appear more saturated in diffuse light. On a cloudy day it’s also possible to shoot all day, because the diffuse light doesn’t change as much as direct light from the sun does on a clear day.
Time of Day with Natural Light
It’s easy to see changes in light just by spending a day observing a subject from the same spot. Before sunrise, with a night sky, there’s still light from the stars and sometimes the moon. Since your eyes will be dark-adapted, they’ll quickly start to notice as dawn approaches and the sun starts to rise.
At dawn (Figure 12), the air is cleaner than at any other time throughout the day, and since the sun’s below the horizon, there is a very diffuse, even light in the sky, casting very few shadows. Light contributes very little visual intensity to a scene at this point since there’s very little luminance contrast.
The sometimes spectacular effects of sunrise happen because, even though air is invisible, it still affects light from the sun passing through it. Specifically, the sky
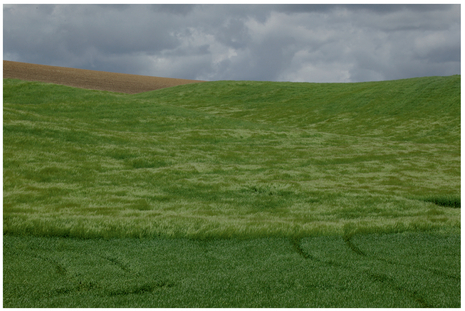
FIGURE 11 A shot from around noon on a stormy day. Because the sky wasn’t pure white and had interesting texture, we chose to include it to increase the image’s visual intensity.
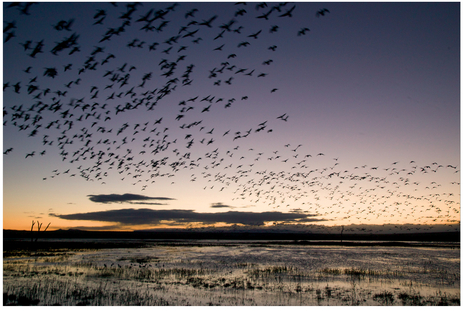
FIGURE 12 A dawn shot of a flock of birds, just as the sun is about to rise.
FIGURE 13 A shot at sunrise with a vibrant sky.
often ends up having warm colors in it, such as red, oranges, and yellows. This is often a popular time for landscape photography because a colorful sky has a higher intensity than a clear blue one. Because the sun is so low in the sky, it creates very long shadows and so interesting shapes in a scene (affecting the overall intensity, as we discussed in Chapter Three). It’s also easiest to create backlit shots during sunrise because you can easily position the sun, at its low angle, behind a subject.
Furthermore, right after sunrise, the light has a very warm color temperature, making objects it illuminates appear golden, like in Figure 14. You’ll often hear the hour or so after sunrise called golden hour (or magic hour). The visual intensity in a scene tends to be higher because of the color and increased contrast during golden hour.
Morning is a popular time in general for photography. Although the light isn’t golden and the sky is blue instead of colorful, the light has a very neutral quality, see in Figure 15, which doesn’t significantly affect an image’s visual intensity. The light is also still relatively soft, but it becomes progressively harder. This is also a good time for outdoor portrait photography.
Midday, when the sun is at its highest point, is the worst time for photography, as you can see in Figure 16. Here, the sun is directly overhead, and it causes many surfaces to create very harsh and contrasty shadows because there’s no light illuminating objects from a lower angle. For example, your eye sockets cast harsh shadows on your eyes, your nose casts a harsh shadow on your mouth, and your chin casts a harsh shadow on your neck. In addition to looking unnatural, images shot at midday often have too much intensity due to all the luminance contrast. If you must shoot at midday on a clear day, use a fill flash to fill in those shadows and reduce the contrast in an image.
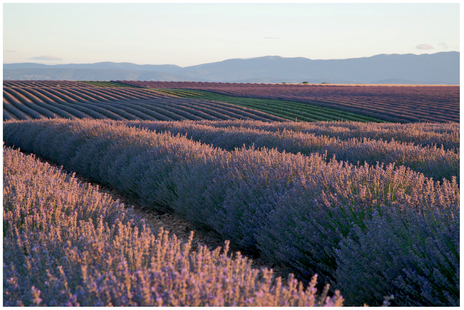
FIGURE 14 About half an hour after sunrise, during golden hour, the light had a very warm quality, causing the lavender to glow.
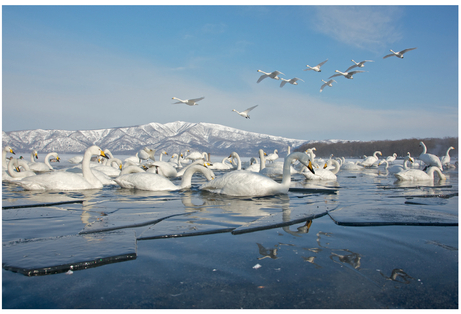
FIGURE 15 A shot in early morning light, after golden hour, when the lower sun angle isn’t creating harsh shadows.
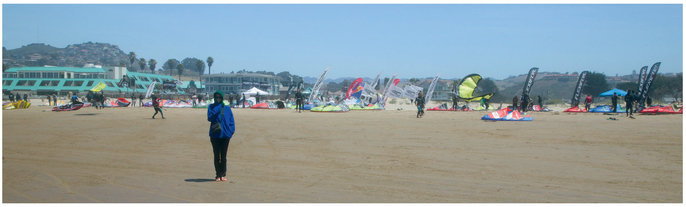
FIGURE 16 An unappealing shot from midday, with dark, contrasty shadows.
Afternoon light is fairly similar to morning light, and you get another opportunity for golden hour before sunset. Sunset is similar to sunrise, in terms of light, but it’s sometimes more colorful because there’s more pollution and dust in the atmosphere at the end of the day.
You might also notice that you can see distant mountains and such more clearly before sunrise and after sunset. This is due to a phenomenon called airlight, which is sunlight scattered by air between us and the distant object. When the sun is up, it creates a lot of airlight, which lowers the contrast of distant objects and makes them difficult to see. When the sun goes down, airlight decreases and it’s easier to see distant objects. Haze is similar and often confused with airlight; but haze is gray whereas airlight is blue.
As the sun dips below the horizon, it creates a twilight arch, which is a yellow/orange glow in the western sky, shown in Figure 17. At the same time, in the eastern sky, it creates a blue earth shadow fringed with a pink anti-twilight arch. In other words, it’s good to look behind you right after shooting a sunset, because the sky does pretty things. A few minutes later, the earth shadow fades and purple light starts to appear above the twilight arch. If you’re shooting in the mountains, alpenglow will start to appear, which is when mountain peaks appear to glow pink/purple as they reflect the twilight arch. The alpenglow will disappear as the twilight arch takes on a reddish color, and eventually it fades away and the sky goes dark for another night (note the reverse of this process happens at dawn).
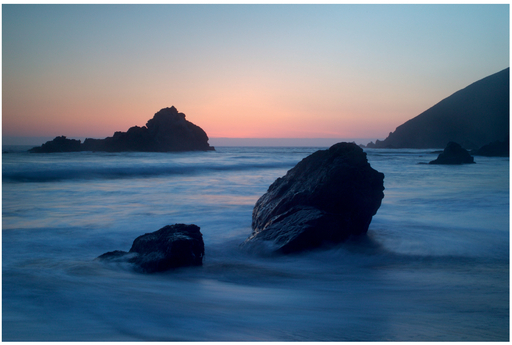
FIGURE 17 A shot after sunset of the twilight arch. Also note how the slow exposure used to capture this light caused the water to become silky.
Keep in mind that, while these descriptions of light at different times of day are generally true, they can vary if you’re shooting at high altitudes or closer to the poles. If you shoot in Iceland in the summer, you might see midnight sun, where the sky never actually gets dark. In this case, golden hour is a lot longer than an hour!
On partly cloudy or overcast days, these attributes change a lot. For example, it’s possible to get decent pictures at noon on a partly cloudy day if the sun is behind a cloud, reducing the luminance contrast. On a cloudy day, you might not see a sunrise or sunset at all, but instead see the large diffuse light source the clouds have become get brighter and darker as the sun rises and sets.


Artificial Light
The problem with natural light is that it’s out of your control. Once you understand light, you’ll find yourself wanting to control it as much as possible to get the shot you want. For landscape photographers, that might mean waiting for the right weather conditions and the right time of day. Sometimes, though, you’ll be able to use artificial light. This is often much more convenient because you have full control over it.
Many cameras have built-in flash to help you control the light, but these flashes are problematic. For one, they’re not powerful enough to illuminate objects more than a few feet away. They also only create front-lit images, which doesn’t let you get depth or shape in the subject—something that separates professional portraits from amateur ones. Because these flashes are aligned with the lens, you also often get red-eye images as a result of light reflecting off the retina. Multi-light setups are a common way to address these problems.
Multi-light setups, like you see in portrait studios, combine lights at different angles and different intensities to blend the benefits of each direction of light. One of the most basic setups, diagrammed in Figure 18, is called a three-light setup. Here, Light 1 is the “key” light, providing most of the light for the image as well as creating the primary shadows. Light 2 is a “fill” light, usually at half the power of the key light, and it’s designed to reduce the shadows on the subject’s face from the key light, which is off to the side, so that the face has depth but doesn’t appear unnatural. Light 3 is the “rim” light, and by backlighting the subject a tiny bit it helps to separate the subject from the darker background and create more depth (and visual intensity) in an image. Sometimes Light 3 is pointed toward the background rather than the subject, as in Figure 19D—that’s perfectly fine and also serves to separate the subject.

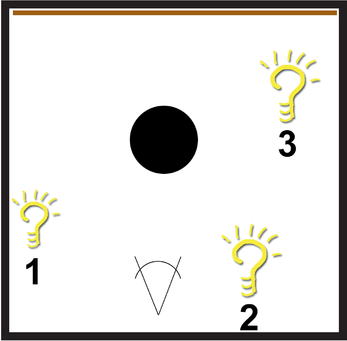
FIGURE 18 A common three-light setup involves a key light (1) to the side, a fill light (2) at a lower power on the opposite side to the key light, and a rim light (3) to separate the subject from the background.
In Figure 19A, we’ve taken a portrait shot with ambient light. Because it’s a fairly dark room and we don’t want a blurry image, we’re forced to use a larger aperture that doesn’t give enough depth of field, a slower shutter speed that could cause blur, and/or a higher ISO that creates a noisier image. We’re also subject to the effects of the ambient light on the subject, which we can’t control. Ideally, we’d want to shoot at a faster shutter speed (so that we could hand-hold and move around), a depth of field that means the subject’s face is in focus, and a lower ISO for a cleaner image. These settings, in this ambient light, would give us a very dark image, and thus we’re going to switch to a three-light setup. Figure 19B shows what happens when we add just a key light, which makes the subject look spooky. In Figure 19C, we’ve added a fill light, and in 19D, we’ve illuminated the background with another light to give it definition but separate it from the subject. Figure 19E shows what happens if we don’t pick the correct settings on our camera and it meters for ambient light while also firing the strobes, giving us an overexposed image.
As we mentioned earlier, a full discussion of lighting setups and possibilities is beyond the scope of this book, but the guiding principles we have discussed, about the quality and direction of light, will apply to every lighting setup you encounter. Once you understand light, you can set about controlling it to help achieve your vision!
Mood and Subject
All the qualities of light and direction combine with our accumulated knowledge about the world to create mood in an image. We often associate tungsten lights with being indoors and a feeling of coziness. Strong overhead fluorescent light creates an institutional feel. Overhead light can also create deep shadows in people’s eye sockets, which can create a depressed or ominous feeling (The Godfather is a great example, as every shot in the Marlon Brando character’s office is so strongly lit from above that you can barely see people’s eyes). Candlelight (or firelight) is very warm, both in color and mood, and it also has a flickering quality rather than being consistent and even, separating it from tungsten light.
Light also inherently conveys information about the image because of our past knowledge. We know if something is indoors or outdoors. We can usually get a rough idea of what time the image was taken, with natural light. Even though this knowledge doesn’t directly contribute to the visual intensity in an image, it does affect our interpretation of the image’s story, which we discuss in the next chapter.
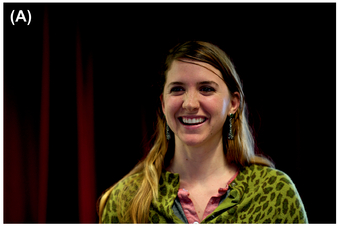


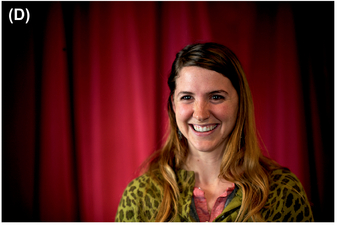
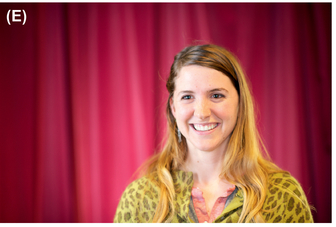
FIGURE 19 An ambient light-only image (A), and images with only a key light (B), a key and fill light (C), and a key, fill, and rim light (D). If we don’t pick the correct mode on the camera when shooting with a flash, it will meter for ambient light and fire all the strobes, giving us an overexposed image that’s also slightly blurry due to the model’s movement during the slow exposure (E). Images courtesy Jeremy Lasky.
Last, light also helps us focus our attention on the right objects in a scene because we tend to look first at objects that are being illuminated. For example, if we have a front-lit image, revealing details in surfaces, and the background is illuminated more brightly than the subject, our brain is automatically going to go to the background first. In this case, the background has more visual intensity than the foreground. That makes it harder to tell what the subject is and often makes our images less effective. In Chapter Eleven we’ll discuss digital relighting techniques that can help fix this problem, but you need to be conscious of the issue while shooting and try to avoid it if possible!