
In This Chapter
Using InfoPath 2007 to create standard forms for your SharePoint site
Customizing InfoPath forms and publishing them to a SharePoint form library
Creating a form library on your SharePoint site
Creating content types for your forms
Adding content types to your SharePoint form libraries
In this chapter, you find out how to use Microsoft Office InfoPath 2007 — the electronic forms application in the Microsoft Office suite of programs — to customize the forms that your teams need to have available to them on your SharePoint site. You also find out how to then publish these forms to special form libraries on the site. Here, your team members can fill out these forms, and you can easily review and collect them.
You also find out how to use SharePoint's content types to create form templates for all the standard forms that are used in all the subsites all over the entire SharePoint site. By creating a special content type for these standard forms, you make it easy to attach the forms to any form library you set up anywhere on the SharePoint site.
InfoPath provides a great tool for people who depend upon electronic forms for gathering and compiling all the types of information vital to their work. (There's even a free trial version that you can download from the Microsoft Office Online Web site.) InfoPath makes it a snap to customize standard electronic forms you need, such as expense reports, meeting agendas, and the like. You can customize your forms so that they contain just the fields you need and use the same layout and format as the paper forms upon which they're based.
If you're a SharePoint team leader who needs to populate your SharePoint site with standardized electronic forms that your team members can use, you'll find using InfoPath particularly beneficial. This is because you can use InfoPath not only to customize the forms you need but also to publish them directly to a new form library on your SharePoint site.
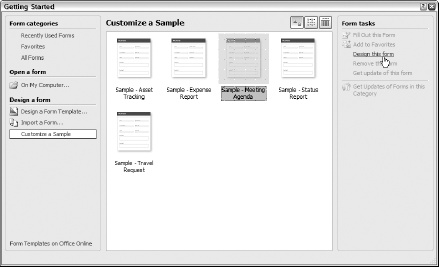
When you first launch InfoPath 2007, the Getting Started dialog box shown in Figure 14-1 appears. You can then customize one of its sample forms, design a form template from scratch, or open a form that you've been working on for further editing.
Note
Microsoft considers Microsoft Office InfoPath 2007 to be a part of its Office 2007 suite of programs (even though it's not actually bundled as part of any of the versions of the Office 2007 suite). For this reason, you find the Microsoft Office InfoPath 2007 menu option for starting this application program on the same All Programs
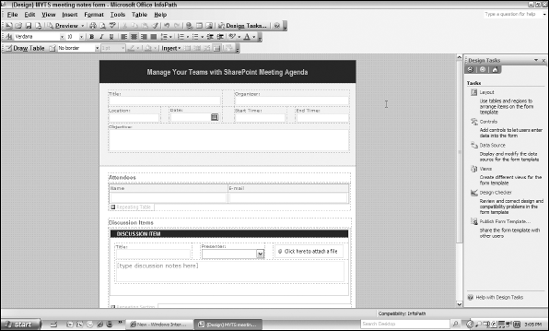
To customize one of the InfoPath sample form templates, click its icon in the Customize a Sample area and then click the Design This Form link that appears in the pane on the right side of the Getting Started dialog box. InfoPath then opens a copy of the form template in its program window (see Figure 14-2), and you can use its many features to customize its look, layout, and contents as necessary.
After you save your changes to a customized InfoPath form template, you're ready to publish the template to your SharePoint site. As part of this procedure, you can actually create a new form library on the site. All you have to do is follow these steps:
Choose File

InfoPath opens the first dialog box of its Publishing Wizard, as shown in Figure 14-3. Here you indicate where you want to publish the customized form template. By default, InfoPath publishes the template to a SharePoint server.
With the default To a SharePoint Server with or without InfoPath Forms Services radio button selected in the first Publishing Wizard dialog box, click the Next button.
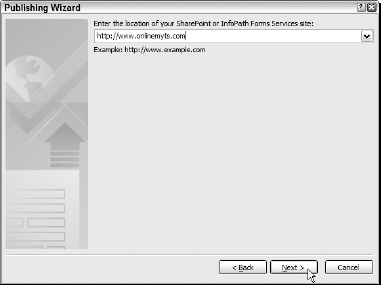
InfoPath opens the second dialog box of the Publishing Wizard (shown in Figure 14-4), where you designate the URL address of the SharePoint site to which the customized form is being published.
Type the URL address of your SharePoint site in the Location text box in the second Publishing Wizard dialog box and then click Next.
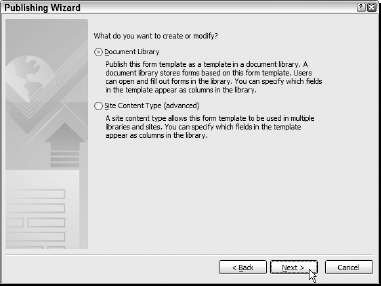
InfoPath logs you into your SharePoint site (after prompting you for your username and password on a hosted site) and displays the third dialog box of its Publishing Wizard (shown in Figure 14-5). Here, you decide between creating a new document library (the default choice) on your SharePoint site and creating a new content type for the form on your SharePoint site. (See "Creating a content type for a form in InfoPath 2007," later in this chapter, for details on your choices here.)
With the Document Library radio button selected in the third Publishing Wizard dialog box, click Next.
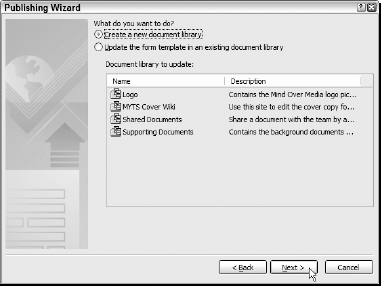
InfoPath connects you to your SharePoint site and displays a list of all the document libraries currently on your SharePoint site in the fourth dialog box of the Publishing Wizard (shown in Figure 14-6). By default, InfoPath selects the Create a New Document Library radio button to create a new document library for the customized form.
Note that if you had already saved the form template in the SharePoint form library and you had made some changes to it in InfoPath and then wanted to save this updated template that form library, you'd select the Update This Form Template in an Existing Document Library radio button and then click the name of the library in the Document Library to Update list box before you click Next.
With the Create a New Document Library radio button selected in the fourth Publishing Wizard dialog box, click the Next button.
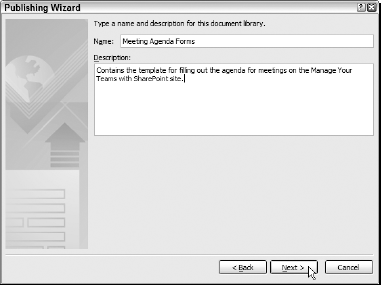
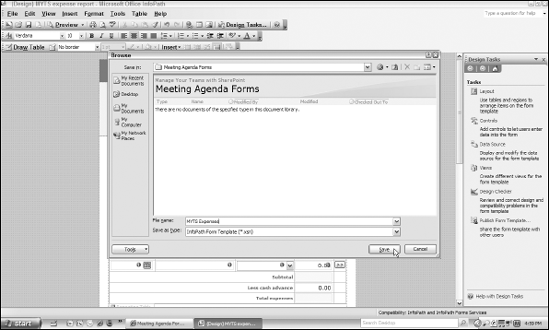
InfoPath opens the fifth dialog box of the Publishing Wizard (shown in Figure 14-7), where you give the new document library a name and description.
Type a name for the new document library in the Name text box. Press Tab and type a short description of the new library in the Description text box of the Publishing Wizard. Then click Next.
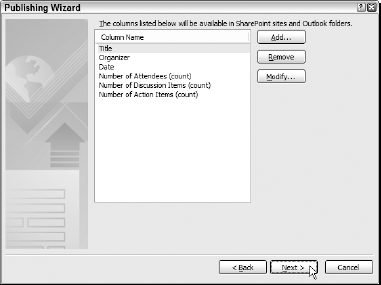
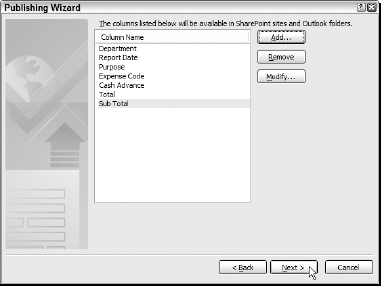
InfoPath opens the sixth dialog box of the Publishing Wizard (shown in Figure 14-8) which displays all the columns from the customized form template that will appear in the list displayed in the new SharePoint document library. You can modify these default list columns by adding to them, removing some of them, and/or renaming them.
After making any desired modifications to the columns that appear in the new document library in the sixth dialog box of the Publishing Wizard, click the Next button.
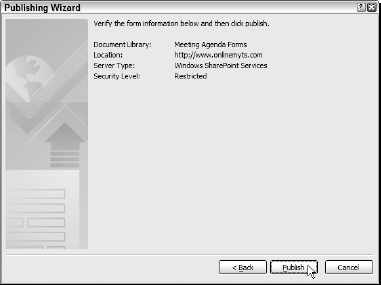
InfoPath displays the seventh dialog box of the Publishing Wizard (similar to the one shown in Figure 14-9). Here, you verify the location of your SharePoint site and its server type as well as the name of the new document library that will be created for your customized InfoPath form template.
After you verify the SharePoint site and document library information displayed in the seventh dialog box of the Publishing Wizard, click the Publish button.
InfoPath publishes the form template to the new document library that SharePoint creates for it, and the program displays the final Publishing Wizard dialog box (shown in Figure 14-10). This dialog box indicates that your form template was successfully published. It also gives you an opportunity to e-mail the customized form to your team members and open its new document library on the SharePoint site before you close the InfoPath Publishing Wizard.
(Optional) Select the Send the Form to E-Mail Recipients check box if you want to e-mail the form to your fellow team members, and/or select the Open This Document Library check box to open the new form library on your SharePoint site.
If you select the Send the Form to E-Mail Recipients check box, InfoPath opens a new e-mail message with the customized form in the body of the message. You can then select your team members as recipients in the To:, Cc: and Bcc: fields, fill in the Subject line field, and send the form in the message by clicking the Send button.
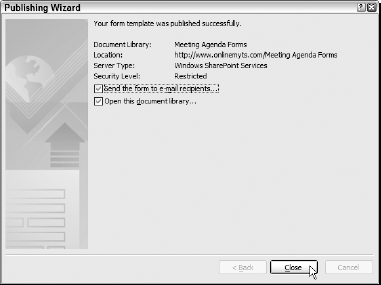
Figure 14.10. Indicate whether or not to e-mail the customized form to your team members and open the new document library on the SharePoint site.
If you select the Open This Document Library check box, InfoPath opens the new document library — now a form library, for all intents and purposes — in your SharePoint site. This library contains an empty list that you can then add to. You'll also notice that SharePoint has automatically added a link to the new form library in the Documents section of the site's Quick Launch.
Click the Close button.

Tip
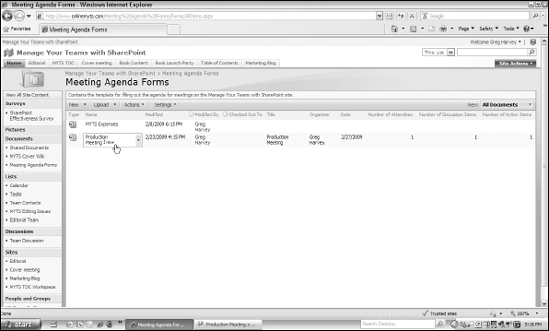
After you publish an InfoPath form to your new form library, you and your fellow team members can fill out forms by choosing New Document from the library's New drop-down menu. SharePoint then opens a fill-in version of the customized form in InfoPath. After you finish filling in the fields of this form, click the Submit button on the InfoPath Standard toolbar and then save the form; its field entries appear in the appropriate columns of the form library.
Figure 14-11 shows you my SharePoint form library after adding a couple of electronic forms using its template. Note that I open each blank form in SharePoint by selecting the Form option on the library's New drop-down menu. Doing this automatically launches InfoPath and opens the blank form in it where I fill in its fields. After submitting and saving the forms in InfoPath, they are then automatically added to the list in my form library when I return to SharePoint.
Content types in SharePoint 2007 are collections of customized settings that can then be used to add new items to any list or document library throughout the entire SharePoint site. They're particularly useful because once you've defined a new content type and associated it with a particular SharePoint subsite, list, or document library, you and your team members can use it to create new items simply by choosing its option from the site's, list's, or document library's New drop-down menu.
InfoPath 2007 makes it a snap to create a new content type for a particular form template. All you do is customize the form template in InfoPath and then publish it as you would a regular form template, using the Publishing Wizard as outlined in the section "Publishing customized InfoPath forms to a new SharePoint form library" earlier in this chapter. The only difference lies in how you deal with the third screen of the Publishing Wizard (refer to Figure 14-5). Instead of accepting the default of creating a new document library on your SharePoint site, you want to choose the Content Type option:
Select the Site Content Type (Advanced) radio button in the third dialog box of the InfoPath Publishing Wizard and then click Next.
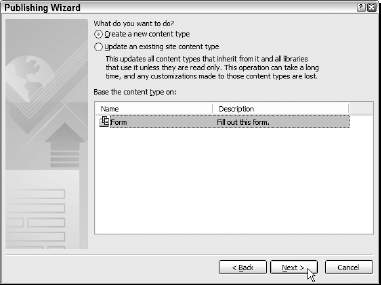
InfoPath displays a fourth dialog box of the Publishing Wizard (shown in Figure 14-12), which lets you choose between creating a new content type and updating an existing one.
With the default Create a New Content Type radio button selected in the fourth dialog box of the Publishing Wizard, click Next.
SharePoint displays a fifth dialog of the Publishing Wizard (shown in Figure 14-13) where you name the content type and give it a description.
Type a name for the content type in the Name text box and then type a description of the function of the content type in the Description list box and click Next.
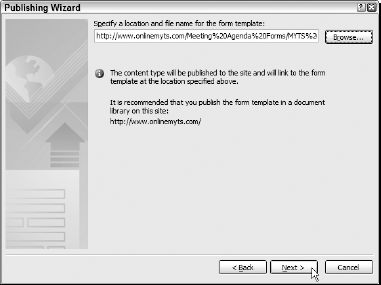
InfoPath displays a sixth dialog box of the Publishing Wizard (shown in Figure 14-14), where you specify the SharePoint location and filename for the new content type template you're creating.
Click the Browse button, select the SharePoint document library where the template file is to be saved in the Site Content list box (see Figure 14-15 ), and then type the new filename in the File Name text box. Click Save.
InfoPath displays the dialog box of the Publishing Wizard (shown in Figure 14-16) where you add the fields you want in the new form content type template.
Click the Add button and then select the fields you want in the new content type in the Select a Field or Group dialog box. When you finish adding the fields, click the OK button to close this dialog box and then click the Next button in the Publishing Wizard.
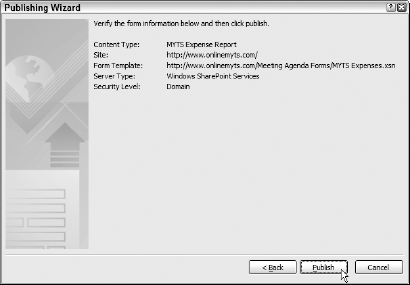
InfoPath displays the dialog box of the Publishing Wizard (shown in Figure 14-17) where you verify the template information before publishing it to the SharePoint site.
Verify the form content type template information and then click the Publish button.
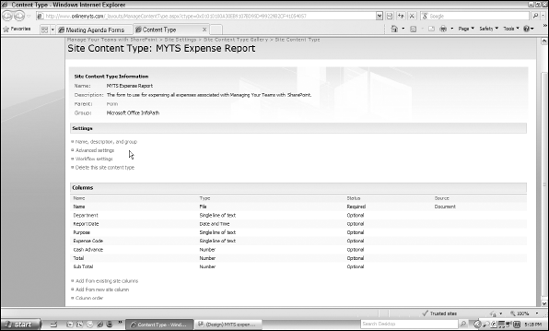
InfoPath saves the template to the SharePoint site. You can then click the Manage This Content Type link that now appears in the dialog box to open the template's page on your SharePoint site (see Figure 14-18) or simply click the Close button to close the Publishing Wizard and remain in InfoPath.

After defining a new form content type (as outlined in the previous section), you still need to associate this content type with the various form libraries on the SharePoint site where you want to make the form template available to your team members. To do this, follow these steps:
Open the Form Library page on your SharePoint site to which you want to associate the new content type and then choose Form Library Settings from the Settings drop-down menu.
SharePoint opens the Customize page for your form library.
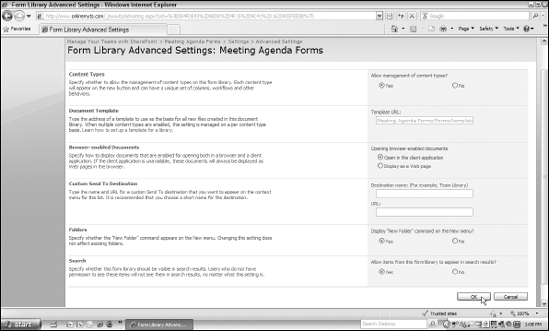
Click the Advanced Settings link in the General Settings column.
SharePoint opens the Form Library Advanced Settings page for your form library, similar to the one shown in Figure 14-19.
Select the Yes radio button under the Allow Management of Content Types question at the top right of the page and then click OK.
SharePoint returns you to a revised version of the Customize page for your form library, where all the content types associated with the library are now listed in a new Content Types section.
In the Content Types section of the Customize page for your form library, click the Add from Existing Content Types link.
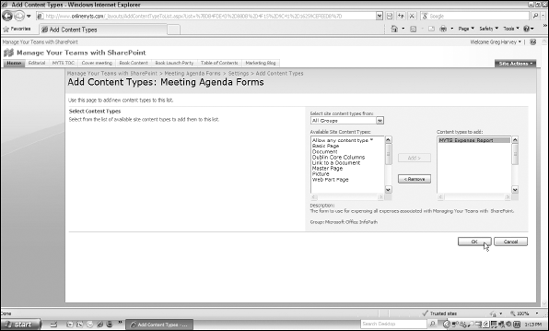
SharePoint opens the Add Content Types page for your form library, similar to the one shown in Figure 14-20.
Click the name of the form content type you want to add in the Available Site Content Types list box on the left side and then click the Add button to move it to the Contents Types to Add list box on the right. Then click OK.
SharePoint adds the selected content type to the form library and returns you to its Customize page.
Click the Content Navigation Breadcrumb link with the name of your form library at the top of the Customize page.
SharePoint opens the Form Library page.
Note
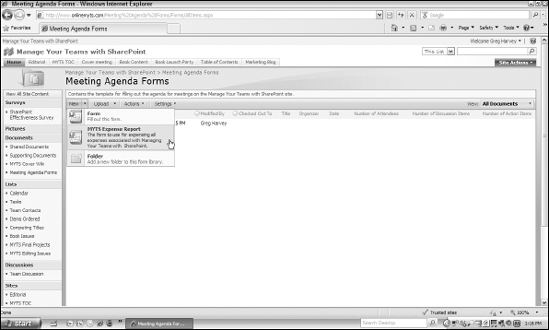
After you associate a custom content type with a list or document library, SharePoint adds a content type–specific option to its New drop-down menu. You and your team members can then use this menu option to add forms based on any template that you've customized in InfoPath and then defined as a SharePoint content type.
Figure 14-21 demonstrates how this works. Here, you see the MYTS Expense Report option that was added to the New drop-down menu after I associated this custom content type with the Meeting Agenda Forms library on my SharePoint site.
Although it's usually much more efficient to create the form library on your SharePoint site by publishing the form template from InfoPath 2007 (right after you finish customizing and saving the form template), this is not the only way to create a SharePoint form library for use with your InfoPath form templates.
You can also create the library in SharePoint as I outline in the following procedure. Just be aware that when you do create the form library in SharePoint, SharePoint links the library to a generic InfoPath form template so that when you or your team members select the New Document option from the library's New drop-down menu, SharePoint displays an Open with Form Template dialog box, where you need to designate the InfoPath form template to use. At the time you select this template, you can also select the Always Use This Form Template for This File check box if you want to make it the only form template associated with your form library.
The steps to creating a form library in SharePoint are as follows:
Click the Documents link in the Quick Launch of the subsite where you want the new form library to be.
If you want the form library to be part of the top-level SharePoint site, open the home page.
SharePoint opens the All Site Content page for the site using the Document Libraries filter.
Click the Create button at the top of the page.
SharePoint opens the Create page for the current site.
Click the Form Library link in the Libraries column.
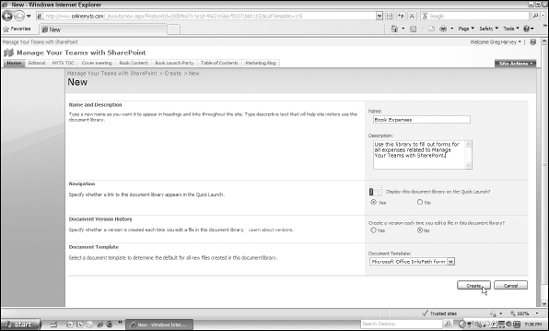
SharePoint opens the New page similar to the one shown in Figure 14-22, where you designate the name and description of the new form library along with the Navigation, Document Version History, and Document Template settings.
Type a name for the new form library in the Name text box and then press Tab.
SharePoint advances the cursor to the Description list box.
Type a description of the new form library.
By default, SharePoint adds a link to the new form library on the site's Quick Launch but does not turn on the version history. The program also selects the generic Microsoft Office InfoPath Form as the default template for all new files added to the library.
(Optional) Make any necessary changes to the Navigation, Document Version History, and/or Document Template settings for the new form library.
Click the Create button.
SharePoint creates the new form library and then displays its page in your Web browser.
Note
After creating a new form library in your SharePoint site in this manner, if you use InfoPath, you can then associate any form you customize with the program with the library by publishing it to this particular library. (See "Publishing a customized InfoPath form to a SharePoint form library," earlier in this chapter, for details.) If you've created a content type for a form template that you want to add to the new form library, you can do so by following the steps outlined in the immediately preceding section, "Adding a form's content type to a SharePoint form library."