In This Chapter
Using Microsoft SharePoint Services to effectively collaborate
Understanding the major components of SharePoint 2007 and how they work
Navigating a SharePoint site with the greatest of ease
Getting the online SharePoint help you need
Searching the SharePoint site for information
Webster's dictionary defines collaboration — from the Latin for laboring together — first and foremost as "working jointly or together especially in an intellectual endeavor." As you find out in this chapter, SharePoint 2007 makes this kind of "working together" especially easy and efficient. SharePoint makes it possible for your teams to readily access the information they need to make decisions and to share essential ideas and feedback.
This chapter begins by describing what exactly SharePoint 2007 is before moving on to explaining just a wee bit about how it does its magic. (I cover just enough of the magic, mind you, to give you a basic understanding of how you and your teams interface with the software in the process of collaborating and yet hopefully not enough to overwhelm you by drowning you in totally incomprehensible geek speak.) As part and parcel of this general introduction to the wondrous workings of SharePoint 2007, I also introduce you to each of the major components that make up this very versatile software tool.
The chapter then goes on to give you all the information you need on navigating a typical SharePoint site before grounding you in the use of its online help system to which, in addition to this nifty reference, you can turn when you have questions about using a particular SharePoint feature.
SharePoint 2007 offers a set of sophisticated Web-based software tools designed to make it easy for you to share essential information with all the members of your teams. SharePoint also can enable team members to freely share their ideas and for you to effortlessly garner their feedback.
To help you understand how SharePoint does all these things, the following sections include a basic introduction to what SharePoint is and how it functions. Following this is a discussion of how your teams can put SharePoint's many features to good use to successfully accomplish a wide array of projects that benefit from good, old-fashioned teamwork coupled with high-tech collaboration.
Don't feel bad at all if you're not really sure what exactly SharePoint is and what it does. (You are by no means alone in your bewilderment.) The confusion stems mainly from the fact that SharePoint's not like the typical Microsoft software programs you find in the Office suite, such as Word, Excel, and PowerPoint.
In fact, rather than any sort of unified application program, SharePoint represents a conglomeration of totally Web-based technologies that have frequently changed names and identities in a rather short period of time. As of the writing of this book, Microsoft markets its SharePoint technology in the following two forms:
Windows SharePoint Services 3.0 (WSS): The core SharePoint technology available as a free download that runs on Windows Server 2003/2008. WSS provides the basic platform that makes it possible for you and your teams to build the sites that enable information sharing and collaboration.
Microsoft Office SharePoint Server 2007 (MOSS): An extension of Windows SharePoint Services that expands the capabilities of the basic WSS platform to enable the development of enterprise business solutions. This product is licensed by Microsoft in several different versions, the basic two being the Standard Edition and Enterprise Edition. The Standard Edition gives you enhanced features in the area of content management, search, portal, and collaboration, and the Enterprise Edition extends these enhancements to include extra business forms and intelligence features. (It's also quite expensive!)
Note
From a technical standpoint, SharePoint 2007 actually refers to the combination of WSS 3.0 with some version of MOSS 2007. Informally, however, when people refer to SharePoint 2007 (or SharePoint, for short), they are actually not referring just to Windows SharePoint Services 3.0, the Web-based platform that does the bulk of the job in enabling the sharing of all kinds of data and information with your team members. Keep in mind, however, that this book covers only WSS 3.0 features under the generic name "SharePoint." The MOSS 2007 enhancements to the basic SharePoint platform offered by WSS 3.0 are well beyond this book's scope.
Note
Keep in mind that Microsoft considers SharePoint 2007 as the core information sharing and collaboration platform for the entire 2007 Microsoft Office System. As a result, SharePoint 2007 technology is very closely integrated with the major Microsoft Office 2007 applications, such as Outlook, Word, and Excel. This is great news if you're currently a user of the latest version of Microsoft Office, and a great incentive to upgrade to Office 2007 if you're serious about using SharePoint 2007 for team collaboration and still haven't gotten around to upgrading your Office applications.
Because all of SharePoint's information sharing and collaboration services are Web-based, this means that you and your team members are going to access the shared information and collaborate with one another on the Web over the Internet. Normally, you'll do this with a Web browser such as Microsoft Internet Explorer or Mozilla Firefox running on a personal computer under Windows XP or Vista. You can, however, also access SharePoint information on a mobile device such as a cell phone that has Internet access and some form of a Web browser.
The following few practical issues are directly related to the fact that SharePoint is an entirely Web-based technology:
Displayed with Special Web Pages: The information you choose to share with your teams is presented and accessed in the form of Web sites with a special type of Web page (a la ASP.NET 3.0) whose content and structure you can modify directly from within your Web browser or by using a special editing program such as Office SharePoint Designer 2007. (See Chapter 13 for more on using this program.)
Accessed via Web Browser: You and your teams can access the information on SharePoint sites from any Internet-ready device. Instead of having to have the right software installed on the device, you only need a valid user ID and password in order to gain access to the SharePoint sites with some sort of Web browser.
Delivered by Web Server: As a Web-based technology, SharePoint requires the use of some sort of Web server to house the WSS and MOSS software along with the SharePoint team sites and the documents and data that you share with your team members. This Web server can either be one maintained by your company in house or one hosted externally by a professional Internet provider that offers SharePoint 2007 technology. (A bunch of service providers host SharePoint sites — to locate one, do a Web search for "SharePoint 2007 hosting.")
Assuming that you're an administrator of your SharePoint site, you can use SharePoint 2007 to facilitate the successful collaboration on most any type of business project that requires teams to share information and ideas with one another. SharePoint's many built-in site templates make it quick and easy to create specialized subsites that contain the elements appropriate for the type of information or idea sharing that your particular teams require.
The normal out-of-the-box site templates are organized into four major categories: Collaboration, Meetings, Application Templates, and Custom. If any of these ready-made templates don't give you exactly what you need, SharePoint makes it easy for you to customize almost any of the elements that a particular template happens to use.
A SharePoint team site enables you to make all sorts of information readily available to the members of the teams that need to access it in order to successfully collaborate with one another on a project.
The information you share on a SharePoint site typically is one of two forms:
Discrete files such as Word documents, Excel workbooks, PowerPoint presentations, and even InfoPath electronic forms or graphics stored in a standard graphics file format such as JPEG or GIF
Data sets stored within other Office application files, such as contacts from your Outlook personal data file, financial figures stored in an Excel workbook, or records stored in the tables of an Access database
Note
In SharePoint, you add the discrete files you want to make available to your teams to libraries that you create for that particular type of document involved. You add data from other compatible files to a list that you create for that particular type of data.
In SharePoint 2007, you and your team members can share your ideas and collaborate with one another using any of the following SharePoint 2007 features:
Alerts: Set alerts on site lists and libraries to automatically inform any or all of your team members by e-mail message of any changes you or other team members make, including changes to the existing content or the addition of new content.
Document workspace: Set up a document workspace as a special place for housing a particular document or set of documents that requires collaborative input and editing.
Meeting workspace: Set up a meeting workspace to inform team members of upcoming meetings and to provide them a common space for accessing any information pertinent to the meeting.
Survey: Set up a survey to garner feedback from your team members about a particular issue of interest to the team or project.
Discussion board: Set up a discussion board to provide a forum for your team members to discuss a particular issue using a threaded discussion format.
Wiki page: Set up a wiki page to provide a page of content where any of your team members can freely edit the content and layout of the page as they see fit.
Blog site: Set up a blog site to provide a discussion blog where your team members can post sequential responses to your thoughts or comments on issues of interest to the team or project.
Figure 1-1 shows the typical home page of a new SharePoint site (the very one used in creating the book you're reading). The home page is the main page of any SharePoint site, the one that appears each time a team member with permission to access the SharePoint site logs on to it.
As you can see in this figure, a home page is divided basically into two unequal rows. The much narrower top row contains the basic global site navigation, command, and search controls. The much thicker bottom row is then divided into two sections. The section on the left contains a bank of controls for navigating the current site — referred to as the Quick Launch group list (Quick Launch, for short). The much larger section on the right side contains a place for listed content. This section, in turn, is divided into a wider left column that contains a place for new announcements and calendar events and a narrower right column with the Windows SharePoint Services logo and a place to add links to other Web sites that may be of interest to the team.
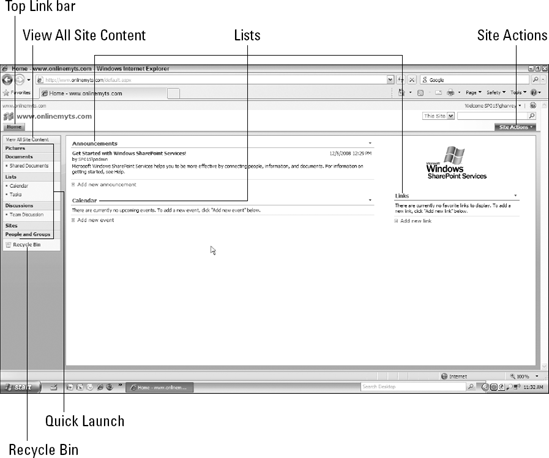
The home page of a new SharePoint site normally uses the Team Site template. This Team Site template introduces you to many of the components you'll typically encounter when creating and using your own SharePoint sites. These common elements include
Top Link bar: Click the site tabs that appear in this bar to go to the top-level page of each subsite that you add to your main SharePoint site. When you first start work on a new SharePoint site, this bar contains only a Home site tab that, when clicked, takes you to the main or home page of your SharePoint site.
Site Actions: Click this button to access a drop-down list with three options: Create (to add a new element to the current site), Edit Page (to add, delete, or modify elements on the current page), and Site Settings (to display a page showing overall site information and links for displaying pages with lists of particular elements).
View All Site Content: Click this link to display a page showing all the SharePoint elements used in the current site, including a description of each and the last time it was modified.
Quick Launch: Click the links in the Quick Launch group list to display pages showing filtered lists of various elements used in the site, including such components as picture and document libraries, lists of calendar events, tasks, team discussions, subsites, members permitted to use the site, and the Recycle Bin where you can rescue stuff you deleted but haven't yet permanently removed from the site.
Announcements, Calendar, and Links: These areas display a listing of any site announcements, upcoming events, or links to other Web sites of interest that you add by clicking the Add New Announcement, Add New Event, or Add New Link hyperlink that appears at the bottom of each of these sections, respectively.
Windows SharePoint Service Logo: This area displays the graphic image of the Windows SharePoint Service logo. You can easily replace this image with that of your own logo. (See Chapter 2 for details.)
Recycle Bin: Click this link to display a page showing all the items from the site that you've deleted but haven't yet gotten rid of permanently.
As you'd expect from a totally Web-based application, many, if not most, of the controls on a SharePoint site are links. And just like links in any traditional Web site, when you position the mouse pointer over them, the pointer changes from an arrowhead to a hand pointer (and if the link is attached to some text, that text becomes underlined), indicating that you can click the link to make the jump to its target.
In addition to the many links that you typically encounter on a standard page of a SharePoint site, you'll also run into a few pull-down command menus (clustered in the upper-right corner of the top of the page). These menus are always indicated by the appearance of a standard drop-down button to the right of the command button's text, although most often you can open the drop-down list attached to the button by clicking anywhere on the button.
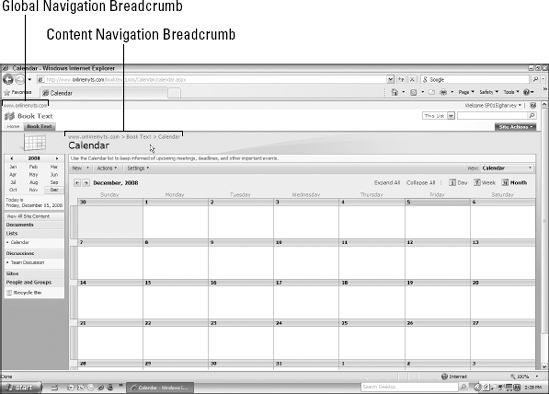
SharePoint sites display a couple of navigation controls that you don't find in your usual Office applications. These controls are referred to as breadcrumbs, and they're named after the Hansel and Gretel fairy tale in which a brother and sister leave a trail of breadcrumbs in a forest to find their way home only to have the crumbs eaten by wild animals.
In SharePoint 2007, you run into two types of breadcrumb navigation controls (both shown in Figure 1-2):
Global Navigation Breadcrumb: This breadcrumb appears in the upper-left corner of a page. Normally, this breadcrumb contains only one link: that of the top-level site in a site collection (including all subsites). However, this breadcrumb does display other related links when you create subsites that aren't directly linked to the top-level site.
Content Navigation Breadcrumb: This breadcrumb appears beneath the Home tab in the Top Link bar above the name or description of the current page whenever you follow links to pages on the top-level site or pages on subsites that you add. To jump back to a page that's on a previous or higher level, simply click its link in the breadcrumb trail that's separated by > (greater than) symbols.
Note
You can use breadcrumb controls only to retrace steps that you've taken in a SharePoint site trail. This means that the last or current breadcrumb in the trail is informational only and never carries a live link. Keep in mind that with Web browsers such as Internet Explorer and Firefox you can also retrace your steps in a trail from the keyboard by pressing Alt+← as many times as needed and that you can jump directly to the top-level of a subsite by clicking the name of its tab. You can also quickly get to the home page of the entire SharePoint site by clicking the Home tab.
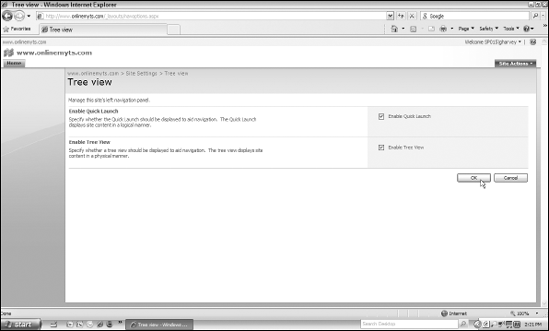
SharePoint offers another nifty way to navigate your SharePoint site: Tree View. In this view, you get an additional hierarchical display of all the components on your SharePoint site, including any and all subcomponents. You can then expand and condense the items with subcomponents in the Tree View as you would a typical folder list in an Office application such as Outlook. You then click any of the components displayed in the Tree View to display its page on the SharePoint site.
Unfortunately, the Tree View is turned off when you first start working in SharePoint, so you have to enable it by following these simple steps:
Log on to your SharePoint site by entering the URL address of your site in your Web browser and then entering your username and password when prompted for it.
On the home page, click the Site Actions button to open its drop-down menu.
The Site Actions drop-down menu on the home page contains three options: Create, Edit, and Site Settings.
Click the Site Settings button.
SharePoint opens the Site Settings page.
Click the Tree View link in the Look and Feel column (the second one from the left) of the Site Settings page.
SharePoint displays the Tree View page, which contains check boxes for enabling and disabling both the Quick Launch group list and the Tree View. (See Figure 1-3.)
Select the Enable Tree View check box and then click OK.
SharePoint returns you to the Site Settings page.
Click the Home tab in the Top Link bar.
After you return to the home page of your SharePoint site after enabling the Tree View (see Figure 1-4), you'll notice that a new Site Hierarchy group list now appears immediately beneath the Quick Launch in the left panel. This group list shows all the components on your SharePoint site (with Expand buttons for any of them that have subcomponents).

The main SharePoint site and each subsite that you add contains its own set of Quick Launch links (simply called the Quick Launch by the folks at Microsoft). This group of links appears beneath the View All Site Content link (which displays a list of all the content on the current site).
The links in the Quick Launch are arranged in categories that depend upon the type of site you're viewing (which, in turn, usually depends upon the type of template that that site uses). For example, when you view a site based on the Team Site template, the Quick Launch contains Pictures, Documents, Lists, Discussions, Sites, and People and Groups. (Refer to Figure 1-1.) But when you view a subsite based on the Wiki Site template, for instance, only a single Wiki Pages category appears in the Quick Launch of this subsite.
As you add pages to your main site or subsites, SharePoint automatically adds the name of the new page to the appropriate category (although you can override this setting and choose not to have a link to the new page appear in the Quick Launch). This makes it easy to visit a page on the current site or to visit the main page of a subsite because all you have to do is click its name in the appropriate category.
Note
Don't forget that the names of the categories that appear in boldface type in the Quick Launch area of a site (such as Pictures, Documents, Lists, and Sites) are also live hyperlinks. By clicking these category links, you display a page that lists all of the current content in that category and also enables you to add new content as well as edit the existing content.
Now it's time to get some experience with navigating a typical SharePoint site. To do so, follow along with my steps as I take you on a short tour of a brand-new SharePoint site using the links that are available at the starting gate, the moment I first log on to its home page:
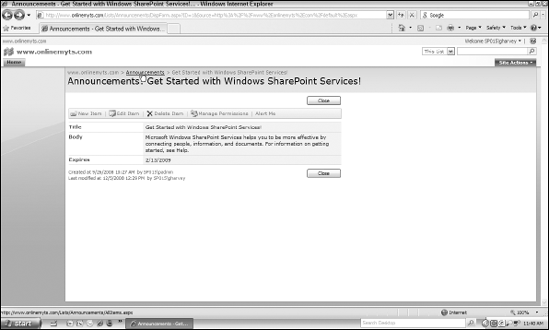
Click the link attached to the title, Get Started with Windows SharePoint Services, which appears under the Announcements heading in the main section of the SharePoint home page. (Refer to Figure 1-1.)
When you start a new SharePoint site, the program automatically adds this general announcement about SharePoint and its uses in the name of the site administrator. When you click the link that's attached to its title, SharePoint displays its own announcements page (see Figure 1-5) where you edit its contents.
Click the Announcements link in the Content Navigation Breadcrumb.
SharePoint jumps back one level to display the general Announcements page. (See Figure 1-6.) This page shows a chronological list of all the announcements added to the site. (Currently, there's only one announcement in this list — the Get Started one.)
Click the link attached to the Calendar item in the Lists category of the Quick Launch.
SharePoint jumps you directly to the Calendar page. (See Figure 1-7.) This page shows you all the meetings, appointments, and deadlines that you've scheduled for the current month, using the very familiar Sunday-to-Saturday weekly layout that you can edit and add to. In addition, you can also view the Date Navigator, which appears immediately above the View All Site Content link and the Quick Launch. The Date Navigator allows you to both review your schedule for past months and add upcoming engagements for future months.
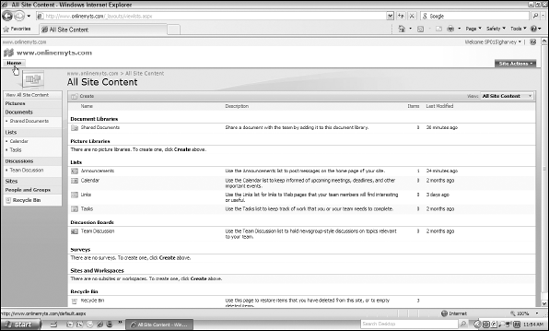
Click the View All Site Content link under the Date Navigator and at the top of the Quick Launch in the left panel of the Calendar page.
SharePoint jumps you directly to the All Site Content page for the site. (See Figure 1-8.) This page displays a list by category of all the content on your site. This is a very valuable page because it not only gives an at-a-glance view of your SharePoint site, but also provides you with links to the existing pages (so that you can open them for editing) as well as a Create button (to the immediate right of the View All Site Content link) that you can use to add new pages.
Click the Home tab in the Top Link bar.
SharePoint immediately returns you to the home page of the SharePoint site.


As you can see from this brief introductory tour (which I urge you to try on your own SharePoint site), the links on a SharePoint site are plentiful and enable you to quickly navigate any of its pages.
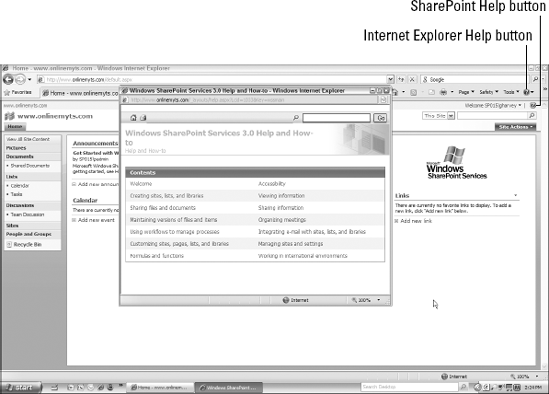
Don't forget about the extensive online SharePoint help that's available to you at any time while you're working on your site. To access the online help, click the Help button in the top-right corner of the site.
Warning
This task is a bit tricky if you're using Internet Explorer 8, however, because for some unknown reason the SharePoint site Help button (with its question mark icon) appears almost directly beneath the Help button for this Web browser. This means that if you use this particular browser to access your SharePoint site, you can all too easily click the wrong Help button and end up with Explorer help when you want SharePoint help.
When you click the SharePoint Help button, the program opens a separate, smaller browser window that typically contains the home page of the Windows SharePoint Services 3.0 Help and How-To window, as shown in Figure 1-9. As you can see in this figure, this page contains a number of topics ranging from the standard "Welcome" to the more specialized "Working in International Environments."
Note
If your SharePoint site is hosted, you may be prompted for your user ID and password the first time you attempt to open the SharePoint Help window during a work session.
To get more information about a particular help topic, click its link. If you have a question about a particular SharePoint feature (such as keyboard shortcuts) or a topic not covered in this initial list (such as spreadsheets in SharePoint), use the search feature by typing the feature or topic in the Help and How-To window's Search text box in its upper-right corner and then pressing Enter.
Tip
After you've displayed the help information you need in the Help browser window, you can print it by turning on your printer and then clicking the Print button near the top on the left of the screen. If the help article you want to print contains several subsections, be sure to click the Show All button that appears at the top of the main article before you click the Print button.
If you want to work on something in your SharePoint site after consulting a particular help topic in the Help window, click the SharePoint site's program button on the Windows taskbar or click somewhere directly on the SharePoint site browser window if part of it appears behind the Help browser window. Doing this automatically minimizes the Help window while at the same time activating the SharePoint site browser window and bringing it to the forefront. You can then redisplay the SharePoint Help window at any time to get more online help simply by clicking its program button on the Windows taskbar.
When you're finished using the online SharePoint help during your work session, you can close the Help browser window by clicking the Close button that appears in the window's upper-right corner. Doing this returns you immediately to the browser window containing your SharePoint site where you can continue working.
Your SharePoint site includes a Search box that you can often use to quickly locate and then visit particular components. This can become a particularly efficient way to navigate your SharePoint site, especially as the site grows.
The Search box is located on each SharePoint page directly beneath the Welcome drop-down list and Help buttons and immediately above the Site Actions button. The Search box itself is sandwiched between a Scope drop-down list (which typically contains the value This Site or All Sites) on the left and a Go Search button (with the magnifying glass icon) on the right.
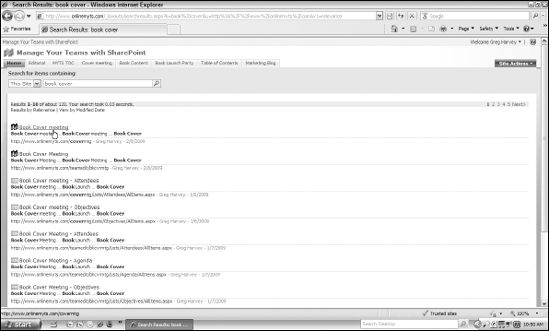
To perform a search for particular content on your SharePoint site, make sure that This Site is displayed in the Scope drop-down list and then enter the search text that SharePoint's search feature will find. This search text normally consists of keywords found on the page or pages of the site you want to locate. For example, to find pages on my SharePoint site where both the terms book and cover are mentioned, I enter the following search text in the Search box:
book cover
However, if I want SharePoint to find the pages where the term book is mentioned but not the term cover, I enter the following search text in the Search box:
book -cover
Note
When you enter more than one term in the Search box separated by spaces, Windows SharePoint Services 3.0 assumes an implicit AND condition (so that in my first example, SharePoint searches for the terms book and cover). If you want to explicitly exclude a term from the search, you need to enter the minus sign before the term (as in my second example where SharePoint searches for all occurrences of the term book where cover is not mentioned).
After you enter the search text in the Search box and designate the scope of the search in the Scope drop-down list, you're ready to have SharePoint conduct the search by clicking the Go Search button (or pressing Enter when the cursor is still in the Search box).
SharePoint then searches for the search text over the range of site components designated by the Scope drop-down list. If the program doesn't find any matches, it displays a Search Results page with the message No Results Matching Your Search Were Found. You can then refine your search text and use it to conduct another (hopefully, more successful) search.
If SharePoint does find matches for the search text, the program then lists them — arranged by their weighted significance to the search text — on the first of possibly many Search Results pages. Each match in this list contains a live link that you can then click to jump directly to that page on your SharePoint site.
Above the list of search results, you can find the total number of matches found to your search text and links to individual Search Results pages (if these matches require multiple pages). This area also contains a View by Modified Date link that you can click to sort the matches by the date that their pages were lasted edited (from most to least recent) rather than by their relevance to the search text.
Figure 1-10 shows you the first Search Results page that SharePoint returned after I searched on my site with book cover as the search text. This first Search Results page displays the top ten matches (out of close to 120 total) to this search text. And to open the Book Cover meeting page referred to in the first match, all I have to do is click its link.