In This Chapter
Using blogs and Wiki page libraries to facilitate team interaction
Creating and using a new SharePoint blog site
Setting up the categories for your new blog and making your first post
Creating and maintaining a new SharePoint Wiki page library
Using RSS feeds to stay informed of additions to SharePoint blogs
SharePoint sites now support blogs and wikis, two of the latest Web-related technologies for fostering interactive communication. Blogs (short for Web logs) enable you to conduct an online conversation with your teams by posting comments to which your team members add their two cents. Wiki page libraries (wikiwiki is Hawaiian for quick) enable any of your team members to easily contribute to or modify the contents that you place there (including pictures, tables, and links to other Web sites and pages within the SharePoint site itself).
In this chapter, you find out how to set up and maintain both SharePoint blogs and Wiki page libraries to encourage members of your team to actively communicate about issues and participate in the maintenance of library pages that require this kind of very active interaction and collaboration.
SharePoint blogs enable you to readily float new ideas with your team members, elicit their feedback, and then have them post their own spinoff thoughts. As with blogs on traditional Web sites, the team members who start and maintain the blogs post their ideas in a series of linear, chronological posts. Then the other team members who visit the blog reply to particular posts with their own comments (which, of course, other members can comment on as well, in addition to commenting on the original posts).
Note
Keep in mind that team members who have access to your blog pages on a SharePoint site can comment freely on the original thoughts and questions you and others post there, but they can't edit or alter the content of these posts. This setup contrasts to Wiki pages on the SharePoint site (discussed at length later in the chapter), where team members with access to the pages can freely edit and amend any material you or others place there.
In SharePoint, a blog is a subsite (see Chapter 2) that uses a special Blog template found in the Collaboration group of site templates. This Blog template enables you to create and manage the posts that you and others make to the blog as well as the comments that you and your team members make to the posts and comments of others. As with other types of SharePoint subsites, you can create as many blogs as you need for the individual teams that you manage.
The procedure for setting up a SharePoint blog is very simple and straightforward. The only catch is that you're generally going to want to change at least one default Blog template setting (covered in the following steps) before you start posting to your new blog and inviting your team members to come visit and add their comments.
Tip
The default setting you routinely need to change is the Content Approval site setting that defaults to Yes and that needs to be set to No so that you don't have to stop and approve each and every comment that your team members make to your posts before they appear on the blog pages. Leaving this default setting at Yes makes sense in a blog that's open to anyone on the Web, where you really do need to screen the contents of user comments before publicly posting them. Screening contents shouldn't be a real concern with a SharePoint blog restricted to a professional team under your direct supervision. (If it is a concern, you probably need to address this issue in person with the team members, instructing them on what constitutes appropriate and inappropriate posts on the team's SharePoint site, rather than relying on the blog site's Content Approval setting.)
To create a new blog for your SharePoint site, follow these steps:
Log on to the SharePoint site and open the subsite under which you want the new blog to appear.
If you want the blog to be available under the top-level SharePoint site, display the home page.
Choose Create from the Site Actions drop-down menu.
SharePoint opens the Create page.
Click the Sites and Workspaces link in the Web Pages column at the far right.
SharePoint opens the New SharePoint Site page, the top of which is shown in Figure 8-1.
Type the name of the new blog in the Title text box and then press Tab.
SharePoint advances the cursor to the Description text box.
Type a description of the blog into the Description text box and then press Tab.
SharePoint advances the cursor to the URL Name text box.
Type a name for the blog subsite (without spaces) into the URL Name text box.
The name you choose here will form the basis for the blog site's URL.
Next, you need to select the Blog template.
Click the Blog option on the Collaboration tab of the Select a Template list box.
As with other, more traditional subsites that you add to the SharePoint site, the program automatically assigns the same user permissions as those in effect for the blog's parent site. To assign different individual permissions, click the Use Unique Permissions radio button.
Likewise, SharePoint displays a link for the new blog in the Sites section of the parent site's Quick Launch. The program also displays a tab for opening it on the SharePoint site's Top Link bar.
(Optional) Make any necessary changes to the Permissions, Navigation, and Navigation Inheritance settings that your new blog requires.
If you don't want your team members to access the blog from the Quick Launch or Top Link bar or you don't want the blog site to have the same Top Link bar buttons as the parent site, you need to change these Permissions, Navigation, and/or Navigation Inheritance settings.
Click the Create button.
SharePoint creates your new blog and then displays the home page of the new blog subsite with its Welcome information, similar to the one shown in Figure 8-2. Note that this home page contains a series of Admin Links in a column on the right side of the page along with the blog site's Quick Launch in three sections (Categories, Other Blogs, and Links) on the left side of the page.
Click the Manage Posts link in the Admin Links column on the right.
SharePoint opens the Posts page for the new blog that contains the single, automatic Welcome to Your Blog post.
Choose List Settings from the Settings drop-down menu.
SharePoint opens the Customize Posts page.
Click the Versioning Settings link in the General Settings column.
SharePoint opens the List Versioning Settings page, similar to the one shown in Figure 8-3.
Select the Content Approval's No radio button under the Require Content Approval for Submitted Items heading.
You see an alert dialog box warning you that any pending and rejected items may show up in the blog posts after disabling content approval.
Click OK. After the alert dialog box closes and you're brought back to the List Versioning Settings page, click that page's OK button.
SharePoint returns you to the Customize Posts page.
Click the name of the blog's button on the Top Link bar.
SharePoint displays the home page of the new blog subsite with its Welcome to Your Blog post. Here, you can customize the blog's categories before making your first post and inviting other team members to start participating in the blog.


Categories in a blog enable you to classify and arrange the posts and comments you and your team members make by the major subject they address.
When you create a new blog in SharePoint, it automatically creates three generic categories called Category 1, Category 2, and Category 3. You can then rename these generic categories to something descriptive of the intended content and audience of the blog as well as add more categories of your own.
To customize and add to the blog's categories, follow these steps:
Click the Categories link in the blog's Quick Launch.
SharePoint opens the Categories page for your blog site, similar to the one shown in Figure 8-4 (except that your Categories page still contains the generic categories that I've already replaced with real category names in this figure).
To rename the generic categories, click each category name and then choose Edit Item from its drop-down menu or simply click its Edit button in the column on the far right.
SharePoint opens the Categories page for the particular item.
Edit or replace the category name displayed in the Title text box and then click OK.
To add a new category for your blog posts, choose New Item from the New drop-down menu.
SharePoint opens a Categories: New Item page.
Type the name of the new category in the blank Title text box and then click OK.
SharePoint returns you to the Categories page, and your new category appears at the bottom of the list.
When you finish editing the three generic categories and adding any of your own, click the blog's tab on the Top Link bar.
SharePoint returns you to the home page of your blog, where your changes to the generic categories and any additions are displayed.

After you've set up the categories for your new blog, you're ready to start posting items to it. To make your first post from your SharePoint blog, follow these steps:
Click the Create a Post link in the Admin Links column.
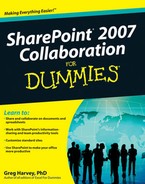
SharePoint displays a Posts: New Item page, similar to the one shown in Figure 8-5.
Type a brief title for the new post that quickly identifies its subject in the Title text box and then press Tab.
SharePoint advances the cursor to the Body text box.
Type the contents of the post in the Body text box.
The only thing left to do before publishing the post to the blog is to select the blog category.
Choose the category to which you want to associate the new post from the Category drop-down list and then click the Publish button.
SharePoint returns you to the home page of the blog, where the new post appears at the top of its list (which always shows the most recent post at the top). In addition to the title and body of the post, this list displays the date and time along with links to the author of the post as well as links for viewing only posts in the same category, for commenting on the post (called permalink), for sending a link to the post to a team member in an e-mail message, and for listing all the comments made to the post.
After making a new post to your blog, other team members can respond to it by posting their own comments. Here's how posting comments works:
Click the link attached to the title of the post or click the Permalink hyperlink that appears under its body.
SharePoint opens a new page that displays the post to be commented on at the top of the page with an area for recording comments below, similar to the page shown in Figure 8-6.
(Optional) If you want to add a title for your comments that is different from the one used to identify the post, click in the Title text box and then enter a title for your comments.
Note that you usually don't need to give a title to your comments unless they introduce a new subject related to the post. When your comments simply address the subject matter of the original post, a new title is not needed.
Click the Body text box and then type your comments to the original post there. Then finish up by clicking the Submit Comment button.
SharePoint returns you to the Post page, where a Comments section with the comment you just published appears immediately beneath the original post. In addition, this page contains an Add Comment section with its own optional Title text box and Body text box where others (especially the team member who made the original post) can respond to your comments.

If you're using Outlook 2003 or 2007 and your SharePoint IT team allows your site to receive e-mail, you and your team members can e-mail posts to the blog from Outlook. Before you can do this, however, you must give the blog an e-mail address using the blog site's Incoming E-mail Settings. (See Chapter 11 for details.)
After you create an e-mail address for the blog site, you and your team members can post to the blog simply by opening a new e-mail message in Outlook and following these simple steps:
Enter the blog site e-mail address in the To field.
Enter the title of the blog post in the Subject field.
Enter the body or contents of the post in the body of the new e-mail message.
Click the Send button.
That's all there is to it. When you switch back to SharePoint and open the blog's home page or Posts page (by clicking the Manage Posts link on the home page), the new post you sent in an Outlook e-mail message will eventually appear at the top of the list. (You may have to give it some time and click the browser's refresh button — e-mail's not instantaneous after all.)
Note
At the time you create and publish a post via e-mail, you can't assign the post to a particular blog category. You must do this from the SharePoint blog site: Open the blog and then click the link to the post to which a category needs to be assigned. Then, click the Edit button on the post page and select the desired post category on its Edit Item page from the Category drop-down menu before you click the Publish button.
If your office uses Word 2007, you can create posts in a Word document and then publish them on the SharePoint blog from within the Word application. The easiest way to do this is from the SharePoint blog site, as follows:
Open the home page of the blog site and then click the Launch Blog Program to Post link at the bottom of the Admin Links.
SharePoint launches Word 2007 and then displays a New SharePoint Blog Account dialog box that contains the Blog site's URL.
Click OK in the New SharePoint Blog Account dialog box and then click Yes.
If an alert dialog box appears, warning you about sending your username and password to your blog service provider, click Yes. Also, if you're prompted for it in another Connect To dialog box, provide your password.
Word displays an alert dialog box telling you that your account registration is successful and indicating that you can change settings for this account by clicking Manage Accounts on the Blog Post tab on the Ribbon.
Click OK in the Word alert dialog box indicating that you have successfully set up an account to your blog site.
Word selects the Blog Post tab on the Ribbon and opens a new document with a field at the top of a horizontal rule that says [Enter Post Title Here].
Click the [Enter Post Title Here] field's text to select it and then replace it by typing the actual title of the new post.
The title you type appears in bold letters above the horizontal rule that divides the blog post's title from its body.
Position the cursor at the beginning of the first blank line beneath the horizontal rule and then type the body text of the blog post.
Word 2007 fortunately enables you to assign a blog category to the post from within Word.
Click the Insert Category button on the Blog Post tab of the Ribbon and then click Yes if an alert dialog box warning you about sending your username and password to your blog service provider appears.
Word adds a Category drop-down list box to the blog document, as shown in Figure 8-7.
Choose the category of the blog post from the Category drop-down menu.
Choose Publish from the Publish drop-down menu and then click Yes if an alert dialog box appears, warning you about sending your username and password to your blog service provider.
Note that Windows doesn't close Word after publishing the post to your SharePoint blog site. If you want, you can check that the post is published before you close Word without saving the new post as a Word document.
Click the blog site's Home button on the Windows taskbar and then click the Refresh button in the Web browser.
The new post that you just created in Word 2007 appears at the top of the blog posts.
Click the Document button on the Windows taskbar that contains the new blog post you just published.
Click the window's Close button and click No in the Word dialog box asking you to save the post as a Word document.
SharePoint closes Word without saving the document, returning you to the home page of the SharePoint site with your new blog post.

Wikis in SharePoint are actually a special type of library called, appropriately enough, a Wiki page library. A Wiki page library comes equipped with controls that enable you (and the team members to whom you give access) to edit its layout and content as well as link it to other Wiki pages.
An important feature of a Wiki page is that you and your users can easily create links to other Wiki pages on the SharePoint site. And unlike links to other Web pages on the site that require you to know and enter the page's URL address, links to other Wiki pages merely require you to enter the name of the page enclosed in two pairs of square brackets. For example, to create a link from the home page to a new Wiki page that takes your team members to an existing Wiki page named How To Use This Wiki Library, you simply enter the name of the page enclosed in double square brackets as follows:
[[How To Use This Wiki Library]]
SharePoint then converts all this text into a live hyperlink that you and your wiki users can click to visit this very informative page on how to edit Wiki pages as well as how to create new Wiki pages and links to them.
The steps for adding a new Wiki page library to your SharePoint site couldn't be simpler:
Open the subsite where you want the wiki to appear.
If you want the wiki added to the top-level site, open the SharePoint home page.
Choose Create from the Site Actions drop-down menu.
SharePoint opens the Create page.
Click the Wiki Page Library link in the Libraries column.
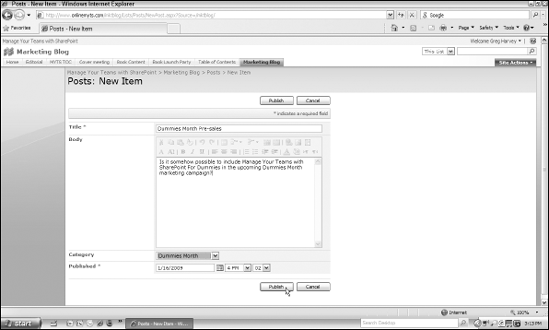
SharePoint opens the New page, similar to the one shown in Figure 8-8. Here's where you assign a name and description, and indicate whether or not the new Wiki page library should appear on the site's Quick Launch.
Type a name for the new wiki site in the Name text box and then press Tab.
SharePoint advances the cursor to the Description text box.
Type a description for the new wiki site that tells your team members what kind of information to expect there.
(Optional) Select the No radio button if you don't want a link to the new Wiki page library to appear in the Documents section of the site's Quick Launch.
If you click No, you and your team members can still access the Wiki page library by clicking the View All Site Content link on its parent site's page and then clicking the link to its name that appears in the Document Libraries section of the All Site Content page.
Click the Create button.
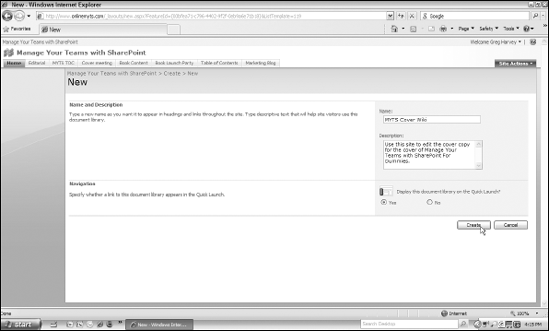
SharePoint creates the new Wiki page library and displays its home page, similar to the one shown in Figure 8-9. The home page gives your users basic information about Wiki pages and contains a How To Use This Wiki Library link that they can click to get more information about actively editing the library.
Note
When you create a new Wiki page library, the library automatically contains two Wiki pages: Home and How To Use This Wiki Library. You can then add as many other Wiki pages to these original two as your library requires. (See the "Adding new pages to a Wiki library" section that immediately follows.)
After you've created the basic Wiki page library, it's easy to add Wiki pages to them:
Click the site's View All Site Content link and then click the link to the Wiki page library in the All Site Content's page Document Libraries section.
SharePoint opens a Wiki library content page that contains a list showing all the Wiki pages currently added to the library.
Choose New Wiki Page from the New drop-down menu.
SharePoint opens a page called New Wiki Page, similar to the one shown in Figure 8-10.
Type a name for the new Wiki page in the Name text box and then press Tab.
SharePoint advances the cursor to the Wiki Content list box, where you type and format the text for the new Wiki page, as well as insert any other content such as tables, links, and graphic images.
Note that as soon as you press the Tab key (or click the cursor in the Wiki Content list box), the various editing buttons at the top of the list box become active. You can then use these buttons to format the text you enter as well as to create tables, insert links and graphic images, and even edit the HTML source code of the page (if you're already familiar with the Hypertext Markup Language).
Enter the text for the new Wiki page in the Wiki Content list box and insert and format any other elements you want to add using the command buttons at the top of the list box.
Click the Create button.
SharePoint creates the new Wiki page and then displays the contents of that page in your browser.

After you add the pages that your new Wiki page library needs, you and any team member to whom you give library access can edit the contents of the pages at will. To edit a Wiki page, display the page in your SharePoint site and then click the Edit button that appears in the cluster of three (Edit, History, and Incoming Links) in the upper-right corner of its page.
SharePoint then opens an Edit Item page containing the page's original contents. At that point, you can change the page using the Wiki Content editing buttons to delete, replace, or add to its text and other non-textual elements.
After you finish making your editing changes, click OK to return to the updated Wiki page in your browser. Then, if you later want to review the additions and deletions made to the page, you can click its History button to view them.
When you click History, SharePoint displays the current version of the page, with all of the text deletions and insertions that have been highlighted in blue and tan, respectively, as shown in Figure 8-11 (in shades of gray). Note, however, that changes made to the page's Web Parts, images, or HTML code aren't displayed in the current version of the page.

To then display the way the Wiki page appeared in an earlier version, you need to click the link attached to its version number — complete with the date and time of the revision — that appears in a chronological list in the panel on the left side of the page.
Tip
To view a chronological listing of the various versions of the Wiki page together, one version above the other from the most recent version to the least recent version, click the Version History button that appears in the row of buttons at the top of the page's Page History. You can then compare differences to the page's Web Parts and graphic images that appear in each of the different versions.
One of the great features of Wiki pages is how easy it is to add links to other pages in the Wiki library. All you have to do is type the name of the Wiki page enclosed in a double pair of square brackets.
For example, for my MYTS (Manage Your Teams with SharePoint) Cover Wiki, I created both Front Cover and Back Cover Wiki pages to enable the book's editorial and marketing teams to mark up and change the book's front cover image and front and back cover copy. I then created a link at the bottom of the Front Cover Wiki page — a link that, when clicked, takes you to the Back Cover Wiki page — by typing the text:
[[Back Cover]]
Then, on the Back Cover Wiki page, I created a link to the Front Cover Wiki page simply by typing the text:
[[Front Cover]]
RSS (Real Simple Syndication) feeds in SharePoint 2007 enable you and your team members to stay informed of when changes occur on your SharePoint site. Although RSS feeds aren't limited to SharePoint blogs, this is the one component where this particular kind of subscription makes perfect sense. By subscribing to RSS feeds for your team's blog, you can automatically stay informed of when additions actually take place.
Note
Note
The key to using RSS feeds with the various elements of SharePoint (anything from a list or document library all the way to your favorite blog site) is to use an RSS reader that can deal with password-protected sites. Not all RSS readers are able to do this, sometimes including Microsoft's own Internet Explorer 7. Because your SharePoint site is password-protected and open only to authenticated users, you must use an RSS reader — such as Outlook 2007 or Mozilla's Firefox Web browser — that can deal with feeds to this type of restricted site.
If you regularly use Outlook 2007, you can use its RSS feed capabilities to make it act as your RSS reader when subscribing to a SharePoint blog. To add an RSS feed for a SharePoint blog in Outlook 2007, follow these steps:
In SharePoint, open the blog to which you want to subscribe.
You can usually do this by clicking its button on the Top Link bar or clicking its link in the Sites section of the Quick Launch.
Click the RSS Feed button below the Links section of the blog's Quick Launch.
SharePoint opens a Posts page containing a banner with RSS feed information, similar to the one shown in Figure 8-12.
Right-click your Web browser's address bar and then choose Copy from the shortcut menu.
SharePoint copies the URL of the blog's RSS feed into the Windows Clipboard.
Switch to Outlook 2007 or, if it's not running, launch the program. Then right-click the RSS Feeds folder in the Mail Folders section of the Outlook Navigation pane and choose Add a New RSS Feed from its pop-up menu.
Outlook opens the New RSS Feed dialog box.
Press Ctrl+V and then click the Add button in the New RSS Feed dialog box.
Outlook pastes the URL of the SharePoint blog's RSS feed into the Enter the Location of the RSS Feed You Want to Add to Outlook dialog box and then displays the Add This RSS Feed to Outlook alert dialog box.
Click the Yes button in the Add This RSS Feed to Outlook dialog box (and then enter your SharePoint password if the Connect To dialog box appears and click OK).
SharePoint then adds a subfolder for the particular blog to the RSS Feeds section of the Mail Folders in the Outlook Navigation pane, while at the same time displaying a list of all the posts the blog currently contains in the new folder in the center pane.

Note
After subscribing to a SharePoint blog in Outlook, Outlook automatically adds all new posts that are made in that blog to the blog subfolder you just added to the RSS Feeds section of the Mail Folders.
Firefox is a good example of a Web browser that does support RSS feeds to password-protected sites (unlike Microsoft's very own Internet Explorer). You can therefore use it to subscribe to various SharePoint lists and libraries.
Note
The great thing about RSS feeds in Web browsers such as Firefox is that new items in the list or library show up immediately in the browser (assuming that it's open in Windows). This isn't the case with RSS feeds in Outlook 2007, where you may have to wait some time before new items appear in the appropriate mail folder.
To add an RSS feed for a SharePoint blog in the Mozilla Firefox Web browser, follow these steps:
Open your SharePoint site in the Firefox browser and display the blog to which you want to subscribe in SharePoint.
You can normally do this by clicking the blog's button on the Top Link bar or by clicking its link in the Sites section of the Quick Launch.
Click the RSS Feed button below the Links section of the blog's Quick Launch.
SharePoint opens a blog page with an RSS feed banner for Firefox that suggests subscribing to the feed using its Live Bookmarks.
Click the Subscribe Now button in the banner on the blog page in Firefox.
Firefox opens an Add Live Bookmark dialog box that suggests a name and location for the new RSS feed bookmark.
If you want to change the name or location of the new RSS feed bookmark, do so before you click the Add button.
Firefox adds an option to its Bookmarks menu with the name of the RSS feed bookmark you just assigned. When you position the mouse pointer over this option, Firefox displays a submenu with individual options for all the posts currently in the blog. You also see options to open the blog pages on your SharePoint site or to open each of the individual posts on the blog in separate Web pages with their own tabs.
Note
After subscribing to a blog in Firefox, you can have the browser add all new posts made to the blog to the submenu attached to the blog's bookmark option. To activate this feature, right-click the blog's option on the Bookmarks menu and then choose Reload Live Bookmark from the shortcut menu that appears.