
In This Chapter
Becoming familiar with the Office SharePoint Designer 2007 interface and environment
Opening your SharePoint site in SharePoint Designer
Creating a custom SharePoint workflow with Workflow Designer
Office SharePoint Designer 2007, the subject of this chapter, is a standalone Web designing program that Microsoft developed specifically for working with SharePoint sites. As you're very much aware if you've had the opportunity to peruse the other earlier chapters of this book, SharePoint Designer is not necessary for performing routine SharePoint customization and maintenance. In fact, the vast majority of SharePoint knowledge workers get along perfectly fine without the program when it comes to tailoring their SharePoint sites for the particular needs of the teams they supervise and collaborate with.
Nevertheless, Office SharePoint Designer 2007 does have its uses, even for the nonprogrammer with no intention of ever trying his hand at XML-driven Web solutions. SharePoint Designer's most notable use (and the real reason for including this chapter) is its very powerful Workflow Designer. This wizard enables even the most code-phobic people to develop custom workflows for a SharePoint site to supplement the default three-state workflow template, which is the only one available to you if you're using Windows SharePoint Services without MOSS 2007. (See Chapter 10 for details about the three-state workflow template.)
As you find out in this chapter, the Workflow Designer in Office SharePoint Designer takes you through each of the steps necessary to define a workflow for a particular list or library on your SharePoint site.
Figure 13-1 shows you the basic Office SharePoint Designer 2007 program window as it appears when you first launch the application for customizing your SharePoint site on your local computer.

Figure 13.1. The Office SharePoint Designer 2007 program window as it appears when you first launch the application.
Note
Microsoft considers Microsoft Office SharePoint Designer 2007 to be an integral part of its Office 2007 suite of programs, even though it's not automatically included in the various versions of the Microsoft Office suite (along with Word, Excel, Outlook, and the rest). For this reason, you find the menu option for starting this application on the same All Programs
As shown in Figure 13-1, besides its pull-down menus and single Common toolbar at the top, for the most part, the SharePoint Designer window consists of different types of panes. The Folder List pane that you use to navigate the folders containing the various parts of your SharePoint site is on the upper-left side. Below it is the Tag Properties pane, which is used to display the properties of the Web page that appears in the pane in the center when a particular SharePoint page is selected.
On the right side of the central pane with its tab, you find the Toolbox pane, which enables you to select various HTML tags and forms controls when customizing a Web page. Beneath that pane, you find the Apply Styles pane, which enables you to format the various elements that appear on the Web page you're customizing using CSS (Cascading Style Sheets) styles.
To be able to customize elements of your SharePoint site using SharePoint Designer 2007, you first need to open the site in the program. To do this, select Open Site from the Open drop-down list on the Common toolbar or choose File
SharePoint Designer then displays an Open Site dialog box similar to the one shown in Figure 13-2. Type the URL address of your SharePoint site in the Site Name text box and then click the Open button.

After you're prompted to provide your username and password (if you're not already logged on to your site and it's hosted by a third-party service provider), SharePoint Designer connects to your SharePoint site. The Folder List pane on the left displays all the subfolders currently in the site, and the central pane contains a Web Site tab that contains a table showing details of this folder structure (see Figure 13-3).

You can then switch the view of the site on the Web Site tab from its default Folders view to Navigation view (as shown in Figure 13-4) by clicking the Navigation button that appears in the row at the bottom below the Web Site tab.
The Navigation view shows the organizational structure of your SharePoint site in a diagram form that graphically depicts the connection between its various elements. In this view, you can see the relationship of all subsites, lists, libraries, and other SharePoint components to each other and all the components that are directly beneath them. This graphic view can help you visualize the hierarchy that exists between the various folders and pages and how they must be navigated on the actual SharePoint site.
Tip
When viewing your SharePoint site in Navigation view, you can narrow the hierarchical diagram displayed in the Web Site tab by right-clicking a SharePoint icon and then clicking the View Subtree Only option on the shortcut menu that appears. SharePoint Designer then temporarily removes all icons except for those that are below the one you right-clicked. To re-expand the Navigation view to once again include all the site components, you just have to click the View All button that appears as a broken arrow pointing up and to the right immediately above the Sites icon.

One of the niftiest features of Office SharePoint Designer 2007 is its Workflow Designer. This wizard enables you to create your own custom workflows for particular Tasks and Issue Tracking lists on your SharePoint site in addition to those workflows based on the default three-state workflow provided by SharePoint Services 3.0 (see Chapter 10) and the document-processing related workflow templates offered by MOSS 2007.
To create a custom workflow in SharePoint Designer, open the SharePoint site and follow these steps:
Choose File

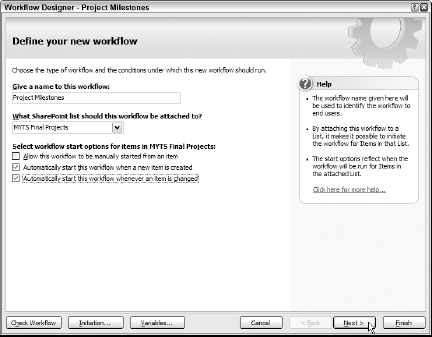
SharePoint Designer opens the Workflow Designer – Workflow 1 dialog box called Define Your New Workflow, similar to the one shown in Figure 13-5. Here, you specify a name for the new workflow, associate the workflow with a particular SharePoint list, and specify whether the workflow is to begin manually or automatically.
Type a name for the new custom workflow in the Give a Name to This Workflow text box and then press Tab.
SharePoint Designer selects the drop-down list called What SharePoint List Should This Workflow Be Attached To.
Select the Tasks or Issue Tracking list with which the new workflow is to be associated on its drop-down list.
By default, SharePoint Designer selects the Allow This Workflow to Be Manually Started from an Item check box as its sole method for starting the new workflow. If you want SharePoint to automatically start the workflow when a new item in the associated list is created, you need to select the Automatically Start This Workflow When a New Item Is Created check box. If you want SharePoint to automatically start the workflow when a new item in the associated list is modified, you need to select the Automatically Start This Workflow Whenever an Item Is Changed check box.
(Optional) To automate the starting of the workflow, click the appropriate Automatically Start check box (or boxes).
Click the Next button at the bottom of the Define Your New Workflow dialog box.
SharePoint Designer opens the Step 1 dialog box (similar to the one shown in Figure 13-6). Here, you specify the conditions and the subsequent actions that ensue when the first condition is met.
For this sample workflow, I want to set up a condition whereby the workflow automatically sends out warning e-mail messages to team members whose tasks are in progress and are less than 50 percent complete. In order to set up the condition, I compare the current entries in the list's Tasks Status field and in the % Complete field. And if the status is not Completed and the % Complete is less than 50, the condition is met and workflow initiates the action that I associate with it.
Click the Conditions drop-down button and then click Compare Field option at the top of the drop-down menu.
SharePoint Designer inserts the generic condition If field equals value into the area to the immediate right of the Conditions button.
Click the field link and then click the % Complete option in the drop-down list.
The condition now reads, If % Complete equals value.
Click the equals link and then click Is Less Than on the drop-down menu.
The condition now reads, If % Complete is less than value.
Click the value link and then type 50 in the text box that appears and press Enter.
The condition now reads, If % Complete is less than 50.
Click the Conditions drop-down button and then click Compare Field option at the top of the drop-down menu.
SharePoint Designer inserts a second line for the condition that reads, And field equals value.
Replace field with Task Status, equals with not equals, and value with Completed in the second line of the condition.
The second line of the condition now reads, And Task Status not equals Completed.
Click the Actions drop-down button and then click the Send an E-Mail option at the top of its drop-down menu.
SharePoint Designer inserts the E-Mail this message action to the immediate right of the Actions button.
Click the link attached to this message in the Actions line.
SharePoint Designer opens the Define E-Mail Message dialog box. Here, you specify the recipients of the message, its subject, and the actual message you want to send.
Specify the recipients (these can be individual team members or user groups), the subject of the e-mail, and the body of the message in the appropriate text boxes and list box and then click OK.
Note that you can use the Add Lookup Body button to insert actual values from particular fields in the SharePoint list (usually those that trigger the sending of the e-mail message) into the body of the message. SharePoint then substitutes the actual value in the list for the field that appears in the body of the e-mail message.
After you click OK, SharePoint Designer closes the Define E-Mail Message dialog box and returns you to the Step 1 dialog box. Here, you can review your condition and actions and also add another Else IF branch to it that specifies what actions the workflow is to take when the initial condition is not met.
After you finish adding all the conditions and related actions for the new workflow, click the Check Workflow button to verify that workflow is complete before you click the Finish button.
SharePoint Designer saves the workflow and closes the Step 1 dialog box of the Workflow Designer. If you're finished using Office SharePoint Designer 2007, you can close the program and return to the list to which the custom workflow is associated on your SharePoint site.

Note
If you specify that a custom workflow created with Office SharePoint Designer 2007 is to be started manually, you need to remember to open the associated list on the SharePoint site, click Workflow on the drop-down menu attached to one of the items in the list, and then click the link to the workflow's name in the Start a New Workflow section at the top of the Workflows page.