
In This Chapter
Adding team members to your SharePoint site
Understanding SharePoint groups and permissions
Assigning team members to various SharePoint groups
Modifying group settings and user information for your team members
When you have your SharePoint site organized the way you want (see Chapter 2) and you've added the content your teams initially need in order to start collaborating on a project (see Chapters 4 and 5), you're ready to grant the team members access to your site. This chapter covers the basic process for giving your team members access to the SharePoint site. You do this by enrolling your team members into groups that grant them the permissions for accessing their information and, in certain situations, editing their contents as well.
The hallmark of SharePoint 2007 is its ability to give you the highest online security for the information you publish there. To maintain this security, it's your responsibility to grant access to each of the individual team members you want as part of your SharePoint site for the purposes of information sharing and collaboration.
Granting access to a team member is typically a twofold process. First, you or a member of your company's IT department (as a site administrator) designates the team member as an authenticated user of the SharePoint site by assigning him an initial username and password. Next, you log on to the SharePoint site (again, as an administrator) and then designate this team member as a new user of the SharePoint site by assigning him or her to a group with certain site permissions. As part of this process, you can send any new team members an e-mail inviting them to tour the site and then begin collaborating in earnest.
If your SharePoint server is administered internally by your own IT department, you will want to give the person in charge of setting up your site a list of all team members you want added as authenticated users of the SharePoint site. If permitted by your IT department, you can choose initial usernames and passwords for each of the team members. If this isn't permitted by the IT department in your company, be sure that the IT SharePoint site administrator provides you with a list of the usernames assigned to each of your team members (because you'll need this information to assign them to SharePoint groups).
Note
If your SharePoint site is hosted by an external Internet provider or Web service, you need to check with its particular procedures for adding users to your SharePoint site. Many times, the SharePoint service provider supplies you with a Web address for a User Management page that you use to authenticate the users of your SharePoint site.
Then, all you have to do is to log on to this page using your administrator user's name and password and there assign each team member his or her own unique site username and password. Figure 3-1 shows a typical Web page for creating a new user for a hosted SharePoint site.

As you can see in this figure, to add a new team member using this particular SharePoint provider's Web page, you assign a unique username and password of between 5 and 20 characters in the Choose a Username and Choose a Password text boxes, respectively (with no spaces or punctuation symbols). Then you specify the Web address of the SharePoint user site to which the user is added in the Specify Website text box. (Conveniently enough, the text box already contains the http:// URL address prefix.)
SharePoint 2007 maintains online security of your SharePoint site on many different levels. Site-level permissions (the top level) determine the overall level of viewing and editing access that each authenticated user has to all the components in the entire site collection.
Because all the subsites you add to your SharePoint site (see Chapter 2) inherit their site permissions directly from the top-level site, if you give your team members top-level site access, they retain that access in all the subsites you create — unless you specifically modify a particular member's permissions.
The common site permissions that you can bestow upon authenticated users include the following levels:
Full Control: Gives the SharePoint user complete site management, including all capabilities bestowed by the other site-permission levels (see the following bullets) as well as the ability to modify the user permissions of authenticated SharePoint users.
Design: Enables the SharePoint user to modify the layout of the SharePoint site — either by using a Web browser or through the use of Office SharePoint Designer 2007 (see Chapter 13) — as well as to edit items and browse the site content.
Contribute: Enables the SharePoint user to add to and edit items added to the pages of the SharePoint site, including data stored in various lists (see Chapter 4) and files stored in various libraries (see Chapter 5).
Read: Enables the SharePoint user to browse the information on the site, including downloading files such as Word documents, Excel workbooks, and PowerPoint presentations stored in site libraries for viewing and printing in their native application programs.
The administrator or administrators of a SharePoint site, by definition, have Full Control permissions for the entire site collection. Moreover, administrators are permitted to designate other authenticated users as administrators as well as to change the site-level (and individual) permission levels of any SharePoint user.
To see who the administrator(s) of the SharePoint site actually are — and then view and edit their user profiles, if you so desire — just follow these steps:
Log on to the SharePoint site and then choose Site Settings from the Site Actions drop-down menu on the home page.
SharePoint opens the Site Settings page for the SharePoint site.
Click the Site Collection Administrators link located in the initial Users and Permissions column of the Site Settings page.
SharePoint displays a Site Collection Administrators page similar to the one shown in Figure 3-2. If you've logged on to the SharePoint site as an administrator (in which case, your username appears in the list of names displayed in the Site Collection Administrators list box), you can add names of administrators in this list box as well as delete names from it.
To add an administrator, enter his or her username in the Site Collection Administrators list box. To remove an administrator, click his or her username and then press the Delete key.
When adding usernames to this list box, you can click the Browse button (the one with the open book icon) to select authenticated usernames in the Select People dialog box. If you type the username, click the Check Names button (the one with the check mark under a person's bust) to verify that you've entered the username correctly and that SharePoint recognizes the team member as an authenticated user. Note that if SharePoint can find a match, it underlines the names, and you can then click them for recommended replacements.
Tip
You can add multiple names to the list box in one fell swoop, as long as each username is separated by a semicolon (;).
Click OK to put your administrator changes into effect or click Cancel if you were just browsing the list.
SharePoint makes your changes and then returns you to the Site Settings page.

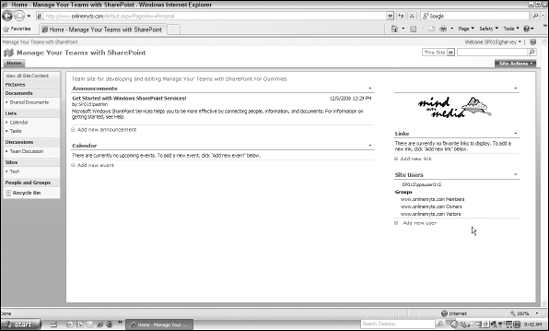
As I mention in Chapter 2 when discussing personalizing your SharePoint site, SharePoint 2007 includes a Site Users Web Part that you can add to a page. This Web Part lists the name of the site administrator followed by the names of all the site's user groups. This Web Part also contains an Add a New User link that you can use to open an Add Users page, where you add new users as well as set the permissions and assign groups to any new authenticated users you've added to your site.
Note
The greatest feature of this Web Part is the Presence icon that appears next to the username when a team member is online. You can use this icon to communicate with the team member via instant messaging as well as to send him an e-mail or schedule a meeting with him.
The Administrator and Site groups listed in the Site Users list each contain a live link. You can follow the administrator's link to view and/or modify his or her user information, and you can follow the user group links to view and/or modify the teams assigned to each group. (See the "Assigning Individual Team Members to SharePoint Groups" section that immediately follows for details.)
If the thought of adding a Site Users Web Part to your home page seems appealing, follow these steps:
Log on to your SharePoint site.
Click the Personalize This Page option on the Welcome button's drop-down menu.
SharePoint displays an Edit Mode panel on the home page with the message that you're editing a Personal Version of the page.
Note
I assume here that you don't want this Web Part to be a part of the home page when other team members log on to the site, so you'll want to specify it as a Personal Version of the home page. Also, I chose the Right Web Part zone because the information displayed in the Site Users Web Part doesn't require the width of the Left zone and is a better fit in the Right zone.
Click the Add a Web Part button at the top of the Right Web Part zone.
SharePoint opens the Add Web Parts to Right dialog box.
Select the check box in front of the Site Users Web Part option and then click the Add button.
SharePoint closes the Add Web Parts to Right dialog box and then adds the Site Users Web Part to the top of the Right Web Part zone.
Position the mouse pointer on the title bar of the Site Users Web Part and then drag its outline down until the I-beam appears beneath the final Web Part in the Right zone (the Links Web Part if you haven't yet customized this zone) and then release the mouse button to drop it into place.
The Site Users Web Part now appears at the bottom of the Right Web Part zone.
Click the Exit Edit Mode button on the far-right side of the Version bar.
SharePoint exits Edit mode, and the Site Users Web Part at the bottom of the Right zone appears with links for the site administrator and site users groups listed. Your page should look similar to Figure 3-3.
Note
Keep in mind that after you add the Site Users Web Part to a Personal Version of the SharePoint home page, that Web Part no longer appears on the page if you switch to Shared view by selecting the Show Shared View option that now appears on the Welcome button's drop-down menu. To then make the Site Users Web Part again available on your home page, you have to click the Show Personal View option that replaces Show Shared View on the Welcome button's drop-down menu.
To help you manage site permissions for your team members, Windows SharePoint Services enables you to assign any team members you've added as authenticated users to different SharePoint user groups. Each group is assigned its own site permissions level as follows:
Owners [Full Control]: Team members you add to the Owner's group become administrators who can change the content and layout of the site as well as modify permissions for authenticated users.
Visitors [Read]: Team members you add to this group are restricted to browsing the contents of the site, although they can download files stored in libraries for editing and printing in their native application programs.
Members [Contribute]: Team members you add to this group can modify the contents of the site as well as browse it.
Note
If you want to give a particular team member Design permissions — permissions that enable him or her to modify the layout of the site as well as to edit and browse its contents — you either need to assign this level directly to that team member (see "Adding authenticated users to a SharePoint group" later in the chapter for details) or you need to create a new SharePoint Design group where you can then place that team member (as outlined in the section that immediately follows). You have to engage in this workaround because Windows SharePoint Services 3.0 doesn't have a ready-made user group with Design permissions.
If none of the ready-made SharePoint user groups have quite the required group settings you want — or don't bestow the desired permissions level you need — you can (as a site administrator with Full Control permissions) create a custom group to do the job. You can then add authenticated users who merit its group settings and permissions level to your newly customized group.
To see how this works, follow the steps in the procedure for creating a new Design user group that bestows the Design permissions on all authenticated users assigned to the group:
Log on to your SharePoint site and then choose Site Settings from the Site Actions drop-down menu.
SharePoint opens the Site Settings page.
Click the People and Groups link at the top of the Users and Permissions column.
SharePoint opens the Peoples and Groups page for your SharePoint site.
Choose New Group from the New drop-down menu.
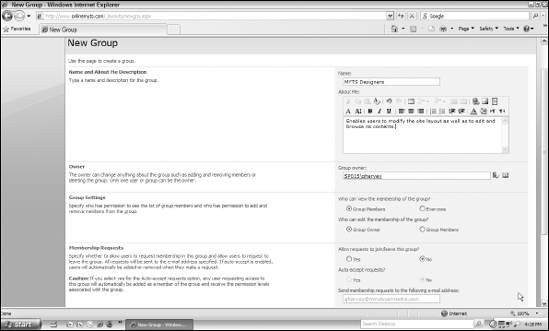
SharePoint opens the New Group page, similar to the one shown in Figure 3-4.
Type the name of the new user group in the Name text box and then press Tab.
SharePoint advances the insertion point to the About Me list box.
Type a description of the new group in the About Me list box.
This explanation should describe the type of users, settings, and/or permission levels that you assign to the group.
(Optional) Select a new user who's responsible for making any modifications to the new group's settings in the Group Owner text box.
SharePoint automatically displays the name of the primary administrator of the SharePoint site in the Group Owner text box. If you decide to designate another user as the group owner who is solely responsible for making changes to its setting, this person must have Full Control permissions on the SharePoint site.
(Optional) Modify any of the Group Settings options that you want to change for the new group.
By default, only users who you assign to the new group can view its membership list, and only the group owner can edit this list. However, you can modify the following settings:
Who can view the membership of the group? To enable any SharePoint user to view this membership list, select the Everyone option.
Who can edit the membership of the group? To enable any group member (not generally recommended) to edit the membership list, select the Group Members option.
(Optional) Enable Membership Requests and modify its settings if you want to enable users to send you requests opting for being added to the group or for being removed from it.
Allow requests to join/leave this group? To allow requests for membership in the group (as well as removal from it), select the Yes option.
Auto-accept requests? To have all requests to join and leave the group automatically accepted, select the Yes option.
By default, SharePoint sends requests to join or leave the group to your primary e-mail address. To have all requests e-mailed to another e-mail address, you need to enter that address in the Send Membership Requests to the Following E-Mail Address text box.
In the Give Group Permissions to This Site area at the bottom of the page, select the check box of the permission level (Full Control, Design, Contribute, or Read) that users you assign to the new group should have.
Click the Create button.
SharePoint creates the new group using the settings you selected.
When the program finishes creating the new user group, SharePoint automatically opens a People and Group page. This page displays the name of the new group and shows it selected (with highlighting) in the Groups links in the left panel. In addition, your name appears listed as the sole user in this group (unless you changed the group owner back in Step 6).
You can then use the Add Users option on the New drop-down menu of this People and Groups page to add all the authenticated users you want to the new custom group you just created. (See the "Adding authenticated users to a SharePoint group" section that follows immediately for details.)
The procedure for adding users to a SharePoint group is very straightforward. Just be aware that SharePoint gives you a couple of ways to open the People and Groups page, which lists all current users in the Members group and from which you can add authenticated users to your site.
The most direct way to open this page is to click the People and Groups link at the bottom of the Quick Launch for the site's home page. You can also open this People and Groups page for the site by clicking the People and Groups link that appears in the Users and Permissions column of the Site Settings page (opened by choosing Site Settings from the Site Actions drop-down menu).
Then, with a People and Groups page open, you can follow these steps to add team members (who are authenticated users) to any of the available user groups:
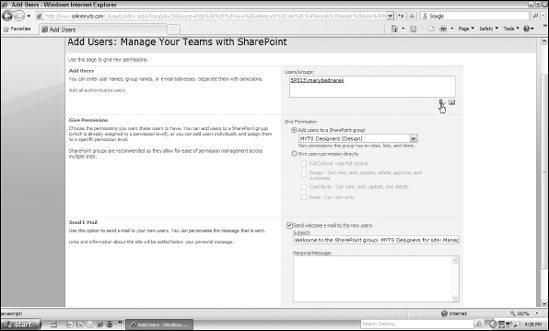
Choose Add Users from the New drop-down menu.
SharePoint opens an Add Users page for your site, similar to the one shown in Figure 3-5.
Enter the usernames, separated with semicolons (;), of all the team members you want to add to a particular user group in the Users/Groups list box.
When adding usernames to this list box, you can click the Browse button (the one with the open book icon) to open the Select People dialog box, where you can search for authenticated users by typing part of their usernames into the Find text box and then pressing Enter. SharePoint then finds the username and displays and selects it in the list box below. You can then add it by clicking the Add button before you click OK.
If you type the usernames, click the Check Names button (the one with the check mark under a person's bust) to verify that you've entered the names correctly and that SharePoint recognizes them as authenticated users.
On the Add Users to a SharePoint Group drop-down list, select the name of the user group with the site permissions you want to assign the user(s) listed above in the Users/Groups list box (if that group's name isn't already displayed in this drop-down list box).
Note that if none of the ready-made user groups bestow the level of permissions that you want to grant, you need to click the Give Users Permission Directly option button and then click the check box of the permission level (Full Control, Design, Contribute, or Read) that you want to assign.
(Optional) To add a personal message to the welcome e-mails that SharePoint automatically sends to the users you're adding, click the Personal Message list box and then type the text of your message.
If you don't need to send welcome e-mail messages to the team members you're adding to the SharePoint site, deselect the Send Welcome E-Mail to the New User check box.
Click OK at the bottom of the Add Users page.
SharePoint adds the users you specified to the group you designated. The program then opens the People and Groups page for that user group, where all the usernames of all team members you added are now listed.
SharePoint makes it easy to manage both the team members you add as users to your site and the SharePoint groups to which you assign them. Simply click the People and Groups link at the bottom of the Quick Launch (immediately above the Recycle Bin) on your SharePoint site's home page.
The program then typically displays a People and Groups page (similar to the one shown in Figure 3-6), which shows a list of the users you've added to the Members SharePoint group. To view users that you've added to another user group, simply click its link in the Groups area on the left, which appears immediately above the View All Site Content link and the Quick Launch. To view all the users that have access to the SharePoint site, click the All People link that appears in the Groups area above the page's Quick Launch.

You can easily view (as well as edit) the settings and permissions for any of the SharePoint groups that your particular site uses (assuming, of course, that you're logged on as an administrator). Simply click the Site Permissions link above the View All Site Content link to open a Permissions page for your site (similar to the one shown in Figure 3-7).
This Permissions page contains a list of all the SharePoint groups used on your site as well as the usernames of any team members you've added to the site without assigning them to a particular group (by directly assigning their permissions level).
To edit the permissions level for a particular group in the list on the Permissions page, follow these steps:
Click the link attached to the name of the group whose permissions need changing (such as Members, Owners, Visitors, and so forth) in the Users/Groups column of the Permissions page.
SharePoint opens an Edit Permissions page for the selected group, showing its current permissions level.
(Optional) Deselect the check box in front of the permissions level currently assigned to the selected group (Full Control, Design, Contribute, or Read).
You always want to remove the currently assigned permissions level before assigning a new level to a group when that new permissions level is less inclusive than the current one (as in going from Full Control down to Contribute). Otherwise, SharePoint still grants the users in this group the rights associated with the more inclusive level even after you finish editing the group's permissions.
Select the check box in front of the new permissions level you want to assign to the selected group (Full Control, Design, Contribute, or Read).
Verify that the check box for the new permissions level — the one you now want the group members to have — is the one selected in the Choose Permissions area.
Warning
Note that if you happen to remove the current permissions level without setting a new one (by clicking OK when all the permissions level check boxes are deselected), the members of the group in question then have no rights to any part of the SharePoint site!
Click OK.
SharePoint closes the Edit Permissions page for the selected group and returns you once again to the general Permissions page showing all the groups and the users not assigned to groups.

Instead of modifying the permissions for an entire SharePoint user group, you may just need to change the level for particular team members. You do this by removing the team member from his or her current SharePoint group and then assigning that member to a new user group with the appropriate permissions.
To change a team member's permissions level when you're logged on to the SharePoint site's home page, follow these steps:
Click the People and Groups link beneath the home page Quick Launch.
SharePoint typically opens the People and Groups page for the Members group where you start by selecting the user group from which the team member in question currently derives his permissions.
If the team member isn't part of the Members group, click the link to the SharePoint group to which he's currently assigned in the Groups area of the left panel.
When you've displayed the group to which the team member is currently assigned, you ready to select that member.
Select the team member in the group list whose permissions you want to modify by clicking the check box in front of his or her name.
Now you're ready to remove the selected team member from the current group and assign him or her to a new group.
Choose Remove Users from Group from the Actions drop-down menu and then click OK in the alert dialog box to confirm the person's removal.
Having removed the team member in question from his or her previous SharePoint group, you're now ready to assign the team member to the user group that has the permissions level you now want him or her to have.
In the Groups area of the left panel, click the link to the SharePoint group with the permissions you now want the team member to have.
Now all you have to do is add the team member to the new group with the new permissions.
Choose Add Users from the New drop-down menu and then follow the procedure for adding the team member in question to this group.
Refer to the section, "Adding authenticated users to a SharePoint group" earlier in this chapter if you need help adding a user.
After adding your authenticated users to a SharePoint site, you typically can view and edit their user information. You can modify the username, e-mail address, description, department, and job title. In addition, you can also add a photo that visually identifies the user on the SharePoint site in any user list.
To edit the information stored in a team member's user profile, follow these steps:
Click the People and Groups link beneath the home page Quick Launch.
SharePoint opens the People and Groups page for the Members group.
Click the All People link in the Groups area on the People and Groups page.
SharePoint opens an All People page, which lists all the authenticated users that have been added to the site.
Click the link attached to the name of the team member whose user profile you want to edit.
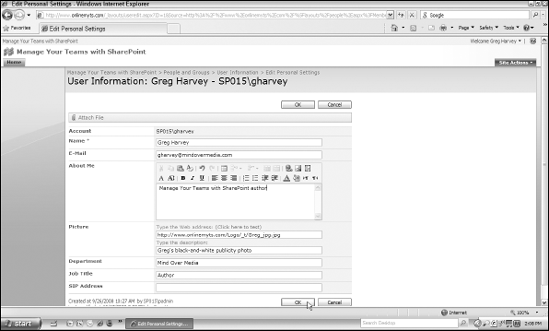
SharePoint opens a User Information page for the selected team member, showing his current user profile information.
Click the Edit Item button at the top of the rows of user information.
SharePoint opens an Edit Personal Settings page for the team member with editable fields containing the user profile information, similar to the one shown in Figure 3-8.
Edit any of the information in the individual fields (Account through SIP Address) that need updating.
To add the team member's photo to his profile, you must specify the URL address of a SharePoint folder that already contains the uploaded graphics file. (See Chapter 5 for details on uploading graphics to a picture library.)
Click OK.
SharePoint closes the Edit Personal Settings page that you just edited and returns you to the All People page, where the updated information now appears for that team member.
If there comes a time when a particular team member is no longer actively working on the project and therefore no longer needs access to the SharePoint site, you can remove him or her.
To remove a team member from the SharePoint site, follow these steps:
Click the People and Groups link beneath the home page Quick Launch.
SharePoint typically opens the People and Groups page for the Members group.
Click the All People link in the Groups area on the People and Groups page.
SharePoint opens an All People page that lists all the authenticated users that have been added to the site.
Select the check box in front of the name of the team member you want to remove from the SharePoint site.
Now you're ready to remove the team member whose username you selected.
Choose Delete Users from Site Collection from the Actions drop-down menu and then click OK in the alert dialog box to confirm the user's removal.
SharePoint removes the name of the selected team member from the All People page, along with his or her permissions to use its contents.
Note
Should you ever find that you need to reinstate a team member that you've removed from your SharePoint site, you can do so by following the procedure for adding the user to the site. (See "Adding authenticated users to a SharePoint group" earlier in this chapter for details.)
SharePoint enables you, as an administrator, to modify a site's permission levels. You can change particular settings for existing permission levels (such as Members, Contributors, and so on). You can add new site permission levels (such as Visitor or Partial Access) and even delete an existing permission level (which, of course, you'd want to do only after reassigning the site permissions for all team members currently granted that level).
To modify the permission levels for a site, take these steps:
Open the site whose permission levels you want to modify.
If you want to modify the permission levels for the top-level site and all subsites below it, open the home page of your SharePoint site.
Choose Site Settings from the Site Actions drop-down menu.
SharePoint opens the Site Settings page.
Click the Advanced Permissions link in the Users and Permissions column.
SharePoint opens the Permissions page for the selected site.
Choose the Permission Levels option from the Settings drop-down menu.
SharePoint opens the Permission Levels page for your site, similar to the one shown in Figure 3-9.

On the Permission Levels page, you can then make any of the following changes to the site's particular levels:
Add a level: Click the Add a Permission Level button at the top of the Permission Levels page. Then, on the Add a Permission Level page, enter a name and description for the new level and select each of the check boxes for the individual permission settings you want to enable. When you're ready, click the Create button. To enable all the permission settings for the new level, select the Select All check box immediately beneath the Description list box.
Delete a level: Select the check box(es) for each of the permission levels you want to delete on the Permission Levels page and then click the Delete Selected Permission Levels button. You then need to click the OK button in the alert dialog box asking you to confirm the deletion.
Warning
Before you click OK to delete the permission level, be absolutely certain that you've reassigned all the users and groups in that level to another level that you're retaining. If you haven't reassigned them, those folks will get locked out of accessing the site!
Modify the settings of an existing level: Click the name of the permission level whose individual settings you want to tweak in the Permission Level column on the Permission Levels page. SharePoint then opens an Edit Permission Level page for the particular level you selected. You can then modify particular permission settings for this level by selecting individual check boxes to enable new settings and/or by deselecting check boxes to disable them before you click the Submit button.
Tip
Perhaps you want to create a new permissions level for the site that's based on the settings of the level currently open in the Edit Permission Level page. If so, click the Copy Permission Level button at the bottom of the page, name the level "copy," and then make any necessary changes to its individual settings before clicking the Create button.