Understanding Tasks, Project Tasks, and Issue Tracking lists
Using the Tasks list that comes with SharePoint and switching its views
Adding the Gantt view to the default Tasks list
Creating and maintaining an Issue Tracking list
Automating the business process in an Issue Tracking list
Dividing your collaborative projects into discrete tasks and then assigning them to teams or particular team members and tracking their progress are frequently important functions of a SharePoint site. To that end, SharePoint supports three types of task-oriented lists:
Tasks: Provides a simple Tasks list with Title, Assigned To, Status, Priority, Due Date, and % Complete fields as its columns. Typically, when you start a new SharePoint site, the site contains a Tasks list (simply called Tasks) that you can start using to assign tasks to your team members and keep track of their progress.
Project Tasks: Tracks the exact same information as a Tasks list except that a Project Tasks list comes with a special, graphical Gantt chart display (simply called Project Tasks) as its default view. The Gantt chart uses bar graphs to give you a visual sense of where project tasks overlap in time and when their due dates are coming up. Note that you can create a custom view for the default that gives you this Gantt chart display of the tasks you track in a regular Tasks list. (See "Creating a custom Gantt view for your site's Tasks list," later in this chapter, for details on how to create this Gantt chart custom view for your site's default Tasks list.)
Issue Tracking: Designed to enable you to track particular issues that your teams need to deal with and resolve, either in the course of their SharePoint collaboration or in the course of their regular job duties. The fields tracked by an Issue Tracking list include Title, Assigned To, Issue Status, Priority, Description, Category (which you must customize), Related Issues, Comments, and Due Date.
In this chapter, you find out about how to use the Tasks and Project Tasks lists to track the tasks that you and your team members need to collaborate on and get done. You also find out how to use Issue Tracking lists to track the issues that you need to deal with and bring to some sort of resolution.
As part of learning the ins and outs of using these very useful Tasks and Project Tasks SharePoint lists, you also find out how to integrate them with the task-tracking capabilities of Outlook 2007 so that the tasks assigned specifically to you automatically show up in your Outlook 2007 To-Do Bar!
Finally, you get an introduction to SharePoint workflows. Workflows simplify common business processes by automatically taking certain steps at particular junctions in the process when you and your team members complete certain tasks. In this chapter, you find out how to use the default three-state workflow that comes with SharePoint Services 3.0 to create a workflow that automates the process for resolving issues pertaining to a particular SharePoint Issue Tracking list.
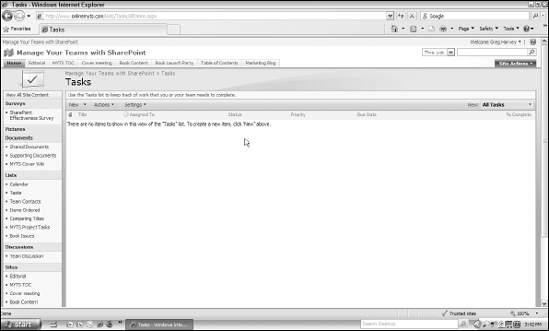
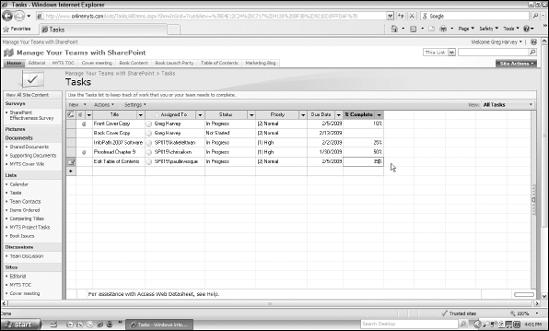
When you start a new SharePoint site created with a Team Site (as so many are), you already have a Tasks list (named, appropriately enough, Tasks). This default list has its own Tasks link in the Lists section of the Quick Launch on the SharePoint site's home page. When you click this link, SharePoint opens the empty Tasks list shown in Figure 10-1, where you can start adding the tasks that you and your fellow team members need to begin working on.
The default Tasks list contains a simple list with columns that identify the following information for each of its tasks:
Title: This field gives you the name of the task.
Assigned To: This field shows you the name of the team member to whom the task is assigned.
Status: This field shows you the current condition of the task. The choices include Not Started, In Progress, Completed, Deferred, and Waiting on Someone Else.
Priority: This field shows you the relative importance of the task. The choices for this field include (1) High, (2) Normal, and (3) Low.
Due Date: This field shows you the date by which the task needs to be completed.
% Complete: This fields shows you the relative percentage of the task that's been completed.
Note
When you add a new task to the Tasks list, the form you fill out contains two extra fields that don't automatically appear in the default All Tasks view: Description (for entering a brief description of the task) and Start Date (for entering the date that you intend work to begin on the task — by default, the current date). You can customize the All Tasks view to include one or both of these fields, or you can simply add them to a new list view that you create. Also note that you can attach files to a task when you add the task to the list. When you do so, a tiny paperclip icon is added to the very first Attach File field, indicating that a file has been attached to the task.
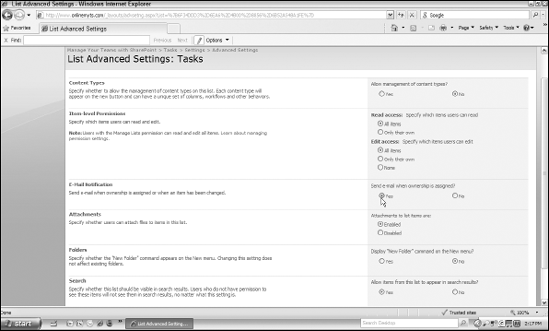
Before you start adding tasks for yourself and your fellow team members, you're first going to want to change one of the default list settings for the Tasks list. By default, the E-Mail Notification setting is set to No — you need to change that to Yes. That way, SharePoint automatically sends an e-mail to individual members or to members of a group. (You can assign tasks to entire SharePoint groups as well individual users.)
To make this change for the Tasks list in your SharePoint site, follow these steps:
Log on to your SharePoint site and then click the Tasks link in the Lists section of the Quick Launch on the site's home page.
SharePoint opens the Tasks page.
Choose List Settings from the Settings drop-down menu.
SharePoint opens the Customize Tasks page.
Click the Advanced Settings link at the bottom of the General Settings column.
SharePoint opens the List Advanced Settings page for the Tasks list, similar to the one shown in Figure 10-2.
Click the E-Mail Notification option's Yes radio button under the heading Send E-Mail When Ownership Is Assigned and then click the OK button at the bottom of the page.
SharePoint saves the change to the E-Mail Notification option and returns you to the Customize Tasks page.
Click the Tasks link in the Content Navigation Breadcrumb at the top of the Customize Tasks page.
SharePoint displays the Tasks page, where you can start adding your tasks.
Tip
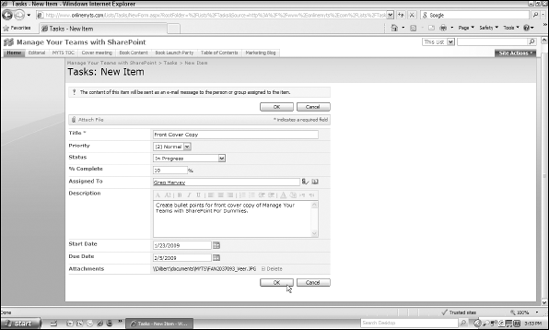
You can tell that the E-Mail Notification has been turned on for a SharePoint Tasks list because the program displays an alert at the top of the data form indicating that the content of the task item you just created will be sent to the person or group assigned the task (see Figure 10-3).
As with the other more generic types of lists you create in SharePoint (see Chapter 4), you can add new items to your Tasks list by one of two methods:
Data form (opened by choosing New Item from the New drop-down menu): The data form contains all of the fields used in the All Task view of the list: Attach File, Title, Priority, Status, % Complete, Assigned To, Description, Start Date, Due Date, and Attachments. (See Figure 10-3.)
Datasheet format (opened by choosing Edit in Datasheet from the Actions drop-down menu): The datasheet format enables you to enter the information for the Title, Assigned To, Status, Priority, Due Date, and % Complete fields using a spreadsheet-like table right on the Tasks page. (See Figure 10-4.)
Note
If you enter a new task in the datasheet format, remember that you can still attach files to the task and add a description and modify or remove the start date for it (which is automatically the date you created the task). All you have to do is switch back to the Standard view by choosing Standard View from the Actions drop-down menu and then click the link to the task in the Title column. When the Task page for the item appears, click the Edit Item button. SharePoint opens the data form for the task, where you can attach a file, add a description, change the date in the Start Date field, and modify any other field in the form.
After you've added all the tasks to your SharePoint Tasks list, you can use the columns of the list to sort and filter the tasks. By default, SharePoint displays the Tasks list using its All Tasks view.
In All Tasks view, the tasks you add to the list are sorted by the ID field. Unfortunately, the ID field doesn't have a column included in the New Item data form — or in the All Tasks view, for that matter. This leaves the Tasks list unsorted, in essence, so that each task you add to the list automatically appears in the bottom row.
To sort the tasks in the list, position the mouse over the name of the field by which you want to sort the list. Then, when a drop-down button appears to the right of the field's name, click the button and then select one of the two sorting options at the top of the drop-down menu:
Ascending: Sorts the tasks in the list in A to Z, smallest to largest, or least recent to most recent order, depending upon whether the field type is text, numeric, or a date, respectively.
Descending: Sorts the tasks in the list in Z to A, largest to smallest, or most recent to least recent order, depending upon whether the field type is text, numeric, or a date, respectively.
In addition to rearranging the order of the tasks in this list, you can also filter the list so that only tasks of a particular type appear. For example, you might want to filter the Tasks list so that you see only tasks that aren't yet started or only tasks that have been assigned High priority.
To filter the Tasks list on a particular entry in a field, click that particular entry on the field's drop-down menu. For example, to filter the list so that only tasks that haven't yet been started are displayed, click the Not Started entry on the Status field's drop-down menu. To once again display all the entries in the Tasks list, choose Clear Filter from Status from the Filter field's drop-down menu.
Although the All Tasks view is the default view for the SharePoint Tasks list, it is by no means the only view available. SharePoint Tasks lists (and Project Tasks lists, for that matter) come with several very handy built-in list views that you can switch to by choosing their names from the View button's drop-down menu:
Active Tasks: SharePoint filters the Tasks list so it displays all tasks except for those whose Status field entries are Completed. Tasks with all other Status field entries (Not Started, In Progress, Deferred, and Waiting on Someone Else) remain displayed.
By Assigned To: SharePoint sorts the Tasks list so its tasks are arranged in ascending order by the team members to whom the tasks are assigned.
By My Groups: SharePoint sorts the Tasks list so its tasks are arranged in ascending order by the user group member to whom the tasks are assigned.
Due Today: SharePoint filters the Tasks list so it displays only the tasks with a due date that is the same as the current date.
My Tasks: SharePoint filters the Tasks list so its displays only the tasks that are assigned to you.
Note
Remember that you can customize any of these built-in list views. Simply switch the Tasks list to that list view and then choose Modify This View from the View drop-down menu. (See Chapter 4 for more on customizing list views.)
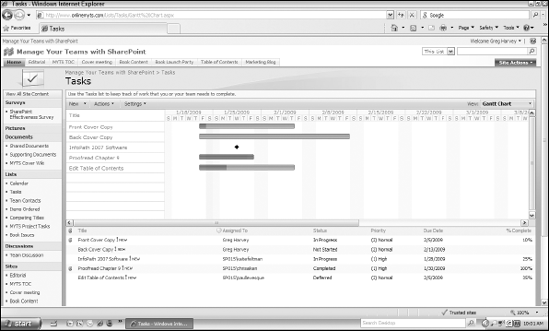
One built-in view missing from the Tasks list is the Gantt Chart view. (Note: It is available in the Project Tasks list.) In a Gantt Chart view, SharePoint displays the tasks using mini bar charts (and some symbols) against a calendar background to graphically depict how the tasks extend in time and overlap one another. Viewing the tasks in this graphically enhanced view often makes it easier to spot potential bottlenecks and problem areas.
To create a custom Gantt Chart view for your SharePoint site's Tasks list, follow these steps:
Open the Tasks list in your SharePoint site and then choose Create View from the View drop-down menu.
SharePoint opens the Create View page for the Tasks list where you choose a view format.
Click the Gantt View link in the Choose a View Format section of the page.
SharePoint opens another view of the Create View page for the Tasks list, this time where you select the particular options for the Gantt View format you selected.
Type a name in the View Name text box.
You can name this view Gantt Chart if you'd like. Also, if you want to make this new Gantt Chart view the new default view for your SharePoint Tasks list, be sure to select the Make This the Default View check box.
Scroll down to the Gantt Columns section of the Create View page and then choose Title from the Title drop-down menu, choose Start Date from the Start Date drop-down menu, choose Due Date from the Due Date drop-down menu, and choose % Complete from the Percent Complete drop-down menu.
Choose ID from the First Sort By the Column drop-down menu in the Sort section and then click the OK button.
SharePoint creates the Gantt Chart view and then returns you to the Tasks list, whose tasks are now displayed using the custom Gantt Chart view. (See Figure 10-5 to get an idea of how this view graphically depicts typical tasks.)
Note
Note that in the Gantt Chart view, the Gantt Chart itself appears in a separate pane above the regular Tasks list display. In the Gantt chart in the upper pane, SharePoint depicts each task to which you assign a start date and due date as a bar on the calendar. Any task that has no due date shows a black diamond symbol. Typically, the uncompleted part of the task appears in light blue in its bar, and the completed part of the task appears in dark blue. (A task whose status is Completed is entirely dark blue.)
You need to know to how to edit the items you place in your SharePoint Tasks list because this is the way that you change and update the status of the tasks you track there.
To edit an item in the Tasks list, click the link attached to its name in the initial Title column in the list. SharePoint duly displays a page with the data form for that task. To then change the entries made in one or more of the fields in this task's data form, you need to click the Edit Item button at the top of the form. Doing this causes SharePoint to display an editable version of the data form where you make your changes before clicking OK.
Note
Don't forget about using the Alert Me feature to help you oversee and manage the tasks added to your Tasks list. You can use this handy feature to have SharePoint send you e-mail updates whenever your team members (specifically those to whom the task is assigned) edit particular tasks. These e-mail alerts can come when any team member changes an item or just when they update the item's status to Completed. To set up e-mail alerts for a particular task, click the Alert Me button that appears at the top of the editable version of its data form. If you want SharePoint to alert you whenever any task in the list changes, choose the Alert Me option from the Actions drop-down menu attached to this button at the top of the list and select the appropriate options on its New Alert page.
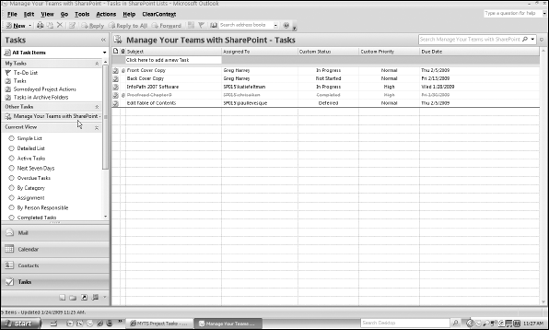
As with other more conventional types of SharePoint lists, you can connect your Tasks list to Outlook 2007. When you do this, SharePoint creates an Outlook folder for the Tasks list that displays all of the tasks. And as an extra special benefit, those tasks in the SharePoint Tasks list that are assigned to you are then automatically added to your Outlook To-Do bar. (Note that some hosted SharePoint service providers don't support this automatic updating in Outlook 2007.)
To connect your Tasks list to Outlook 2007, follow these steps:
Open the Tasks list in your SharePoint site and then choose Connect to Outlook from the Actions drop-down menu.
Internet Explorer opens an alert dialog box asking you to confirm that you want to allow SharePoint to open the Outlook program on your computer.
Click the Allow button in the Internet Explorer alert dialog box.
SharePoint launches Outlook 2007 (if it's not already open on your computer) and Outlook displays an alert dialog box asking you to confirm your intention to connect the SharePoint Tasks list to Outlook.
Click the Yes button in the Outlook alert dialog box.
If your SharePoint site is on a hosted SharePoint server, a Connect To dialog box asking for your username and password may appear. Enter any missing information and click OK.
Outlook then displays the Tasks module, where a new folder bearing the name of your SharePoint site appears in the Other Tasks section of its Navigation pane and those tasks currently in the Tasks list appear in the center pane. (See Figure 10-6.)
As I mention earlier in this chapter, a Project Tasks list is nothing more than a Tasks list whose default view is a Gantt Chart view (simply called the Project Tasks view). Otherwise, the Project Tasks list is almost identical to a Tasks list, containing all the same fields in its data form and offering most of the other built-in list views. This is the reason that many SharePoint 2007 users simply add the Gantt Chart as a custom view to the default Tasks list (as outlined in the section "Creating a custom Gantt Chart view for your site's Tasks list," earlier in this chapter) and forget all about the Project Tasks list.
However, if you don't want to go through the rigmarole of creating a custom Gantt Chart view for your Tasks list, you can easily get all the benefits of a Gantt Chart view simply by adding a Project Tasks list to your SharePoint site:
Open the subsite where you want the new Project Tasks list added.
To add the list to the top level of the SharePoint site, open its home page.
Click the Lists link in the site's Quick Launch.
SharePoint opens the All Site Content page, filtering out everything but the lists on the site.
Click the Create button at the top of the All Site Content page.
SharePoint opens the site's Create page.
Click the Project Tasks link in the Tracking column.
SharePoint opens a New page.
Type a name for the new Project Tasks list in the Name text box and then press Tab.
SharePoint advances the cursor to the Description text box.
Type a description of the new Project Tasks list in the Description text box.
(Optional) Select the No Navigation radio button to prevent SharePoint from adding the new Project Tasks list to the site's Quick Launch and/or select the Yes E-Mail Notification radio button to have SharePoint send e-mail alerts to a team member whenever a task is assigned to him.
Be sure to select the Yes radio button for E-Mail Notification if you want SharePoint to let your team members know when you've assigned them a task to complete.
Click the Create button.
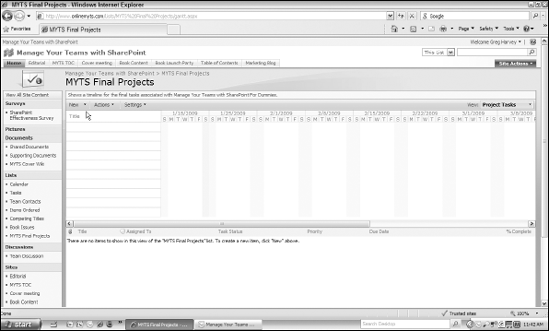
SharePoint creates the new Project Tasks list and then displays its empty list page (in the default Project Tasks list view with its Gantt chart), which is similar to the one shown in Figure 10-7.
You can then use the New button at the top of the Project Tasks list page to add tasks to the new list or you can switch the list to Datasheet view (by choosing Edit in Datasheet from the Actions drop-down menu) and then add them in the spreadsheet-like table.
Note
Keep in mind that the moment you switch a Project Tasks list into Datasheet view, the Gantt chart in the top pane disappears from the page, and only the datasheet table is displayed there. However, as soon as you switch the Project Tasks list back into Standard view (by choosing Show in the Standard View from the Actions drop-down menu), the Gantt Chart pane immediately reappears, updated with whatever tasks you added to the datasheet.
Issue Tracking lists are just like Tasks lists except that, in addition to helping you track the priority and status of a particular issue that you and your teams must resolve, they enable you to categorize the issues you're dealing with and record detailed comments about the steps you took at each stage in its resolution.
Moreover, Issue Tracking lists have a special Related Issues field that enables you to link issues that are related to each other. This field is helpful when you're dealing with a larger issue that can't be resolved until smaller, related issues are fixed. For example, if you're tracking an order fulfillment problem for a customer, you may have to resolve a related issue with a discrepancy between the customer's billing and shipping addresses before it can be cleared up.
To add an Issue Tracking list to your SharePoint site, follow these steps:
Open the subsite where you want the new Issue Tracking list added.
To add the list to the top level of the SharePoint site, open its home page.
Click the Lists link in the site's Quick Launch.
SharePoint opens the All Site Content page, filtering out everything but the lists on the site.
Click the Create button at the top of the All Site Content page.
SharePoint opens the site's Create page.
Click the Issue Tracking link in the Tracking column.
SharePoint opens a New page.
Type a name for the new Issue Tracking list in the Name text box and then press Tab.
SharePoint advances the cursor to the Description text box.
Type a description of the new Issue Tracking list into the Description text box.
(Optional) Select the No Navigation radio button to prevent SharePoint from adding the new Issue Tracking list to the site's Quick Launch and/or select the Yes E-Mail Notification radio button to have SharePoint send e-mail alerts to a team member whenever an issue is assigned to him.
Be sure to click the Yes radio button for E-Mail Notification if you want SharePoint to let your team members know when you've assigned them an issue to resolve.
Click the Create button.
SharePoint creates the new Issue Tracking list and then displays an empty list page in its default All Issues list view.
In the All Issues list view, an Issue Tracking list contains columns for displaying the entries in the Issue ID, Title, Assigned To, Issue Status, Priority, and Due Date fields. In addition to the default All Issues view, a new Issue Tracking list contains an Active Issues list view that filters out all issues that are resolved or closed and a My Issues list view that filters out all issues that are not assigned to you.
Note
Keep in mind that an Issue Tracking list is the one kind of SharePoint list that you can't connect directly to Outlook 2007. If this kind of connectivity is really important to you — perhaps because you're on Outlook all day long and it serves as your early warning system for all things project related — you can get around this limitation by creating a new Tasks list (that you can connect to Outlook) to which you add the following custom fields: Issue Status, Category, Related Issues, and Comments using the Add Columns from Site Columns link. (See Chapter 4 for details on adding custom fields to SharePoint lists.)
You can add items to your new Issue Tracking list just as you would add items to a SharePoint Tasks or Project Tasks list: by using the data form (opened by choosing New Item from the New drop-down menu) or the datasheet format (opened by choosing Edit in Datasheet from the Actions drop-down menu).
When you add a new issue to the list using the data form, you have an opportunity to fill in many of the same fields as you do in a SharePoint Tasks or Project Tasks list, including Title, Description, Assigned To, Priority, and Due Date.
In addition, the New Item page that comes with a new issue data form contains the following additional fields unique to the Issue Tracking list:
Issue Status: This field enables you to select one of three different statuses for the issue: Active, Resolved (meaning that the issue is no longer active and has been successfully dealt with), and Closed (meaning that the issue is no longer active and may or may not have been successfully dealt with).
Category: This field enables you to select one of three generic categories: Category1, Category2, or Category3. You can (and need to) customize the names of these generic categories so that they reflect the types of issues that you and your teams are actually dealing with. (See the section "Customizing the generic issue categories" that immediately follows for more on customizations.) Note that, as part of customizing the generic issue categories, you can also create as many additional custom categories as needed.
Related Issues: This field enables you to connect issues in the list that are related to one another. This creates a link between the issues that you can use to track their progress and ensure that all the interrelated issues are being taken care of.
Comments: This field enables you and your fellow team members to record a history of the steps you've taken to resolve the issue. To that end, SharePoint clears out the Comments field each time you edit the issue. This enables you to use this field to record your latest efforts to successfully resolve the issue. Your series of comments (which appear in chronological order immediately beneath the Comments list box in the issue's Edit Item page) provide you with the history of how the issue was handled each step of the way.
When you first create a new Issue Tracking list, SharePoint creates three generic categories (Category1, Category2, and Category3) for classifying the issues that you add to the list. One of the first things you'll want to do upon creating a new Issue Tracking list is to rename these generic categories and, perhaps, create additional categories for the types of issues that your list is bound to deal with.
For example, if your Issue Tracking list follows team-related issues, you might want to rename the generic categories to something like Technical, Communication, and Training and then add a couple of your own such as Leadership and Support.
To rename the generic categories in a new Issue Tracking list and add some of your own, follow these steps:
Open the Issue Tracking list in SharePoint and then choose List Settings from the Settings drop-down list.
SharePoint opens the Customize page for the Issues Tracking list.
Click the Category link in the Columns section of the Customize page.
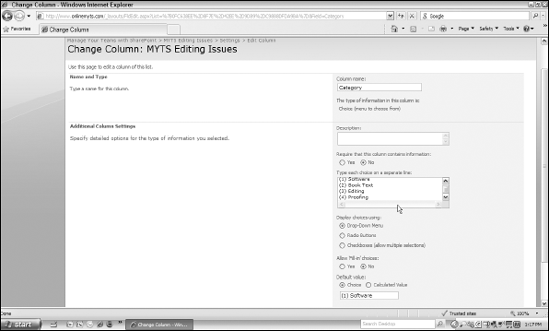
SharePoint opens the Change Column page for the Category field, similar to the one shown in Figure 10-8.
Select the Category1 text in the choices list box in the Additional Column Settings section and then replace its text with the name of the issue category you want in your list. Repeat this action for Category2 and Category3.
(Optional) To add more categories, type the name of the category.
Note that you can have less than three issue categories: To delete a generic category, however, you need to remove all of its text on its line in the list box.
(Optional) Make any necessary changes to the other column settings that determine how the category choices appear, whether to allow fill-in, and what default choice to use.
SharePoint automatically displays the default category choice listed in the Default Value text box in a drop-down list button, and your category choices appear on a drop-down menu. If you want your category choices displayed with radio buttons instead, select the Radio Buttons option under the Display Choices Using heading. If you want your category choices displayed with check boxes, select the Checkboxes (Allow Multiple Selections) option.
Note
Note that by selecting the Checkboxes option, you automatically enable your users to choose more than one category for the issue. (When you select the Drop-Down Menu or Radio Buttons option, users can select only one category.)
Also, regardless of how you display the category choices, SharePoint doesn't allow your users to choose any category other than the ones you designate when you replace the generic Category1, Category2, and Category3 categories. If you want your users to be able to enter other categories that they enter, you must click the Yes button under the Allow 'Fill-In' Choices heading.
SharePoint also enables you to designate one of your category choices as the default value that's automatically selected when you or your team members add a new issue to the Issue Tracking list. Enter the name of the category that you think is the most likely category choice in the Default Value text box.
Click the OK button.
SharePoint saves your changes and returns you to the Customize page.
Click the Issue Tracking list's breadcrumb in the Content Navigation Breadcrumb at the top of the Customize page.
SharePoint returns you to your Issue Tracking list. When you next add a new issue there, you will see the custom categories that you just created for the list.
As you and your team members continue to work on particular issues that you've added to the Issue Tracking list, you'll need to edit them to record the steps that you've taken. To edit an issue in the list, click the link that's attached to it in the Title column and then click the Edit Item button in the page that appears, displaying the data form with the current field entries.
By clicking the Edit Item button, you tell SharePoint to open a page containing an editable version of the data form, where you can update any of its fields (similar to the one shown in Figure 10-9). When this page opens, you will notice, however, that the Comments list box is now empty (and the comments you previously made in this list box are now displayed beneath it).
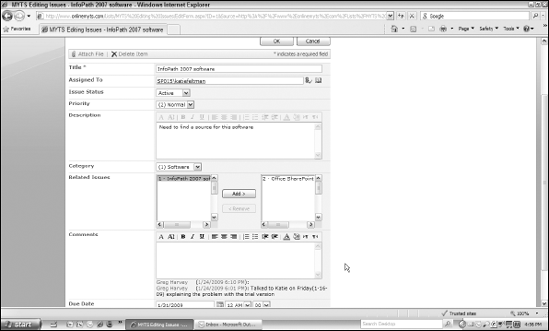
You can then record the latest steps you've taken to resolve the issue in this empty Comments list box. When you or your team finally resolves the issue, you then open the issue's data form for editing one last time, where you change the Issue Status field entry from Active to Resolved and record your final comments in the Comments list box.
Tip
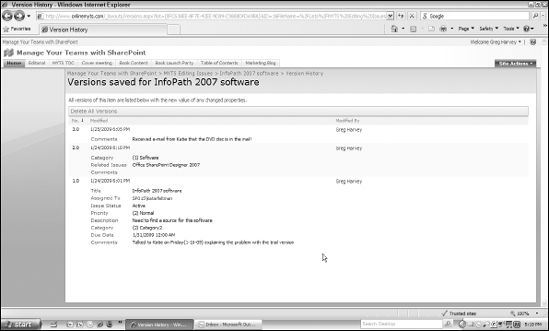
To review all the comments that you and your team members made in the course of resolving an issue, open the Issue Tracking list and then choose Version History from the issue's drop-down menu (opened by positioning the mouse pointer over the name of the issue in the Title column and then clicking the drop-down button that appears). SharePoint then opens a list showing all the versions of the issue, similar to the one shown in Figure 10-10.
This list shows the version number, the date the issue was modified, and the name of the team member who modified it. The list also shows the comments that you and your team have made in the issue's Comments fields, thus giving you a nice little history of the issue from its inception to its final resolution.
Workflows in SharePoint enable you to use data stored on your SharePoint site to automate business processes that you and your teams routinely follow. The workflow feature represents an area in SharePoint that varies depending on whether you're using SharePoint Services 3.0 alone or with Office 2007 SharePoint Server.
If you're using SharePoint Services alone, you're probably going to be restricted to using just the three-state workflow template that comes with it to create workflows for your Issue Tracking lists. If, however, you're using Office 2007 SharePoint Server, you have access to additional built-in workflow templates for document management and document workflows that you can use in your SharePoint Tasks lists in addition to the three-state workflow template.
Tip
The good news is that if you also have access to Office SharePoint Designer 2007, you can use its Workflow Wizard to create custom workflow templates tailored to the content of your SharePoint site without having to write a single line of code. (See Chapter 13 for general information on using Office SharePoint Designer 2007 and specific information on using the Workflow Wizard to create custom workflow templates.)
True to its name, the three-state workflow tracks a typical business process through three distinct phases:
Active (Initial): Before you start this initial phase, you create the list that tracks the tasks associated with the workflow (usually, an Issue Tracking list) and then assign a three-state workflow template to be used on the list. You then add the specific tasks (or issues) that your team needs to deal with and assign these tasks to your team members. Depending upon how the workflow is set up, SharePoint either automatically starts the workflow as soon as you assign new tasks to the list, or you can manually start the workflow.
Ready for Review (Middle): In this second (middle) phase, team members mark their tasks as complete, and SharePoint then automatically updates the status of the workflow from Active to Ready for Review and alerts you to the fact that the tasks are now complete and ready for you to review.
Complete (Final): In this third (final) phase, you review and approve the tasks in the tasks list and update them as complete. SharePoint then changes the status of the workflow from Ready for Review to Complete.
The beauty of this workflow is that SharePoint automates the transitions from the Initial/Active state to the Middle/Ready for Review state and from the Ready for Review state to the Final/Complete state. All you have to do is set up a Tasks list, assign a workflow to it, and assign the tasks to your team members as you normally would.
Although you can use the three-state workflow with custom Tasks lists that you create (provided that the list contains some sort of status field with three choices), this template is particularly well suited for the Issue Tracking list. (See the section "Working with Issue Tracking Lists," earlier in this chapter, for details.)
This is because the three-state workflow template is perfectly designed to work with the choices offered by the Issue Tracking list's Issue Status field (Active, Resolved, and Closed). These three Issue Status field choices correspond to the workflow's three states (Initial, Middle, and Final).
To assign a three-state workflow for an Issue Tracking list that you've created, follow these steps:
Open the Issue Tracking list in SharePoint and then choose List Settings from the Settings drop-down menu.
SharePoint opens the Customize page for your Issue Tracking list.
Click the Workflow Settings link in the Permissions and Management column.
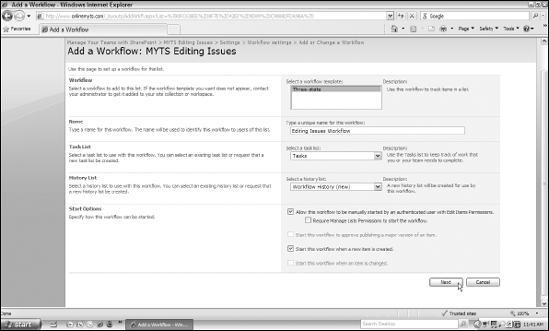
SharePoint opens the Add a Workflow page, similar to the one shown in Figure 10-11. By default, SharePoint selects the Three-state template option in the Workflow list box. (This may be the only template available if you're using SharePoint Services 3.0 and haven't created any custom workflow templates.)
Click the Name text box and then type a unique name for the new workflow.
By default, SharePoint adds the new workflow to the Tasks list you have open and sets it up so that you must start the workflow manually. If you want SharePoint to create a new list for the workflow, choose New Task List from the Task List drop-down menu. If you want SharePoint to initiate the workflow whenever a new item is created in your Tasks list, click the Start This Workflow When a New Item Is Created check box.
(Optional) Make any desired changes to the Task List and Start Options.
Click the Next button.
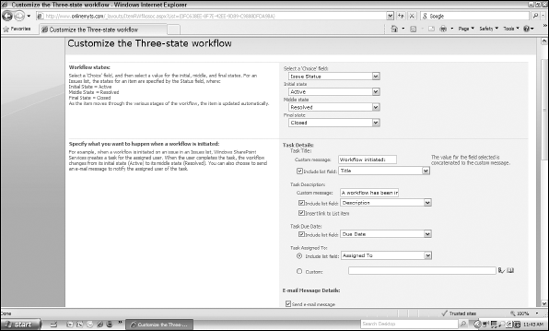
SharePoint opens the Customize the Three-State Workflow page, the top part of which is shown in Figure 10-12. This part contains the options for synchronizing the three Workflow States (Initial, Middle, and Final) with the three options in a choice field (specifically, the Active, Resolved, and Complete choices in the Issue Tracking field). This part also contains options for detailing what actions SharePoint is to take when the workflow is started.
(Optional) Customize any of the messages (and fields referred to in those messages) using the options found in the Task Details section for sending out word that the workflow has been initiated.
Note that you can accept the default messages and Issue Tracking field lists offered by SharePoint.
In the Initiated State section, specify the team members to whom messages regarding the changes in the workflow tasks are to be sent by using the Task Details message and field options. Also, under E-Mail Message Details, fill in the To and Subject text boxes as well as the Body text box.
When you scroll up the Customize the Three-State Workflow page to display the bottom part, you see the options for specifying what you want to happen when the workflow changes to its middle state (see Figure 10-13).
In the Middle State section, specify yourself or some other team member to receive notification that initial tasks are done and are ready for review by using the Task Details message and field options. Also, under E-Mail Message Details, fill in the To and Subject text boxes and the Body text box.
Now you're ready to create the workflow.
Click the OK button.
SharePoint creates the workflow for the current Issue Tracking list and returns to this list.

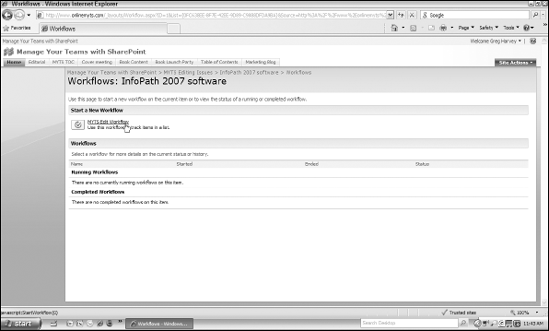
After creating a workflow for an Issue Tracking list, you can start the new workflow for any issues that you add to the list. All you have to do is click the drop-down button that appears when you position the mouse pointer over the list item and then click the Workflow option that now appears on this drop-down menu.
SharePoint then opens a Workflows page for the particular issue item, similar to the one shown in Figure 10-14. Click the link that appears under the name of the Workflow you just created for the Issue Tracking list at the top of the Workflows page and SharePoint starts the workflow, automatically sending out e-mail messages to specified team members to inform them of the tasks that they are to perform during the Initial workflow phase.