
The only mandatory tools you’ll need to build the electronics projects in this book are those included in the standard soldering kit (and even some of those can be faked).
You’ll need a 25-watt soldering iron with a chisel or pencil tip (shown in Figure A-11). You can work on electrical projects with irons of 15 to 40 watts, but a 25-watt iron is probably the handiest: Cooler irons are great for soldering little components but will be a royal pain for soldering hardware, and hotter irons (great for quickly soldering plugs and jacks) can ruin ICs, LEDs, and diodes in a flash.
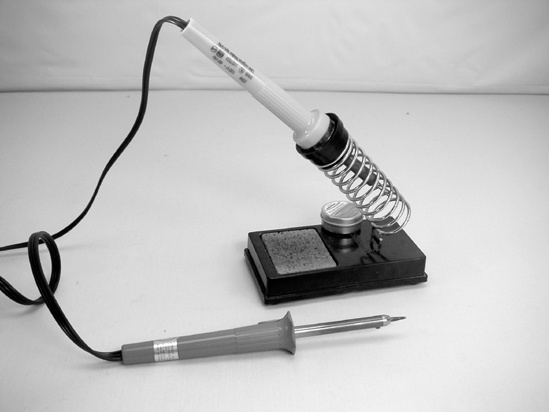
Figure A-11. Here are a 15-watt (bottom) and 25-watt soldering iron with stand (top). The damp sponge in the stand is used for cleaning the tip, although many tinkerers prefer to use a copper scrubbing pad or old bolt instead.
In terms of value, your best bet is a Weller soldering iron. This brand is often sold at hardware stores, and a $25 Weller (their entry-level model) will vastly out-perform any $10 generic counterpart: It will last longer, heat more regularly, and its replacement tips are cheap and easy to find (usually at the same hardware store that sold you the iron). You should also acquire a soldering iron stand; otherwise you will burn yourself. You could just lay the hot iron across a china plate or tile, but you will eventually absent-mindedly pick up the hot barrel instead of the insulated handle. (I vividly recall the hot July night that I seared my index finger and thumb prints into the chrome of my first soldering iron. Fortunately, I was working in an un-air-conditioned third-floor room, and my hands were so sweaty that I dropped the iron before all the moisture seared off my fingers. I bought a stand the next day, but my prints were etched into that iron a decade later when I finally invested in a decent Weller.)
Use thin rosin-core solder.[20] Anything you buy at RadioShack will fit the bill. It’s actually difficult to get the wrong kind of solder nowadays, but you should avoid the acid-core solder sold at hardware stores. That stuff is used for working with copper plumbing, and it will ultimately corrode your electronic projects. Lead-free solder is a good idea, but even old solder doesn’t pose much of a threat, as long as you aren’t chewing on it. Always wash your hands after soldering and before eating. (Incidentally, you should always wash your hands before eating. What would your mother think?)
Several hand tools are vital when soldering: diagonal cutters, wire strippers, needle-nose pliers, and clamps (all shown in Figure A-12).
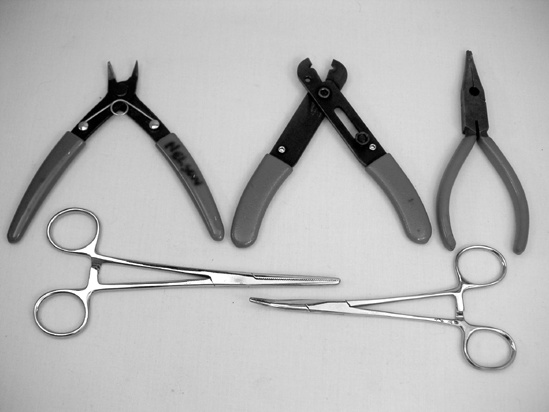
Figure A-12. Clockwise from top left: diagonal cutters, wire strippers, needle-nose pliers, and two types of clamps
Diagonal cutters are fine snips used to cut the legs off of components after you’ve soldered them. Don’t confuse diagonal cutters with heavy-duty wire snippers sold in hardware stores—these are a different sort of diagonal cutters, often called dikes. Dikes are too beefy to get in close to a circuit board. On the other hand, fine diagonal cutters are too delicate to be used on thicker gauge wires (such as guitar strings), which will notch and ruin them. In a pinch, you can often use a pair of nail clippers if you don’t have actual diagonal cutters.
Wire strippers are notched snips used for cutting through the plastic insulation of electrical wires while leaving the core intact. You can substitute a small pair of scissors, provided you’re very careful not to nick the wire’s core (which will weaken them). Like diagonal cutters, wire strippers are a very good investment.
Needle-nose pliers are great for bending wires and component legs, seating components into hard-to-reach places, and loosening stubborn nuts and plugs. Any set of small pliers will work well, and any cheap pair of needle-nose pliers will probably fit the bill.
The items at the bottom of Figure A-12 are locking clamps, the same sort used by doctors (who call them forceps, hemos, or hemostatic clamps). They come curved or straight, in a variety of sizes, and are really handy for holding components while soldering.
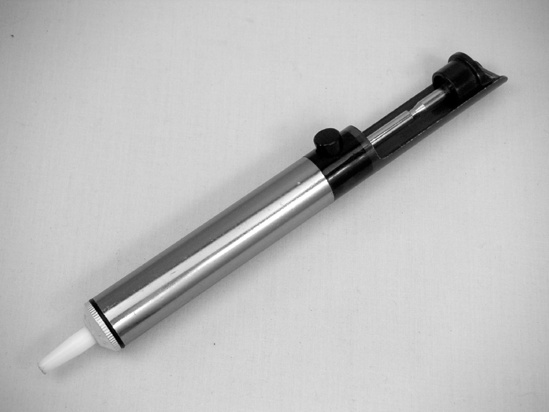
Although a desoldering tool is not mandatory, if you suspect you’ll be working on more than a project or two, you should invest in one. Desoldering tools come in a variety of forms, including desoldering braids—also called solder wicks—and comical squeezy bulbs, but the spring-loaded desoldering vacuum (shown in Figure A-13) is by far my favorite. You’ll use your desoldering tool very infrequently, but the moment you realize you’ve soldered a transistor backward, you’ll be very glad you bought one. (You’ll learn more about desoldering in Skills in Skills.)
Finally, buy a roll of electrical tape; this black, rubberized tape can be used to secure wires, cover their soldered joints, and insulate bare solder points from each other. Insulation becomes especially important as you cram your projects into inconveniently sized enclosures. (As a rule, any enclosure that looks like the perfect size when you are planning a project will turn out to be a hair too small.)
A heat sink (on the left of Figure A-14) is clipped into the leads of a heat-sensitive component between the solder point and component to prevent the component from getting overheated. (You can get by using an alligator clip or a spare set of clamps as stand-ins, as shown in Figure 16-4 in Building It.) You probably won’t need a heat sink very often in the course of normal soldering, but it comes in handy during desoldering (which tends to go slower and take more heat than soldering) or if you are working with an expensive component and you don’t want to fry it.
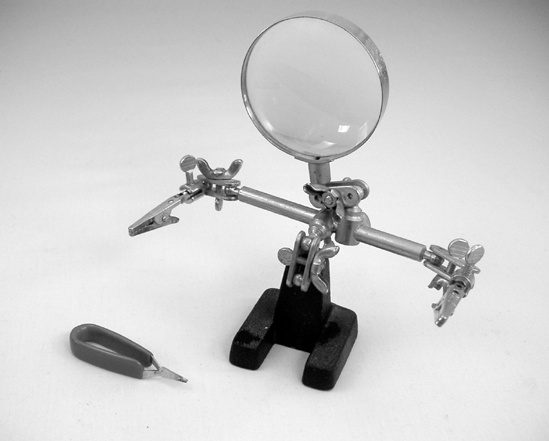
Although you can hold all your soldering with clamps, clothespins, your elbows, and stacks of books, most hobbyists eventually buy a helping hands jig (shown on the right of Figure A-14). These are also used by model builders and fly fisherman, so they might pop up for cheap at garage sales. They come with and without the integrated magnifying glass; I’ve never had call to use the magnifier, so I don’t consider it mandatory—but I’m getting terribly near-sighted, more so with every year, so maybe I should have been using that lens all along.
Several common hand tools shown in Figure A-15 make frequent appearances on the electronic tinkerer’s workbench, especially jeweler’s screwdrivers[21] (for tiny screws or for prying ICs out of their sockets), a tapered half-round file (the round side is great for clearing burrs from holes drilled in metal cases, and the flat side takes the rough edges off of trimmed pot shafts), and a small hacksaw (for cutting down those pot shafts).
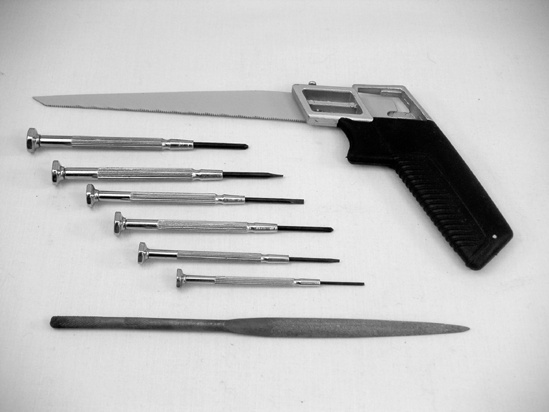
Figure A-15. Jeweler’s screwdrivers (center), a tapered half-round file (bottom), and a hacksaw (top)
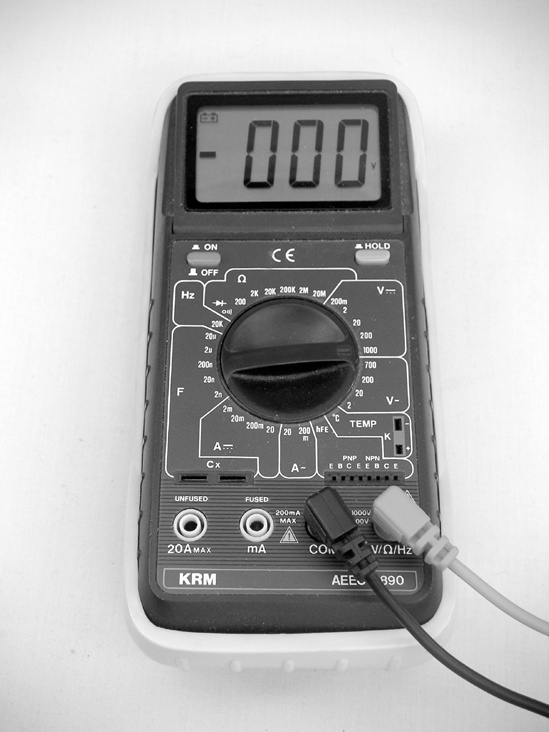
After you’ve decided you like creating electronics gadgets, go out and buy a digital multimeter (like the one in Figure A-16). Do not get an analog meter (the kind with the old-timey dial gauge on it, rather than an LCD display). These are no longer cheaper than digital meters (which start at around $20), and they are far more confusing to use.
Even the cheapest multimeters will measure DC voltage, resistance, and current and will do the job well. Slightly nicer meters have special settings for testing continuity (handy) and testing the forward voltage on diodes (only occasionally called for but a big time-saver), and they can be used on AC circuits, which might come in handy down the road if you need to fix something around the house or install a light fixture.
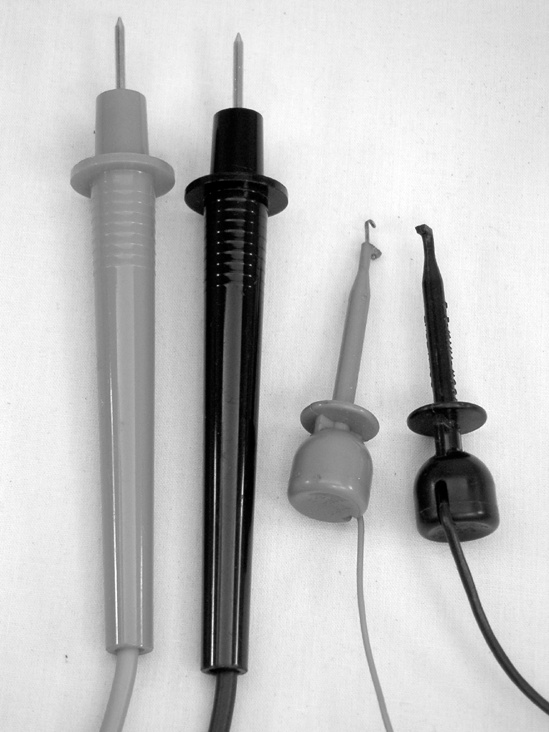
Most multimeters come with a normal set of probes (these look like thin knitting needles with bulky insulated handles; see Figure A-17) and will serve most purposes as you poke around testing batteries and trouble-shooting circuits. Occasionally you’ll need a pair of clip leads, which will free up your hands as you run tests—again, you won’t need them often, but you’ll be glad to have them when you do.
Also handy for troubleshooting or mocking up circuits are several sets of insulated test leads. (These are also called jumpers, clip jumpers, alligator jumpers, and clip leads, and they look a lot like miniature automotive jumper cables.) You can buy these at RadioShack (part #278-1156 is a set of ten color-coded, insulated test leads for less than $8) or buy two sacks of insulated alligator clips (part #270-378) and get some practice soldering (although you save only a buck going that route).
[20] The smell of melting solder might remind Catholic hobbyists of Midnight Mass; the rosin used in solder is a pine product and is similar to the resins used in making the incense still used during Catholic and Greek Orthodox services. In solder, the rosin serves to clean the contacts while you work, thus helping to ensure a good joint.
[21] If electronic tinkering is really turning you on, now is probably the time to invest in a multi-bit Torx driver like the Husky 8-in-1 Precision Screwdriver; Torx-headed screws are sometimes called “star-driver screws,” “star keys,” or “those goddamned things!” and are increasingly popular on small consumer electronics that the manufacturer would prefer you just throw away and replace, rather than attempt to fix or monkey with yourself.