Chapter 3
Getting Started with Instagram
IN THIS CHAPTER
![]() Using Instagram for branding
Using Instagram for branding
![]() Getting set up with Instagram
Getting set up with Instagram
![]() Choosing photos to share
Choosing photos to share
![]() Making your photos searchable with hashtags
Making your photos searchable with hashtags
![]() Creating a community on Instagram
Creating a community on Instagram
Have you ever noticed how people tend to react more to imagery than text on the social networks? That’s because they see photos before they read text. So it’s always in a brand’s best interest to accompany great text with a great photo. Many times, though, the photo speaks for itself, and few words are needed. In fact, brands can find their community is receptive to hanging out with them on a more visual platform, and that’s where Instagram comes in.
Instagram is a social network based on photos, not words — although Instagram still allows hashtags, likes, and comments, so there are various ways to engage with your audience. Both individuals and brands alike let their photographs do the talking. In fact, many people prefer Instagram to other social platforms because there’s less chatter.
Instagram gives you an opportunity to show your brand’s creative side and think outside the box. Instead of attracting people with written stories, you’re presenting a more visual experience.
In this chapter, we talk about how to set up an Instagram account and share photos and video with your community.
Promoting Your Brand on Instagram
Like Snapchat (see Chapter 2 in this minibook), Instagram is a mobile platform. Although you can view Instagram photos online with your regular web browser, you’re limited in what you can do. The majority of people using Instagram to view photos and interact are doing so with smartphones and tablets.
 You can’t set up an Instagram account or upload photos to your Instagram account from your computer; you can only view and like photos from your computer. If you want to sign up for an Instagram account or share photos with your community on Instagram, you must use a mobile device.
Here are a few examples of how brands use Instagram in creative ways, while still staying in their comfort zones:
- The Starbucks account shares images of its customers, its baristas, and even members of the executive team trying new flavors and blends.
- Red Bull Energy Drink uses its Instagram account to appeal to adrenaline junkies by posting photos of skydivers or skateboards high in the air.
- Nike shares photos of athletes doing what they do best.
- King Arthur Flour shares recipes with mouthwatering photos.
- Jimmy Choo shares stunning images of its shoes.
- Home Goods shares home-decorating options and tips.
- The Paris Opera Ballet shares behind-the-scenes images and scenes from performances.
Be creative with your Instagram photos. The best Instagram strategy is to keep it simple. You don’t need to take a trip to Europe to take photos to share with your community, because your brand has enough interesting things going on in your own backyard.
Almost every brand can present a more visual side to its community by using Instagram, although you might not immediately see what your brand should highlight. In the section “Determining What Is Photo-Worthy for Your Brand,” later in this chapter, we throw out some suggestions for photogenic moments.
Creating and Using Your Instagram Account
Is your mobile device in hand? Good. In the following sections, we discuss how to set up an Instagram account, upload photos, and control notifications.
Setting up your account
Follow these steps to set up an Instagram account:
- Locate the Instagram app on iTunes or Google Play and download it to your mobile device.
- Choose to register with your Facebook account or with your phone or email account, as shown in Figure 3-1.

FIGURE 3-1: Use Facebook or your email address to create an Instagram account.
- Do one of the following:
- Facebook account: Enter your Facebook login information.
- Email account: Enter your email address and the password you want to use for the site and select Next.
Create your username and click Continue.
Either choose the one Instagram suggests or create your own.
- (Optional) Connect to Facebook to choose friends to follow.
- (Optional) Search your email contacts for friends on Instagram.
Tap the Done link to be taken to your (very empty) profile page.
Don’t worry … we’ll be filling that in soon!
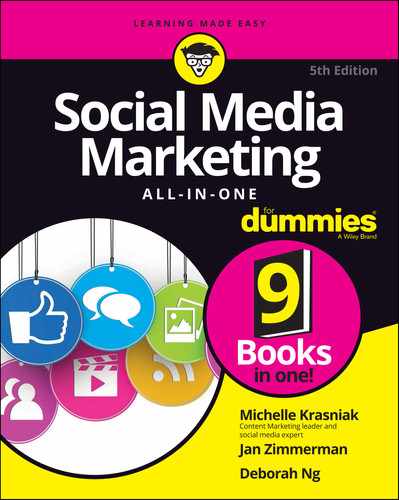
Tap the three lines on the top right of your profile and select Settings.
The screen shown in Figure 3-2 appears.
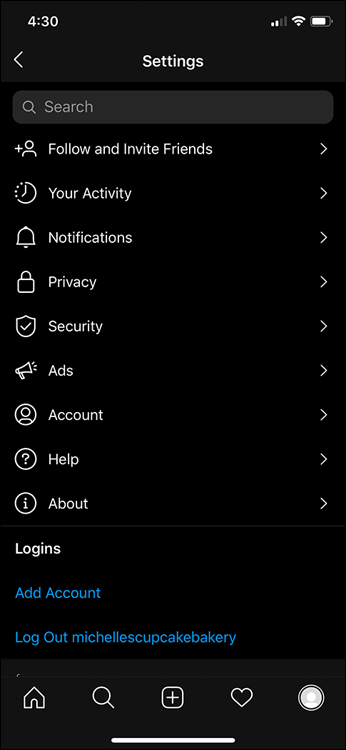
FIGURE 3-2: The Settings screen.
Tap the Account link and then tap the blue Switch to Professional Account link at the very bottom of the page.
Now it’s time to turn this into a business account.
Select the type of business you have, either Creator or Business.
For the purpose of this example, I chose the business option (see Figure 3-3).

FIGURE 3-3: Are you a Creator or a Business?
Tap Continue.
You’re taken to a screen to fill out more information about your business.
Select a category that your business falls into from the suggested list; you can also search for one using the search box at the top and tap Next.
Don’t worry if there’s not an exact match. You can choose whether or not to display this on your profile.
 I recommend at least trying a search for your category if none of their suggestions are applicable. I searched for “cupcake shop” and it was actually its own category!
You’ll be prompted to verify your public business information including your email address, phone number, and business address.
This information will be publicly visible, and you can remove or change it at any time. If you don’t want to provide any information, tap the “Don’t use my contact info” link at the bottom of the page.
(Optional) Choose how to connect your business Facebook page.
The Facebook business page(s) you see listed are ones already connected to your email address. If you don’t see your page listed, check to make sure you’re an admin of that page. Alternatively, you can skip connecting to Facebook by tapping the Don’t Connect to Facebook Now link at the bottom of the screen (see Figure 3-4).
If you don’t have a Facebook page for your business, Instagram makes it very convenient for you to create one! All you have to do is tap the Create a New Facebook Page link.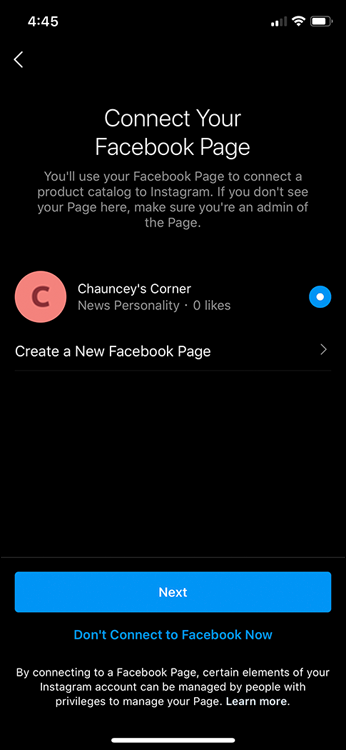
FIGURE 3-4: Decide whether or not you want to connect your business’ Facebook page.
Welcome to Instagram! Instagram will walk you through four steps to get up and running.
The first step is completing your profile, and the following section takes you through that process. After you complete this part of the orientation, you move on to Learn from others, Invite friends, and finally Share photos and videos.
Completing your profile
It’s important that you have a completed profile before you start posting photos and videos. Otherwise, you run the risk of looking like a spam account.
To get started filling in the rest of your profile, follow these steps:
- From your profile page, tap the Edit Profile button in the center at the top of the page and then tap Change Profile Photo.
- Import the photo from Facebook or Twitter, take a new photo, or select a photo from your mobile device’s image library.
- Position your photo to fit in the profile photo window.
Tap Done.
You’re back at the Complete Your Profile screen.
(Optional) Tap on the space that says Website and enter your web address.
If you don’t want to do this now, you can always add it later on.
(Optional) Tap on the section that says Bio to add your business’ bio and tap Done.
This is the most important part of your profile, so if you don’t want to fill it in now, make a note to return to it soon. You have only 150 characters to work with, so be creative — and brief!
Finding friends and fans on Instagram
The next two sections of Instagram’s orientation are finding other accounts to follow as well as inviting your friends to follow you. The idea is that when you follow similar accounts, you’ll see the types of content they share and how they engage with their audience. Imitation is the sincerest form of flattery, right? Figure 3-5 shows a number of other cupcake shops that Instagram suggests you follow. They make it super easy for me since all you have to do is tap the Follow button.
Of course, you’re not going to stop finding accounts to follow once you’ve completed the orientation! Once your account is up and running, here’s how to search for people or brands to follow:
- Tap the magnifying glass icon in the bottom menu bar.
In the search box, type the name or Instagram handle of the person or brand.
The search results page is divided up into Top, Accounts, Tags, and Places. The Top results are all things that are most closely related to your search term, whereas Accounts, Tags, and Places contain just those categories of results.

FIGURE 3-5: Instagram suggests I follow these accounts based on my business.
You can search hashtags for topics related to your business. For example, if you restore classic cars, you might use the #classiccars, #classiccarspotting, and #classiccarsdaily hashtags, which are the most popular hashtags in that topic. Now you can see some of the classic car enthusiasts that are on Instagram. Follow them, and they may follow you in return to see photos of your restorations.When you find an account you’re interested in, click the Follow link to follow that account.
The account’s photos automatically appear in your feed, unless you’re following a person or brand with a private account. You must request permission to follow someone who has a private account. Many of the people you follow will follow you in return.
- (Optional) For additional results, you can also select one of the three options at the top of the screen:
- IGTV: Tapping on the IGTV button brings you to the search function specifically for this feature, where you can look for IGTV creators to follow. IGTV is a video app where you can take longer videos compared to regular Instagram videos. Although IGTV is available as a standalone app, basic functionality is available within Instagram and on the website. (See Figure 3-6.)
FIGURE 3-6: Searching for IGTV creators to follow.
- Shop: Tapping the Shop option takes you to a page where you can shop the products shown in photos and videos directly from Instagram. (See Figure 3-7.)
- Well-being: Our lives are so hectic that sometimes we just need to slow down and take a breather. Check out some of the well-being guides for information and advice on a wide variety of topics. (See Figure 3-8.)
- IGTV: Tapping on the IGTV button brings you to the search function specifically for this feature, where you can look for IGTV creators to follow. IGTV is a video app where you can take longer videos compared to regular Instagram videos. Although IGTV is available as a standalone app, basic functionality is available within Instagram and on the website. (See Figure 3-6.)
(Optional) To invite people you know to connect with you, tap the icon that looks like a person with a plus sign at the top of the screen (next to the search bar).
You come to a screen with a couple of options:
- Connect to Facebook: Tapping the Connect button means that Instagram syncs up to your Facebook account, and if any of your Facebook friends are on Instagram, they will be suggested to you.
- Connect Contacts: This option syncs up with your phone’s contact list to see if any of your contacts are on Instagram, and if so, you’ll be able to follow them (and hopefully they’ll follow you back!).
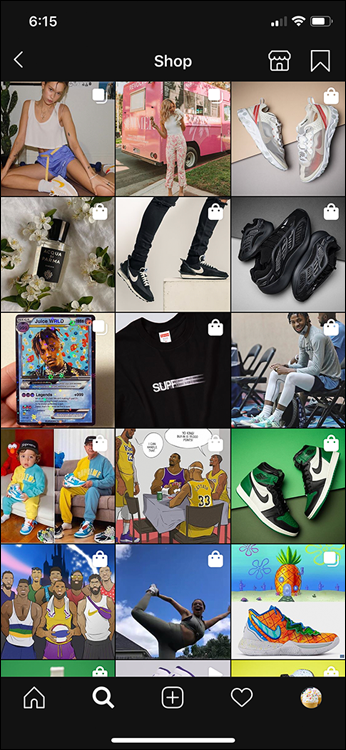
FIGURE 3-7: See anything you like? In the Shop section you can find all types of items to buy.

FIGURE 3-8: Take a moment for yourself and peruse the different well-being guides offered.
Online communities are made up of like-minded people. It’s a waste of time to follow people who have no interest in what you do. Find people with whom you have a common interest for a mutually beneficial relationship.
Make sure to tell your Facebook, Twitter, and blog communities that you’re now on Instagram. If people follow you on one social media site, they’ll likely follow you on another.
Sharing photos
Okay, it’s time! The third part of Instagram’s orientation is posting your first photo or video onto your brand new account. All you have to do is follow these steps:
- Open the Instagram app on your mobile device and select the Photo Upload button (square with a plus sign).
- Perform one of the following and then tap Next.
- Select a photo from your smartphone’s library.
- Tap the photo or video option, and then snap your photo or record video using the round button at the bottom of the screen.
(Optional) Select a filter to enhance the photo.
You see the photo you want to display, along with various filters, as shown in Figure 3-9. The filters are fun ways to highlight your photo with different borders and tones or even in black and white. If you like the photo as-is, don’t worry about a filter.
Take the time to familiarize yourself with Instagram’s different filter options because you might find some that make your photos look awesome.- Tap Next.
Write a caption and add hashtags, if needed (see Figure 3-10).
For more on hashtags, see the later section “Using Hashtags in Your Instagram Posts.”
(Optional) Tag people, check into a location, and select other social networks on which you’d like to share your photo.
You can upload your Instagram photos to Facebook, Twitter, and Tumblr at the same time you’re Instagramming. Your photo gets increased visibility when you share it on multiple channels, which means more opportunities for others to like, share, comment, and recognize your brand.
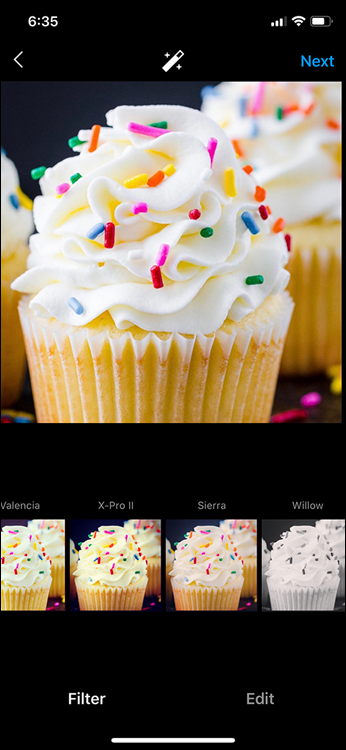
FIGURE 3-9: Instagram comes with a variety of filters you can use to enhance your photos.

FIGURE 3-10: Capture their attention with your caption.
When you post the same content on every platform, people may not feel the need to follow you on every platform. You may gain more Instagram followers if you don’t share the same images on Facebook, Twitter, and other platforms.If you’re not logged into these social networks, you may be taken to a screen at those social networks so you can log in.
- Tap Share, located at the top right of the screen.
There you have it! Figure 3-11 shows what your image looks like after it’s been posted.

FIGURE 3-11: My first post is making me hungry!
Controlling notifications
You can set up your account so that you can receive Instagram notifications on your mobile device, even when you’re not using the app. To do so, follow these steps:
- Click your profile (three straight lines) in the top right corner of the Instagram screen, and select Settings.
- On the next screen, tap Notifications.
Select the types of notifications you want to receive by tapping on each individual category.
When you tap on a category, it opens more options, as shown in Figure 3-12.

FIGURE 3-12: This is where you adjust notifications for Posts, Stories, and Comments.
Select whom you want to receive notifications from.
For example, you might want to receive notifications only from people you follow.
If you find that your phone is always beeping and buzzing because you’re receiving Instagram notifications every time someone likes or comments on a photo or sends a friend request, you can turn off notifications in your smartphone’s notification center. Look for the Instagram app in the notification center and select your desired notification settings.
If there is any activity on your account — for example, you receive a like, you’re tagged in an image, or someone new followed you — the heart at the bottom of the screen turns red and a pop-up shows the type of activity it was.
Determining What Is Photo-Worthy for Your Brand
You may be thinking your brand isn’t as visual as an energy drink or a coffee brand. The truth is, few brands can tell their stories in photos. Most, however, can find some ways to present photos while staying true to their brand’s focus and mission.
Here are some of the ways brands can share on Instagram:
- Teamwork: Fans love to see the behind-the-scenes workings of a brand. Don’t shy away from showing the team at meetings, in the cafeteria, or chatting it up in the hallway.
- Test kitchens and factories: Who doesn’t love to see how products are made or served to the public? Unveiling the mystery (without giving away company secrets) will endear you to fans (see Figure 3-13).

Courtesy of Field & Main
FIGURE 3-13: The Field & Main chef working hard in the kitchen.
- Products and ingredients: Show what goes into a product. For example, if yours is an organic food brand using only wholesome ingredients, share photos of some of your suppliers, such as farms and farmers markets. Showing what goes into a product is also a great tool for selling (see Figure 3-14).

Courtesy of Field & Main
FIGURE 3-14: Ingredients straight from the garden!
- Outings: Share photos of the team picnic or conference.
- Get to know individual team members: Share photos and information about specific team members so customers can get to know you better! (See Figure 3-15.)
- Ideas for using the product or service: What are some of the things people make with your products? Share how others use what you sell.
- Sightings in the wild: If you spot people using your products on the street, share photos on Instagram, but get permission first.
With Instagram, the possibilities are endless. You don’t need expensive equipment or a degree in photography. You need only the ability to understand what your community responds to.

Courtesy of Field & Main and Julie Gray
FIGURE 3-15: Everyone meet Julie! She’s Field & Main’s newest team member!
Using Hashtags in Your Instagram Posts
Hashtags help to make a photo searchable. For example, if you post a photo of shoes on Instagram and use the hashtag #shoes, #style, or #fashion (or a combination), that photo will show up in the streams of others who are looking for items by using the same hashtag. When someone clicks the hashtag, public images labeled with that hashtag will appear.
 Hashtagged content has a limited shelf life, especially content with a popular hashtag. If the topic is trending or popular, your content may be visible at the top of the search for only a few minutes or hours. Play around with both popular and less trendy hashtags to see where you receive the most engagement.
Here are some hashtag best practices:
- Use two or three hashtags at most. Using too many hashtags makes a post too busy. Sure, your post appears on many different searches now, but most people prefer to look at photos with less clutter.
- Make up your own hashtag. Create a hashtag that suits your brand and share it with your community. Now when they use your product or take part in a related activity, they use your brand’s hashtag, giving you more visibility and prompting others to try the same.
- Keep an eye out for trending hashtags. Hashtags don’t have to be brand related. Plenty of hashtags relate to holidays, current events, and television shows. Don’t spam a hashtag with irrelevant content, but if you have an image appropriate for trending hashtags, don’t be afraid to use it.
- Think of popular things people like to do or buy. Some popular hashtags on Instagram are #food, #shoes, and #cats. Familiarize yourself with popular hashtags, but keep in mind that content with a popular hashtag won’t stay at the top for long.
- Take part in hashtag memes. Try having fun with your Instagram account by taking part in a meme. For example, you can use #ThrowbackThursday or #TBT to share photos of your business in its early stages or #outfitoftheday to show what your staff is wearing.
People come to Instagram for the visuals. Although you should give the photo a brief caption or description, you’ll lose people if you only write captions containing hashtags.
Using Instagram Stories
Instagram has a stories feature that enables users to share rapid-fire images and video and they’re available for only 24 hours. Similar to Snapchat stories (see Chapter 2 in this minibook), Instagram stories give a place to add a sequence of photos or a video to illustrate a story. In this way, prolific Instagram posters can share a group of photos without hogging their friends’ feeds. Due to the fact that it expires after 24 hours, it’s a great way to post something you want your followers to see, but you don’t necessarily want it posted to your account.
Take these steps to use Instagram stories:
- On your home screen, tap the camera icon at the top left of the screen.
- Select the type of photo or video you want to take.
- Live: We discuss Instagram Live in the following section.
- Create: Colorful images featuring things like text, images, polls, and so on.
- Normal: Just a plain ol’ photo or video.
- Boomerang: A short 3-second video clip that continuously repeats or “boomerangs.”
- Layout: Select different ways to showcase multiple photos into a collage.
- Superzoom: A short video that automatically zooms in on the subject while adding the filter of your choosing and music to the video clip.
- Hands-free: Tap the record button once and the video will keep recording until you tap it again to stop. It will record in continuous 10-second clips.
For the purpose of this example, we’ll take a straight photo or video by tapping or holding down the round button at the bottom.
To add filters and effects while recording, swipe left and select the one you want to use.
(Optional) Enhance your photo or video:
- Save: Tap the down arrow and line icon.
- Add a silly filter: Tap the circle button with the smiley face.
- Add a sticker: Tap the square button with the smiley face.
- Remove the sound: Tap the sound icon so it has a slash through it.
- Add a doodle: Tap the squiggly line.
- Add text: Tap the Aa button.
For more on enhancements, see Instagram’s Help Center at
https://help.instagram.com.- Save the photo, add it to your story, send it to close friends, or click the Send To button to share to your story or with specific users.
Going Live with Instagram Live
Instagram has a feature called Instagram Live that allows you to stream live to your followers and engage with them in real time. When someone broadcasts live video on their account, a ring highlights their profile picture in the Instagram Stories section to let followers know that they can view the live stream.
With Instagram Live you can:
- Save a replay of video to your Instagram Stories.
- Engage with followers as they send likes or comments.
- Pin follower comments to top of the video so they stay at the top of the comment stream.
There are a few ways to utilize Instagram Live for your social media marketing, such as
- For product demos, tutorials, or announcements
- Showing your followers a behind-the-scenes look into your office or workstation
- Letting followers know when you’re running a flash sale
- Answering audience questions live
Follow these steps to use Instagram Live:
- On your home screen, tap the icon that looks like a square with a plus sign at the top right of the screen.
- Swipe to the left at the bottom of the screen and select the Live option.
(Optional) Add a title to your video by tapping on the Title icon on the left, or tap the Fundraiser icon to show you’re raising funds for your selected charity. (See Figure 3-16.)
If you select the Fundraiser option, you’ll be taken to a screen to select the specific charity you’re helping (see Figure 3-17).
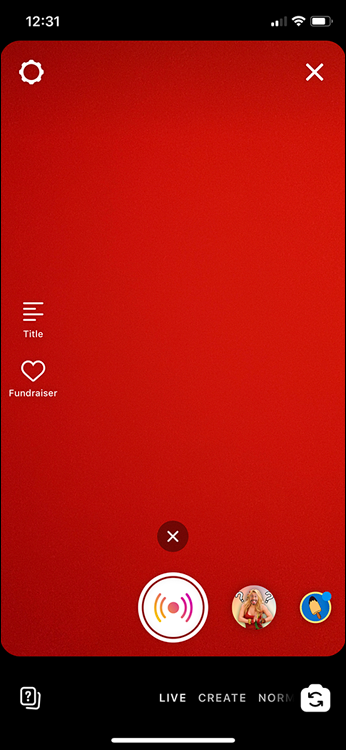
FIGURE 3-16: This is where you’ll start your Instagram Live broadcast.

FIGURE 3-17: If you selected to make your broadcast into a fundraiser, you’ll select your charity here.
- (Optional) To add filters and effects while recording, swipe left and select the one you want to use.
Tap the record button.
Instagram checks your Internet connection, then starts recording. When you are live, your followers receive a notification that you’ve gone live (see Figure 3-18).
When you’re done recording, tap End on the top right of the screen.
Instagram verifies that you want to stop recording. Tap End Now.
Select an option for saving or posting your video.
Your options are Share to IGTV, Download Video, or Delete Video.
Instagram and Snapchat stories and Instagram Live share many of the same features. For example, video and photos uploaded to Instagram stories are temporary, whereas photos posted to Instagram on your regular feed stay put. You can also see who viewed your Instagram stories. If you’re using Instagram to share stunning one-off images rather than a story, don’t feel you need to use the additional features. Use Instagram in a manner that best suits you and your community.
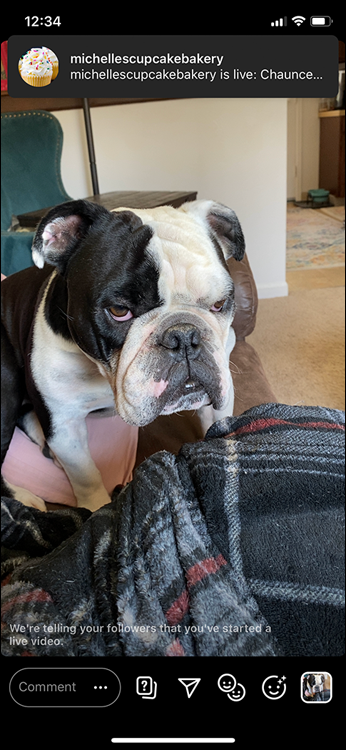
FIGURE 3-18: And we’re live!