
Test Suites are used for grouping and organizing test cases under the Test Plan. Grouping test cases under a Test Suite helps Testing Teams to run and report all the tests in a particular Test Suite. After creating the Test Plan, a default Test Suite is added as a root node to the plan with the same name as Test Plan. This node contains all the other Test Suites.
A new Test Suite can be created in different ways:
After creating the Test Suite, we can also customize the order of the Test Case in the Test Suite. Test Suites can also be copied from another Test Plan in the team project.
Every project has the requirements in one form or another documented as specified in the documentation which can be referred and verified during the Design, Construction and testing phases. In Visual Studio 2010, these requirements are collected as work items, often as Requirements (in MSF or CMMI) or user stories (under MSF for Agile Software Development) and saved under the corresponding Team Project. These user stories then on used during the testing phase to create test cases for the requirement and linked to the user stories. This group of test cases, linked to the requirement, are created as a Test Suite by adding the requirement to the Test Plan.
The following screenshot shows the first step, which involves the creation of test cases. On the right side of the test manager tool you can find the New option with multiple sub options such as Bug, Issue, Task, Test case, User Story, and shared steps. Select the Test case option and keep creating the test cases with test steps.

After creating the test cases and the test steps, the test case can be linked to the corresponding requirement specification. These requirements would have been created during the initial stages of the project while collecting the requirements from the users if we are following the regular Waterfall method and the Agile methodology. The requirement would be collected and decided on release. Select the fourth tab, All Links, from the available tabbed page and click on Link to from the tab page which opens the Add link to test case window as shown:
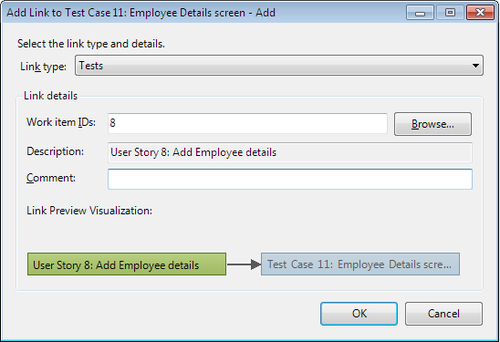
The image shows the test case already linked to the requirement. Select the Link type and then click on the Browse… option to search for the requirement and then select it for linking. One of these requirement selections is shown as follows:

Now we have the test case linked to the User story and the requirement. Go back to the Test Plan and choose the Add requirement option which opens the Add existing requirements to this test plan to search for the requirement and add it to the plan. Build the query with the known information about the requirement such as the Team Project, area path, and work item category, and then run the query. This lists requirements available for the given query condition. Select the requirement for which we have the test cases defined and which needs to be added to the Test Plan.
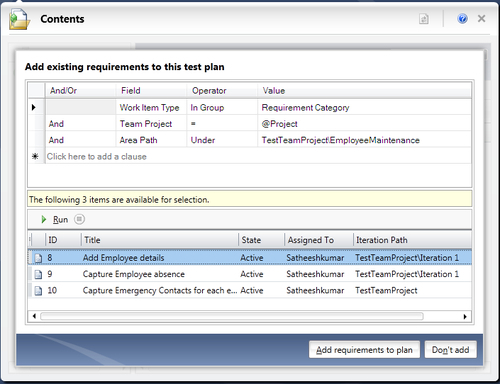
Select the requirement from the list and click on the Add requirements to plan option which adds the selected requirement to the Test Plan as a new Test Suite. This new Test Suite will be added under the root Test Suite node. You can also see the test cases which are linked to the requirement listed on the right.

The test can be modified or can be assigned to the tester who needs to test the application as per the test case definition.
This is similar to the requirement based Test Suite with the difference that the selection of test cases is by query instead of requirement. To add test cases, we need to define the Query, first based on the property of test cases such as name or priority. Choose the options Add and Query-Based Test Suite from the Test Plan window which opens the Create a Query-Based Test Suite window. Now, build a query to fetch all priority two test cases from the available list of test cases. In the following screenshot, we have two test cases available for the query defined. Provide a name for the Query and then choose the Create test suite option.

The new Test Suite is created with the name provided, while defining the query and the resulted test cases from the query makes them added to the Test Suite in the Test Plan. These test cases can be edited, assigned, and configured based on requirements.

This is the Test Suite holding the hierarchy of the Test Suite, which is created by selecting the test cases from the list of available test cases from the Team Project. Choose the Suite option under New and provide a name for the new Test Suite. On the right we can see the option to Add existing test cases and Create new test cases to be added to the Test Suite. Choose the option, Add, if you have the test cases defined already. This brings up the Add Test cases to Suite window, which provides the flexibility to search for test cases and selects the required test cases from the result and selects the Add test cases option which adds the test cases from the result to the Test Suite.

After adding, the test cases can be assigned to the testers.
In the case of a static Test Suite, there is an additional option to edit the Query directly from here.
For all the Test Suite test cases, there are additional options such as Open, Assign, and Configuration:
- Open: used to open the test case and modify the test case information.
- Assign: used for assigning testers to the test cases so that they take care of executing the test case and take full ownership of the test case.

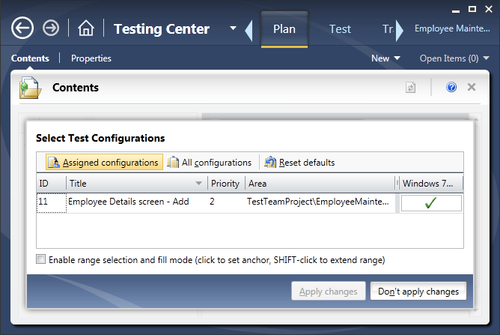
The assigned configuration option is used to view the currently assigned configuration for the selected test case.
If there are a lot of changes to make, select the option Enable range selection and fill mode to mark a range and start marking the range. After completing the configurations choose Apply changes to save the changes made.