So far in all previous chapters, we have created a lot of testing applications, but we have not grouped the tests based on common properties so that we can easily manage them. There are different common properties that we can set for tests using the test run configuration file, which is used by the tests during execution. VSTS provides a utility to edit the common test configuration stored in the testrunconfig file. VSTS provides different tools that support easy ways of managing and grouping tests. Using these tools, we can enable and disable tests, select them to run, filter tests from the list of all the tests created for the project, and set properties for an individual test. This chapter covers the following topics:
- Managing tests using Test Lists
- Organizing Test List
- Test View
- Toolbar options
- Configuring Tests
- Editing Test Run Configurations
- Test Properties
The test solution can contain any number of tests. If the number is small we can manage tests easily, but if it is too high it is difficult to identify the tests within the large list of tests. We need to group the tests based on some property to identify and filter them easily. The Test List Editor is the main interface provided by Visual Studio for managing all tests under the solution. On opening the Test List Editor, using the Test menu option in VSTS, you can see all the tests listed in the editor under All Loaded Tests, by default. The Test List Editor is divided into two panes. The left pane has the options to choose the list of tests to be displayed on the right side.
By default, the editor displays all tests in the solution irrespective of the type, option to choose the test from the list, the test name, and the project it belongs to.
The Test List Editor has a toolbar with options for grouping the tests, filtering the tests, and loading the metadata.
We can select the tests from the list and run them using the Run Checked Tests option in the toolbar. We can add or remove the columns to be displayed in the list.
The editor window has three different top-level nodes in the left pane to show the test groups based on some property. They are:
- Lists of Tests: This is where we have to maintain the tests under the new lists. Initially there won’t be any lists created.
Select the New Test List... option after selecting and right-clicking the List of Tests node. There will be a new screen for entering the Test List Name and Description. The window will also provide the flexibility to choose the node in the tree to place this new list node. For example, the following image shows the new Test List with the name, SampleTestList, added to the root node.


- The preceding screenshot shows the Lists of Tests added to the solution. If the main node is selected, all the sub-nodes or the lists under the root node will also get selected by default. The new list, SampleTestList, is not selected, but grayed out because there are no tests added to the list yet. It’s an empty list.
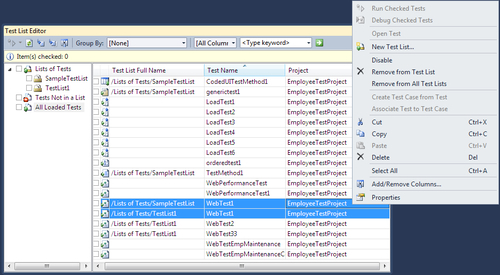
To add the tests to the list, select the tests from the list under Tests Not in a List, which are not yet added to any list. After the selection, drag-and-drop the selected tests on the Test List name. We can also use the cut, copy, and paste commands to move the tests under the lists. Now you can see the selected tests added to the list.
Each test can belong to more than one other lists. To copy the tests to the list, without removing it from the original list, press the Ctrl key while dragging the test to the new list.
To remove a test from all the Test Lists to which it is added, select it from any Test List, then right-click and choose the option Remove from All Test Lists. For example, the following screenshot shows how to remove WebTest1, which is then added to the lists, SampleTestList and TestList1. The other option available is to remove the test from just the selected Test List.
- Tests Not in a List: This is to list the tests that are not part of any of the List. Using this list, we can identify the tests that we need to organize and place under a particular Test List.
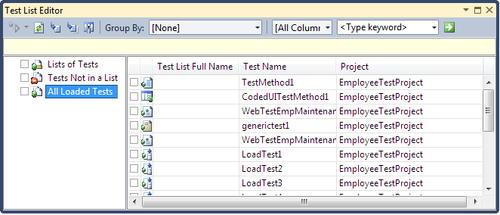
- All Loaded Tests: This option shows all the tests that are available in the solution. Whether it is part of the test or not it will be shown under this option.
The Test View window is similar to the Test List Editor, but this one shows all the tests in the solution. We cannot create any lists here, but we can filter the tests based on test properties or names. We can create a new performance session for the Load Test and Web Test from the Test View to collect the data to study and analyze the application performance. The Test View toolbar is similar to the toolbar for Test List Editor which provides Group By, Filter, Run, and Debug options, as seen in the following screenshot:

This is the common context menu option available for both Test List Editor and the Test View window. By default, all the tests listed under a Test List are enabled, which means that the test can be run. If the test is not yet ready to run or if any supporting source data is not available, we can disable the test until it is ready. In the case of ordered tests, we might have more tests. If any of the tests in the order is not ready, or if we are sure that the test will fail, then we can disable the test and run the remaining tests in the order. If the test is ready to run, we can re-enable the test using the context menu option.
The toolbar options provided by Test List Editor and the Test View window are almost the same, with features such as filtering and grouping the test based on test properties.
The Display of tests in the Test List Editor and Test View window can be controlled using the Apply Filter option in the toolbar. Filtering is useful in finding specific types of tests from the huge list of tests available in the solution. Developers might want to list only the unit tests to find out the test for testing the code change for defect fix before delivering that to the test team. On the other hand, the test team might want to list only the Web Performance Test to see if the defect fixed by the developer still exists, or if it is fixed and working as expected.
To filter the tests, use the drop-down provided in the toolbar of the Test List Editor or Test View Window and select the property on which you want to filter the tests. After selecting the property in the drop-down, enter the string in the Filter Text box to find a matching string in the selected property of all the tests. Now click on the Apply Filter button which is next to the Filter Text box control. Now, the filter is applied, and the editor lists only the test which has matching text in the property selected and the string entered in the Filter Text as shown here:

The Group By option is used for displaying the Test List by grouping tests based on a selected property. For example, the following screenshot shows the Test List Editor and Test View window in which tests are grouped based on properties. The Test List Editor groups the tests by the test property that identifies if the test is enabled or disabled. The Test View Window groups the tests based on the test type.

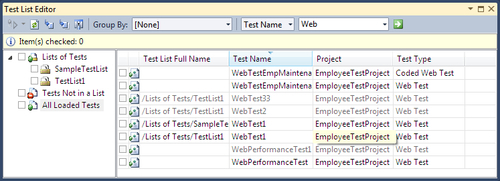
The columns drop-down list in the toolbar is also used for filtering the test. If we do not remember the full test name or type, we can select the column name from the drop-down list and then enter the partial or full text and then apply the filter. This will filter the test that has text matching the text or keyword entered for the filter. This can be a partial or full match. The following sample screenshot shows the filtered result that has returned all the tests which contain the name, Web, as part of the Test Name: