
Automated Testing is the new simplified form of automating manual testing and automating user interface testing and controls. Validating the controls and testing the functionality of user interfaces is made simpler in Visual Studio 2010. These tests are also called coded UI tests. The existing manual tests, test cases, and the action recordings of the user interface tests are reused for generating the automated tests and the code files in managed code (C# or VB.NET). And then the UI controls can be added to the coded UI test, and properties and values of the controls can be verified using the Coded UI Test Builder feature (built-in recorder in Visual Studio 2010). To have the same test performed with multiple sets of data and test the UI functionality, the coded UI test is created as a data driven test by adding a data source to the test method. The test method is then called for each set row of data in the data source. The coded UI test can be run directly from Visual Studio, Microsoft Test Manager, or Team Foundation Build., The coded UI test can be linked to the requirements to determine the number of automated tests for each requirement.
Action recording is useful for manual testing to record the user action and to play back the test multiple times instead of repeating the same test manually. Recording the action is done by using the Test Runner. The details of creating and recording user actions are covered as part of Chapter 2, Test Plan, Test Suite, and Manual Testing, which talks about Test Plan and manual testing. This section explains the details of creating the coded UI test from the existing action recording.
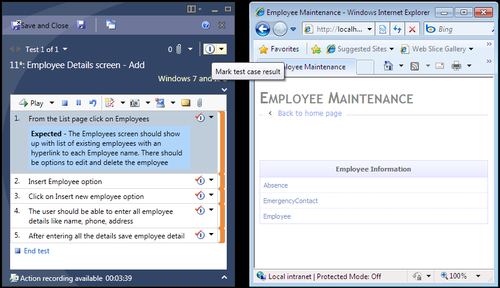
The following screenshot shows the successful completion of the action recording for the manual test:
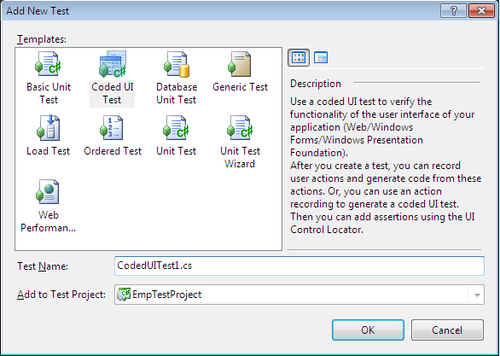
In Visual studio, select the test project that you want to test from the solution explorer if it already exists in the solution and then add a new test to the project. Otherwise select the New Test option from the Test menu and then select Coded UI Test from the available list of options.
The selected Coded UI test option will add the code file to the test project. The code file will contain only the class with the CodedUITest attribute, a test method named CodedUITestMethod1 with the attribute TestMethod and a test context. All these methods are empty as we have not generated the code yet.
After selecting the coded UI test, we need to select the option to generate the code to the coded UI test file for the current test. There are two options available:
- To record the actions and edit UI Maps or add assertions
- To use an existing action recording for the manual test

Let us select the second option to use the existing action recording which was recorded already as part of a Manual Testing chapter run in Microsoft Test Manager. After choosing the second option we need to select the manual test case and the action recording for which we need the coded UI test to be generated. Select the work item using the Work item picker screen, which is displayed after selecting the action recording option.
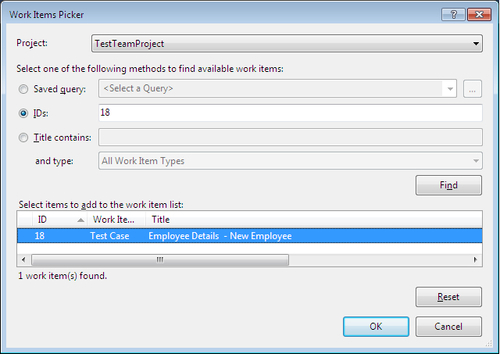
Selecting the test case from this window generates the code based on the action recording that we have for that test case. You can see that there are some additional files such as UIMap.uitest, UIMap.cs, and UIMap.Designer.cs created and modified at the time of code generation. The main method CodedUITestMethod1() in the CodedUITest1.cs file will contain the method calls for each action in the action recording. The corresponding method definition is created in the Designer.cs file by the Coded UI Test Builder itself. The following code contains the action methods generated under the CodedUITestMethod1():
// Sample code - generated based on action recording
public void CodedUITestMethod1()
{
// To generate code for this test, select "Generate Code for Coded UI Test" from the shortcut menu and select one of the menu items.
// For more information on generated code, see http://go.microsoft.com/fwlink/?LinkId=179463
this.UIMap.FromtheListpageclickonEmployees();
this.UIMap.InsertEmployeeoption();
this.UIMap.ClickonInsertnewemployeeoption();
this.UIMap.EnterallthedetailsfortheemployeeFirst_NameLast_ NameMiddle_NameDepartmentOccupationGenderCityStateCountryPhone Params.UIFirst_NameEditText = TestContext.DataRow["First_Name"]. ToString();
this.UIMap.EnterallthedetailsfortheemployeeFirst_NameLast_ NameMiddle_NameDepartmentOccupationGenderCityStateCountryPhone Params.UILast_NameEditText = TestContext.DataRow["Last_Name"]. ToString();
this.UIMap.EnterallthedetailsfortheemployeeFirst_NameLast_ NameMiddle_NameDepartmentOccupationGenderCityStateCountryPhone Params.UIMiddle_NameEditText = TestContext.DataRow["Middle_Name"]. ToString();
this.UIMap.EnterallthedetailsfortheemployeeFirst_NameLast_ NameMiddle_NameDepartmentOccupationGenderCityStateCountryPhone Params.UIDepartmentEditText = TestContext.DataRow["Department"]. ToString();
this.UIMap.EnterallthedetailsfortheemployeeFirst_NameLast_ NameMiddle_NameDepartmentOccupationGenderCityStateCountryPhone Params.UIOccupationEditText = TestContext.DataRow["Occupation"]. ToString();
this.UIMap.EnterallthedetailsfortheemployeeFirst_NameLast_ NameMiddle_NameDepartmentOccupationGenderCityStateCountryPhone Params.UIGenderEditText = TestContext.DataRow["Gender"].ToString();
this.UIMap.EnterallthedetailsfortheemployeeFirst_NameLast_ NameMiddle_NameDepartmentOccupationGenderCityStateCountryPhone Params.UICityEditText = TestContext.DataRow["City"].ToString();
this.UIMap.EnterallthedetailsfortheemployeeFirst_NameLast_ NameMiddle_NameDepartmentOccupationGenderCityStateCountryPhone Params.UIStateEditText = TestContext.DataRow["State"].ToString();
this.UIMap.EnterallthedetailsfortheemployeeFirst_NameLast_ NameMiddle_NameDepartmentOccupationGenderCityStateCountryPhone Params.UICountryEditText = TestContext.DataRow["Country"]. ToString();
this.UIMap.EnterallthedetailsfortheemployeeFirst_NameLast_ NameMiddle_NameDepartmentOccupationGenderCityStateCountryPhone Params.UIPhoneEditText = TestContext.DataRow["Phone"].ToString();
this.UIMap.EnterallthedetailsfortheemployeeFirst_NameLast_ NameMiddle_NameDepartmentOccupationGenderCityStateCountry Phone();
this.UIMap.Afterenteringallthedetailssaveemployeedetail();
}
The coded UI test code generation creates several files and adds them to the test project. We will see the details of each file generated to support the coded UI test.
When we create a coded UI test, the coded UI Test Builder generates five different files to map the user interface, test methods, parameters, and assertions for all tests.
The name of this file is generated based on the name of the test that we created. This file can be modified any time. This file contains one public class with the name CodedUITest1 with the CodedUITest attribute added to the class so that this class can be recognized as a test class.
The class also contains two additional default properties, TestContext and UIMap.

There are two additional optional methods which are commented by default.

The MyTestInitialize() method is called once before any other test method. This is useful for initializing the tests. This is identified as the initializer using the attribute TestInitialize. Similarly the MyTestCleanup() method is called once after each test has been called and this method is identified using the attribute TestCleanup().
The Coded UI Test Builder automatically creates the code in this file when a test is created. And when the test changes, you may not have to generate the code manually as it gets recreated automatically after each change. The file is recreated whenever the test changes. This file contains a UIMap class which has the attribute, GeneratedCode, which is also there for all the other classes in this same file. The UIMap class contains the definition of all the methods identified during the recording. The following are some of the methods captured from the recording:
public void FromtheListpageclickonEmployees()
public void InsertEmployeeoption()
public void ClickonInsertnewemployeeoption()
public void Afterenteringallthedetailssaveemployeedetail()
Each method follows a defined structure. The structure contains the summary of the method, a region at the top which defines the variables, and then the method calls and properties are defined. The following code shows the definition for one of the method calls:
/// <summary>
/// FromtheListpageclickonEmployees - Test Case 18 - Use 'FromtheListpageclickonEmployeesParams' to pass parameters into this method.
/// </summary>
public void FromtheListpageclickonEmployees()
{
#region Variable Declarations
HtmlHyperlink uIEmployeeHyperlink = this.UIBlankPageWindowsInteWindow.UIEmployeeMaintenanceDocument. UIEmployeeHyperlink;
#endregion
// Go to web page 'http://localhost:3062/' using new browser instance
this.UIBlankPageWindowsInteWindow.LaunchUrl(new System.Uri(this.FromtheListpageclickonEmployeesParams. UIBlankPageWindowsInteWindowUrl));
// Click 'Employee' link
Mouse.Click(uIEmployeeHyperlink, new Point(19, 8));
}
This file contains the Partial UIMap class but does not contain any properties or methods initially. But we can include our custom code in the UIMap class to customize the functionality or add new functionality.
This is an XML file which represents the structure of the coded UI test recording. It includes the actions, properties, and methods of the classes. The UIMap.Designer.cs file contains all the code that is generated by the coded UI Builder. Always use the Coded UI builder to modify the test which automatically modifies the UIMap.uitest and UIMap.Designer.cs files. Editing the file directly is not allowed and not advisable.
The coded UI Test that we created previously is for given data during test recording. Later we might want to run the test not only for one set of data but for different sets of data and multiple times. To achieve this, we can parameterize each field to get data from a data source during testing. Each row of data in the data source is an iteration of the coded UI test. When we generate methods or assertions for the coded UI test, all constants in the recorded methods are parameterized into parameter classes. In our example, there is a method, FromtheListpageclickonEmployees as shown:
public void FromtheListpageclickonEmployees()
{
#region Variable Declarations
HtmlHyperlink uIEmployeeHyperlink = this.UIBlankPageWindowsInteWindow.UIEmployeeMaintenanceDocument. UIEmployeeHyperlink;
#endregion
// Go to web page 'http://localhost:3062/' using new browser instance
this.UIBlankPageWindowsInteWindow.LaunchUrl(new System.Uri(this.FromtheListpageclickonEmployeesParams. UIBlankPageWindowsInteWindowUrl));
// Click 'Employee' link
Mouse.Click(uIEmployeeHyperlink, new Point(19, 8));
}
For the preceding method the coded UI test builder creates the class as follows and adds fields to the class for every constant value that we used while recording:
/// <summary>
/// Parameters to be passed into 'FromtheListpageclickonEmployees'
/// </summary>
[GeneratedCode("Coded UITest Builder", "10.0.30319.1")]
public class FromtheListpageclickonEmployeesParams
{
#region Fields
/// <summary>
/// Go to web page 'http://localhost:3062/' using new browser instance
/// </summary>
public string UIBlankPageWindowsInteWindowUrl = "http://localhost:3062/";
#endregion
}
Now we have created the required test and test files. Let us create a data source in the form of a .csv file and use it for the coded UI test. The sample data in the .csv file is shown here:

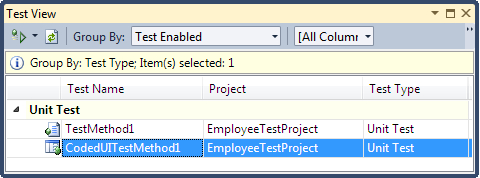
Open the Test View window from the Test menu option. All tests in the current test project including the coded UI Test will be shown in the Test View window.
Select the coded UI Test, right-click and select Properties. The property window displays all the properties for the selected test. One of the properties is the Data Connection String of the data provider for the data driven test. Click the ellipsis (…) button next to the Data Connection property which opens the new test data source wizard. Select the type of data source from the available list of data sources such as Database, CSV File, and XML File.
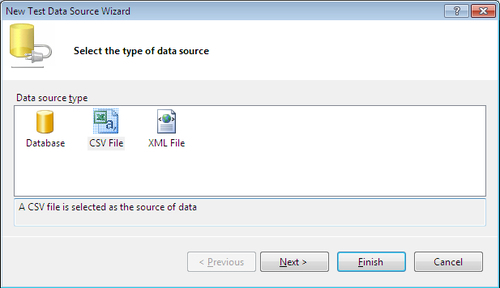
Using the wizard, select the .csv data source file that we created earlier. Once we select the file, we can see that the Data Provider name is set to Microsoft.VisualStudio.TestTools.DataSource.CSV and the Data table name is set to EmpData#csv. You can choose the file to be part of the deployment items so that it is included and deployed along with the files during the deployment of this project.
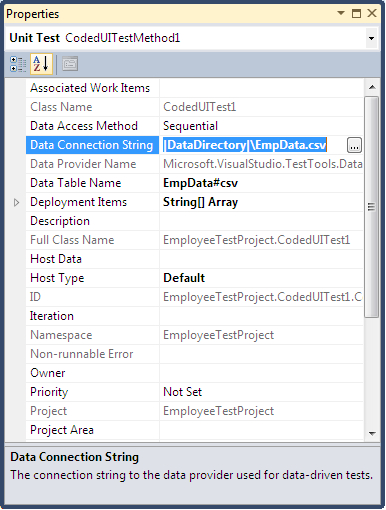
All the properties that we set in the test property window are saved in the CodedUITest1.cs file. If we check the CodedUITestMethod1, the attributes of the method contain the data source and the deployment items information set along with the attribute as shown in the following code:
[DeploymentItem("EmployeeTestProject\EmpData.csv"), DataSource("Microsoft.VisualStudio.TestTools.DataSource.CSV", "|DataDirectory|\EmpData.csv", "EmpData#csv", DataAccessMethod.Sequential), TestMethod]
public void CodedUITestMethod1()
{
// To generate code for this test, select "Generate Code for Coded UI Test" from the shortcut menu and select one of the menu items.
// For more information on generated code, see http://go.microsoft. com/fwlink/?LinkId=179463
this.UIMap.FromtheListpageclickonEmployees();
this.UIMap.InsertEmployeeoption();
The data source is added to the method but we need to map the fields to the corresponding UI controls so that the data value from the data row is assigned to the controls automatically during runtime. To do this, we have to modify the code or use the tool itself to map the fields. The following code shows two of the fields mapped to the columns to pick the values from the data row and assign it to the field during the test run.:
this.UIMap.EnterallthedetailsfortheemployeeFirst_NameLast_NameMiddle_NameDepartmentOccupationGenderCityStateCountryPhoneParams.UIFirst_NameEditText = TestContext.DataRow["First_Name"].ToString();
this.UIMap.EnterallthedetailsfortheemployeeFirst_NameLast_NameMiddle_NameDepartmentOccupationGenderCityStateCountryPhoneParams.UILast_NameEditText = TestContext.DataRow["Last_Name"].ToString();
If we run the CodedUITest1 test now, the test runs for each row in the data source. As we have three rows in the data source the test runs three times. If one of these tests fails, the entire test result fails.
We always have some kind of validation to the UI controls. For example, some of the controls in the UI should not be null. We can use the Coded UI Test builder to generate code for the validation method that uses an assertion for a UI Control. We can add the UI control to the existing UI map file and generate the code to the existing coded UI test file:
- Open the test project and the coded UI test file which is named
CodedUITest1.cs. In the code file place the cursor onCodedUITestMethod1(), right-click and select the option Generate Code for Coded UI Test and then choose Use Coded UI Test Builder….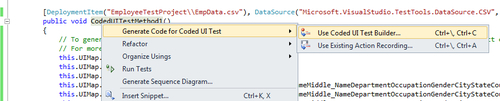
The coded UI Test builder is opened and ready for adding the controls and validations. Open the application and the UI page for which we need to add the validation logic to the controls. Keeping the UI open, drag-and-drop the crosshair from the Test Builder to the control on the UI. The other option is to select the control and keep the mouse pointer on the UI Control and then click Windows Logo Key+I to select the control at the mouse pointer.

- After selecting the control, the Add assertion screen opens for the selected control. The window displays all the properties of the selected control. We can add the validations and test assert for the control. Select the property of the control to be validated and then click on the Add Assertion option. The following screenshot shows the window to select the assertion type and to add the Comparison Value for the validation.
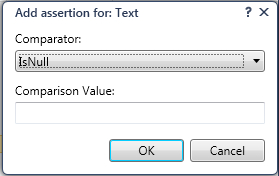
- Just for testing purposes let's add the
IsNullassertion type for the First Name UI control. Click OK to add the assertion to the test. We can keep adding the assertions for all the validations that we require. After adding all the assertions, click on the Generate code option in the Test Builder and then provide a name for the assert method. This option will automatically create the code for the assertions and add the method definition and method call to the corresponding files.
All assertion method definitions will be added to the UIMap.Designer.cs file and the method is called from the main method CodedUITestMethod1() in the CodedUITest1.cs file. The following snippet shows the code for the assertion generated in the designer file:
public void AssertMethod1() { #region Variable Declarations HtmlEdit uIFirst_NameEdit = this.UIEmployeeWindowsInterWindow. UIEmployeeDocument1.UIFirst_NameEdit; #endregion // Verify that 'First_Name' text box's property 'Text' is not equal to 'null' Assert.IsNotNull(uIFirst_NameEdit.Text, "The First Name is Not null"); } - Now select CodedUITest1 from the Test View window and run the test. As we have three rows in the data source, three iterations of the test will run and all tests will fail because the First name has a value in all data rows. Our test is checking for a null value in the First Name field. So the entire test result will fail because of the test's failure.

Now we can see that the required coded UI testing is successful. One difficulty in this type of code generation is the code maintenance. As we know that all the assertion code and the validation methods are added to the UIMap class, there is a chance of this class file growing to a larger size if we keep on adding the controls and methods. To avoid this situation, we can have multiple UIMap files generated.
The application can be grouped into modules or logical subsets and map each UIMap file to one particular logical subset of the application. This logical grouping also helps the tester to work on the individual module without affecting the other areas of the application. To create the logical grouping, we can first create a folder under the test project. Then select the folder and create a new item of type Coded UI Test Map from the available templates.
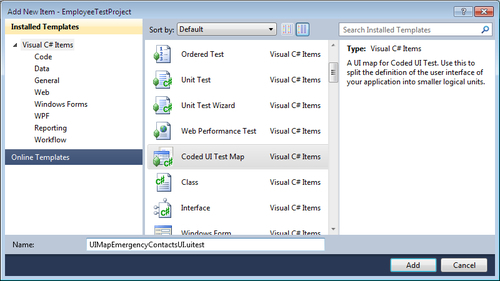
- Click on Add after providing a meaningful name for the new Map file. Now the Coded UI Test Builder window appears after minimizing the Visual Studio window. Using the Test Builder we can keep recording the actions and creating the validations for the UI controls. Make sure you add the controls and validation specific to the module for which you are creating the map file. Generate the code using the option in the test builder after completing the recording. You can see the new
.uitestfile anddesigner.csfiles added to the test under the new folder. The following screenshot shows two new UIMap files created for two different UI screens in the application:

For any mapping that we create there are certain best practices to follow for easy maintenance and successful test results:
- Do not modify the
UIMap.Designer.csfile as it is meant only for the test builder to modify - Always use Coded UI Test Builder and create all assertions using Coded UI Test Builder and limit the recording to a few user actions
- Use meaningful names for the UIMap files and the assertion methods to easily identify and maintain the code and tests
- Always rerecord the user actions in case of changes to the user interface