
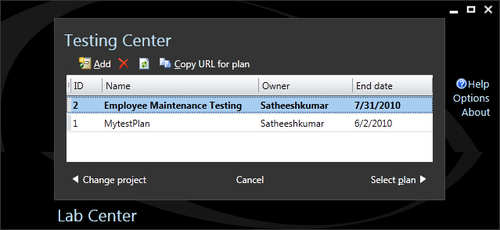
After selecting the Team project, next comes the selection of the existing Test Plan from the Team project or creating a new one. The following screenshot has two test plans already from which we will select the first one to create all Test Plans. The window also has an option to copy the URL to open the Test Plan in the Testing Center. For example, the URL for the first Test Plan in the list would look like mtm://my-pc:8080/tfs/defaultcollection/p:TestTeamProject/Testing/testplan/connect?id=2, which would directly open the Test plan when you browse to it.
After selecting or creating the Test Plan, you can see the Testing Center open with existing Test Suites and Test Cases. The Testing Center has multiple tabs like Plan, Test, Track, and Organize. The Testing Center contains shortcuts to create new work items such as Bugs, Issue, Shared Steps, Tasks, Test Case, and User Story. Other shortcuts such as choosing another Test Plan or going back to the home page is also available. the following is the list of the descriptions the tabs:
- Plan: This tab contains all the features to create Test Suites and test cases. Adding or associating existing requirements to the Test Plan is possible from this tab.
- Test: This tab contains features to select a particular test case and then run that test.
- Track: Used for building queries to see the status of the Tests. The Testing Center provides multiple queries by default, which we can use or customize to create our own.
- Organize: Using this, you can organize or manage Test Plans, Configurations, Test Cases, and Shared Steps for Test Cases
This tab contains two sub-tabs—Contents and Properties. The Contents tab lists all available test suites and test cases associated to the test suite. On the left pane, you can see the list of all test suites and on the right, you can see the corresponding test cases for the selected suite. Each Test plan can have any number of Test suites and each test suite can have any number of Test cases. The right-side pane shows the current configuration selected for the Test Plan and the requirement associated to this test suite.

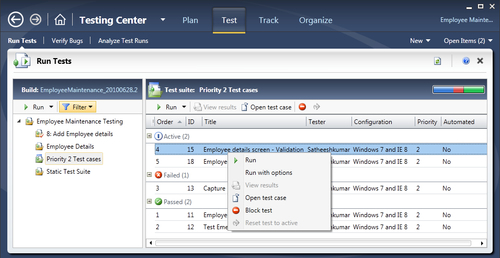
There is also a progress bar that shows the current stage and progress of the test suite. There are different types of test suites that we can create. One is to create a Test Suite and then add test cases to it and the other type is to create a Test suite based on the query to filter the test cases. For example, the previous screenshot contains the test cases that are created or manually added to the suite. At any time we can add or remove test cases from the Test Suite. The following screenshot contains the Test Suite that was created based on a query to select Priority 2 Test Cases from all available test cases in the Test plan.

The other option is to add requirements to the Test Plan. Adding or linking the requirements to the Test case helps us to identify those test cases which could get affected in case of any requirement change. Also it is easy to find the related test cases and testing scenarios for the requirement. The following screenshot shows the selection of a requirement from the existing requirements list and adding it to the Test Plan.

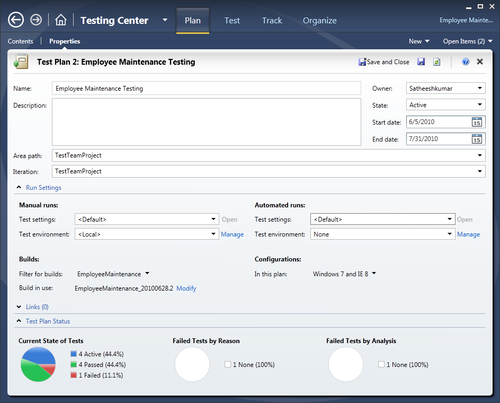
You can set the properties for the Test Plan using the Properties tab. You can choose the configurations to use for Manual and Automated test runs. The Test Plan can be associated with a build as well. The other common properties such as Area, Iteration, Start, and End Date of the task can be set using the properties window. The properties window shows the summary of Current State of Tests under the Test Plan.
The Test tab contains three different sub-tabs: Run Tests, Verify Bugs, and Analyze Test Runs. The first tab, Run Tests, is useful to run the test cases and capture the test results. The right pane also lists the test results and the status of each run of the test case. You can select the test case and start running the test with different run options, such as choosing a different build configuration, test settings, and environment. After the test run, we can also view the test result details.
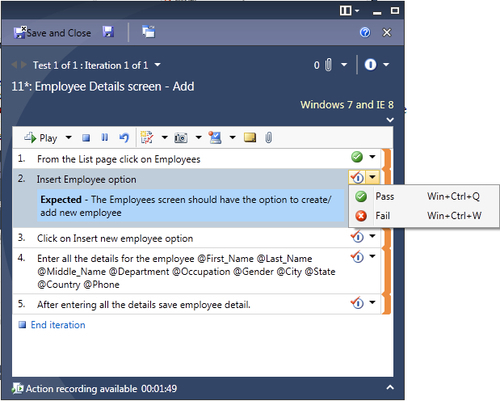
Selecting the test case and running the test opens the window for recording the test actions and the result for each step in the test case. Recording the test actions is optional but is very useful in the case of automating the test. With use of the recording window we can play, pause, and stop the test at any time. Each step shows the actual test step and the expected result for the test step.

Based on the test result for the particular step, we can set it as pass or fail. After completing all the steps, the test iteration can be set as complete. Clicking on Save and Close saves the entire test result and the action recording for further analysis. The toolbar in the window provides other multiple features, such as Creating a Defect directly from here, Taking the Snapshot of the screen, Capture the Environment details used at this moment, and Adding any other Attachment to this Test Step.
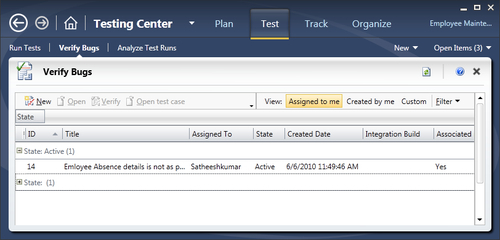
The second tab, Verify Bugs, under the Test tab is to verify bugs created as a part of the test suite and test runs. We can create a new defect or edit an existing defect from this window. We can also create an entirely new test case based on the defect that arose during the test.
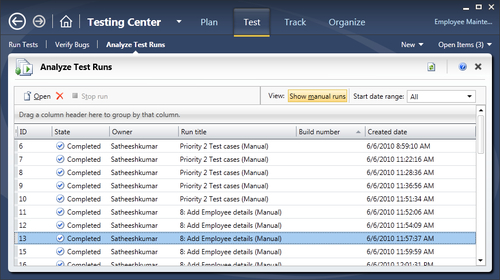
The third tab, Analyze Test Runs, is very useful to compare and analyse multiple test runs for the same test. We can change the configuration settings or environments for the test run and have multiple test results collected. We might have to analyse the results of the same test run with different configuration settings later on. The Analyze Test Runs window shows the history of test runs and the details of each test run.
The Track tab in Testing Center is used for keeping track of the test cases, test runs, and test run results. Assigning builds with work items and getting the test recommendations based on the build change is also provided by this tab.
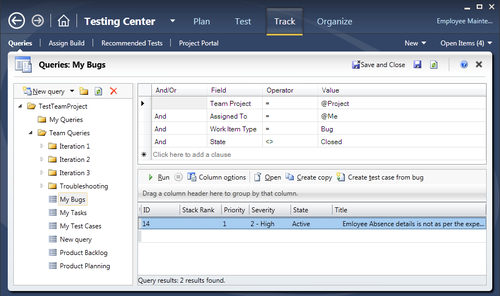
Using the first sub-tab, Queries, we can build queries based on some parameters to get the status of defects and test runs. The Test Manager itself provides a list of built-in queries to track the tasks and defects. For example, the Active Bugs is an inbuilt query which fetches the list of all active defects under the team project. We can customize and refine the queries as per our needs. We can build our own brand new queries and save them under the My Queries section, which is only meant for the current user who is creating it. We can then can run the query to get the result.
The next tab is the Assign Build tab which is used for assigning a new build to the test. This is very useful in situations such as when the development team has fixed some defect that is reflected in the new build, so the testing should happen against the new build and not the old build. To make this change, we can reassign the tests to the new build in which the new defect fixes are available. You can choose the build based on the work items associated to the build.

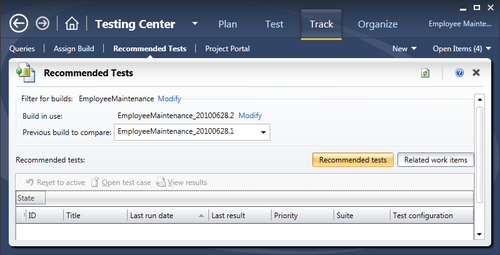
The next tab, Recommended Tests, provides an interesting feature that recommends all the tests that need to be re-run based on the changes that are a part of the new build. Because of some requirement change, design change, or code change, some of the tests need to be re-run to make sure the functionality is not broken. We need to choose the builds to compare and identify the differences of work that went into the build. This also helps the tool to identify the changes and the corresponding tests for the change. It then recommends us to re-run the tests. From the resulting list, we can choose the test case and reactivate it or make some necessary changes to the test case to align with the new change in the build.
The next tab is the Project Portal tab, which opens the website for the team project through which we can get all the information about the team project. This is very useful for all who do not have Visual Studio installed on the local machine but want to access the resources from the Web. For example, if the management wants to know the current status of the project or defects, it is easy to go to the portal and access the corresponding report instead of having Visual Studio installed locally.
The Organize tab in Test Center is used for maintaining and managing the Test Plans, Test Configurations, Test Cases, and Shared Steps for test cases. This tab contains four different sub-tabs to manage all of these.
- The first sub tab, Test Plan Manager, is used for setting or modifying different properties of the Test Plans.
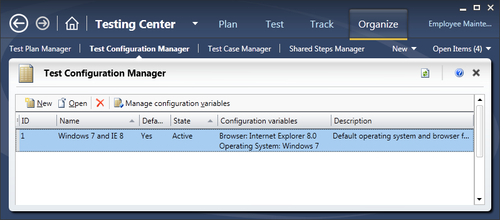
- The second tab, Test Configuration Manager, is for managing and modifying the configurations. We can create multiple configurations based on different parameters such as the Operating system, Browser, version and other system variables.
- The next tab is the Test Case Manager, where all the test cases in the Test plan are displayed. We can select any of the test cases and modify it or create a new test case or create a copy of existing test case. We can filter the test cases from all existing test cases and then choose the test case to modify.

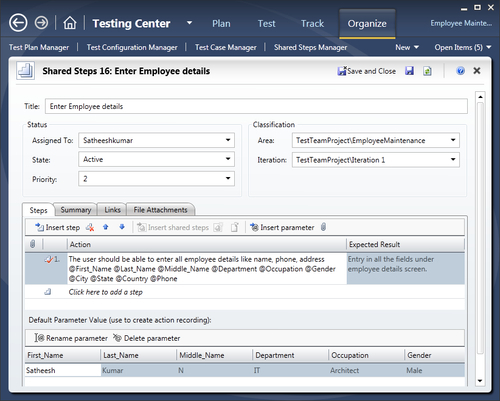
- The next tab is the Shared Steps Manager tab, which is for creating and maintaining the test cases that are shared across many test cases. These are called shared steps because they are common steps that are repeated in multiple test case steps. For example, the entering employee details step is the same step used while creating a new employee detail and updating an employee detail.
All of these changes are saved to the Team Foundation Server store. As you see in all of these tabs in Testing Center, none of the steps are dependent on Visual Studio. As long as we have the Team Project available in TFS, it is enough to capture the test steps and test cases for the Team project using the Test Center.