
In the earlier section, we did not include any Spring-related functionality, and we implemented a Java class that had DAO implementation, which connected to a database to fetch a particular record using JDBC. Now in this section, we will look at some of the features of the Spring Framework that make our job easier by eliminating the boilerplate code. Here, we will look into the connection support provided by Spring that makes it easy to handle the connections.
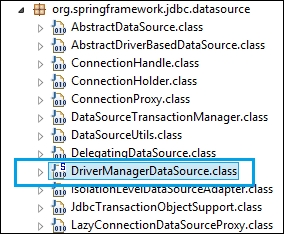
The DriverManagerDataSource class is used for configuring the DataSource for application, which is defined in the configuration file, that is, Spring.xml. So, first of all, we need to add the Spring JAR that will have the DriverManagerDataSource class to our project. The Spring Framework provides the JAR for JDBC spring-jdbc-4.1.4.RELEASE.jar containing the package named DataSource, which will have the class DriverManagerDataSource.class, as shown in the following screenshot:
The configuration of DriverManagerDataSource is shown here. We need to provide the driver class name and the connection URL. We can also add the username and the password in the property if the database requires it.
Check out the file Spring.xml using the following code snippet:
...
   <context:annotation-config />

   <context:component-scan base-package="org.packt.Spring.chapter5.JDBC.dao" />

   <bean id="dataSource"
   class="org.springframework.jdbc.datasource.DriverManagerDataSource">
          <property name="driverClassName" value="${jdbc.driverClassName}" />
          <property name="url" value="${jdbc.url}" />
   </bean>

   <context:property-placeholder location="jdbc.properties" />
...
The bold properties in the aforementioned configuration code represent the values that you normally pass to JDBC to connect it with the interface. For easy substitution in the different deployment environments and for easy maintenance, the database connection information is stored in the properties file, and the Spring's property placeholder will load the connection information from the jdbc.properties file:
jdbc.driverClassName=org.apache.derby.jdbc.ClientDriver
jdbc.url=jdbc:derby://localhost:1527/db
In the previous section, we added the properties for the DataSource in the configuration file Spring.xml. So, we will look into the DAOs class to see the benefit of using DataSource. We will implement the EmployeeDao interface that we defined in the earlier section.
The final directory structure of the application is shown in the following screenshot:

In the earlier section, we were trying to perform a few basic steps, which are common for methods such as:
- Set up connection to a database
- Create a prepared statement
The first step is to connect to the database that is common for all the methods of the application. We will take out the boilerplate code for this step from the methods defined in the EmployeeDaoImpl class.
We have defined DataSource as a member variable and annotated it by the @Autowired annotation. We have called the getConnection() method of this DataSource to get the connection based on the definition provided in the configuration file.
Checkout the file EmployeeDaoImpl.java for the following code snippet:
package org.packt.Spring.chapter5.JDBC.dao;

import java.sql.Connection;
import java.sql.PreparedStatement;
import java.sql.ResultSet;
import java.sql.SQLException;
import java.sql.Statement;
import javax.sql.DataSource;
import org.packt.Spring.chapter5.JDBC.model.Employee;
import org.springframework.beans.factory.annotation.Autowired;
import org.springframework.stereotype.Repository;

@Repository
public class EmployeeDaoImpl implements EmployeeDao {
   @Autowired
   private DataSource dataSource;
Here, the EmployeeDaoImpl class is annotated by the stereotypical annotation, @Repository, so that Spring automatically scans this class and registers it as the Spring bean employeeDaoImpl.
The getEmployeeById(int id) method is used to get the employee details based on the employee ID, as shown here:
   @Override
   public Employee getEmployeeById(int id) {
          Employee employee = null;
          Connection conn = null;
          try {
                conn = dataSource.getConnection();
                PreparedStatement ps = conn
                              .prepareStatement("select * from employee where id = ?");
                ps.setInt(1, id);
                ResultSet rs = ps.executeQuery();
                if (rs.next()) {
                       employee = new Employee(id, rs.getString("name"));
                }
                rs.close();
                ps.close();
          } catch (SQLException e) {
                throw new RuntimeException(e);
          } finally {
                if (conn != null) {
                      try {
                            conn.close();
                      } catch (SQLException e) {
                      }
                }
          }
          return employee;
   }
The createEmployee() method is used for creating the Employee table, as shown in the following code snippet:
   @Override
   public void createEmployee() {
          Connection conn = null;
          try {
                conn = dataSource.getConnection();
                Statement stmt = conn.createStatement();
                stmt.executeUpdate("create table employee (id integer, name char(30))");
                stmt.close();
          } catch (SQLException e) {
                throw new RuntimeException(e);
          } finally {
                if (conn != null) {
                      try {
                            conn.close();
                      } catch (SQLException e) {
                      }
               }
        }
   }
The insertEmployee(Employee employee) method is used for inserting the data into the Employee table, as shown here:
   @Override
   public void insertEmployee(Employee employee) {
          Connection conn = null;
          try {
                conn = dataSource.getConnection();
                Statement stmt = conn.createStatement();
                stmt.executeUpdate("insert into employee values ("
                            + employee.getId() + ",'" + employee.getName() + "')");
                stmt.close();
         } catch (SQLException e) {
                throw new RuntimeException(e);
         } finally {
               if (conn != null) {
                      try {
                             conn.close();
                      } catch (SQLException e) {
                      }
                }
         }
   }
}We have package org.packt.Spring.chapter5.JDBC.main that contains the class HrPayrollSystem with the main() method:
package org.packt.Spring.chapter5.JDBC.main;

import org.packt.Spring.chapter5.JDBC.dao.EmployeeDao;
import org.packt.Spring.chapter5.JDBC.model.Employee;
import org.springframework.context.ApplicationContext;
import org.springframework.context.support.ClassPathXmlApplicationContext;

public class HrPayrollSystem {

   public static void main(String[] args) {
         @SuppressWarnings("resource")
         ApplicationContext context = new ClassPathXmlApplicationContext(
                      "Spring.xml");
          EmployeeDao employeeDao = context.getBean("employeeDaoImpl",
                      EmployeeDao.class);
          // create employee table
          employeeDao.createEmployee();
          // insert into employee table
          employeeDao.insertEmployee(new Employee(1, "Ravi"));
         // get employee based on id
         Employee employee = employeeDao.getEmployeeById(1);
         System.out.println("Employee name: " + employee.getName());
   }
}
The types of code that we have discussed so far use the Spring Framework to manage DataSource and this makes things simple. We have taken all the connection parameters from the class and set them to bean defined by an XML file. In DAO, we have used the method of the new bean to get the connection of the database.