Spring framework provides classes such as JavaMailSenderImpl
, SimpleMailMessage
, and so on, which simplify sending e-mails via JavaMail API. In this recipe, we'll look at Roo commands that help with the configuration of these classes. To verify that the emailing feature in our application is working correctly, we'll send an e-mail via Gmail.
Create a new directory C:
oo-cookbookch06-email in your system. Copy the ch06_web_app.roo script to the ch06-email directory. If you are using a different database than MySQL or your connection settings are different than what is specified in the script, then modify the script accordingly.
Start the Roo shell from the ch06-email directory and execute the ch06_web_app.roo script using the script command. Executing the Roo script will create a flightapp-web eclipse project that represents a Spring Web MVC application consisting of Flight and FlightDescription JPA entities.
To simplify e-mail sending, follow the steps given here:
- Execute the
emailsendersetupcommand, by providingusernameandpasswordargument values for the Gmail account through which you want to send e-mails. In the following command, replace the<username>and<password>argument values with the values that reflect your Gmail account username and password, respectively. It is important to note that you don't need to specify@gmail.comas the value of username, as it is derived from thehostServerargument. If you are using a different mail server for sending e-mails, then modify the argument values accordingly.... roo> email sender setup --hostServer smtp.gmail.com --port 587 --protocol SMTP --username <username> --password <password> Updated SRC_MAIN_RESOURCESMETA-INFspringapplicationContext.xml Updated ROOTpom.xml [Added dependencies ..., javax.mail:mail:1.4.1, javax.activation:activation:1.1.1] Created SRC_MAIN_RESOURCESMETA-INFspringemail.properties
- Execute the
emailtemplatesetupcommand to specify the sender of the e-mail message and the subject of the e-mail (replace<username>with your Gmail account username), as shown here:... roo> email template setup --from <username> @gmail.com --subject "A new Flight instance has been created" Updated SRC_MAIN_RESOURCESMETA-INFspringapplicationContext.xml Updated SRC_MAIN_RESOURCESMETA-INFspringemail.properties
- Add Spring's
MailSenderandSimpleMailMessagefields, along with asendMessagemethod, toFlightController.javausing thefieldemailtemplatecommand, as shown here:... roo> field email template --class ~.web.FlightController Updated ...flightappwebFlightController.java
- Execute the
performeclipsecommand to update the project's classpath settings:.. roo> perform eclipse - Import the
flightapp-webEclipse project into Eclipse IDE. - Open
FlightController_Roo_Controller.ajfile, copy the declaration that introducescreate(...)method inFlightController.javaand paste it in theFlightController.javafile.Note
If you are using Spring Roo 1.1.3, then remove the
createmethod declaration fromFlightController_Roo_Controller.ajfile. This is required because the create declaration fromFlightController_Roo_Controller.ajfile is not automatically removed in Spring Roo 1.1.3.The
createmethod of theFlightControllerclass is invoked when the user enters flight information and submits the request to create a newFlightinstance. After adding thecreate(...)method, yourFlightController.javashould look as follows:@RooWebScaffold(...) @RequestMapping("/flights") @Controller public class FlightController { @Autowired private transient MailSender mailTemplate; @Autowired private transient SimpleMailMessage simpleMailMessage; @RequestMapping(method = RequestMethod.POST) public String create(@Valid Flight flight, BindingResult bindingResult, Model uiModel, HttpServletRequest httpServletRequest) { ... flight.persist(); return "redirect:/flights/" + encodeUrlPathSegment(flight.getFlightId().toString(), httpServletRequest); } public void sendMessage(java.lang.String mailTo, java.lang.String message) { ... } }In the given code, the
createmethod has been directly added to theFlightController.javaby copying it from theFlightController_Roo_Controller.ajAspectJ ITD file. In the ITD, the create method is declared as shown here:public String FlightController.create(...)
Make sure that you remove the
FlightControllerfrom the name of the method when you copy it to theFlightController.javafile. So, this method inFlightController.javabecomes:public String create(...)
When you add the
create(...)method inFlightController.javawith the same signature as inFlightController_Roo_Controller.aj, then Roo removes thecreate(...)method fromFlightController_Roo_Controller.aj. Refresh theflightapp-webproject in Eclipse IDE so that modifications made by Roo are visible. - Now, modify the
create(...)method inFlightController.javaby adding the following piece of code just after the call toflight.persist()method:sendMessage("<username>@gmail.com", "A new instance of Flight entity with id " + flight.getFlightId() + " has been created.");In this code, replace
<username>with your Gmail account username. - Exit the Roo shell and execute the
tomcat:rungoal of the Tomcat maven plugin from thech06-emaildirectory to deploy theflightapp-webproject in an embedded Tomcat container, as shown here:C: oo-cookbookch06-email> mvn tomcat:runAccess the
flightapp-webapplication from the web browser using the following URL:http://localhost:8080/flightapp-web. You should now see the following home page of theflightapp-webapplication:
Select the Create new Flight Description option from the menu, which shows the form for creating a new
FlightDescriptionentity instance. Once you have created theFlightDescriptioninstance, select the Create new Flight menu option to create aFlightinstance. The following screenshot shows the form for creating aFlightinstance: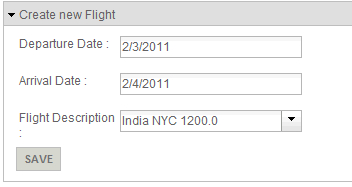
Enter Departure Date, Arrival Date, and Flight Description information and click the Save button. Saving the
Flightinstance will result in sending an e-mail to your Gmail account, with the subject as A new Flight instance has been created and the message A new instance of Flight entity with ID 1 has been created. As you create moreFlightinstances, an e-mail is sent to your Gmail account for eachFlightinstance created.
JavaMail API provides classes such as Session
, Transport
, Authenticator
, and so on, that are used for composing, sending, and reading e-mails. If you want to directly use the JavaMail API to send an e-mail message, then you'll need to know how to use different JavaMail API classes and interfaces. Spring framework abstracts the inner workings of JavaMail API by providing a set of classes and interfaces, which simplifies writing programs that require the functionality of sending e-mails. Also, Spring provides an exception hierarchy, which abstracts exceptions thrown during composing, parsing, and sending e-mails or while authenticating with the mail server.
The following figure shows the important classes and interfaces of Spring that provide e-mail sending functionality. You can find these classes and interfaces in the org.springframework.mail and org.springframework.mail.javamail packages of the Spring framework.
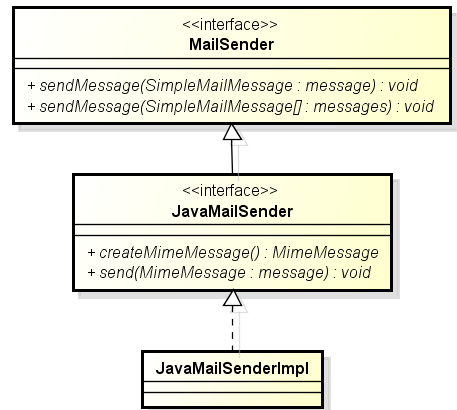
MailSender interface is a generic interface that defines e-mail sending functionality. As shown in the given figure, it defines two send methods that accept Spring's SimpleMailMessage and SimpleMailMessage[] objects as arguments.
The JavaMailSender interface extends the MailSender interface and defines methods specific to sending e-mails using JavaMail API. JavaMailSender defines methods such as createMimeMessage—for creating a MimeMessage instance (which is part of JavaMail API), send—for sending a MimeMessage, and so on. For the complete list of methods defined by Spring, refer to the Spring API documentation for the JavaMailSender interface. Spring provides a concrete implementation of the JavaMailSender interface through the JavaMailSenderImpl class, which you can use in your application to send e-mails.
It is important to note that the MailSender interface defines send methods that accept SimpleMailMessage or SimpleMailMessage[] objects as arguments, and the JavaMailSender interface defines send methods that accept MimeMessage or MimeMessage[] objects as arguments. SimpleMailMessage is part of Spring framework and is useful for creating simple mail messages consisting of from, to, e-mail body, and so on. If you want to send more refined messages consisting of attachments, inline images, and so on, then you should use MimeMessage to create your mail message.
Now that we have a basic understanding of different classes and interfaces that come into the picture when it comes to sending e-mails, let's look at various Spring Roo commands that we used in the flightapp-web application for setting up e-mail support and sending e-mails.
The email sender setup Roo command sets up e-mail sending support in a Roo project by configuring JavaMailSenderImpl in Spring's application context. When the email sender setup command is executed, the following actions are performed by Roo:
- The
SRC_MAIN_RESOURCESMETA-INFspringapplicationContext.xmlfile is updated to configureJavaMailSenderImplas a Spring bean - The
SRC_MAIN_RESOURCESMETA-INFspringemail.propertiesfile is created, which contains properties for setting up theJavaMailSenderImplinstance. The properties defined in theemail.propertiesfile come from the arguments specified for theemailsendersetupcommand. - The
pom.xmlfile is updated to reflect dependency on JavaMail and Java Activation Framework(JAF) JAR files.
The following listing shows the JavaMailSenderImpl configuration in the applicationContext.xml file:
<bean class="org.springframework.mail.javamail.
  JavaMailSenderImpl" id="mailSender">
  <property name="host" value="${email.host}"/>
  <property name="protocol" value="${email.protocol}"/>
  <property name="port" value="${email.port}"/>
  <property name="username" value="${email.username}"/>
  <property name="password" value="${email.password}"/>
  <property name="javaMailProperties">
    <props>
      <prop key="mail.smtp.auth">true</prop>
      <prop key="mail.smtp.starttls.enable">true</prop>
    </props>
  </property>
</bean>
In the given XML, JavaMailSenderImpl is configured with properties such as host, protocol, port, and so on. The values of these properties come from the email.properties file.
The following listing shows the email.properties file:
email.host=smtp.gmail.com email.password=<password>email.port=587 email.protocol=smtp email.username=<username>
Instead of <username> and <password>, you'll see username and password values specified for the email sender setup command. The email.properties file is read by Spring's PropertyPlaceholderConfigurer to fill the placeholders defined in the configuration of JavaMailSender. The applicationContext.xml file uses the <property-placeholder> element of Spring's context to configure a PropertyPlaceholderConfigurer, as shown here:
<context:property-placeholder location="classpath*:META-INF/spring/*.properties"/>
The location attribute specifies that the PropertyPlaceholderConfigurer will look for properties files in the META-INF/spring directory of the project.
Note
In this recipe, we used the email sender setup command to set up JavaMailSenderImpl for the flightapp-web project that represents a Spring Web MVC application. You can use the email sender setup command with any Roo project that requires an e-mail sending feature.
Let's now look at how to set up a SimpleMailMessage instance:
The email template setup command configures SimpleMailMessage as a bean in the applicationContext.xml file. The email template setup command accepts two arguments: from and subject, identifying the sender and subject of the email, respectively. When the email sender setup command is executed, the following actions are performed by Roo:
- Configures
SimpleMailMessageas a Spring-managed bean inapplicationContext.xml, as shown here:<bean class="org.springframework.mail.SimpleMailMessage" id="templateMessage"> <property name="from" value="${email.from}"/> <property name="subject" value="${email.subject}"/> </bean> </beans>The values of
${email.from}and${email.subject}placeholders come from theemail.propertiesfile. - Updates the
email.propertiesfile to includeemail.fromandemail.subjectproperties, the values of which come from the value of thefromandsubjectarguments passed to theemailtemplatesetupcommand:email.from=<username>@gmail.com email.subject=A new Flight instance has been created
Now that JavaMailSenderImpl and SimpleMailMessage instances are configured in the application context XML file, we'll look at how to send e-mails.
To send an e-mail from your enterprise application you'll require access to both the JavaMailSenderImpl and SimpleMailMessage instances registered with the Spring's application context. Attributes referring to these instances are automatically added to a class by the field email template Roo command. The following code listing shows the FlightController.java class after the field email template command was executed against it:
import org.springframework.mail.MailSender;
....
public class FlightController {

  @Autowired
  private transient MailSender mailTemplate;

  @Autowired
  private transient SimpleMailMessage simpleMailMessage;

  public void sendMessage(java.lang.String mailTo,
   java.lang.String message) {
     simpleMailMessage.setTo(mailTo);
     simpleMailMessage.setText(message);
     mailTemplate.send(simpleMailMessage);
  }
}
In the given code, the mailTemplate attribute refers to the JavaMailSenderImpl instance and the simpleMailMessage attribute refers to the SimpleMailMessage instance registered with the Spring's application context. It is important to note that the type of the mailTemplate attribute is MailSender and not JavaMailSender. Also, a sendMessage method is added to the FlightController.java for sending e-mails. The sendMessage method accepts arguments that identify the e-mail recipient's address and the text content or body of the e-mail. The sendMessage method makes use of the send(SimpleMailMessage) method of MailSender to send e-mails.
You can now call the send method from within the FlightController.java class methods to send e-mails. In our example scenario, we called send method from the create method after a Flight instance was persisted, as shown here:
@RequestMapping(method = RequestMethod.POST)
 public String create(@Valid Flight flight,
   BindingResult bindingResult, Model uiModel,
   HttpServletRequest httpServletRequest) {
   ...
   flight.persist();
   sendMessage("<username>@gmail.com",
   "A new instance of Flight entity with id "
    + flight.getFlightId()
    + "has been created.");

   return "redirect:/flights/" +
     encodeUrlPathSegment(flight.getFlightId().toString(),
     httpServletRequest);
}Let's now look at how to send e-mails asynchronously, how to send more refined e-mails consisting of attachments, inline images, and so on, and finally how to send e-mails when the JavaMail Session is configured in JNDI.
E-mail sending that we have discussed so far in this recipe, is synchronous in nature. Typically, e-mails are sent asynchronously by applications—something which can be achieved in Spring via the @Async annotation. The field email template command supports an async argument, that instructs Roo to do the following:
- Create the
sendMessagemethod, which is annotated with the@AsyncSpring annotation - Enable detection of the
@Asyncannotated methods using the<annotation-driven>element of Spring'stasknamespace, as shown here:<task:annotation-driven executor="asyncExecutor" mode="aspectj" />The
executorattribute refers to an implementation of thejava.util.concurrent.Executorinterface, responsible for executing the@Asyncannotated method. - Configure Spring's
ThreadPoolTaskExecutorin application context XML using the<executor>element of Spring'stasknamespace, as shown here:<task:executor id="asyncExecutor" pool-size="${executor.poolSize}" /> - Spring's
ThreadPoolTaskExecutorconfigures ajava.util.concurrent.ThreadPoolExecutorinstance (an implementation ofjava.util.concurrent.Executor) with the thread pool size specified by thepool-sizeattribute value. The${executor.poolSize}placeholder's value comes from theemail.propertiesfile. - Add the
executor.poolSizeproperty to theemail.propertiesfile, as shown here:executor.poolSize=10
To send mails asynchronously when a FlightDescription instance is created, execute the following field email template command against the FlightDescriptionController class, as shown here:
.. roo> field email template --class ~.web.FlightDescriptionController --async
Now, copy the create(...) method from FlightDescriptionController_Roo_Controller.aj to FlightDescriptionController.java and add a call to the sendMessage(...) method, as shown here:
@RequestMapping(method = RequestMethod.POST)
public String create(@Valid FlightDescription...) {
  ...
  flightDescription.persist();
  sendMessage("<username>@gmail.com",
    "FlightDescription instance created");
  return "redirect:/flightdescriptions/" + ..
}As mentioned earlier, if you want to send mails with attachments, inline images, and so on, then you need to use MimeMessage instead of SimpleMailMessage. The field email template command adds SimpleMailMessage and MailSender type attributes to the Java class, as shown here:
  @Autowired
  private transient MailSender mailTemplate;

  @Autowired
  private transient SimpleMailMessage simpleMailMessage;
Now, MailSender defines methods which accept a SimpleMailMessage or SimpleMailMessage[] object as the argument. JavaMailSender, on the other hand, defines methods which accept a MimeMessage or MimeMessage[] object as the argument. So, we need to change the type of mailTemplate attribute from MailSender to JavaMailSender (a sub-interface of MailSender) to send messages of type MimeMessage. Also, we need to remove the simpleMailMessage attribute from the class because we need mail message of type MimeMessage and not SimpleMailMessage when sending mail messages with attachments or inline images.
So, how do we go about creating a MimeMessage? Spring provides the following utility classes that simplify creating a MimeMessage:
MimeMessagePreparator: A callback interface for preparing aMimeMessageMimeMessageHelper: A helper class that provides methods for creating and populating aMimeMessage
The following code shows modified FlightDescriptionController.java that makes use of MimeMessageHelper to send a mail message with an attachment when a new FlightDescription instance is created:
import javax.mail.MessagingException;
import javax.mail.internet.MimeMessage;
import org.springframework.mail.javamail.JavaMailSender;
import org.springframework.mail.javamail.MimeMessageHelper;
import org.springframework.scheduling.annotation.Async;
...
public class FlightDescriptionController {

  @Autowired
  private transient JavaMailSender mailTemplate;

  @RequestMapping(method = RequestMethod.POST)
  public String create(@Valid FlightDescription
    flightDescription...) {
    ...
    flightDescription.persist();
    sendMessage(..);
    return "redirect:/flightDescriptions/" + ...);
  }

  @Async
  public void sendMessage(java.lang.String mailTo,
    java.lang.String message) throws MessagingException {
    MimeMessage mimeMessage =
      mailTemplate.createMimeMessage();

    MimeMessageHelper helper =
      new MimeMessageHelper(mimeMessage, true);
    helper.setTo(mailTo);
    helper.setText(message);
    helper.addAttachment("logo.gif",
      new File("C:/logo.gif"));
    mailTemplate.send(mimeMessage);
  }
}
In the FlightDescriptionController.java we made the following changes:
- Changed return type of the
mailMessageattribute fromMailSendertoJavaMailSender - Removed the
simpleMailMessageattribute of typeSimpleMailMessageas we need aMimeMessageinstance to send mails with attachments - Modified the
sendMessagemethod to make use of theMimeMessageHelperclass to create aMimeMessageinstance and add attachments to it.
If JavaMail Session is configured in JNDI of your application server, then you'll need to modify the applicationContext.xml file of your Roo project to create the JavaMailSenderImpl instance using JavaMail Session configured in JNDI, as shown here:
<beans ... xmlns:jee="http://www.springframework.org/schema/jee" ... xsi:schemaLocation="http://www.springframework.org/schema/jee http://www.springframework.org/schema/jee/spring-jee-3.0.xsd">
.....
<jee:jndi-lookup id="mailSession" jndi-name="mail/session" />

<bean class="org.springframework.mail.javamail.JavaMailSenderImpl"
  id="mailSender">
  <property name="session" value="mailSession"/>
</bean>
.....
The jndi-lookup element of Spring's jee namespace, shown in the given code, is responsible for accessing the JavaMail Session configured in JNDI with name "mail/session" (referred to by the jndi-name attribute) and making it available in a Spring application context with bean id as "mailSession".