Spring Roo provides support for developing messaging applications based on JMS (Java Message Service) API. As of Spring Roo 1.1.5, the only JMS provider supported by Roo is embedded ActiveMQ(http://activemq.apache.org/); it is configured in the same JVM as the Java application accessing it.
In this recipe, we'll look at how Spring Roo supports sending and receiving JMS messages using embedded ActiveMQ.
Create a sub-directory ch06-jms inside the C:
oo-cookbook directory.
Copy the ch06_web_app.roo script into the ch06-jms directory.
Execute the ch06_web_app.roo script that creates flightapp-web Roo project, sets up Hibernate as persistence provider, configures MySQL as the database for the application, creates Flight and FlightDescription JPA entities, and defines many-to-one relationship between Flight and FlightDescription entities. Also, script makes use of controller all command to scaffold a Spring Web MVC application from JPA entities. If you are using a different database than MySQL or your connection settings are different than what is specified in the script, then modify the script accordingly.
Start the Roo shell from the C:
oo-cookbookch06-jms directory.
In this recipe, we'll look at how to send the newly created Flight instance's attributes as a JMS message to a queue destination and use an asynchronous message listener for reading the JMS message from the queue.
To set up flight-app as a JMS messaging application, follow the steps given here:
- Execute the
jmssetupcommand to create a new Spring application context XML file for theflightapp-webapplication, which configures embedded ActiveMQ as JMS provider, a JMS destination queue namedmyDestination, and Spring'sJmsTemplatefor sending JMS messages, as shown here:.. roo> jms setup --provider ACTIVEMQ_IN_MEMORY --destinationName myDestination --destinationType QUEUE Created ..META-INFspringapplicationContext-jms.xml ... Updated ROOTpom.xml [Added dependency org.apache.activemq:activemq-core:5.4.2]
- Execute the
fieldjmstemplatecommand to inject Spring'sJmsTemplateintoFlightController.java. TheFlightControllermakes use ofJmsTemplateto send JMS messages to embedded ActiveMQ configured in the first step... roo> field jms template --class ~.web.FlightController --fieldName jmsTemplate Updated ...sample ooflightappwebFlightController.java
- Execute the
jmslistenercommand to create aMyListenerJMS message consumer that consumes messages asynchronously from themyDestinationqueue created in the first step.... roo> jms listener class --class ~.web.MyListener --destinationName myDestination --destinationType QUEUE Created SRC_MAIN_JAVAsample ooflightappwebMyListener.java Updated SRC_MAIN_RESOURCESMETA-INFspringapplicationContext-jms.xml
- Execute the
performeclipsecommand to update the project's classpath, as shown here:.. roo> perform eclipse - Now, import the
flightapp-webproject into your Eclipse IDE. - Modify
Flight.javaandFlightDescription.javato implement thejava.io.Serializableinterface, as shown here:import java.io.Serializable; ... public class Flight implements Serializable { .. } import java.io.Serializable; ... public class FlightDescription implements Serializable { .. } - Open the
FlightController_Roo_Controller.ajfile and copy the declaration that introduces thecreate(...)method inFlightController.javaand adds it directly toFlightController.java. Thecreatemethod of theFlightControllerclass is invoked when a user enters information in the flight creation HTML form and submits the request to create a newFlightinstance. After adding thecreate(...)method, yourFlightController.javashould look as follows:@RooWebScaffold(...) @RequestMapping("/flights") @Controller public class FlightController { @Autowired private transient JmsTemplate jmsTemplate; @RequestMapping(method = RequestMethod.POST) public String create(@Valid Flight flight, BindingResult bindingResult, Model uiModel, HttpServletRequest httpServletRequest) { ... flight.persist(); return "redirect:/flights/" + encodeUrlPathSegment(flight.getFlightId().toString(), httpServletRequest); } public void sendMessage(java.lang.Object messageObject) { jmsTemplate.convertAndSend(messageObject); } }Note
In Spring Roo 1.1.3, if you attempt to override a method defined in
*_Roo_Controller.ajfile by defining it in your*Controller.javafile, then Roo complains that the method is already defined in the corresponding*Controller.javafile. This issue is resolved in Spring Roo 1.1.4 and later versions. You can address this issue in Spring Roo 1.1.3 by removing the copied declaration from the*_Roo_Controller.ajfile. - In the given code, the
createmethod has been directly added to theFlightController.javaby copying it from theFlightController_Roo_Controller.ajAspectJ ITD file. In the ITD, the create method is declared as shown here:public String FlightController.create(...)
- Make sure that you remove the
FlightController.prefix from the name of the method when you copy it to theFlightController.javafile. So, this method inFlightController.javabecomes:public String create(...)
- Now, modify the
create(...)method inFlightController.javaby adding thesendMessagemethod call just after the call to theflight.persist()method:sendMessage(flight);
- Exit the Roo shell and execute the
tomcat:rungoal of the Tomcat maven plugin from thech06-jmsdirectory to deploy theflightapp-webproject in an embedded Tomcat container, as shown here:C: oo-cookbookch06-jms> mvn tomcat:run - Access the
flightapp-webapplication from the web browser using the following URL:http://localhost:8080/flightapp-web. You should now see the following home page of theflightapp-webapplication: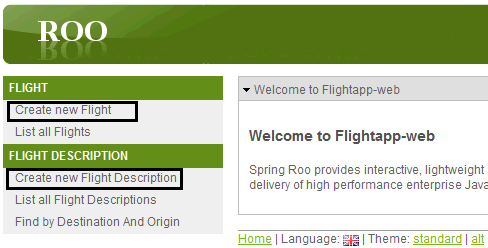
- Select the Create new Flight Description option from the menu that shows you the form for creating a new
FlightDescriptionentity instance. Once you have created theFlightDescriptioninstance, select the Create new Flight menu option to create aFlightinstance. The following screenshot shows the form for creating aFlightinstance: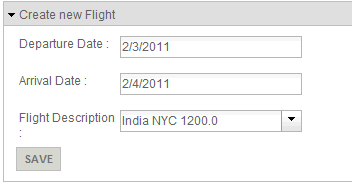
- Enter Departure Date, Arrival Date, and Flight Description information and click the Save button. Saving the
Flightinstance will result in sending a JMS message to themyDestinationqueue containing details of the newly createdFlightinstance and the associatedFlightDescriptioninstance attributes. - The
MyListenerJMS message consumer asynchronously reads the JMS message from themyDestinationqueue and writes it to the standard output, as shown here:JMS message received: DepartureDate: Tue Feb 01 00:00:00 IST 2011, ArrivalDate:Wed Feb 02 00:00:00 IST 2011, FlightDescription: Origin: NYC, Destination: INDIA , Price: 1200.0
The JMS add-on
of Roo is responsible for processing JMS related commands, which are: jms setup, jms listener, and field jms template.
Spring simplifies integrating an enterprise application with a JMS provider. Spring's JmsTemplate class is a helper class, that enables the applications to send and receive JMS messages synchronously. The JmsTemplate class holds reference to the javax.jms.ConnectionFactory instance—used for creating connections with the JMS provider.
Note
The JMS provider in our example is the embedded (or in-memory) ActiveMQ. It is important to note that Roo only supports embedded ActiveMQ as the JMS provider. If you want to use any other JMS provider or standalone ActiveMQ, then you'll need to change the Roo-generated JMS provider configuration.
Let's look at various commands that we used in the flightapp-web application for setting up a JMS provider, and for sending and receiving JMS messages.
The jms setup command sets up a JMS provider for your enterprise application. The jms setup command accepts the following arguments:
provider: A mandatory argument that specifies the JMS provider for which support needs to be added to the application. Roo defines only a single value that this argument can accept, that is,ACTIVEMQ_IN_MEMORY, which is meant for setting up embedded ActiveMQ as the JMS provider.destinationName: An optional argument that specifies the name of the JMS destination accessed by the application. If unspecified, the name of the destination is defaulted tomyDestination.destinationType: An optional argument that identifies the type of the JMS destination specified via thedestinationNameargument. Roo defines only two possible values for this argument, which areQUEUE(if the JMS destination is of type queue) andTOPIC(if the JMS destination is of type topic). If unspecified, the destination type is defaulted toQUEUE.
The jms setup command creates an application context XML file: applicationContext-jms.xml in SRC_MAIN_RESOURCES/META-INF/spring directory. The applicationContext-jms.xml file configures embedded ActiveMQ broker, JmsTemplate, JMS ConnectionFactory, JMS destinations, and message listener containers.
The following listing shows the embedded ActiveMQ broker configuration in applicationContext-jms.xml:
<beans xmlns="http://www.springframework.org/schema/beans"
   xmlns:amq="http://activemq.apache.org/schema/core" ...>

  <amq:broker persistent="false" useJmx="true">
    <amq:transportConnectors>
      <amq:transportConnector uri="tcp://localhost:61616"/>
    </amq:transportConnectors>
  </amq:broker>
  ...
</beans>
The amq namespace refers to ActiveMQ schema, which allows configuring ActiveMQ in Spring's application context XML file. The <broker> element configures an embedded ActiveMQ broker whose name is localhost. If you want to specify a custom name for the broker, then you can do so by using brokerName attribute of <broker> element. The persistent attribute specifies whether the JMS messages received by the ActiveMQ broker are persisted into a data store or not. The value false instructs the broker not to persist messages. If you specify true as the value of the persistent attribute, ActiveMQ configures KahaDB as the default data store for messages. The useJmx attribute specifies if broker's services are exposed via JMX. If the attribute value is true, then you can use JMX clients to invoke ActiveMQ broker's services such as start or stop broker, to add or remove topics and queue JMS destinations, and so on. The <transportConnectors> element defines the transport connectors on which ActiveMQ broker listens to a connection from clients. The <transportConnector> element in the given code listing specifies a tcp transport connector that listens on port 61616.
JMS ConnectionFactory is configured in the applicationContext-jms.xml file, as shown here:
<amq:connectionFactory brokerURL="vm://localhost"
  id="jmsFactory"/>

<bean class="org.springframework.jms.connection.CachingConnectionFactory" id="cachingConnectionFactory">
  <property name="targetConnectionFactory">
    <ref local="jmsFactory"/>
  </property>
</bean>
The <connectionFactory> element of the amq namespace configures a JMS ConnectionFactory
. JMS ConnectionFactory is typically configured in the application server and fetched by applications using JNDI. If ConnectionFactory is configured in the application server, then you can make use of the <jndi-lookup> element of Spring's jee schema to obtain it. The brokerURL attribute identifies the URL for connecting to ActiveMQ broker. The value of the brokerURL attribute is vm://localhost, which means that the VM (Virtual Machine) protocol is used by clients to access ActiveMQ broker named localhost. The vm protocol is used because the client (which is flightapp-web application in our case) and broker are located in the same JVM. The use of the VM protocol ensures improved performance because there is no network overhead involved between client and broker communication and the client directly invokes the methods of the broker.
Spring's CachingConnectionFactory class is a JMS ConnectionFactory adapter that caches instances of JMS Session, MessageConsumer, and MessageProducer for improved performance. The targetConnectionFactory property identifies the ConnectionFactory, which the CachingConnectionFactory instance uses to obtain the JMS Connection. The targetConnectionFactory property in the given configuration refers to the JMS ConnectionFactory created by the <connectionFactory> element of the amq namespace.
In the jms setup command, we also passed JMS destination name (myDestination) and type (QUEUE), which JMS add-on uses to configure a JMS queue named myDestination in the applicationContext-jms.xml file, as shown here:
<amq:queue id="myDestination" physicalName="myDestination"/>
Here, the <queue> element of amq namespace configures a JMS queue named myDestination. The physicalName attribute specifies the name of the JMS queue in ActiveMQ. JMS destinations are typically configured in the application server and fetched by applications using JNDI. If JMS destination is configured in the application server, then you can make use of <jndi-lookup> element of Spring's jee schema to fetch it.
Spring's JmsTemplate is also configured in applicationContext-jms.xml file, as shown here:
<bean class="org.springframework.jms.core.JmsTemplate"
    id="jmsTemplate">
  <property name="connectionFactory"
      ref="cachingConnectionFactory"/>
  <property name="defaultDestination" ref="myDestination"/>
</bean>
The connectionFactory property refers to the CachingConnectionFactory instance. JmsTemplate defines send methods that accept the JMS Destination object or JMS destination name as the parameter. The defaultDestination property refers to the JMS destination that is used for sending or receiving messages when the send method used doesn't accept the JMS Destination object or JMS destination name as the parameter.
To allow the flighapp-web application to asynchronously receive JMS messages, the jms setup command configures a Spring's message listener container in the applicationContext-jms.xml file, as shown here:
<beans xmlns="http://www.springframework.org/schema/beans"
   xmlns:jms="http://www.springframework.org/schema/jms" ...>
   ...
   <jms:listener-container connection-factory="jmsFactory"
      destination-type="queue" />
   ...
</beans>
A message listener container receives messages from the JMS provider and dispatches it to a message consumer implementation. The message listener container saves the effort for writing the code that you'll need to write for asynchronous message consumption, which includes registering with the JMS provider, managing transactions, and so on.
In the given configuration, the <listener-container> element of Spring's jms namespace creates a message listener container. The connection-factory attribute identifies the JMS ConnectionFactory that the container uses for creating connections with the JMS provider. The destination-type identifies the JMS destination type (queue, topic, or durable topic) from which the container receives messages. You can add <listener> elements (of Spring's jms namespace) inside <listener-container> to define the message consumers to which the listener container dispatches the messages for processing.
Let's now look at how we send JMS messages using the JmsTemplate class.
The field jms template command autowires the JmsTemplate instance into a class identified by the class argument. The fieldName argument identifies the name of the field with which JmsTemplate is added to the class.
The following code shows the FlightController.java file into which we added the JmsTemplate field using the jms template command:
import org.springframework.jms.core.JmsTemplate;
...
public class FlightController {

    @Autowired
    private transient JmsTemplate jmsTemplate;

    public void sendMessage(Object messageObject) {
        jmsTemplate.convertAndSend(messageObject);
    }
}
The given code shows that the jms template command adds a JmsTemplate field and a sendMessage method to the FlightController class. The sendMessage method accepts Object type as argument, which represents the object that you want to send as a JMS message to the JMS destination. The sendMessage method invokes the convertAndSend method of JmsTemplate, which converts the passed object into a JMS message and sends it to the default destination set by the setDefaultDestination(...) method or specified by the defaultDestination property of JmsTemplate in the application context XML file. In the case of Roo-generated code, the default destination of JmsTemplate is specified by the defaultDestination property (refer to the applicationContext-jms.xml file of the flightapp-web project).
So, you might ask—how is the conversion between an object and JMS message performed? Spring provides a MessageConverter interface, which you can implement to define how to handle conversion from a Java object to a JMS message and vice versa. Spring provides a built-in MessageConverter implementation: SimpleMessageConverter, which is used by default by JmsTemplate and is responsible for conversion between String and JMS TextMessage, byte[] and JMS ByteMessage, Map and JMS MapMessage, and between the Serializable object and JMS ObjectMessage. As Flight and FlightDescription objects in the flightapp-web application implement the Serializable interface, the convertAndSend method of JmsTemplate converts them into JMS ObjectMessage instances.
The jms listener command creates an asynchronous JMS message consumer. If you want your application to synchronously consume messages, then you can use one of the receive methods of JmsTemplate. If you also want to convert the received JMS message into a Java object using SimpleMessageConverter, then you can use receiveAndConvert(...) method of JmsTemplate to receive messages.
The jms listener command creates a message consumer and updates the applicationContext-jms.xml file to create a new message listener container containing the newly created message consumer as a listener. In the case of flightapp-web, the jms listener command creates the MyListener JMS message consumer and adds the following configuration to the applicationContext-jms.xml file:
<bean class="sample.roo.flightapp.web.MyListener"
    id="myListener"/>

<jms:listener-container connection-factory="jmsFactory"
     destination-type="queue">
  <jms:listener destination="myDestination"
     method="onMessage" ref="myListener"/>
</jms:listener-container>
The <bean> element configures MyListener message consumer as a Spring bean.
The <listener> element of Spring's jms namespace defines a message listener to which the message listener container (specified by the enclosing <listener-container> element) dispatches JMS messages for processing. The destination-type attribute of <listener-container> is derived from the value of destinationType argument of jms listener command. The ref attribute refers to the message consumer instance, which is responsible for processing the JMS message. The destination attribute (which corresponds to the destinationName argument value of the jms listener command) identifies the JMS destination from which the message consumer receives JMS messages (via the message container listener) for processing. The method attribute specifies the name of the method of the message consumer class, which is responsible for processing the receive JMS message.
So, by executing jms listener command for flightapp-web we have created a MyListener class, which is responsible for processing JMS messages received by the myDestination JMS destination. The following code listing from MyListener.java shows the Roo-generated MyListener class:
public class MyListener {

  public void onMessage(Object message) {
     System.out.println("JMS message received: " + message);
  }
}
As the given code shows, the Roo-generated message listener doesn't implement any interface or extend any class, and defines an onMessage method which accepts the JMS message as argument. The onMessage doesn't do anything interesting—it simply prints the message on the standard output.
Let's now see how you can send JMS messages asynchronously from your enterprise application:
The field jms template command supports an async argument, which you can use to specify that the Roo-generated sendMessage method is annotated with Spring's @Async annotation. An @Async annotated method of an object is executed asynchronously by Spring using java.util.concurrent.ThreadPoolExecutor. If async argument is specified, Roo performs the following actions:
- Creates the
sendMessagemethod that is annotated with Spring's@Asyncannotation - Enables detection of
@Asyncannotated methods inapplicationContext.xmlvia the<annotation-driven>element of Spring'stasknamespace, as shown here:<task:annotation-driven executor="asyncExecutor" mode="aspectj" />The
executorattribute refers to an implementation ofjava.util.concurrent.Executorinterface, responsible for executing the@Asyncannotated method. - Configures Spring's
ThreadPoolTaskExecutorinapplicationContext.xmlusing<executor>element of Spring'stasknamespace, as shown here:<task:executor id="asyncExecutor" pool-size="${executor.poolSize}" /> - Spring's
ThreadPoolTaskExecutorconfigures ajava.util.concurrent.ThreadPoolExecutorinstance (an implementation ofjava.util.concurrent.Executor) with the thread pool size specified by thepool-sizeattribute value. The${executor.poolSize}placeholder's value comes from Roo-generatedjms.propertiesfile, as shown here:executor.poolSize=10