

Appendix B
Ways to Continue
In th is appendix, w e glance through some of the more exciting tech nologies that
are not part of the core JavaScript language and therefore c hange and develop more
rapidly. The intention is not to write an exhaustive reference but rather a gentle intro-
duction to those technolog ie s, to broaden your horizons and make it easier fo r you to
find your way through the formidable and ever-growing load of available sources on
the top ic .
B.1 Graphics with Canvas
JavaScript can be used to dynamically draw client-side gr aphics, which is an important
feature in modern web application design, where clients are responsible for present-
ing data provided by servers. Because composing and rendering graphics from data
in real-time uses a lot of computational time, this takes a substantial computation al
burden from servers, possibly saving on hardware equipment. Apart from that, raw
images ar e normally much bigger than the code used to produce graphics on the client
side, which significantly reduces needed bandwidth.
There are two quite powerful technologies for generating client-side g raphics. The
first one is based on the <canvas> HTML5 elem ent usin g a JavaScript-based API
for drawing. Another graphics technology is called Scalable Vector Graphics (SVG),
which is conceptually quite different from <canvas> in that you create dr awings by
composin g a tree o f XM L elements instead of invoking Java Script methods. Each of
the two technologie s has its strengths and we aknesses but essentially th ere’s no thing
that one could do which the other couldn’t. Because the <canvas> element is proba-
bly easier to grasp f or a beginne r than SVG, we only put some focus on the <canvas>
element.
The <canvas> HTML5 element has no visual display of its own. Rather, it sets up
a surface within a docu ment on wh ic h you can draw using a powerful API that the
element exposes to client-side JavaScript in the form of a Canvas object. The sur-
face cre ated by Canvas is a bitmap, which op erates in a so-called immediate mode.
In pr actice, th at means that your program rende rs graphics directly to the Canvas’s
bitmap and has no “memo ry” of the g raphical objects d rawn on the canvas—the only
271

thing that stays behind is the re sulting bitmap. A direct co nsequence of this fact is
that if you want, for example, to remove a g raphical object from the bitmap, you must
redraw the whole bitmap by yourself or at least redraw th e part of the bitmap affected
by the removed obje ct.
To set up a canvas in HTML, you most commonly provide the id attribute for easier
referenc e from JavaScript code, and the width and height attributes to set physical
dimensions of the element. The <canvas> element ca n also have content, which will
only be displayed if the visitor’s browser doesn’t support it. This is an example of
HTML code defining a 400 × 200 px canvas:
<canvas id="someCanvas" width="400" height="200">
Your browser doesn’t seem to support HTML5 Canvas.
</canvas>
As with any other HTML element, you can of course also set Canvas dimensions
through CSS or even dynamically using JavaScript.
From within JavaScript, you fetch a reference to a canvas element in the same fashion
as you fetch a reference to any other HTML element. For example, you can use the
getElementById() method:
var canvas = document.getElementById("someCanvas");
A peculiar thing about Canvas is that most of the time you don’t actually use Canvas
for drawing. Instead, you u se its drawing context object. You get this object by calling
the getContext() method on a Canvas object using the argumen t "2d":
var context = canvas.getContext("2d");
This way, you obtain a CanvasRenderingContext2D obje ct, which c an be used for two-
dimensional drawing on th e canvas. If yo u want to use three-dimensional graphics,
you can u se Web G L (Web Graphics Library) JavaScript API, which is the newest
addition to the <c anvas> element and is already supported by most major browsers. If
you want to use WebGL, you can refer to the
developer.mozilla.org/en-US/docs/Web/
WebGL
where you’ll find a quite exh austive c ollection of useful WebGL articles and
other resources.
Drawing Lines
Drawing a line on a canvas takes some programming effort because to draw even a
single line you need to define a path. A path is a series of one or more subpaths and a
subpath is a series of one or more lines. When you’re done de fining subpaths, you can
stroke them and you can also fill the individual areas enclosed by the subpaths. A new
path and subpath begin with the beginPath() and moveTo() methods, r espectively.
You don’t have to end a path or subpath because it closes automatically when a new
path or subpath starts. Note that the mov eTo() method star ts a new subpath and at the
272 Appendix B. Ways to Continue
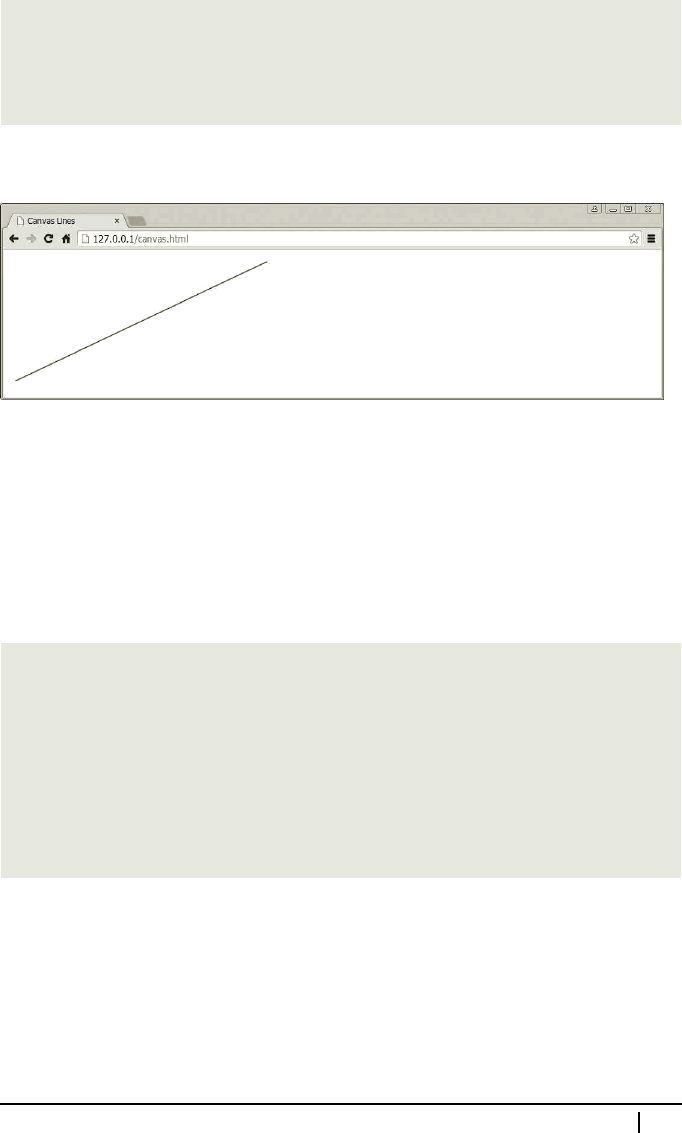
same time defin es the starting point for that subpath. For example, the following code
fragment draws a single line from point (10, 190) to p oint (390, 10) on our previously
defined canvas:
context.beginPath(); //Begins a new path
context.moveTo(10, 190); //Begins a new subpath starting at
//(10, 190)
context.lineTo(390, 10); //Adds a line from (10, 190) to (390, 10)
context.stroke(); //Strokes the path
This is what the code will produce in the browser window.
The line m ay strike you as odd if you’re accustomed to the standard, positively ori-
ented Cartesian coo rdinate system. Namely, the default canvas coordinate system is
negatively oriented (i.e., w ith the positive y-axis pointing down) with the or igin (0,
0) in the upper left c orner of the canvas. That’s why th e point with the y-component
value 190 is placed lower than the point with the y -component value 10.
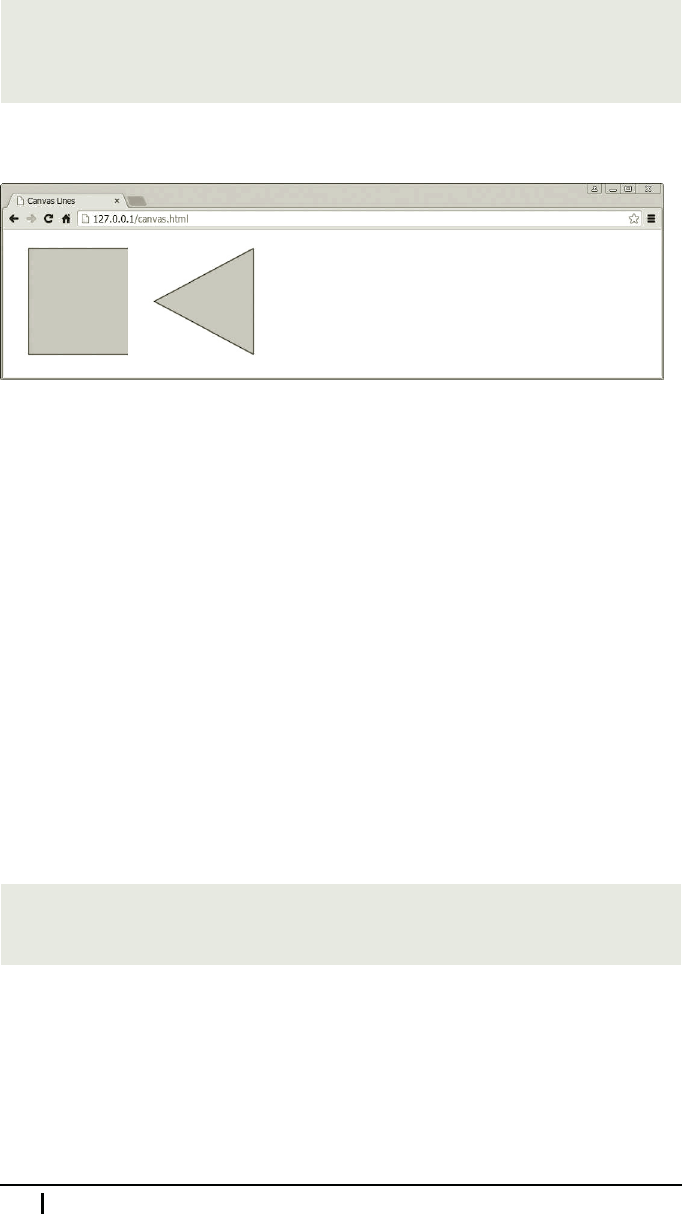
The next example is a bit more complex. There is still a single path, but this time
composed of two subpaths. The first of the subpaths makes u p a rectangle an d the
second on e a triangle:
context.beginPath(); //Begins a new path
context.moveTo(180, 20); //Begins the first subpath: a rectangle
context.lineTo(30, 20);
context.lineTo(30, 180);
context.lineTo(180, 180);
context.moveTo(370, 20); //Begins the second subpath: a triangle
context.lineTo(220, 100);
context.lineTo(370, 180 );
context.closePath(); //Closes the second subpath
Observe a call to the closePath() method a t the end of the second subpath. The
closePath() me thod closes the most recently added subpath so that it c onnects the
last point in the subpath to the first point of the same subpath. That said, nothing
is drawn in the browser window until we call either of the methods stroke() or
fill(). As already seen in the previous example, stroke() simply draws all the
lines of th e path, while fill() fills the areas defined by individual subpaths with the
current fill color. These are the lines that finalize the drawing:
B.1. Graphics with Canvas 273
context.fillStyle = "lightgray"; //Sets the fill color
context.fill(); //Fills the areas enclosed by the subpaths with
//the current fill color
context.stroke(); //Strokes the path
This is the drawing you will see in the browser window.
Notice that the rectangle is in fact enclosed by only three lines, each produced by on e
of the calls to lineTo(), while the triangle has a ll of its sides, the last on e b eing
the result of the call to closePath(). Th e gray areas in the drawing are produced
by fill() and you can observe that the rectangle is filled as though the subpath
were closed. Note that c alling closePath() explicitly is only required for str oke()
because fill() automa tically closes a subpath to get a closed area to fill.
Canvas State
In our last example you probably noticed how the fill color was set as a property of a
CanvasRenderingContext2D object. Graphics param eters like color and line width are
not passed as arguments to drawing method s but are r ather part of the generic graphics
state of the canvas. You can think of this partition of the graphics state and drawing
methods as being like the partitio n of p resentation and content shared between CSS
and HT ML, respectively.
Technically, you set the state of the canvas by assigning appropria te values to certain
properties of its con text object. For dimensions, CSS p ixels are assumed, while colo rs
can be specified as CSS color strings, such as "#0 FA" or "green". For instance, we
could use the following values to change the look of our triangle and recta ngle:
context.lineWidth = 2; //Sets the width of lines
context.lineStyle = "black"; //Sets the color of lines
context.fillStyle = "#0FA"; //Sets the fill color
Note that the canvas state is used only by the stroke() and fill() methods, and
that the state wh ic h is in effect at the time of calling stroke() or fill( ) is used.
That means that if line width change s fr om, say, two to four between two distinct calls
to lineTo(), both lines will be drawn four pixels wide be cause at the time of ca lling
stroke() this is the current width.
274 Appendix B. Ways to Continue
Drawing Rectangles and Circles
You can draw a rectangle also by simply c alling the rec t() method of the context
object. The method accepts four arguments, the first two specifyin g the position of
the rectangle’s upper left corner and the next two the recta ngle’s wid th and he ight.
Alternatively, you can specify any other corner of the rectangle and pass negative
width and/or height accordingly. The crea te d rectangle repre sents a subpath of its
own and cannot be connected to any other subpath.
If you search for a method to draw a circle, you won’t fin d it because there’s no
special method for drawing circle s. Instead, yo u can use the arc() method, which
draws a part of a circle. The meth od’s five arguments a re: x- and y-coordinates of
the center point, a radius, a start angle, and an end angle. The angles define the start
and end points along the circle between which an arc should be drawn and are given in
radians. Unlike re ct(), ar c() adds an arc to the current subpath. arc() also accepts
an optional Boolean parameter, which causes an ar c to be drawn in anticlockwise
direction if set to true.
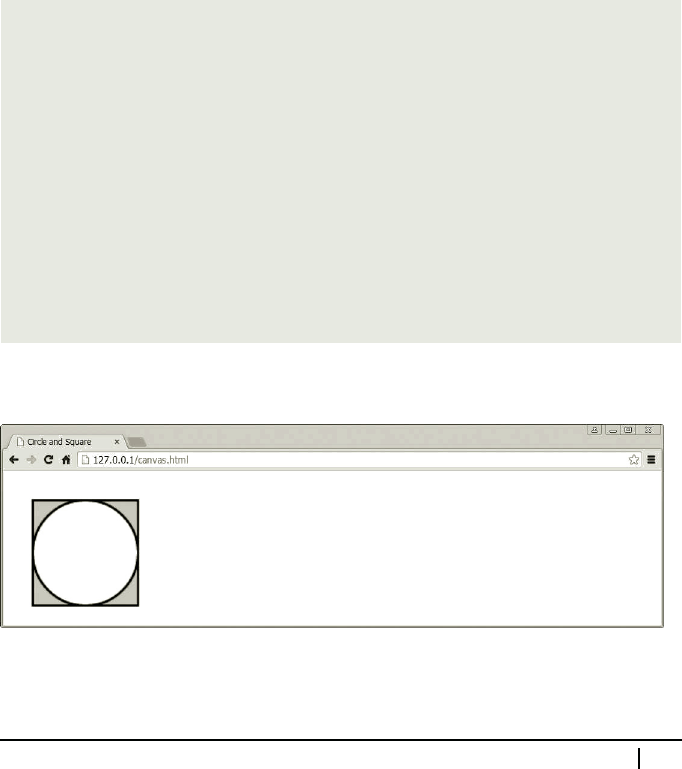
For example, the following code draws a circle inscribed into a square:
context.beginPath();
//Adds a full arc (0 to 2 * PI rads) to the subpath. The last
//argument (true) specifies that the arc direction is
//anticlockwise, so the fill will apply to the circle’s outside:
context.arc(70, 70, 50, 0, 2 * Math.PI, true);
//rect() begins a new subpath:
context.rect(20, 20, 100, 100);
context.lineWidth = 2;
context.lineStyle = "black";
context.fillStyle = "lightgray";
context.fill();
context.stroke();
This is the drawing produced by th e above code.
Apart from rect(), there are three more methods for drawing a rectangle defined by
CanvasRenderingContext2D. The fillRect() and strokeRect() methods fill and
stroke the specified rec ta ngle, respectively. While d oing so, fillRect() uses the
B.1. Graphics with Canvas 275
..................Content has been hidden....................
You can't read the all page of ebook, please click here login for view all page.