Chapter 8
Come on In! Creating an Eye-Catching Storefront
In This Chapter
![]() Setting up your shop
Setting up your shop
![]() Hoisting a banner on your shop page
Hoisting a banner on your shop page
![]() Composing your shop title and announcement
Composing your shop title and announcement
![]() Organizing your Etsy store into sections
Organizing your Etsy store into sections
![]() Entering your payment and billing info
Entering your payment and billing info
![]() Sharing personal info on your About page and profile
Sharing personal info on your About page and profile
If you want to join the ranks of people who supplement their income or earn their living on Etsy, you need to take one more step: Set up your Etsy shop. Fortunately, doing so is a snap, as you discover in this chapter.
You can personalize your Etsy shop in any number of ways: by adding a banner, by including a shop title and a shop announcement to describe your shop, and by using sections to organize your goods. You can also personalize your shop by populating your Etsy profile and your About page. Certain items that you add, such as your profile picture, or avatar, will appear on your shop page, too.
One more thing: This chapter steps you through the process of setting up your shop. Your shop won’t officially go live, however, until you’ve added your first listing — which you learn how to do in Chapter 13.
On Your Mark: Getting Started
Becoming an Etsy seller is a simple matter of setting up a shop on the site and listing your first item. (The former is covered here; the latter, in Chapter 13.)
1. Click the Sell link in the upper-left corner of the main page.
The Sell page (shown in Figure 8-1) appears. This page reminds you what you can and can’t sell on Etsy. (For a more thorough review, refer to Chapter 7.)
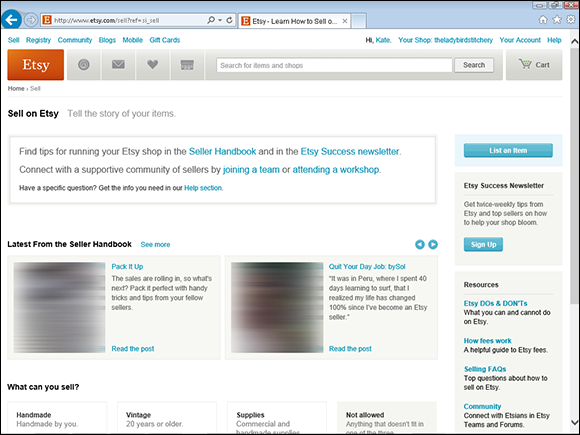
Figure 8-1: The Sell page.
2. Click the Open an Etsy Shop button.
Etsy prompts you to choose a language, currency, and country for your shop.
 Although most Etsy sellers hail from the ol’ U. S. of A. — which is one reason the site’s default currency is the U.S. dollar — plenty of Etsy sellers call other countries home. If you’re in that latter group, or if you find that your buyers tend to be clustered in a particular region abroad, you can list items and receive payments in a different currency (assuming that it’s one of the other 20-plus currencies supported, including those of Australia, Canada, the European Union, Great Britain, Hong Kong, Israel, Japan, Mexico, New Zealand, Singapore, Thailand, and more).
3. If your shop language is English, your shop currency is the U.S. dollar, and your shop country is United States, simply click Yes. If not, click the No, I Want to Choose link; choose the desired language, currency, and shop country; and click Save.
Etsy saves your changes and prompts you to select a shop name, as shown in Figure 8-2.
4. Click the Enter Your Shop Name link.
The Shop Name screen appears, as shown in Figure 8-3.
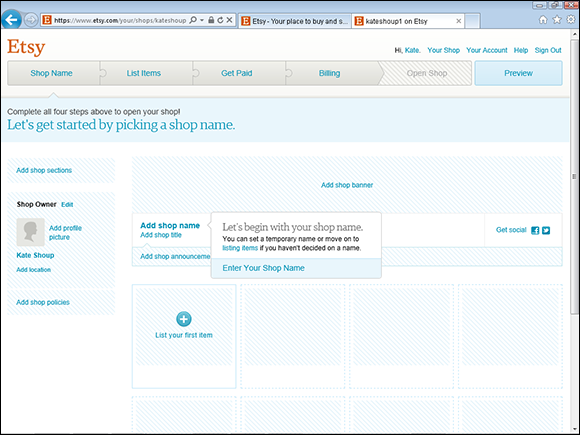
Figure 8-2: Etsy prompts you to enter your shop name.
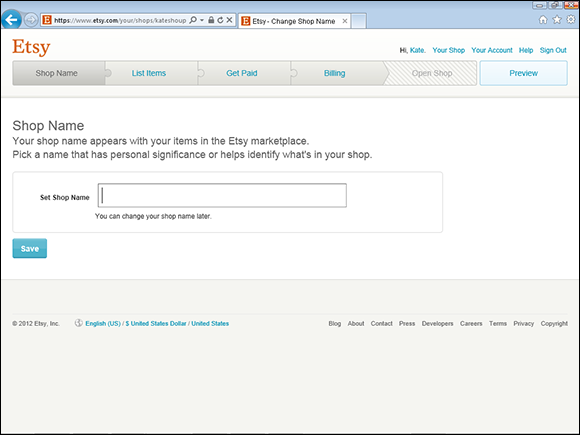
Figure 8-3: The Shop Name screen.
5. Type the name you’d like to use for your shop and click Save.
Assuming no other seller has beaten you to the punch and selected your shop name already, Etsy assigns to your shop the name you typed.
Although Etsy prompts you to list an item next, we skip that step for now. You find out all about listing items in Chapter 13. For now, we focus on gussying up your shop.
Mind Your Banners: Adding a Banner to Your Shop Page
To personalize your Etsy shop, you can add a banner (a graphic that runs across the top of the page). Your banner should incorporate your shop name and can include photos of your work, a shop slogan (assuming you have one), or even a special announcement.
Don’t just create a banner willy-nilly. The banner you create needs to give viewers some idea of what they’ll find in your shop and has to reflect the aesthetic of the items you make in some way. It also must tie in with your overall branding. (You find out more about branding in Chapter 16.)
You can create your banner from scratch using just about any image-editing software you like — even free stuff online. Here are just a couple image-editing tools to choose from:
![]() Photoshop (
Photoshop (www.photoshop.com): Like Tylenol and Kleenex, Photoshop is so ubiquitous, it has crossed over into the general vernacular. It's by far the most respected and full featured image-editing program available today. It's also among the most expensive and complicated to use (although Adobe, the maker of Photoshop, does offer a cheaper, scaled-down version called Photoshop Elements, which has more than enough bells and whistles to do the job, as well as a more affordable "subscription" option for its beefier software).
![]() GIMP (
GIMP (www.gimp.org): This free, downloadable image-editing tool is nearly as powerful as its costly counterpart, Photoshop — albeit somewhat clumsier in design. It's great for performing essential image-editing tasks like resizing, editing, and cropping. You can even use it for more advanced purposes, such as adjusting levels and the like.
![]() Picasa (
Picasa (www.picasa.com): Offered free from Google and available for download for both Mac and Windows, Picasa supports basic photo-editing functionality, including color enhancement and cropping.
If you use a Windows PC, you can also use the Paint program, which was included free with your computer. Yet another option is to use the software that came with your digital camera.
When you have your banner in hand, it’s time to upload it to your Etsy shop. Here’s how:
1. If it’s not open already, open the Shop Name page by clicking the Your Shop link along the top of any Etsy page.
The Shop Name page (shown in Figure 8-4) opens.
2. Click the Add Shop Banner link.
The Info & Appearance page opens.
3. In the Shop Banner Image section, click the Browse button (see Figure 8-5).
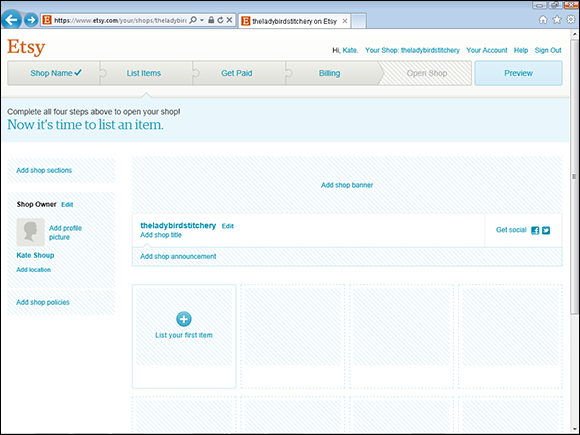
Figure 8-4: The Shop Name page.
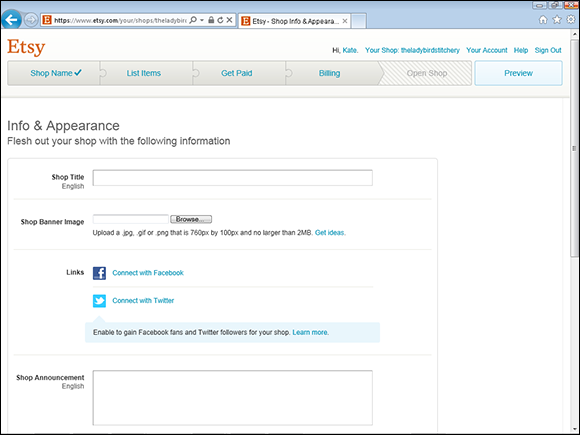
Figure 8-5: Click Browse to begin uploading your banner.
4. Locate and select your banner file; then click the Open button.
5. Click the Save Changes button.
Etsy uploads your banner to your shop (see Figure 8-6).
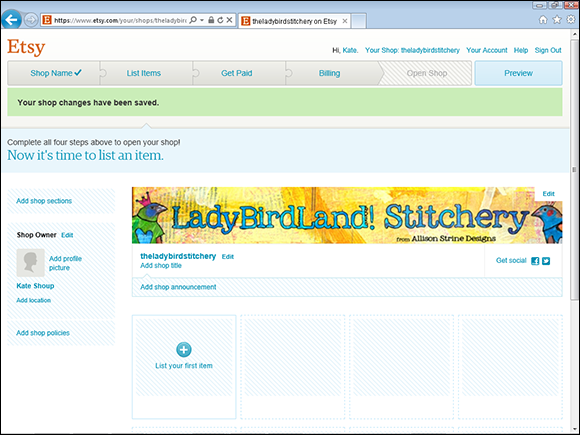
Figure 8-6: What a difference a banner makes!
Title Wave: Adding a Shop Title and Announcement
Looking for a way to tell visitors what your shop’s about? Look no further. Etsy enables you to include a shop title and shop announcement on your shop’s main page.
Think of your shop title as a tagline of sorts. It needs to briefly sum up what your shop is about. For example, if you sell belt buckles, your shop title — which appears just below your username on your Etsy shop page — may be “Keep Your Pants On . . . With Becky’s Belt Buckles.” If customers are likely to search for you by your full name or your business name, consider including that in your shop title.
The shop announcement, in contrast, is a great way to, well, announce things about your shop. For example, you may use it to trumpet the types of items you sell, the variety of materials or ingredients you use, or your artistic philosophy. Alternatively, your shop announcement may broadcast when your next sale will be or share a summary of your shop policies.
To add a shop title and announcement to your shop, follow these steps:
1. If it’s not open already, open the Shop Name page. To do so, click the Your Shop link along the top of any Etsy page.
The Shop Name page opens.
2. Click the Add Shop Title link, under your banner and shop name.
The Info & Appearance page opens.
3. Type your shop title in the Shop Title field.
4. Type your shop announcement in the Shop Announcement text box (see Figure 8-7).
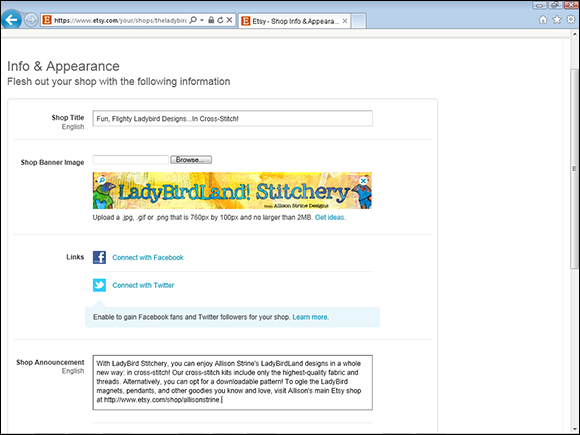
Figure 8-7: Type the text for your shop title and shop announcement.
5. Click the Save Changes button.
Etsy adds your shop title and shop announcement to your shop (see Figure 8-8).
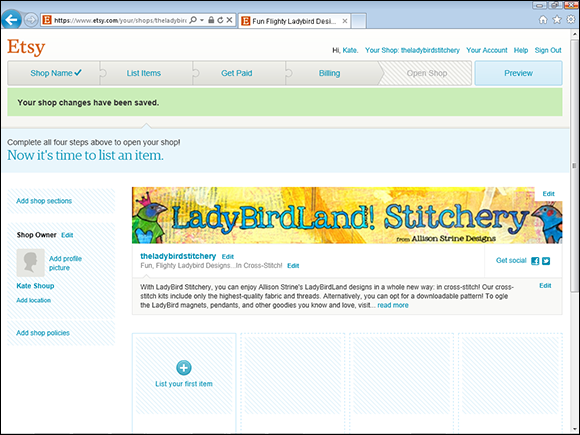
Figure 8-8: Your shop announcement appears under your banner; the shop title is under your username.
Note: Your shop announcement can be as short or as long as you want. Just be aware that if it’s more Anna Karenina than haiku, not all of it will be visible by default. To read it in its entirety, click the Read More link that appears after the first few lines.
Section Leader: Setting Up Sections
What if, when you went to your grocery store, everything was set out haphazardly — with the milk alongside the charcoal briquettes, the kitty litter next to the radishes, the cheese by the sardines? You’d never be able to find everything you needed to buy! That’s why grocery stores are organized into sections and aisles: so you can find what you’re looking for.
Why should your Etsy shop be any different? Fortunately, Etsy enables you to organize your items by section. For example, if you sell different types of items — say, magnets, notebooks, and picture frames — you can use sections to organize your shop by item. Even if you don’t sell different types of items — maybe you’re all about knit caps — you can use sections to organize your goods by, say, yarn type, size, or price. You’re allowed ten sections in all, as well as the default All Items section that’s available in every shop.
To create a section, follow these steps:
1. If it’s not open already, open the Shop Name page by clicking the Your Shop link along the top of any Etsy page.
The Shop Name page opens.
2. Click the Add Shop Sections link on the left side of the page.
The Shop Sections page opens (see Figure 8-9).
3. Type a name for the new section in the Create a Section field.
The name can contain as many as 24 characters.
 In addition to using your shop title and shop announcement, Google uses your section titles as keywords for search. Opt for section titles that double as likely keywords. (Check out Chapters 12 and 16 for more about SEO.)
4. Click the Save button.
Etsy creates a section, using the name you typed.
5. To add another section, click the Create New Section link and repeat steps 3 and 4.
6. To change the order in which sections appear, click the icon to the left of the section and drag it to the desired spot in the order.
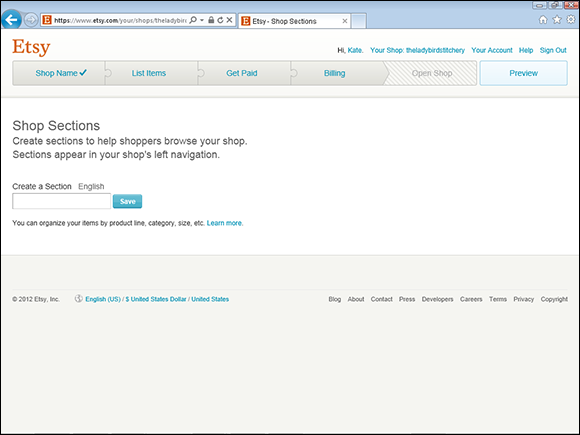
Figure 8-9: Create sections for your Etsy shop.
If you haven’t created any shop listings yet, you can’t view sections on your shop’s main page. After you create a listing, however — and assign it to a section — that section gets listed along the left side of your Etsy shop page. You find out how to create a shop listing and assign that listing to a section in Chapter 13.
Money Talks: Setting Up Payment Options
At the risk of sounding crass, odds are that you’ve set up your Etsy shop in the hopes of pulling in some coinage. Before you can do that, however, you have to indicate to Etsy what forms of payment you want to receive.
Exam cram: Examining your options
You can set up your Etsy shop to accept the following forms of payment:
![]() Credit card (Visa, MasterCard, American Express, and Discover): Etsy’s Direct Checkout feature enables you to accept payment via credit card — namely, Visa, MasterCard, American Express, and Discover. Although it’s currently available only in the United States (look for expansion to international sellers in 2013), this payment method is easily the most popular on the site. But wait, there’s more: Direct Checkout offers protection from fraud and enables you to purchase and print U.S. Postal Service shipping labels directly from your Etsy shop.
Credit card (Visa, MasterCard, American Express, and Discover): Etsy’s Direct Checkout feature enables you to accept payment via credit card — namely, Visa, MasterCard, American Express, and Discover. Although it’s currently available only in the United States (look for expansion to international sellers in 2013), this payment method is easily the most popular on the site. But wait, there’s more: Direct Checkout offers protection from fraud and enables you to purchase and print U.S. Postal Service shipping labels directly from your Etsy shop.
Note: If you go the Direct Checkout route, be aware that Etsy charges a processing fee for each Direct Checkout order: 3 percent of the total sale (including shipping and sales tax), plus 25¢.
![]() PayPal: PayPal is another popular method of payment among Etsy users. Electronic payments are instantly deposited into your PayPal account, and transferring money from your PayPal account to a bank account is easy and free.
PayPal: PayPal is another popular method of payment among Etsy users. Electronic payments are instantly deposited into your PayPal account, and transferring money from your PayPal account to a bank account is easy and free.
![]() Money order: Some people are simply old school. They prefer the time-honored system of paying by money order over using newfangled digital solutions like Direct Checkout or PayPal. Fortunately, Etsy allows you to accommodate these buyers. The downside? Unlike with Direct Checkout and PayPal, payment isn’t rendered immediately. You have to wait for the buyer to snail-mail you the money order (or send it via some other type of delivery service).
Money order: Some people are simply old school. They prefer the time-honored system of paying by money order over using newfangled digital solutions like Direct Checkout or PayPal. Fortunately, Etsy allows you to accommodate these buyers. The downside? Unlike with Direct Checkout and PayPal, payment isn’t rendered immediately. You have to wait for the buyer to snail-mail you the money order (or send it via some other type of delivery service).
![]() Personal check: Allowing payment by personal check offers the same basic advantages and disadvantages as permitting payment via money order: You indulge the Luddites, but you have to wait for delivery of payment.
Personal check: Allowing payment by personal check offers the same basic advantages and disadvantages as permitting payment via money order: You indulge the Luddites, but you have to wait for delivery of payment.
![]() Other: If you want, you can accept additional payment methods — say, cashier’s checks, gold doubloons, shiny beads, or what have you. If you opt to accept other forms of payment, be sure to indicate on your Shop Policies page what types you accept. (You find out how in the next chapter.)
Other: If you want, you can accept additional payment methods — say, cashier’s checks, gold doubloons, shiny beads, or what have you. If you opt to accept other forms of payment, be sure to indicate on your Shop Policies page what types you accept. (You find out how in the next chapter.)
Preferential treatment: Specifying your preferences
When you’ve decided what forms of payment to accept, you need to indicate your preferences on Etsy. Here’s how:
1. If necessary, click the Your Shop link along the top of any Etsy page.
The Shop Name page opens.
2. Click the Get Paid tab.
The Get Paid page opens, as shown in Figure 8-10.
If you want to accept credit cards and gift cards as forms of payment, you must enable Etsy’s Direct Checkout feature. (To confuse matters, Etsy sometimes refers to this as a “Shop Payment account.”)
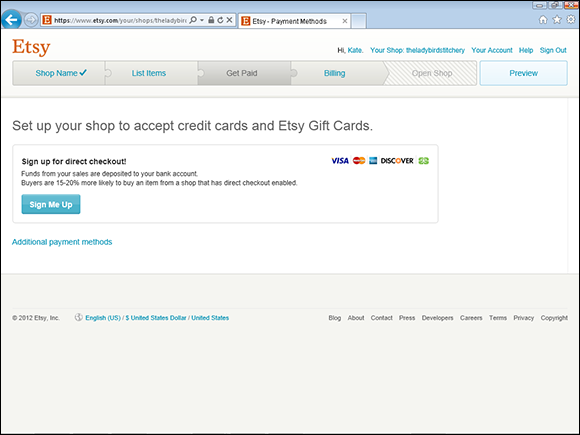
Figure 8-10: The Get Paid page.
3. To enable Direct Checkout, click the Sign Me Up button.
Etsy displays the Terms of Service.
4. Read the Terms of Service, and then click the Continue button to accept them.
As shown in Figure 8-11, Etsy prompts you to enter your personal information — your name, your date of birth, the last four digits of your Social Security number or federal tax ID number, your home address, your phone number, and your business name (optional). (Note that none of this information will be displayed publicly on Etsy. Pinkie swear.)
5. Enter the requested information and click the Continue button.
Next, enter your bank info — the type of account you use, the name of the account owner, your bank’s routing number, and your account number (see Figure 8-12).
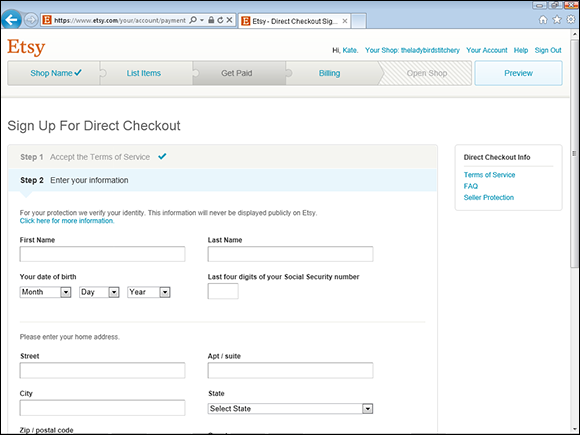
Figure 8-11: Time to get personal!
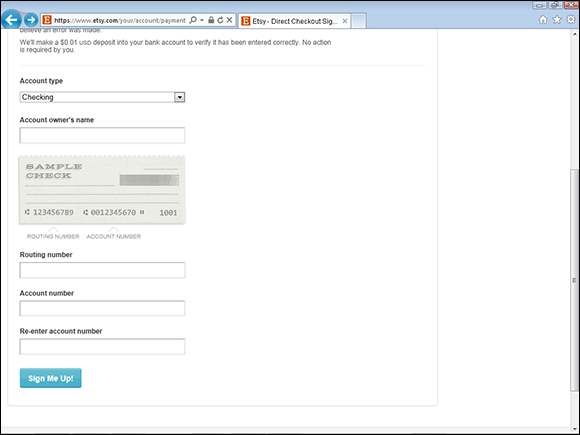
Figure 8-12: Enter your bank info here.
6. Enter the requested information and click the Sign Me Up! button.
Etsy enrolls you in Direct Checkout.
7. To accept other forms of payment — PayPal, money order, personal check, other — click the Get Paid tab.
8. If necessary, click the Additional Payment Methods link.
Etsy reveals additional payment options.
9. Click the check box next to each type of payment you want to accept.
10. Click the Save button.
Etsy saves your changes.
Bill Me: Setting Up Your Credit Card
Of course, you’re not the only person here trying to make a buck. Etsy deserves a bit of compensation for helping you to sell your item, wouldn’t you agree? As mentioned in Chapter 1, Etsy stays afloat by charging sellers a listing fee (currently, 20¢) for each item listed on the site. In addition, Etsy collects a commission from the seller for each item sold — currently, 3.5 percent of the total price of the item (not counting shipping or tax).
To pay these fees, a credit card is required. That means you must supply Etsy with one before your shop can go live. To enter your credit card info, follow these steps:
1. If necessary, click the Your Shop link along the top of any Etsy page.
The Shop Name page opens.
2. Click the Billing tab.
The Billing page opens, as shown in Figure 8-13.
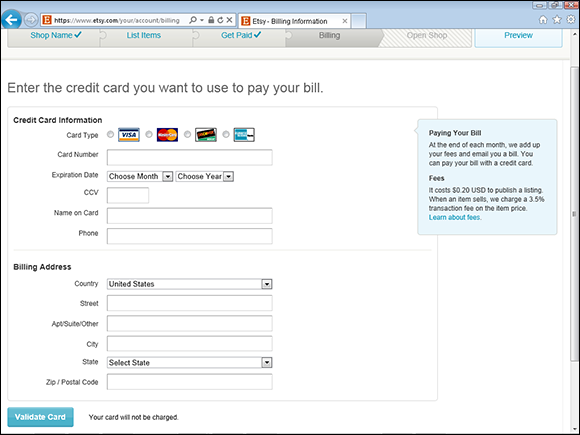
Figure 8-13: The Billing page.
3. Enter your credit-card information in the fields provided.
4. Enter your billing address in the fields provided.
5. Click the Validate Card button.
Etsy validates the card.
Note: You can set up your account to pay your Etsy bill automatically. For more information, see Chapter 18.
High Profile: Setting Up Your Public Profile
Everyone on Etsy has a public profile page. Why? A couple reasons. For one, being able to check out other Etsy members helps to inspire confidence in the site. That is, it’s not populated by a bunch of faceless buyers and sellers; it’s populated by actual people! For another, it’s fun to see who else is on the site.
An Etsy profile can include the following tidbits:
![]() Your profile picture (also known as your avatar)
Your profile picture (also known as your avatar)
![]() Your name
Your name
![]() Your gender
Your gender
![]() Your city
Your city
![]() Your birthday
Your birthday
![]() Your bio
Your bio
![]() A list of your favorite materials
A list of your favorite materials
Anyone who visits your Etsy shop can access your public profile by clicking your name or avatar on any page in your Etsy shop.
To populate your Etsy public profile, follow these steps:
1. Click the Your Account link along the top of any Etsy page.
The Your Account page opens.
2. Click the Public Profile link on the left side of the screen.
The Your Public Profile page appears (see Figure 8-14).
3. To add a profile picture, or avatar, to your profile, click the Browse button; then, in the dialog box that appears, locate and select the image you want to use.
4. If you want, indicate your gender.
If you prefer to keep that information private, select the Rather Not Say option button.
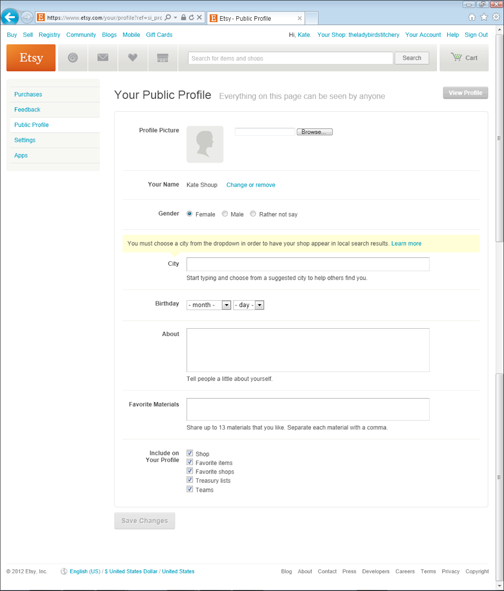
Figure 8-14: To populate your profile, click the Public Profile link on the Your Account page.
5. Type your city in the City field.
As you type, Etsy displays a list of matching locales; click your town in the list to select it.
 By entering your location, you enable Etsy buyers to find your shop using the Shop Local tool. Chapter 3 has more information about this feature.
6. Use the Month and Day drop-down lists to enter your birthday.
7. Type your bio in the About box.
For tips on writing your bio, see the section “Biohazard: Writing a Winning Bio or Shop Story” later in this chapter.
Note: You should also disclose any other usernames you use on Etsy in the About box of your public profile. For example, you might write, “I’m also on Etsy under these usernames. . . .”
8. In the Favorite Materials box, indicate which materials you like to use, separating entries with a comma and a space.
You can add as many as 13.
9. If you want your profile to include your shop, any favorite items or shops, any Treasury lists you’ve compiled, and any teams you’ve joined, leave the check boxes at the bottom of the screen checked.
Just remember: If you choose to share your favorite items, Treasury lists, or teams with the public, buyers visiting your shop can see them, too. Make sure that you keep things on the appropriate side and that these items are a good reflection of who you are as a brand.
10. Click the Save Changes button.
Etsy saves the changes you made to your profile.
11. To preview your profile, click the View Profile button.
Etsy shows you how your profile will appear to others (see Figure 8-15).
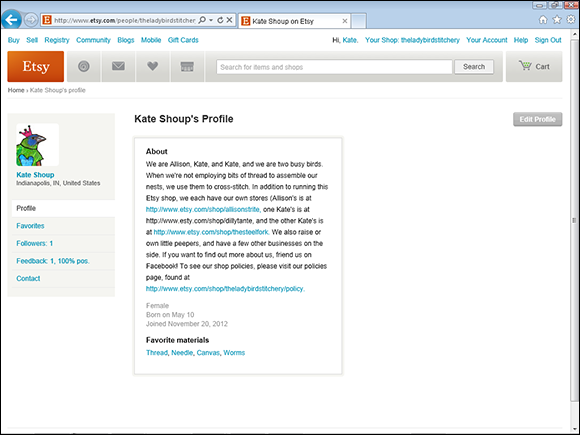
Figure 8-15: Preview your profile.
All About Me: Adding an About Page
Part of the reason people shop on Etsy is that they want to feel a personal connection with the living, breathing artists and craftspeople who make what they buy. Enter the About page. This page is a bit like the bio on your public profile, only expanded.
You won’t be able to create your About page until after you’ve created your first listing. (For info on how to create listings, turn to Chapter 13.) After you’ve done that, you’ll want to flip back to this section to get the lowdown on creating your About page.
To create your About page, follow these steps:
1. Click the Your Shop link along the top of any Etsy page.
Notice that the page that appears is different, now that your shop is completely set up. Links along the left side of the page offer immediate access to tools for adding and managing listings, handling orders, dealing with bills, changing shop settings, promoting your shop, and more.
2. Under Shop Settings, click the Info & Appearance link.
The Info & Appearance page opens.
3. Click the About tab.
An editable About page opens.
The first step in creating an About page is to add info about the shop owner, as shown in Figure 8-16.
4. In the Portrait section, click the Add Photo link; then, in the dialog box that appears, locate and select the image you want to use.
5. In the Name field, type your name.
6. In the Role section, select any check boxes that apply: Maker, Designer, and/or Curator. (Owner is selected automatically.)
If your role is best described in some other way, type it in the field provided.
7. Enter a short bio.
You’re limited to 250 characters here, so keep it short. You’ll find out where your more full-featured bio goes in a moment.
8. Click the Add Shop Member button.
Etsy saves your info and clears the fields in the Shop Members section, enabling you to add more members as needed. It also reveals additional editable sections: Shop Story, Shop Photos, and Shop Links.
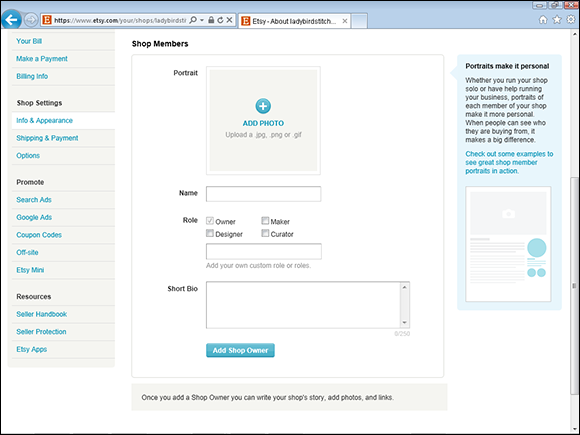
Figure 8-16: The editable About page.
9. If you share the responsibilities of running your shop with others, repeat steps 4–8 as many times as needed to add their info.
 Absolutely nothing can stop you from opening an Etsy shop with, say, your grandma, your best friend, or the guy whose welding studio is across the hall from yours. (Etsy refers to shops run by or including goods crafted by more than one person as collectives.) But be aware that you can’t attach multiple names to an Etsy account. That is, if you’re the one who creates the account for the collective, your name — and your name only — is associated with that account, even though you can (actually, you’re required to, per Etsy) add other shop members to your shop’s About page. In other words, Etsy holds you responsible for all account-related activities. So, even if you had nothing to do with that flame war Grandma launched on the Etsy Ideas forum while using the collective’s account, you’re the one who’ll be blamed for it. To find out more about running an Etsy collective, see Chapter 18.
The next step in creating an About page is to tell your story, or the story of the shop.
10. In the Shop Story section (see Figure 8-17), type a headline in Story Headline field.
This may or may not be similar to your shop title.
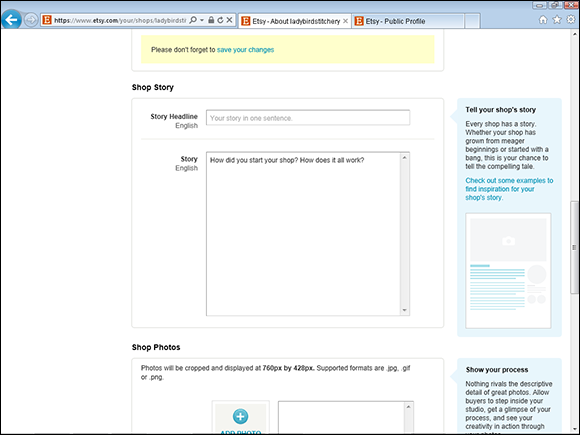
Figure 8-17: The Shop Story section.
11. In the Story field, type up your bio, or your shop’s story.
This might be similar to the bio you wrote for your public profile, but it doesn’t have to be. Lots of Etsy sellers use the Story section to get into the nitty-gritty of what they do and why. Alternatively, it might discuss who the seller is on a more personal level, what their studio is like, or how a normal day is for them.
The next step in creating an About page is to add photos. Opt for images that show you, your process, your shop, or maybe a partly finished product. The idea is to give viewers an idea of who you are and how you work.
12. In the Shop Photos section (see Figure 8-18), click an Add Photo link; then, in the dialog box that appears, locate and select the image you want to use.
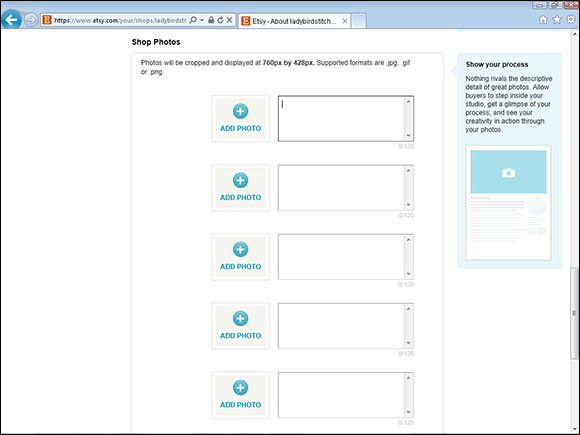
Figure 8-18: The Shop Photos section.
13. Repeat Step 12 to add as many images as you’d like.
These images will be presented in slideshow form on your About page.
The next step in creating an About page is to add links to other sites you maintain for your craft business. This might be a Facebook page, a Twitter feed, a blog, or a separate website. (Note that this separate website can’t be one where you sell the same items listed in your Etsy shop.)
14. In the Shop Links section (see Figure 8-19), click the Link Type drop-down list and choose Facebook, Twitter, Shop Blog, or Shop Website.
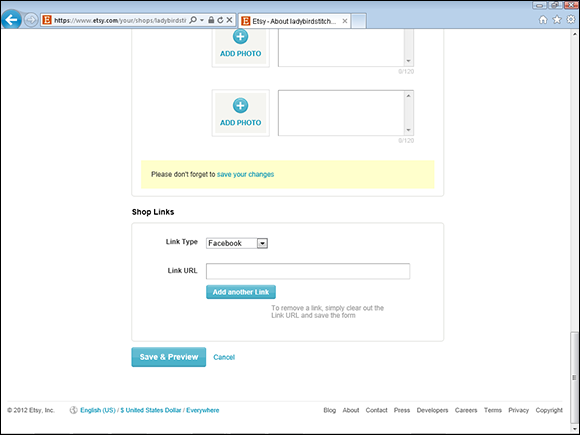
Figure 8-19: The Shop Links section.
15. Enter the page’s URL in the Link URL field.
16. Optionally, repeat Step 15 to add more links.
17. Click Save & Preview.
Etsy displays a preview of the About page, as shown in Figure 8-20.
18. If you don’t love the page, click the Continue Editing button to make changes; otherwise, click the Publish button.
Etsy publishes the page.
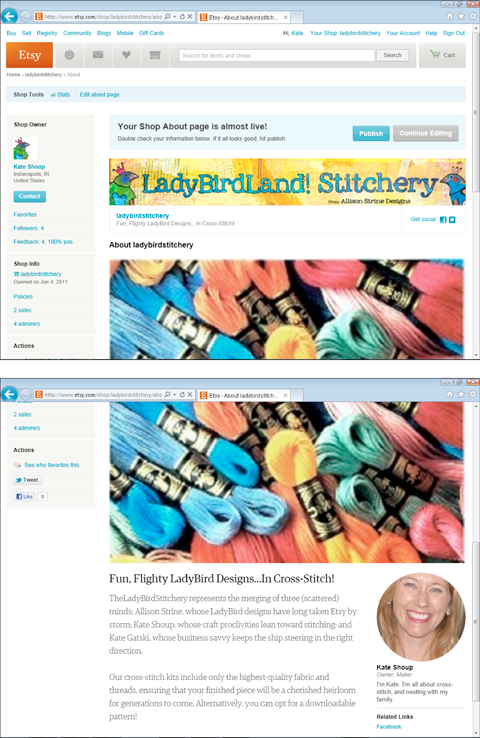
Figure 8-20: Preview your About page.
Biohazard: Writing a Winning Bio or Shop Story
For many crafty types, the idea of writing anything — let alone a piece about themselves — is about as enticing as spelunking in Yucca Mountain. But a succinct, clever, well-written bio, or shop story — both the one that appears in your public profile and the one on your About page (which may be similar, but don’t have to be) — is essential to the success of your Etsy shop. Why? Lots of reasons. Here are just two:
![]() Your bio enables buyers to see who they’re buying from. Through your bio, you become a bona-fide human being in your buyers’ eyes.
Your bio enables buyers to see who they’re buying from. Through your bio, you become a bona-fide human being in your buyers’ eyes.
![]() Your bio lets you toot your own horn a bit. Maybe your work has been recognized in some way. Or maybe you studied your craft at the most prestigious school around. If so, you want to make sure that everyone who visits your shop knows about it!
Your bio lets you toot your own horn a bit. Maybe your work has been recognized in some way. Or maybe you studied your craft at the most prestigious school around. If so, you want to make sure that everyone who visits your shop knows about it!
In the following sections, we explain how to write a first draft of your bio, edit it effectively, and polish it with a few extra details.
Quiz show: Starting with a few essential questions
If writing your bio seems a bit daunting, don’t freak out. Writing your bio is a process, just like anything else. It starts with writing down answers to a few key questions:
![]() Who are you?
Who are you?
![]() What’s your educational and/or artistic background?
What’s your educational and/or artistic background?
![]() What do you make? Do you have a signature product? If so, what’s the story behind that product?
What do you make? Do you have a signature product? If so, what’s the story behind that product?
![]() What do you enjoy most about making the things you sell?
What do you enjoy most about making the things you sell?
![]() What are your hobbies?
What are your hobbies?
![]() What are you passionate about?
What are you passionate about?
![]() Who or what inspires you?
Who or what inspires you?
Armed with your answers, you’re ready to write the first draft of your bio. Notice that we said “first draft.” That’s code for “Don’t try to be perfect right out of the gate.” For now, just put your pen to paper (or your fingers to keyboard) and see what comes out. The idea is to tell buyers a little bit about yourself, your business, and the products you sell.
The tweak shall inherit the Earth: Tweaking your first draft
With your first draft complete, it’s time to tinker and tweak. As you do, try incorporating some or all of these tips:
![]() Say hello. If you were the proprietor of a real-world boutique, you’d certainly greet customers as they entered your store. Do the same for folks visiting your Etsy shop. While you’re at it, thank them for stopping by. It’s just good manners.
Say hello. If you were the proprietor of a real-world boutique, you’d certainly greet customers as they entered your store. Do the same for folks visiting your Etsy shop. While you’re at it, thank them for stopping by. It’s just good manners.
![]() Start strong. The first few pages of a novel need to grab readers by the throat and shake them until their lunch money falls out of their pockets (figuratively speaking). Likewise, the first paragraph of your Etsy bio needs to seize buyers by the eyeballs to convince them to read on. (Again, we’re talking figuratively; actually seizing someone by the eyeballs would probably subject you to litigation.)
Start strong. The first few pages of a novel need to grab readers by the throat and shake them until their lunch money falls out of their pockets (figuratively speaking). Likewise, the first paragraph of your Etsy bio needs to seize buyers by the eyeballs to convince them to read on. (Again, we’re talking figuratively; actually seizing someone by the eyeballs would probably subject you to litigation.)
![]() Be friendly and approachable. This strategy will yield substantially better results than taking the opposite tack — being rude and inaccessible. Also, a little bit of humor can go a long way.
Be friendly and approachable. This strategy will yield substantially better results than taking the opposite tack — being rude and inaccessible. Also, a little bit of humor can go a long way.
![]() Tell a story. An anecdote about how your business started or a story about the spark behind your store name may be just the thing to pull a buyer in.
Tell a story. An anecdote about how your business started or a story about the spark behind your store name may be just the thing to pull a buyer in.
![]() Go the fictional route. If it’s true that all fiction is autobiographical, why not opt for a clever fictional “bio”?
Go the fictional route. If it’s true that all fiction is autobiographical, why not opt for a clever fictional “bio”?
![]() Keep it short. It’s your Etsy bio, not War and Peace. A few short paragraphs will do.
Keep it short. It’s your Etsy bio, not War and Peace. A few short paragraphs will do.
![]() Break your information into sections. For most people, reading large blocks of text is about as appealing as chewing gum pried off the floor of a subway car. If your bio is running a little long, people perusing it will appreciate your use of sections, with titles, to break up your information.
Break your information into sections. For most people, reading large blocks of text is about as appealing as chewing gum pried off the floor of a subway car. If your bio is running a little long, people perusing it will appreciate your use of sections, with titles, to break up your information.
![]() Proofread. Before you post your bio, triple-check it to make sure that it doesn’t contain any spelling or grammatical errors. Better yet, ask your English-major friend to check it for you.
Proofread. Before you post your bio, triple-check it to make sure that it doesn’t contain any spelling or grammatical errors. Better yet, ask your English-major friend to check it for you.
![]() Be professional . . . sort of. No, you don’t have to wear pin-striped suits and practical pumps and drive a no-nonsense four-door sedan. But you do need to project an air of competence — even if your shop is all about fun. You want to be taken seriously as a seller, right? That being said, the tone of your bio needs to match the tone of your shop and products. If your business is about whimsy, a stuffy bio just won’t do!
Be professional . . . sort of. No, you don’t have to wear pin-striped suits and practical pumps and drive a no-nonsense four-door sedan. But you do need to project an air of competence — even if your shop is all about fun. You want to be taken seriously as a seller, right? That being said, the tone of your bio needs to match the tone of your shop and products. If your business is about whimsy, a stuffy bio just won’t do!
Extra! Extra! Adding a few extras
In addition to sharing your story with readers, you can use your bio to include the following information:
![]() Press clippings: If you or your business has garnered a nod in the media, don’t hesitate to provide a link to the story in your bio. Just don’t go too crazy with the clippings. Having links to more than a few may make your shop seem more corporate than co-op.
Press clippings: If you or your business has garnered a nod in the media, don’t hesitate to provide a link to the story in your bio. Just don’t go too crazy with the clippings. Having links to more than a few may make your shop seem more corporate than co-op.
![]() Product info: If you find yourself answering the same question about one of your products over and over again (“Yes, the sweaters are knit from hair shed by my hamster”), consider spelling out the information in your bio.
Product info: If you find yourself answering the same question about one of your products over and over again (“Yes, the sweaters are knit from hair shed by my hamster”), consider spelling out the information in your bio.
![]() Disclaimer: If your product merits a disclaimer, you can include it in your bio. For example, if you sell vintage items, you may want to include a disclaimer indicating that your goodies are old and used. If you sell, say, copper jewelry, you can mention in your disclaimer that your pieces may turn people’s skin green. Or if you craft toys, but they aren’t meant for babies, you can include a disclaimer to that effect.
Disclaimer: If your product merits a disclaimer, you can include it in your bio. For example, if you sell vintage items, you may want to include a disclaimer indicating that your goodies are old and used. If you sell, say, copper jewelry, you can mention in your disclaimer that your pieces may turn people’s skin green. Or if you craft toys, but they aren’t meant for babies, you can include a disclaimer to that effect.
![]() Charitable giving: Many Etsy sellers donate a portion of their take to charity. If you’re one such seller, you can indicate that in your bio. (Note that charitable listings and shops are subject to a few rules, outlined here: www.etsy.com/help/article/483#charity.)
Charitable giving: Many Etsy sellers donate a portion of their take to charity. If you’re one such seller, you can indicate that in your bio. (Note that charitable listings and shops are subject to a few rules, outlined here: www.etsy.com/help/article/483#charity.)
Team Edit-ward: Editing Your Shop Settings
Inspiration may strike after you set up your shop. Maybe you’ll want to update your banner, revise your shop announcement, or change some other aspect of your storefront. Fortunately, doing so is easy. You access the vast majority of settings discussed in this chapter by clicking the Your Shop link along the top of every Etsy page and then clicking the Info & Appearance link on the left side of the page that appears. Additional settings — namely, those pertaining to your payment and billing info — are also accessible via Your Shop; this time, though, you choose from the links in the Bill section on the left side of the screen.

 We’ve said it before and we’ll say it again: A major reason people shop on Etsy is to feel connected to the artists who make what they buy. To make sure people buy from
  If you choose to accept personal checks, money orders, or cashier’s checks as payment, do so with care. These forms offer less protection from fraud. Never, never, ever ship an item to a buyer until her personal check, money order, or cashier’s check clears, no matter how nicely she asks!