
Naming our sheets and giving them titles not only helps us find the relevant sheets while working on our dashboards or storyboards, but it also helps our end users understand what we are trying show in our views. Tableau will, by default, take our sheet name as our title for that sheet, which we can change if we want to.
While working with dashboards, we briefly saw how to add titles to our worksheets and dashboards and how to do some basic formatting on them. In this recipe, let's relook at how we can add titles to our worksheet, format them, and even make them dynamic based on what the user selects.
We will continue using our existing My first Tableau Workbook workbook and create a quick bar chart by using the Orders (Sample - Superstore) data source. Let us get started.
- Let us create a new sheet and rename it as Formatting Titles & Captions.
- Next, let us select the Orders (Sample - Superstore) data source from the Data pane and create a bar chart by selecting the Sub-Category field in the Dimensions pane followed by doing a Ctrl + select on the Profit field in the Measures pane. We will then select the bar chart option from Show Me!. Refer to the following screenshot:

- This will create a horizontal bar chart for us, which we will sort in descending order by Profit. Refer to the following screenshot:

- Now, let us right-click on the Region field in the Dimensions pane and select the Show Filter option. Refer to the following screenshot:

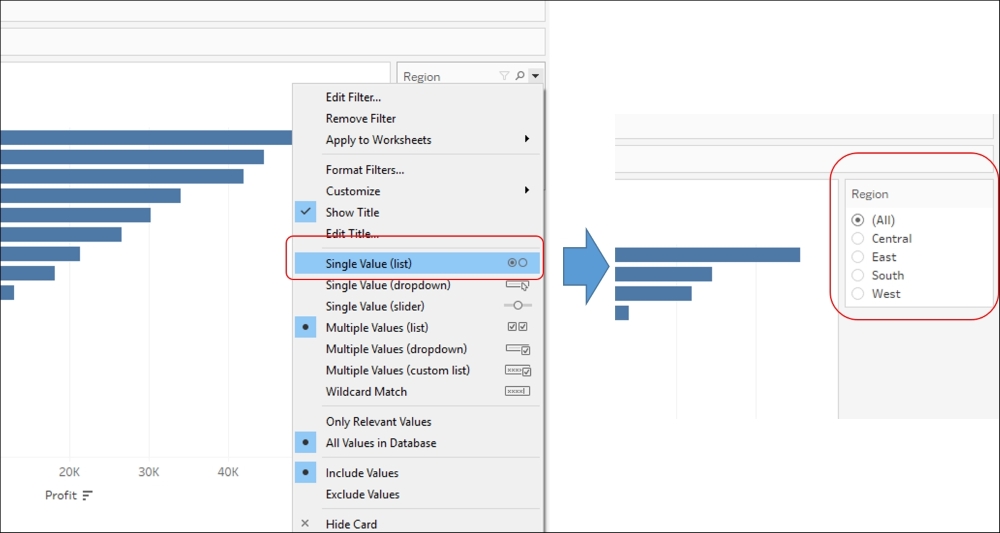
- Next, let us make this filter a single select radio button instead of the multiple value select by clicking on the dropdown of the filter control and selecting the Single Value (list) option. Refer to the following screenshot:
- Now, if we notice, the
Sheet Nameas well as theWorksheet Titleare exactly the same. Let us change the title of this worksheet to something more meaningful that will help our users understand what we are trying to show using the bar chart that we have created. To do so, let us double-click on the title and it will open a textbox for us. Refer to the following screenshot:
- As we can see in the preceding screenshot, the text box contains the SheetName. We will remove this and type Subcategory wise Profit. This will change our title. Refer to the following screenshot:

- Now, this is how we can add titles to our sheet. The earlier textbox gave us a couple of options to format. However, if we wish to add background color and borders to our titles, to make them stand out, then we can do so by right clicking on the title and selecting the Format Title… option. Refer to the following screenshot:

- Under the Title section, we will begin by keeping the Border: section as is. We will add a gray background color to our title by using the Shading: dropdown. Refer to the following screenshot:

- We will then go to the Caption section and keep the Shading: dropdown as is. We will instead add a border from the Border: drop-down menu. Refer to the following screenshot:

- This will update our view, as shown in the following screenshot:

- In previous steps, we formatted our caption; however, our worksheet currently doesn't have a caption, and to enable it we will select the Worksheet | Caption option from the toolbar. Refer to the following screenshot:

- Lastly, we have a Region filter and it would be great if we can customize our title to show which Region is selected in the filter. To do so, double-click on the title and this will open the text box for us. We will go to the end of the current text, insert a space, and then type the word for. After we do this, we will then select the Insert | Region option and then click OK. Refer to the following screenshot:

- Now if we change the filter selection from All to Central, our title will read as Subcategory wise Profit for Central. Refer to the following screenshot:

The preceding recipe explains how we can add Titles and Captions to our worksheets and format them. We also saw how we can make our titles dynamic to give more context to our visualizations by using the Insert option.
We can also format our Tooltips, Reference lines, Legends, Filter controls, Highlighter controls, and Parameter controls.
To format our Tooltips, we will have to click on the Tooltip shelf in the Marks card, which will enable a textbox where we can do the desired formatting. Refer to the following screenshot:

Next, to format our Reference Lines, we can select the Reference Lines… option from the Format menu in the toolbar. Refer to the following screenshot:

To format our Legends, Filter controls, Highlighter controls, and Parameter controls, we can select the relevant options from the Format menu in the toolbar. Refer to the following screenshot:

Another quick point to explore is the Workbook Theme. We can change the default workbook theme by selecting the Format | Workbook Theme option. Refer to the following screenshot:

Lastly, now that we have made all these changes to our My first Tableau Workbook, which is a .twb file, let's make sure we save it and also make sure that we keep our My first Tableau Packaged Workbook, which is the .twbx updated as well. We will select the Export Packaged Workbook… option from the File menu in the toolbar and replace the existing My first Tableau Packaged Workbook.twbx.
Formatting is a vast topic and is very subjective as well. Even though we saw a whole lot of options, there is always more to explore. To read more about formatting in Tableau, refer to the following link: http://onlinehelp.tableau.com/current/pro/desktop/en-us/formatting.html.