
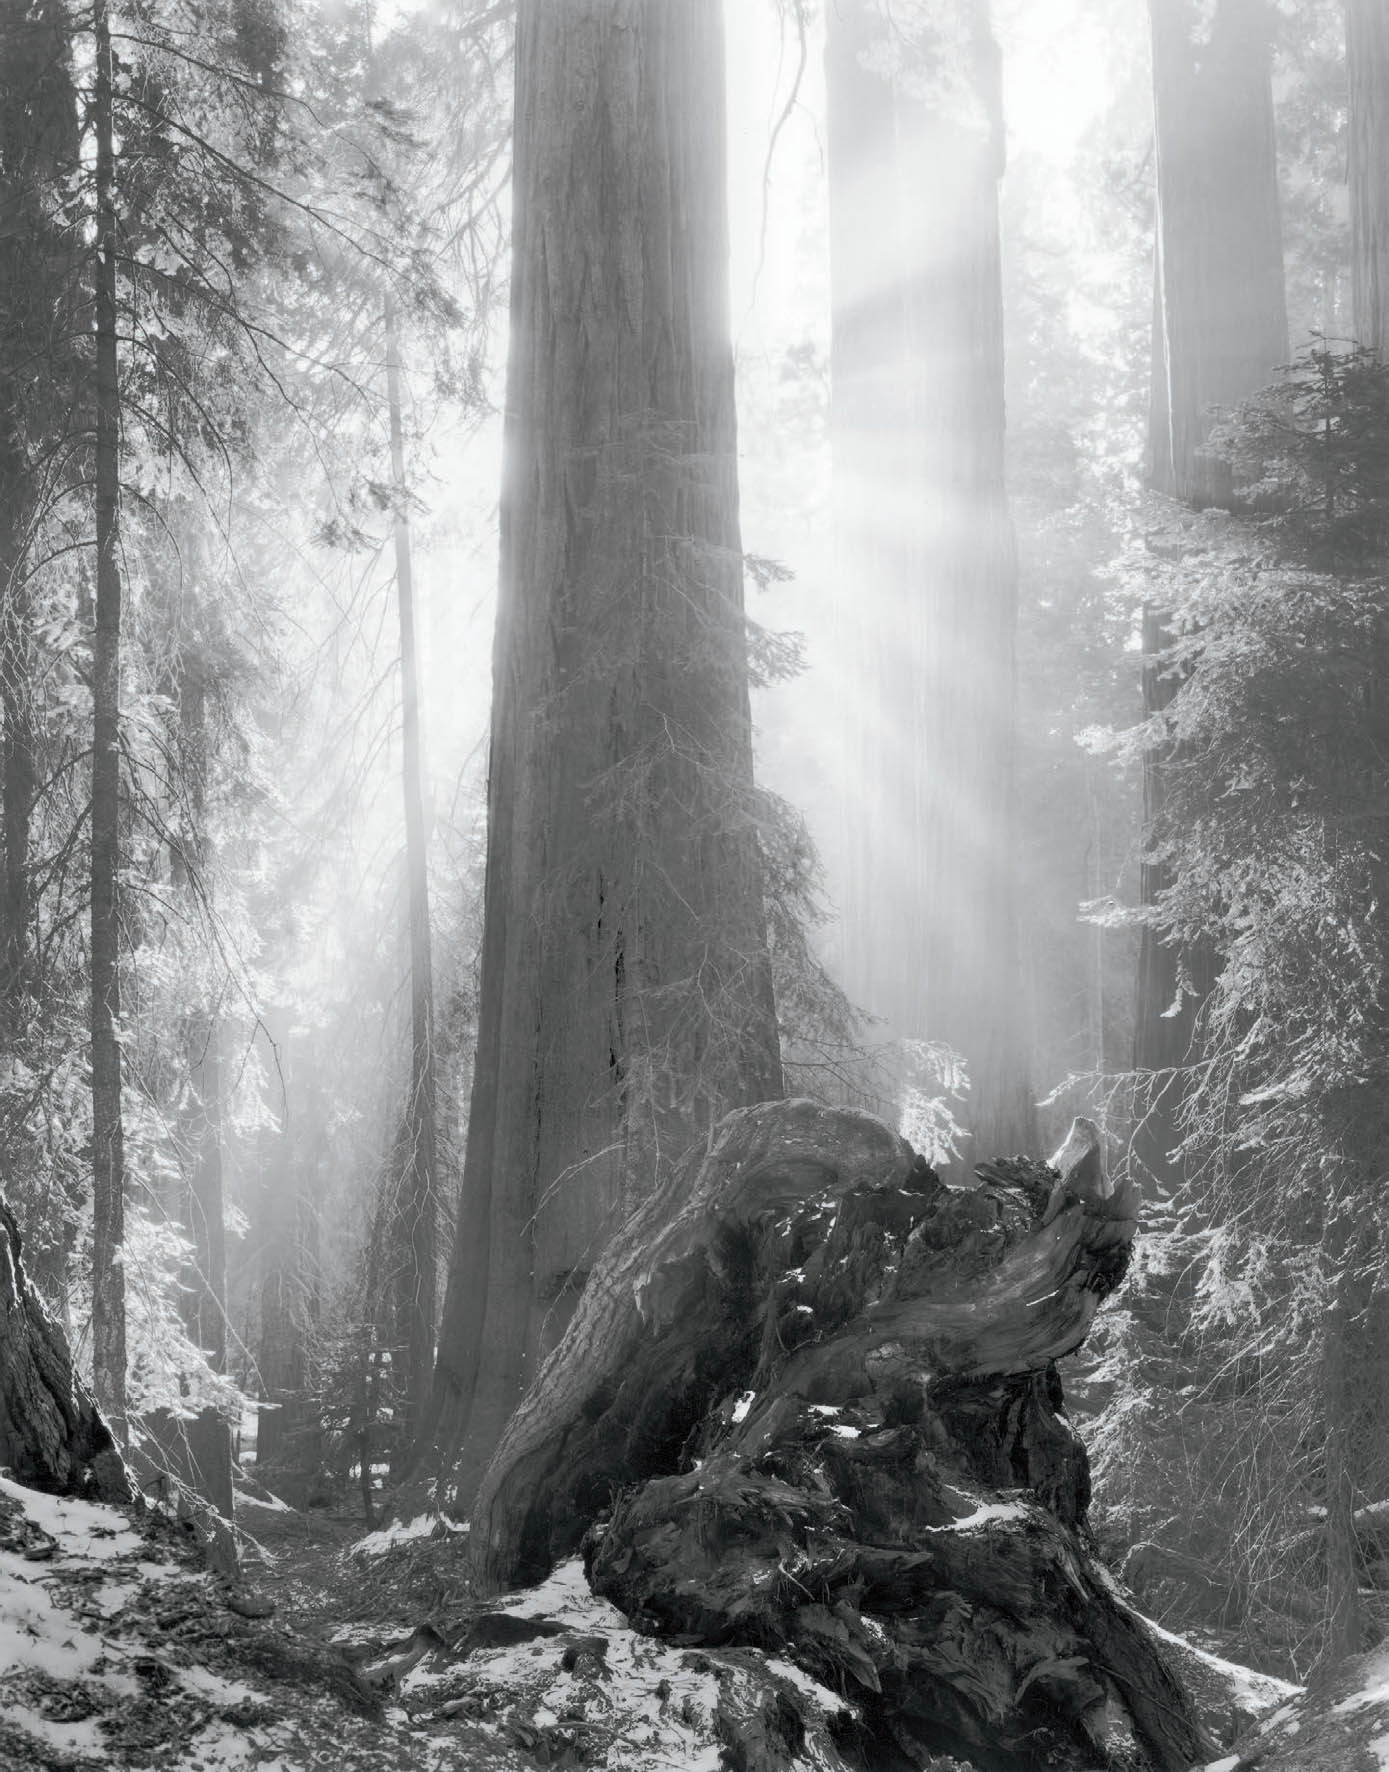
Figure 5-1: Sequoias and Sunburst
Mid-morning, with a touch of fog hanging in the air, I photographed directly toward the sun with the huge sequoia tree blocking it from the lens. The ample exposure retained full detail on the backlit trees and in the huge root ball. The unrivaled brightness range of film allowed me to hold detail everywhere, from the deepest shadows to the brightest highlights.
CHAPTER 5
Light
![]()
THE IMPORTANCE OF LIGHT IN PHOTOGRAPHY cannot be overemphasized. Light, in fact, is the central issue. The word photography was coined by William Henry Fox Talbot when he made the first negative/positive image in 1839. It was an amalgam of two Greek words, photo (light) and graphy (to draw). Fox Talbot saw photography as a means of “drawing with light.”
The only thing recorded by film and sensors is light. They have no understanding of subject matter. Film and sensors do not recognize faces, trees, buildings, sunsets, etc. They only recognize levels of light. A sharp lens focuses those levels of light on specific areas of the film plane or sensor. Neither film nor sensors recognize lines, forms, relationships among them, or any of the other elements of composition. You have to recognize those things, select them in the viewfinder, and make your exposure to maximize them. The film or sensor then records the light levels it is exposed to for the length of time the shutter is open.
Light is the essence of photography. Knowledgeable photographers realize that they are not photographing objects, but rather light and the way it delineates objects or is emitted by them. Photography is the study of light, the perception of light, and the interpretation of light. Lines, forms, and shapes appear because of the way light reveals those various compositional elements, not solely because of the forms themselves.
Light must be used as a means of directing the viewer’s eye as you, the photographer, want the viewer’s eye to be directed. In chapter 2 we discussed how the eye jumps to the brightest or most contrasty areas first. This physiological fact indicates that light alone can be used more effectively than lines or forms—or any other element of composition—to direct the eye. In fact, light is the most important element of composition because it determines form.
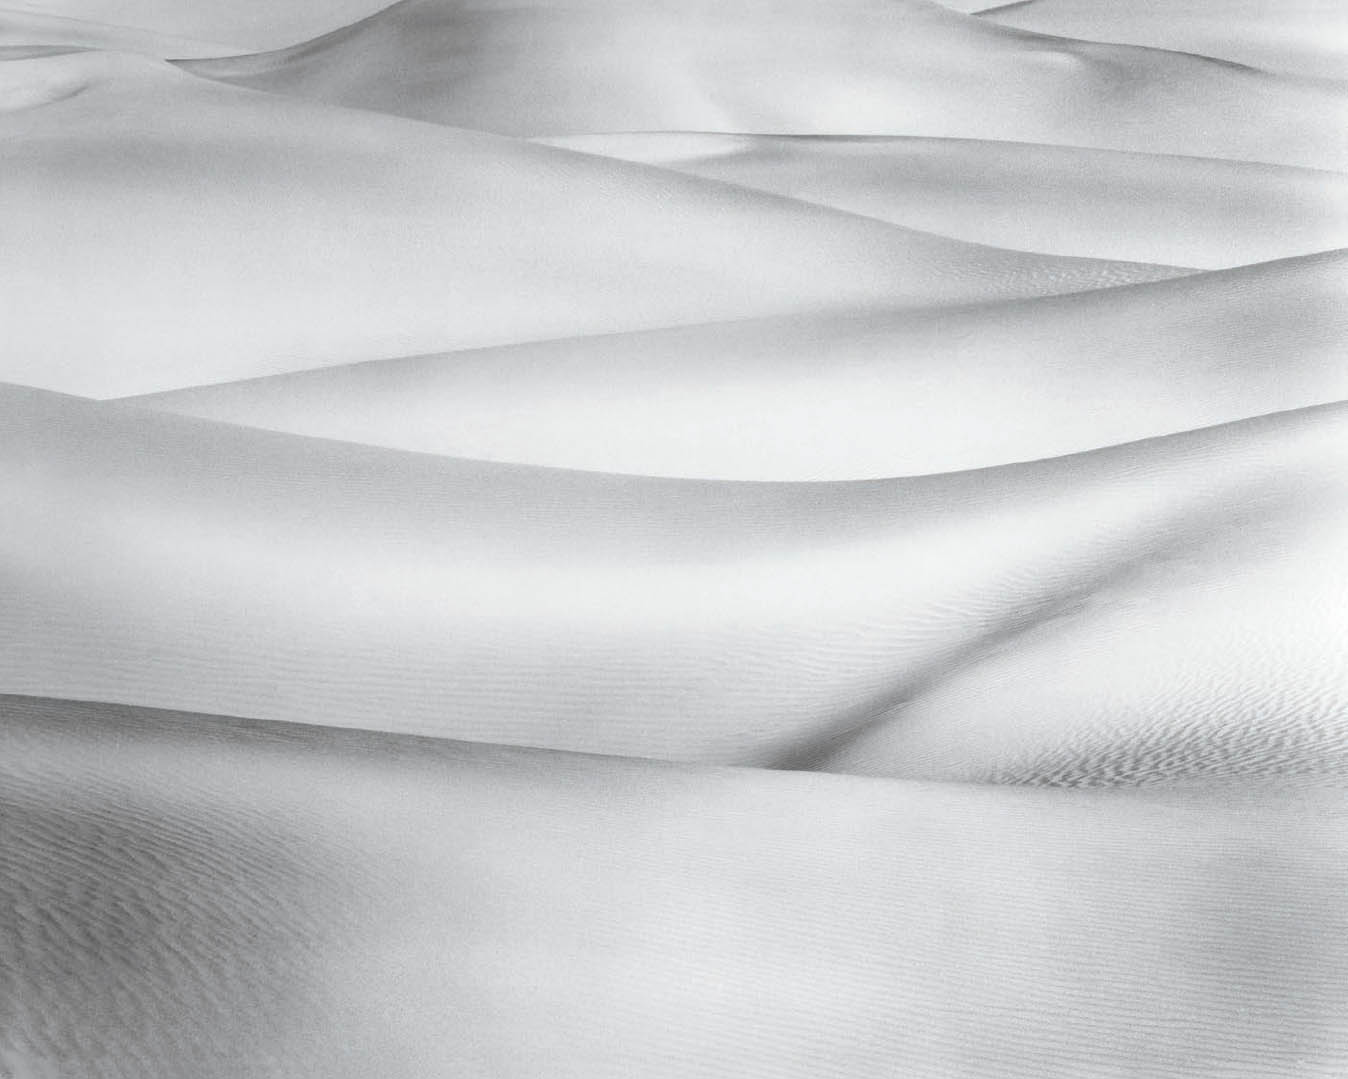
Figure 5-2: Silver Sunlit Dunes
Axis light—sun directly behind the camera—is difficult to work with because it tends to flatten the scene. Here, mid-morning axis light produced a pewter-like sheen on the Death Valley dunes, with sensuous forms coming to the fore.
Light determines form. It’s critical to understand this concept and to put this understanding to use.
Light is so important that it is necessary to become an expert in every aspect of light, from its bold qualities to its subtle nuances. When you are engaged in composing a photograph, there are two considerations about light that should be of prime concern to you. The first is how light distributes itself on the ground glass, viewing screen, or LCD. Look at the light and dark areas, light and dark spots, light and dark lines, etc., to see if they attract the eye toward important elements or insignificant elements within the composition. In doing so, identify the brightest of the light areas and the darkest of the dark areas—in other words, the areas that stand out the most. Those are the areas that will draw the eye most forcefully.
You must also understand the type of light (also known as the “quality of light”) available to you, and see if it is the type of light you want for the mood you’re attempting to convey. Is it strong sunlight on a perfectly clear day, hazy sunlight, overcast light, or foggy light? Is it overhead midday light, sunrise light, or low, directional sunset light? Is it backlight (coming directly toward you) or axis light (coming from directly behind you) (figures 5-1 and 5-2)? Is it ambient lighting from sources you can control, such as spotlights, floodlights, or light boxes? Is it indoor light from a window or from overhead lights or lamps? Whatever it is, you must determine whether it is compatible with the desired mood. If you’re outdoors, you can wait for the light to change to something better for your purposes; if you’re indoors, you can probably change the light at will. Don’t waste film or useless digital exposures until the desired changes occur.
It’s wise to consider the adjustable and the nonadjustable elements you’re working with. Outdoors, in natural light, you can change your camera position (i.e., your location, and then the exact location of the camera lens), your focal length, any filtration you may use, etc., but you can’t change the light (though you may be able to impart some reflected fill light into dark areas of the scene). Both indoors and outdoors you may be able to change how and where a portrait subject stands or sits, and your location in relation to your portrait subject. For outdoor portraits you can bring the subject into sun, or around the corner into a shady area. Indoors you may have complete control over the lighting, including its sharpness or softness, its directionality, its color, and other important aspects, especially in studio settings. Of course, indoors, you also have all the other controls over your camera settings and position that you have outdoors. So, your options tend to be greater indoors. In particular, light tends to be a far more adjustable factor indoors than outdoors. This points to the degree of flexibility you generally have indoors, and the limiting restrictions you may encounter outdoors.
Don’t confuse quality of light with quantity of light. Most nonphotographers equate good light with an abundance of light. They’re wrong. As any good photographer knows, you can keep the shutter open for long periods of time—from many seconds to many minutes—when the light is dim (figures 1-6, 3-6, 3-12, and 5-3).
You can have extremely short shutter speeds—1/125, 1/250, 1/500, 1/1000, or shorter—when the light is excessively bright (figure 5-4). So you can control the quantity of light under almost all circumstances. But you may not be able to control the direction, color, sharpness, or diffusion of light in all cases, and those are the things that fall under the category of quality of light. If you want strong cross lighting from the sun to bring out the crags in a mountain, but it’s an overcast or hazy day, you’d be better off enjoying the view of the mountain than photographing it. If you want strong cross lighting to bring out the crags in a person’s face, but you have only soft room light rather than a sharp spotlight to work with, you should walk away from that photograph as well. Only when the quality of light you want and the light you actually have coincide can you make the photograph you want (figure 5-5).
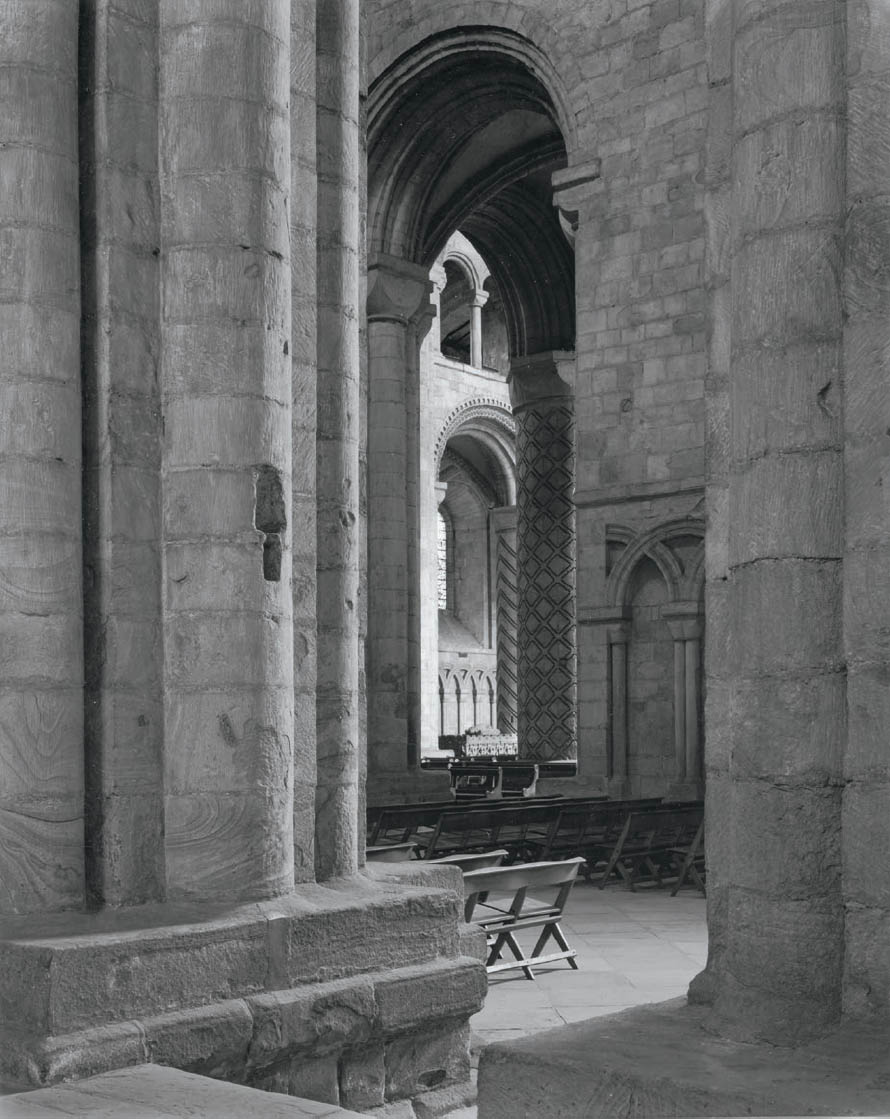
Figure 5-3: Pews and Columns, Durham Cathedral
The interiors of all English cathedrals were dark, none more so than Durham Cathedral. But they all possessed a quality of light that was exceptional, so much so that none really seemed dark. They all seemed infused with light. Still, exposures ranged from 5 to 20 minutes. Here, the magical light takes your eye past the near columns and folding removable side pews to the far reaches of the interior, with its wall carvings, columns, and deep-set stained glass window . . . then your eye returns to study the nearer columns and wall once again.
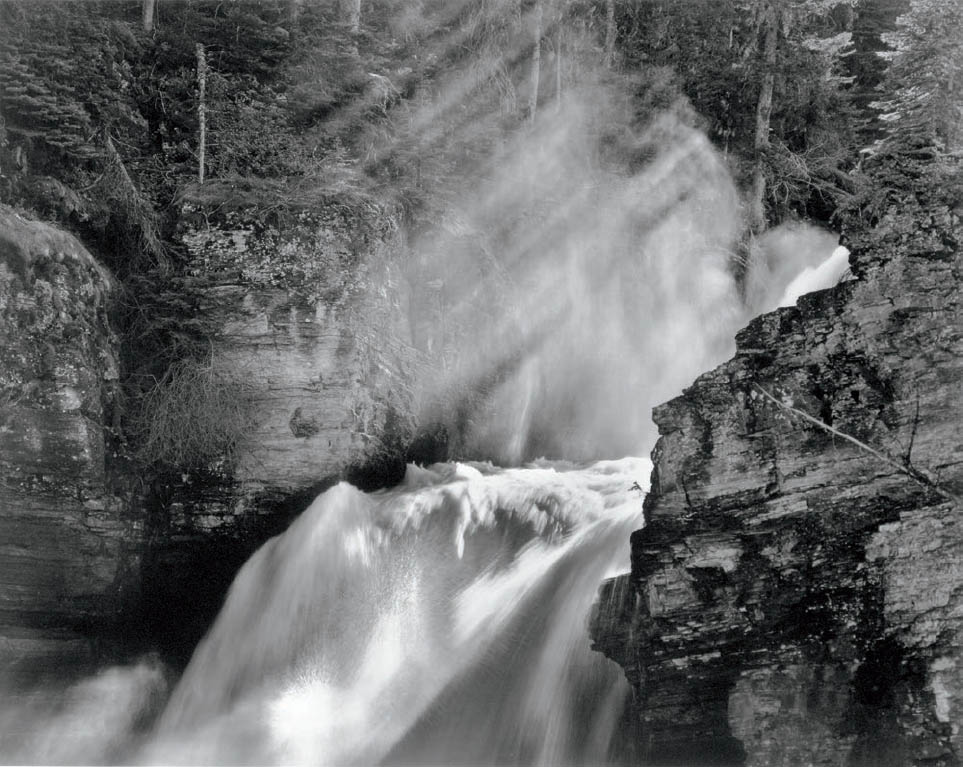
Figure 5-4: St. Mary Falls, Glacier National Park
The range of light here was extraordinary, from sunlit white water to deep forest shadows. Sunlight was also illuminating mist kicked up by the next higher of the series of stair-step falls just out of view upstream, with shadows of tree limbs punctuating the sunlit mists. A short shutter speed—just enough to retain shadow detail—virtually froze the motion of the water while retaining all essential detail from the brightest highlights to the deepest shadows.
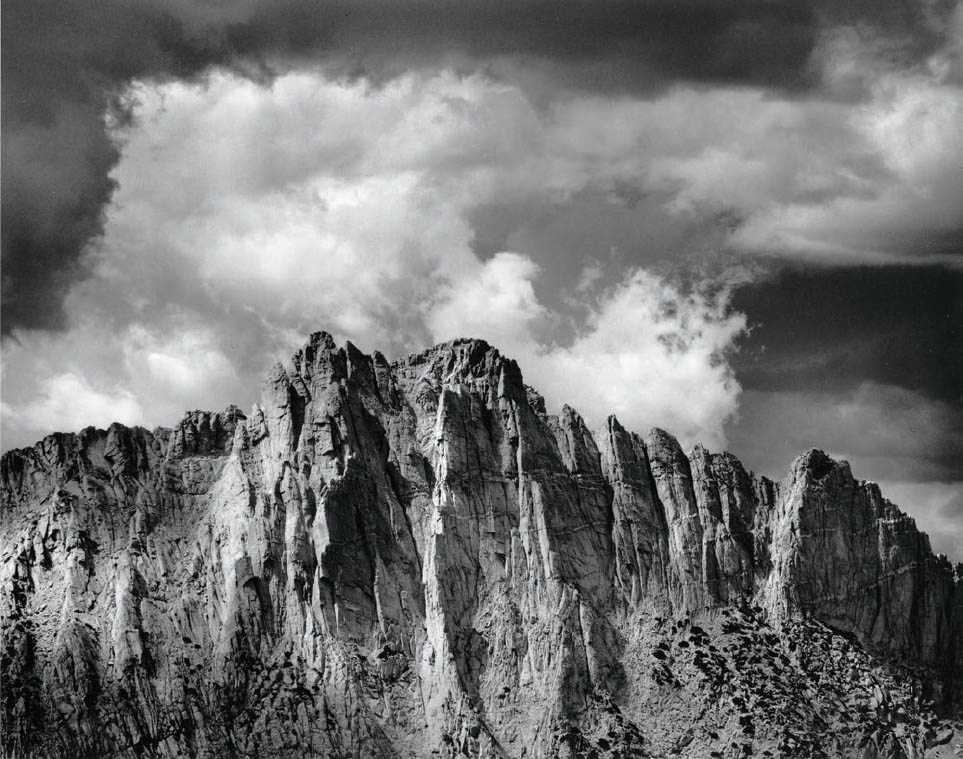
Figure 5-5: Whorl Mountain
This craggy mountain rises starkly above one of several north/south trending canyons in Yosemite National Park. At sunrise, sunlight hits it directly. But at midday (the time most landscape photographers avoid), sunlight edges its numerous crags, yielding the relief that makes it such a grand spectacle. An afternoon thunderstorm was quickly gathering, and the unusual form of the square, dark cloud adds an additional, unexpected surprise to the image.
Therefore, it is necessary to understand how these qualities of light can be modified photographically. By first recognizing the qualities of light as they exist, and then understanding how they can be maintained, intensified, or subdued, you place yourself in firm artistic control. You also place yourself in the position of determining a strategy to achieve your goals. Just as a painter controls what goes on the canvas, a photographer must control what goes onto the camera’s sensor or photographic emulsion first, and onto the final print in the end.
Looking at Light
The perceptive photographer first looks at the distribution of light within the frame, and then looks at the objects—the things—in the picture. Of course, you’re first drawn to a scene because of the objects, but once you grab the camera, you must stop thinking in terms of objects and concentrate on light. If the light alone draws the eye to the proper objects—the ones you want to emphasize—the composition may be very strong. (Remember that good composition is the art of directing the viewer toward the most important elements of the photograph.)
Furthermore, the light should serve to hold viewers within the photograph rather than catapult them away from it. It’s so easy to get caught up in subject matter (the “things” within the picture) that you fail to notice that the brightest area is the upper left corner or the right edge. An oversight like this can undermine the photograph entirely. It’s possible that there is a valid reason to place the brightest area in the upper left corner or the right edge or any other location within the image (after all, there are no compositional rules in photography), but you should be aware of it and do it deliberately with a purpose in mind. Accidental compositions are rarely successful.
![]() Most nonphotographers equate good light with an abundance of light. They’re wrong.
Most nonphotographers equate good light with an abundance of light. They’re wrong.
Not only should you study where the brightest lights are distributed throughout the image area, but you should also see how bright they are in relationship to other areas—and, conversely, how the darkest portions of the scene compare to other areas. Can you work with those areas? Can you keep them in play? Or are they so far out of line that they can’t be worked with, no matter how hard you try? Some of the answers come from basic sound thinking, some of them from experience. You’ll have to try and fail a few times—and learn from those failures—to know the limits of what you can and cannot do. Furthermore, as your technical skills improve (either traditional or digital), you’ll expand the range of what you can work with.
Don’t be repetitive in your use of light. It’s wise, for example, to fight the urge to place the brightest area at, or near, the center of every composition or, alternatively, a third of the way in and up, as some photographic “rules” may suggest. Such compositions quickly become boring and they indicate an inclination to “play it safe” artistically. You can play it safe for only so long before viewers lose interest or patience. It’s not a good idea to compose according to a predetermined formula, but rather to judge each photograph according to its unique circumstances. For example, it may be powerful to direct the eye to a corner of the image by clever placement of light. Sometimes such unusual and risky lighting can be immensely effective. Above all, you must fully recognize the overriding importance of light and its placement within each composition.
![]() You’re first drawn to a scene because of the objects, but once you grab the camera, you must stop thinking in terms of objects and concentrate on light.
You’re first drawn to a scene because of the objects, but once you grab the camera, you must stop thinking in terms of objects and concentrate on light.
Exercises in Learning to See Light More Accurately
Here’s a good exercise to improve your understanding and perception of light. Whenever you think of it—driving to work, sitting at the office, out with friends—quickly frame a scene and determine the brightest and darkest spot within the frame. This may seem trivial at first. It isn’t. As you continue with the exercise, you will start to see things you missed at first. While stopped at a red light on your way to work, you might frame a scene that includes cars, buildings, street signs, and other common urban objects. Immediately, you note that the painted white line on the street is the brightest thing, but further study shows that the glint of sunlight off a car’s bumper is far brighter. Similar surprises may occur on the dark end of the scale. The black asphalt of the road may initially seem to be the darkest thing in the scene, but the open end of a ventilation duct on the side of a building may prove to be far darker.
As you continue with this simple exercise, you sharpen your seeing immensely. You then realize that you are seeing every aspect of a scene much more intensely. If you have a 1° spot meter with you to check your perceptions, that will help a great deal. For example, you’ll be amazed to see how sunlit black asphalt on the street turns out to be extremely bright, even though you perceive it to be black.
Next, you can speculate about what would happen under other lighting conditions. On a cloudy day, there would be no glint of light off the bumper. What would be brightest object in the scene under those circumstances? As you peruse the scene for the answer, you start to envision it under alternate conditions. You begin to understand how different lighting would affect the scene.
Depending on the digital editing software you’re using, you can try a variation on this exercise on your monitor by looking at an image and picking out the brightest and darkest spaces . . . then check your guess with the eye-dropper or other appropriate tool that gives you an exact reading right on screen. You’ll find surprises, such as a bright object that jumped out at you simply because it was surrounded by darker objects turns out not to be as bright as other parts of the image that register higher numbers, but are all located together, so none of those jump out at you. These exercises sharpen your vision immensely, and they are very much worth doing. This helps, but not quite as much as doing the same exercise in reality, where you’re looking at things in real life, and sharpening your vision of what you’ll encounter with a camera in hand.
If you are out photographing, you can begin to envision how the scene would look under altered conditions as well as under the circumstances at hand. You may determine that the photograph would be better if it were made under other conditions. An hour’s wait would put the sun lower in the sky and perhaps produce an enhanced effect. It may turn out that cloudy conditions would be best of all. If you determine that conditions are not optimal, you may be able to wait for them to improve. If you aren’t sure, make an exposure under existing conditions and again under the desired conditions, and then compare the two to determine which works best for your purpose. Along the way, you will learn a great deal about light and about your response to various types of light.
Light Determines Form
Look carefully to see how light affects lines, forms, and the relationships between objects in a scene. You’ll see that light is the determining factor. As an example, start with a single tree that has two branches, one above the other. Let’s suppose it’s a dead tree or a deciduous tree in winter, i.e., a tree with no leaves. The branches are smooth and clean. What’s the difference in appearance between the two branches at noon on a sunny day versus noon on an overcast day?
On a sunny day, the upper branch may cast its shadow across the lower one, but the upper branch may be fully lit by sunlight. Both branches are physically continuous, of course, but the lower branch appears photographically discontinuous because of the shadow that interrupts its tonal continuity. It’s sunlit at one end, suddenly dark in the center, then sunlit beyond the shadow. For photographic purposes, it is effectively broken into three distinct sections. The upper branch has no such tonal discontinuity, so it is both photographically continuous and physically continuous.
On a cloudy day, however, where no shadows are cast, both branches are photographically continuous and physically continuous. There are no tonal breaks along their entire lengths. This shows how light alone can alter the form of an object for photographic purposes. In fact, from a photographer’s point of view, light determines the form of those two branches. On a cloudy day, the branches are photographically and physically continuous, but on a sunny day the lower branch is no longer photographically continuous, even though it is just as continuous physically.
There are also other subtle differences. On the sunny day, the sunlit upper portion of each branch is extremely bright, then there is a sharp tonal jump to the shadowed lower portion of each branch. Yet on a cloudy day the brightness on the upper branch gradually grades to a slightly darker bottom. Thus, a cross-section of the branch on a sunny day could just as well be that of a diamond-shaped object as a circle, but on the cloudy day, the soft gradation of light reveals that it is indeed a circle.
This simple example tells you that when you get behind the camera you have to look at light rather than at subject matter. “Photographic seeing” is very different from “everyday seeing.” In everyday seeing, there are two branches coming out of the trunk that are physically continuous. In photographic seeing, you recognize that on a sunny day the lower branch appears as three separate pieces; the two end pieces relate to one another, but the shadowed piece in the center does not relate to either of them.
Now visualize a whole forest of trees under sunny or cloudy conditions. On a cloudy day, each trunk and limb is physically and photographically continuous. This means that as you follow each branch from beginning to end, there are no abrupt tonal changes along its entire length. But on a sunny day, spots of light break up each trunk, limb, and branch into patches of light and dark. Visually, the spots of light on one trunk relate more to the spots of light on other trunks than they do to the rest of the trunk that is shaded. As a result, the visual continuity of each trunk, limb, or branch is lost.
A photograph of the forest under such spotty conditions may look more like a pizza than a forest. The photographic situation no longer parallels the physical situation. The physical lines and forms of the forest are the same under cloudy or sunny conditions, but from the point of view of photography, everything has changed. Continuity has been lost. Light alone has made the difference. Light determines form . . . and sometimes soft light makes things possible (figure 5-6).
Can you photograph a forest on a sunny day with any semblance of success, or is it just something that inevitably leads to failure? Of course you can, but you have to see (i.e., understand) exactly what the light is doing. One of the key strategies that I employ is backlighting, or photographing directly toward the sun, thus looking at the shaded side of the trees. With the sun coming toward me, the trees in front of me are completely in shade, with those slightly off to the sides are just edged by sunlight. This tends to make everything far more cohesive and controllable (figures 5-1 and 5-7). But, you might ask, won’t the contrast be excessive, making it impossible to photograph? No, not a bit, as figures 5-1 and 5-7 attest. (See chapters 8, 9, 11, and 12 to understand how to control such light traditionally and digitally.)
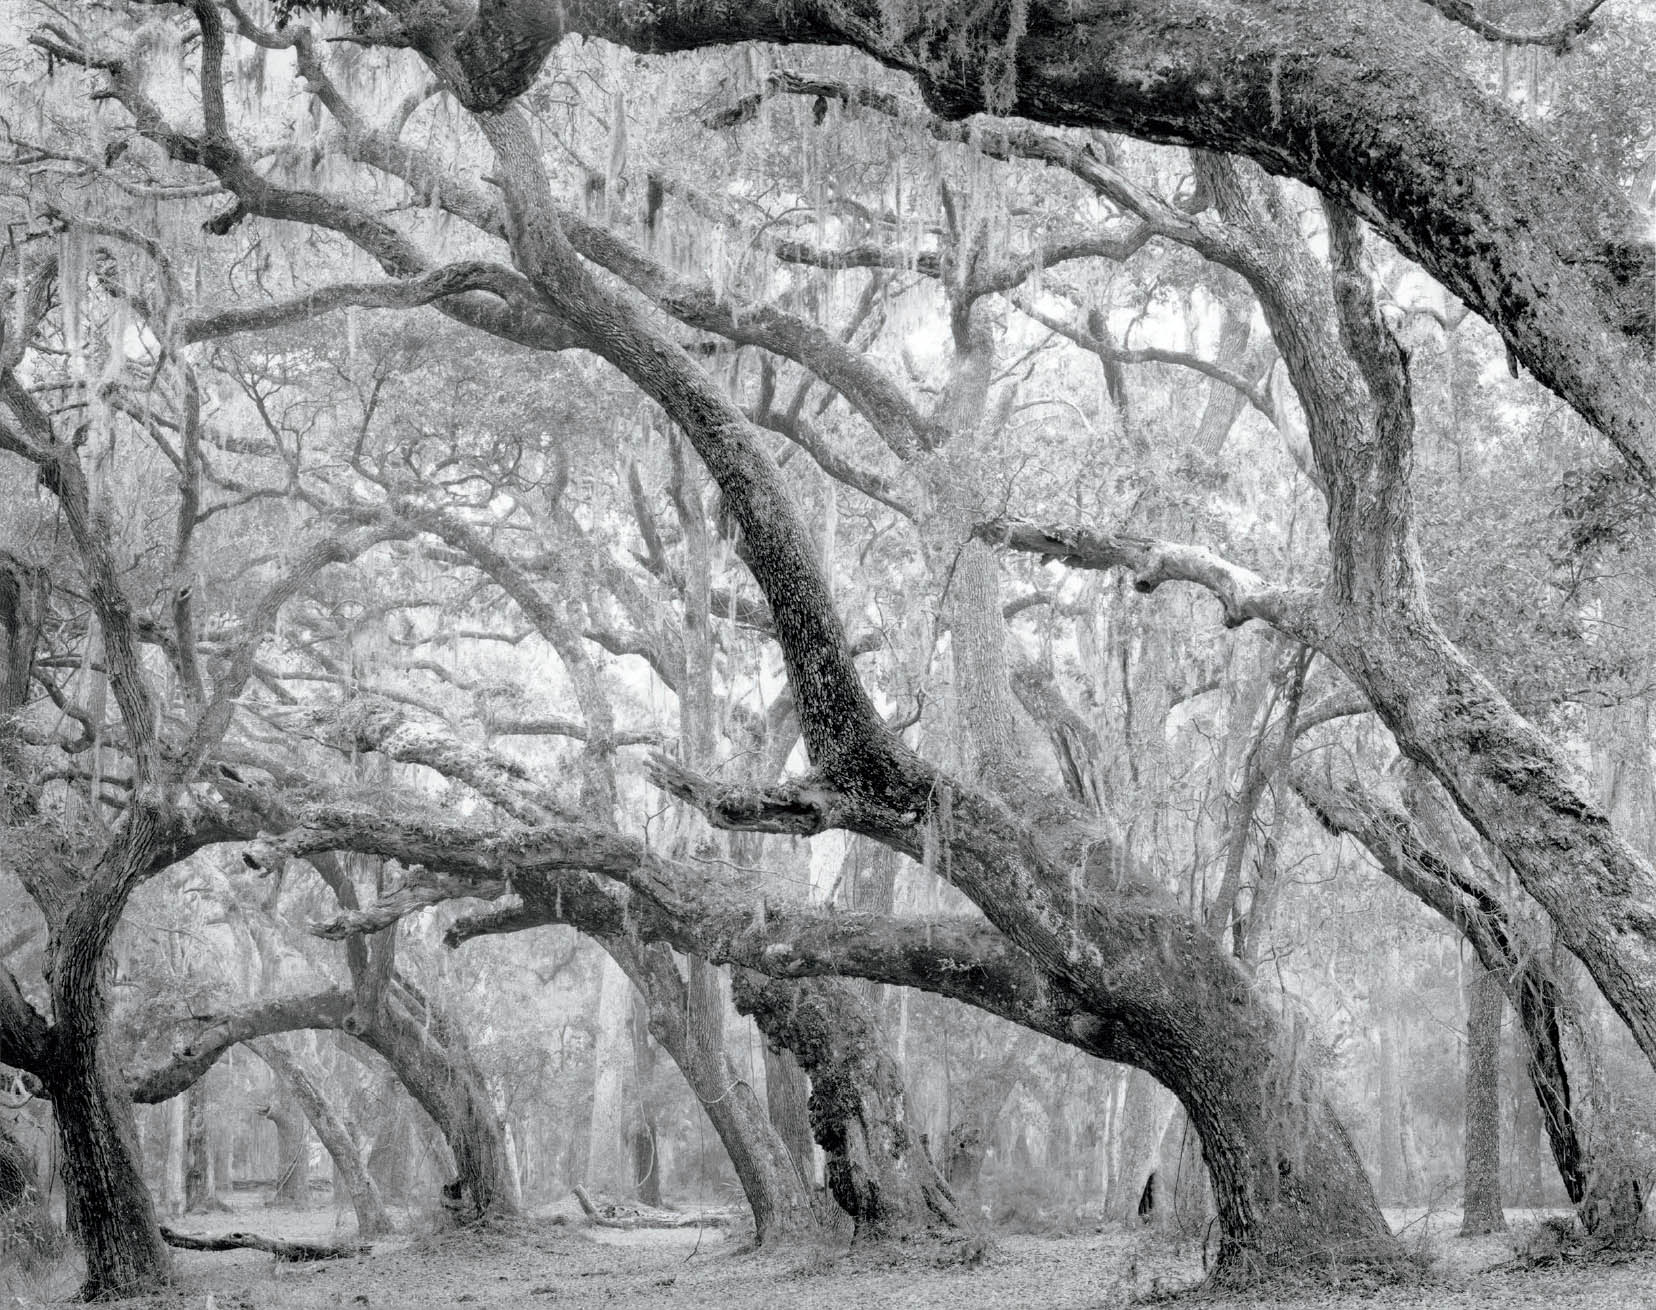
Figure 5-6: Live Oak Forest, Sapelo Island
A thin, overcast cloud cover evened out the light on the live oak trees, bent like well-manicured bonsai. Sunlight would have created a patchwork of light and dark splotches. Soft light allowed each trunk, branch, and leaf to stand out unbroken and undisturbed by shadows from higher limbs. I had full control of contrast through negative exposure and development and printing techniques, but I could not have altered the light had it been patchy.
However, I also caution against using this suggestion of backlighting as a formula or rule to employ on sunny days. Backlighting is one strategy I employ in a forest on bright, sunny days, but it’s not the only one. What I recommend is looking carefully at the light and the forms as you walk through a forest, because all the right things may converge at some point to make an unlikely situation occur—such as an opening that allows cross light to shine on a group of trees exactly where you need it. Don’t discount that possibility, for it can happen.
In the foregoing discussion I stress one aspect of outdoor nature photography: forests. I do that because it presents vexing problems under various lighting conditions. Also, in most outdoor photography, you cannot change the light, so you have to fully understand the light given to you on any day, and consider your options carefully. You must be a keen observer of light. I ask the reader to extrapolate from the examples given to other outdoor subject matter, including other natural settings, architecture, portraits, and even still lifes outdoors. Then bring the lessons from outdoors inside where you may have greater options to control the lighting as you wish. With the right equipment in a studio, you can control the amount, direction, sharpness, diffusion, and virtually all other aspects of the light. When you combine that control with your camera position, the position of a portrait subject indoors, her body language and facial expression, and either a simple or complex backdrop, you can make a serious statement about your portrait subject, your still life, or any other subject matter you choose to photograph.
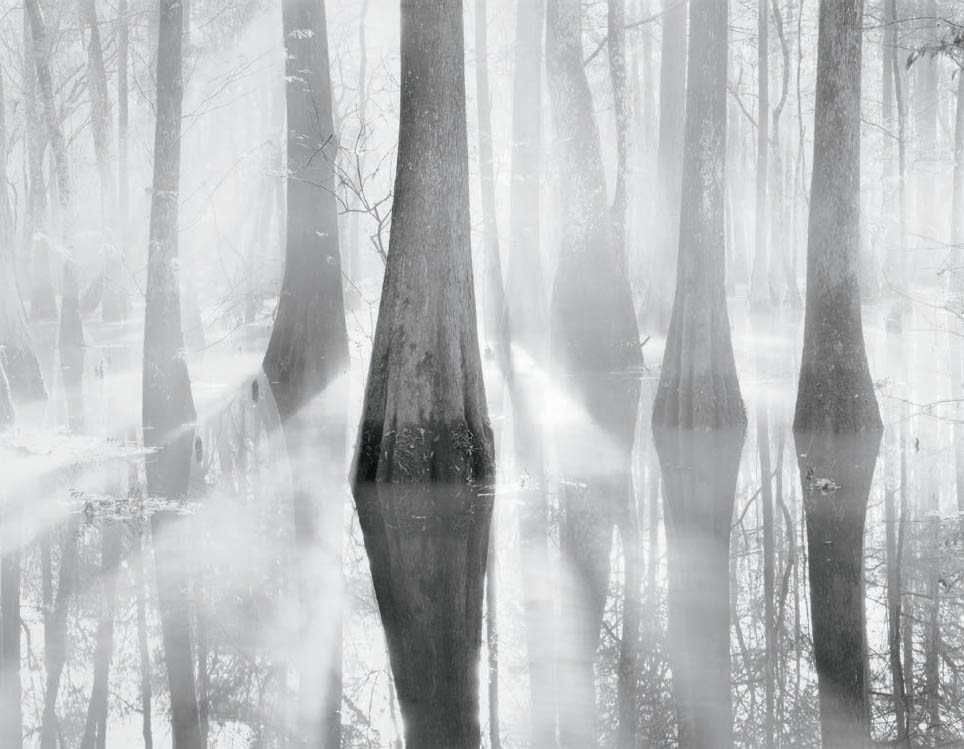
Figure 5-7: Altamaha Cypress Swamp, Sunrise
Using the same basic approach to bright, harsh sunlight in a forest as in figure 5-1, I aimed my camera directly toward the sun, using a foreground tree to block it out. On a very cold December morning, with fog steaming up from the sunlit swamp, I placed the darkest shadows high on the exposure scale. This allowed me to convey the magical feeling of light emanating from everything in the scene.
It has been my observation over 40 years of teaching that most beginners—as well as many experienced photographers—look at objects, not light. Furthermore, most photographers tend to avoid soft, even light because of their belief that such light produces flat, bland photographs. This common perception is simply untrue. Soft light eliminates sudden breaks of tonality, but contrast can always be increased via a variety of photographic controls. Especially in close-up scenes, soft light is often the only usable light, for it is the only one that can be fully controlled (figure 5-8). Soft light implies continuity of form, but it does not imply or impose blandness.
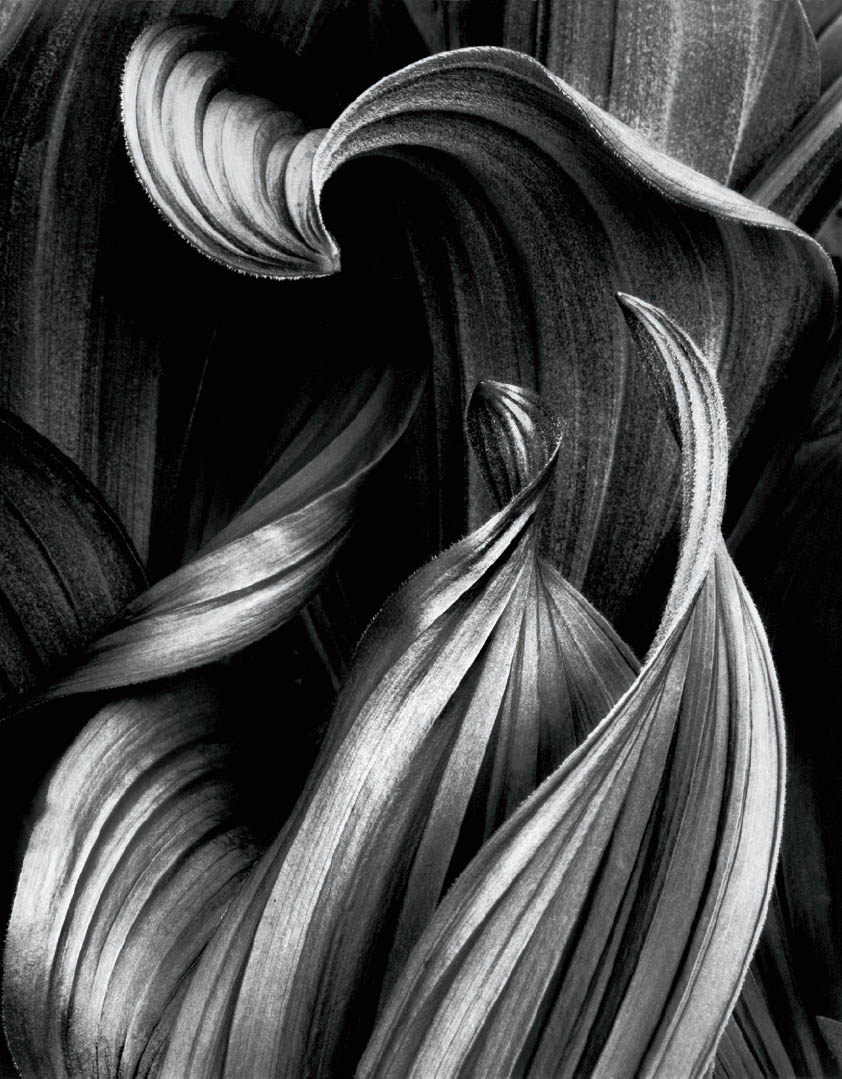
Figure 5-8: Dance of the Corn Lily
Made in late afternoon under the shadow of a nearby mountain, this image captured a ballet-like feeling in the twisting corn lily leaves and a protective or warm feeling in the leaf sheltering them. No shadows broke up the graceful forms, allowing uninterrupted visibility.
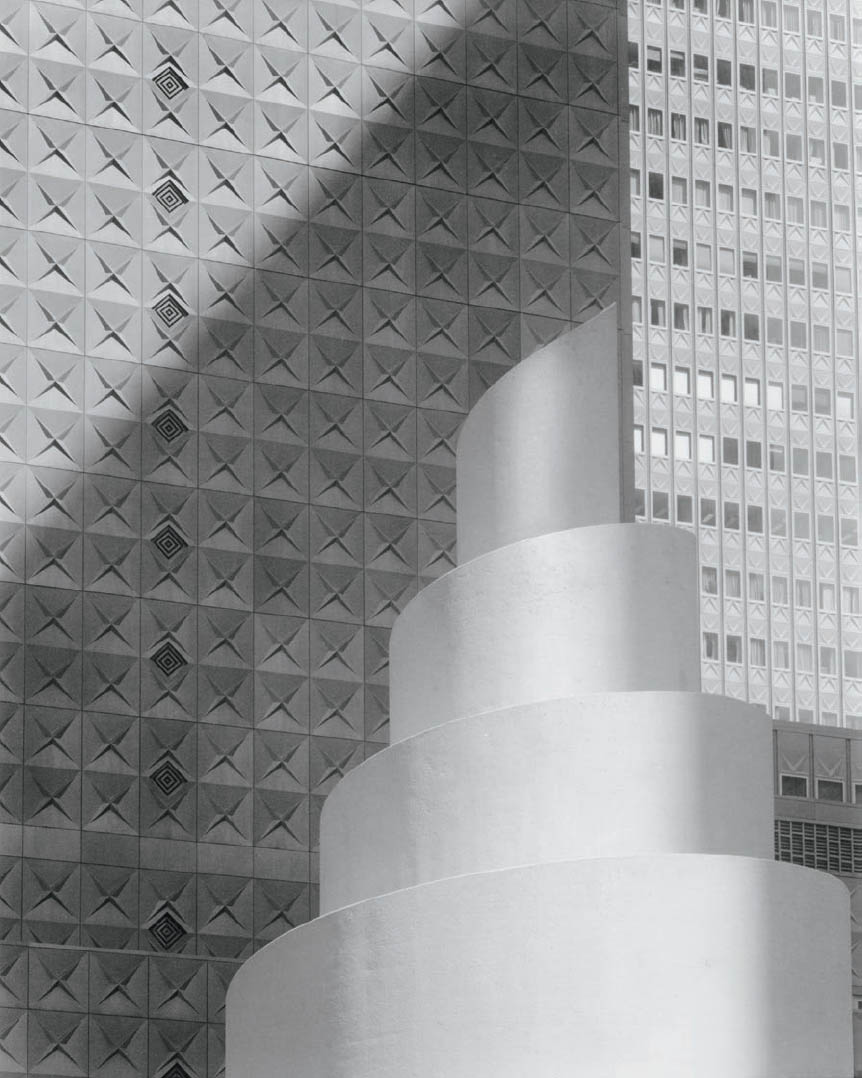
Figure 5-9: Thanksgiving Square, Dallas
Amidst the Dallas skyscrapers, this spiral monument was edge-lit by the sun. A diagonal shadow across the building behind the monument (which came from a building to the right, out of the frame) created compositional interest, far better than if everything had been in sunlight or shade. Note the tones of the monument against those of the buildings behind.
Just as the lines of branches on a tree may be disrupted by strong directional lighting (such as sunlight), shapes of objects can be similarly altered. Consider an architectural subject like a modern office building. Its straight, clean, rectangular facade can be changed by the shadow of a nearby building falling diagonally across it. Instead of a rectangular array of windows, there could be two triangular areas of windows: one shaded, one sunlit. Physically, the building is still rectangular; photographically, it is a pair of triangles (figure 5-9). As always, this is not necessarily undesirable or wrong. This effect may be your intent. Just be aware of the effect created by the light, so you can use it for your interpretive ends. As stated near the beginning of this chapter, observe how the light is distributed before looking at the physical entity of the building.
As you grow to notice the visual changes objects assume under varied lighting conditions, you will become aware of how each type of light affects your feelings about an object. It is surprising how much more deeply you will understand the essence of things by studying the light that falls upon each one. You will discover changes of meaning with every change in lighting. This will reveal ways to interpret those objects most appropriately for the message you wish to convey.
Types of Lighting/Quality of Light
You can best understand light by categorizing the infinite variety of lighting into a few distinct types. Directional and nondirectional light can be the two major categories. Let’s see how to work with both of them outdoors and indoors, starting with outdoor lighting.
Outdoors, sunny weather provides directional light, as do dawn and dusk light from the east or west. Yet there is a difference between sunlight and dawn or dusk light (before sunrise or after sunset), both of which are devoid of the deep shadows associated with sunlit conditions. Overcast weather provides nondirectional light, though early morning or late afternoon hazy (shadowless) clouds may be softly directional. Directional light can be broken down into cross lighting (light directed from the side), axis lighting (light from behind the camera), and backlighting (light from behind the subject). Each of these categories merges gradually into the next, but each has its own unique character, its own quality (figure 5-10).
For any outdoor photograph, it is worthwhile to quickly compare the current lighting situation versus other possibilities, in order to envision how the same scene may differ and perhaps improve under alternate conditions. Under partly cloudy conditions, see if spotty sunlight highlights the important areas of the scene, or if a change in the cloud positions would better highlight those areas. If so, wait for the desired situation (and hope that it will occur!). It may be worthwhile to make several exposures as conditions change, subsequently choosing the best of the lot as your photograph. On the other hand, additional thought may indicate that full sunlight or full shade would better reveal the scene. If so, save yourself some useless exposures and return when better conditions prevail.
Consider, for example, the various types of lighting on a panoramic mountain landscape. Under clouds, the mountains could be a mass of mid-gray tones with little delineation of internal structure, while the cloudy sky—the source of light—would be a nearly featureless light gray. It may prove to be a dreadfully dull photograph, despite the spectacular mountains.
With axis light and a deep blue sky, the mountains may appear brighter than the sky. But lacking shadows, the crags and crevices of the mountains would be invisible. The scene could still be photographically dull. Backlighting could make the peaks stand out in silhouette against the bright sky, but again, the slopes and buttresses below could be featureless, with no light and no life photographically. Strong cross lighting could bring out each pinnacle and buttress in bold relief, and the photograph could begin to have real excitement and vibrancy.
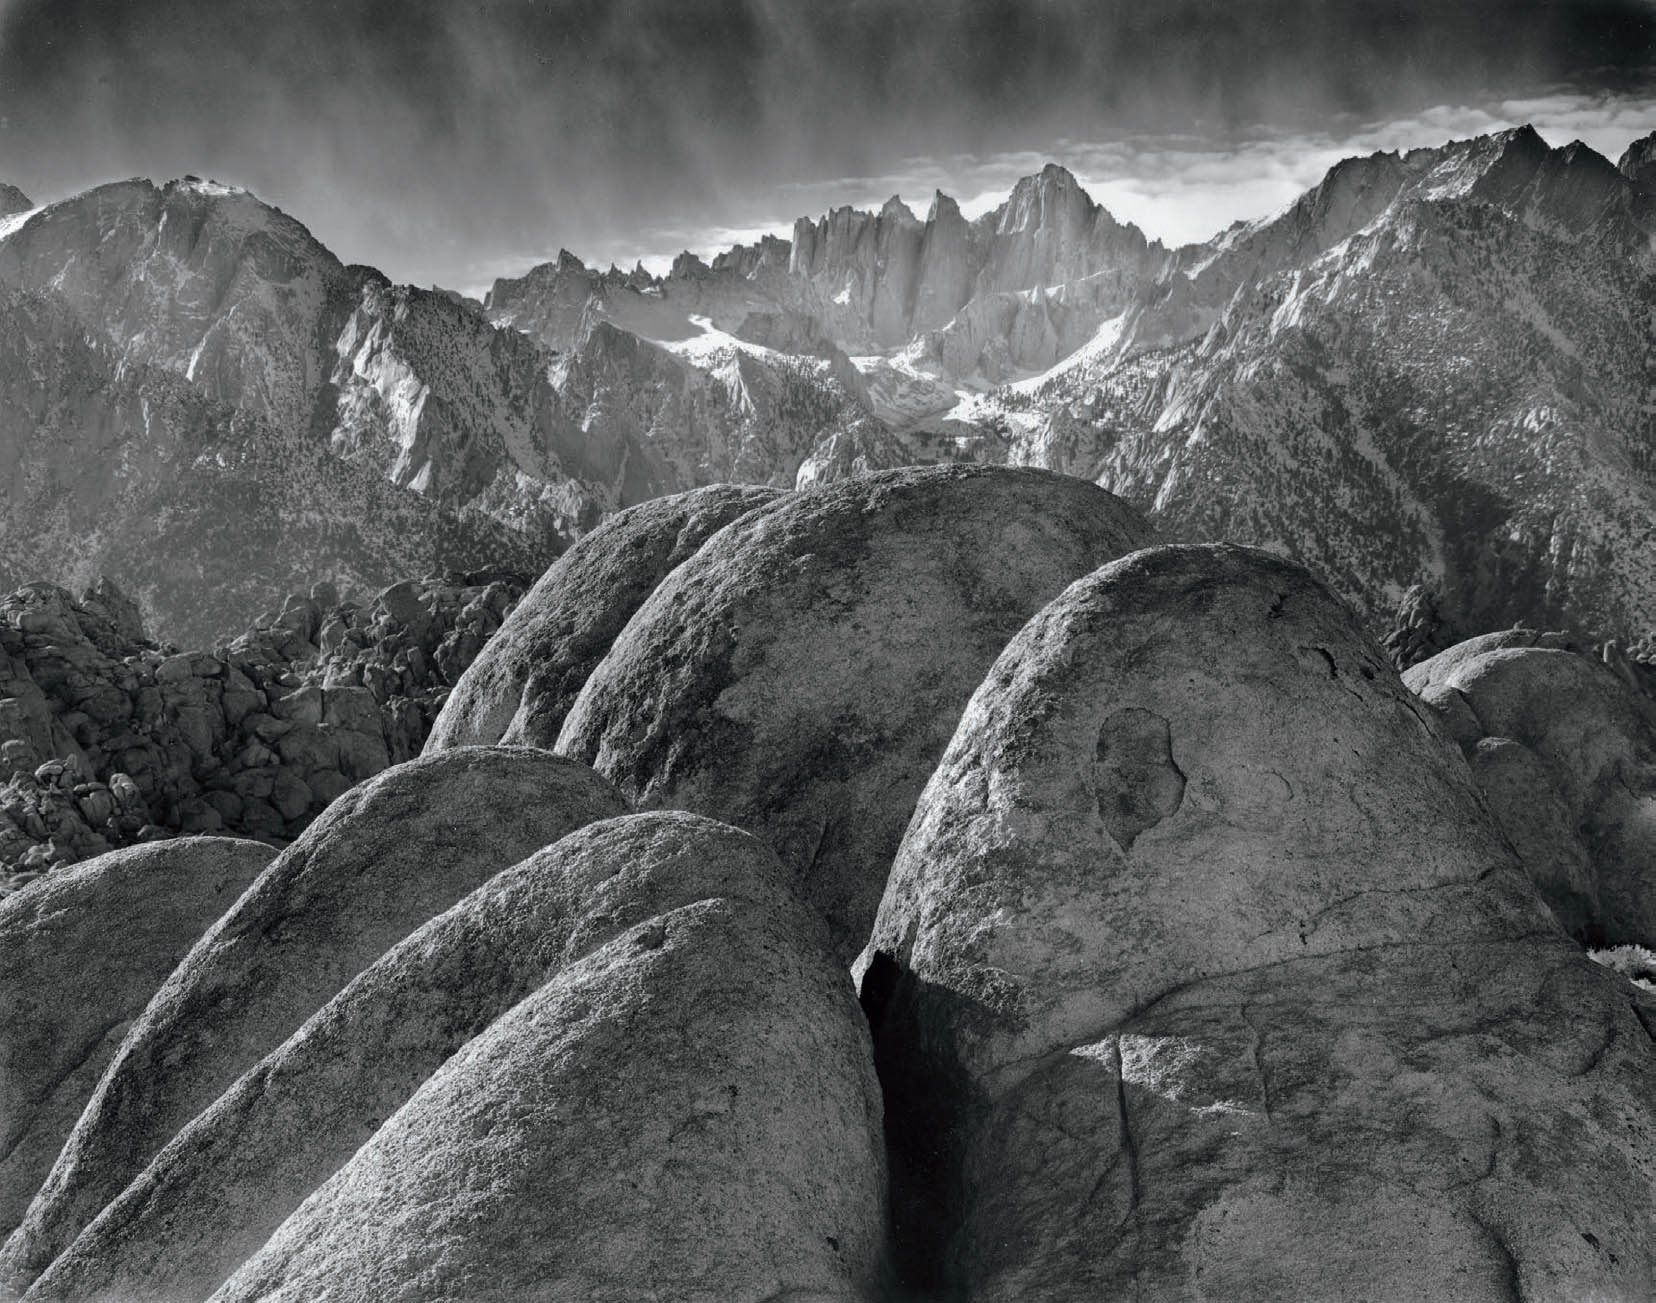
Figure 5-10: Mt. Whitney and Alabama Hills Boulders
Strong directional late-afternoon light coming toward the camera from the left side highlights the huge boulders of the Alabama Hills in the foreground, and even a few of the numerous granite towers, like a picket fence, leading to the summit of Mt. Whitney. The dramatic lighting, together with the incoming thin layer of clouds behind the mountain wall, combines to give the scene the grandeur it needs.
But consider, too, the lighting not only on the distant mountains, but on the foreground as well. Do the foreground forms relate to the mountains, and does the lighting on the foreground enhance the core of the scene photographically? Do the supportive foreground elements—the nearby trees and low hills, the farmlands, the city buildings, etc.—add to the scene or detract? Does the lighting throughout the scene blend nicely, or does it conflict? Do you want a smooth blending, or would a lighting conflict serve you better?
Partly cloudy conditions could produce additional possibilities as well as additional problems. Selected patches of sunlight could highlight some of the more spectacular aspects of the mountains, directing the eye to them immediately. Yet a spot of bright sunlight at the edge of the frame or on an unimportant foreground area could pull the eye away from the main body of the photograph. Under rapidly changing outdoor conditions, be aware of the effect of each change and be prepared to shoot when conditions meet your desires. This requires a combination of patience, awareness, and quickness.
Consider a portrait under the same variety of outdoor lighting conditions. Under midday overcast or in open shade, the subject’s face and body would be evenly lit. There would be a wonderful smoothness and softness. This type of light hides nothing and is a very “revealing” light for portraiture as well as close-ups of nature (figure 5-11). Under bright midday sun, there could be deep shadows under the nose and in the hollows of the eyes. This could be either a major problem or a very effective light for the appropriate subject.
Axis lighting could be quite beautiful, with the center of the face brightest and a fall-off of brightness on either side. But there could be a harshness that makes it appear a bit chalky, unless handled deftly. Edward Weston used axis light with great success for many of his nudes. Cross lighting could pose problems, for the sunlit side of the face may be excessively bright compared to the shadowed side; or, the shadowed side could lose detail in the dark grays and blacks, while the sharp demarcation line between the sunlit and shadowed sides could be highly distracting. It could, however, have an intriguing abstract quality that may well suit your purpose. (Always consider the creative possibilities that “wrong” lighting may produce.) Soft cross lighting, perhaps just after sunset, could impart a luminosity, smoothness, and dimensionality unmatched by any other form of outdoor light. The brighter side of the face would not overwhelm the darker side with light, and there would be no sharp shadow line between the two sides.
For any other subject matter in outdoor settings, consider the same variety of lighting possibilities and try to mesh your perception of the scene to the effect that each type of light will have on it. Look at the following photographs presented in this book for examples of various types of lighting:
- Soft, directionless lighting: See figure 3-7, Fallen Sequoias
- Soft, directional lighting: See figure 1-4, Ghost Aspen Forest
- Cross lighting: See figure 1-2, Mt. Clarence King
- Backlighting: See figure 3-4, Sunlight, Capitol Park, Sacramento
- Axis lighting: See figure 5-2, Silver Sunlit Dunes
Axis lighting is rarely used in landscape photography because it often yields flat, uninteresting imagery, but every rule has its exception. While it may to difficult to find a compelling landscape under axis lighting, it is not impossible.
When you begin thinking about how light can affect a scene, or about how the scene in front of your eyes can change under different lighting, you will no longer be thinking in terms of recording a scene, but rather in terms of interpreting a scene. You will no longer be showing merely what you saw, but how you reacted to it. You will no longer be reporting on scenes; instead, you will be commenting on them. In short, you will be using photography as a means of personal expression.
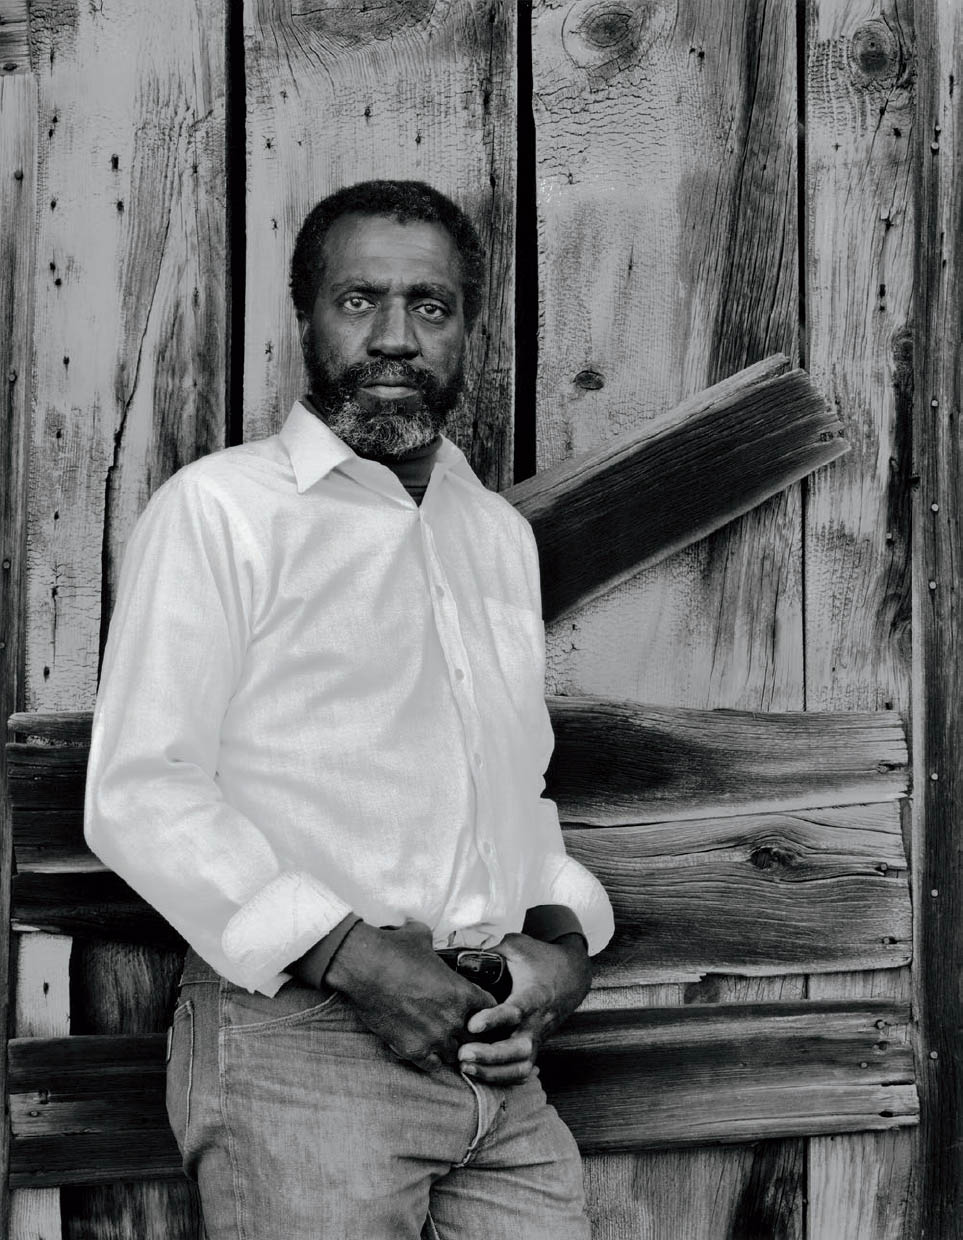
Figure 5-11: Reginald McCoy
On a bright sunny day at the ghost town of Bodie, California, I photographed Dr. McCoy. We chose the shaded side of a building, at a wall with especially strong wood textures. Under the soft light, I was able to retain the textures of the wood, Reggie’s face, and his shirt.
![]() When you begin thinking about how light can affect a scene . . . You will no longer be reporting on scenes; instead, you will be commenting on them. . . . you will be using photography as a means of personal expression.
When you begin thinking about how light can affect a scene . . . You will no longer be reporting on scenes; instead, you will be commenting on them. . . . you will be using photography as a means of personal expression.
Indoor lighting is similar in its basic categories. It can be soft or harsh, directional or nondirectional. The major difference is that you generally control the light, whereas outdoors you are usually at the mercy of nature. In indoor lighting situations you can control the intensity of light, the direction of light, the combinations of light, and, in general, most aspects of light to best achieve your goals. Furthermore, controlled lighting is unchanging as long as you choose to maintain it. (Outdoors, it often changes as you prepare for the photograph, and that can be extremely frustrating!)
Direct floodlights or spotlights provide harsh, directional light. Light boxes or bounced light off reflectors, walls, or ceilings provide soft, directional light or soft, nondirectional light. Combinations of direct and reflected light can be used to create virtually any lighting effect imaginable, and a wide variety of equipment is available for such purposes. Let’s proceed with the assumption that your only limitation is imagination, not equipment.
With that in mind, now let’s be specific about the interpretive aspects of light. Suppose your subject is an old man with rough, craggy skin. How would he appear in strong cross light? The wrinkles and crags, the moles and warts, would stand out glaringly. High-contrast cross light would further accentuate the effect. He could be made to appear quite sinister and menacing. Soft, enveloping light would have an entirely different effect. All features and blemishes would be softened; he could be portrayed as a vastly different type of person.
This understanding will allow you to convey the character of the man as you perceive it. You cannot change the man’s face, but you can alter the lighting on it indoors, or wait for the desired light outdoors; your choice of light is an interpretive choice. Coupling this with the expression on his face, his position, your choice of camera lens, and your distance from him will give the viewer a perception of the man. He could easily be depicted as kindly and benevolent, or as disagreeable and malevolent. While there are many things that add up to the final depiction of character, lighting is certainly one of the most important.
Not only are the directionality and the harshness or softness of light pivotal to a character study, but also the amount of light has emotional connotations. Subdued, soft light creates a very different mood from soft but bright light. Subdued light can convey a mood of loneliness and isolation, whereas brighter light can convey a feeling of openness, accessibility, and, perhaps, friendliness. All of these things must be considered if you are to engage in photography that goes beyond typical studio portraits and expresses your perception of the subject’s character.
You may or may not be able to control the intensity of light, but you can control the amount of light hitting the film or sensor during the exposure. Thus you can interpret light quite differently from the light you encounter. A dimly lit subject (human, architectural, still life, etc.) can be made light and airy, if desired, by a long exposure or open aperture. A brightly lit subject can be made dim by a short exposure or closed aperture, or both. With experience, you will begin to see opportunities for manipulating light and interpreting scenes that an untrained observer would never imagine.
The several examples of lighting discussed to this point indicate possible benefits of harsh light over soft light and vice versa, and of cloudy conditions over sunny conditions and vice versa. Most important is the understanding that no lighting situation is inherently good or bad. Some types of light are perfect for some scenes but poor for others, and even these may change as your specific needs and goals change. For certain purposes, you may wish to have bright sun in a forest scene or overcast in a mountain scene. You must recognize the lighting and its effect on the subject matter, then try to create a photograph that reflects that mood and perhaps even enhances it. Lighting may be the element that most profoundly determines the mood of your photograph. Good lighting alone cannot make a great photograph, but inappropriate light will surely destroy one.
There is no such thing as “the best time” to photograph. Outdoor photographs can be made at sunrise, midday, afternoon, sunset, dusk, and even at night. Cloudy weather, sunny weather, fog, or any other natural lighting can offer optimum conditions for specific scenes. Anyone who feels that the hours between 10 a.m. and 4 p.m. are photographically useless is locked into preconceived ideas about “acceptable” and “unacceptable” photographs. As soon as you start to look for and think about the unlimited possibilities each type of lighting offers—about close-range subjects, abstractions, lines, forms and textures, and, in general, about things photographic instead of things scenic—you can find ample reason to keep the camera out at any time.
Light as Seen by the Eye and by Film or Sensors, and the Inverse Square Law
Finally, you must learn a disheartening fact: the light that the eye/brain combination sees, and the light that film or digital sensors see, is often quite different. This was discussed in the previous chapter, but it’s so important that it bears repeating. There are additional aspects to be considered as well. As the eye peruses a scene, moving from bright areas to dim areas, the iris of the eye (its aperture) contracts and dilates to compensate for the changing light levels. This tends to soften the contrasts and blend the discontinuities of the scene, making it more understandable and acceptable. The eye/brain sees each part of a scene at a different aperture—a larger aperture for dark areas, a smaller aperture for light areas, and a still smaller aperture for the brightest area. Film and sensors, on the other hand, see the entire scene at the preset aperture you choose. There is no mechanism like the eye/brain combination to smooth the rough edges, i.e., to subdue the harsh bright spots or brighten the darkest areas. The camera is an optical robot lacking the human ability to see under an incredibly varied range of light levels.
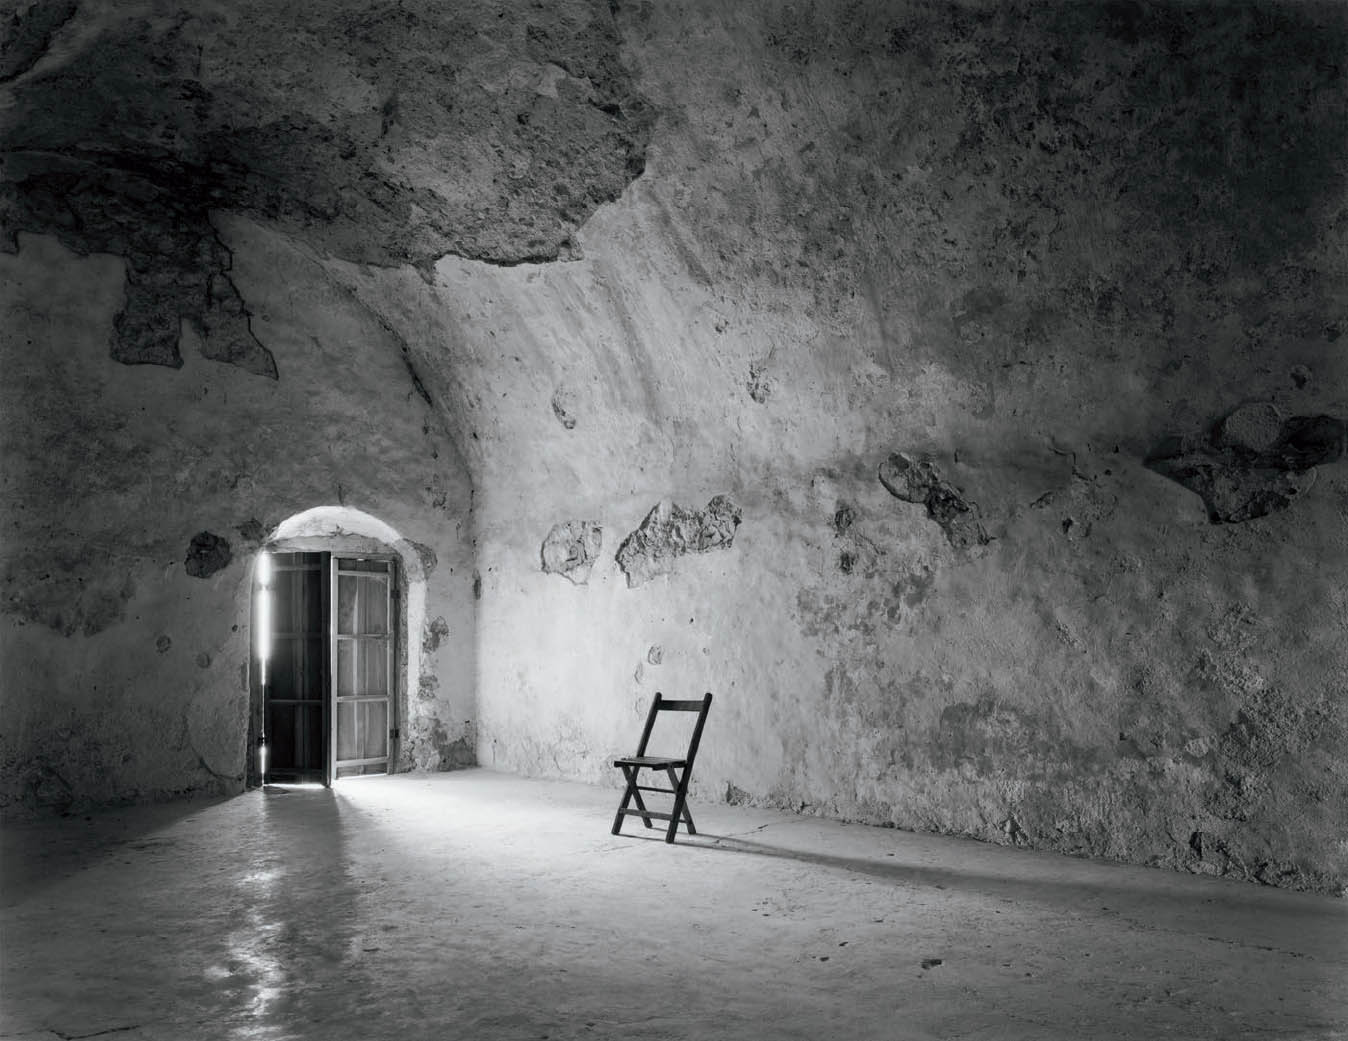
Figure 5-12: Chair and Shadow, Convento San Miguel
An enormous structure, built shortly after the Spanish conquest, stands in the tiny village of Maní in Mexico’s Yucatan Peninsula. It is a church, a ruin, a school, a convent, and a town center. When I saw the wooden folding chair in a large side room, in the light of an open door, I imagined a story unfolding: Pablo Casals had just finished playing one of Bach’s “Suites for Cello” and had walked out the open door. The music was still echoing off the walls. It was magic. The inverse square law of light created a serious lighting imbalance. To overcome it, I dodged the wall’s darker right half, then burned the wall nearest the door.
The problem is disconcerting in both indoor and outdoor situations. Indoors, we must deal with the “inverse square law,” which states that as the distance from the light source (open window, lamp, floodlight, spotlight, reflector, etc.) to the subject increases, the amount of light decreases in proportion to the inverse square of the distance between the two (figure 5-12). In practical terms, this means that if three subjects are placed one foot, two feet, and three feet from a light source, the second subject receives only one-fourth the light of the first (1/22 = 1 / (2 × 2) = ¼) and the third subject receives only one-ninth the light of the first (1/32 = 1 / (3 × 3) = 1/9).
As the eye scans the scene, the iris progressively opens as the light decreases. The brain further equalizes the differences, so we note only slight changes in light levels. We do not see the full extent of the decrease from the first to the third subject. The film or sensor, however, sees it as it truly is, for it sees everything at the aperture that has been set. (The specifics of this issue are discussed at the end of chapter 8.)
Outdoors, the inverse square law does not apply (because the sun is so far away), but another problem arises. The light of the sky is considerably brighter than the light on the land, especially on cloudy, overcast days. A magnificent scene may end up as a photograph with a disappointingly dark lower half and a surprisingly bright sky. It may be close to blank white in the print. Careful light meter readings or analysis of histogram displays will indicate the potential problem, where the histogram of this scene will have a large bulge toward the left, another bulge or spike on the right, and with little in the middle. Almost immediately, the wise photographer recognizes this histogram display as a graphic indication of a challenge ahead. The eye, in concert with the brain, is a wonder of practical deception that helps us get through life by smoothing over problems like these.
There are even times when the eye/brain combination actively deceives us because of its lifelong experience. You can try the following experiment to prove it to yourself: have two people stand next to a doorway, with one outside in sunlight and the other just inside in shadow. The person outside must wear a very dark shirt (preferably black), and the one inside must wear a very light shirt (preferably white). Let’s assume the shirts are made of the same material, so they have the same surface reflectivity. Now see which shirt appears lighter to you. You know the white shirt is lighter, but in the shadow it receives far less light. If you are like 99 percent of the people who try this, the white shirt will truly appear lighter, but meter readings will always show that the black shirt in sunlight is the lighter one. The eye/brain combination has learned to overcome the fact that the black shirt in sunlight is brighter than the white shirt in shadow, because experience has taught us that the white shirt is lighter than the black shirt!
Film and sensors can never match this human ability, so you have to learn to see the way they see. You must begin to recognize amounts of light as they actually are, not as experience tells you they “should be.” You must begin to see continuities and discontinuities of lines and forms caused by light, as well as changes in scenes that result from altered lighting. This is the heart of the difference between seeing and photographic seeing. The photographer has to learn how to see the light! It will prove to be a lifetime study.