
C H A P T E R 19
![]()
Using Drupal's APIs in a Module
The nature of the game in making modules for Drupal is using the tools Drupal provides you. API stands for Application Programming Interface and is a fancy way of saying that code has clearly defined ways of talking to other code. This chapter is devoted to introducing APIs, the hooks and functions Drupal provides to you, in the context of building the X-ray module introduced in Chapter 18. As each feature of the module requires using another tool from the extensive selection in Drupal's API toolbox, I will introduce it and use it.
At the time of this writing, Drupal core provides 251 hooks. This chapter covers some of the most-used ones. Hooks, though the stars of the show, are but one part of the ensemble you have to work with. You have a fantastic supporting cast in the form of Drupal's excellent utility functions. These functions, too, are a part of Drupal's APIs.
The module made in this chapter is loosely based on a suggestion posted to the Contributed Module Ideas group (groups.drupal.org/contributed-module-ideas) by Zoë Neill-St. Clair. She proposed a module to give a technical summary of a Drupal site, with relationships between content types and explanations of what in Drupal produces each page. You don't know how to do this yet, but you know it can be done; everything else is filling in details.
In this chapter, you will see instructions and examples for using the hooks and functions provided by Drupal. These are covered in the course of building a complete module and include the following:
- Altering forms.
- Localization (providing a translatable user interface).
- Making modules themeable and styling your module.
- Creating pages with
hook_menu(). - Using and defining permissions.
- Retrieving and storing data using the database abstraction layer.
Altering Forms
Changing anything about forms calls for my all-time favorite hook: hook_form_alter(). Whether you want to modify a form element, change the order of form elements, remove something entirely, or add something new, this is the hook for you. It comes in two varieties: the original, general hook_form_alter() that runs for every form Drupal outputs, and any number of hooks in the pattern hook_form_FORM_ID_alter(), which are specific to particular forms.
As always, you can find documentation for any function or hook on api.drupal.org, so for this hook, type api.drupal.org/hook_form_alter. The first parameter your implementation of hook_form_alter() will receive is the nested array that represents the form. The reason this hook is so powerful is because Drupal holds all the information about the form in this array when it renders and processes the form, so any change you make affects the form cleanly and more than cosmetically.
Form elements are exhaustively documented at api.drupal.org/api/drupal/developer--topics--forms_api_reference.html/7. (For convenience, I'll link to this and related documentation from dgd7.org/forms.) Fortunately, to begin altering forms, you don't need to know about every possible form element—you can simply look at the elements present in the form you choose to alter.
That's another nice thing about hook_form_alter(), everything you learn while messing with other forms is applicable when you build your own forms. Whether creating a new form or adding to an existing one, the form element definition looks exactly the same.
As a refresher, the X-ray module you started in Chapter 18 prints the form identifier for each form on the site. Instead of just showing the code this time, I'll explain what code to write. Add the code in Listing 19–1 to the xray.module file (if you have already defined xray_form_alter(), only add the debug line within it—PHP can't have two functions with the same name).
Listing 19–1. Implementation of hook_form_alter() by the X-rayModule, Containing Only Debug Statements
/**

 * Implements hook_form_alter().

 */

function xray_form_alter(&$form, &$form_state, $form_id) {

  debug($form, $form_id, TRUE);

}
![]() Tip After creating any
Tip After creating any modulename_form_alter() or modulename_form_FORM_ID_alter() function for the first time, clear your caches. You can do this, for instance, with the Drupal shell command drush cc all. (For more on the marvelously powerful and convenient Drush, see Chapter 26.)
The debug() function takes any variable, including an object or an array (such as your form) and prints it to the screen. If you don't see any debug output, it could be that something is interfering (as can be the case when Devel module's backtrace logging option is selected) rather than because your code is not running (such as due to the module not being enabled, the hook name being incorrectly formed, or caches not having been cleared yet). You can put an exit('Show me a sign'), line in your code (with the status text of your choice) as a quick way to establish whether it's being run at all.
![]() Tip Drupal 7 introduces a
Tip Drupal 7 introduces a debug() function, which is a great convenience when developing (or, naturally, debugging). To use it, you can put any variable or output-generating function as the first parameter, optionally followed by a label to help you keep track of multiple uses of debug(). For instance, debug($user, 'User object'), prints the contents of the $user variable, which in most places in Drupal is an object representing the currently logged-in user.
Visiting any page with a form (which is every public page if the Search module and block are enabled) will result in a message for each form printing the array of all form elements (which are more arrays), both visible and hidden. The only part of the form that looks likely to always be of interest, however, is the Form ID which is printed as the label for the form array in Listing 19–1.
For your informative addition to forms, you don't want to use a form element of a type that can be submitted. The usual display-only #type is ‘markup’ (and because ‘markup’ is the fallback if #type is not defined, it does not have to be stated explicitly).
![]() Tip New in 7, the output of a default
Tip New in 7, the output of a default #type‘markup’ form element must be given in a #markup property, like so: $form['just_for_show'] = array('#markup' => t('Form, not function.'));
However, Drupal provides another form element type, ‘item’, that is also for static markup but includes the trappings of a real form element, such as #title and #description properties. This information-only form item is what you'll use to print out the form ID at the top of every form (see Listing 19–2).
Listing 19–2. Implementing hook_form_alter() to Add a Markup-Only Item to Every Form
/**

 * Implements hook_form_alter().

 */

function xray_form_alter(&$form, &$form_state, $form_id) {

  $form['xray_display_form_id'] = array(

    '#type' => 'item',

    '#title' => t('Form ID'),

    '#markup' => $form_id,

    '#theme_wrappers' => array('container__xray__form'),

    '#attributes' => array('class' => array('xray')),

    '#weight' => -100,

  );

}
![]() Note Using
Note Using #prefix and #suffix for markup can be a quick shortcut while developing; indeed, this form element was originally built not with #theme_wrappers and #attributes but simply with '#prefix' => '<div class="xray">' and '#suffix' => '</div>', but that's not what should be used in a finished module. (You can see the correction made in the X-ray module's repository at drupalcode.org/project/xray.git/commit/839927e.) See Chapter 33 for the journey of discovery, but the properties to use instead, as used in this example, are '#theme_wrappers' => array('container__xray__form') and '#attributes' => array('class' => array('xray')). These have identical HTML output to the manual prefix and suffix but eliminate the risk of unmatched markup (such as missing the closing </div>). More importantly, they allow themers to change the markup without trying to re-alter the form. The double underscores in front of “xray” and “form” in the theme wrapper container__xray__form mean that they are optional for theme functions overriding your container markup. If a theme function with the name THEME_container__xray__form() or THEME_container__xray() exists (where THEME is the name of one's theme), it will be used; if not, then THEME_container() will be used. If no theme function overrides it, see api.drupal.org/theme_container for the function that will theme the wrapper to this form element. Making your module themeable is covered later in this chapter.
The #markup property will print its value directly into HTML, so you need to make sure the argument passed to your function is HTML safe. Most of the time $form_id is a PHP identifier that can only contain numbers, letters, and the underscore, so it's considered safe in any HTML context; in the very rare other cases, it's the module author's responsibility not to allow unfiltered user input to become a $form_id. Drupal core itself prints $form_id in the form HTML as a hidden variable.
The large negative weight (-100) ensures that in almost any conceivable form, this added form element will be printed at the top.
![]() Note The Form API is a very important API in Drupal. Where one might expect a special API for modules to talk to each other for a particular reason, Drupal sometimes relies on its robust Form API to bring in new functionality. Node module enhances Block module with block visibility based on content type by implementing a form alter hook. In
Note The Form API is a very important API in Drupal. Where one might expect a special API for modules to talk to each other for a particular reason, Drupal sometimes relies on its robust Form API to bring in new functionality. Node module enhances Block module with block visibility based on content type by implementing a form alter hook. In node.module the function node_form_block_admin_configure_alter() is an implementation of hook_form_FORM_ID_alter(), where block_admin_configure is the form ID in that pattern of the form that is altered. Similarly, Open ID module alters the login form with openid_form_user_login_alter() or openid_form_user_login_block_alter() (for the main user_login form or the user_login_block form, respectively).
Localization with t() and format_plural()
There is one function in the form_alter() implementation that is easy to overlook as it is only one character long: t(). The t stands for translate and the t() function is Drupal's most-used function. It is part of the localization system that makes it possible to translate Drupal's user interface—the parts of Drupal generated by code, as opposed to content written by users. This translatable user interface should include all text you put in any modules you make. For the most part, this means that it should all be wrapped in the t() function.
![]() Note The tools for translating content (words written by the site's users) are frequently called internationalization and are not part of Drupal core. The gray area of administrator-defined words in Drupal (such as site name and slogan; welcome messages; and structure like menus, some taxonomy, and content type names) also falls under the rubric of internationalization and is where translation gets most difficult, er, fun. These forms of translation are usually not your concern when writing modules, rather, only localization is. In Drupal discussions and even module names, localization is frequently abbreviated as l10n and internationalization as i18n. (The abbreviations come from each word's first and last letter and the number of letters in between.) A current list of resources for both tasks is at
Note The tools for translating content (words written by the site's users) are frequently called internationalization and are not part of Drupal core. The gray area of administrator-defined words in Drupal (such as site name and slogan; welcome messages; and structure like menus, some taxonomy, and content type names) also falls under the rubric of internationalization and is where translation gets most difficult, er, fun. These forms of translation are usually not your concern when writing modules, rather, only localization is. In Drupal discussions and even module names, localization is frequently abbreviated as l10n and internationalization as i18n. (The abbreviations come from each word's first and last letter and the number of letters in between.) A current list of resources for both tasks is at dgd7.org/translate.
The point may seem obvious, but only text that you write can be translated in advance to be available to people who download your module (if you or others take the time to do the translation). Text that is modified by users or administrators and output by your module—anything that can't be known ahead of time—should not be wrapped in a translation function. Moreover, don't try to translate variables. From the X-ray module, the subheading on the reports page t('Content summary') is a classic example. Strings for translation are always written in English; if you can provide immediate translation for your module into another language, that's fantastic! The text in your code, however, must be in English so that all localizations can start from the same base.
This is straightforward. It gets more interesting with the ability to take placeholders for the parts of strings that should not be translated. The t() function has built-in security for showing such (potentially) user-submitted data when you use its placeholder array. You'll see this used in examples throughout this chapter—placeholders prefaced with @ to sanitize the variable, % to sanitize and emphasize, and ! to insert without any safety checks or changes (by the way, only use ! placeholders when you know the source is safe (never from a user) or already escaped). These placeholders are well documented at api.drupal.org/t. The following code shows the use of the % emphasis placeholder: %func is replaced with a sanitized value of the %func key from the array (the $page_callback variable concatenated with a pair of parenthesis) and wrapped in <em> tags:
$output = t('the function %func', array('%func' => $page_callback . '()'));
When you need text that changes based on the quantity of items being discussed (singular or multiple), Drupal has a function for you, format_plural(). Note that the t() function is used inside it (see Listing 19–3).
Listing 19–3. Using the format_plural() Function
  $output .= format_plural(

    xray_stats_content_type_total(),

    'The site has one content type.',

    'The site has @count content types.'

  );
The first parameter that the format_plural() function takes is a number. This should always be an integer (one that will vary, of course, because if you already knew if it were a single or a multiple value, you could just write your text string accordingly). In this case, that number is being supplied by your function xray_stats_content_type_total(). The second parameter is the string to use if the number given as the first parameter is just one; the third parameter is what string to use if it is two or more (or zero). The @count placeholder (which is the number provided by the first parameter) is always available to both strings, but you can provide more placeholders and values (just like for the t() function) in an array in the fourth parameter.
Finding a Drupal Function That Does What You Need
Finding a function that does what you need can be a three-step process of identifying a page that does something similar to what you want to do or displays information you are also interested in, looking up what function produces that page, and looking within that function to see what functions it calls.
The example below is not the cleanest (this book uses real examples, not contrived ones, precisely to show how applying methods like these really work) but don't be put off by the pages spent tracking a function down. The basic steps really are as easy as 1, 2, 3!
- Identify a page that produces output like what you want to see.
- Look up the
page callbackfunction for that page's menu item. - See what functions are used (or database queries made) in the
page callbackfunction.
![]() Tip An analogous process can be followed to see how Drupal produces a given block; see
Tip An analogous process can be followed to see how Drupal produces a given block; see dgd7.org/233.
You're looking to display a summary of theme information. As before, you can look directly in the database to find your information (themes, along with modules, are in the system table). Whenever possible, however, you want to use functions Drupal already provides rather than creating duplicates, even if you are just pulling data. You should put in due diligence trying to find a function that does what you need before writing your own database queries.
Finding code that uses the database table that holds information you care about can be a good way to find such a function. Even already knowing that themes are in the system table, searching the code for the word system isn't going to help you much. The system.module file alone is nearly 4,000 lines of code. Something more precise is needed to find the function related listing theme information.
This is why you look for a page in Drupal that is doing something similar to what you want to do. Especially in Drupal core, often this will be an administrative page. A look through Drupal's administration section for a listing of themes brings a swift victory: Administration ![]() Appearance (
Appearance (admin/appearance) appears to show all the themes!
With a debugger (see dgd7.org/ide), you can try to watch all the functions called as this page loads. Without using a debugger, this can sometimes be done even faster and is usually a two-step process. First, you find the menu item that loads the page. Second, you see what functions the menu item call. You can find the menu item by searching Drupal's code for the path of the page.
You know the enabled and available themes are shown to you when you visit the Appearance administration page (admin/appearance). Paths are provided by implementations of hook_menu(), hook implementations generally live in .module files, and you know this page is provided by Drupal core, so you can restrict your search to the top-level modules folder, like so:
grep -nHR --include=*.module 'admin/appearance' modules
A search using the powerful command line text search utility grep returns a number of matching lines, but this is the hit that's interesting to you:
Now you've reached the second step: follow the code to this function. You're told what file the function is in (modules/system/system.module) and the line number the function appears on (590). The “$items” is an indicator that this is part of a menu definition (hook_menu() implementations are supposed to return an array of menu items). The search output has told you where to look, so you open system.module to see for yourselves (see Listing 19–4).
Listing 19–4. The admin/appearance Path Definition at Line 590 in system.module
  // Appearance.

  $items['admin/appearance'] = array(

    'title' => 'Appearance',

    'description' => 'Select and configure your themes',

    'page callback' => 'system_themes_page',

    'access arguments' => array('administer themes'),

    'position' => 'left',

    'weight' => -6,

    'file' => 'system.admin.inc',

  );
Menu items are fantastic because they tell you exactly what makes a page and where it's done. The page callback is the function that makes the page and the file, if specified, is the file where the page callback function lives. In this case, it's system.admin.inc. If no file is specified, the page callback function is in the same .module file as the implementation of hook_menu().
Therefore, go to system.admin.inc and look for the system_themes_page() function. And there it is. Early in this function, it calls system_rebuild_theme_data() to get the list of themes.
But wait. This should work... but based on the function name alone, it seems a bit much. Rebuild theme data? You just want to know what the themes are! You can look a little deeper in the function to assess if it is one you want to use.
Inside the function system_rebuild_theme_data(), it calls the internal function _system_rebuild_theme_data() (note the preceding underscore that indicates it's not meant as a public function for any module to use). You can look this function up in your code, but you can also look it up on Drupal's API site at api.drupal.org/api/function/_system_rebuild_theme_data/7. Doing the latter lets you know it is called by exactly two functions. One, of course, is system_rebuild_theme_data(), which is how you found it. The other is list_themes(), which is functionally equivalent to system_rebuild_theme_data() but has a more comforting name. (There is an issue filed to reduce this code duplication in Drupal 8 at drupal.org/node/941980.)
![]() Note The
Note The list_themes() function also has static caching; if it happens to be called twice on a page load, the second call will hardly take any resources. Most statically cached functions can be easily spotted by a line at the top of the function similar to this one in list_themes():
$list = &drupal_static(__FUNCTION__, array());Investigating What the Function Gives You
So, you have a function list_themes() that... lists themes. X-ray needs to give a summary of how many themes are present on a site, what themes are enabled, and anything else that might be useful to a site administrator.
Watching the Appearance administration page load in a debugger would let you look into the variable returned by _system_rebuild_theme_data(), which, as noted, is the source for everything given out by list_themes(). Or you can make a test PHP file that bootstraps Drupal and prints the output of list_themes(). Or, since you already have a module you're working on, you can stick a debug() call into our code. Let's do that last one; see Listing 19–5.
Listing 19–5. Printing the Data from list_themes() with debug() within an X-ray Module Stub Function
/**

 * Implements hook_help().

 */

function xray_help($path, $arg) {

  switch ($path) {

// ...

    case 'admin/appearance':

      return _xray_help_admin_appearance();

// ...

  }

}


/**

 * Help text for the admin/appearance page.

 */

function _xray_help_admin_appearance() {

  debug(list_themes());

}
The important addition is in bold—debug(list_themes());. The rest is an excerpt from our old friend hook_help() calling a function when someone visits the Appearance administration page (the admin/appearance path). That function, _xray_help_admin_appearance(), is just a stub, now, with nothing in it but your debug code.
The information about themes is lengthy, so please look at your own output or refer to dgd7.org/145 for the full result. Getting accustomed to huge nested arrays is something you have to do when developing with Drupal (see Listing 19–6).
Listing 19–6. Information for the Bartik Theme Excerpted from the Output of the Function list_themes()
Debug:


array (

  'bartik' =>

  stdClass:__set_state(array(

     'filename' => 'themes/bartik/bartik.info',

     'name' => 'bartik',

     'type' => 'theme',

     'owner' => 'themes/engines/phptemplate/phptemplate.engine',

     'status' => '1',

     'bootstrap' => '0',

     'schema_version' => '-1',
     'weight' => '0',

     'info' =>

    array (

      'name' => 'Bartik',

      'description' => 'A flexible, recolorable theme with many regions.',

      'package' => 'Core',

      'version' => '7.0-dev',

      'core' => '7.x',

      'engine' => 'phptemplate',

      'stylesheets' =>

      array (

        'all' =>

        array (

          'css/layout.css' => 'themes/bartik/css/layout.css',

          'css/style.css' => 'themes/bartik/css/style.css',

          'css/colors.css' => 'themes/bartik/css/colors.css',

        ),

        'print' =>

        array (

          'css/print.css' => 'themes/bartik/css/print.css',

        ),

      ),

      'regions' =>

      array (

        'header' => 'Header',

        'help' => 'Help',

        'page_top' => 'Page top',

        'page_bottom' => 'Page bottom',

        'highlighted' => 'Highlighted',

        'featured' => 'Featured',

        'content' => 'Content',

        'sidebar_first' => 'Sidebar first',

        'sidebar_second' => 'Sidebar second',

        'triptych_first' => 'Triptych first',

        'triptych_middle' => 'Triptych middle',

        'triptych_last' => 'Triptych last',

        'footer_firstcolumn' => 'Footer first column',

        'footer_secondcolumn' => 'Footer second column',

        'footer_thirdcolumn' => 'Footer third column',

        'footer_fourthcolumn' => 'Footer fourth column',

        'footer' => 'Footer',

        'dashboard_main' => 'Dashboard main',

        'dashboard_sidebar' => 'Dashboard sidebar',

      ),

      'settings' =>

      array (

        'shortcut_module_link' => '0',

      ),

      'features' =>

      array (

        0 => 'logo',

        1 => 'favicon',

        2 => 'name',

        3 => 'slogan',
        4 => 'node_user_picture',

        5 => 'comment_user_picture',

        6 => 'comment_user_verification',

        7 => 'main_menu',

        8 => 'secondary_menu',

      ),

      'screenshot' => 'themes/bartik/screenshot.png',

      'php' => '5.2.5',

      'scripts' =>

      array (

      ),

      'overlay_regions' =>

      array (

        0 => 'dashboard_main',

        1 => 'dashboard_sidebar',

      ),

      'regions_hidden' =>

      array (

        0 => 'page_top',

        1 => 'page_bottom',

      ),

      'overlay_supplemental_regions' =>

      array (

        0 => 'page_top',

      ),

    ),

     'stylesheets' =>

    array (

      'all' =>

      array (

        'css/layout.css' => 'themes/bartik/css/layout.css',

        'css/style.css' => 'themes/bartik/css/style.css',

        'css/colors.css' => 'themes/bartik/css/colors.css',

      ),

      'print' =>

      array (

        'css/print.css' => 'themes/bartik/css/print.css',

      ),

    ),

     'engine' => 'phptemplate',

  )),

// ...

)


in xray_help_admin_appearance() (line 109 of /home/ben/code/dgd7/web/sites/default/modules/xray/xray.module).
The Garland, Seven, Stark, and Test themes, and the Update test base theme have all been removed from this output. The test themes you've probably never heard of; they have an extra attribute in this array: hidden, which is set to TRUE. You will want to account for this and not list them with the regular themes (see Listing 19–7).
Listing 19–7. Initial Code to Count and Display the Number of Hidden Themes
/**

 * Fetch information about themes.

 */

function xray_stats_enabled_themes() {

  $themes = list_themes();

  // Initialize variables for the data you will collect.

  $num_hidden = 0; // Number of hidden themes.

  // Iterate through each theme, gathering data that you care about.

  foreach ($themes as $themename => $theme) {

    // Count each hidden theme.

    if (isset($theme->info['hidden']) && $theme->info['hidden']) {

      $num_hidden++;

    }

  }

  return compact('num_hidden'),

}


/**

 * Help text for the admin/appearance page.

 */

function _xray_help_admin_appearance() {

  $output = '';

  $data = xray_stats_enabled_themes();

  $output .= format_plural(

    $data['num_hidden'],

    'There is one hidden theme.',

    'There are @count hidden themes.'

  );

  return theme('xray_help', array('text' => $output));

}
The $num_hidden variable is originally set to zero. A foreach function goes through the array of themes, and inside an if statement you add one to the $num_hidden variable each time you are dealing with a hidden theme. $num_hidden++ is a shortcut way of writing $num_hidden = $num_hidden + 1;. The if statement identifies what is a hidden theme by checking if the 'hidden' item in the theme info array exists and has a value equivalent to TRUE. That first isset() function is needed or else PHP will complain about you asking it to look for a non-existent piece of information; non-hidden themes don't necessarily have the ‘hidden’ item in their info array at all. If it's not there, the if statement exits immediately and moves on to the next code. (In this case, that is the continuation of the foreach loop and when that's done, the return of the information you are gathering.) If the ‘hidden’ item is there, the isset() function returns TRUE and so the if statement continues on to the second expression (after the &&) and reads the value of $theme->info['hidden']. If this also evaluates to TRUE (which the number 1 will), the code inside the if statement is run.
![]() Tip Two expressions that are joined with
Tip Two expressions that are joined with && both have to be evaluated if the first expression returns TRUE but can stop immediately if the first expression returns FALSE (because no matter what the second expression is, the combination is FALSE and && is asking “are this expression AND that expression both TRUE?”). It's the opposite for two expressions joined with ||. Here, if the first expression is TRUE, the next need not be evaluated; if the first expression is FALSE, the next expression needs to be evaluated because the entire condition will be TRUE if either the first OR the second is TRUE.
The compact() function creates an array out of the named variables (if they are present), and this is the value you return. Here it is only ‘num_hidden’ (which uses the $num_hidden variable) but it could be a list of several variable names, as you will see in the next code listing.
You only want a count of the hidden themes, but you'll show administrators more information about the other themes. To do that, you need to continue to look at the information in the theme objects. Looking at the printout of data for Bartik in Listing 19–7, one clearly important attribute is status. That's whether the theme is enabled (1) or not (0). Most of the rest of the interesting information is nested a layer deeper in an info array. The regions, features, and stylesheets are all things you can easily count, at least. They are in arrays, which means you can use the count() function, as shown in Listing 19–8. (See php.net/count for a definition of that function.)
Listing 19–8. Extracting and Summarizing Information from an Array of Data about Themes
/**

 * Fetch information about themes.

 */

function xray_stats_enabled_themes() {

  $themes = list_themes();

  $num_themes = count($themes);

  // Initialize variables for the data you will collect.

  $num_hidden = 0; // Number of hidden themes.

  $num_enabled = 0;

  $summaries = array();

  // Iterate through each theme, gathering data that you care about.

  foreach ($themes as $themename => $theme) {

    // Do not gather statistics for hidden themes, but keep a count of them.

    if (isset($theme->info['hidden']) && $theme->info['hidden']) {

      $num_hidden++;

    }

    else {  // This is a visible theme.

      if ($theme->status) {

        $num_enabled++;

        // This is an enabled theme, provide more stats.

        $summaries[$theme->info['name']] = array(

          'regions' => count($theme->info['regions']),

          'overlay_regions' => count($theme->info['overlay_regions']),

          'regions_hidden' => count($theme->info['regions_hidden']),

          'features' => count($theme->info['features']),

          'kindsofstylesheets' => count($theme->info['stylesheets']),
          'allstylesheets' => isset($theme->info['stylesheets']['all']) ? count($theme->info['stylesheets']['all']) : 0,

        );

      }

    }

  }

  return compact('num_themes', 'num_hidden', 'num_enabled', 'summaries'),

}
Everything used in this much larger function has just been discussed; it's taking place in the same foreach loop, using the ++ shortcut (note that the variable is defined first), and count() to return the number of elements in an array. The ternary operator and isset() are thrown in at the end to only count the ‘all’ sub-array of the ‘stylesheets’ if the ‘all’ sub-array is present, and return zero otherwise. See dgd7.org/262 for the code used to display all of this theme information!
![]() Tip One of the great benefits of working in an open source free software community is that you can expect others to see and comment on your code and suggest improvements. You don't have to wait for that to happen by chance, however. If something seems a little off, ask about it in IRC. If you've done enough investigating to have found one or more possible answers but you are unsure about the best answer, no one in a development discussion channel or forum will mind you asking a question such as, “I'm trying to show a list of themes, what is the simplest way to do it? I have so far only found
Tip One of the great benefits of working in an open source free software community is that you can expect others to see and comment on your code and suggest improvements. You don't have to wait for that to happen by chance, however. If something seems a little off, ask about it in IRC. If you've done enough investigating to have found one or more possible answers but you are unsure about the best answer, no one in a development discussion channel or forum will mind you asking a question such as, “I'm trying to show a list of themes, what is the simplest way to do it? I have so far only found system_rebuild_theme_data().” Whether you get an answer or not depends on if anyone knows the answer, of course, but an interesting question can inspire people to look into the answer even when they don't know! If your question can be answered with yes or no (such as “Is there a better way to do X?”), it's a sign that you could phrase it better. Try “I'm trying to do X and have tried Y and Z. What is the best way to do it?”
Creating a Page with hook_menu()
Defining a whole page is one of the ways you get to feel the power of making your own modules. You can put the page at any path you want and make anything display there, yet still have all the surrounding design, blocks, login functionality, and everything else that Drupal provides.
![]() Tip Check out the Examples project's (
Tip Check out the Examples project's (drupal.org/project/examples)menu_example module and api.drupal.org/hook_menu for just-the-facts implementations of hook_menu(), and see Chapter 29 for more about the menu (router) system's role in Drupal.
Sure, you could make a node and use Path module to place it at almost any path you want. User-editable nodes are a bad fit for module-provided information, though. And how does Drupal know how to understand the underlying node/1883 path to show you the node with ID 1883 when you go there? That's right: hook menu. If you want your own, better system for handling pieces of data, you could define the path megabetternodes/ that takes arguments in the form of letters instead of numbers, like megabetternode/rg. That is a terrible idea; the node system is excellent and easily extended with the Node API hooks (api.drupal.org/api/group/node_api_hooks/7), fields, and many great things it would be foolish to try to reproduce. The fact remains, however, that all Drupal's major subsystems with dedicated paths for displaying entities (think node/, user/, taxonomy/term/) are brought to you by hook_menu(), and it gives you access to the same power.
Let's start with a more modest goal. The X-ray module needs a page of its own. This page will display all the information that you've been displaying on certain administration pages with hook_help() and more.
Choosing a Path for an Administration Page
What path shall you give this page? In a system as extendable and popular as Drupal, you always have to try to avoid namespace conflicts—two pages can't have the same path. Therefore, it's a best practice to incorporate your module name into paths created by your module, because every project hosted on drupal.org has a unique system name.
![]() Note The convention of using the module system name in paths provided by the module is followed in Drupal core by Node and Contact modules, among others. This is the case both for their user-facing paths (such as
Note The convention of using the module system name in paths provided by the module is followed in Drupal core by Node and Contact modules, among others. This is the case both for their user-facing paths (such as node/99 or contact) and also in their administration paths (such as admin/content/node and admin/structure/contact). (User module has user-facing paths like user/3/edit and user/register, but as of Drupal 7 its administrative pages are at admin/people and admin/config/people. Moral of this story: On occasion, core can do things you should not do yourself.)
As currently conceived, X-ray module is meant for administrators. Therefore, it should be displayed in the administration section of the site, which is every single page that falls under admin/ in the path. But you're not done yet—a path like admin/xray is completely possible with the power of hook_menu() but terribly presumptuous. That's like saying your module is as important as the entire configuration section (admin/config) or the modules listing (admin/modules)! You must look a little more carefully and play well with others.
Every module in Drupal core fits its administration pages under the following categories, the top level of administration menu items: Dashboard, Content, Structure, Appearance, People, Modules, Configuration, Reports, and Help. Really, the best choice for most module administration pages is between the Structure and Configuration sections, and in most cases somewhere under Configuration. X-ray is a little different, however. It is providing information about the site, and so naturally fits under the Reports menu. This would give your page the path admin/reports/xray.
Defining a Page with a Normal Menu Item
Now you know where you want to put your page; all you have to do is put it there. At the root of every page displayed in Drupal (for nodes, administration pages, or anything else) is hook_menu().
![]() Note Drupal's Menu system isn't accurately named because it does so much more than menus. In addition to making possible every page in Drupal, whether they have a link in any menu or not,
Note Drupal's Menu system isn't accurately named because it does so much more than menus. In addition to making possible every page in Drupal, whether they have a link in any menu or not, hook_menu() is ultimately responsible for every path, whether it returns a page or not. Some paths used in AJAX requests just return a little bit of data.
As with every Drupal hook or Drupal function, you can get great documentation on hook_menu() by adding it in after the address of Drupal's API site. Case in point: api.drupal.org/hook_menu, which redirects to api.drupal.org/api/function/hook_menu/7.
You can also look for an example of hook_menu() in most any module's .module file, including for the core modules mentioned in the note with regard to their administrative paths, Node module and Contact module.
Let's look at the file node.module, which is located within a download of Drupal's code in the modules/node folder. Implementations of hook_menu() must return an array containing one or more menu items. The menu items themselves are also arrays. Drupal likes arrays. (And arrays of arrays of arrays of arrays of arrays. If you are not writing an array about every 5–10 lines, you are probably doing something wrong.) I'll discuss their structure after Listing 19–9.
Listing 19–9. Excerpt from Node Module's Implementation of hook_menu()
/**

 * Implements hook_menu().

 */

function node_menu() {

  $items['admin/content'] = array(

    'title' => 'Content',

    'description' => 'Find and manage content.',

    'page callback' => 'drupal_get_form',

    'page arguments' => array('node_admin_content'),

    'access arguments' => array('access content overview'),

    'weight' => -10,

    'file' => 'node.admin.inc',

  );

// ...

  return $items;

}
![]() Caution Looking at examples from core and other Drupal code is a great way to learn, but you can never expect any given section of code you look at to match up one-to-one with your needs.
Caution Looking at examples from core and other Drupal code is a great way to learn, but you can never expect any given section of code you look at to match up one-to-one with your needs.
The array of menu items is keyed by the all-important path; the path for the menu item in the code excerpt above is admin/content.
The first element in the menu item array is the title. (PHP and Drupal don't care what order the elements of a keyed array are in, but the Drupal developers are noting something about the importance of the title by putting it first.) If present, the descriptionelement is frequently listed second. For pages, meaning menu items such as the above with the default type of MENU_NORMAL_ITEM, the description is used for the title text (the hover-over tool tip) on menu links to the page. It is also shown on administrative listings. You won't see the text “Find and manage content.” at the path admin or hovering over the Content link in the Toolbar on your standard Drupal install, however, because Comment module changes the description for admin/content to “Administer content and comments.” in its implementation of hook_menu_alter().
![]() Note As of 7, the title and description of menu items are by default passed through the
Note As of 7, the title and description of menu items are by default passed through the t() function, so you don't wrap them in the t() function yourself, as you do for all other user-facing text in your modules. It is possible to have the title handled by a different function or no function by setting the title callback to another function or FALSE. In that case, you should handle running text you provide through a translation function yourself. The description is always passed through t().
Not even the title is a required element for a menu item, but clearly certain elements must be present for the menu item to do anything useful; the required elements depend on a menu item's purpose. The most important element when showing a page is the page callback. Drupal calls the function named as the page callback when the menu item's path is visited. The page callback function must provide the main content of the page.
![]() Tip Node module is showing you a neat trick with the file attribute. Putting
Tip Node module is showing you a neat trick with the file attribute. Putting 'file' => filename.extension in a menu item tells Drupal to include the named file. This allows the function in the pagecallback to be in that other file, outside the .module file. This can help you organize the code for a complex module in a sensible way by grouping functions related to one page's functionality together in one file. It also can boost Drupal's performance (on sites without an opcode cache such as APC) by excluding unneeded code from being loaded and parsed. That is why Drupal frequently puts code related to administration in separate files, as it is doing here with the admin/content path and the node.admin.inc file. Unlike code related to showing nodes (content), taxonomy terms, or blocks, the code for administering nodes only needs to be loaded when a user with sufficient privileges goes to this page.
The code excerpt in Listing 19–9 was the first menu item defined at the top of Node module's long and complex implementation of hook_menu(), and it is a pretty good model for what you want to do. It defines an entire administrative section, which you do not want to do, but you can move it down a level just by adding to the path; instead of admin/content, you're going to have admin/reports/xray, as discussed earlier.
Defining a Tab with a Local Task Menu Item
You could stop there, but the Node module is doing something pretty cool with a second menu item. It is defined in only five lines, as shown in Listing 19–10.
Listing 19–10. Excerpt from Node Module's Implementation of hook_menu(), Second Menu Item Defined
$items['admin/content/node'] = array(

    'title' => 'Content',

    'type' => MENU_DEFAULT_LOCAL_TASK,

    'weight' => -10,

  );
This second menu item provides a tab that is selected by default. That is how the type MENU_DEFAULT_LOCAL_TASK is interpreted. The first menu item did not specify a type attribute, which means it defaults to MENU_NORMAL_ITEM, a page, so that the page defined by the first menu item can be extended with multiple tabs (see Figure 19–1).
Figure 19–1. The Content local task (tab) is provided by Node module's admin/content/node menu item.
Local tasks work such that you see them as a tab on the page you extend. Because it is the default local task, the page is identical whether you go to admin/content or admin/content/node.
You'll use this to make your page not just a page but also the Overview tab for X-ray reports. This way you can easily add new, more in-depth report pages as additional tabs.
![]() Note Drupal does not display any description for local tasks, which Drupal themes as tabs—not even as link title tool-tip text. This may change in Drupal 8 (
Note Drupal does not display any description for local tasks, which Drupal themes as tabs—not even as link title tool-tip text. This may change in Drupal 8 (drupal.org/node/948416), but for Drupal 7 avoid confusion by leaving off the description element for menu items of type MENU_LOCAL_TASK or MENU_DEFAULT_LOCAL_TASK.
Declaring Menu Items for X-ray Module
After much ado, Listing 19–11 shows a menu declaration of your own.
Listing 19–11. X-ray Module's Implementation of hook_menu()
/**

 * Implements hook_menu().

 */

function xray_menu() {

  $items['admin/reports/xray'] = array(

    'title' => 'X-ray technical site overview',

    'description' => 'See the internal structure of this site.',

    'page callback' => 'xray_overview_page',
    'access callback' => TRUE,

  );

  $items['admin/reports/xray/overview'] = array(

    'title' => 'Overview',

    'description' => "Technical overview of the site's internals.",

    'type' => MENU_DEFAULT_LOCAL_TASK,

    'weight' => -10,

  );

  return $items;

}
![]() Gotcha For your menu item—and page—to appear, the menu_router table must be cleared. Saving the modules page (without enabling or disabling any modules) no longer does this, as it did in Drupal 6. You can instead put the
Gotcha For your menu item—and page—to appear, the menu_router table must be cleared. Saving the modules page (without enabling or disabling any modules) no longer does this, as it did in Drupal 6. You can instead put the menu_rebuild() function directly into your code— outside of the hook_menu() implementation, which is only called when menus are rebuilt! (See data.agaric.com/node/3376 for the code that skips over flushing all caches if nothing changes on the modules page.) The reliable drush cc all (or the more precise drush cc menu) also work to rebuild menus.
I still haven't explained everything going on in the menu declaration. A very important part of every new path is access control. In other words, can a user view the page (or access another callback)? The access callback is typically a function that returns TRUE if access is allowed and FALSE if access should be denied. (By default, it is the user_access() function, and so Drupal can simply take a permission name in the access arguments to evaluate if a given user's role has access to the menu item.) By setting the value of access callback to TRUE, you short-circuit any of this and make the page always viewable by anyone. This is not recommended but it will hold you over until you choose or define a permission.
![]() Caution Menu items deny access by default. If you provide no value for either the access callback or access arguments attributes, use of your menu item (including trying to visit a page it defines) will be denied to everyone—even user 1, which typically bypasses access checks.
Caution Menu items deny access by default. If you provide no value for either the access callback or access arguments attributes, use of your menu item (including trying to visit a page it defines) will be denied to everyone—even user 1, which typically bypasses access checks.
As a menu item that defines an administration page, X-ray module's admin/reports/xray should limit access to authorized users. To set this access, you can create a new permission with hook_permission() or re-use an existing permission.
Using Existing Permissions in Your Module
The Permissions administration page (admin/people/permissions) is one of the more intimidating configuration pages in Drupal—or in any content management system. Drupal's fine-grained permission system is a great strength, but it means a large grid of checkboxes to be able to configure all the permissions for each role. For a new site based on Drupal core's default installation profile, this is just three roles (listed across the top) and about 60 permissions (listed down the side), as shown in Figure 19–2.
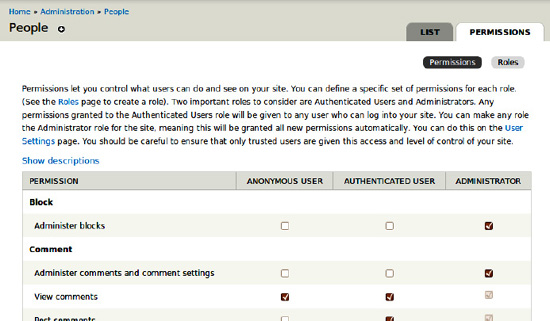
Figure 19–2. The top of the Permissions configuration page of a fresh Drupal core default installation profile
As the number of roles on a site increases, and as functionality increases along with the number of permissions, this page becomes more visually overwhelming. Every new content type adds separate create, edit, and delete permissions, and then there's extra edit and delete permissions per content type for the author of the piece of content in question.
The normal rule in Drupal is when in doubt, make it configurable or extendable. In other words, don't try to guess the use cases someone else will need; instead, try to make anything possible. If there's an option, provide it. When it comes to administrative options and especially permissions, however, I prefer to avoid contributing to the wall of checkboxes unless a clear use case is present. People who need a specific permission can file an issue asking for it; a site developer who needs finer-grained permissions for an unusual use case can create her own and make a page require it by modifying the existing menu item with hook_menu_alter().
![]() Note When you do want to create your own permission or permissions,
Note When you do want to create your own permission or permissions, hook_permission() is a very straightforward hook, as seen in the example from system.module, documented at api.drupal.org/hook_permission.
So you want to re-use an existing permission rather than create your own. There's a catch, however. The permissions you can see at Administration ![]() People'sPermissions tab (
People'sPermissions tab (admin/people/permissions) are not named exactly the same as their system or internal name, which your module must use. For one thing, all the internal names are (almost always) lower-case only, but the words can change, too. This is not something you want to guess at; access will be denied because no user can have a permission that doesn't exist (except user 1, which ignores user access checks).
![]() Note As of 7, permissions have human-readable names and descriptions. This is great for humans, but you developers, trying to write code that speaks to machines, get left out in the cold a little bit.
Note As of 7, permissions have human-readable names and descriptions. This is great for humans, but you developers, trying to write code that speaks to machines, get left out in the cold a little bit.
There will undoubtedly be a module for matching up Permission's public human-readable names with internal system names—you'll incorporate the functionality into X-ray, in fact—but as developers, you should know how to get this information without a helper module, even if you always use the convenience.
Finding Permissions' System Names in the Database
Longtime Drupal developer Moshe Weitzman celebrates exploring the database as a way of understanding Drupal (in general and in the case of a particular site). To list all the internal names of permissions you can start by looking at your Drupal site's database. Looking at all the tables in it (via the command line as in Listing 19–12 or with a more graphical application such as phpMyAdmin), you can see that table role_permission is the only table with a name that mentions permissions. You can then look inside the role_permission table to see the permissions it holds.
Listing 19–12. SQL Commands for Listing Drupal's Database Tables and the System Names of Permissions
mysql

mysql> SHOW DATABASES;

mysql> USE d7scratch;

mysql> SHOW TABLES;

mysql> SELECT * FROM role_permission WHERE rid=3;
![]() Tip The command line steps in Listing 19–12 use all UPPERCASE letters for SQL commands to help distinguish the commands from information like database, table, and field names; however, you don't need to type SQL commands in all caps, and it's much easier to not mess with hitting the Shift or CapsLk key.
Tip The command line steps in Listing 19–12 use all UPPERCASE letters for SQL commands to help distinguish the commands from information like database, table, and field names; however, you don't need to type SQL commands in all caps, and it's much easier to not mess with hitting the Shift or CapsLk key.
As you will see, there are a lot of permissions even for an untouched Standard install of Drupal. The rid (Role ID) of 3 is Drupal's administrative role which is given all permissions by default (see Listing 19–13). Selecting only for this role allows you to see all the permissions present in the fresh installation, without duplication. The purpose of the role_permission table is to track which roles have which permissions. This is why permission machine names can appear more than once (or for permissions never granted to a role, not at all).
Listing 19–13. Output of the SELECT * FROM role_permission WHERE rid=3 Query on a Fresh Standard Installation of Drupal
+-----+------------------------------------+------------+

| rid | permission                         | module     |

+-----+------------------------------------+------------+

|   3 | access administration pages        | system     |

|   3 | access comments                    | comment    |

|   3 | access content                     | node       |

|   3 | access content overview            | node       |

|   3 | access contextual links            | contextual |

|   3 | access dashboard                   | dashboard  |

|   3 | access overlay                     | overlay    |

|   3 | access site in maintenance mode    | system     |

|   3 | access site reports                | system     |

|   3 | access toolbar                     | toolbar    |

|   3 | access user profiles               | user       |

|   3 | administer actions                 | system     |

|   3 | administer blocks                  | block      |

|   3 | administer comments                | comment    |

|   3 | administer content types           | node       |

|   3 | administer filters                 | filter     |

|   3 | administer image styles            | image      |

|   3 | administer menu                    | menu       |

|   3 | administer modules                 | system     |

|   3 | administer nodes                   | node       |

|   3 | administer permissions             | user       |

|   3 | administer search                  | search     |

|   3 | administer shortcuts               | shortcut   |

|   3 | administer site configuration      | system     |

|   3 | administer software updates        | system     |

|   3 | administer taxonomy                | taxonomy   |

|   3 | administer themes                  | system     |

|   3 | administer url aliases             | path       |

|   3 | administer users                   | user       |

|   3 | block IP addresses                 | system     |

|   3 | bypass node access                 | node       |

|   3 | cancel account                     | user       |

|   3 | change own username                | user       |

|   3 | create article content             | node       |

|   3 | create page content                | node       |

|   3 | create url aliases                 | path       |

|   3 | customize shortcut links           | shortcut   |

|   3 | delete any article content         | node       |

|   3 | delete any page content            | node       |

|   3 | delete own article content         | node       |

|   3 | delete own page content            | node       |

|   3 | delete revisions                   | node       |

|   3 | delete terms in 1                  | taxonomy   |

|   3 | edit any article content           | node       |

|   3 | edit any page content              | node       |

|   3 | edit own article content           | node       |

|   3 | edit own comments                  | comment    |
|   3 | edit own page content              | node       |

|   3 | edit terms in 1                    | taxonomy   |

|   3 | post comments                      | comment    |

|   3 | revert revisions                   | node       |

|   3 | search content                     | search     |

|   3 | select account cancellation method | user       |

|   3 | skip comment approval              | comment    |

|   3 | switch shortcut sets               | shortcut   |

|   3 | use advanced search                | search     |

|   3 | use text format filtered_html      | filter     |

|   3 | use text format full_html          | filter     |

|   3 | view own unpublished content       | node       |

|   3 | view revisions                     | node       |

|   3 | view the administration theme      | system     |

+-----+------------------------------------+------------+

61 rows in set (0.00 sec)
There, toward the top of the list and provided by the required core System module, is a nice permission for X-ray's overview page: “access site reports.” It's the same permission used by the other pages available at Administration ![]() Reports (
Reports (admin/reports). You can use it for X-ray's page too.
![]() Tip Drupal stores all kinds of interesting and important information in its database. It's worth putting in some time to look around in there.
Tip Drupal stores all kinds of interesting and important information in its database. It's worth putting in some time to look around in there.
Finding Permissions' System Names in Code
An alternative way to find the machine name is to search for it in Drupal core. As mentioned, a permission only exists in the database if there is at least one role that has been given it. Once you've seen “view site reports” on the Permissions administration page (admin/people/permissions), you can search for it in the code of Drupal's core modules. Listing 19–14 shows a grep command that can be run from terminal; your operating system's file browser or IDE can also search for a text string in your Drupal code. If run from the root of a Drupal install, this grep command searches only .module files within the modules folder for the text “view site reports.”
Listing 19–14. Command Line Step (in Bold) to Search for “View site reports” Text in Drupal's core
grep -nHR --include=*.module 'View site reports' modules

modules/system/system.module:233:      'title' => t('View site reports'),
As the grep command (or other search) tells you, the one place your text appears is line 233 of system.module, which is shown in Listing 19–15.
Listing 19–15. Excerpt from System module's Implementation of hook_permission()
/**

 * Implements hook_permission().

 */

function system_permission() {

  return array(

// ...
    'access site reports' => array(

      'title' => t('View site reports'),

    ),

// ...

  );

}
![]() Tip This is also, of course, how to define your own permission. Chapter 24 describes it in more depth, but it's as simple as the code in Listing 19–15: the array returned by an implementation of
Tip This is also, of course, how to define your own permission. Chapter 24 describes it in more depth, but it's as simple as the code in Listing 19–15: the array returned by an implementation of hook_permission().
Every implementation of hook_permission() needs to return an array of permission arrays keyed by the internal system name (and including, at minimum, a title element with the human-facing name). The key for the permission with the title “view site reports” in the array returned by system_permission() is “access site reports” so that is what you use as the access argument in your menu item, as shown in Listing 19–16.
Listing 19–16. Menu Item Using the “access site reports” Permission for Access Control
  $items['admin/reports/xray'] = array(

    'title' => 'X-ray technical site overview',

    'description' => 'See the internal structure of this site.',

    'page callback' => 'xray_overview_page',

    'access arguments' => array('access site reports'),

  );
The default local task will inherit this access control (but other tasks, or tabs, will not).
A Second Local Task to Complement the Default Local Task
As mentioned, when you created the first local task, a default local task, no tabs appear from these local tasks until there are at least two defined and accessible to the user, as shown in Listing 19–17.
Listing 19–17. Menu Item Defining a Local Task (Displayed as a Tab) for the X-ray Permission Names Page
function xray_menu() {

  $items = array();

// ...

  $items['admin/reports/xray/permissions'] = array(

    'title' => 'Permissions',

    'page callback' => 'xray_permission_names_page',

    'type' => MENU_LOCAL_TASK,

    'weight' => 10,

    'access arguments' => array('access site reports'),

  );

// ...

  return $items;

}
You gave it a weight of ten so it will appear after the Overview tab which was given a weight of negative ten. Lower (lighter) and negative values are said to float to the top (for elements displayed vertically) and front (for elements displayed horizontally). In left-to-right languages, this means the local tasks with the lightest (most negative or lowest) weights are displayed as tabs to the left of heavier-weighted tabs, as you can see in Figure 19–3.
Figure 19–3. When at least two local tasks are defined, the tabs are shown.
![]() Gotcha While the default tab (
Gotcha While the default tab (MENU_DEFAULT_LOCAL_TASK) inherits its access control from the parent menu declaration, other tabs (MENU_LOCAL_TASK) do not. You must declare access arguments and/or an access callback in your menu item declaration.
Now let's make the function for the page callback you defined, xray_permission_names_page(), and make this page give you permission names, both human-readable and machine!
Call All Implementations of a Hook
You know from your investigation into finding permissions' machine names that the information you need is in modules' implementations of hook_permissions(). How do you get this information for yourself? There's a function for that: module_invoke_all() is used for invoking all implementations of a given hook. From a module, all implementations of hook_permission() in Drupal can be invoked, and their data gathered, with the following single line:
$permissions = module_invoke_all('permission'),
The $permissions variable is now an array keyed by permission machine name, but the values are another array that includes the permission description and other information you don't need. It can be cycled through quickly and the extra data dropped, like so:
  // Extract just the permission title from each permission array.

  foreach ($permissions as $machine_name => $permission) {

    $names[$machine_name] = $permission['title'];

  }
Now let's put these names in alphabetical order by title before handing them off to a theme function. PHP.net has excellent built-in search, so you can just go to php.net/sort to see what it gives you. It takes you directly to PHP's sort() function, but reading the notes for that function indicates it's not good enough. It assigns new keys to the array, and you are using a keyed array: the system names are the keys, pointing to the human-readable title. Throwing out the machine name key would defeat your purpose of showing what the machine or system permission names match the titles. So, you'll use asort(), like so:
  // Put permission names in alphabetical order by title.

  asort($names);
![]() Tip Always read the Notes and SeeAlso sections of PHP manual pages. The related functions listed in these sections, in particular, can teach a great deal about PHP and picking the function you really want, and not your first guess.
Tip Always read the Notes and SeeAlso sections of PHP manual pages. The related functions listed in these sections, in particular, can teach a great deal about PHP and picking the function you really want, and not your first guess.
The next step, handing the sorted $names array to a theme function for formatting as a table, will require a little research.
Format Data for Display as a Table
You'd like to show your permission machine names and permission titles in a nice grid as an HTML table. This is such a common need that surely Drupal has helper functions, an API, for printing tables. Let's find a place in core that does this. As this is a user interface element, instead of looking at code, you can start by browsing the user interface.
Clickety, clickety... aha! The Permissions page itself, at admin/people/permissions, is a table (a complicated table that is also a form with lots of checkboxes, but a table). Searching the code for ‘admin/people/permissions’ to find what creates this page and table turns up these two functions in modules/user/user.admin.inc: user_admin_permissions() and theme_user_admin_permissions(). You can also see the full functions online at api.drupal.org/user_admin_permissions and api.drupal.org/theme_user_admin_permissions.
While stealing code, you can steal your doxygen documentation block from User module. The function theme_user_admin_permissions() has the in-code documentation shown in Listing 19–18.
Listing 19–18. Doxygen Documentation Block for theme_user_admin_permissions()
/**

 * Returns HTML for the administer permissions page.

 *

 * @param $variables

 *   An associative array containing:

 *   - form: A render element representing the form.

 *

 * @ingroup themeable

 */
As with all theme functions, it takes one parameter, $variables. Sometimes $variables contains a single render element—in this case, ‘form’—but it is still provided in an associative array, as noted in this docblock.
Documenting Themeable Code with @ingroup themeable
Furthermore, User module put its theme_user_admin_permissions() function in a theme-related group with the line @ingroup themeable in the introducing docblock. Using the @ingroup instruction is a way to make your code self-documenting.
This theme function is quite complex, as it is dicing and splicing a large form. You don't need any of that and can skip down to the end to see how the table is generated. That's the following line:
$output .= theme('table', array('header' => $header, 'rows' => $rows, 'attributes' => array('id' => 'permissions')));
The $rows variable needs to be an array of rows, and each row is itself an array of cells. Each cell, in turn, can be just a string, or it too can be an array, that separates data (the contents of each cell) from HTML attributes to apply to the table cell. See more at api.drupal.org/theme_table.
Listing 19–19 is X-ray module's version of a simple themed table, built from the data returned by invoking all occurrences of hook_permission().
Listing 19–19. Theme Table for Permission Names (for Machines and for Humans)
/**

 * Display the X-ray permission names page.

 */

function xray_permission_names_page() {

  $names = xray_permission_names();

  return theme('xray_permission_names', array('names' => $names));

}


/**

 * Collect permission names.

 */

function xray_permission_names() {

  $names = array();

  $permissions = module_invoke_all('permission'),

  // Extract just the permission title from each permission array.

  foreach ($permissions as $machine_name => $permission) {

    $names[$machine_name] = $permission['title'];

  }

  // Put permission names in alphabetical order by title.

  asort($names);

  return $names;

}


/**

 * Returns HTML of permission machine and display names in a table.

 *

 * @param $variables

 *   An associative array containing:

 *   - names: Array of human-readable names keyed by machine names.

 *

 * @ingroup themeable

 */

function theme_xray_permission_names($variables) {

  $names = $variables['names'];

  $output = '';

  $header = array(t('Permission title'), t('Permission machine name'));

  $rows = array();

  foreach ($names as $machine_name => $title) {

    $rows[] = array($title, $machine_name);

  }

  $output .= theme('table', array('header' => $header, 'rows' => $rows, 'attributes' => array('id' => 'xray-permission-names')));

  return $output;

}
The final theme function receives an array of permission names with the machine names as the key and the version of the name intended for people to look at as the value, which was created by the xray_permission_names() function defined immediately above it.
Neither theme function theme_xray_permission_names() nor any function to override it will receive anything or be called at all if you don't register it with the Drupal theme system. This is covered next.
Making Modules Themeable
Modules and themes go together perfectly, as made famous in the Drupal power ballad, “I can be your module, you can be my theme” (drupal.org/project/powerballad; listen at your own risk). A well-made module allows all elements of its presentation to be overridden by the theme of the site on which it is used. This is done by using the theme() function whenever you want to send output to the screen or by providing a renderable array to parts of Drupal that will accept one, which includes all page and block output. (In the case of providing a renderable array, Drupal calls theme() for you, making use of #theme and #theme_wrapper properties.) For complex output, several theme functions may feed into another theme function.
For its theme functions to be recognized, your module must implement hook_theme(), which returns an array of theme hooks or callbacks and associated information; most of the time, you just need to give the name that you will put 'theme_' in front of and a theme will put its THEMENAME_ in front. So from the code in Listing 19–19, it's just 'xray_permission_names' and you tell it whether it gets a single render element or an array of variables (which you can name and provide defaults for). Listing 19–20 shows an implementation of hook_theme() for X-ray module, defining the xray_permission_names theme hook with a single variable and so called ‘render element.’
Listing 19–20. Defining the xray_permission_names Theme Hook with a Single Variable and ‘render element’
/**

 * Implements hook_theme().

 */

function xray_theme() {

  return array(

    'xray_permission_names' => array(

      'render element' => 'names',

    ),

  );

}
Although ‘xray_permission_names’ is stated here to take a single renderable array, when passed to a theming function such as theme_xray_permission_names(), it's nested within another array and so can be treated exactly as the $variables array for passing multiple variables to a theming function, which you'll see later.
![]() Tip Whenever you make changes to your implementation of
Tip Whenever you make changes to your implementation of hook_theme(), you need to rebuild the theme registry for those changes to take effect, including when you first define the hook, if your module was already enabled. You can do this in code by placing the function drupal_flush_all_caches(); in a part of your code that is run; remember to remove it later. You can manually clear caches and the theme registry at Administration ![]() Configuration
Configuration ![]() Development
Development ![]() Performance (
Performance (admin/config/development/performance) by clicking the Clear all caches button. And as usual, the most convenient way is with Drush via the command drush cc all.
Resources for Theming in Modules
Reading Chapter 15, on making themes, will certainly help you understand theming for modules. See more on producing quality, overridable output from your module code on drupal.org.
- Read more about
hook_theme()at the Drupal API site atapi.drupal.org/hook_theme. - See every
theme_function in Drupal core—every function a themer can override to change the way Drupal's output looks—atapi.drupal.org/api/group/themeable/7. - Read “Using the Theme Layer (Drupal 7.x)” in the Module Developer's Guide at
drupal.org/node/933976. - See the Drupal Markup Style Guide at
groups.drupal.org/node/6355for a working proposal on the kind of HTML modules should produce.
![]() Note
Note Drupal.org manual pages are entirely written and maintained by volunteers. You may find one talking about how to do something in Drupal 6 but not find a handbook page explaining the Drupal 7 equivalent. As you figure something out, you can edit or create the appropriate handbook page.
A More Drupal 7 Approach: Leveraging the Power of Render Arrays
As noted, the permission names table example was taken from Drupal 7 core, but nevertheless there is a more Drupal 7 way to do it! (User module, from which you took the example, could use some love and attention.) Renderable arrays are now accepted and preferred as the result from a page callback function. In essence, Drupal gathers all the information to display a page as a giant structured array and knows what theming function needs to be run on each part of that array, but doesn't run anything until it has everything together. This lets anyone come and easily move pieces of the page around (and is described in Appendix C). You call to your own theme function in the xray_permission_names_page() callback and your subsequent call to the table theming function short-circuited that page, altering ability a bit. Adopting the renderable array approach also makes it sensible to refactor your code to not need a custom theming function at all, as shown in Listing 19–21.
Listing 19–21. Refactoring the X-ray Permission Names Page Callback to Take Advantage of Drupal 7's Render System
/**

 * Display permission machine and display names in a table.

 *

 * @return

 *   An array as expected by drupal_render().

 */

function xray_permission_names_page() {

  $build = array();

  // Gather data, an array of human-readable names keyed by machine names.

  $names = xray_permission_names();

  // Format the data as a table.

  $header = array(t('Permission title'), t('Permission machine name'));

  $rows = array();

  foreach ($names as $machine_name => $title) {

    $rows[] = array($title, $machine_name);

  }

  $build['names_table'] = array(

    '#theme' => 'table__xray__permission_names',

    '#header' => $header,

    '#rows' => $rows,

    '#attributes' => array('id' => 'xray-permission-names')

  );

  return $build;

}
You're using the same data gathering function and setting up the data in the same way, and you're using the same theme_table() function you identified before, but you're telling Drupal to call that function by identifying it in the #theme property in the sub-array you are returning. What before was the array of variables handed to the theme table call becomes additional properties (#rows, #header, #attributes) that Drupal will hand to table theming function for you.
Did you just undo the work you did? Well, yes. Letting go of old code is how code gets better. But everything you learned about theming still applies and will be used again shortly!
You added one innovation here: the extension of the name of the table theming hook from ‘table’ to 'table__xray__permission_names'. Each double underscore means that everything after the double underscore is optional, so core's theme_table() function still handles theming for you, but you've now enabled themers who want to tweak your table to override theme_table() in this instance only (or for all X-ray tables, stopping at the first set of underscores) rather than the unworkable proposition of changing the theming of all tables in Drupal. This could also have been done for the table function when calling via theme().
Removing your custom function from the mix means that if themers wanted to add text, for example, instead of overriding your theme function, they would be better off adding it to the renderable page array with hook_page_alter(). See Appendix C for more about renderable arrays and the flexibility they provide in altering pages after the fact.
Calling a Drupal Function Directly
Hooks are not the only way to interact with Drupal's code; it has many useful functions you will want to call directly. The example in Listing 19–22 is a pretty internal-focused function used in this case (because the goal of X-ray module is to show Drupal's internal functioning), but it demonstrates the principle of getting data from a Drupal function and using parts of it.
Listing 19–22. Displaying Router Information with menu_get_item() Information
/**

 * Provide the page callback function (and other router item information).

 */

function xray_show_page_callback() {

  // Do not hand in the path; menu_get_item() finds dynamic paths on its own

  // but fails if handed help's $path variable which is node/% for node/1.

  $router_item = menu_get_item();

  // menu_get_item() can return null when called via drush command line.

  if ($router_item) {

    return theme('xray_show_page_callback', $router_item);

  }

}


/**

 * Theme the page callback and optionally other elements of a router item.

 */

function theme_xray_show_page_callback($variables) {

  extract($variables, EXTR_SKIP);

  $output = '';

  $output .= '<p class="xray-help xray-page-callback">';

  $output .= t('This page is brought to you by '),

  if ($page_arguments) {

    foreach ($page_arguments as $key => $value) {

      $page_arguments[$key] = drupal_placeholder($value);

    }

    $output .= format_plural(count($page_arguments),

      'the argument !arg handed to ',

      'the arguments !arg handed to ',

      array('!arg' => xray_oxford_comma_list($page_arguments))

    );

  }

  $output .= t('the function %func',

               array('%func' => $page_callback . '()'));

  if ($include_file) {

    $output .= t(' and the included file %file',

                 array('%file' => $include_file));

  }

  $output .= '.</p>';

  return $output;

}
The first function assigned the return value of menu_get_item() to a variable, $router_item, and handed it to a theme function. The default implementation for this theme function is the second function in Listing 19–22. It checks the information available and adds it to an output variable, which it returns at the end. Note that it uses another function created for X-ray module, xray_oxford_comma_list(), which is defined later in this chapter.
![]() Tip Theme functions are always handed arrays, even for a sole render element. A quick way to deal with the array, as demonstrated in
Tip Theme functions are always handed arrays, even for a sole render element. A quick way to deal with the array, as demonstrated in theme_xray_show_page_callback() in Listing 19–22, is to make the first line of theming function extract($variables, EXTR_SKIP);. This converts a single element in $variables into a variable of the name provided for 'render element' and multiple $variables into the names provided for 'variables' in the implementation of hook_theme(). The EXTR_SKIP parameter is a security precaution preventing any existing variable from being overwritten.
Remember that this theme_xray_show_page_callback() function (and any function that would override it), which you are counting on to display the information you gathered, will not be found by the Drupal theme system unless you register it with Drupal in hook_theme(); see Listing 19–23.
Listing 19–23. Addition to hook_theme() Defining the xray_show_page_callback Theme Function with Three Variables
/**

 * Implements hook_theme().

 */

function xray_theme() {

  return array(

// [existing code not shown to save space]

    'xray_show_page_callback' => array(

      'variables' => array(

        'page_callback' => NULL,

        'include_file' => NULL,

        'page_arguments' => NULL,

      ),

    ),

  );

}
Don't forget to clear caches!
Any variable passed to a theming function in the $variables array will be available to the theming function, but only the ones defined in hook_theme() (in this case, these are page_callback, include_file, and page_arguments) can be absolutely counted on to be initialized—to exist and have the values set, all NULL in this case, but any defaults can be given. (In this unusual case of providing an entire function's result to the theme, instead of defining the three variables you plan to use, as in Listing 19–23, you could have run menu_get_item() in the theme hook just for the purpose of defining every key it returns as NULL or an empty string.)
One final thing necessary to start seeing this work is to use hook_help() to print it; this can be seen at dgd7.org/259.
Styling Your Module: Adding a CSS File
The first duty of a module, regarding how it looks, is to be modifiable by themes. That doesn't mean it can't provide its own default appearance. And far be it for Drupal to cramp your style! Modules can have their own cascading style sheets (CSS) added to every page by listing them in their .info file, just like themes can. The CSS file uses the classes or IDs you gave to the module's HTML output to style it.
Add stylesheets with the stylesheets[TYPE][] directive, where TYPE is the type of media (print, screen, etc.) that the stylesheet should be used for. The second set of brackets is because there can be multiple stylesheets for a given medium. If you want your stylesheet to be used no matter what medium the site is viewed through, use ‘all’ for the type, as shown in Listing 19–24.
Listing 19–24. The .info File with Stylesheets Directive
name = X-ray technical site map

description = Shows internal structures and connections of the web site.

package = Development

core = 7.x

stylesheets[all][] = xray.css
![]() Note Stylesheet files are listed in the
Note Stylesheet files are listed in the .info file with the stylesheets directive, not the files directive.
Listing 19–25. A CSS file for the X-ray Module Boringly (but Properly) Called xray.css
p.xray-help,

div.xray {

  display: block;

  color: white;

  padding: 5px;

  background-color: black;

  border: 4px solid white;

  -webkit-border-radius: 8px;

  -moz-border-radius: 8px;

border-radius: 8px;

}
In Listing 19–25, the line added to xray.info tells Drupal to add this CSS (the contents of the specified file, xray.css) on every page. The files xray.info and xray.css are both at the same level in the xray directory, or else xray.info would have had to provide the path to xray.css. The style defined in Listing 19–25 gives the help messages and form-identifying divs a stylish, slimming black background and rounded borders. This works because you wrapped your output in classes when printing via hook_help() and hook_form_alter().
![]() Caution Always namespace your module's CSS files; that is, use your module's name as the name of your CSS file or as the first part of the name of your CSS files. This is because Drupal lets themes automatically override CSS files simply by having them named the same, and you do not want a theme accidentally overriding your stylesheet.
Caution Always namespace your module's CSS files; that is, use your module's name as the name of your CSS file or as the first part of the name of your CSS files. This is because Drupal lets themes automatically override CSS files simply by having them named the same, and you do not want a theme accidentally overriding your stylesheet.
Figure 19–4. X-ray module's display (including two help-area messages and the form ID printed in the form)
Listing 19–26. Additions to the xray.css File
/* Make non-help xray font size consistent with help text size. */

div.xray {

  font-size: 0.923em;

}


/* Remove extra form item padding in X-ray output (for form ID). */
div.xray .form-item {

  margin: 0;

  padding: 0;

}
Once you have entries in your CSS file that apply to the HTML you need to affect (and have cleared Drupal's CSS aggregation and your browser's cache) you can use an HTML/CSS inspection tool such as Firefox's Firebug to tweak properties until you have the visual effect you want. Listing 19–26 shows additions to the xray.css file. Your module's style should be tested in at least the core themes of Stark, Bartik, and Garland. If your module will output anything that will be seen in the administration section, such parts should also be tested in core's Seven theme.
Database API
Drupal 7 introduced a robust database layer built on PHP Data Objects (PDO), a lightweight, consistent interface for accessing databases. Dubbed DBTNG (Database The Next Generation) by its lead developer, Larry Garfield (crell), the Drupal 7 Database API provides object-oriented tools for adding, changing, and reading SQL data.
The vendor-agnostic abstraction layer for accessing multiple kinds of database servers is designed to preserve the syntax and power of SQL when possible but more importantly, it:
- Allows developers to use complex functionality, such as transactions, that may not be supported natively by all database engines.
- Provides a structure for the dynamic construction of queries.
- Enforces security checks and other good practices.
- Provides modules with a clean interface for intercepting and modifying a site's queries.
The most obvious benefit is that your Drupal application can run with any database (or more than one database) that has a driver written to work with the Drupal 7 Database API. All queries properly written to take advantage of the database layer will not care what database your site is using. Drupal core, out of the box, works with MariaDB/MySQL, PostgreSQL, and SQLite. Database back ends already exist for MSSQL (drupal.org/project/sqlsrv) and Oracle (drupal.org/project/oracle). (The so-called NoSQL MongoDB database used to help scale Drupal in Chapter 27 makes use of pluggable storage for Field API and does not use the database abstraction layer, which is designed for SQL databases.)
![]() Note As of 7, Drupal provides transaction support. This means that if you are making changes to the database and it's critical to your application that these changes be all or nothing—the classic example is debiting one account to credit another account—then you need to wrap your interaction with the database in a transaction. This is done by declaring a transaction variable with the function described here,
Note As of 7, Drupal provides transaction support. This means that if you are making changes to the database and it's critical to your application that these changes be all or nothing—the classic example is debiting one account to credit another account—then you need to wrap your interaction with the database in a transaction. This is done by declaring a transaction variable with the function described here, api.drupal.org/db_transaction. The transaction continues until that variable is destroyed (which includes at the close of the function in which it is defined).
One additional large benefit, derived from the unified structure for dynamic queries (including all insert, update, and delete queries), is that the intelligent database layer helps your site scale. Multiple insert operations will be performed in one query for databases that support this (a much faster approach allowed by the very common MariaDB/MySQL database, among others), and fall back to repeating a series of single queries for databases that do not support it.
All in all, DBTNG is one of the key developer-experience initiatives of the Drupal 7 release cycle. Next, I will cover how to use it. You can also refer to the excellent documentation at drupal.org/developing/api/database and api.drupal.org/api/group/database, along with the DBTNG Example module in drupal.org/project/examples.
Fetching Data with a Select Query
Pulling data out of the database is the most common database-related task you'll see in Drupal core, contributed modules, and your own modules.
For the summary X-ray provides at the top of the Structure administration page, it would be nice to show how many content types the site has. This means counting the number of content types, of course. You can get the number of content types by looking in the node_type table. Use a command line database client or an application such as phpMyAdmin to browse your site's database tables and the columns and content within them.
Out of the box, Drupal stores its data in relational databases (that's what MariaDB/MySQL, Postgres, and SQLite are). The data can be accessed, manipulated, and saved by using the standardized structured query language SQL. As noted, all dynamic queries (which include manipulating and saving) should use the Database API query builder, but non-dynamic, or static, queries can and should use SQL directly. (There are lapses in standardization, and working around these is one of the purposes of the Database API, but this is not a concern in most cases of selecting data.)
You're encouraged to use straight SQL for data access queries (when possible; more on that in a moment). This means using the db_query() function for SQL queries starting with SELECT, as shown in Listing 19–27.
Listing 19–27. Basic SQL Query to Count Content Types from the node_type Table
db_query("SELECT COUNT(*) FROM {node_type}")->fetchField();
The SQL is within the quotation marks. Frequently, such SQL will take the form of "SELECT column_a, column_b FROM table_y". In this example, instead of selecting data with a column name, it selects a count of all rows from the table node_type. When a method for fetching a single field, ->fetchField(), is added to it, db_query() returns a number directly. That number is 2 for the two content types (Article and Basic page) in a fresh Standard installation of Drupal.
The db_query() function passes whatever you give it to the database almost exactly; it does prefixing and expands array-placeholders, but that's it. This is the simplest and fastest way for Drupal to get data that can be fetched with a single standard SQL query.
![]() Tip You can't attach methods to
Tip You can't attach methods to db_query()except for the fetch*() methods.
To be complete, this query should not return anything for disabled content types. That means adding a WHERE clause.
![]() Tip Use phpMyAdmin or the command line
Tip Use phpMyAdmin or the command line mysql to test queries. You'll need to use actual table names (without brackets) and values (not placeholders). You will also have to do escaping yourself (quotes around strings but not numbers); with db_query() and db_select() queries properly written using placeholders, Drupal does this for you. The advantage is that you can test the query instantly, and tools like phpMyAdmin can help you construct the query.
The code in Listing 19–28 is an example of a raw SQL query that could be run in the command line or with an application such as phpMyAdmin.
Listing 19–28. Raw SQL to Return the Number of Available Content Types from the Node Type Table
SELECT COUNT(*) FROM node_type WHERE disabled = 0;
![]() Gotcha If you aren't familiar with SQL, here's your first gotcha—the equality comparison is a single equals sign, not two. In SQL, you should use
Gotcha If you aren't familiar with SQL, here's your first gotcha—the equality comparison is a single equals sign, not two. In SQL, you should use <> for the “does not equal” comparison, which will also work in PHP.
To use this query in Drupal, you use the db_query() function and make several modifications to the SQL. Listing 19–29 is the same query as Listing 19–27 but in the style that Drupal needs as the content of a db_query(); in other words, it has brackets around the table name and values passed in via placeholders.
Listing 19–29. Recommended Basic-SQL Query to Count Content Types from the node_type table
db_query("SELECT COUNT(*) FROM {node_type} WHERE disabled = :status", array(':status' => 0))->fetchField();
You have replaced node_type with {node_type} so that your module will work on sites that use database table prefixes. The second, bigger change is using a placeholder. Instead of disabled = 0, you have disabled = :status. In this case, it's replacing a hardcoded zero, and isn't strictly necessary. When it's a variable that may come from a user, it is absolutely necessary. You should never see something like disabled = $status; it should always be disabled = :status with the array(':status' => $status) in the select queries second parameter. Note that you can have as many placeholders in this array as you want.
Using the placeholder array is a best practice and is absolutely required for potentially user-sourced variables, so it should always be used for all variables. Placeholders also take care of quoting string values for you (and handing in numeric values without quotation marks).
![]() Tip You can test simple queries like this (and other code) in a bootstrapped
Tip You can test simple queries like this (and other code) in a bootstrapped test.php file by creating a file with the first three (out of four) lines of code from index.php and then adding the code you want to run after that. Don't forget to print the output. See Chapter 33 or dgd7.org/testphp for a full explanation of using a test.php file to help your development flow.
Drupal's more complex database function db_select() can also be used to make unchanging (static) queries that fetch data, although this use is not recommended. If you already know even a little SQL, the simple db_query() approach will be easiest for you. If you are not familiar with SQL, learning both normal SQL and Drupal's object-oriented syntax for databases can be a lot at once. The same simple select query written using the db_select() function can look the one in Listing 19–30, which counts the number of content types on a site, needlessly using the full Database API (for example only).
Listing 19–30. A Simple Select Query
  db_select('node_type')

    ->fields('node_type')

    ->condition('disabled', 0)

    ->countQuery()

    ->execute()

    ->fetchField();
This query selects the table node_type, adds all fields for the node_type table just so the query runs, adds a condition that is equivalent to a "WHERE disabled = 0" clause, adds the countQuery() method, executes (runs) the query, and fetches the single field. The countQuery() method makes this query return a count of the rows in the result set rather than the content of any of the fields. For more counter-examples of db_select() versions of static queries, see dgd7.org/235.
![]() Note Best practices for realizing the virtues of avoiding duplicate code and writing maintainable code dictate that you investigate other ways to get this information from Drupal's APIs, rather than writing your own query. And Drupal has APIs coming out of its ears. A new API in Drupal 7 that is eminently relevant to getting information about content types (and, as you shall see, other central components of Drupal) is the Entity API. This is covered in the upcoming section “Drupal Entities: Common Structure Behind Site Components” (after a whole lot more on the Database API).
Note Best practices for realizing the virtues of avoiding duplicate code and writing maintainable code dictate that you investigate other ways to get this information from Drupal's APIs, rather than writing your own query. And Drupal has APIs coming out of its ears. A new API in Drupal 7 that is eminently relevant to getting information about content types (and, as you shall see, other central components of Drupal) is the Entity API. This is covered in the upcoming section “Drupal Entities: Common Structure Behind Site Components” (after a whole lot more on the Database API).
Before moving on to dynamic queries that require db_select(), let's look at a few more examples of static queries that put their SQL in the db_query() function.
Fetching Data with a Static Query with a Join on Two tables
Another piece of information the X-ray module can provide is the number of blocks enabled for each theme. There are several queries in modules/block.module that get information from the block table, but they don't fetch precisely this information, and in any case they aren't in stand-alone API functions that you could use. You therefore have every justification in writing your own query. You can wrap it in a function for easy re-use later, as shown in Listing 19–31.
Listing 19–31. Static Query to Count the Number of Blocks Enabled for Each Theme
/**

 * Fetch the number of blocks enabled per theme.

 */

function xray_stats_blocks_enabled_by_theme() {

  return db_query("SELECT theme, COUNT(*) as num FROM {block} WHERE status = 1 GROUP BY theme")->fetchAllKeyed();

}
The ->fetchAllKeyed() method provided by Drupal's Database API for db_query() objects takes any two-column result set (here, the theme and the count of blocks) and makes an array in which the values from the first column are the keys to the values from the second column.
Listing 19–32. The Array Returned by db_query(“SELECT theme, COUNT(*) as num FROM {block} WHERE status = 1 GROUP BY theme”)->fetchAllKeyed();
array (

  'bartik' => '10',

  'garland' => '7',

  'seven' => '9',

  'stark' => '7',

)
![]() Caution The
Caution The ->fetchAllKeyed() method returns only the first two columns of a result set and silently ignores the rest.
There are still two things wrong in Listing 19–32. First, this section is titled “Static Query with a Join” and this query doesn't have a join yet. Second, this query is returning the number of enabled blocks for every theme, when restricting the report to enabled themes would make more sense. Let's revise the query to solve both those problems, as shown in Listing 19–33.
Listing 19–33. Static Query Involving a Join from the Block Table to the System Table to Restrict Data Reported to Enabled Themes
/**

 * Fetch the number of blocks enabled per enabled theme.

 */

function xray_stats_blocks_enabled_by_theme() {

  return db_query("SELECT b. theme, COUNT(*) as num FROM {block} b INNER JOIN {system} s ON b.theme = s.name WHERE s.status = 1 AND b. status = 1 GROUP BY b. theme")->fetchAllKeyed();

}
The first necessary new part of this query is that the reference to the {block} table is followed by a letter b (which could be most any characters or word) that acts as its table alias. The next major addition is the join statement, which is what makes the table alias necessary; it's now possible to have two columns with the same name from different tables. That b is then used in front of the where condition status = 1, such that it becomes b.status = 1. This is necessary for database engines to differentiate between block status and theme status because the table you are joining to the block table, system, also has a status column.
The system table, for its part, is also given an alias, s, as can be seen in the join statement, which immediately follows and becomes part of the from statement, such that together it reads FROM {block} b INNER JOIN {system} s ON b.theme = s.name.
An inner join means that there has to be a match in each table for a row to exist in the result set, and the “ON” part of the statement declares the columns to match the tables on;in this case, it's the block (b) table's column theme (which contains theme system names) with the system (s) table's column name (which contains project names including themes). Table aliases are used consistently throughout to prevent any ambiguity, although in this case there is no theme column in the system table, and no name column in the block table, so the table alias ‘b’ for the block table could be left off when referring to the theme column and the alias ‘s’ left off when referring to the name column, but once you start making joins, it's important to be explicit.
A Non-Database Interlude: Displaying the Same Data in Two Locations
Before moving on to dynamic, structured queries, let's take a moment away from the database to close the loop and show X-ray's information to site builders. First, Listing 19–34 shows a function for providing a full summary of the Structure page which calls the function you just defined, xray_stats_blocks_enabled_by_theme(), and a couple others defined elsewhere.
Listing 19–34. Displaying Summary Data on the Structure Page
/**

 * Summary data for Structure section (admin/structure).

 */

function xray_structure_summary() {

  $data = array();

  $data['blocks_enabled_by_theme'] = xray_stats_blocks_enabled_by_theme();

  $data['block_total'] = xray_stats_block_total();

  $data['content_type_total'] = xray_stats_content_type_total();

  // @TODO menu, taxonomy

  return $data;

}


/**

 * Implements hook_theme().

 */

function xray_theme() {

  return array(

// [existing code not shown for space reasons] ...

    'xray_structure_summary' => array(

      'variables' => array(

        'data' => array(),

        'attributes' => array('class' => 'xray-help'),

      ),

    ),

  );

}
/**

 * Implements hook_help().

 */

function xray_help($path, $arg) {

  $help = '';

// [existing code not shown for space reasons] ...

  switch ($path) {

    // Summaries for main administrative sections.

// [existing code not shown for space reasons] ...

    case 'admin/structure':

      $variables = array('data' => xray_structure_summary());

      return $help . theme('xray_structure_summary', $variables);

// [existing code not shown for space reasons] ...

    default:

      return $help;

  }

}


/**

 * Returns HTML text summary of Structure section (admin/structure) data.

 *

 * @param $attributes

 *   (optional) An associative array of HTML tag attributes, suitable for

 *   flattening by drupal_attributes().

 * @param $variables

 *   An associative array containing:

 *   - data: result of xray_structure_summary().

 *

 * @ingroup themeable

 */

function theme_xray_structure_summary($variables) {

  // Make direct variables of xray_structure_summary()'s data elements.

  extract($variables['data'], EXTR_SKIP);

  $attributes = drupal_attributes($variables['attributes']);


  $output = '';
  $output .= "<p $attributes>";

  $output .= t('This site has @total blocks available. Of these,',

             array('@total' => $block_total));

  $output .= ' ',

  $list = array();

  foreach ($blocks_enabled_by_theme as $theme => $num) {

    $item = '';

    $item .= format_plural($num, '1 is enabled', '@count are enabled'),

    $item .= ' ' . t('on %theme', array('%theme' => $theme));

    if ($theme == variable_get('default_theme', 'bartik')) {

      $item .= t(', the default theme'),

    }

    elseif ($theme == variable_get('admin_theme', 'seven')) {

      $item .= t(', the admin theme'),

    }

    $list[] = $item;
  }

  $output .= xray_oxford_comma_list($list, array('comma' => '; '));

  $output .= '.  ';

  $output .= format_plural($content_type_total,

    'The site has one content type.',

    'The site has @count content types.'

  );

  return $output;

}
The xray_oxford_comma_list() function is defined in Chapter 20 in the section titled “Writing a Utility Function when Drupal's APIs Miss Your Need.” For now all that matters is that it turns the array of items provided to it into a text string output.
Listing 19–35. Reusing the Summary on the X-ray Reports Overview Page
/**

 * Overview page with summaries of site internal data.

 */

function xray_overview_page() {

  $build = array();

  $build['intro'] = array(

    '#markup' => '<p>' . t("Technical overview of the site's internals.  These summaries also appear / can be configured to appear on main administration section.") . '</p>',

  );

  // Repeat each summary from the top of each administrative section.

// [existing code not shown for space reasons] ...


  $build['structure_title'] = array(
    '#theme' => 'html_tag',

    '#tag' => 'h3',

    '#attributes' => array('class' => 'xray-section-title'),

    '#value' => t('Structure summary'),

  );

  $data = xray_structure_summary();

  $build['structure_summary'] = array(

    '#theme' => 'xray_structure_summary',

    '#data' => $data,

    '#attributes' => array('class' => 'xray-report'),

  );


  return $build;

}
The overview page is built as a renderable array. Unlike the somewhat antiquated Help system, where you must call theme() yourself to process your array of variables to an HTML string, in the page callback function xray_overview_page() you can build and return an entire renderable array and Drupal will know what to do with it. A site builder could alter this page array by changing the #theme function or even adding to the #data array, but it's unlikely anyone would need to get this fancy. Most themers' needs will be met with CSS, and so you also hand in a different class (in the #attributes array) to make it very straightforward to style it differently with CSS should you or anyone else choose to do so.
There are two more functions providing data for the information you just themed and presented about the site's Structure administration section. This data is also provided by SQL queries.
Using variable_get() and Another Static Select Counting and Grouping Query
The other inputs for presenting structure-related information also came from static (db_query()-style) SQL queries. The one that fetched content type statistics was the function xray_stats_content_type_total() returning the query you showed in Listing 19–26 for selecting the count of non-disabled content types.
The other piece of data used was the total number of blocks available, which can be calculated from the block table, filtered by theme as the block table has a row for every block for each theme.
Listing 19–36. Query to Return the Total Number of Blocks Available to a Site
/**

 * Fetch the total number of blocks available on the Drupal site.

 */

function xray_stats_block_total() {

  // Get count of total blocks.  All blocks are repeated in the block table

  // for each theme, so you filter for one theme (it could be any theme).

  return db_query("SELECT COUNT(*) FROM {block} WHERE theme = :theme", array(':theme' => variable_get('theme_default', 'bartik')))->fetchField();

}
Listing 19–36 uses Drupal's variable_get() function. The variable_get() function is funny because it must always provide its own default value as the second parameter (here, ‘bartik’). This should be the same value a corresponding variable_set() function uses. This is because the variable_set() function may not have ever been run, if for instance no one has saved the settings page on which it is used. In this case, the configuration value does not exist in the {variable} table (which is loaded into the $conf array on every page load), and the variable_get() will return nothing.
Analogous queries and theming functions are used in the module to get information about other sections of the site; see the code or dgd7.org/252.
![]() Tip Drupal doesn't have the most consistent naming scheme for its tables. Usually this is due to the need to avoid words that are reserved for special use by various databases. Hence, although the rule is that tables take the singular form of what they hold (comment, block, variable), the table of user records is called users because the term user is reserved in MySQL.
Tip Drupal doesn't have the most consistent naming scheme for its tables. Usually this is due to the need to avoid words that are reserved for special use by various databases. Hence, although the rule is that tables take the singular form of what they hold (comment, block, variable), the table of user records is called users because the term user is reserved in MySQL.
Dynamic Queries
As mentioned, it's best to use the simple SQL queries when possible, and you have begun to demonstrate the query builder alternative, but you have not defined what “when possible” means. The Database API's functions and methods (for all the goodness of DBTNG described in the opening section) must be used for all dynamic queries, which includes using db_select() instead of db_query() for dynamic select queries. A dynamic query is:
- All
INSERT,UPDATE, orDELETEqueries (for which the Database API providesdb_insert(),db_update(), anddb_delete()respectively). SELECTqueries that Drupal may need to modify, such as to provide access control.SELECTqueries that you want to change based on user input (meaning the structure of the query changes, asdb_querycan handle what is passed in).SELECTqueries that make use of functionality that is not implemented consistently across different database engines. For instance, if you usedb_select()withLIKE(orNOTLIKE) as the third parameter of a->condition()method, you can be sure the comparison will be done in a case insensitive manner.
![]() Note The need to provide access control includes every time you query the node table, so you must use the
Note The need to provide access control includes every time you query the node table, so you must use the db_select() query builder and include the method ->addTag('node_access') before the ->execute() method. Leaving off this tag constitutes a security hole in that site visitors may see content they are not authorized to see, such as unpublished nodes. Don't tell anyone you read it here, but if you are new to SQL and learning it along with the Database API, there's nothing horribly wrong with sometimes using the heavier Database API functions even when you don't need them, if you're simply more comfortable with them. However, the db_query() SQL approach has several additional qualities that argue for its use whenever possible: you learn the underlying queries (which is valuable for using the query builder approach also); you will be able to test a query more rapidly than with the db_select() query builder (such as directly on the database without Drupal at all), and finally, you may need to do complex queries that the query builder can't do.
You've been looking at the database a lot in this chapter. In an ideal Drupal world, your module would not be looking at the database tables of another module; instead there'd be an API to get whatever information it needs. Practically, it would be an exercise of premature optimization for a module developer to try to make a function for anything that another module might want from its data. The database layer, as mentioned, is very robust in Drupal 7 and lets the storage of data be handled by any database that provides integration with Drupal's database layer, without your code having to care what database gets used. When your module needs to store data, however, it is undoubtedly your job to use the database layer!
You've seen one contrived example of a query-builder; now let's look at some real ones. But first, if your module is going to be manipulating its own data with SQL, it needs to make a database table.
The .install File
In case you couldn't guess, creating a database table involves another hook: hook_schema().
Every hook you have looked at so far has been implemented in the .module file, but there are four main types of hooks that go in a different file: the .install file. These hooks are hook_install(), hook_schema(), hook_uninstall(), and hook_update_N(). When your module has its own database table, you need a .install file that implements hook_schema(). There are other reasons to have a .install file, too. Your hook_install() can insert data into that database table (or another module's) and it can be used to add a nice message with drupal_set_message() to help people know what to do when your module is enabled. One or more implementations of hook_update_N(), such as example_update_7000 and example_update_7001(), are needed if the schema of your database tables have changed. While you should always ensure hook_schema() has the most current schema, if you've released versions of your module and then changed the schema, you need hook_update_N() to catch people up who installed your module with the old schema.
Other .install module hooks (or really, all of these are callbacks as they are called for the one module being installed only) include hook_requirements(), to have any requirement you can code checked before your module is installed, and hook_update_dependencies(), to make sure hook_update_N() functions that rely on another module's hook_update_N() function don't run before it. See dgd7.org/253 for conveniently clickable links to api.drupal.org for these functions and for more information on all .install callbacks.
![]() Note As of 7, if all your module needs to do is define a database table, you can skip implementing
Note As of 7, if all your module needs to do is define a database table, you can skip implementing hook_install() and hook_uninstall(). If Drupal sees a hook_schema() implementation in your .install, it figures out that you want the tables defined in it created on install and removed on uninstall. Note that if your module puts any configuration settings in the variable table, you'll still have to use hook_uninstall() to clean that up yourself with variable_del() or your own SQL call via db_delete().
Figuring Out Your Data Model
Before creating your database tables, and ideally before coding related parts, you need to decide what data model will serve your purposes.
The X-ray module needs a database table to store a record of hook invocations that are made on a site, so that it doesn't have to start fresh at each cache refresh, and so that it can combine hook information from multiple sources in one, sortable table. The information you'd like to store is:
- The name of the hook invoked.
- The time you first recorded the hook being invoked.
- The time you last recorded the hook being invoked.
- The list of modules that implement this hook, if any.
The code that gather shook information, the invocation of the hook module_implements_alter(), only runs when the hook implementation cache is cleared, so recording the total number of times you recorded the hook being invoked doesn't seem likely to mean anything definite. You'll put a count in there anyway to see if any patterns arise.
![]() Note When Drupal stores additional data that may have varying structures or amounts and that it will not want to sort, Drupal often chooses to stuff it all into a single column as a serialized array.
Note When Drupal stores additional data that may have varying structures or amounts and that it will not want to sort, Drupal often chooses to stuff it all into a single column as a serialized array.
Because a database can't sort on a list of information such as you will be storing in the modules column, you can add another piece of information you'd like to store separately: the number of implementing modules. (You could also store the implementing modules in a separate database table with two columns, hook and module, where the two together provide a unique combination—but a separate table for this violates the common-sense rule of starting simple and adding what you need when and if you need it. Initially, X-ray even skipped its own table at all, pulling information for what hooks were invoked from Drupal's cache_bootstrap table; see dgd7.org/255.)
Creating a Database Table
Drupal core's. install files and their hook_schema() implementations are a great place to look for how to define various data types. For the hook name, you'll need a basic text string: varchar. For timestamps, numbers are used: int. A database field type for a moderately-sized serialized array was harder to find, but system_schema() had it for the {system} table's info array, so you'll copy and modify its definition, where the type is blob. For a count, you want an integer again (int). The primary key is the hook (each hook should appear only once in the table), and you're going to be certain to add an index for each additional column (field) that you wish to sort by. Note that the primary key is automatically indexed.
That's been enough ado. Now let's define a database table. Create the .install file, if you don't have one yet, and implement hook_schema(). Listing 19–37 shows the schema definition for X-ray module for a table to hold hook invocation and implementation information, with four columns (or fields).
![]() Note While every module with its own database tables should define them in its .
Note While every module with its own database tables should define them in its .install file, when data storage is handled on your module's behalf, such as is the case with the Field API, you don't define the table yourself.
Listing 19–37. This Entirety of the xray.install File
<?php

/**

 * @file

 * Install, update and uninstall functions for the X-ray module.

 */


/**

 * Implements hook_schema().

 */

function xray_schema() {

  $schema['xray_hook'] = array(

    'description' => 'A record of hook invocations (using module_invoke_all).',

    'fields' => array(

      'hook' => array(

        'description' => 'The primary identifier for a node.',

        'type' => 'varchar',

        'length' => 255,

        'not null' => TRUE,

        'default' => '',

      ),

      'first' => array(

        'description' => 'Timestamp of when the hook was first recorded.',

        'type' => 'int',

        'unsigned' => TRUE,

        'not null' => TRUE,

        'default' => 0,

      ),

      'last' => array(

        'description' => 'Timestamp of when the hook was last recorded.',
        'type' => 'int',

        'unsigned' => TRUE,

        'not null' => TRUE,

        'default' => 0,

      ),

      'count' => array(

        'description' => 'Total count of times the hook is recorded as invoked.  Note that this is only recorded after a cache clear.',

        'type' => 'int',

        'unsigned' => TRUE,

        'not null' => TRUE,

        'default' => 0,

      ),

      'modules' => array(

        'description' => 'A serialized array of module machine names for the modules which implement this hook.',

        'type' => 'blob',

        'not null' => TRUE,

      ),

      'modules_count' => array(

        'description' => 'Count of the number of implementing modules.',

        'type' => 'int',

        'unsigned' => TRUE,

        'not null' => TRUE,

        'default' => 0,

      ),

    ),

    'indexes' => array(

      'xray_hook_first' => array('first'),

      'xray_hook_last'  => array('last'),

      'xray_hook_count' => array('count'),

    ),

    'primary key' => array('hook'),

  );

  return $schema;

}
While you no longer have to tell Drupal to create a database table on install or destroy it on uninstall, if you have an existing, released module, you do have to tell it to create the table in an update hook. Moreover, you need to copy the schema into that update hook because it needs to be the baseline against which any other updates are run. Imagine you add a database table in version 1.2 of your module, add a column to it in version 1.3, and change the unique indexes in version 1.4. Someone who downloads 1.4 should have a version of hook_schema() that includes all of that. However, your true fan (the person you really care about) who had version 1.1 of your module and upgraded to 1.2 needs an update hook that creates the database table. When updating to version 1.3, the same fan will need an update hook that adds a column. And so again when updating to version 1.4. (In fact, X-ray had a beta release before this table was added, and so needs the install-a-whole-table update hook. Details on this and the more common uses of hook_update_N() at dgd7.org/261.)
Inserting and Updating Data
You have a database; now it's time to populate it. Frequently you will be either inserting new rows of data or updating existing rows of data in about the same place in the code. As noted later, db_merge() is often the best function to use for that. That isn't always the case, though, and isn't so here: you need both db_insert() and db_update() when adding or updating hook information to the {xray_hook} table defined in the previous section.
The reason you can't use db_merge() is that you want to set the “first time” if you are inserting, but leave it alone if you are updating. You also want to increment the count value. Therefore, you need to check if the hook has been saved already and fetch the value from the count column. This should be done with straight SQL and can be done in one statement. Listing 19–38 shows the use of the db_insert() and db_update() Database API functions. Because there are a few bumps in the road on the way to the two DBTNG functions you care most about, that portion of the code is in bold.
Listing 19–38. Use of the db_insert() and db_update() Database API Functions /**
 * Implements hook_module_implements_alter().

 */

function xray_module_implements_alter(&$implementations, $hook) {

  // Because hook_module_implements_alter() is invoked for X-ray before the

  // xray_hook table is created, check if the table exists and bail on this

  // function if it does not.  Because this hook can be called many times on

  // page loads after a cache clear, statically cache this check.

  static $table = NULL;

  if ($table === FALSE || !($table = db_table_exists('xray_hook'))) {

    return;

  }


  $is_existing = (bool) $count = db_query('SELECT count FROM {xray_hook} WHERE hook = :hook', array(':hook' => $hook))->fetchField();

  // Increase the count of times this invocation has been checked by one.

  // $count++ does not work if $count is FALSE.

  if ($is_existing) {

    $count++;

  }

  else {

    $count = 1;

  }


  // You don't want first and last timestamp potentially varying by a second
  // in cases where they should be the same.

  $timestamp = time();


  $fields = array(

    'last' => (int) $timestamp,

    'count' => (int) $count,

    'modules' => serialize($implementations),

    'modules_count' => (int) count($implementations),

  );


  if ($is_existing) {
    // Update the hook.

    db_update('xray_hook')

      ->fields($fields)

      ->condition('hook', $hook)

      ->execute();

  }

  else {

    // The hook has not been recorded yet, insert it into the database.

    $fields['hook'] = (string) $hook;

    $fields['first'] = (int) $timestamp;

    db_insert('xray_hook')

      ->fields($fields)

      ->execute();

  }

}
![]() Tip If you didn't need to check if the first time existed (and provide it or not accordingly), you could use the wonderfully convenient
Tip If you didn't need to check if the first time existed (and provide it or not accordingly), you could use the wonderfully convenient db_merge() function that automatically does the equivalent of a db_update() if the primary key already exists and the equivalent of a db_insert() if it does not. See api.drupal.org/db_merge and drupal.org/node/310085.
I ran into a bunch of errors when doing this code originally. Many debug() statements were deployed in figuring out the places I went wrong; see dgd7.org/256 to commiserate with me about (or laugh at) my problems.
Displaying Data in a Sortable Table
You know the drill by now. Find something you like in core. The Recent log messages page of the Database logging module looks like a good choice. Three of the columns are sortable and there are no administrative checkboxes bringing the complications of a form into it. The section “Finding a Drupal function that Does What You Need” will take you to where this table is created—or X-ray will tell you: “This page is brought to you by the function dblog_overview() and the included file modules/dblog/dblog.admin.inc.” Off you go.
![]() Tip The
Tip The dblog_overview() function and its helper functions in modules/dblog/dblog.admin.inc also have an example of using a filter query and filter form that allow users to filter a table.
Nearly every part of the table in Figure 19–5 is a simpler version of the log messages table used as example code. It uses the renderable array structure to pass several parameters (as properties of the array) to a table theming function ('#theme' => 'table'). The first function that chooses to implement ‘table’ (and you've fancied it up even more with the double underscore magic, using '#theme' => 'table__xray__hooks' to allow a theming function to take over for ‘table__xray’ or ‘table__xray__hooks’) will get to make the HTML table. In this case (and in practically all cases), no modules or themes choose to take on the task of theming a table and Drupal core's theme_table() has the job. You've already looked at theme_table() and as before you can look up what it expects at api.drupal.org/theme_table. Even better, you have the dblog.admin.inc example.
The code in Listing 19–39 introduces a legitimate use of the db_query() function (in bold, since this section is purportedly about the Database API). With the method ->extend('TableSort') added to the query, and fields using the same table nickname (‘h’) in the query as they do in the table's headers, the theme_table() function fairly magically knows what query to manipulate to sort the table in different ways.
The use of array_keys() on the array of implementing modules (which is unserialized from the database) warrants a moment of explanation. This goes back to the way Drupal handed the implementations to xray_module_implements_alter(), which is where you saved this information to the database. The implementing modules were listed with the key as the module name and the value as only FALSE. If a module's name is present as a key, that means the module implemented the hook; the value is not used. Drupal does this because searching on the key is faster than searching on the value. (Elsewhere in Drupal identical keys and values are sometimes used for this same reason.) As you did not change this before saving it to the database, you need to use array_keys() to make an array out of the keys (and drop the values) before handing it to any listing function.
Let's go to the code! The first segment is adding this menu callback so the page is shown. You'll have to clear caches to see the new Hooks tab added to the Administration ![]() Reports
Reports ![]() X-ray section.
X-ray section.
Listing 19–39. The Callback Showing the Information from the {xray_hook} Database Table as a Sortable HTML Table
/**

 * Implements hook_menu().

 */

function xray_menu() {

// [existing code not shown due to space considerations] ...

  $items['admin/reports/xray/hooks'] = array(

    'title' => 'Hooks',

    'page callback' => 'xray_hook_implementations_page',

    'type' => MENU_LOCAL_TASK,

    'weight' => 20,

    'access arguments' => array('access site reports'),

  );

  return $items;

}


/**

 * Table of available hooks and the modules implementing them, if any.

 */

function xray_hook_implementations_page() {

  $build = array();


  $header = array(

    array('data' => t('Hook'), 'field' => 'h.hook'),

    array('data' => t('Implementing modules'), 'field' => 'h.modules_count'),

    array('data' => t('First recorded'), 'field' => 'h.first'),

    array('data' => t('Last recorded'), 'field' => 'h.last'),

  );
  $rows = array();


  $query = db_select('xray_hook', 'h')->extend('TableSort'),

  $query->fields('h', array('hook', 'modules', 'modules_count', 'first', 'last'));

  $result = $query

    ->orderByHeader($header)

    ->execute();


  foreach ($result as $invocation) {

    // Prepare the implementing modules text.

    if (empty($invocation->modules)) {

      $modules_text = t('<em>None</em>'),

    }

    else {

      $modules = array_keys(unserialize($invocation->modules));

      $modules_text = xray_oxford_comma_list($modules);

    }

    $rows[] = array(

      // Cells.  Must be in the correct order to match $headers!

      $invocation->hook,

      $modules_text,

      format_date($invocation->first, 'short'),

      format_date($invocation->last, 'short'),

    );

  }


  $build['hook_table'] = array(

    '#theme' => 'table__xray__hooks',

    '#header' => $header,

    '#rows' => $rows,

    '#attributes' => array('id' => 'xray-hook-implementations'),

    '#empty' => t('No hooks recorded yet (this is unlikely).'),

  );


  // Return the renderable array that you've built for the page.

  return $build;

}
A little more on the code in a moment, but first... it works!
There's one cool thing a little bit hidden here that's not from the Recent log messages table. The Hooks HTML table is showing data that comes from one column in the database table, but sorting that HTML column based on the data from a different database table. This is what allows the modules listing, which is coming from an unsortable blob in the database (literally), to be sorted by the number of modules.
Figure 19–5. Success! You now have a beautiful and sortable table of every hook Drupal has called via module_implements().
![]() Tip If you are wondering if something can be done, just try it. No one knows everything up front, and coding in a development environment with version control means you can always recover from a failure.
Tip If you are wondering if something can be done, just try it. No one knows everything up front, and coding in a development environment with version control means you can always recover from a failure.
Inconveniently, the first time you click on Implementing modules, it sorts by the number of modules ascending, which means it starts with those hooks with no modules implementing them, which is less interesting than the most-used hooks. There's an issue for allowing a descending sort to be the initial one when clicking a table header: see drupal.org/node/109493. How did I find that issue? I found it while searching for “drupal table sort different column,” which did not come up with an answer. How did I actually discover you could use a different field than is shown to sort a column? I just tried it. This is perhaps the most important way of learning and succeeding, as advocated in Chapter 14. If you're wondering about it, give it a try. It won't hurt, and you may make a cool discovery.
![]() Note An initial iteration of this table used Drupal core's
Note An initial iteration of this table used Drupal core's item_list() function—theme('item_list', array('items' => $modules));—to format the list of implementing modules, but the rows for the most-used hooks became unreadably high. The xray_oxford_comma_list() defined in the next chapter came to the rescue. Another common trick is to use CSS to make HTML lists display inline.
One final thing: while the guess about sorting the implementing modules column using the modules_number field from the database succeeded pretty much right away, twenty other things went wrong the first time coding this section. The database errors took the longest, but even printing out the list of implementing modules first silently failed because I left out the ‘modules’ field from the query (doh!), then failed very loudly because I had a typo in “$invocaton”, and then failed moderately loudly because I forgot to unserialize that column's data. Three different causes of one problem! (This is disturbingly common in programming.) Authors of other books and other chapters are probably less error-prone, but trust me, no one gets everything right the first time, and you shouldn't even try. (But don't leave out a field you want to display. Or leave serialized data serialized. Or make typos. Skip my stupid mistakes and reach for intelligent, ambitious mistakes. And when things don't work, fix the errors. And enjoy it all the more when it finally works out!)
Drupal Entities: Common Structure Behind Site Components
Drupal 7 introduced the concept of entities to standardize its treatment of essential data objects. Users, nodes, comments, taxonomy vocabularies, taxonomy terms, and files—these are all entities in Drupal 7 core. Contributed modules can register additional entity types by implementing hook_entity_info(); this is covered in Chapter 24.
Nodes, the main content object on Drupal sites, are the prototypical entity; the creation of the entities concept in Drupal 7 had a lot to do with making the other objects act more like nodes. In particular, the introduction of Fields in Drupal core made it seem necessary to give non-node objects something analogous to content types (also called node types). In Drupal 6, the Content Construction Kit project (drupal.org/project/cck) and related modules made it possible to add fields (text fields, number fields, e-mail address fields, file fields, image fields, etc.) to content types. Every content type represented a set of fields. In Drupal 7, any entity can have fields (if its entity type definition declares it a “fieldable entity”) but it was also desired for one entity type to have entities with different sets of fields. The word bundle was forcibly conscripted into service in Drupal to describe this generic sense of “thing with fields,” the analog of content type for non-node entities.
![]() Note Entities introduce the concept of bundle and content types are examples of bundles. In other words, a content type is a bundle—the most common bundle you are likely to deal with in Drupal 7.
Note Entities introduce the concept of bundle and content types are examples of bundles. In other words, a content type is a bundle—the most common bundle you are likely to deal with in Drupal 7.
You can get information about every bundle on a Drupal site with a function named field_info_bundles(). While figuring out what to display and how to display it on the Structures administration page, you can print the output of this and other functions or variables with the debug() function. (You can also, of course, use a debugger; see dgd7.org/ide.) In a bootstrapped test.php file (dgd7.org/testphp) or a function that is called such as a callback in hook_help() or a page callback, place the code debug(field_info_bundles());
The output is a wealth of information about your site's entities. It would take 11 pages if placed in this book, so please look at your own output (or refer to dgd7.org/151) for the full result. This is an excessively large array, but huge nested arrays are expected when developing with Drupal.
From this entity and bundle information, output by the function field_info_bundles(), you learn there are six types of entities on your site already in a typical install. These entities are comment, node, file, taxonomy_term, taxonomy_vocabulary, and user. Each entity type is further divided into at least one bundle. The file entity type, for instance, defines only the file bundle, while the comment entity type has bundles for every content type to which comments attach.
![]() Gotcha The node type is not stored in the comment table. It's only available in the comment entity, and so through a function such as
Gotcha The node type is not stored in the comment table. It's only available in the comment entity, and so through a function such as field_info_bundles(). Don't expect all bundle information to be easily found in the database!
You can use field_info_bundles() to provide a listing of all entities and bundles with X-ray. See dgd7.org/254 for turning the debug statement into a nicely formatted informative table—but you can get all the information you need from the debug output, of course.
Summary
This chapter introduces you to APIs and teaches you how to write a whole module. You saw instructions and examples for using the hooks and functions provided by Drupal, which include altering forms, localization, making modules themable, creating pages with hook_menu(), and using and defining permissions. These were covered in the course of building a complete module. As each feature of the module requires using another tool from the extensive selection in Drupal's API toolbox, I introduced the tools and showed you how to use them.
Now you know what it takes to write a whole module, but there is still more to the module story, which is finished off in Chapter 20 where you will learn to create a configuration page and settings form and refine your module into a drupal.org-worthy module, including fixing errors and reviewing for coding standards.
![]() Tip Also check out
Tip Also check out dgd7.org/intromodule for discussion about confusing parts of this chapter and the continued development of X-ray module.