
C H A P T E R 20
![]()
Refining Your Module
Chapters 18 and 19 have shown you how to write your module, but there's more to a module than just the code you've written. In this chapter you'll see how to:
- Create a configuration page and settings form.
- Refine your module into a
drupal.org-worthy module, including fixing errors and reviewing for coding standards.
Creating a Configuration Page for Your Module
X-ray module could get away with setting sensible defaults and having no configuration page. The design philosophy of Don't Make Me Think (in general, but in particular the now-classic book of that name by Steve Krug) argues for removing non-essential options. Whenever possible, replace choices to be made by the user with sensible defaults. Almost as good as or better than leaving out configuration options, perhaps, is a configuration page most administrators using your module will never have to visit.
X-ray module will allow administrators to turn off the display of administrative section summaries, page callbacks, and form IDs. These will all be on by default so that the module just works out of the box.
Where to Put a Configuration Page
There is an entire section of Drupal's administration called Configuration, so there's not too much question of where to put a configuration page. It's not that simple, of course. The Configuration section in Drupal 7 is divided into many subsections, including (in core Drupal) People, Content authoring, Media, Search and metadata, Regional and language, System, User interface, Development, and Web services. As X-ray is clearly a development aid, its configuration should go under Development (admin/config/development), but you'll need to decide for each module you create (that has a configuration section) what category it belongs in, based on core modules and on any related, respected contrib modules. Personally, I dislike the fragmentation of a module's administration pages into wholly separate sections, as it doubles the number of places administrators must look for things. This separation, however, is the way of Drupal 7; indeed, it is the way of the future as well. A module providing reports for administrators, as X-ray does, should put them in the Reports section of Administration; if that module provides any configuration options they go in Configuration. This does make sense in the long run, as it makes modules work in a way consistent with Drupal core, but for the site builder who just enabled a module and is trying to figure out how to use it, the separation adds to the difficulty of navigating an already overwhelming interface. You will use hook_help() again in the “Using hook_help() as Drupal intended” section to make a helpful link from X-ray's reports page to its configuration and vice versa.
Defining a Menu Item for a Settings Form
Configuration forms are such a common need, in Drupal core as well as for contributed modules, that Drupal provides a number of helpful functions and shortcuts (see Listing 20–1).
Listing 20–1. A Menu Item for the X-ray Settings Page
/**

 * Implements hook_menu().

 */

function xray_menu() {

  $items = array();

  // ...

  // Administration page.

  $items['admin/config/development/xray'] = array(

    'title' => 'X-ray configuration',

    'description' => 'Configure which elements of internal site structure will be shown.',

    'page callback' => 'drupal_get_form',

    'page arguments' => array('xray_admin_settings'),

    'file' => 'xray.admin.inc',

    'access arguments' => array('administer site configuration'),

    'weight' => 0,

  );

  return $items;

}
The most interesting parts of this menu item declaration, compared to what you have looked at before, are the ‘page callback’, ‘page arguments’, and ‘file’ instructions. The ‘page callback’, rather than being a custom function as in other examples, is a Drupal core function for getting forms. This function, drupal_get_form(), needs to be given an identifier for a form, which is usually the name of a function that returns a form structure as an array of arrays, but it can also be an identifier registered with hook_forms() that returns the real function. This form ID is passed in here as the only item in an array given to ‘page arguments’. Finally, the ‘file’ is specified because the argument 'xray_admin_settings' that you are passing drupal_get_form() means that the function xray_admin_settings() will be called—and that function, as I will cover below, is defined in a separate file.
![]() Tip For pages that are solely forms, as many administration pages are, Drupal frequently makes use of a code-saving trick. Instead of a custom function, the menu item's page callback is ‘drupal_get_form’ and via page arguments, it is passed a form identifier. This saves creating a function just to handle the page callback to display the form.
Tip For pages that are solely forms, as many administration pages are, Drupal frequently makes use of a code-saving trick. Instead of a custom function, the menu item's page callback is ‘drupal_get_form’ and via page arguments, it is passed a form identifier. This saves creating a function just to handle the page callback to display the form.
You'll borrow the code for this menu definition, as you will for the settings form it calls, from Drupal core. User module provides a good example. This code is directly modeled on the definition of the Account settings administration page by user_menu() in user.module. X-ray itself will tell you, regarding admin/config/people/accounts, that “This page is brought to you by the argument user_admin_settings handed to the function drupal_get_form(), with the help of the file modules/user/user.admin.inc.”
Creating a Separate File for Administration Code
Dividing your code into files provides two advantages. First, it helps you organize your code into manageable segments. Second, it allows Drupal to avoid loading the code into memory when it's not going to be used. (This is the point of the file instruction in the admin/config/development/xray menu item definition. The file xray.admin.inc is only included when this path is visited.)
Your page callback is the function drupal_get_form(), which is loaded in Drupal bootstrap. The form identifier it is handled is the name of a function returning a form array. The file xray.admin.inc and this xray_admin_settings() function are modeled on user.admin.inc and user_admin_settings().
![]() Note Not everything in a core file will match your needs, of course. User module's implementation of
Note Not everything in a core file will match your needs, of course. User module's implementation of hook_menu() defines the path admin/config/people and with the callback system_admin_config_page(). Most modules you create will not need to do this because their configuration pages will go in a subsection of Configuration that already exists. X-ray module, for its part, is in the Development subsection (admin/config/development).
Building a Settings Form
With an assist from a specialized function of Drupal's Form API, your settings form can be lean indeed. The system_settings_form() function used right before returning the $form array takes the fieldset and three checkbox options you provide and takes care of adding the submit button as well as doing all the submit handling for anything with a form key that matches the variable name! Note how 'xray_display_section_summaries' is both the identifier in the form array and the default value in the variable_get() function. Drupal will use variable_set() to save the value chosen when someone submits the form; you don't have to handle any of it! Listing 20–2 is an administration file that holds the form definition for X-ray's settings form, which is only loaded when admin/config/development/xray is visited, with the form building function for administration settings.
Listing 20–2. An Administration File That Holds the Form Definition for X-ray's Settings Form
<?php

/**

 * @file

 * X-ray module settings UI.

 */


/**

 * Form builder; Configure which X-ray information is shown.

 *

 * This form provides feeds the menu callback for the X-ray settings page.

 *

 * @ingroup forms

 * @see system_settings_form()
 */

function xray_admin_settings() {

  $form = array();

  // X-ray output visibility settings.

  $form['display'] = array(

    '#type' => 'fieldset',

    '#title' => t('Display options'),

  );

  $form['display']['xray_display_section_summaries'] = array(

    '#type' => 'checkbox',

    '#title' => t('Show summaries on administration sections.'),

    '#default_value' => variable_get('xray_display_section_summaries', 1),

    '#description' => t('If unchecked, the summaries will still be visible on the

<a href="@xray-overview">X-ray reports</a> page.',

      array('@xray-overview' => url('admin/reports/xray'))

    ),

  );

  $form['display']['xray_display_callback_function'] = array(

    '#type' => 'checkbox',

    '#title' => t('Show the page callback function on all pages.'),

    '#default_value' => variable_get('xray_display_callback_function', 1),

  );

  $form['display']['xray_display_form_id'] = array(

    '#type' => 'checkbox',

    '#title' => t('Show form ID in forms.'),

    '#default_value' => variable_get('xray_display_form_id', 1),

  );

  return system_settings_form($form);

}
As you can see in Figure 20–1, you are now producing a form on the administration page you defined.
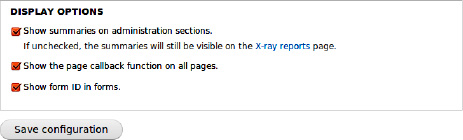
Figure 20–1. Administration page with three checkboxes on by default
LETTING DRUPAL STORE CONFIGURATION SETTINGS VS. CREATING A DATABASE TABLE
There are two ways to store configuration settings in Drupal: letting Drupal do it, and doing it yourself. Drupal makes it easy for you to store configuration in the global configuration variable (the $conf array, from which individual settings can be retrieved with variable_get()). By default, system_settings_form() wraps a naked form array in a submission handler that automatically saves all form elements with variable_set() into the variable table. This is loaded into the global $conf variable for every page load.
For once, I don't think it is necessarily best practice to follow the path of least resistance in Drupal. The configuration information available on every page load should not be bloated with settings that are only needed in specific situations. Module authors should go through a little extra effort to store separately any large amount of data that isn't required in Drupal's global context.
![]() Tip There is an initiative for Drupal 8 to make Drupal's settings saving more intelligent and pluggable; see
Tip There is an initiative for Drupal 8 to make Drupal's settings saving more intelligent and pluggable; see dgd7.org/config for links, including anything that is backported to Drupal 7.
If X-ray module were to have settings that were used only when visiting the X-ray reports page, it would make sense to save them in your own database table. The settings you have, however, affect many or every page view and so should go in the variable table that is loaded into the $conf array.
Defining New Permissions
You still have a very big step to take: making your code honor your new settings. Before doing so, however, let's take another look at X-ray's permissions, or lack thereof. If you're going to allow administrators to turn off certain types of messages, you can accept that some people will want to hide X-ray's messages from whole classes of users. (Such people will not be you or me, as we will be following the deployment practices in Chapter 13 and will never have X-ray enabled on a live site, but there's an outside chance people who have not read this book will use X-ray.)
This calls for a “View X-ray messages” permission. A look at admin/people/permissions shows that there is no appropriately fine-grained permission for X-ray module administration. “Administer site configuration” is a permission likely to be handed out to most administrators of any kind, while the ability to toggle X-ray settings on and off only makes sense to users with at least some developmental bent. You could try to save a permission by intuiting that someone with “Administer site configuration” and “View X-ray output” should be able to configure displays, but Drupal frowns on such trickery that will be opaque to administrators. So two new, straightforward permissions it is: “Administer X-ray” and “View X-ray output”. These are shown in Listing 20–3.
Listing 20–3. X-ray Module with an Implementation of hook_permission() with Two New Permissions Defined
/**

 * Implements hook_permission().

 */

function xray_permission() {

  return array(

    'view xray messages' => array(

      'title' => t('View X-ray messages'),

      'description' => t('Allows users to see X-ray output.'),

    ),

    'administer xray' => array(

      'title' => t('Administer X-ray'),

      'description' => t('Allows administrators to configure which X-ray messages are

 shown.'),

    ),

  );

}
You will have to clear caches before these permissions show up on the admin/people/permissions page.
![]() Caution Remember when using single quotation marks to delineate strings, as above, that using an apostrophe in the string will break everything. Use double quotation marks for those strings or escape the apostrophe with a
Caution Remember when using single quotation marks to delineate strings, as above, that using an apostrophe in the string will break everything. Use double quotation marks for those strings or escape the apostrophe with a .
Back in your most recent additions to xray_menu(), you need to replace ‘administer site configuration’ with ‘administer xray’ to have your new, finer-grained permission have any effect. And for the “View X-ray messages” permission to mean anything, you need to check for it in the code at the same time as you check the display-or-not configuration of different types of X-ray messages.
Conditionally Taking Action Based on Configuration or User Access
In Drupal code you will frequently want to take some action only in the case of certain configuration settings or depending on the user's permissions—or, in the case of X-ray, check both at once.
Conditionally taking an action on a configuration setting is usually as simple as checking the result of a variable_get(). An if statement loads a configuration variable with variable_get() and proceeds if that setting is TRUE; for more complex settings, it can compare several possible values from the setting to the condition you care about. The simple case can look like the following:
if (variable_get('xray_show_formid')) { ... }
Conditionally, taking an action on a permission a user may or may not have calls for the user_access() function. It takes a string with the machine name of a permission. It, too, can go in an if statement that wraps around the code you only want run if the user has permission to access it (based on the permissions given to roles and the roles granted to users). Alternatively, within a function, the if statement can reverse the check and return immediately, meaning all the remaining code is skipped; see Listing 20–4.
Listing 20–4. Using a Permission Check to Bail on an Entire Function if the User Doesn't Have the Required Access
function example_something($account = NULL) {

  if (!user_access('do something complex', $account)) {

    return;

  }

  // lots of complex code here that never gets looked at if the user

  // does not have the permission 'do something complex'.

}
It's a best practice to separate a function from reliance on any global variables, such as the user account of the currently logged-in user. With proper separation, the function can be reused for different purposes. The user_access() function performs the check for the current user when the $account parameter is not present, which would tie the function to checking the access of the presently logged-in user only. It's best if user access checks are done outside of the function that does the work or, at the least, able to accept a user account that can be set to something other than the currently logged-in user. That is the approach taken in Listing 20–4. When $account is NULL, which is the default there, user_access() checks access for the currently logged-in user, but the example_something() function has the potential to do the check for any user account handed in.
The code in Listing 20–5 is not in a potentially reusable function but in a hook implementation, where you can expect the global environment variables, such as the currently logged in user, to be the only ones that matter. It contains the addition of a configuration check (should you be showing the form ID at all?) and a user access check (does this person have the permission to view X-ray messages granted to a role they are in?) added to xray_form_alter().
Listing 20–5. xray_form_alter() with Configuration Check and User Access Check Addedfunction
xray_form_alter(&$form, &$form_state, $form_id) {

  if (variable_get('xray_show_formid', TRUE) && user_access('view xray messages')) {

    $form['xray_display_form_id'] = array(

      '#type' => 'item',

      '#theme_wrappers' => array('container__xray__form'),

      '#attributes' => array('class' => array('xray')),

      '#title' => t('Form ID'),

      '#markup' => $form_id,

      '#weight' => -100,

    );

  }

}
Only the code in bold is new: the opening of the if statement and its closing with a }. The code in between has been indented to meet coding standards for clarity. If both the xray_show_formid setting is TRUE and user_access returns TRUE, the xray_display_form_id item will be added to the form array.
![]() Caution Don't forget the default value of
Caution Don't forget the default value of variable_get()! Drupal won't throw an error, but leaving it blank is the equivalent of claiming the default is FALSE, which is the opposite of what you mean in this case. Every use of variable_get() should have two parameters: the variable's name and its default value.
Writing a Utility Function when Drupal APIs Miss Your Need
After several dozen pages on Drupal's APIs, you can be forgiven for thinking that all your coding needs can be met by drupal.org and PHP.net. And in a way, that's true; the code you write is of course for Drupal and the language it is written in is PHP. But every function in Drupal was created to fill a need, and you can write your own.
![]() Note JavaScript, the client-side scripting language that enhances Drupal's front end, is the exception to the all-PHP rule. Even for this, Drupal supplies some PHP API functions for working with JavaScript. And in JavaScript, Drupal provides functions for translation and other Drupal-specific capabilities. Not to mention that Drupal includes the JQuery library to provide many, many utility functions that make JavaScript much easier to work with, especially for cross-browser support.
Note JavaScript, the client-side scripting language that enhances Drupal's front end, is the exception to the all-PHP rule. Even for this, Drupal supplies some PHP API functions for working with JavaScript. And in JavaScript, Drupal provides functions for translation and other Drupal-specific capabilities. Not to mention that Drupal includes the JQuery library to provide many, many utility functions that make JavaScript much easier to work with, especially for cross-browser support.
Listing Data as Human-Readable, Properly-Punctuated Text
The X-ray module so far has been more than liberal in sprinkling t()s everywhere, and it probably sets a record for the number of times format_plural() has been used in a module. Both provide good handling of including variables. Nonetheless, in turning data into natural text, X-ray module had a recurring need not met in Drupal core: taking an array of items and making it into a sentence-ready list with commas and a conjunction.
The function I found after searching for “comma separated list PHP” and similar search terms could have been in any PHP project—a snippet put up by anyone. Yet it was shared by a Drupalista because the community rocks. Building on that snippet is the utility function shown in Listing 20–6.
Listing 20–6. The Oxford Comma Function
/**

 * Make an array of items into a proper, punctuated, and sentence-ready list.

 *

 * Based on www.drupaler.co.uk/blog/oxford-comma/503

 * Grammatically fun helper to make a list of things in a sentence, i.e.

 * turn an array into a string 'a, b, and c'.

 *

 * @param $list

 *   An array of words or items to join.

 * @param $settings

 *   An array of optional settings to use in making the Oxford comma list:

 *   - type
 *     The text to use between the last two items. Defaults to 'and'. Pass in

 *     'or' and 'and' without translation; translate any other join.

 *   - comma

 *     The join for the list. Defaults to a comma followed by a space.

 *     To make an Oxford comma list with semicolons, use '; '.

 *   - oxford

 *     Change this from default 'TRUE' and you are a philistine.

 */

function xray_oxford_comma_list($list, $settings = array()) {

  // Set default settings.

  $comma = ', ';

  $type = 'and';

  $oxford = TRUE;

  // Overwrite default settings with any passed-in settings that apply.

  extract($settings, EXTR_IF_EXISTS);

  // Translate 'and' and 'or'.

  if ($type == 'and') {

    $type = t('and', array(), array('context' => 'Final join'));

  }

  elseif ($type == 'or') {

    $type = t('or', array(), array('context' => 'Final join'));

  }

  //

  if ($oxford && count($list) > 2) {

    $final_join = $comma . $type . ' ';

  }

  else {

    $final_join = ' ' . $type . ' ';

  }

  // Take the last two elements off of the $list array.

  $final = array_splice($list, -2, 2);

  // Combine the final two removed elements around the final join string.

  $final_string = implode($final_join, $final);

  // Add the combined elements (now a single element) back onto the list array.

  array_push($list, $final_string);

  // Return the list as a text string joined together with commas (or other).

  return implode($comma, $list);

}
This function was fun to write, not least because most of the work had already been done. It introduces the concept of context for translation functions, making clear with a third parameter given to the t() function that this use of ‘and’ and ‘or’ are for final joins and not whatever inappropriate use someone else might come up with for them.
Another new thing is the use of extract() with a new constant to tell it to extract if exists. (Rule of thumb: never use a bare extract; always add a second argument.) See dgd7.org/245 for an older, more verbose version of the default settings code that was made leaner and cleaner with this use of extract().
As you do more with Drupal and PHP, you will get a consistently better sense of what is possible (most everything), and, knowing something is possible, also know that you can find a way to get there. Actually, there will be multiple ways to get there. One beautiful thing about writing code that encapsulates its functionality in functions and methods is that readability or performance improvements can be made in one piece of code without always having to pay attention to all the rest of the code. The xray_oxford_comma_list() function went through several overhauls for adding capability and then purely for code elegance—and will undoubtedly go through more.
Making Mistakes and Embracing Error Messages
Following the advice to write what you know, I've decided to do a whole section on messing up. There's no such thing as bug-free code, especially not on the first writing. Knowing what to do when your code breaks something is the route to victory.
Searching for Answers
Web search is your friend, as always, when it comes to error messages. Be sure to remove any parts of the message that are unique to your environment, such as web site URLs or Drupal directory paths.
![]() Tip Quote enough of the error message to return precise results, but cut out any parts that are specific to your site or system (such as site name or the system path to your home folder). Effective searching for solutions to errors you encounter will involve trial and error even after you get good at the initial search. It's usually worth trying
Tip Quote enough of the error message to return precise results, but cut out any parts that are specific to your site or system (such as site name or the system path to your home folder). Effective searching for solutions to errors you encounter will involve trial and error even after you get good at the initial search. It's usually worth trying drupal.org's search and the general Internet.
See what other occurrences of the error have been posted and read other people's comments. With luck, and perhaps some perseverance, you'll find someone who has a solution. Searching for answers works most of the time, but it's also good to know how to recognize and solve certain types of errors like those listed below.
Syntactic Fatal Errors
Fatal errors mean we are alive. They mean our code is having an effect. And they are usually easy to fix by adding, removing, or moving a semicolon, parenthesis, or curly bracket. As PHP isn't a compiled language, it's almost as fast to fail trying to run the code for real (loading a web page from a local server) as it is for code syntax checking in an editor to give you a heads up. However, any good PHP IDE provides syntax checking.
![]() Tip Enable syntax checking with the Vim editor; see
Tip Enable syntax checking with the Vim editor; see dgd7.org/vi.
Drupal lines should end with a semicolon in most cases (when the line represents a statement); when it's part of a multi-line array definition, each item is separated with a comma. Mistakes like these will mostly be easy to fix, with PHP telling you which line the error is on. The hardest syntax error to fix is a mismatch in opening and closing curly braces. A missed closing curly brace (also called bracket) can produce an error pointing to the end of the file as the problem, when of course the actual cause can be much further up the file.
Runtime Fatal Errors
As mentioned, syntactic fatal errors manifest at runtime since PHP is not compiled, but because it's easy to catch them before running the code in the context of the whole application (just loading the code triggers the error), they are treated separately here. What I will call runtime fatal errors can occur only when taking an action (including visiting a page) that uses your code:
Fatal error: Cannot use object of type stdClass as array in

 /home/ben/code/dgd7/web/sites/default/modules/xray/xray.module on line 186
If your development environment is properly set up, this error will be printed to your screen. Even on a production site, this will be written to the error log on the server, which is helpful because all that you see may be the less-than-informative White Screen of Death (WSOD). (Even better, a properly set up development environment will provide a call stack of all the functions called. The next section shows how to enable a stack trace with the Devel module. Also, see Chapter 30 for a walk through a stack of function calls, similar to what you did at the beginning of this chapter.)
PHP is being very helpful and telling you precisely where and what the problem is. It's on line 186 and you are trying to use an object as an array. The code in Listing 20–7 shows the error-triggering code and the corrected code.
Listing 20–7. The Line That Breaks Everything and the Corrected Code
<?php

// Line 186 looks like this:

    if (isset($theme['info'] ['hidden']) &&$theme['info'] ['hidden'] == TRUE) {

// ...

}


// But it needs to look like this:
    if (isset($theme->info ['hidden']) &&$theme->info ['hidden'] == TRUE) {

// ...

}

?>
The point is not that code that looks like the former is always wrong (if $theme were an array, it would be correct); the point is that when you have an error stating “Cannot use object of type stdClass as array”, it means that you are dealing with an object and should be using object notation, the arrow (->).
Tracking Down the Cause of Errors and Warnings
If a new error pops up on your site while you're coding your module, odds are it's something you did. However, the error message may point to some core file that you have never touched. In this case, it is almost certain that the error has its origin somewhere else, whether caused by code you wrote or something you installed or configured. The process of figuring out where an error or bug came from and fixing it is called debugging. Figure 20–2 shows one such error that came up while coding the X-ray module.

Figure 20–2. “Warning: htmlspecialchars() expects parameter 1 to be string” error message
Warning, array given, warning, object given, on line 1,476 of bootstrap.inc ?What are you to do with that? You've never even looked at bootstrap.inc! You could take a look now to see how the function htmlspecialchars() is used in the Drupal function check_plain(), and then you could search through all the code of Drupal for the 157 functions that call check_plain(). Yes, 157; see api.drupal.org/check_plain for the list. It would be overkill to point out that one of the functions that calls check_plain() is the t() translation function, which, at 1,246 calls in core alone, is the most-used function in Drupal. So you could look through everywhere that t() is used, and everywhere else that check_plain() is used, and the functions that are calling them, and so on up the tree to try to find the one that's making htmlspecialchars() angry at you...
Or you could let a tool take care of this in an instant. There are standalone debugging tools and Integrated Development Environments (IDEs), which are discussed at dgd7.org/ides, but, as this is Drupal, there's also a module for that. The Devel module includes the option to print a backtrace from a PHP warning or error back up the chain of functions, formatted for readability with Krumo. Let's take a look at how it works.
Using Devel Module Trace an Error Back Up the Stack
Devel module contains tools for Drupal development and deserves to always be on hand. Let's install Devel module with Krumo and watch it transform the error message.
- Download Devel module from
drupal.org/project/develor with Drush:drush dl devel(and give thanks to Moshe Weitzman, creator of both Devel and Drush). - Enable the module at
admin/modulesor with Drush:drush -y en devel. - Go to
admin/config/development/devel(you can get there via the Configure link onadmin/modules). - Scroll down the page to find Error handler, change it from Standard drupal to Backtrace, and then submit the form with Save configuration.
- Navigate to a page that causes the error message and enjoy.
Now, back to your htmlspecialchars() warnings (see Figure 20–3).

Figure 20–3. “Warning: htmlspecialchars() expects parameter 1 to be string” error message with Devel and Krumo
All right, that's not helping much yet. Click the “... (Array, 19 elements)” text (where 19 will be the number of elements in your backtrace array) to expand the Krumo-formatted array); see Figure 20–4.
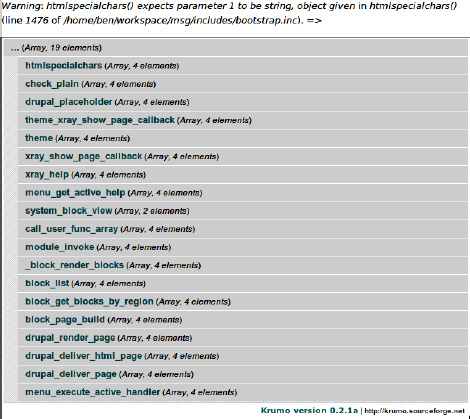
Figure 20–4. Krumo-formatted backtrace array for “Warning: htmlspecialchars() expects parameter 1 to be string” error
Now you're in business. You can see every function involved from htmlspecialchars(), the function that is complaining, up through the function that calls it and the function that calls that function and the function that calls that function all the way to menu_execute_active_handler(), the function in index.php that starts off Drupal most of the time (see Chapter 30 to view Drupal through the eyes of this function). In that long list are several functions from X-ray module, which are far more likely culprits than a core function spontaneously generating an error.
You can click on theme_xray_show_callback in the function stack and drill down to the arguments given to it. As the error message indicated, the page_arguments array has an object in it and this is the fault of xray_show_page_callback().
![]() Tip If you don't have Devel module or anything else handy, you can put a
Tip If you don't have Devel module or anything else handy, you can put a debug(debug_backtrace()); call where Drupal reports the error, but the output won't be nearly as easy to read as Krumo makes it.
To prevent the error, you will have to check each page argument and make sure it is not an object or array when you hand it to drupal_placeholder(). This level of complication in a theme function (or template) is a clear indicator it should have a preprocess function cleaning up the variables before it.
Making a Preprocess Function
When making a preprocess function for a theming function or template file, you can (as is so often the case) turn to Drupal core for examples. Node module yields template_preprocess_node() as a possible model (after a search for ‘preprocess’, for instance, with the command line search grep -nHR 'preprocess' modules/node).
![]() Note As of 7, theme functions can have preprocess functions just like templates. It's still considered more friendly to themers to be able to copy and modify template files rather than override theme functions in
Note As of 7, theme functions can have preprocess functions just like templates. It's still considered more friendly to themers to be able to copy and modify template files rather than override theme functions in template.php. Theme functions have better performance than templates, however, and are preferred for small things or things where re-theming is unlikely. See drupal.org/node/933976 in the module developer's guide for more on using the theme layer in your module.
Preprocess functions defined in a module begin their names with template_ (themes use the theme name here); next is preprocess_; and finally the name of the theme function or underscore. There's no need to add anything to your implementation of hook_theme(); Drupal is already looking for preprocess functions. Preprocess functions look and act the same whether for a template file or a theme function. A key point is that the $variables array is passed in by reference, so any changes or additions to this array need to be to the referenced copy. See Listing 20–8 for an example.
Listing 20–8. A Preprocess Function to Prepare Variables for theme_xray_show_page_callback()
/**

 * Process variables for show page callback theme function.

 */

function template_preprocess_xray_show_page_callback(&$variables) {

  if ($variables['page_arguments']) {


    foreach ($variables['page_arguments'] as $key => $value) {

      // Arrays and objects can't be easily printed in a message, so instead

      // identify what they are.

      if (is_array($value)) {

        $value = t('array') . ' ' . $key;

      }

      elseif (is_object($value)) {

        $value = t('object') . ' ' . $key;

      }

      // Sanitize for security and add emphasis to each argument.

      $variables['page_arguments'][$key] = drupal_placeholder($value);

    }

  }

}
/**

 * Theme the page callback and optionally other elements of a router item.

 *

 * @param $variables

 *   An associative array, as generated by menu_get_item(), containing:

 *   - page_callback: The function called to display a web page.

 *   - page_arguments: (optional) An array of arguments passed to the page

 *     callback function.

 *   - include_file: (optional) A file included before the page callback is

 *     called; this allows the page callback etc. to be in a separate file.

 *

 * @see template_preprocess_xray_show_page_callback()

 *

 * @ingroup themeable

 */

function theme_xray_show_page_callback($variables) {

  extract($variables, EXTR_SKIP);


  $output = '';
  $output .= '<p class="xray-help xray-page-callback">';

  $output .= t('This page is brought to you by '),

  if ($page_arguments) {

    $output .= format_plural(count($page_arguments),

      'the argument !arg handed to ',

      'the arguments !arg handed to ',

      array('!arg' => xray_oxford_comma_list($page_arguments))

    );

  }

  $output .= t('the function %func',

               array('%func' => $page_callback . '()'));

  if ($include_file) {

    $output .= t(' and the included file %file',

                 array('%file' => $include_file));

  }

  $output .= '.</p>';

  return $output;

}
Arguably this data cleanup should be done even before the preprocess function. There's no way of requesting review quite like publishing your code in a book, so tune into this chapter's online companion at dgd7.org/61 for what will undoubtedly be more critiques and improvements of this code.
![]() Note The code in Listing 20–8 has been enhanced (and made more complicated) by offering Krumo output. See
Note The code in Listing 20–8 has been enhanced (and made more complicated) by offering Krumo output. See dgd7.org/259 for the improved and expanded version, which includes a helper function for dealing with arrays and objects.
Final Considerations
You've seen a dozen APIs and looked at a lot of code and written your own code, but did you make a module? Pretty much, yes! Not every line of the X-ray module has been shown (in particular, the repetitive parts), but you can find it, along with all the code from this book, at dgd7.org/code.
This module lends itself to extension, but you didn't provide an API for other modules to extend it; instead, patches (additions or modifications to code that can be easily applied by a project maintainer) are very welcome! Now let's cover some final considerations, including coder module review and peer review.
The biggest final consideration, of course, is if you met the minimum requirement for what you were trying to do. Everything else is secondary—but still important.
- Try to ensure there's nothing hardcoded that people will want to change.
- Look very carefully for security vulnerabilities. Using Coder review module (covered next) will help catch many, but it can't catch everything. Is user access checked before anyone is able to see or change anything administrative? Is anything a user might enter ever output again without being escaped? The need to escape potentially dangerous markup includes user-submitted data being shown after it has been saved in the database; the protections the Database API provides against SQL injection attacks have nothing to do with the protection against HTML and JavaScript injection attacks that sanitization functions such as
t(),check_plain()(whicht()uses), andfilter_xss()provide. See Chapter 6 for an overview of security considerations. - Go over your code to ensure that it follows coding standards; see
drupal.org/coding-standards. The Coder review module can help with this; see the next section.
![]() Note Most of your code has gone into the .
Note Most of your code has gone into the .module file, but where in the file should you put, say, your next hook implementation? There's no official coding standard or widely agreed-upon best practice. Use something that helps you find your code (a good code editor will let you jump easily to specific functions) and don't spend too much time thinking about it. I keep all hook implementations together at the top of the .module file and favor importance, with a fallback on alphabetical order when indecisiveness strikes. Another approach is to put them in order of execution (see Chapter 30 for that order). I group the rest of the code by functionality, which is more art than science.
Coder Module Review
It's never too early to run an automated review of your module's code with Coder review module, in the Coder project found at drupal.org/project/coder. But it should definitely be run as the last thing you do before a release, too.
Download and enable the Coder review module (drush dl coder; drush -y en coder_review). Then go to Administration ![]() Configuration
Configuration ![]() Development
Development ![]() Coder (
Coder (admin/config/development/coder) and leave everything at their defaults, which means the enabled reviews will be Drupal Coding Standards, Drupal Commenting Standards, Drupal SQL Standards, Drupal Security Checks, and Internationalization. You can select “minor” so that coder will show every error or perceived problem it comes across. Under “Select specific modules,” find the one you are working on among the module machine names, listed alphabetically.
Running this for X-ray resulted in this message: “Coder found 1 projects, 3 files, 1 critical warnings, 12 normal warnings, 9 minor warnings, 0 warnings were flagged to be ignored”. Fortunately the critical warning was a false positive where the parser had not yet been updated to the new Database API way of doing queries.
The other errors, however, brought to light a coding mistake that wasn't documented anywhere really except by Coder review module: text in t() functions should not begin or end with a space. The logic is that translators are not likely to understand or notice the space, but in trying to build sentences that depended on whether, say, any page arguments existed at all, I repeatedly violated this rule. (This has been fixed in the code in the module and the code shown in the book.)
The moral of the story is always do a final pass with the automated code review before expecting people to look at and use your code. And having people look at your code can be a great way to learn, just as you learn from looking at other people's code.
Peer Review
“Contributing to Drupal is like pair programming with the entire community.”
—Mark Ferree (
twitter.com/mrf)
Contributing to an open source project means potentially thousands of reviewers will help make your code better. When you contribute to Drupal core, your work will be reviewed as a matter of course. When you publish your first project to its own project page on drupal.org (see Chapter 37), it will get a code review, too. The rest of the time, you have to ask specifically.
For a long time Drupal didn't have a recommended process for soliciting a review of your work. The best contributors ask; even when contributing a patch to core, top contributors find others to review their code, often swapping reviews, to keep things moving along. IRC, as is frequently the case, is usually the most effective place to ask. You might also find some interest on groups.drupal.org if the module relates to an existing group.
There is now a process for soliciting code reviews, centered around the Peer Review group on at groups.drupal.org/peer-review. This initiative aims to match people who want reviews for their projects with people willing to do the review. Remember that giving as well as receiving reviews is an excellent way to learn and to build relationships in the community. To request a code review, follow these steps:
- Before seeking a review, you'll need to get your code on
drupal.org. See Chapter 37 for instructions on starting to use a Git sandbox project. - Create a new issue for your own project that you want reviewed—the issue should be dedicated to the overall project review, rather than the tag being added to an existing issue. The category for the issue should be “task” and the status, naturally, is “needs review.” (This is a bit of an abuse of the “needs review” status, as usually it means there is a patch that needs review, but here you are using it to apply to your whole project.) In the description, state what you are most looking for from a review and make clear your commitment to make improvements when they are recommended.
- Before submitting the issue, add the peer-review tag (with a dash between peer and review). All issues requesting peer review use this tag. You can optionally focus the kind of review you are looking by adding tags such as code-review, ux-review, accessibility-review, etc. See
groups.drupal.org/peer-review/requestsfor the current list of tags. - Any person who volunteers to review will post responses in that issue. The reviewer can change the status from “needs review” to “needs work” if he or she found issues (which should be described in a comment or created as separate issue reports on your project). Normally the “Assigned” attribute is for the person working on the code, but as you posted the issue and it's understood you will be working on the code, this should be used by a person reviewing to claim the primary reviewer role.
- After you've fixed any problems found, set the status back to “needs review.” With luck, the reviewer will come back and mark it “Reviewed and Tested by the Community (RTBC)” if he or she has approved your work!
- Feel free to add “Reviewed by [username (linked to user account)] on [date (linked to the issue)]” to the description on your project page!
Just as for core contributors, it helps a great deal to get a timely review if you solicit one; offer to swap a review in exchange. Hanging out in IRC (see Chapter 9) is usually how such casual requests are made. Drupal meetups can also be a place to swap code reviews!
![]() Note It's very important that you follow the best practices described in this book and stick to coding standards (at
Note It's very important that you follow the best practices described in this book and stick to coding standards (at drupal.org/coding-standards) before asking someone to invest their time in making your code better.
The best reviewers are people motivated to use your module because they need it. You don't necessarily have to solicit this review— bug reports, feature ideas, and support requests will be filed in your issue queue. If you have an opportunity to watch someone try to use your module, that can provide invaluable feedback. Many usability problems people run into don't get self-reported. The best way to get a usability review is to watch people try to use something and solicit their feedback immediately. It doesn't have to be done in a lab for you to learn a lot. If you can't find willing victims/participants in person to test your module, ask people you know are interested in using your module to try it out and report any bugs or confusion they encounter.
Using hook_help() as Drupal Intended
The most common usage of hook_help() is the one you haven't used it for yet. But first, I promised a full look at the hook's definition.
The hook_help() Function Signature
Every hook has a function signature: the parameters passed in to implementations of the hook and the nature of the value the invocation expects returned (if any). What you start with and what type of data you end with are defined; in the middle you can do whatever you want. That is the nature of APIs.
![]() Note Implementations of
Note Implementations of hook_help() are expected to return an HTML string, most likely because it was overlooked during Drupal 7's conversion to renderable arrays. See Appendix C for more about the render system that applies everywhere else in Drupal!
The Parameters $path and $arg
What you receive to start with are called parameters or arguments to a function. The $path variable passed in to functions that implement hook_help() is the router path, which is Drupal's idealized understanding of what path it is on, based on the paths defined by implementations of hook_menu(). This just means that on code-defined pages such as admin/structure, the router path is also admin/structure, while on pages that might be created by the user, such as node/1, the router path is node/%. Therefore, to put a message on only a certain node (or user, or taxonomy term), you could still implement hook_help(), but you will have to use the $arg parameter to see the actual path you are on.
One way to see what these paths are for any page, as it isn't always intuitive, is to implement hook_help() and have it print the path and arg variables on every page. In a module called test (thrown in here just so you remember you can make modules that aren't named X-ray), this function would do that; Listing 20–9 shows the contents of test.module that, with a basic test.info file and when enabled, would print the path and arguments as interpreted by help on every page.
Listing 20–9. Contents of test.module
<?php

function test_help($path, $arg) {

  return $path . '<pre>' . var_export($arg, TRUE) . '</pre>';

}
The same effect could be achieved by adding the return line to xray.module's xray_help() function.
![]() Tip You can also use the
Tip You can also use the debug() function almost anywhere in Drupal to print any variable to the screen, like so: debug($path, 'path'), debug($arg, 'arg'), The second parameter, a label, is optional. (For variables that are large arrays or objects, a third parameter TRUE may be necessary to avoid errors.)
Using this, you can visit node/add/article and see that the content type machine name (article) is present in the router path, node/add/article. This is true even if it is a content type you modify or create yourself, because the paths for add node pages for all content types are defined dynamically in node_menu(). The paths for edit forms for whole content types, however, like the edit form for nodes, make use of a wildcard placeholder in the router path. When you go to admin/structure/types/manage/article to edit the Article content type, for instance, the $path parameter for this path looks like the following: admin/structure/types/manage/% (article has been replaced by a percentage symbol, %, which signifies the wildcard placeholder). To see what content type you are editing, you need to look at the $arg parameter, which is an array that includes each part of the real path (‘admin’, ‘structure’, ‘types’, ‘manage’, and ‘article').
On-site Documentation for a Module
Your use of hook_help() for the X-ray module (to add summaries and pieces of information to various places throughout the site) has been unusual. The usual use is for documenting how a site administrator should use the module itself. This may be as help messages on configuration pages for the module, which works the same as your path-based usage, but the most common use of hook_help() is, ironically, a special case as far as the code is concerned. When an implementation of hook_help() returns text for the path admin/help plus a hash sign (#) followed by a module name (in your case, admin/help#xray), Drupal creates a help page for the module at admin slash help slash module name (admin/help/xray for your module) and links to this dedicated help page from admin/help.
Let's close out this chapter by adding a proper, ordinary help page for X-ray module; note the path it returns on (see Listing 20–10).
Listing 20–10. Classic Help Page for the X-ray Module
/**

 * Implements hook_help().

 */

function xray_help($path, $arg) {

  $help = '';

  // Display in a help message the function that provides the current page.

  $help .= xray_show_page_callback();

  switch ($path) {

    // Summaries for main administrative sections.

    case 'admin/content':

      $variables = array('data' => xray_content_summary());

      return $help . theme('xray_content_summary', $variables);

    case 'admin/structure':

      $variables = array('data' => xray_structure_summary());

      return $help . theme('xray_structure_summary', $variables);

    case 'admin/appearance':

      $variables = array('data' => xray_appearance_summary());

      return $help . theme('xray_appearance_summary', $variables);

    case 'admin/people':

      $variables = array('data' => xray_people_summary());

      return $help . theme('xray_people_summary', $variables);

    case 'admin/modules':

      $variables = array('data' => xray_modules_summary());

      return $help . theme('xray_modules_summary', $variables);

    // The main help page for the module itself.

    case 'admin/help#xray':

      // This is shown as a regular page; do not include the

      // xray_show_page_callback $help or it is shown twice.

      return _xray_help_page();

    default:

      return $help;

  }

}


/**

 * Help page for the X-ray module.

 */

function _xray_help_page() {
  $output = '';

  $output .= '<h3>' . t('About') . '</h3>';

  $output .= '<p>' . t('X-ray module provides a look at the skeletal structure of your site

 from several perspectives intended to benefit developers and site builders.') . '</p>';

  $output .= '<p>' . t('It adds an accounting summary of relevant objects to the help above

 the main administrative sections (blocks, content types, menus on <a href="@structure">

Structure</a>; themes on <a href="@appearance">Appearance</a>; etc).', array('@structure' =>

 url('admin/structure'), '@appearance' => url('admin/appearance'))) . '</p>';

  $output .= '<h3>' . t('Uses') . '</h3>';

  $output .= '<dl>';

  $output .= '<dt>' . t('Page callback and arguments') . '</dt>';

  $output .= '<dd>' . t('X-ray exposes the function that is primarily responsible for

 providing a given page in a help message at the top of that page.  It precedes the name of

 the function with the arguments handed it, if any.  It also provides the name of the file

 where this function lives if available (the file is only available if the callback does not

 live in a .module).  Note that just because arguments are handed in to a function does not

 mean they are used.') . '</dd>';

  $output .= '</dl>';

  return $output;

}
The many other functions for displaying summary data about the site on various administration overview pages, such as People and Modules, are very similar to those shown for the Structure page in this chapter and can be found at dgd7.org/252. It's worth noting again that in addition to a data-gathering function and a theme function, X-ray's summary data require implementations of hook_theme(), hook_menu() (plus a page callback function), and hook_help(). Like every module hosted on drupal.org, you can look at X-ray's code to see how these messages and any new features are implemented.
Summary
By now, you may have figured out that if I can do this, you can do this. After reading Chapters 18, 19, and 20, I hope that you feel ready to take on the rewarding work of building your own modules to add power to your web projects and to contribute to Drupal.
![]() Tip Discuss Chapters 18, 19, and 20, continuing work on X-ray module, and module development generally at
Tip Discuss Chapters 18, 19, and 20, continuing work on X-ray module, and module development generally at dgd7.org/intromodule.