
In this chapter, we learn how to perform an IoT pentest and understand the first element of it, which is attack surface mapping. A lot of pentesters have not yet been able to move to IoT penetration testing because of the lack of knowledge of how to perform an IoT pentest: What are the different components involved? What tools should be used? How do you execute the overall pentest?
This chapter shares insights on how to perform an IoT pentest and answer these questions. We also cover the first phase of the penetration testing process, attack surface mapping, which we use to assess the target IoT device solution and get a fair estimate of what kind of security issues might be present in the product that we are testing.
What Is an IoT Penetration Test?
An IoT penetration test is the assessment and exploitation of various components present in an IoT device solution to help make the device more secure. Unlike traditional penetration tests, IoT involves several various components, as we have discussed earlier, and whenever we talk about an IoT pentest, all those component needs to be tested.

IoT penetration testing methodology overview
As for any typical IoT pentest, we as pentesters need to understand the scope of the pentest and any other constraints and limitations. The penetration testing conditions will vary from product to product and could be anything, ranging from ensuring that the testing happens between 10 p.m. and 5 a.m. (or overnight), to performing the pentesting on a staging environment provided by the client. Once you understand the technical scope of the project, it is worth mentioning to the client what kind of pentest (white box, black box, or gray box) you or your team is going to perform to ensure that both the client and you are on the same page. One of the other things about IoT penetration testing is the requirement of multiple devices. Often during an IoT pentest, certain techniques we use involve destructive methods such as removing a chip from a circuit board for analysis, which would most likely make the device unusable for further analysis.
After the discussions, the next step is to perform the penetration test as per the desired scope and methodology. This phase of the penetration test starts with mapping out the entire attack surface of the solution, followed by identifying vulnerabilities and performing exploitation, which is then followed by postexploitation. The testing concludes with an in-depth technical report.
In this chapter, we cover only the first step, attack surface mapping. In the following chapters, we look at the various ways of identifying and exploiting vulnerabilities, and in the final chapter, we have a look at how to write a penetration testing report for IoT devices.
Attack Surface Mapping
The process of attack surface mapping means mapping out all the various entry points that an attacker could potentially abuse in an IoT device solution. This is the first step, and one of the most important ones, in the entire IoT pentesting methodology. It also involves creating an architecture diagram of the entire product from a pentester’s perspective. During penetration testing engagements, we often spend one full day on this phase.
This step is useful because it helps you understand the architecture of the entire solution, and at the same time helps you establish various tests that you would run on the product, sorted by priority. The priority of the attacks can be determined by ease of exploitation multiplied by the impact of the exploitation. In a case where the exploit is extremely easy and leads to successful compromise and retrieval of sensitive data from the device, that would be classified as a high-priority, high-criticality vulnerability. By contrast, something that is difficult to execute—with output obtained during the test that is not that useful—would be categorized as a low-criticality, low-priority vulnerability. In engagements, whenever we identify a vulnerability of high criticality, we also notify the vendor immediately of the vulnerability overview and impact the same day, instead of waiting for the engagement to complete.
Now that you have a basic idea of what to do in attack surface mapping, let’s get deep into this and understand the exact details of how to perform this process.
How to Perform Attack Surface Mapping
As soon as you get a new target, take time to understand the device first. Starting an assessment with incomplete or partial information is one of the biggest mistakes a pentester can make. This means going through all the possible channels and collecting information, such as device documentation and manuals, online resources and posts about the product, and any available content or prior research about the device.
Take note of the various components used in the device, CPU architecture type, communication protocols used, mobile application details, firmware upgrade process, hardware ports, external media support on devices, and pretty much anything else that you can find. Often things are not as obvious as they seem, initially, and that is why you should dig deeper into each of the various functions that the device offers.
- 1.
Embedded device.
- 2.
Firmware, software, and applications.
- 3.
Radio communications.
Our goal in analyzing the IoT device for attack surface mapping would be to categorize the functionality and the security threats corresponding to each category. We consider what the thought process should be when you categorize the potential vulnerabilities according to the categories just mentioned. Each of the categories mentioned next serve as an introduction to that component, and are detailed in greater depth in the upcoming chapters.
Embedded Devices
An embedded device is the key to any IoT device architecture and is also the “thing” in the Internet of Things. The embedded device in an IoT product can be used for several different purposes depending on the user case scenario. It could be used as a hub for the entire IoT architecture of the device, it could serve as the sensor that collects data from its physical surroundings, or it could be used as a way of displaying the data or performing the action intended by the user. Thus, the things in Internet of Things could be used to collect, monitor, and analyze data, and perform actions.
To clarify this with a real-world example, think of a smart home IoT product. There are many devices that together make the smart home IoT product. These include a smart gateway or the hub, smart lightbulbs, motion sensors, smart switches, and additional connected devices.
Even though the devices serve different purposes, for the most part, the approach to test these devices for security issues would be the same. Depending on what purpose the device serves, it will hold sensitive information that when compromised would be considered critical.
Serial ports exposed.
Insecure authentication mechanism used in the serial ports.
Ability to dump the firmware over JTAG or via Flash chips.
External media-based attacks.
Power analysis and side channel-based attacks.
To assess the security of the device, the thinking process should be based on these questions: What are the device’s functionalities? What information does have the device has access to? Based on these two factors, we can realistically estimate the potential security issues and their impact.
Once we go deep into hardware exploitation, in Chapter 3, we will understand more underlying flaws in common IoT devices and look at how we can exploit the various hardware security vulnerabilities that we find in IoT devices.
Firmware, Software, and Applications
After hardware exploitation, the next component that we look at is the software part of an IoT device, which includes everything from the firmware that runs on the device, the mobile applications that are used to control the device, to the cloud components connected to the device, and so on.
These are also the components where you can apply the traditional pentesting experience to the IoT ecosystem. This would also involve topics such as reverse engineering of binaries of different architecture including Advanced RISC Machines (ARM) and MIPS, as well as reverse engineering of mobile applications. These components can often help you uncover many secrets and find vulnerabilities. Depending on what component you are testing, you will be using different tool sets and varying techniques.
One of the other objectives during the pentesting of software-based components is looking at the various ways in which we can access the individual component we want to test. For instance, if case we want to analyze the firmware for vulnerabilities, we would need to get access to the firmware, which often is not easily accessible.
We also need to focus a lot of our efforts on the reverse engineering of the communication APIs that help us understand how the different IoT device components interact with each other, and look at what kind of communication protocols are in use.
Mobile application : This allows us to control the smart devices—turning the lights on and off, adding new devices to the smart home system, and so on. Typically, you will have mobile applications for Android and iOS platforms, which are the two dominant mobile application platforms as of this writing. There are several attacks that are possible in mobile applications that could reveal sensitive information from the device or how the device works. It could also serve as an entry point to attack the web component (mentioned later) by reverse engineering the application binary and its communication APIs. Regarding mobile applications, we might also need to work with native components of the mobile application, which can lead us to additional understanding of the entire application binary and various underlying functionalities such as encryption and other sensitive aspects.
Web-based dashboard : This allows the user to monitor the device, view analytics and usage information, control permissions for the devices, and so on. Most of the IoT devices that you will encounter will have a web interface where you can access the data sent from the device to the web endpoint. If the web application is vulnerable, it could allow you to access unauthorized data, which could be the data of the same user or any other user using the same IoT device, which has been the case with many IoT devices in the past, notably baby monitors.
Insecure network interfaces : These are the components of the IoT device that are exposed over the network and could be compromised because of vulnerabilities in the exposed network interface. This could be either an exposed port that accepts connection to the service without any sort of authentication, or a service that is running a vulnerable and outdated version that has known vulnerabilities against that specific version. Previously, we have pentested many devices that have been running vulnerable versions of components such as Simple Network Management Protocol (SNMP), File Transfer Protocol (FTP), and so on.
Firmware : This controls the various components on the device and is responsible for all the actions on the device. You can think of it as the component that holds the keys to the kingdom. Pretty much anything that you can imagine that could be extracted from the device can be found in the firmware. The chapter dedicated to firmware in this book walks you through what firmware is, the internals, the various vulnerabilities we can find in firmware, and how to perform additional analysis on the firmware.
Mobile applications, web applications, and embedded devices often communicate with the other components and back-end endpoints through different communication mechanisms such as Representational State Transfer (REST), Simple Object Access Protocol (SOAP), Message Queuing Telemetry Transport (MQTT), Constrained Application Protocol (CoAP), and more, which we cover briefly in the upcoming chapters. Additionally, some of the components would be collecting data and sending it to a remote endpoint on a frequent basis, which could often be also treated as a privacy violation, more aptly, than a security issue. The whole focus of attack surface mapping is to ensure that you have enough information to understand the all the various aspects and functionalities of the device that will help us understand the security issues in them.
- Firmware
Ability to modify firmware.
Insecure signature and integrity verification.
Hard-coded sensitive values in the firmware—API keys, passwords, staging URLs, and so on.
Private certificates.
Ability to understand the entire functionality of the device through the firmware.
File system extraction from the firmware.
Outdated components with known vulnerabilities.
- Mobile applications
Reverse engineering the mobile app.
Dumping source code of the mobile app.
Insecure authentication and authorization checks.
Business and logic flaws.
Side channel data leakage.
Runtime manipulation attacks.
Insecure network communication.
Outdated third-party libraries and software development kits (SDKs).
- Web application
Client-side injection.
Insecure direct object reference.
Insecure authentication and authorization.
Sensitive data leakage.
Business logic flaws.
Cross-site request forgery.
Cross-site scripting.
That list is just a sample of some of the vulnerabilities present in these components, which should give you an idea of the kind of vulnerabilities that affect these components.
Radio Communications
Radio communications provide a way for different devices to communicate with each other. These communication mediums and protocols are usually not considered by companies when thinking about security, and thus act as a sweet spot for penetration testers to identify vulnerabilities in the IoT devices.
Some of the common radio communication protocols used in IoT devices are cellular, Wi-Fi, BLE, ZigBee, Wave, 6LoWPAN, LoRa, and more. Depending on what communication protocol a device is using, specialized hardware could be required to perform analysis of the radio communication .
During the initial analysis process, you should also list all the different hardware and software items that are required to perform a security assessment of the radio protocols in use. Even though initially this might appear to be a onerous task, once you have acquired the tools required to perform the assessment, it’s just a matter of analyzing the communication using those tools.
Setting up software and tools for radio pentesting (and other IoT pentesting components) can be a daunting task. That is why we have built a custom virtual machine (VM) called AttifyOS that you can use for all the IoT pentesting exercises and labs covered in this book. You can download AttifyOS at https://attify.com/attifyos .
Software Defined Radio (SDR).
ZigBee exploitation.
BLE exploitation.
Man-in-the-middle attacks.
Replay-based attacks.
Insecure Cyclic Redundancy Check (CRC) verification.
Jamming-based attacks.
Denial of service (DoS).
Lack of encryption.
Ability to extract sensitive information from radio packets.
Live radio communication interception and modification.
What are the roles of various components involved?
Which component initiates the authentication and pairing mechanism?
What does the pairing mechanism look like?
How many devices can each component handle simultaneously?
On which frequency does the device operate?
What protocols are being used by different components? Are they custom or proprietary protocols?
Are there any similar devices operating in the same frequency range as this device?
These are just some of the items you should consider when analyzing the radio communication for a given IoT device .
Creating an Attack Surface Map
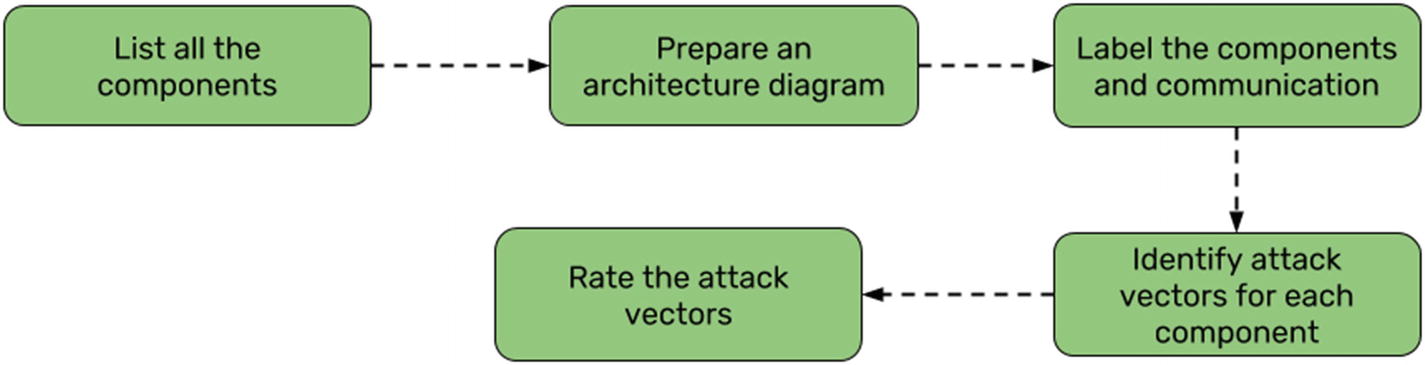
Attack surface mapping process
List all the components present in the target product.
Prepare an architecture diagram.
Label the components and the communication flows between them.
Identify attack vectors for each component and the communication channel or protocol used.
Categorize the attack vectors based on the varying criticality.
The initial architecture diagram also helps us during the entire architecture of the IoT solution and the various components involved. Make sure that during the architecture diagramming process, you list all the components involved, no matter how minor they seem to be, along with all the technical specifications of that component.
For some of the information, which might be tough to obtain initially, such as the frequency on which the device operates, you can find information available online, starting with places such as fccid.io where you can enter the FCC ID of an IoT device and find plenty of information about that specific device.
Smart Home Hub
Motion sensor
Power outlet
Presence sensor
Motion sensor
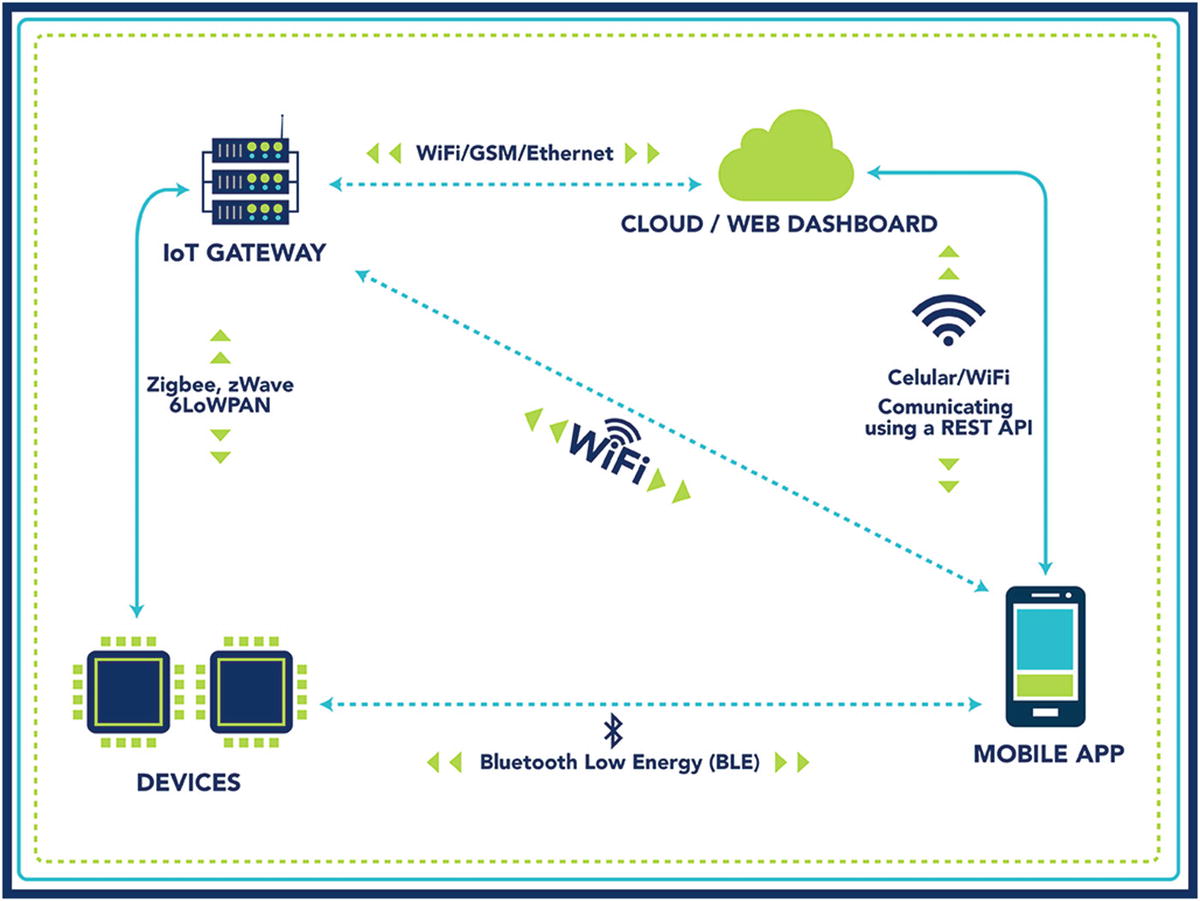
Attack surface map for an IoT device
- The following components are involved in this smart home system:
Devices.
Mobile application.
IoT gateway.
Cloud assets.
Communication protocols: BLE, Wi-Fi, ZigBee, ZWave, 6LoWPAN, GSM, and Ethernet.
The devices and mobile application communicate via BLE.
The smart hub and the devices communicate via various protocols, namely ZigBee, zWave, and 6LoWPAN.
The mobile application can also interact with the smart hub over Wi-Fi.
The mobile application and the smart hub communicate with the cloud every five minutes and share data.
The mobile application uses a REST API to communicate via the cloud assets.
The smart hub gateway has an Ethernet port and an external SD card slot that could be used for firmware upgrade.
The device contains a Broadcom processor.
The mobile application is a native application with a possibility of it having additional libraries.
During the initial setup process, the device is set up with a default password of admin.
The Android application still works if there is a certificate issue; that is, the application works over insecure connections with nontrusted certificate authorities (CAs) for the SSL certificate.
As you can see from Figure 2-3, we have all the different components mentioned in the diagram along with the various communication channels and protocols the various devices use to communicate with each other or the web endpoints.
After looking at this diagram and all the technical specifications, when we start our pentest, we now know exactly how to approach these devices and what our drilled-down targets are. At this step, we need to think like an attacker. If you had to attack a component, then how would you go for it? What vulnerabilities would you look for? What test cases would you perform? Exploiting that specific component is what you should focus on.
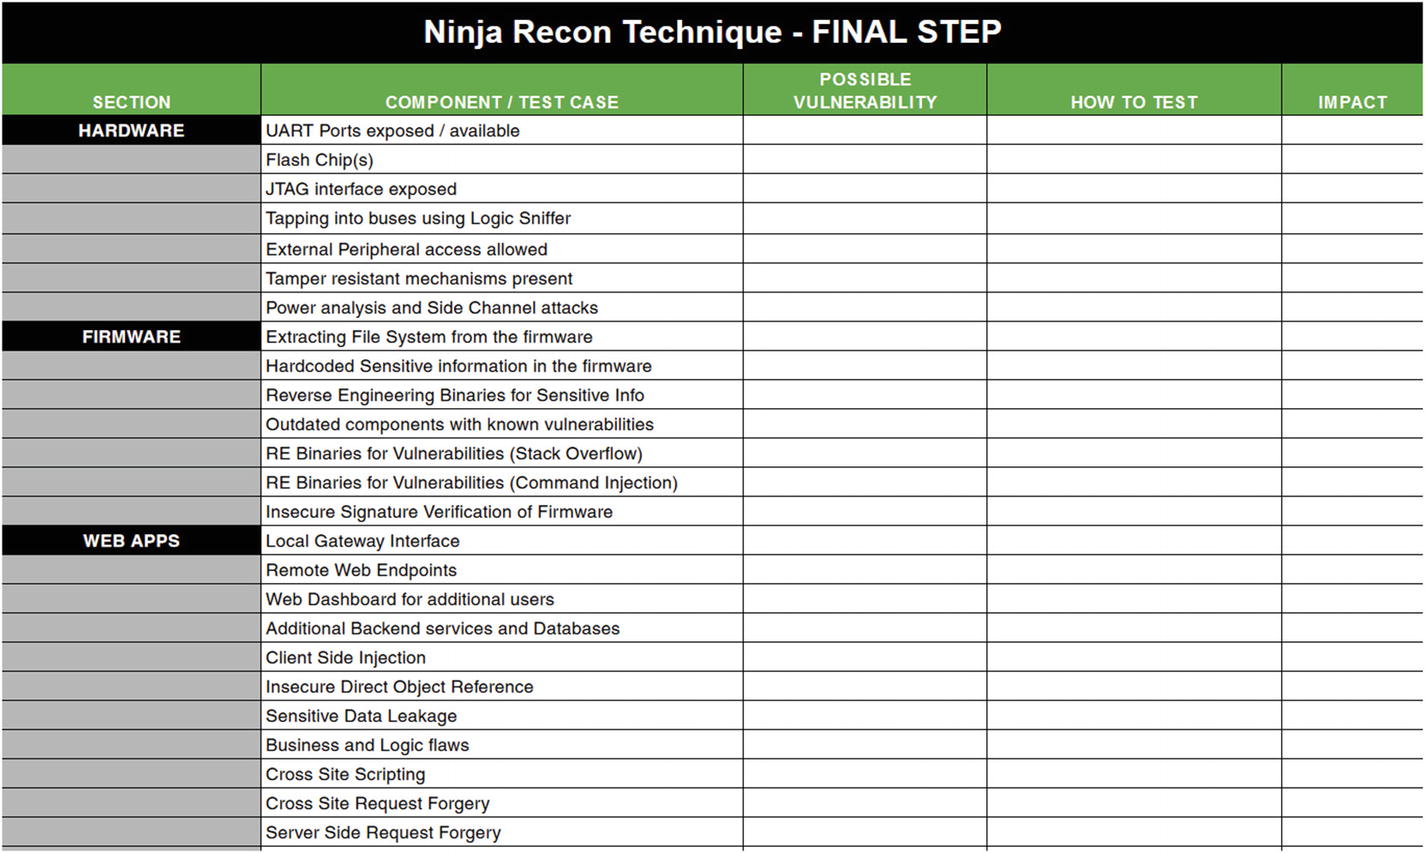
A sample spreadsheet for attack surface mapping
Attify’s IoT pentesting guide available at http://www.iotpentestingguide.com .
Embedded Hacking Guide by OWASP.
OWASP IoT Attack Surface.
Structuring the Pentest
Because IoT penetration testing is relatively new compared to other forms of penetration testing, not many people are familiar with how to execute the overall pentest. This section explains how to structure the pentest, the ideal team size, the number of days required, and other relevant details.
Again, all of this is comes from personal experience of pentesting hundreds of IoT devices in the past couple of years—and having found critical security issues in almost all of them. I believe this approach works efficiently. If you have another approach for executing the pentest that works best for you, you can certainly continue with that.
Next the overall structure of an IoT pentest is explained in detail.
Client Engagement and Initial Discussion Call
This is the initial discussion call after we get a request from an organization to pentest their IoT device. Even before this stage, we have an initial discussion with our technical team members to see if we have expertise relevant to the IoT device we are dealing with and other logistical requirements—resources available, next available dates, and so on.
During this stage, we let our pentesting lead get on a call with the client and discuss the device. These are some of the questions we discuss: What is the expected outcome required from the pentest? What components do they want to focus on the most? Would they like a normal pentest or a pentest with an additional research team involved?
If you are a pentester, I cannot overstate that your clients are your most valuable assets; it is extremely important that you deliver services and offerings only in the domain in which you and your team excel in. In that way, you will be able to serve the client best and will be able to maintain a long-lasting relationship.
Additional Technical Discussion and Briefing Call
Once we have decided that this is the project that we want to work on, and we would be able to contribute value to the overall engagement with great research, we ask the client to have their technical team join in on a discussion with our pentesting team who will work on that engagement. Remember, this stage comes after signing a nondisclosure agreement and other required documentation so that the client can freely share the technical specifications of the product.
We ask many questions during this stage to understand the product better. This enables us to understand the product best and explain to the client our pentesting methodology and what they can expect during each stage of the pentest. We also share our secure reporting mechanism, daily reporting system, test cases that we are going to perform, assessment team, interacting with their back-end mechanism, and so on. It is important that you are transparent and fair to the client on your pentesting methodology and the results they should expect each day, at the end of each phase, and at the end of the engagement.
We also need to understand their development process, what kind of testing their security team runs, if their quality assurance (QA) testing involves security tests, if there is a secure development life cycle, and so on. This also helps in getting the teams introduced to each other, as we also later offer personalized support to the developers when they are fixing the vulnerabilities.
Obviously, most of these components correspond to a gray box assessment, but you get the idea. During a black box pentest, you would omit details that an attacker won’t have, which is also called an attacker simulated exploitation. An attacker simulated exploitation is a pentesting method in which you compromise and attack the end device in a way that a highly targeted attacker would.
Attacker Simulated Exploitation
This is the actual penetration testing phase where we find vulnerabilities in IoT products and exploit them. Once we have received the devices into our labs, our pentesting process runs parallel with several activities going on at the same time:Our reverse engineering team works on the reverse engineering of various binaries, the embedded hacking team hacks into the IoT hardware device, the Software Defined Radio (SDR) team works on exploiting the radio communication, and the software pentest team works on firmware, mobile apps, web apps, and cloud-based assets.
This is only possible if you have a strong team where you have different pentesting divisions and individuals who possess expertise in their area of work. If you are an individual security researcher, you can do this as well, but for IoT pentesting, I highly recommend building a team of at least three people—software and firmware, hardware, and radio specialists—before performing penetration testing engagements.
Once the engagement is completed, we share a highly detailed report along with PoC scripts, high-quality video demonstrations, techniques used to find the vulnerabilities, steps to reproduce, remediation methods, and additional references that provide more about the identified vulnerabilities.
Remediation
Once we have completed the penetration testing engagement, we work with the developers, offering them support over voice and video calls and e-mails, pinpointing what exactly needs to be changed and what kind of patches need to be put in place. Even though all this information is provided in the technical report, we have found that working with developers during this phase and offering support helps them fix bugs more quickly and avoid making the same mistakes again because of the things they learn from our team during the remediation discussions.
Reassessment
Once the security vulnerabilities have been fixed by the developers, we perform another pentest for the vulnerabilities identified in the initial pentest. This ensures that all the patches are in place and the patches applied by the developers are secure, and do not lead to vulnerabilities in other components. This is one of the mistakes we see pentesters make: Once the device is patched, they limit the reassessment test to only the components they found to be vulnerable. However, you need to pay special attention to ensure that the fixing of code at that place has not led to the creation of bugs at another. That is how we conclude our pentest for that version of the device.
Conclusion
In this chapter, we learned how to start an IoT penetration testing engagement, creating a threat model, also known as attack surface mapping for the product. We also dug below the surface and had a look at the various components present in an IoT architecture and the security vulnerabilities that we could find in those components.
Action Point
- 1.
Take any IoT device around you (or think of one) and create an architectural diagram for that device.
- 2.
Once the architectural diagram is created, add the details of how the devices interact with each other: which components connect with which and what communication medium and protocol are being used.
- 3.
List security issues corresponding to each node and each medium in the diagram you created.
For feedback on your creation and thought process, send me an e-mail with a picture of your diagram and any additional notes to [email protected].