
The Phong Reflection Model
Many different algorithms can simulate the reflection of light, but the one you’ll implement here is called the Phong reflection model (named for Bui Tuong Phong, the researcher who developed it). It simulates the interaction between three different types of lighting:
-
Ambient reflection is background lighting, or light reflected from other objects in the environment. The Phong model treats this as a constant, coloring all points on the surface equally.
-
Diffuse reflection is light reflected from a matte surface. It depends only on the angle between the light source and the surface normal.
-
Specular reflection is the reflection of the light source itself and results in what is called a specular highlight—the bright spot on a curved surface. It depends only on the angle between the reflection vector and the eye vector and is controlled by a parameter that we’ll call shininess. The higher the shininess, the smaller and tighter the specular highlight.
The following illustration shows the effects of each of these attributes. The first sphere is rendered using only ambient reflection, the second sphere uses only diffuse reflection, and the third sphere uses only specular reflection. The last sphere combines all three.
As you can see, by themselves they don’t do a whole lot. But when you combine them, you get something with a lot more potential!
The first thing you’re going to need for this is a light source. You’re going to implement what is called a point light—a light source with no size, existing at a single point in space. It is also defined by its intensity, or how bright it is. This intensity also describes the color of the light source.
Add the following test to demonstrate the attributes of a point light.
| | Scenario: A point light has a position and intensity |
| | Given intensity ← color(1, 1, 1) |
| | And position ← point(0, 0, 0) |
| | When light ← point_light(position, intensity) |
| | Then light.position = position |
| | And light.intensity = intensity |
The next thing you need is a structure called material that encapsulates not just the surface color, but also the four new attributes from the Phong reflection model: ambient, diffuse, specular, and shininess. Each should accept a nonnegative floating point number. For ambient, diffuse, and specular, the typical values are between 0 and 1. For shininess, values between 10 (very large highlight) and 200 (very small highlight) seem to work best, though there is no actual upper bound.
Add the following test, which introduces a material function and shows the default values of each of the material’s attributes.
| | Scenario: The default material |
| | Given m ← material() |
| | Then m.color = color(1, 1, 1) |
| | And m.ambient = 0.1 |
| | And m.diffuse = 0.9 |
| | And m.specular = 0.9 |
| | And m.shininess = 200.0 |
Next, add a material property to your sphere, along with the following tests. These show how that property is used and what its default value should be.
| | Scenario: A sphere has a default material |
| | Given s ← sphere() |
| | When m ← s.material |
| | Then m = material() |
| | |
| | Scenario: A sphere may be assigned a material |
| | Given s ← sphere() |
| | And m ← material() |
| | And m.ambient ← 1 |
| | When s.material ← m |
| | Then s.material = m |
Make your tests pass by implementing the point light, the material function, and the sphere’s material property. Once you’ve got that, we’ll bring it all together with one more function: lighting.
This lighting function is what will shade your objects so that they appear three-dimensional. It expects five arguments: the material itself, the point being illuminated, the light source, and the eye and normal vectors from the Phong reflection model. While the function is not especially complicated by itself, several cases for the tests to consider will make sure everything checks out. Begin by writing the following series of tests, which will move the eye and light source around to exercise the lighting function in different configurations.
You can assume that each of these tests shares the following setup:
| | Background: |
| | Given m ← material() |
| | And position ← point(0, 0, 0) |
For the first test, the eye is positioned directly between the light and the surface, with the normal pointing at the eye, like this:
In this case, you expect ambient, diffuse, and specular to all be at full strength. This means that the total intensity should be 0.1 (the ambient value) + 0.9 (the diffuse value) + 0.9 (the specular value), or 1.9.
| | Scenario: Lighting with the eye between the light and the surface |
| | Given eyev ← vector(0, 0, -1) |
| | And normalv ← vector(0, 0, -1) |
| | And light ← point_light(point(0, 0, -10), color(1, 1, 1)) |
| | When result ← lighting(m, light, position, eyev, normalv) |
| | Then result = color(1.9, 1.9, 1.9) |
In this next test, the surface and the light remain the same as before, but you’ll move the eye to a point 45° off of the normal, as shown in the next illustration.
Here, the ambient and diffuse components should be unchanged (because the angle between the light and normal vectors will not have changed), but the specular value should have fallen off to (effectively) 0. Thus, the intensity should be 0.1 + 0.9 + 0, or 1.0.
| | Scenario: Lighting with the eye between light and surface, eye offset 45° |
| | Given eyev ← vector(0, √2/2, -√2/2) |
| | And normalv ← vector(0, 0, -1) |
| | And light ← point_light(point(0, 0, -10), color(1, 1, 1)) |
| | When result ← lighting(m, light, position, eyev, normalv) |
| | Then result = color(1.0, 1.0, 1.0) |
Next, the eye is back to being directly opposite the surface, but the light is moved to a position 45° off of the normal. The following figure shows how this looks.
Because the angle between the light and normal vectors has changed, the diffuse component becomes 0.9 × √2/2. The specular component again falls off to 0, so the total intensity should be 0.1 + 0.9 × √2/2 + 0, or approximately 0.7364.
| | Scenario: Lighting with eye opposite surface, light offset 45° |
| | Given eyev ← vector(0, 0, -1) |
| | And normalv ← vector(0, 0, -1) |
| | And light ← point_light(point(0, 10, -10), color(1, 1, 1)) |
| | When result ← lighting(m, light, position, eyev, normalv) |
| | Then result = color(0.7364, 0.7364, 0.7364) |
For this next test, the light and normal vectors are the same as the previous test, but you’ll move the eye directly into the path of the reflection vector, like this:

This should cause the specular component to be at full strength, with ambient and diffuse the same as the previous test. The total intensity should therefore be 0.1 + 0.9 × √2/2 + 0.9, or approximately 1.6364.
| | Scenario: Lighting with eye in the path of the reflection vector |
| | Given eyev ← vector(0, -√2/2, -√2/2) |
| | And normalv ← vector(0, 0, -1) |
| | And light ← point_light(point(0, 10, -10), color(1, 1, 1)) |
| | When result ← lighting(m, light, position, eyev, normalv) |
| | Then result = color(1.6364, 1.6364, 1.6364) |
For the final test, you move the light behind the surface, like this:
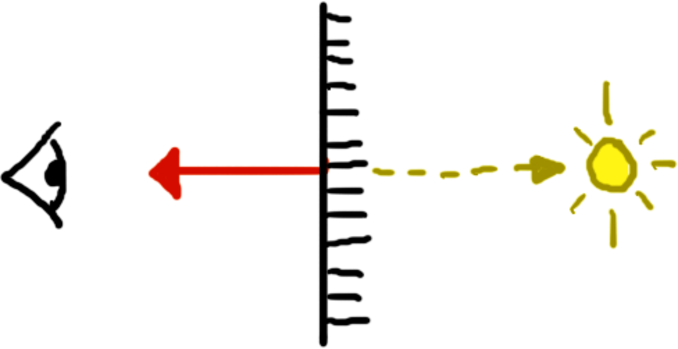
As the light no longer illuminates the surface, the diffuse and specular components go to 0. The total intensity should thus be the same as the ambient component, or 0.1.
| | Scenario: Lighting with the light behind the surface |
| | Given eyev ← vector(0, 0, -1) |
| | And normalv ← vector(0, 0, -1) |
| | And light ← point_light(point(0, 0, 10), color(1, 1, 1)) |
| | When result ← lighting(m, light, position, eyev, normalv) |
| | Then result = color(0.1, 0.1, 0.1) |
So, those are the tests! Make them pass now by implementing the lighting function. In a nutshell, it will add together the material’s ambient, diffuse, and specular components, weighted by the angles between the different vectors. In (annotated) pseudocode, it looks something like this:
| | function lighting(material, light, point, eyev, normalv) |
| | # combine the surface color with the light's color/intensity |
| | effective_color ← material.color * light.intensity |
| | |
| | # find the direction to the light source |
| | lightv ← normalize(light.position - point) |
| | |
| | # compute the ambient contribution |
| | ambient ← effective_color * material.ambient |
| | |
| | # light_dot_normal represents the cosine of the angle between the |
| | # light vector and the normal vector. A negative number means the |
| | # light is on the other side of the surface. |
| | light_dot_normal ← dot(lightv, normalv) |
| | if light_dot_normal < 0 |
| | diffuse ← black |
| | specular ← black |
| | |
| | else |
| | # compute the diffuse contribution |
| | diffuse ← effective_color * material.diffuse * light_dot_normal |
| | |
| | # reflect_dot_eye represents the cosine of the angle between the |
| | # reflection vector and the eye vector. A negative number means the |
| | # light reflects away from the eye. |
| | reflectv ← reflect(-lightv, normalv) |
| | reflect_dot_eye ← dot(reflectv, eyev) |
| | |
| | if reflect_dot_eye <= 0 |
| | specular ← black |
| | else |
| | # compute the specular contribution |
| | factor ← pow(reflect_dot_eye, material.shininess) |
| | specular ← light.intensity * material.specular * factor |
| | end if |
| | end if |
| | |
| | # Add the three contributions together to get the final shading |
| | return ambient + diffuse + specular |
| | end function |
Go ahead and make those tests all pass. Once they’re all green, you can be confident your shading routines are working as they should, and you can move on to the final part of this chapter: rendering a sphere with realistic lighting!