3Chapter 3: Managing Your Images

Introduction
The electronic display screens on the Sony a7 II serve two purposes: the first is to compose and preview the subject before the photo is recorded to the memory card; the second is to evaluate the recorded picture or movie after it has been captured. In both cases, you can check the quality of the image and ensure that the focus, exposure, and color are suitable. When you preview the image on the electronic screens, you can see if egregious errors in exposure and color balance need to be corrected before you release the shutter. You can also review the captured image to see how you need to fine-tune the camera settings to make sure future images look the way you want them to.
Only one display screen works at a time. In the default configuration, the EVF is enabled when the camera senses an object—presumably your eye—in front of the eyepiece. When you hold the camera away from your eye, the EVF turns off and the monitor turns on. This feature prevents the battery from being drained unnecessarily.
Although they serve the same purposes, each display has advantages. The value of using the monitor is that it can be tilted up or down so you can view the scene from above or below the level of the camera. It also allows you to view both the subject and the back of the camera at the same time. This is an advantage when you manipulate the camera controls or navigate through the menus. When you mount your camera on a tripod, the monitor is particularly convenient while you aim and adjust your camera.
The main benefit of the viewfinder is that your eye blocks the ambient light and makes it easier for you to see the subject. Intense noonday sunlight can swamp the monitor and make it difficult for you to see the subject, let alone frame or compose it. A second advantage is added steadiness when you hold the camera against your face. Be flexible and use whichever display screen provides the best results in a given situation.
This chapter covers how to preview and review your still pictures and movies, and it describes useful tools you can use when you evaluate your images. As with most functions on the a7 II, there is often more than one way to accomplish your photographic goals. Experiment with the camera, and over time you will find what works well for you.
The Monitor
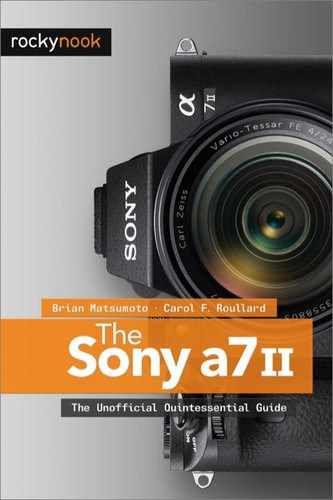
The Sony a7 II has a large, high-quality monitor with 1,228,800 dots. This is an improvement over the 921,600 dots in the display of the earlier Sony a7 model. The monitor is located on the rear of the camera and can be tilted (figure 3-1). It has a diagonal measurement of 3 inches (7.5 cm), which is large enough to provide a clear view at arm’s length.
The monitor is hinged so it can be extended from the camera body. This gives you flexibility when you work in cramped or awkward locations. For example, to frame a photograph over a crowd, raise the camera above your head and tilt the screen down so you can look up and compose the image. To get the same shot with a DSLR that does not have a tilting screen, you would need to hold the camera above your head and shoot blind.
We mentioned that when you look at the monitor you can view the camera commands and buttons along with the scene. This makes it easier to navigate and set the camera functions. In addition, when you mount your camera on a tripod, it is easier to view the framed image on the monitor.
You can set the monitor brightness with the Monitor Brightness command:
MENU > Setup (1) > Monitor Brightness > Brightness Setup > [Manual], [Sunny Weather]
This command is available only while you view the monitor. If you attempt to use the Monitor Brightness command while you look through the viewfinder, an error message will tell you to use the monitor.
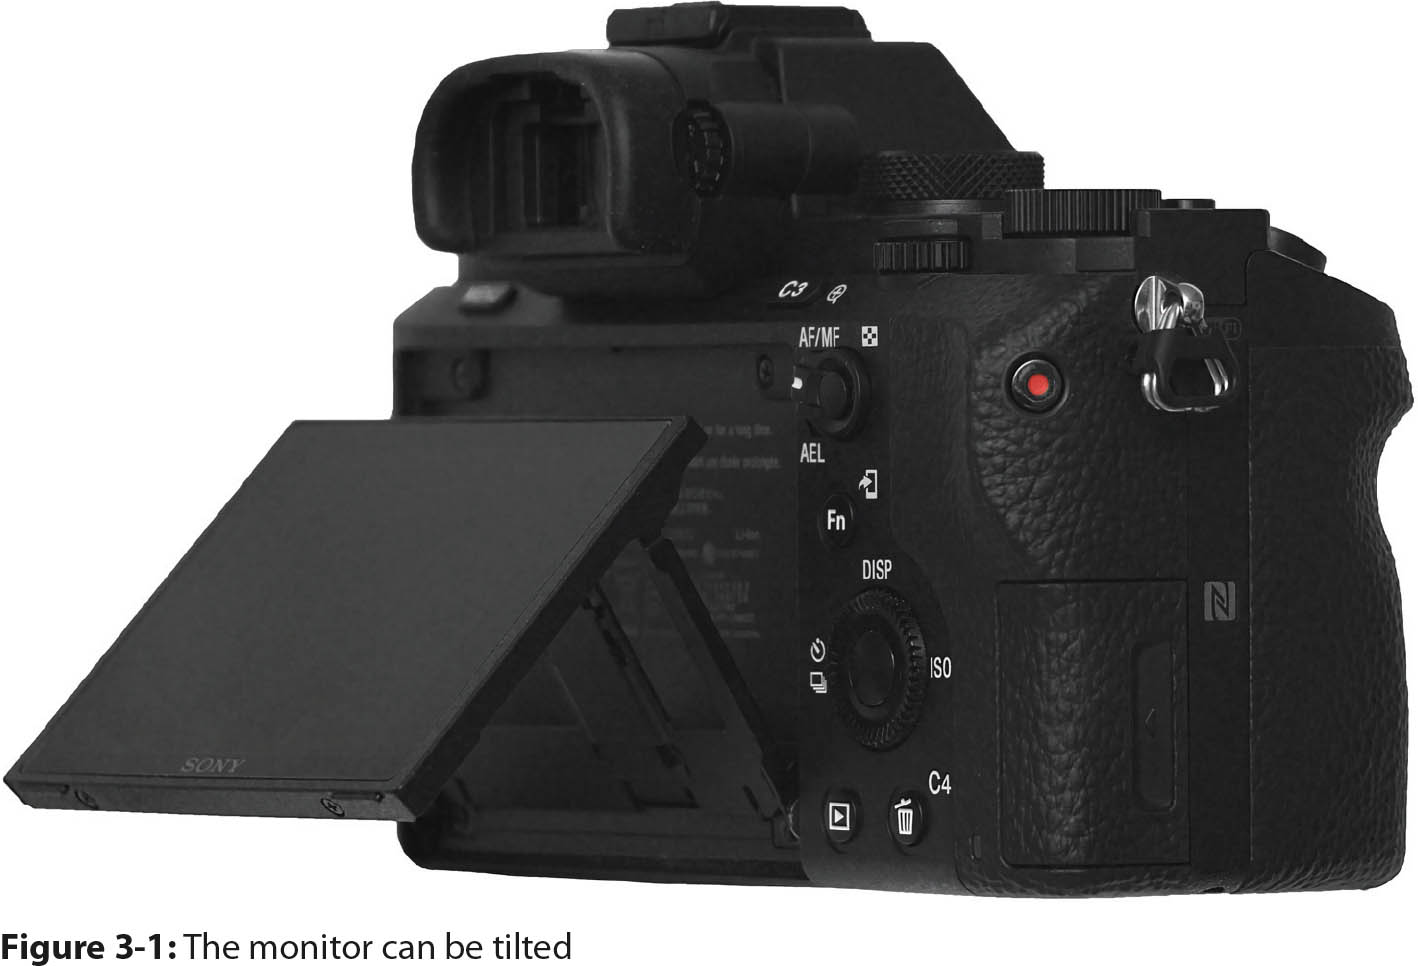
Along with the command options, a color grid and grayscale step wedge are displayed so you can adjust the screen brightness to an appropriate level.
When you use the [Manual] option for Brightness Setup, you can adjust the screen from –2 to +2 units of brightness (figure 3-2). The color grid and gray scale will change as you press the right or left buttons. Use these indicators to set the brightness to a level that is suitable for the ambient light.
This control may not be sufficient when you work under bright outdoors conditions. In that case, set the Brightness Setup command to [Sunny Weather], which maximizes the brightness of the screen. This setting is useful when you work with your camera on a tripod because you will probably frame the image with the monitor. Keep in mind that the camera batteries will be depleted faster if you use this setting frequently. When you handhold your camera, there is no need to use this command. It is easier and faster to use the EVF, which isn’t affected by bright sunlight.
The Viewfinder
The EVF on the Sony a7 II is a small screen that is made up of 2,359,296 dots. A magnifier that can be focused enlarges the screen for your eye. Like the monitor, it provides a live view with the camera settings displayed around the image before you take a picture. Its function is analogous to that of a DSLR optical viewfinder.
The advantage of the EVF is that it provides an excellent, enlarged, and bright image, which makes composition easier. The magnifier allows you to view fine details. As described in chapter 1, you should focus the viewfinder display for your eyesight with the diopter-adjustment dial. Use the letters and numbers that are displayed in the viewfinder as the focus point. When their edges are crisp, the viewfinder is correctly adjusted for your eyesight.
Unlike an optical viewfinder on a DSLR, you can display the camera’s menu commands and options in the a7 II EVF, along with histogram information and graphical displays of intensity levels. The control wheel, dials, and custom buttons all function the same way on the EVF as on the monitor. For example, when you display a menu, rotate the control wheel or press the up or down buttons to move through the menu structure and command settings.
You can adjust the brightness of the EVF screen with the Viewfinder Bright. command:
MENU > Setup (1) > Viewfinder Bright. > Brightness Setup > [Auto], [Manual]
Set the Brightness Setup option to [Auto] to let the camera determine the brightness level of the EVF screen. If you are unhappy with this setting, set the option to [Manual] so you can adjust the EVF screen from –2 to +2 units of brightness.
The Viewfinder Bright. command works only when you look through the viewfinder. If you view the monitor instead, an error message will tell you to use the viewfinder.
Sometimes it is better to use the EVF instead of the monitor, such as when you photograph a stage production. The glow of the monitor can distract the performer and annoy the audience. Another important advantage of the viewfinder is that you gain stability when you hold the camera against your face. This is beneficial for low-light photography and situations when you use long shutter speeds or work with a long telephoto lens because the slightest camera movement will be magnified. Steadiness is even more critical when you shoot movies because all camera movement is recorded.
Monitor versus Viewfinder
As mentioned before, only the monitor or the viewfinder can be active at one time. You can determine which screen you will use as your primary viewing device by using the following command:
MENU > Custom Settings (4) > FINDER/MONITOR > [Auto], [Viewfinder], [Monitor]
The [Auto] option is the default setting. It switches automatically between the monitor and the viewfinder, depending on which screen you happen to be using. This switching can be annoying while you enter menu commands and view them on the monitor. If your hand passes close to the viewfinder, the camera may turn off the monitor and activate the EVF. To avoid this annoyance, use the [Monitor] option to make sure the monitor stays on.
Sometimes you want to use only the EVF. For example, if you are shooting in an environment where the light of the monitor is distracting, you can set the FINDER/MONITOR command to [Viewfinder]. Then only the viewfinder will be active, and the monitor will stay dark.
Data Display Formats
You can review the camera settings in Live View prior to and after recording so you can make any needed adjustments to improve your image. However, the data may distract you while you compose a picture. The following sections cover data display formats before and after you record a still picture or a movie. Become familiar with each format because you may find that certain data display formats work best for you in different shooting scenarios.
Previewing Data Display Formats
There are six display formats for Live View. Five of them are used for previewing or composing the subject. The sixth display option, [For viewfinder], does not display an image; instead, it provides a summary of the camera settings. When this option is used with the Fn button, it provides a fast and efficient way to change settings. In contrast, the display formats for the EVF are used only for previewing the subject; the [For viewfinder] option is not available. With this many choices, it can be daunting to know which one to use, so let’s review all six data display formats:
• Graphic Display: Graphic Display is not a default option for either the monitor or the viewfinder, so you must enable it if you wish to use it. This option displays a full-size image with the major shooting settings. There are two horizontal scales: one for shutter speed and one for aperture. The current setting is indicated on the scale, and a vertical line is displayed on the bottom-right side of the screen (only for still picture shooting modes).
• Display All Info.: This setting is convenient for scientific or technical work because it displays significant data. However, this can be distracting when you compose and frame the image. It displays a full-size image with the camera settings on three sides of the frame. This is a default setting for the monitor, but not the viewfinder.
• No Disp. Info.: This format briefly displays the shooting mode and battery power data, and it is ideal for careful composition. The data disappears after a few seconds and leaves the screen clear. Additional shooting settings are displayed at the bottom border of the monitor and at the top and bottom borders in the viewfinder. This is a default setting for both the monitor and the viewfinder.
• Histogram: A real-time histogram occupies the lower right of the screen so you can evaluate the exposure. It displays the full-size image, shooting mode, and exposure settings. Additional shooting settings are displayed at the bottom border on the monitor and at the top and bottom borders in the viewfinder. The shooting mode and battery power are superimposed over the image at the top of the monitor and disappear after a few seconds. The histogram helps you adjust the exposure under difficult lighting conditions. This is a default setting for both the monitor and the viewfinder.
• Level: The level is displayed as an aid for architectural photography when you want to keep the plane of the camera sensor perpendicular to the ground. It displays the full-size image, shooting mode, exposure settings, and digital level in the center of the screen. The level indicator turns green when the camera is level, both horizontally and from front to back. Additional shooting settings are displayed at the bottom border on the monitor and at both the top and bottom borders in the viewfinder. The shooting mode and battery are superimposed over the image at the top of the monitor and disappear after a few seconds. This is a default setting for the viewfinder but not for the monitor. When you shoot with wide-angle lenses for interiors or for architectural photographs, the level information helps you eliminate perspective distortion, which is caused by tilting the camera.
• For viewfinder (MONITOR only): This option is very useful because it displays only the camera settings and gives you a portal to change those settings. This option shows data only, not the subject. A histogram, a level, and the exposure settings are displayed. This data display format has an extra feature that offers a convenient way for you to change the settings. When you press the Fn button, the screen changes to the Quick Navi screen and lets you alter the camera settings.
If you want to change one of the camera settings, use the up, down, right, and left buttons to navigate to the setting, then press the center button to access the command. Select a new value for the command, and press the center button to accept the change. The camera then returns to the [For viewfinder] screen.
If you want to change more than one setting, rotate the control wheel to access the command and make changes. This is a faster but less versatile way to make changes. Basically, you highlight the command you want to alter by pressing the Fn button, then you change the setting by rotating the control wheel. After you set the value, you can move to another command by pressing the rim of the control wheel to highlight it, then you rotate the control wheel to change the setting. Although this approach is fast, it works for fewer settings. If you want to change more complex commands, such as WB, Creative Styles, or DRO, you will have fewer options than if you had used the approach described in the previous paragraph.
The For viewfinder format is a default for the monitor, but it is not available for the viewfinder or when you set the mode dial to Movie.
You might think that since the options have the same names in both the monitor and viewfinder commands, the data display formats will be identical, but that is not the case. When the camera Aspect Ratio is set to [3:2], the data at the top of the display is superimposed on the image when you view it on the monitor, and it is displayed above the image when you view it through the viewfinder. When the Aspect Ratio is set to [16:9], the data at the top of the display is above the image on both the monitor and the viewfinder. In addition, when the mode dial is set to Movie, the Ch1 and Ch2 horizontal audio recording scales are displayed at the left of the screen for all data formats except [No Disp. Info.] and [For viewfinder].
Whereas all the data display formats within the viewfinder include a row of camera setting information along the top of the screen, regardless of the display format, this row of camera setting information is displayed only in the [Graphic Display], [Display All Info.], and [For viewfinder] options on the monitor.
There are two exceptions. When the camera is in Sweep Panorama mode, the [Graphic Display] format does not display the shutter speed and aperture scales, and the [Histogram] format is replaced with the [No Disp. Info.] format. Plus, when the camera is in Movie mode, the [For viewfinder] slot is replaced with the [Display All Info.] format on the monitor.
Each format has benefits. When you are carefully composing a landscape or a portrait, an unobstructed preview of the image is important, so you might use [No Disp. Info.]. When it’s important that you keep your camera level—such as for panoramas, extreme wide-angle lenses, or architectural photography—use [Level]. When you want to easily access the camera settings, use [For viewfinder] so you can initiate the Quick Navi screen. You will probably have a favorite format or two, but it’s easy to switch among them with the DISP button, and you will likely use each display format frequently enough to see its value.
Activating Data Display Formats
The data display formats on the monitor and in the viewfinder are independent. For example, you can have three formats available for the monitor and five for the viewfinder. Scrolling through the activated data display formats is also independent for each screen. For example, you can have Graphic Display on the monitor and No Disp. Info. on the viewfinder.
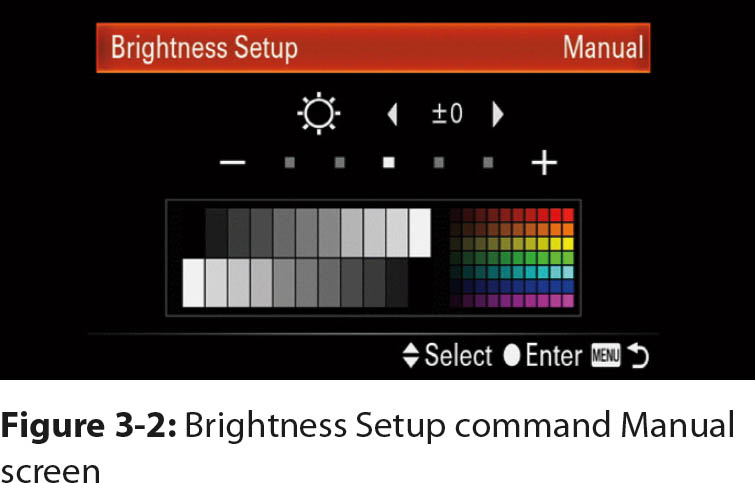
Use the DISP Button > Monitor command to select which data display formats are available for previewing images on the monitor, and use DISP Button > Finder for the viewfinder:
MENU > Custom Settings (2) > DISP Button > Monitor > [Graphic Display], [Display All Info.], [No Disp. Info.], [Histogram], [Level], [For viewfinder]
MENU > Custom Settings (2) > DISP Button > Finder > [Graphic Display], [Display All Info.], [No Disp. Info.], [Histogram], [Level]
For both commands, each of the data display format options are preceded by a check box. As you scroll through the options, a sample display screen appears in the lower-left corner (figure 3-3). The sample shows what the display format looks like so you can decide if you want to use it. Press the center button to check or uncheck an option. You can check up to six options for the monitor and five for the viewfinder. Navigate to [Enter] and press the center button to save the changes. Only the checked data display formats will be available in preview mode.
After you select the display formats you want to use, go to preview mode and press the DISP button to cycle through the various views. For example, suppose you selected DISP Button > Monitor > [Display All Info.], [No Disp. Info.], [Histogram], and [Level]. Each time you press the DISP button while you preview a framed image, you will cycle through these four display formats. Choose which screen display you prefer to use. For example, you may think the preview image is too cluttered with information, so you can select [No Disp. Info.]. The scene will then be displayed without an overlay of numbers and letters. The shooting mode and the battery level will be displayed briefly, but they disappear in less than 5 seconds.
Framing for a Movie Recording
When you press the movie button to record a movie while the camera is set to a shooting mode other than Movie, the frame for the preview image will change from an aspect ratio of 3:2 to 16:9. This means that the framing for your movie may not be what you expect. If you need more precision, you can use the small bracket marks within the interior of the frame. These brackets mark the corners of the frame for the movie. For the most accuracy and to ensure that your movie is framed properly, switch the mode dial to Movie.
Playback Formats for Still Pictures
When you play back your still pictures, three data display formats are available:
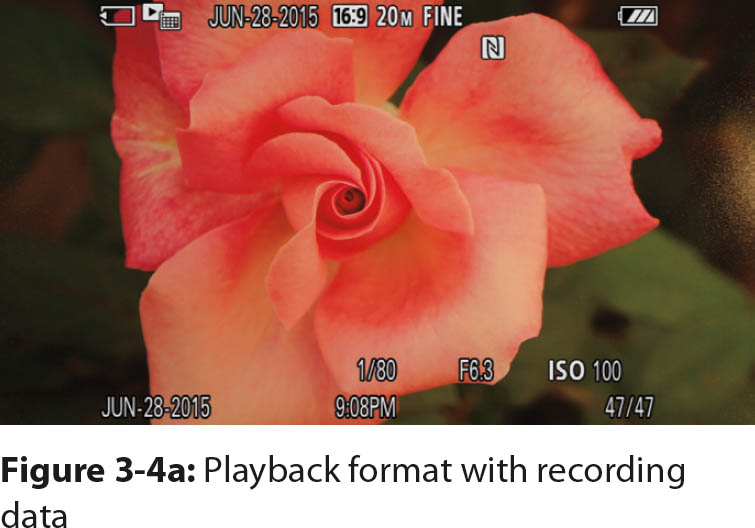
• Image with recording data (figure 3-4a)
• Image with histograms and recording data (figure 3-4b)
• Image only, no data (figure 3-4c)
After you press the playback button to review your saved pictures, you can cycle through the three display formats by pressing the DISP button.
Each playback format has benefits. The recording data includes the camera settings you used to produce the image. This is invaluable when you review your images to determine which camera settings worked and which might need to be adjusted to improve the next shot.
The histogram view displays the intensity range of the luminosity channel and the three color channels (RGB) of the recorded picture. You can see if the sensor failed to capture all the light and color information in the scene. This is important because if the full intensity range of all color channels is not captured, a color shift may be introduced if you change the brightness of the image during post-processing.
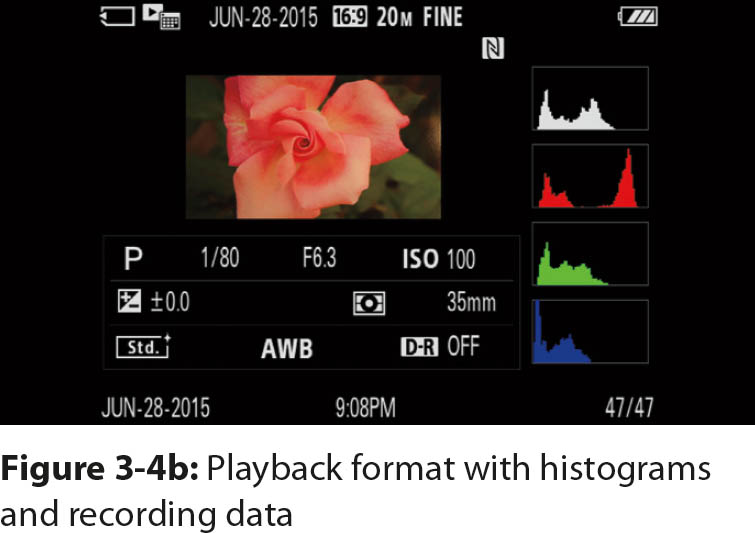
Also, any overexposed, or blown-out, areas will blink from white to black, and any underexposed areas will blink from black to white. This is an excellent way to see which areas in the image have details that were not recorded by the sensor. Overexposed highlights will be predominantly white with few intensity transitions, and underexposed areas will display noise and no detail.

Initial Display Formats for Reviewing Movie Data
Although three data display formats are initially available when you press the playback button to review a movie, there are really only two playback formats when the movie is played. After you press the playback button, but before you play back the movie, press the DISP button to cycle through the following three formats:
• Movie with recording data displayed within the border of the picture (figure 3-5a)
• Small thumbnail image of the first frame, with recording data displayed outside the thumbnail (figure 3-5b)
• Movie without recording data (figure 3-5c)
All three of these options will display the first frame of your movie with a playback arrow in the center of the image. After you press the center button to start the movie, the DISP button has only two formats: with recording data displayed, and without recording data displayed.
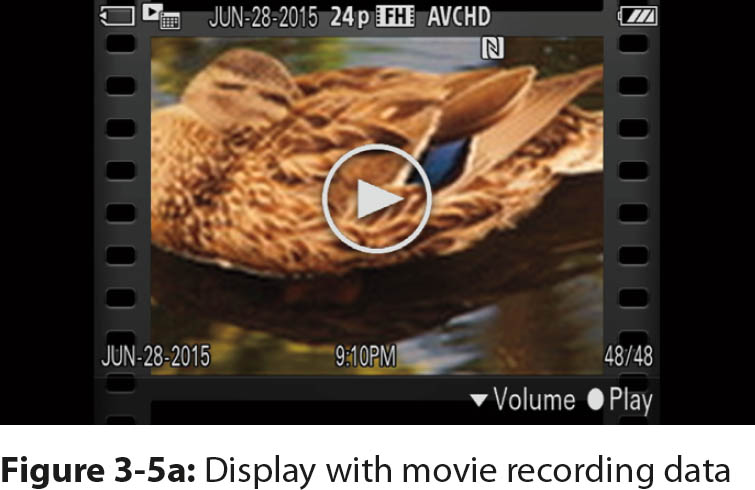
Image Overlays to Aid Composition
The camera can project lines and grids onto the screen to help you align and frame your pictures and movies. They are not recorded in the image files and are not visible when you play back your images and movies.

Use the following command to set the lines and grids:
MENU > Custom Settings (1) > Grid Line > [Rule of 3rds Grid], [Square Grid], [Diag. + Square Grid], [Off]

Each of the three Grid Line options have specific patterns and benefits. The [Rule of 3rds Grid] consists of a 3×3 array of rectangles (figure 3-6). This pattern allows you to position the main subject one-third or two-thirds of the way from any side of the screen. Many artists think this technique helps them create a balanced composition. The next two patterns are more useful for scientific photography. The [Square Grid] pattern divides the screen into an array of 6×4 squares to help you make sure the picture is well balanced and not tilted. The final pattern, [Diag. + Square Grid], divides the screen into an array of 4×4 rectangles with diagonal lines from the center to each corner, which helps you center the image in the frame. No grid lines are shown when the command is set to [Off].

All three grid patterns are useful in architectural photography and in scenic shots with horizons. They help you avoid perspective distortion by providing an alignment guide to ensure the vertical lines of buildings are rendered as parallel rather than converging at a point, which occurs when you frame a tall building with your camera tilted. This creates the illusion that the building is tipping or falling over. To avoid converging lines, keep the sensor vertical and use a tilt-shift lens to frame the top of the building.
Sony does not sell tilt-shift lenses for architectural photography, but you can use third-party lenses from Bower, Rokinon, Samyang, or Schneider with an adapter. Although it is best to do architectural photography with your camera mounted on a tripod, we have taken successful handheld shots with the help of the grid lines and the level. The high pixel count of the Sony a7 II has the potential to capture dramatic shots of tall buildings, without making them look like they are falling over.
Reviewing Recorded Images
You should review your still pictures and movies on the camera after you record them so you can adjust the composition or exposure and reshoot if needed. The a7 II has a couple of tools to help you do this. Keep in mind that when we talk about still pictures, we include panoramas.
Auto Review
The Auto Review command allows you to view a picture immediately after you take it. You can set the camera to display the picture for 10, 5, or 2 seconds, or you can eliminate Auto Review by turning the command [Off]:
MENU > Custom Settings (2) > Auto Review > [10 Sec], [5 Sec], [2 Sec], [Off]
When the display time expires or when you press the shutter button halfway, the camera will return to Live View.
We recommend that you turn this command [Off] so the camera will return to Live View immediately after you take a picture. This eliminates interruptions to picture taking and allows you to continually view the subject on the display screen. This is particularly important when you shoot action or sports and need to follow a subject. For example, you might be photographing your child’s soccer game, and he passes the ball and is advancing on the goal. An interruption to Live View could cause you to miss the next great picture. Because you can review your pictures at a convenient time by pressing the playback button, we think Auto Review is an inconvenience that slows down the photographic process.
Playback Button
You can review your still pictures with either the Slide Show command (discussed later in this chapter) or the playback button, which puts the camera in Playback mode. Be aware that at least one of the camera apps creates files that Playback does not recognize. For example, when we created a time-lapse movie with the Time-lapse app, the only way we could review the movie on our camera was to use the Time-lapse app. If you exit the app, the time-lapse movie will not be played when you press the playback button.
Playback remembers how you last used your camera. The file that is displayed for both still pictures and movies is dictated by the image you dealt with last; that is, either the last image you recorded, the image you played back when you last ended the Playback function, or the last View Mode command option you selected. For example, if your last action was to take a picture, you will be presented with that image when you press the playback button. Likewise, if you used Playback mode, exited, then re-entered, the camera will display the last image you viewed.
Your camera can store hundreds of pictures and movies, and they can be in a variety of file formats. Suppose you want to play back only pictures or you want to view all movies you recorded on a specific day. The View Mode command allows you to play back a subset of all files that are stored on the memory card.
In the View Mode command, you first define which type of files to display, then you fine-tune the selection to display files from a specific folder or to view files starting at a specific recording date:
MENU > Playback (1) > View Mode > [Date View], [Folder View(Still)], [Folder View(MP4)], [AVCHD View], [XAVC S View]
The advantage of using this command is that it allows you to specify whether you want to view still pictures and movies starting from a given date or within a specific file folder that contains still pictures or MP4 movies. If you want to play back images that you recorded on a specific date, such as your child’s birthday, select [Date View] from the View Mode command, navigate to the specific date on the displayed calendar, and press the center button to select it. The camera will use the selected date as a starting point, then you can review all the pictures and movies that you made on and after that date. You can choose to view files in a specific folder only for still and MP4 files.
Regardless of which View Mode options you select, if there are saved files on the memory card that meet the search criteria, you will see a screen that is divided into three parts: File Type Select bar, Month/Year selection or Folder selection, and thumbnail images. Each part of the screen further defines which images you want to view.
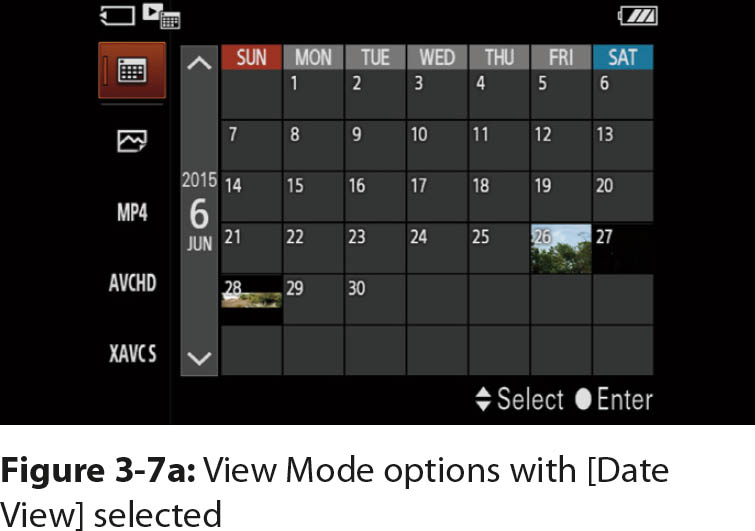
On the left side of the screen you will see the File Type Select bar, which contains icons for each of the five View Mode options (figure 3-7a). This allows you to change the file type selection without having to go back to the beginning of the menu.
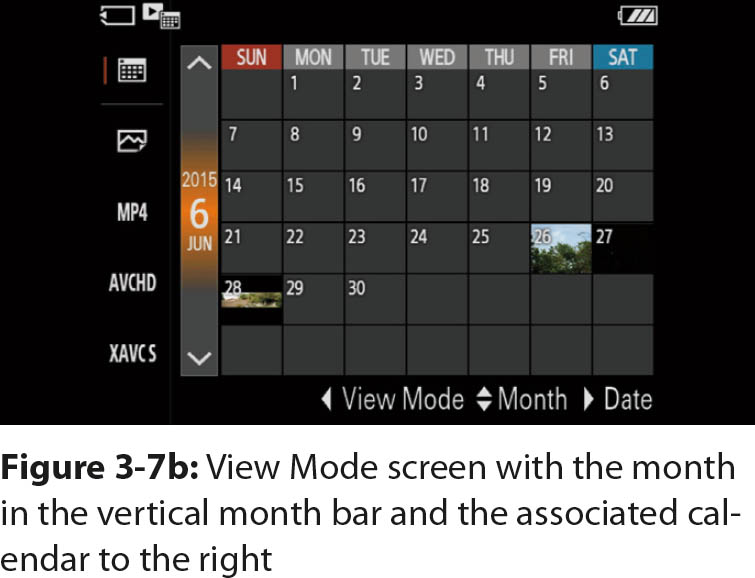
What you see in the second and third parts of the screen depends on whether you selected a View Mode option that is specific to a date or a folder. The [Date View], [AVCHD View] and [XAVC S View] options are specific to a date. If you chose one of these options, the middle part of the View Mode screen contains a vertical month bar, and the right side of the screen displays a calendar for that month (figure 3-7b).
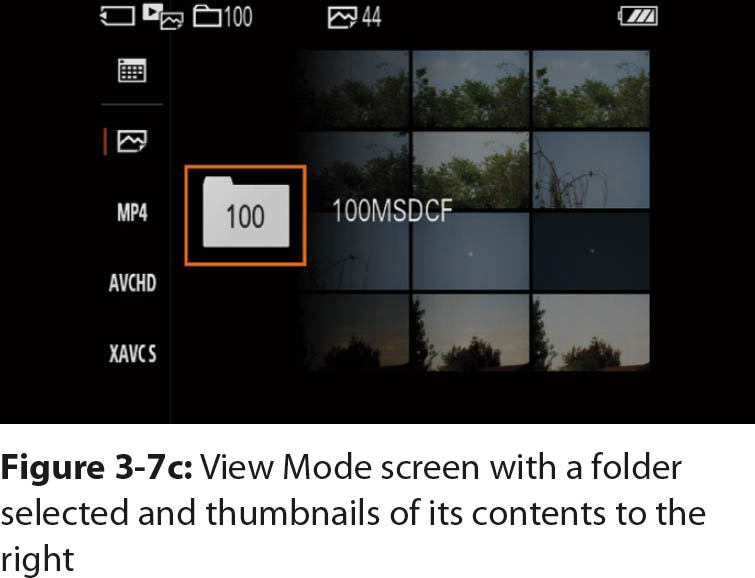
If you chose [Folder View(Still)] or [Folder View(MP4)], which are specific to a folder, the middle part of the screen will display folder icons, and the right part of the screen will display grayed-out thumbnail previews of the image files in the highlighted folder (figure 3-7c). After you select a folder, the thumbnail previews become active, and you can select an image.
Use the right button to move from the File Type Select bar to the next part of the screen. Use the up or down buttons to navigate through the list of months or folders, depending on which option you chose.
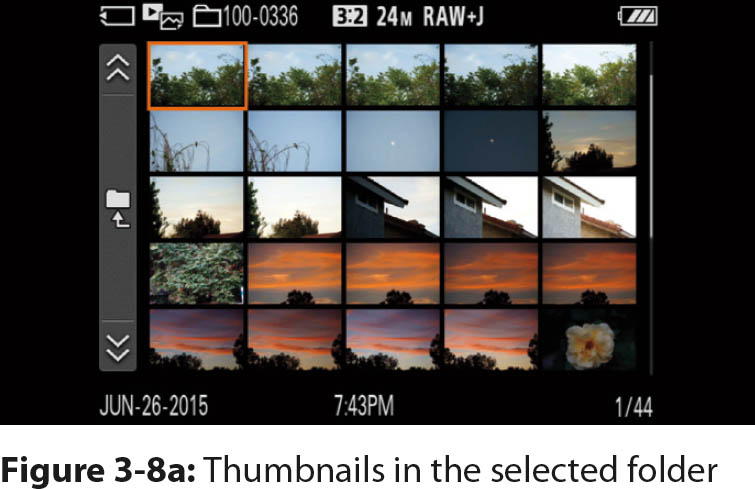
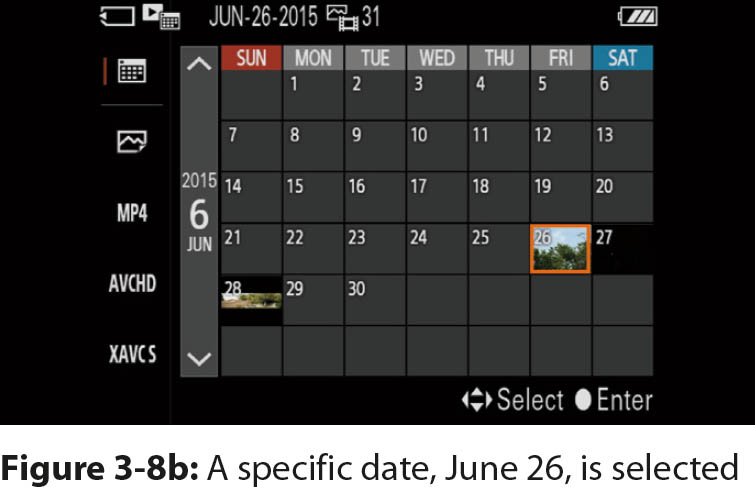
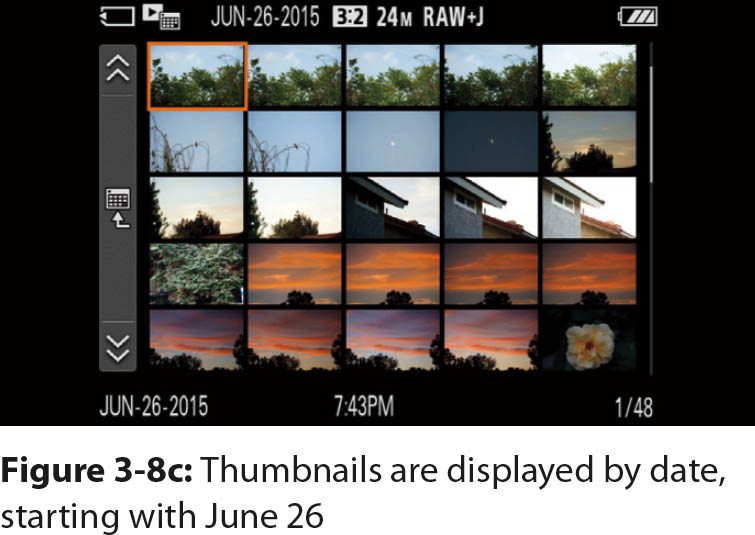
The appearance of the thumbnails depends on the View Mode option you chose and the value in the second part of the screen. As you move through the available months or folders in the second part of the screen, the thumbnail preview changes; either the calendar will change to match the month, or the thumbnails will change to indicate the folder contents. If you select a folder, the thumbnails will become active for you to view (figure 3-8a). If you selected a month, you need to select a specific date within that month. Use the right button to enter the calendar and navigate to the date you want to view (figure 3-8b). Press the center button to see the images, starting with the date you chose (figure 3-8c).
If the camera is already in Playback mode, you can access View Mode and choose folders or dates faster if you press the Image index button, which is the AF/MF or AEL button when the camera is in Live View. The Image index function works only when the camera is in Playback mode. It will take you directly to the View Mode screen so you can select new values.
After the Image index screen displays the images you wish to view, rotate or press the rim of the control wheel to navigate through them. The vertical scroll bar on the right side of the screen changes as you move through the images, indicating the relative position of the displayed images within the total number of images for the selected file type. Use the vertical File Type Select bar on the left to change the file type.
Sometimes when you access Playback mode, you don’t find the images you expect to see, perhaps because the View Mode command is set to the wrong file type. To remedy this problem, access the View Mode command and select the desired file type.
Playing Back Still Pictures
When you want to see your still pictures, press the playback button. Either the last recorded picture or the last picture that was played back or selected via the View Mode command will be displayed first. Rotate the control wheel clockwise or counterclockwise to display the next or previous picture, respectively. You can also press the right or left buttons, or rotate the front or rear dial, to navigate through your pictures. Note that the displayed images wrap around as you continue to navigate through them. Remember to use the DISP button to view the recorded image data in the different data display formats.
Playing Back Panoramic Pictures
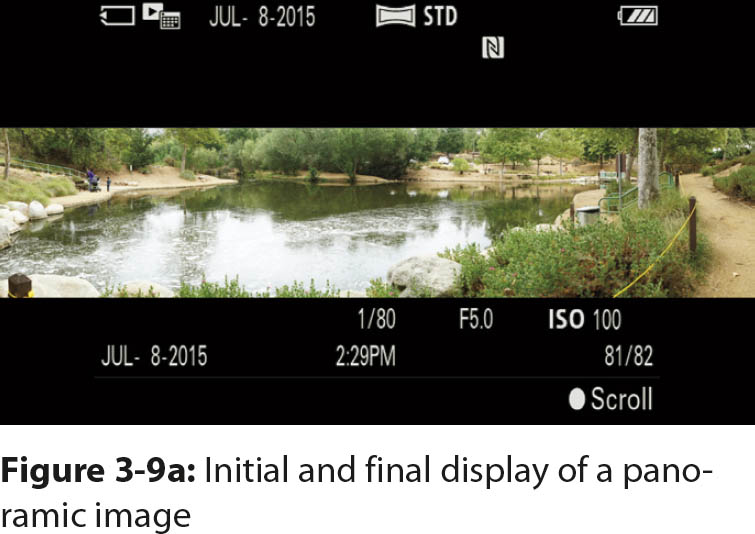
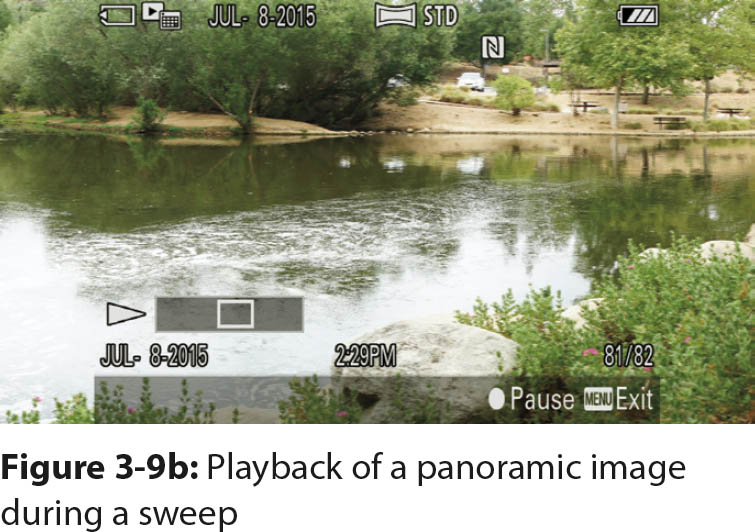
Sweep Panorama images play back differently than regular still pictures. When you first see an image, the entire panorama is framed within an elongated rectangle (figure 3-9a). When you press the center button, the image enlarges to fill the screen, and the image moves as it pans through the panorama in the direction it was recorded (figure 3-9b). After the camera has played to the end of the sweep, the image is zoomed out so you can see the entire image again, as shown in figure 3-9a. This gives you both an overall view of the panorama and a closer view of the image.
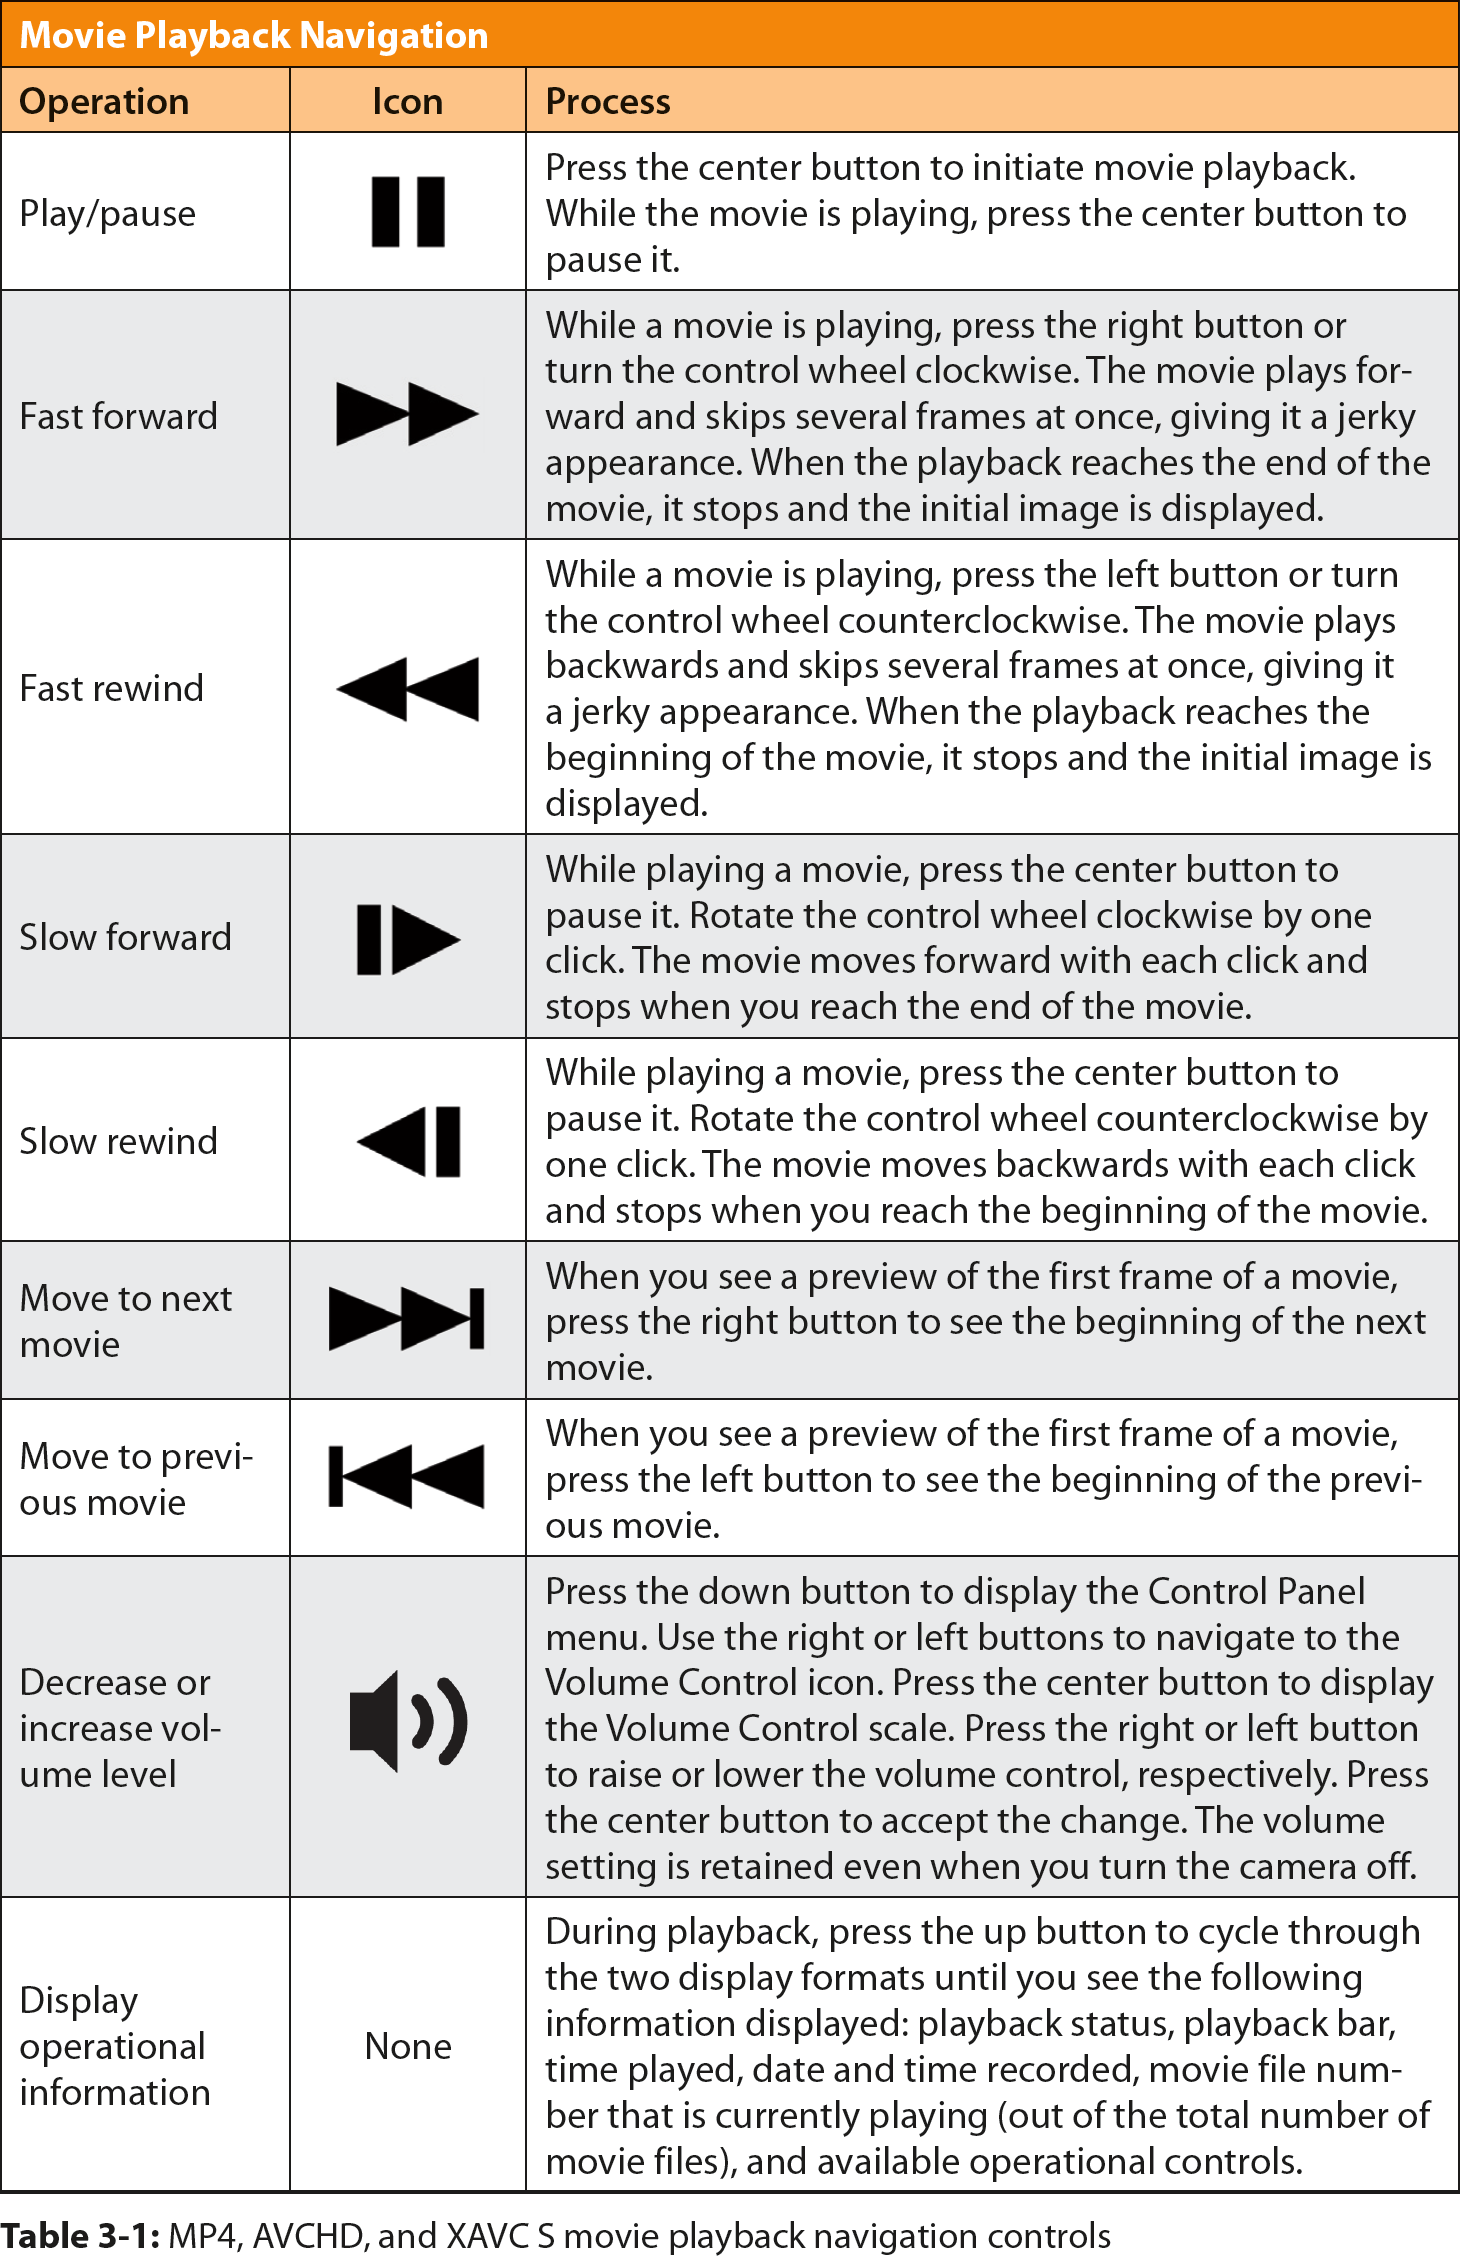
Playing Back MP4, AVCHD, or XAVC S Movies
As you cycle through the files on your memory card in Playback mode, you will see only the first frame of each movie. Press the center button to play the movie. Press the DISP button to toggle between playback with operational data displayed and playback with no data overlay (figure 3-10a).

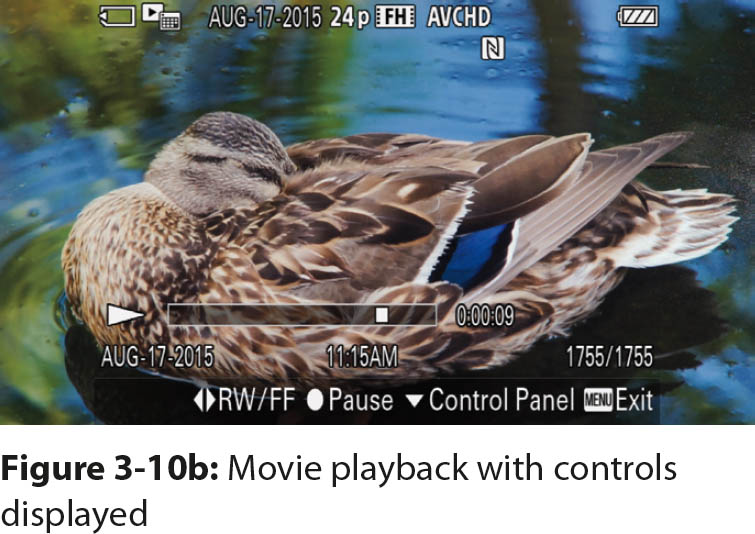
The operational data that is displayed before you initiate playback includes the date and time the movie was taken, the movie file type, and the movie quality. The playback prompts appear at the bottom of the screen. Press the center button to play the movie. After the movie starts to play, you will see prompts for Fast Rewind (left button), Fast Forward (right button), and Pause (center button) (figure 3-10b). Press the down button to see the Control Panel, where you can set the volume either before you initiate playback or during playback. When you see the Volume Settings screen, use the left and right buttons to decrease or increase the volume, respectively (figure 3-10c).

You don’t have to wait until a movie has played back completely to see the next movie. While the first movie is playing, press Pause (center button). Press the right button to advance to the first frame of the next movie. You can move to subsequent movies by continuing to press the right button. If you want to view a previous movie, press the left button. When you are ready to play a movie, press the center button.
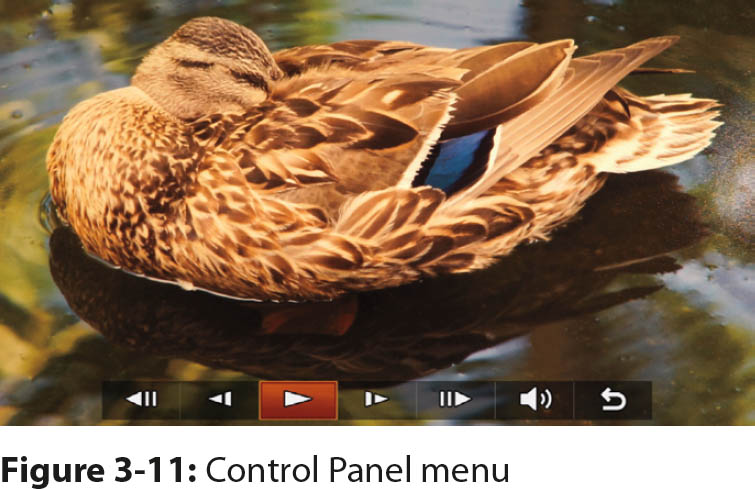
You can also use the Control Panel menu to navigate and choose movie playback operations. While a movie is playing, press the down button. The Control Panel menu will be displayed on the bottom of the screen (figure 3-11). Depending on what you want to do, you may have to go back and forth to the pause icon to choose one of the other options. Other than using the Control Panel menu for volume control, we find it easier to navigate playback options without using this menu. Use table 3-1 to become familiar with the movie controls.
Reviewing Several Pictures and Movies
Use the Image Index command to display from 9 to 25 thumbnail images (still pictures and/or movies) in a folder or on a specific date:
MENU > Playback (1) > Image Index > [9 Images], [25 Images]
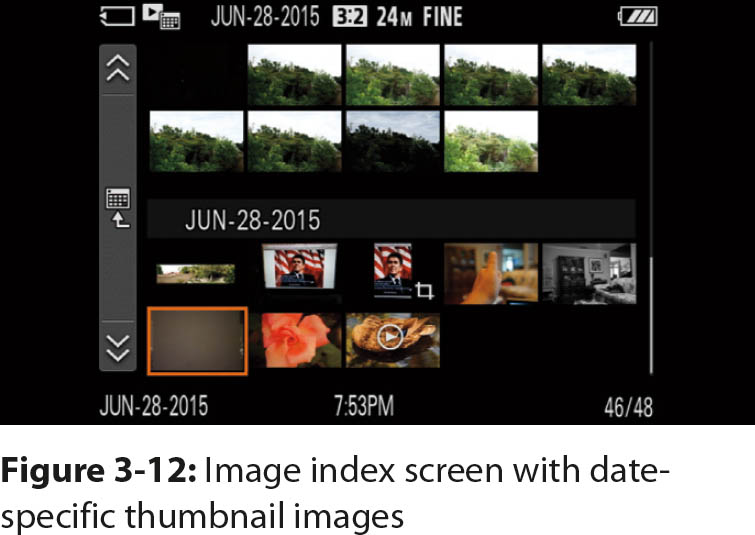
The selected Image Index value is applied regardless of the file type, although there is a difference between displaying the files by date and by folder. For a folder, 9 or 25 images can be displayed at one time. For a specific date, fewer thumbnails may be displayed because part of the screen is needed to display the date (figure 3-12). The main thing to remember is that more images are displayed if you select [25 Images] instead of [9 Images]. The option you choose also applies to the number of thumbnail images that are displayed when you push the Image index button in Playback mode.
As before, use the control wheel to navigate through the displayed thumbnail images. To view a specific image, navigate to the image you want to see and press the center button. The highlighted image will fill the screen. You can continue to scroll through the images one by one, or you can return to the multiple-image view by pressing the Image index button again.
You may see fewer than 9 or 25 images when you first access the Image index screen. This could be because for the selected file type, fewer than 9 or 25 images have been saved, and you see the last few saved images; or perhaps you chose to view the images by date. You can determine the total number of images by scrolling or looking at the bottom-right corner of the screen where the image number (out of the total number of images) is displayed.
Reviewing Still Pictures with the Slide Show Command
It’s easy to view your images with the Slide Show command. You can play the slide show on your camera or on a compatible high-definition television (HDTV) when you connect them with an HDMI Type D (Micro) connector.
The Slide Show command depends on the setting for the View Mode command. First, the Slide Show command is enabled when the View Mode is set to [Date View] or [Folder View(Still)], and it is disabled when the View Mode is set to [Folder View(MP4)], [AVCHD View], or [XAVC S View]. This does not mean you cannot incorporate movies into a slide show; it simply means you cannot make a slide show by selecting only a movie. Movies will be played back with still photographs if they were taken on the specific date you selected in [Date View]. However, when a movie appears, it will display the first frame and the play icon. To play the movie, you have to press the center button.
Second, to build and play a slide show, make sure the View Mode is set to [Date View] or [Folder View(Still)] and then use the following command:
MENU > Playback (1) > Slide Show > [Repeat], [Interval], [Enter], [Cancel]
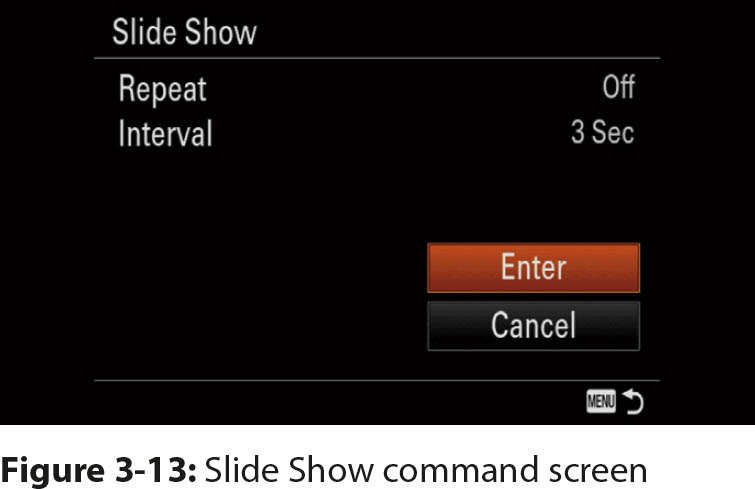
After you enter the Slide Show command, you will see the following options: [Repeat], [Interval], [Enter], and [Cancel] (figure 3-13).
The Repeat [On] option causes the slide show to loop through the pictures continuously; you have to turn the slide show off manually. The Repeat [Off] option plays the slide show once then exits to Live View.
MENU > Playback (1) > Slide Show > Repeat > [On], [Off]
The Interval option allows you to set how long each picture is displayed, from 1 to 30 seconds.
MENU > Playback (1) > Slide Show > Interval > [1 Sec], [3 Sec], [5 Sec], [10 Sec], [30 Sec]
After you set whether the slide show will repeat and how long each picture will be displayed, you start the slide show by navigating to [Enter] and pressing the center button. If you don’t wish to play the slide show, select [Cancel] and press the center button.
After a slide show begins, you have some navigational options. Press the right or left buttons to navigate forward or backward through the slide show. You can also rotate the control wheel clockwise or counterclockwise. The front or rear dials on top of the camera will give you the same results.
Because movies also play in the slide show when View Mode is set to [Date View], there is a volume control option. You can adjust the volume while the movie is playing, or you can pause the movie then adjust the volume. Press the down button to display the Volume Control scale. Use the right or left buttons to raise or lower the volume. The volume change is retained even after the slide show finishes.
To terminate the slide show, press the MENU button or press the shutter button halfway to return to Live View. You cannot pause the slide show while still pictures are playing.
The disadvantage of creating a slide show with your camera is that it is inflexible and temporary. The command plays back all saved images—both good and bad. An in-camera slide show is a quick way to view each image without having to manually scroll through them. Keep in mind that the Slide Show command uses images and movies that are on the memory card in the camera. For a more permanent and flexible solution, download your images and movies to your computer and use software to create personalized slide shows. You can combine images from multiple memory cards, rearrange the order of images, add image transitions, and maybe add music, depending on the software you use.
There is one major benefit of the in-camera Slide Show command: you can see your still images on an HDTV. This requires an HDMI cable (not supplied with the camera). Use the following steps to connect your camera to an HDTV:
1. Turn off both the camera and the HDTV.
2. Connect an HDMI cable to your Sony a7 II, then connect the other end of the cable to your HDTV.
3. Turn on the HDTV and make sure the HDMI input selection is correct.
4. Turn your camera on. If the HDTV input is set properly (input settings match the camera’s output settings), you will see the image that the camera is displaying.
5. When you press the MENU button on the camera, you will see the menu commands appear on the HDTV.
Note: If you have a compatible 4K television, you can see your still images at 3840 × 2160 pixels. This is twice the pixel count of a true HDTV, so you will see finer detail than on an HDTV. To activate this feature, use the following command:
MENU > Playback (2) > 4K Still Image PB > [OK]
If the command is grayed out, the television is not compatible with 4K operation. If the command is accessible, select [OK].
Instead of a slide show, you can also use these steps to play back your images with the playback button on the HDTV.
Zooming In to Still Images
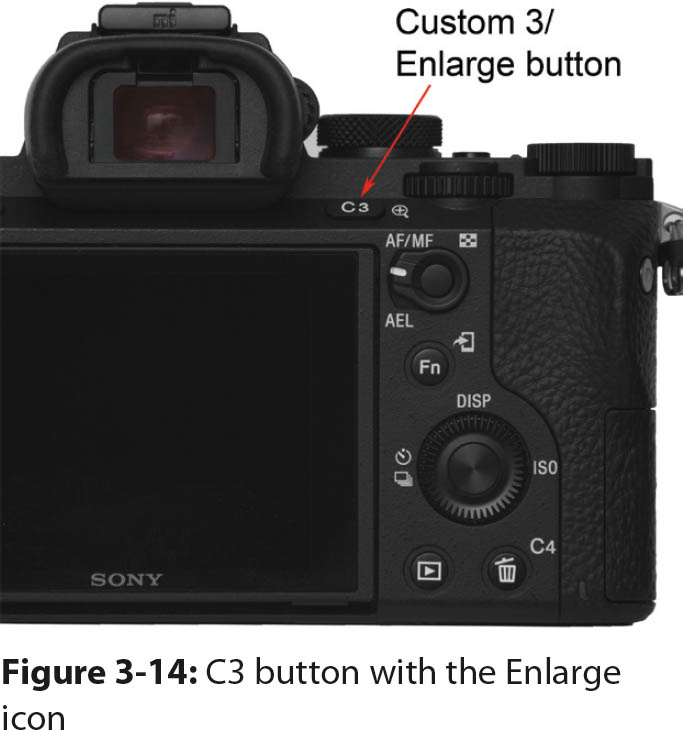
Sometimes you need extra magnification to see if the fine details in a recorded picture are clear. Although you cannot enlarge movie files, you can enlarge all types of still pictures, including panoramas. To do so, press the C3 button next to the Enlarge icon (magnifying glass with plus sign) when the camera is in Playback mode (figure 3-14). The first press of the button will enlarge the image significantly. You can continue to enlarge the image seven more times in smaller increments by pressing the C3 button multiple times, depending on the Image Size.
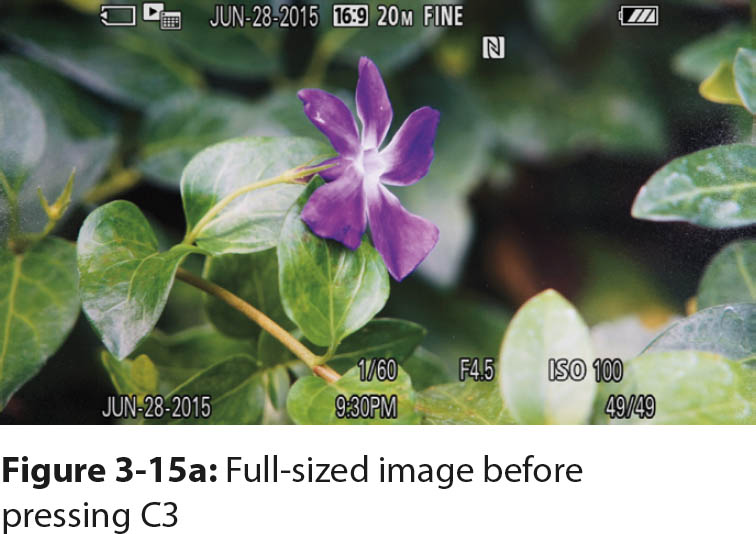
After the image is enlarged, a white box containing a picture of the original image is superimposed in the lower portion of the screen. It displays the entire image with a small orange box, which indicates the portion of the image that is enlarged (figures 3-15a and 3-15b).
Remember that each subsequent press of the C3 button increases the magnification of the image in small increments. To decrease the magnification, press the AF/MF and AEL button. Unlike the initial press of the C3 button to enlarge an image, there is no initial large decrease in magnification. Instead, each press of the AF/MF/AEL button decreases the magnification by a small amount. The orange box enlarges as the magnification decreases to indicate the viewable area on the monitor.
Four arrows surround the enlarged image to indicate the directions you can move the displayed portion of the image; simply press the corresponding right, left, up, or down button. The small orange box within the superimposed full-size image moves in tandem with the button you press and indicates what portion of the image you can see on the monitor.

You can also enlarge the last viewed image without entering Playback mode by initiating the Enlarge Image command:
MENU > Playback (2) > Enlarge Image
This command works the same way as when you access Playback mode and press the C3 button to enlarge the image. We prefer to use the C3 button so we don’t have to use the camera menu.
Evaluating Exposure with Histograms
A histogram helps you evaluate exposure. It’s a graphical representation of the range and distribution of light-intensity values that are recorded by the sensor. Intensity values are represented on the horizontal axis (black to white), and the numbers of pixels are represented on the vertical axis.
Theoretically, a histogram has the shape of a classic bell curve, with the maximum values near the center, indicating that the brightness level of most pixels is in the middle—not too bright, not too dark. In practice, the shape of a histogram may be distorted and irregular. Figure 3-16 shows three histogram plots as displayed on a Sony a7 II monitor.
The left histogram indicates that the image is underexposed, which means that not enough light reached the sensor; the middle histogram shows a properly exposed image; and the right histogram indicates that the image is overexposed, which means that too much light reached the sensor.
As you become more experienced, you’ll realize that you should watch for large numbers of pixels to appear at the extreme ends of the graph. If the histogram is skewed with the curve piled up on the right side of the horizontal axis, some pixels are receiving too much light and the sensor cannot record all the intensities in the brightest region of the scene. If this region is large, it will appear as a white mass. However, if only a few pixels are overexposed and they are widely separated, the picture will be acceptable.
Conversely, if the histogram is piled up against the left side of the horizontal axis, it indicates underexposure. Many pixels are not receiving sufficient light to generate an electrical signal. Again, if many underexposed pixels are grouped together, the dark regions of the scene are not being recorded. Such areas will not include fine details, and they will exhibit increased noise.

Either way, you will have problems. If the histogram is positioned at the extreme right, the image will have burned-out highlights; if it is at the extreme left, the image will have impenetrable black shadows that lack detail.
Histogram in Preview Mode
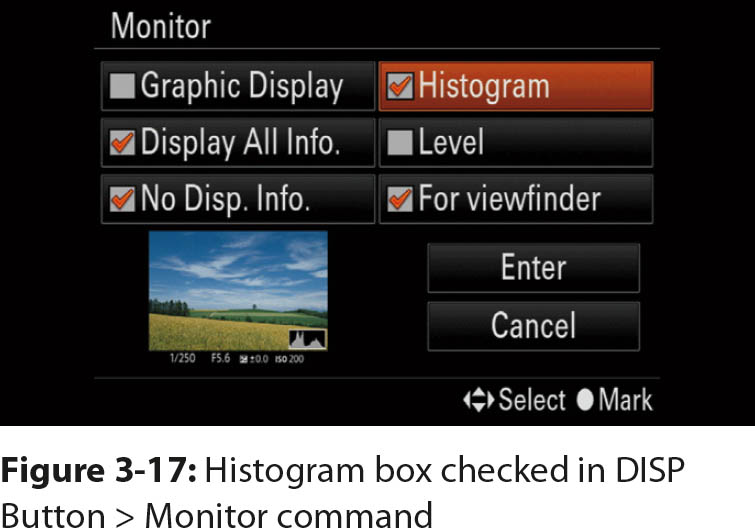
The Sony a7 II displays a histogram when you preview your shot so you can adjust the camera settings before you take a picture. This histogram is a rough guide. To display the histogram during preview, make sure the Histogram data display format box (figure 3-17) is checked in the DISP Button > Monitor or Finder command that was covered earlier in this chapter. You can even see a histogram while you shoot a movie or just before you capture a panorama. With a panorama, the DISP Histogram data display format does not work, but you can review the histogram before you start a panorama with the [For viewfinder] data display format on the monitor.
Keep in mind that a histogram is a real-time approximate measurement of light (luminosity) at the moment you take the photograph. It will change as the light changes or when you adjust the camera settings. Different scenes will usually have different histograms. Because panoramas record multiple scenes, you can first pan the area to reveal exposure problems through the [For viewfinder] histogram and make adjustments before you shoot. Also, the live histogram cannot show the results of a flash exposure.
Histograms in Playback Mode
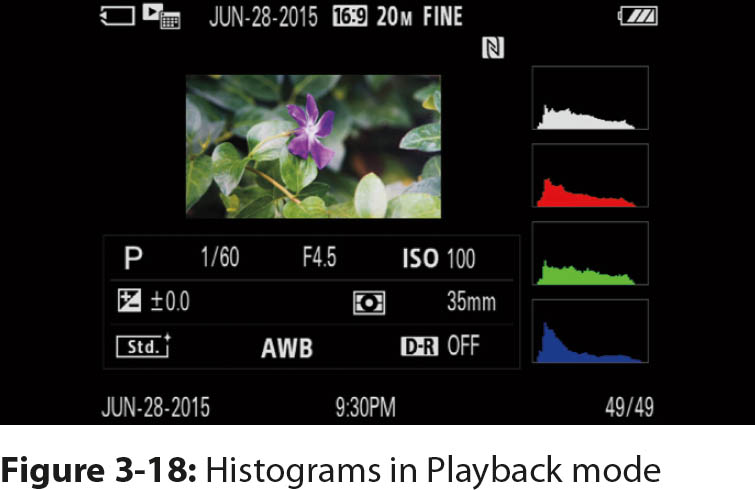
A more accurate way to evaluate an exposure is to study the histograms that are displayed in Playback mode. You will see four histograms: one each for luminosity (represented in white), the red color channel, the green color channel, and the blue color channel (figure 3-18). This allows you to see how the color channels responded to the exposure. Each color channel has a different sensitivity to light. When you view the color channel histograms, you can see how intensity values pile up at the ends of the axes.
If one channel is over- or underexposed, the picture may take on a color cast in either the highlights or shadows. The luminosity (white) histogram may miss this detail. Luminosity is, at best, an average of the light intensities from the red, green, and blue photosites on the sensor. For example, underexposed images show intensity values that accumulate and spike at the left edge of the graph. You can correct this by reshooting with an increased exposure. The reverse is true for overexposed images.
Protecting Saved Pictures and Movies
Have you ever inadvertently deleted a picture you wanted to save? The Protect command guarantees this won’t happen when you tag the images you want to keep.
The Protect command can be confusing because although it has five options, only three are displayed in the menu at any one time. This is because the options depend on the value of the View Mode command. If the results are unexpected, go back to the View Mode command and set it to the date or folder that contains images you wish to save.
When View Mode is set to [Date View], [XAVC S View], or [AVCHD View], the Protect command displays the following:
MENU > Playback (2) > Protect > [Multiple Img.], [All with this date], [Cancel All with this date]
When View Mode is set to [Folder View(Still)] or [Folder View(MP4)], the Protect command displays the following:
MENU > Playback (2) > Protect > [Multiple Img.], [All in this Folder], [Cancel All in this Folder]
The [Multiple Img.] option displays all the saved files on the memory card, starting with the last one that was recorded or played back. To protect specific images, do the following:
1. Select Protect’s [Multiple Img.] option. The recorded images are displayed with a check box at the middle-left side of the screen.
2. Scroll through the images to find an image you want to protect.
3. Highlight the image you want to protect, and press the center button. An orange check appears in the check box to indicate the image is protected. To unprotect the image, uncheck the box by pressing the center button again.
4. After you have checked all the images you want to protect, press the MENU button to save the settings.
5. Select [OK] to protect the files; select [Cancel] to return to the previous screen. Press the center button to process the selected option.
6. When you are done, press the center button to exit.
When you select [All with this date], a message appears with the date the camera will use to decide which images to protect. If you agree, select [OK]. Otherwise, select [Cancel] to exit the command. The displayed date is the View Mode’s last date value. The [All in this Folder] option works the same way, but it protects files in a specific folder. In both cases, if you don’t see the Protect options you expected, exit the Protect command, go to the View Mode command, and modify it as needed.
There are two ways to unprotect images:
• Reenter the Protect command, select the [Multiple Img.] option, and uncheck the checked boxes one at a time.
• Execute the available cancel option, either [Cancel All with this date] or [Cancel All in this Folder], depending on the value in the View Mode.
All image and movie files, regardless of protection, will be erased when you reformat the memory card with the Format command. In addition, the Protect command is enabled only if there is at least one image stored on the memory card for the selected View Mode.
Deleting Saved Pictures and Movies
Not every picture or movie is a keeper. As you view saved images on your memory card, you may want to delete one or more.
There are multiple ways to delete files. One way is to use the Delete button to delete one image at a time when the camera is in Playback mode. The Delete screen will be displayed with Delete and Cancel options. Navigate to the option you want and press the center button to execute it. The Delete option deletes the image and displays the next image in Playback mode. The Cancel option exits the Delete function and continues to display the image.
Another way to delete images is to use the Delete command in the Playback menu. This method allows you to delete multiple images at the same time. Like the Protect command, the Delete command options are at the mercy of the value in the View Mode command:
MENU > Playback (1) > Delete > [Multiple Img.], [All with this date], [All in this Folder]
In this command, the [Multiple Img.] option is always displayed, but the [All with this date] and [All in this Folder] options depend on which View Mode is set:
• When View Mode is set to [Date View], [XAVC S View], or [AVCHD View], the Delete command displays the following:
MENU > Playback (1) > Delete > [Multiple Img.], [All with this date]
• When View Mode is set to [Folder View(Still)] or [Folder View(MP4)], the Delete command displays the following:
MENU > Playback (1) > Delete > [Multiple Img.], [All in this Folder]
Use the following steps to delete specific images:
1. Select a Delete [Multiple Img.] option. The recorded images are displayed with a check box at the middle-left side of the screen.
2. Scroll through the images to find an image you wish to delete.
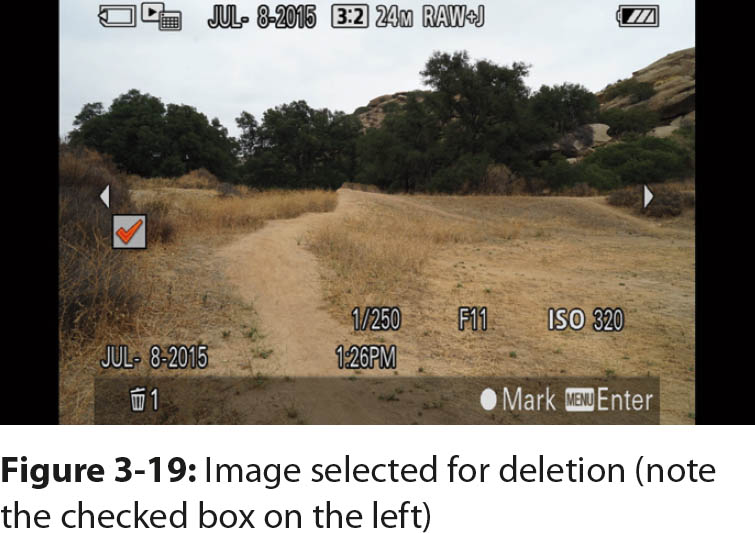
3. Press the center button. An orange check appears in the check box to indicate the image should be deleted (figure 3-19). You can uncheck the box by pressing the center button again.
4. After you have checked all the images you want to delete, press the MENU button to save the settings.
5. Select [OK] to delete the files; select Cancel to return to the previous screen. Press the center button to process the selected option.
6. When you are done, press the center button to exit.
When you select [All with this date], a message appears with the date the camera will use to decide which images to delete. If you agree, select [OK]. Otherwise, select [Cancel] to exit the command. The displayed date is the View Mode’s last date value. The [All in this Folder] option works the same way, but it deletes files in a specific folder. In both cases, if you don’t see the Delete options you expected, exit the Delete command, go to the View Mode command, and modify it as needed.
A third method to delete images is to reformat the memory card, which will erase all stored files, even protected ones, regardless of file type:
MENU > Setup (5) > Format > [Enter], [Cancel]
The most important thing to remember is that when you delete a saved file, it is permanently gone from the memory card. The Format command erases all files on the memory card, even if they are protected, whereas the Delete function does not erase protected files. In addition, the Delete command is enabled only if there is at least one image stored in the corresponding folder or date on the memory card. For example, if your memory card contains still pictures but no MP4 files, the Delete command will be grayed out if you select the MP4 option in View Mode, and it will be enabled if you select the still images folder.
An Important Practice when Deleting Files
We discussed how individual pictures can be selected or deleted; however, we seldom use this process with our own pictures. Instead, we copy all our pictures to a computer after a day of shooting. From that point on, we work with the files on our computer. It is much easier to view them, determine if we want to keep them, group them into folders, and even create new files for social media posts.
When we finish downloading files from our camera and verify that the copy operation was successful, we reformat the memory card to delete all the files:
Menu > Setup (5) > Format > [Enter]
This practice prevents new files from becoming fragmented as they are saved to the memory card. This is especially important when you work with the highest-quality movies. If the card file structure is fragmented, it may cause delays and skips in movie files.
Working Outside the Camera
There are many ways to view and manage your pictures and movies outside the camera. At the minimum, you can treat your camera as an output device. You can play pictures and movies directly from your camera to a TV. You can also use apps to make adjustments to your pictures within the camera then upload them to social media sites. Eventually, though, you will want to download your pictures to a computer and work with them there. Although this adds an extra degree of work, it allows you to get the most out of your photography. The technology you use depends on your equipment, software, and level of knowledge. Rather than go into details here about how to use various technologies, we recommend that you consult your hardware and software manuals, along with their corresponding websites, for information about how to accomplish your goals.
Downloading Pictures and Movies to Your Computer
Eventually you will want to download your pictures and movies from your camera’s memory card to another device, most likely your computer, and then delete them from your memory card. Sony supplies Image Data Converter and PlayMemories Home software to help you manage your files on your computer and create lasting images to view and share. You can also use third-party software, such as Adobe Photoshop Elements or Apple Photos for still photographs, or Apple iMovie for movies.
Sony does not supply Image Data Converter and PlayMemories Home on a disk with new cameras; you have to download the software from their website. The software is free, so you don’t have to buy software to work on your RAW files. Having said that, we feel that third-party software is superior. It processes commands faster, so adjustments to contrast and white balance appear immediately. The Sony software is slower, and there is a slight delay as the image is updated. It may take only a few seconds, but if you are used to the speed of Adobe and Apple software, the delay is annoying.
There are two ways to download files from your camera to your computer. The first is to use the supplied USB cable and connect your camera to a USB port on your computer. Typically, if you have installed an image-processing program on your computer, a prompt will pop up and tell you how to copy files to your computer. For example, PlayMemories Home appears automatically and displays the RAW, JPEG, MP4, and AVCHD files that are stored on the memory card. You can select the files and import them to the computer hard drive. This is a straightforward process, but it does consume power from the camera battery.
The second way is to download the files directly from the memory card. If you have a USB 3.0 port on your computer, we recommend that you get a card reader and connect it to that port. Then you remove the card from your camera and insert it into the card reader. Card readers are devices that have slots for one or more types of memory cards. Many laptop computers have an SD card reader built into their chassis. You simply insert the memory card into the slot and start the download. In essence, the SD card is an external hard drive, and you transfer files like any other data files. Again, if you have Image Data Converter and PlayMemories Home software, prompts will walk you through the process. After you download the files, you can organize, edit, and display them.
This strategy works well for still photographs and MP4 files. It does not work as well for AVCHD files because they are stored on the memory card in a bewildering array of subdirectories, so it is not clear what to download and where to save the files. This is especially true if you want to burn your movies to a DVD. It’s best to rely on programs like PlayMemories Home or iMovie when you are ready to download AVCHD movies to your computer.
If you want to process your files with more advanced software than the free Sony programs, you can use proprietary software. Apple Photos (free with Apple computers) and Adobe Lightroom ($79 upgrade) are two programs that allow you to organize and manipulate your images on a computer. More advanced users might want to try Adobe Photoshop ($9.99 monthly subscription). Other options are Adobe Photoshop Elements ($99.99) and Apple iPhoto ’11 ($15). There are even two free choices for either Windows or Macintosh computers: Picasa (picasa.google.com) and GIMP (gimp.org).
Sony a7 II Software and Support
Your Sony a7 II does not come with a software CD. If you want to use Image Data Converter 4.0 and PlayMemories Home, you can download them from the Sony website at the following URL:
http://esupport.sony.com/US/p/model-home.pl?mdl=ILCE7M2K
You can download manuals, software updates, and firmware updates from this website. Sony regularly updates the firmware for their cameras. In the case of the a7 II, many users had to upgrade their firmware from 1.0 to 1.20. The updating of firmware is not limited to the camera body; the lenses also have firmware and they can be updated at this site.
Image Data Converter
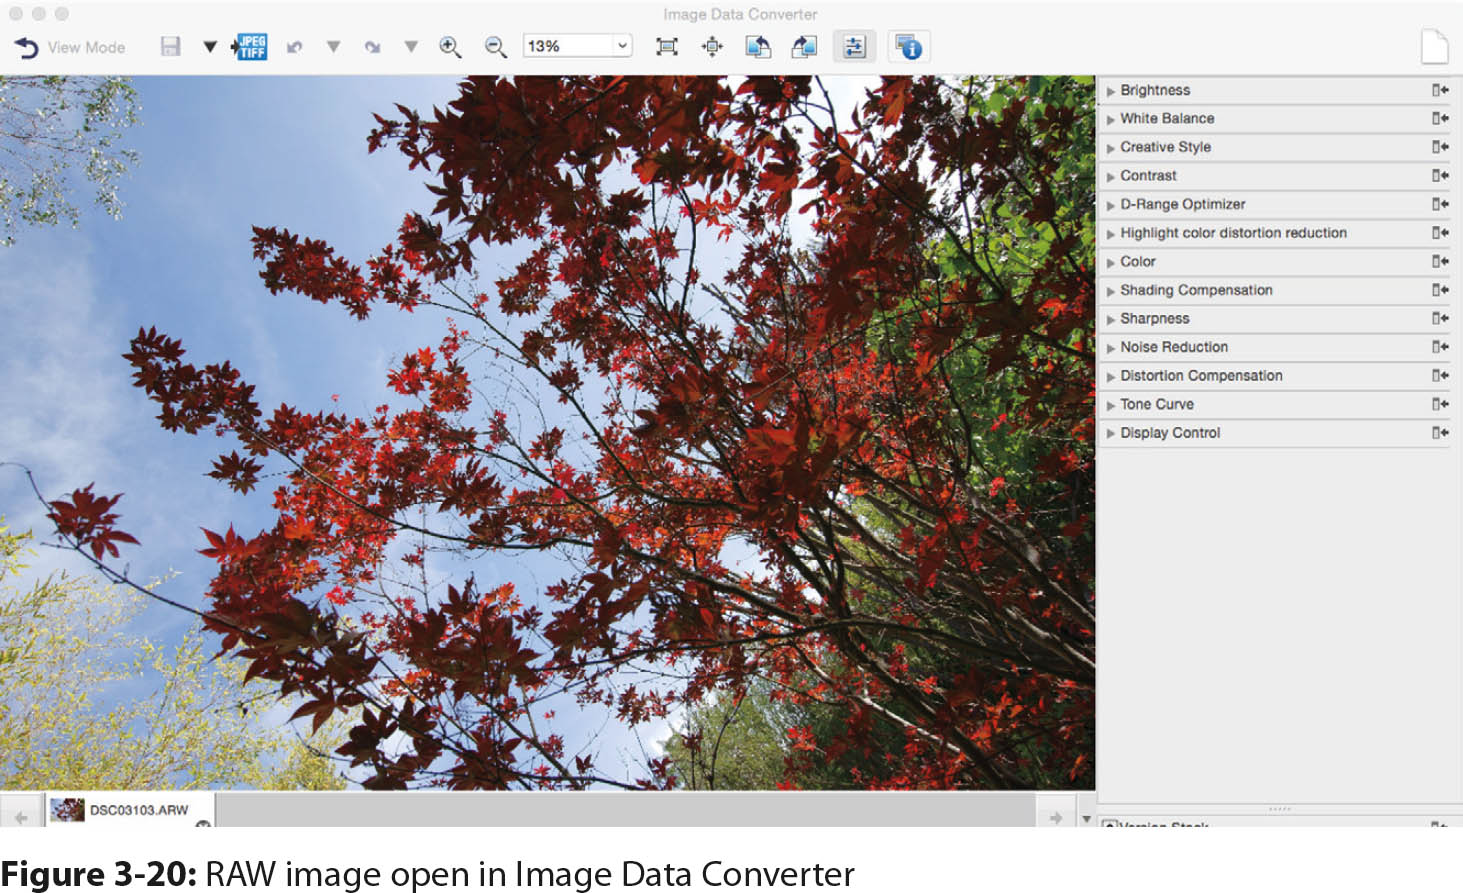
Although Image Data Converter can view JPEG files, its ability to process these files is limited. It is designed to process Sony RAW files so you can adjust the brightness and white balance and optimize the dynamic range. You can also apply Creative Style options; experiment with Dynamic Range Optimization (DRO); add shade compensation, sharpness, and noise reduction; and apply other image-processing functions. Figure 3-20 shows an image in Image Data Converter. The software also lets you do minor processing to JPEG files, such as rotating an image and adjusting the tone curve. The Sony RAW files can be saved as Sony RAW, or translated to 16-bit TIFF or 8-bit JPEG and saved in those file formats.
If you do not have an image-processing program or one that can read Sony a7 II RAW files, Image Data Converter is definitely worth using. It can convert your RAW files to 16-bit TIFF format. Almost all image-processing software can handle TIFF files.
We typically use Photoshop or Aperture because less time is required to process a RAW file. However, Aperture and Photoshop are not free, whereas Image Data Converter is included with your camera. Sony provides two versions of this program: one that can work on the Mac and the other on a PC. We have worked with Image Data Converter on a Dell computer with a quad-core processor (i7) and a MacBook Pro with a quad-core processor. In both instances, the program worked, but it took a second or two to execute a function or open a pull-down menu.
A recent problem arose for us when Apple released their new image-processing program, Photos. This program replaces iPhoto and Aperture. At this time, we feel that Photos is not suitable for us; we are not using it as a replacement for Aperture, so we’ve been using Adobe Lightroom and Photoshop for most of our work.
PlayMemories Home
You can download your pictures and movies to your computer with PlayMemories Home, and the program lets you organize and maintain files in folders. Not only can you view images by name, file type, or as thumbnails, but you can also add date information and organize them in a calendar structure. For AVCHD movies, which have a complicated file storage system on the memory card, PlayMemories Home is the most convenient way to transfer files to your computer. For Windows computers, PlayMemories Home is a worthwhile program. You can convert your AVCHD files to playable disks. However, we were not enthusiastic about this program for Apple computers. We prefer iMovies, which can download and transcode AVCHD files. It gives us more movie editing capability than PlayMemories Home. For professional work with movie files on an Apple computer, we recommend Final Cut Pro.
Playing Pictures and Movies on Your TV
To connect your Sony a7 II directly to your TV you will need to purchase an HDMI cable. We recommend that you consult both the camera and TV manuals and the manufacturers’ websites to get up-to-date information.
After the camera is connected, you can play slide shows on your TV. One advantage of viewing a slide show on a wide-screen HDTV is the size of the screen. It is huge compared to the camera monitor, and you can comfortably show your pictures and movies to several friends at once. You can better appreciate the definition, color, and contrast of your pictures and movies when they are shown on a large screen.
If you have a 4K-compatible TV, an additional Playback option will be displayed:
MENU > Playback (2) > 4K Still Image PB > [OK]
This command will allow you to play back your still images on a compatible 4K TV.
Printing Your Pictures
You can print your images with third-party software or the supplied PlayMemories Home software. You can also use the Specify Printing command on your camera and then take your memory card to a print shop that supports digital print order format (DPOF). Make sure the print shop can handle your images properly. Discuss any restraints the shop might have to make sure you get the desired print results.
There are three options in the Specify Printing command:
MENU > Playback (2) > Specify Printing > [Multiple Img.], [Cancel All], [Print Setting]
The [Multiple Img.] option displays all the saved files on the memory card, regardless of file type, starting with the file that was last recorded or played back. It allows you to select specific images for printing. The recorded images are displayed with a check box on the middle-left side of the display screen. Scroll through the images to find one you want to print, then press the center button. An orange check will be entered in the check box to indicate the image should be printed. To unselect an image, uncheck it by pressing the center button again. Even though your movie files will be displayed, they will not have print check boxes. After you have chosen all the images you want to print, press the MENU button to save your selections. Choose [OK] to save the print indicators, and press the center button. When you are done, press the center button to exit.
The [Cancel All] option erases all check marks so no images are selected to print. You will be asked to validate your request; enter [OK] and press the center button, then press the center button again.
The [Print Setting] option has a submenu where you can specify if you want to record the date and time on the printed copy:
MENU > Playback (2) > Specify Printing > Print Setting > Date Imprint > [On], [Off]
The Specify Printing command formats your selected images with the common DPOF protocol. DPOF is advantageous if you do not have a printer connected to your computer. You can take your memory card to a printing service, and they can use the information directly from the card to generate your selected prints. Some printers can use DPOF data to generate your selected prints directly from the memory card. They usually have a card slot that does not need to be attached to a computer.
Here are some important points to remember:
• As with anything important, back up the contents of your memory card before you give it to a printing service.
• The Specify Printing command is available only for JPEG files. You cannot select RAW files. This is another good reason to save your files in both JPEG and RAW formats.
• The Specify Printing command is enabled only if the View Mode is set to [Date View] or [Folder View(Still)], and if there is at least one image stored on the memory card. The displayed image might be a movie, but you cannot select it for printing.
• Although you can check the boxes for panoramic images, you may not be able to print them. It depends on the capabilities of the printer.
• Images shot in widescreen [16:9] format may have both sides cut off when they are printed.
Recommendations
We recommend leaving the FINDER/MONITOR setting to [Auto] so that automatic switching between the monitor and the viewfinder is operational. This allows you to quickly switch from one screen to the other without having to access the menu structure.
We usually turn off the Auto Review command. This command slows the operation of the camera and disrupts the flow of capturing pictures. Also, we shoot a series of pictures then review them as a group. Some pictures take only a second to review, and some take longer. Auto Review [Off] puts the review process in our hands.
We have to retake fewer pictures because the display screen allows us to evaluate images for exposure, white balance, and focus before we take a picture. Unlike with an optical viewfinder in a DSLR, we can identify the most obvious WB and exposure errors and correct them before we take a picture. This increases our efficiency and gives us a good success rate in the field.
It might seem like overkill, but we have concluded that it is best to select all data display formats when we preview images. Although we each have preferences, we find that we use each of the display formats at least occasionally. Checking them all gives us the flexibility to use what we want, when we need it, without having to change menu settings. If we decide we need the Level gauge, it’s already available. We just have to press the DISP button to get the desired format.
We recommend that you review your histograms frequently. A histogram is an excellent tool for reviewing an exposure, both before and after you take a picture. We use them often, especially in the camera’s semiautomatic and manual modes.
We set the grid line command to the [Rule of 3rds Grid] option. This helps us balance the composition with a minimum number of lines. The grid lines are prominent enough that you can see them, but they are faint enough to ignore when you don’t need them.
Be aware that by themselves, the monitor and the EVF don’t provide sufficient magnification to critically evaluate image sharpness. We frequently enlarge an image before and after we take a picture so we can confirm that detail in the image is in focus. Rather than spending money to print an image and discover that important areas are not in focus, get in the habit of enlarging the image on the monitor. If the image isn’t in focus, you will likely have time to make adjustments and recapture the picture.
You will likely use your computer to manage your photos and movies. This may sound obvious, but get in the habit of downloading your pictures and movies to your computer soon after you shoot them so you can reformat the memory card and shoot again. Because we download the contents of our memory cards to our computers, we don’t use the DPOF print capabilities. We prefer to do our own printing. But this takes time, and you need to have your own equipment, so you can use the Specify Printing command and send your files to be printed by a third party if necessary.
Last but not least, experiment with the Slide Show command. It’s fun and quick, but it’s temporary. For a more permanent solution, use your computer to build slide shows with Sony Image Data Converter and PlayMemories Home software or with third-party software. Then store the results on a DVD so you can play back your saved memories on your computer or TV. An added benefit is that you can make copies of your DVDs to share with friends and family.