6Chapter 6: Manual Operations
Introduction
This chapter is about taking complete control of your camera settings and learning to manually fine-tune them to reflect your artistic photographic vision. Although we use mostly the semiautomatic settings described in the previous chapter, we use manual controls when we need our results to be reproducible and precise.
Sometimes you want the exposure and focus to be fixed at a constant value. For example, suppose you want to take a panoramic shot the old-fashioned way, without using the Sweep Panorama feature. You mount the camera on a tripod, set the exposure manually, and take a series of overlapping pictures by panning the camera on the tripod head. The focus and aperture must be fixed; they should not change as you pan. After you take all the pictures, you download them to your computer and join them in third-party software to create a panoramic image.
Although this is more laborious than using the automated Sweep Panorama mode, you can obtain a higher resolution image with this manual technique because you can take advantage of the full area of the sensor. If you position the camera to the portrait orientation, you will collect a series of images that have a vertical height of 6,000 pixels, instead of 1,856 pixels with Sweep Panorama. You can create an even larger panorama by shooting multiple sweeps and stitching one sweep on top of the other. When you know how to set your camera to manual exposure and manual focus, you can pursue such strategies to improve your images.
In this chapter we will describe how manual control extends beyond exposure and focusing. We will show you how to enter custom WB settings that are more precise than the preset values for incandescent lights or daylight. You can set the WB for any light source, which requires you to set the color temperature value based on the specifications of the light bulb. We will also describe how to calibrate your camera for the ambient light if there are multiple light sources.
We will also cover how you can record high-contrast scenes with the DRO/Auto HDR function. Both DRO and HDR allow you to record an image under difficult lighting conditions. Under bright daylight, it’s difficult to record enough detail in both the highlights and the shadows. When you expose for the highlights, the shadow areas become impenetrable black masses. When you expose for the shadows, the highlights can be blinding white with little or no detail. When you use DRO/Auto HDR, the image retains detail in both the shadows and the highlights. When you take control of your camera, you can extend your photographic abilities and create artistic, one-of-a-kind shots.
Manual Exposure Mode Controls
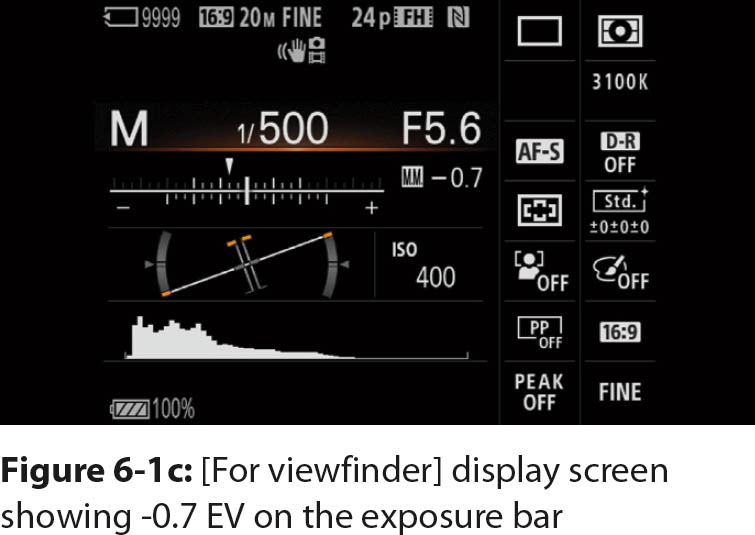
Turn the mode dial to manual (M). You will see a screen (figure 6-1a) with the shutter speed and aperture values displayed as white numbers along the bottom. You change these values by rotating either the rear dial (shutter speed) or the front dial (aperture). In figure 6-1b, we rotated the rear dial to change the shutter speed from 1/320 second to 1/500 second.
To determine how many EVs you are moving away from the recommended exposure, look at the numbers to the right of M.M., which stands for Metered Manual. In figure 6-1b, we set the camera to –0.7 EV. In figure 6-1c, you can see that the shape and position of the histogram is toward the left. Figure 6-1c shows the [For viewfinder] setting. You can see that there is a triangle on the exposure bar, which indicates that the exposure is set to the tick mark at –0.7 EV; this is a graphical indication of how far you have moved away from the recommended exposure. You can also see the exposure bar in the viewfinder.
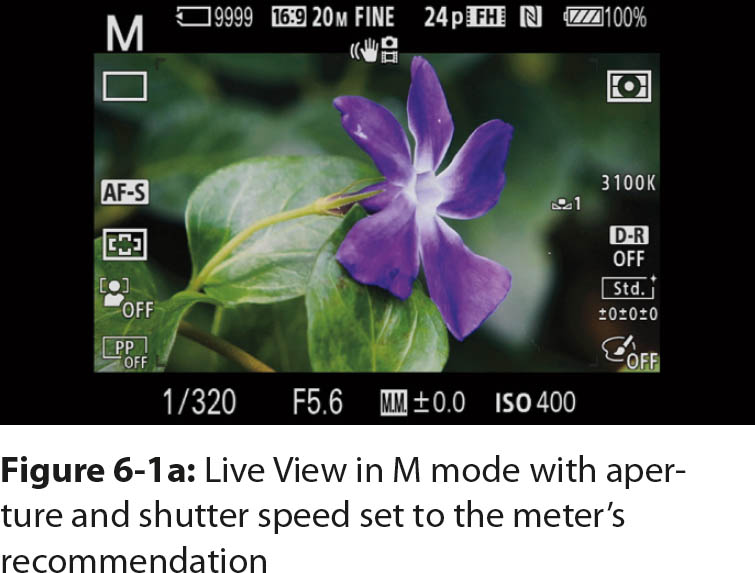
When the camera settings are at ±0.0 M.M., they are set at the recommended exposure. As you deviate from this value, you will see the EV change in increments of 1/3 EV. These numbers represent the offset from the recommended exposure. When we frame a snow scene, we have found that +1 EV renders the snow as brilliant white. The camera’s recommended ±0.0 M.M. exposure estimate is based on the assumption that the overall scene consists of midtone values. If you use the manual exposure of ±0.0 M.M., the snow will look dingy gray in the image.

You can check the effects of different EV offsets by studying the monitor. The beauty of having a Live View camera is that you can preview the subject before you take a picture. In M mode, the brightness of the a7 II display screen indicates the appearance of the recorded image. If the sensor receives too little light, you will see a dark screen with muddy colors; if it receives too much light, you will see a bright screen with washed-out colors.
You can adjust the exposure by modifying the aperture, shutter speed, and ISO value. It might seem illogical, but the exposure compensation dial is enabled when you set the ISO to [ISO AUTO]. When you do this, you can alter the recommended exposure by turning the exposure compensation dial, which in turn alters the ISO setting. In contrast, the dial is inactive if you set the ISO to a fixed value.
Extremely Long Exposures
The longest shutter speed for P, A, and S modes is 30 seconds. M mode extends the available shutter speeds and allows you set an exposure of at least 5 minutes. Turn the rear dial to lengthen the value of the shutter speed numbers until you reach the bulb (B) setting, which is just beyond a 30-second exposure. At the B setting, the shutter opens when you depress the shutter button, and it remains open as long as the button is depressed. When you release the shutter button, the shutter closes and terminates the exposure.
When we tested the a7 II, we successfully captured an image with a shutter speed of 5 minutes. If you find that B is not available, you probably set a command that disables this setting. This includes commands that take multiple exposures, like Multi Frame NR and Cont. Shooting.
For multisecond exposures, you should mount your camera on a tripod and fire it with a remote shutter control. Any camera movement will blur the image, and it is difficult to hold the shutter button down for such a long time without jarring the camera—even touching the camera may shift it. If you regularly use long exposures, we recommend that you get the Sony RM-VPR1 remote control, which has a slider lock. When the camera’s shutter speed is set to B, the lock will allow you to open the shutter and keep it open with a single press of the remote’s button.
Bulb
Old mechanical cameras have pneumatically driven shutters. To open the shutter, you squeeze an air bulb, and the shutter stays open until you release it. In modern cameras, you press the shutter button to open the shutter and hold it down to keep the shutter open. When you release the button, the shutter closes.
The slider lock is essential if you take exposures that last minutes. The remote control also has a dedicated button that starts a movie and a rocker switch that adjusts the focal length of motorized zoom lenses. In addition, it can be used on the Sony SLT series cameras. The previous remote control model for the SLT series cameras cannot be used on the a7 II. Sony’s full-frame mirrorless cameras use a different receptacle to connect the remote control.
Shutter Speeds
Typically, the shutter speed is measured in fractions of a second, and you will see them written as a reciprocal. For example, 1/4 represents a quarter of a second. However, when you set a shutter speed longer than 1/3 second, the display switches from fractions to decimals, so 0.4" represents the next longest shutter speed. For longer shutter speeds, the " symbol follows the shutter speed number. For example, 1" indicates 1 second, and 30" indicates 30 seconds.
The Exposure Set. Guide command is usually on. It is indicated by a ribbon that shows the f-stop or shutter speed numbers. When you turn the rear dial or front dial, the ribbon makes it apparent that the shutter speed or aperture is being changed. The strip portrays numbers directly, without the reciprocal sign. The bar will disappear after a short time of inactivity. If this prompt is too distracting, you can turn it off with the following command:
MENU > Custom Settings (2) > Exposure Set. Guide > [Off], [On]
One reason to dispense with the exposure setting guide is that it obscures the histogram while you adjust the aperture or shutter speed. For this reason, we prefer to keep it turned off.
Images you take with long exposures suffer from a special kind of noise that appears as bright dots, called hot pixels, against the black background. The Long Exposure NR command reduces this effect by using a procedure known as dark frame subtraction whenever the shutter speed exceeds 1 second. Set the Long Exposure NR command as follows:
MENU > Camera Settings (6) > Long Exposure NR > [On], [Off]
This process requires two images to create a single picture, and it will operate only in shooting and drive modes in which a single image is recorded. It will not work if the camera is recording a continuous series of images, such as in Sweep Panorama or the SCN Hand-held Twilight or Anti Motion Blur modes. Also, Long Exposure NR is not available in any of the continuous and bracket Drive Mode options. It does, however, work on both RAW and JPEG files.
When the Long Exposure NR command is turned [On] and the exposure is longer than 1 second, the following steps occur: When you press the shutter button, the camera records the image, including the noise generated by the sensor. The camera takes a second exposure but does not record an image. This is the so-called dark frame that creates a reference map for the noise pattern in the previous image. The camera subtracts the hot pixels in the dark-frame image from the first image to reduce the appearance of noise.
Long Exposure NR doubles the time it takes to record an image. If you take a photograph with a 10-second exposure, the camera will automatically take another 10-second exposure to create the dark frame, then it processes the subtraction algorithm to remove noise from the first image.
For exposures longer than several seconds, this creates a tedious wait, so some people turn Long Exposure NR off. Most of our exposures are less than 1 second, so the wait is inconsequential. We have been pleased with the results for the few pictures we have taken with exposures of several seconds or more. If we take exposures of 30 seconds or longer, we think about turning the command off. Again, when you use long exposure times, mount your camera on a tripod, trigger the shutter with a remote control, and turn off the SteadyShot option.
Noise Reduction at High ISOs
As we mentioned previously, a higher ISO results in increased noise, so we tend to photograph at ISO 1600 or lower. If you are forced to work at a higher ISO, you might want to try the High ISO NR command. It only works on JPEG files at ISO 1600 and higher. No second exposure is required to capture a dark frame; it works on just one image.
You can set High ISO NR to [Normal], [Low], or [Off] with the following menu command:
MENU > Camera Settings (6) > High ISO NR > [Normal], [Low], [Off]
High ISO NR essentially blurs the image and smooths the appearance of noise. The resulting picture looks softer, and edge details are not well defined. It can be used when you fire continuously. Be aware that the command can take some time to execute, so it may slow down the frame rate when you use continuous firing.
We set High ISO NR to [Off]. We think the noise reduction algorithm is too aggressive and sometimes muddies fine details. We prefer to reduce noise by opening pictures on our computer and using software to reduce the punctate pattern. This gives us more control because we can study the fine details in the scene and determine if too much fine structure is being lost in our efforts to remove noise. This flexibility allows us to find the best compromise between removing noise and retaining detail. You cannot undo High ISO NR.
When we want the best noise reduction results, we use DxO OpticsPro 10 software. A big advantage is that the program works on RAW files. The major disadvantage is the cost. It is currently $199 for the ELITE Edition, which is required for files from full-frame cameras. When we use the software at its best noise removal setting, it can take 5 to 10 minutes to process an image. If we do not need this level of performance, we use the noise reduction feature in Adobe Photoshop CS. Although it is not as good as what we can obtain with DxO, it operates faster, works on RAW files, and is superior to the a7 II High ISO NR setting.
Metering Modes
It is critical to control exposure, so when you use manual settings you need to know where and how your camera’s light meter measures intensity. The built-in light meter on the Sony a7 II uses three metering modes (table 6-1) that you access with the following command:
MENU > Camera Settings (4) > Metering Mode > [Multi], [Center], [Spot]
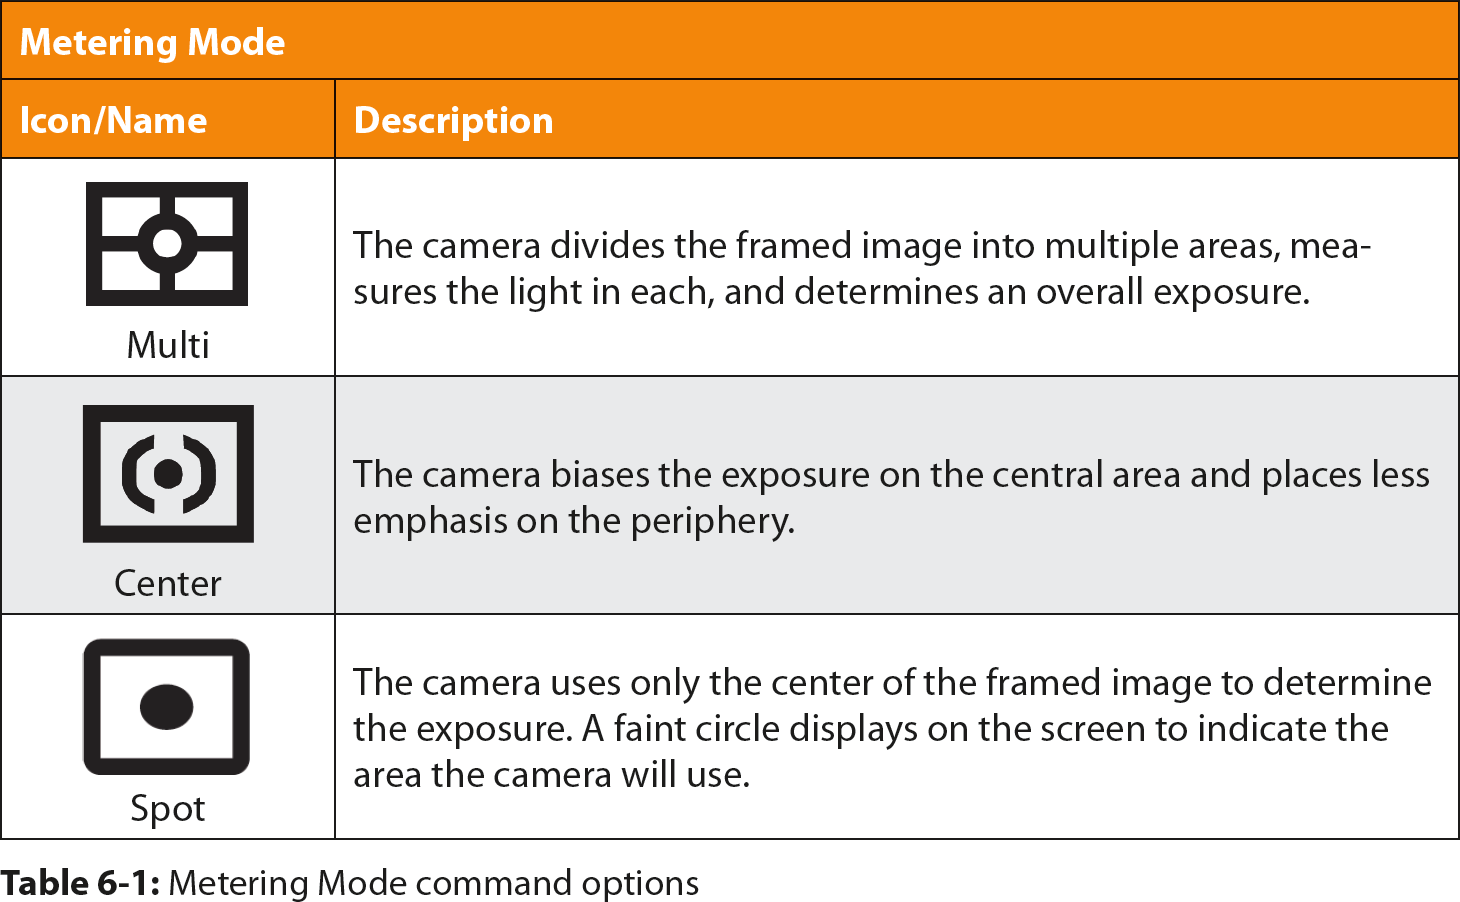
You can also access the command with the Quick Navi screen or the Fn button (figure 6-2).
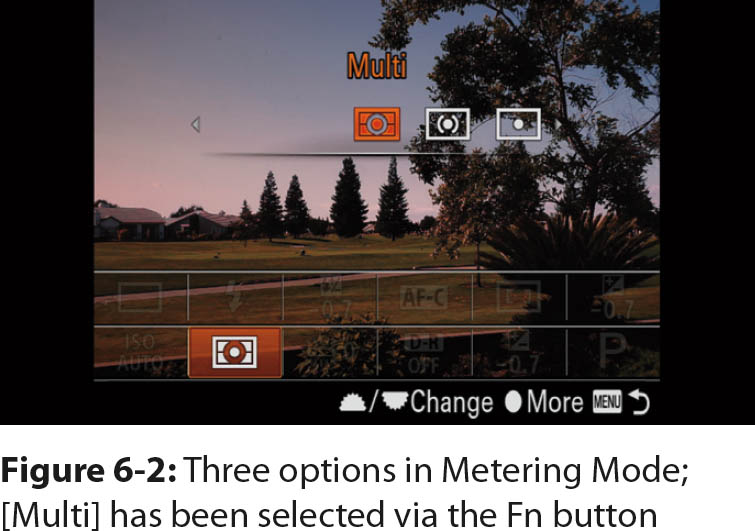
The default and most commonly used Metering Mode is [Multi]. Light over the entire area of the framed image is used to calculate the exposure. This is more than a simple average; it is a complex computation that ensures a balanced exposure for a wide variety of subjects. Camera manufacturers originally developed these calculations for film cameras and later refined them for digital cameras.
Although early versions of this option were unreliable, it improved over time. Now [Multi] is a workable exposure method for the Sony a7 II automatic exposure modes. For manual exposure, it serves as a good starting place because you can evaluate an image and decide if you want to override the camera’s recommendation.
You can improve on the camera’s recommended exposure by studying the live histogram and slightly adjusting the exposure. If you are comfortable with the Zebra command (covered in chapter 5), you can use it to identify regions in the scene that are overexposed. With a live view camera, you can decide whether to modify the exposure before you take a picture.
The second metering method is [Center], which uses a straightforward algorithm to evaluate exposure. It is based on the assumption that the most important part of the picture is the center; therefore, the meter biases the exposure toward that region to make sure a central subject is well exposed. The peripheral areas are also measured and contribute to the overall exposure, but they are given less priority. This approach was developed for single lens reflex (SLR) photographers who use film. Although this older technology has the virtue of simplicity, it is not as reliable as [Multi] metering. We rarely use it because, compared to [Multi], it results in a higher percentage of unacceptable exposures.
The third and most direct way to meter is [Spot]. This is for careful photographers who are knowledgeable about their cameras and the results they want. The use of [Spot] requires great care because it converts your camera into a light meter, and you have to calculate how to use exposure data to create a picture. When [Spot] is selected, you can see a small circle in the center of the screen that targets the area being metered (figure 6-3).
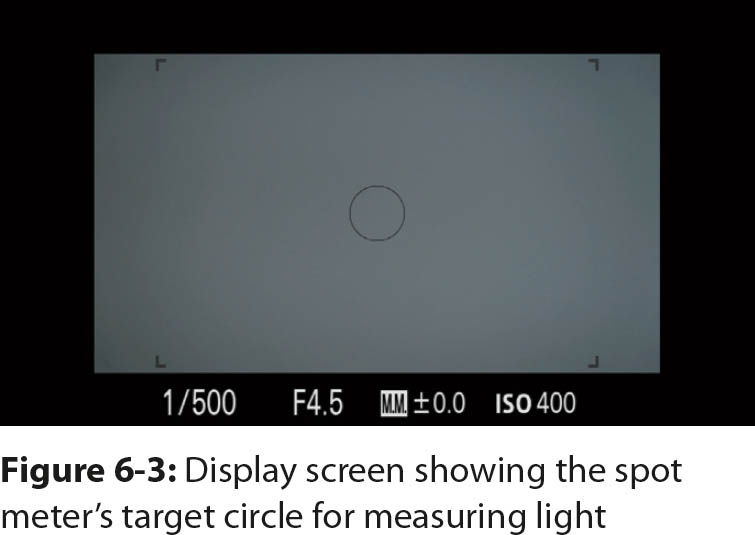
The target measures the intensity of light within the circle. It requires finesse and thought to interpret the reading. For example, we use spot metering when we photograph people on stage. At a piano recital, when the performer is lit with a spotlight and the remainder of the stage is black, we use [Spot]. We place the target over the performer’s face to measure the reflected light from the face. To record bright, clean skin tones for a fair complexion, we adjust the exposure to about +0.7 EV. For darker complexions, adjust the exposure to about -0.7 EV so the person does not look washed out.
We also use [Spot] when we photograph manuscripts. We find that positioning the target on the white page and overexposing by 1 2/3 f-stops results in an excellent image of black text against a white background. If we set the camera exposure without compensation, the white paper looks dingy and will be too dark.
Manual Focusing: Overriding Automatic Focusing
In chapter 5 we described how to use the menu to reset the focus with the Focus Mode command. We discussed using [Single-shot AF] and [Continuous AF] in semiautomatic shooting modes. In this chapter we will discuss the remaining two options, [MF] and [DMF], so you can manually focus your camera.
MENU > Camera Settings (3) > Focus Mode > [DMF], [MF]
Although you can use the menu to select a command, it may be too inconvenient for fast operation in the field. It is easier and faster to use either the Fn button or the Quick Navi screen.
Direct Manual Focus [DMF] is supposed to be a quick way to touch up automatic focusing. When you use this option, press the shutter button halfway to initiate autofocus. When focus is established, and while you continue to hold the shutter button halfway down, you can adjust the focus with the focusing ring on the lens. To take the picture, fully press the shutter button.
Our main complaint about [DMF] is its quirky behavior and occasional unreliability. It first requires the camera to automatically acquire focus, then you must maintain light pressure on the shutter button to activate the focusing ring. If you prematurely let go of the shutter button, the function of the ring is disabled and you have to start over. Aside from wasting time, this option can be extremely aggravating. If the lens cannot automatically establish focus, manual focus is not available, and you have to change the Focus Mode.
We find it easier to use [MF], which allows the focus ring to be active at all times. When you try your hand at manual focus, you will see that Sony provided some options to ease the process. If your goal is to switch from automatic to manual focus, you will find that the AF/MF button can be even faster and more convenient because there are additional command settings.
Pressing the AF/MF button puts your camera in MF mode. The factory default requires you to press the AF/MF button continuously to manually focus. When you release the button, the camera reverts to automatic focus. Use the following command to program the button so that one press puts the camera in MF mode and another press puts it back in AF mode:
MENU > Custom Settings (6) > Custom Key Settings (2) > AF/MF Button > [AF/MF Control Hold], [AF/MF Ctrl Toggle]
We find the [AF/MF Ctrl Toggle] option convenient because we don’t have to maintain continuous pressure on the AF/MF button to manually focus. If your viewfinder and monitor are set to [Display All Info.], an icon on the left side of the screen lets you know if the button is set for MF or AF.
MF Assist
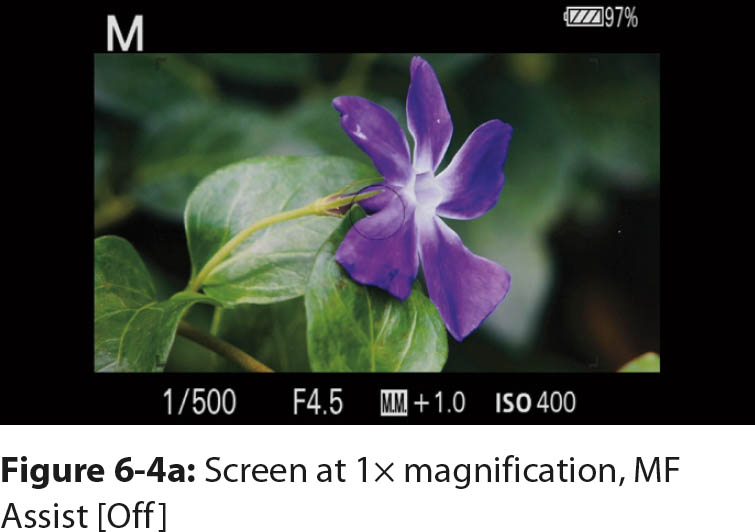
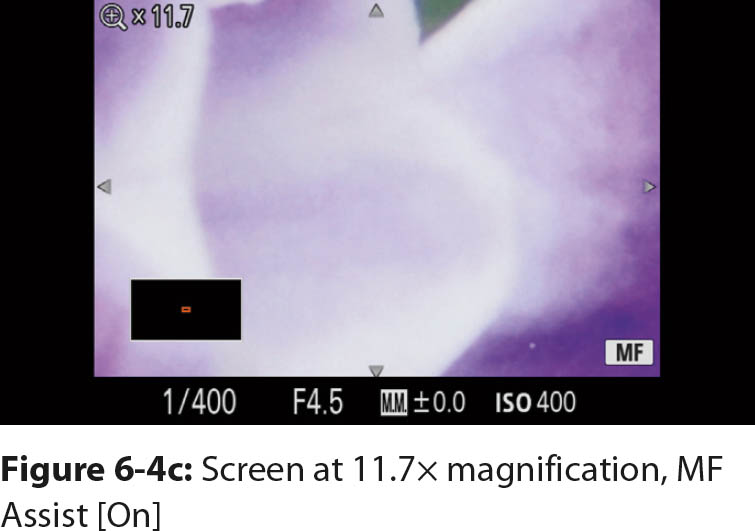
You may find that your view of the subject is too small and you can’t see fine enough details to accurately focus. At such times, you can use [MF Assist] to magnify the center of the screen and enlarge the fine details.
The base magnification of the display screen may not be sufficient to find precise focus (figure 6-4a). If you have to judge the sharpness of the subject, we recommend using the viewfinder because its resolution is higher than the monitor, and it reveals finer details. We use MF Assist extensively, especially when we photograph with a long telephoto lens. This makes it easier to focus. You can activate MF Assist with the following command:
MENU > Custom Settings (1) > MF Assist > [On], [Off]
When MF Assist is [On], the camera can increase the magnification to either 5.9× or 11.7× when you turn the focus ring on the lens. For this feature to work, you must use a Sony Autofocus lens: an FE-mount, E-mount, or A-mount. If you use a legacy lens made by Nikon or Canon, turning the focusing ring won’t activate MF Assist. For these lenses, you need to press the C2 button to increase the magnification.
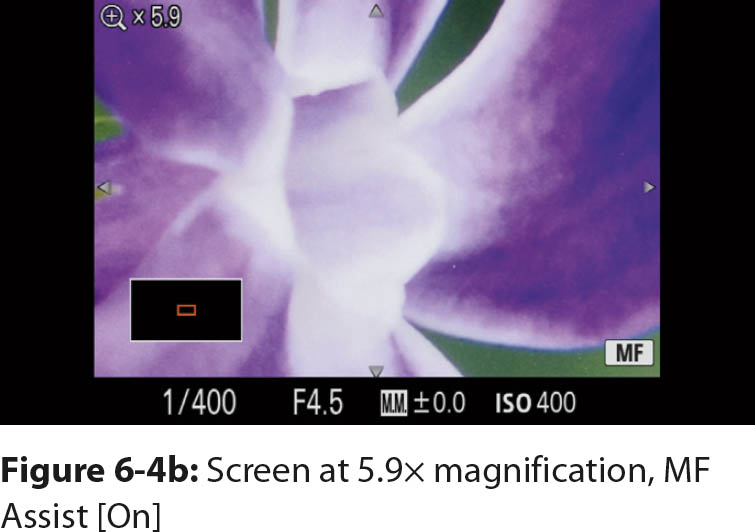
Typically we find that 5.9× magnification is sufficient (figure 6-4b), but if needed you can jump to 11.7× (figure 6-4c) by pressing the center button.
A second tool to help you manually focus is Focus Magnif. Time:
MENU > Custom Settings (1) > Focus Magnif. Time > [2 Sec], [5 Sec], [No Limit]
Basically, this command determines how long the magnified view is displayed after you stop turning the focus ring on the lens. You can choose to retain the magnified view for two or five seconds before it returns to normal. The default setting for this command is [No Limit], which retains the magnification indefinitely.
When you use Sony AF lenses, you will find that when you use [MF] in conjunction with MF Assist, turning the focusing ring automatically raises the screen magnification to 5.9×. Remember that the time you specify for Focus Magnif. Time begins after you stop turning the focus ring, and you can generally focus the lens in less than a second.
When you use Sony FE lenses, you can generally find focus in less than one second. When we use our camera with macro lenses, microscopes, telescopes, extreme telephoto lenses, or legacy lenses, we take more time to study the image and evaluate the focus. The automatic reduction of magnification disrupts our workflow, so we leave Focus Magnif. Time set to the default of [No Limit]. The [No Limit] option is not a handicap because we can return to the base magnification by lightly pressing the shutter button.
The MF Assist function has one limitation: it provides only a partial field of view, so you may end up focusing on an unimportant part of the image. This can be confusing when you don’t expect it. To see a preview of the region that will be magnified, press the C2 button. You will see an orange rectangle over the area that will be magnified. Press the up, down, left, or right buttons to move the rectangle to an area that is important to focus on.
You can accelerate the movement of the rectangle by rotating the front dial, rear dial, or control wheel. The front dial and control wheel move the rectangle vertically, and the rear dial moves it horizontally. When we use the viewfinder, we prefer to use the rim of the control wheel to position the rectangle. It may be just us, but we find it awkward to use the dials and wheel.
A Warning for a7 and a7R Owners
In our book titled The Sony a7 and a7R: The Unofficial Quintessential Guide, we said you could activate MF Assist with the C1 button. However, on the a7 II you use the C2 button. This change reflects a modification of Sony’s default camera configurations. When you update the a7 firmware from version 1.02 to version 2.0, the operation of that camera’s C1 button will not change.
Focus Magnifier
MF Assist is an invaluable aid if you focus manually for still photography. It is automatically activated when you turn the lens ring. There is another command for magnifying a portion of the screen called Focus Magnifier. This function is very similar to MF Assist except that if you turn the focusing ring when the camera is set to [MF], it will not increase the magnification of the preview screen.
MENU > Camera Settings (5) > Focus Magnifier
When you select Focus Magnifier from the menu command, you can press the center button to return to Live View. You will see an orange rectangle on the screen that indicates the region that will be magnified when you press the center button. Use the up, down, right, and left buttons to move the rectangle to the area you want to magnify. A faster option is to rotate the control wheel or front dial to move the rectangle vertically, and rotate the rear dial to move it horizontally. If you need more magnification, a second and third press of the center button will enlarge the image when you are in a still photography mode. If you are in Movie mode, the magnification is raised to 4.0x and it cannot be increased any further. A fourth press of the center button returns the view to 1x magnification, as does a light press of the shutter button.
Operationally, the Focus Magnifier is indistinguishable from MF Assist. If you like to magnify the framed image to evaluate the focus when you take still photographs and movies, Focus Magnifier is a good command to use, especially if you customize a button for quick access.
Peaking
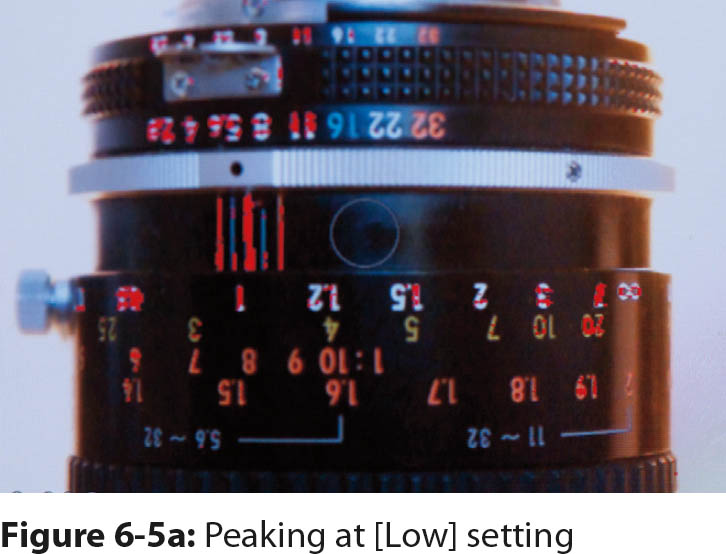
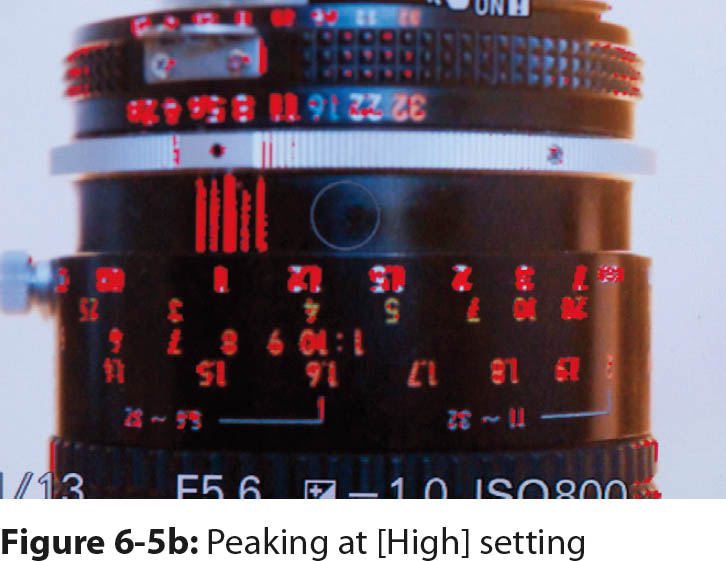
Peaking uses colored fringes to highlight the borders of in-focus areas. You can set the size and color of the fringes (figures 6-5a and 6-5b). They appear only when you use manual focus, and they are not recorded with your picture or movie.
There are two commands for the peaking function. The first allows you to set the level of peaking; the second allows you to set the color of the highlights.
MENU > Custom Settings (2) > Peaking Level > [High], [Mid], [Low], [Off]
MENU > Custom Settings (2) > Peaking Color > [Red], [Yellow], [White]
Peaking has two advantages. First, you see the full image; it does not limit the field of view through the finder. You will see all of what the sensor is seeing, which will help with overall composition. Second, Peaking is useful while you shoot movies. In comparison, Focus Magnifier should only be used just prior to the start of recording a movie. Using it while recording is distracting because it changes your field of view. Because the Peaking color fringes are not recorded, they will not interfere with the appearance of your movie.
Peaking sounds great, but it does have flaws. First, the fringes are distracting, which is especially annoying in still photography. When the level is set to [High], its appearance at the borders interferes with careful composition. Second, some people question if Peaking is as precise as MF Assist for critical focusing. For precision macro or scientific work, Peaking is less accurate than MF Assist. Although we like to use Peaking when we shoot movies, we prefer MF Assist or Focus Magnifier for still photography.
The good news is that if you like Peaking and want to use it occasionally, you can assign it to one of several customizable keys. The Peaking Color and Level settings you use will depend on the scene and its overall color scheme and contrast. It’s a personal preference; one of us likes yellow, and the other prefers red.
The Peaking Level you should use depends on the contrast in the scene. With a high-contrast scene, use [Low] because the fringes can become large and distracting when the lens is in focus. If the edges in the scene have low contrast, the [Low] level produces such small fringes that they do not aid in focusing; it is better to use [High] to make the fringes easier to see.
Aperture and Zoom Lenses
It’s easiest to manually focus when you use the widest or maximum aperture of your lens because the depth of field is shallow, and when you pass from out of focus to in focus, the image seems to snap into focus. When the lens is stopped down and the depth of field is large, the transition from soft focus to sharp focus is more gradual.
The selected shooting mode will determine whether you are focusing with the open aperture or the working aperture. When you use Sony FE lenses in P and S mode, they are set to their maximum aperture during live preview. As mentioned in chapter 5, these shooting modes use open-aperture metering. FE lenses maintain the widest aperture opening while you adjust the controls to set the aperture. The camera calculates the exposure and changes the aperture numbers as you turn the dial. When you press the shutter button, the aperture closes to the chosen setting just before the picture is taken.
This is not the case in A and M mode. If you decide to use a smaller aperture, the lens closes down as you turn the front dial. The light that falls on the sensor diminishes as the aperture becomes smaller. Because the viewfinder is electronic, its brightness and the brightness of the monitor stay constant while the camera automatically maintains the correct exposure. This allows you to see the increased depth of field in real time. However, this is not ideal for accurate focusing because the increased depth of field makes it hard to identify the precise point of focus.
You can see this for yourself. Set your camera to A mode. Focus with an aperture of f/4, then with an aperture of f/22. With f/4, as you turn the focus ring, the image quickly changes from tack sharp to blurry. With f/22, the transition occurs gradually, and it’s difficult to tell where the precise focus point is.
You can use the minimum depth of field to accurately focus a zoom lens, too. With a zoom lens, the shallowest depth of field occurs at the maximum focal length. To accurately focus a zoom lens, start at the maximum focal length. After you establish focus, you can zoom out to get a wider field of view, and the focus will be maintained. In contrast, if you focus at the minimum focal length then zoom in, the focus point will change. To focus accurately with a zoom lens, use the longest focal length.
Manual Adjustments of Color Temperature
Color Temperature
In chapter 5 we described how to use preset WB values by matching a light source to an icon. However, there are two other ways to set the WB: by selecting a specific color temperature and by saving a customized white balance. Each method requires effort. Table 6-2 contains icons for these two methods.
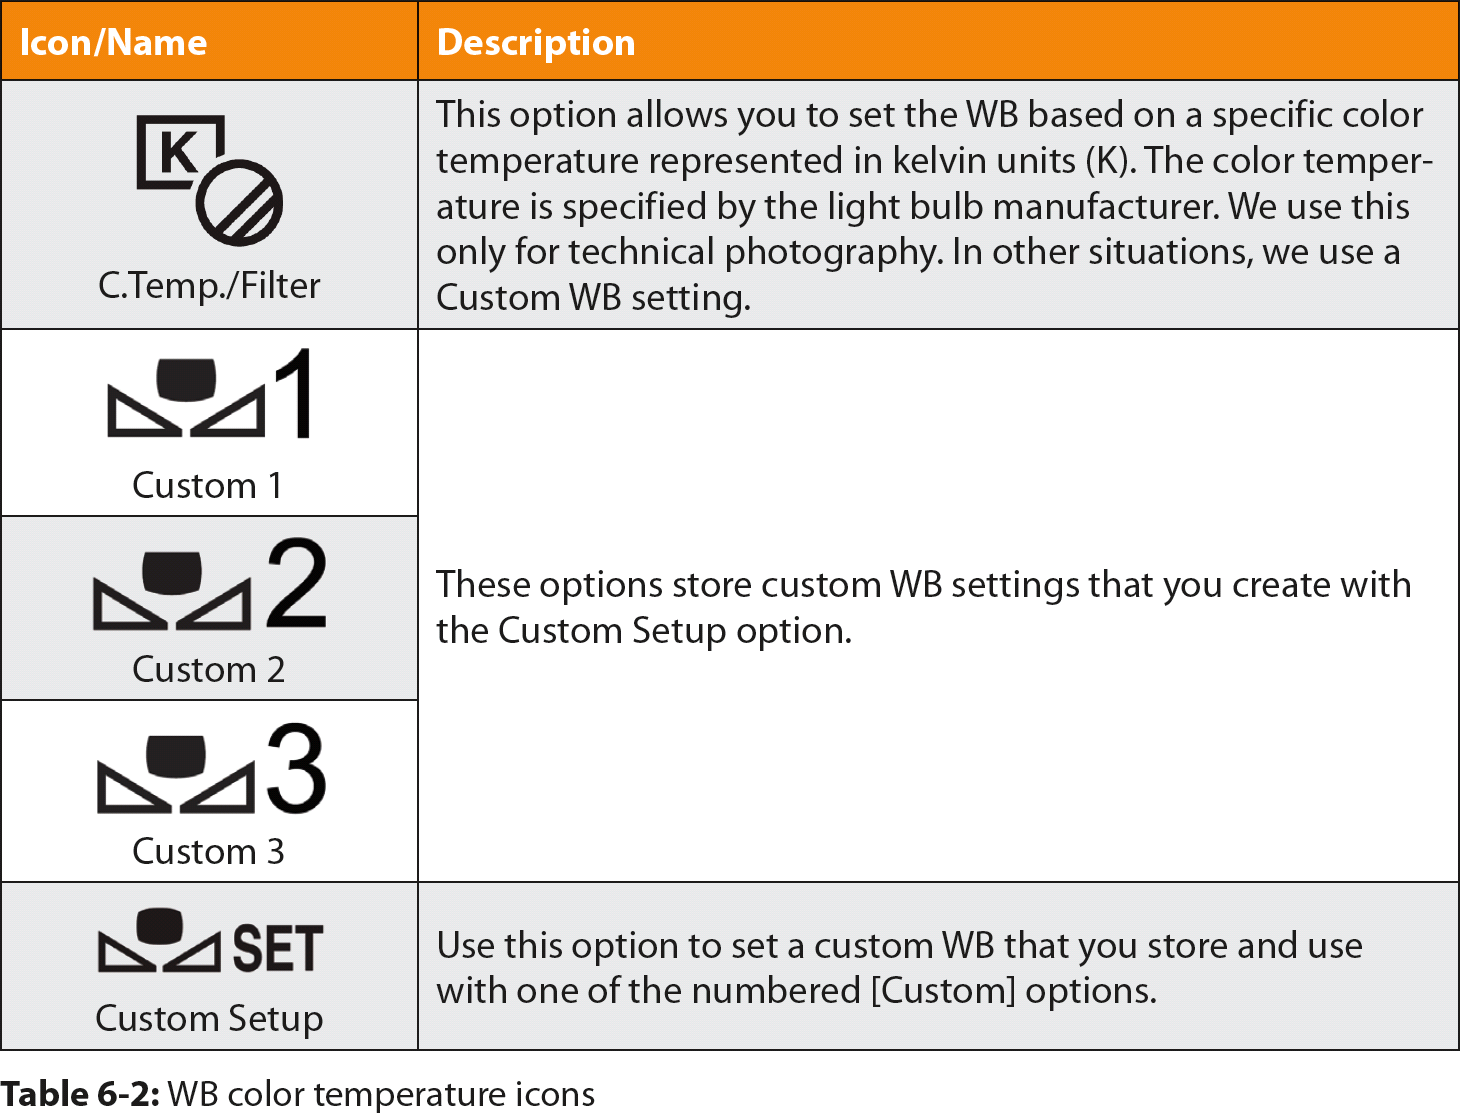
First, navigate to the White Balance screen through the menu by pressing the Fn button:
MENU > Camera Settings (4) > White Balance > [C.Temp./Filter], [Custom 1], [Custom 2], [Custom 3], [Custom Setup]
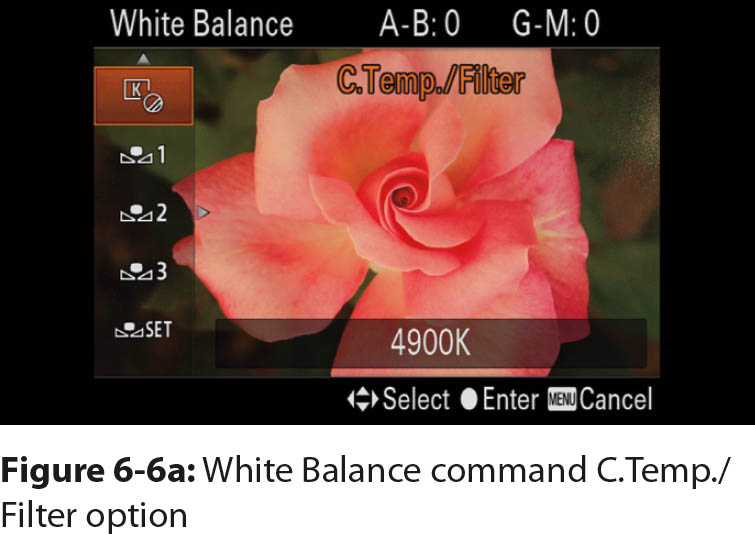
Rather than use the menu, you can press the C1 button to quickly access the White Balance command. After you press the button, you will see the icons from table 6-2 on the right side of the screen, along with a description at the top. Scroll through the options until you reach [C.Temp./Filter] (figure 6-6a).
Press the right button to enter the Color Temp. screen, which has an orange bar at the bottom with a four-digit number before the letter K (Kelvin). The up and down arrows indicate that you can move through the available temperatures (figure 6-6b), which range from 2500K to 9900K.
To navigate through the range, press the up or down button, or rotate the control wheel or front and rear dial. The numbers will change in increments of 100; they represent color temperatures for different light sources. The goal is to set your camera’s White Balance to the color value of the ambient light.
Manufacturers of some light bulbs provide the color temperature, and you can set the White Balance to the given value. For example, the manufacturer of the tungsten bulb on our microscope rated the bulb at 3200 K, so we can set [C.Temp./Filter] to that value when we take pictures through our microscope. Manufacturers’ stated color temperatures are approximate. As a bulb ages, its glass envelope becomes coated with tungsten from the filament. Light is filtered through the coating and becomes cooler. The color temperature of an incandescent bulb depends on the operating voltage; it emits a warmer color with a lower voltage. When the color temperature is critical, you can use a color temperature meter to measure the light and ensure consistency. These meters are expensive; they can cost more than your camera and lens combined. Fortunately, your Sony a7 II can measure the color temperature with the Custom WB command.
Custom White Balance
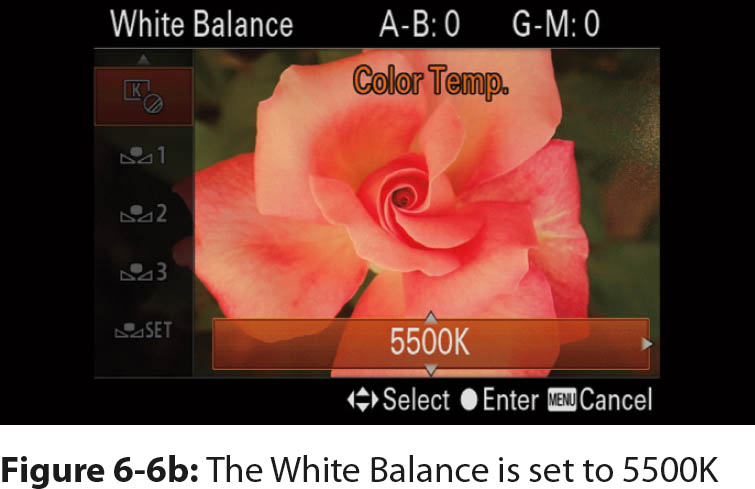
We rarely use the color temperature scale. Instead, we use the Custom WB feature, which is effective with any light source. It sets the WB by calibrating the camera directly to the light. The camera saves the value, and you can reuse it if you save it as a preset in one of the numbered custom commands. To use Custom WB, get a blank sheet of white paper, then follow these steps:
1. Focus the lens on the paper, and make sure the paper fills the entire frame. Press the WB (C1) button and scroll through the options with the control wheel. Highlight the [Custom Setup] option (figure 6-7a).
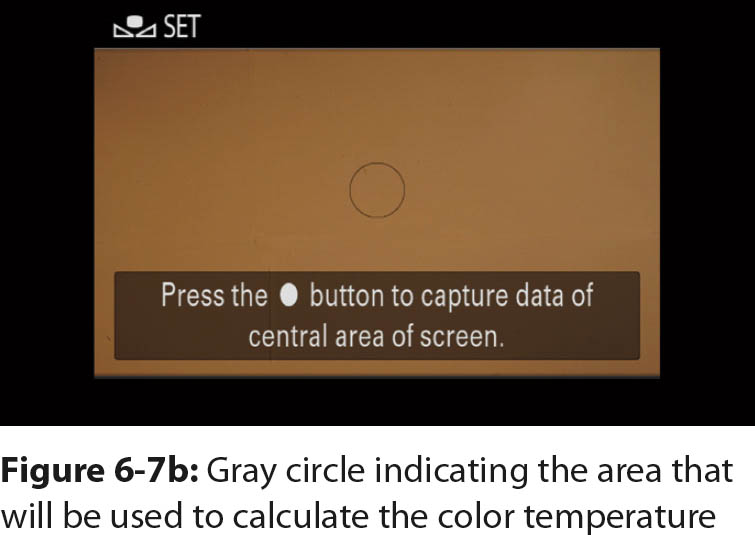
2. Press the center button. A new screen appears with a circle in the middle and a message that says, “Press the center button to capture data of central area of screen” (figure 6-7b). The white paper reflects the light, and you can see its apparent color on the screen. You can tell that the WB is not correct because the paper has an orange cast.
3. You will hear the camera take a picture. A new screen appears with a gray rectangle that says “Select register.” You will also see the color temperature value (5500K in figure 6-7c) and numeric values for A-B and G-M (amber to blue, and green to magenta, discussed in the next section). The gray background indicates that the correct WB has been set.
4. To store the color temperature value as a custom preset, use the left and right buttons to select register number 1, 2, or 3 (orange symbol in figure 6-7c), then press the center button.
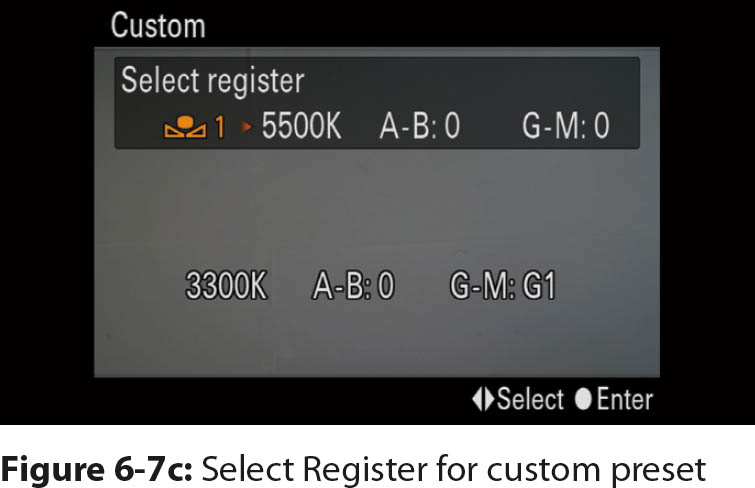
You can store up to three custom presets—one per register. You can use these custom WB values when you press the WB button and select a register number. The presets are retained even when you turn off the camera, but they will be lost if you execute the Setting Reset [Initialize] option.
Custom WB is easy to use. We use it regularly for our technical photography. For example, when we work with a microscope, we remove the specimen from the field of view and calibrate the WB to the light. This is more accurate than using a color temperature scale because it compensates for the color cast from the microscope optics. The same principle applies to other types of artificial light that change with age. Use Custom WB just before a photo session to compensate for variations in the light source.
Fine-Tuning White Balance
For every WB preset, you can fine-tune the color by changing the ratio of amber to blue (A-B) and green to magenta (G-M). This counteracts any undesirable tones caused by unusual lighting conditions or multiple light sources. For example, an interior scene may include daylight streaming through a window, an incandescent light on a table, and fluorescent lights hanging from the ceiling. These mixed lighting conditions can cause an undesirable color cast in the image. Fortunately, you can correct the problem by adding a slight tint to the image; it will be recorded in both JPEG and RAW files.
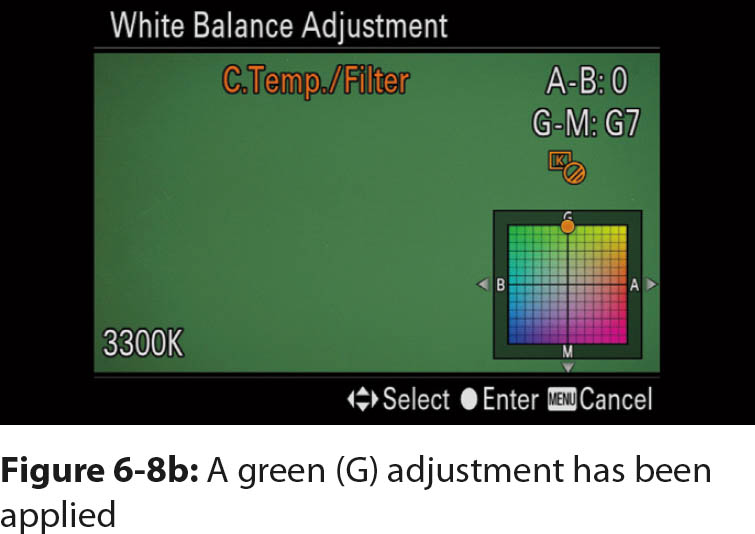
When you select a WB preset, press the right button to see a screen with a large square made up of smaller multicolored squares. If you use the C.Temp./Filter option, press the right button twice; the first press displays the color temperature values, and the second press displays the multicolored square.
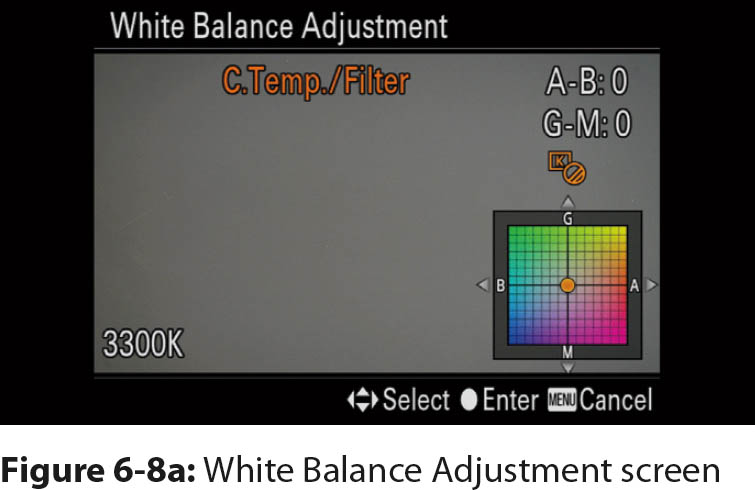
At the center of the multicolored square you can see an orange circle (figure 6-8a). Press the rim of the control wheel to move the circle within the color square. Move it horizontally to apply blue or amber. Move it vertically to apply green or magenta (figure 6-8b). You can see the effects of the color changes on the Live View screen.
As noted earlier, adjustments may be needed to fix color casts under multiple light sources. You may also need to fine-tune the WB if you use a single light source that emits a discontinuous spectrum, such as fluorescent or LED lights. When you shoot under this type of light, your images may have a color cast that you cannot fix with a preset WB value. You can use this process to offset the color cast.
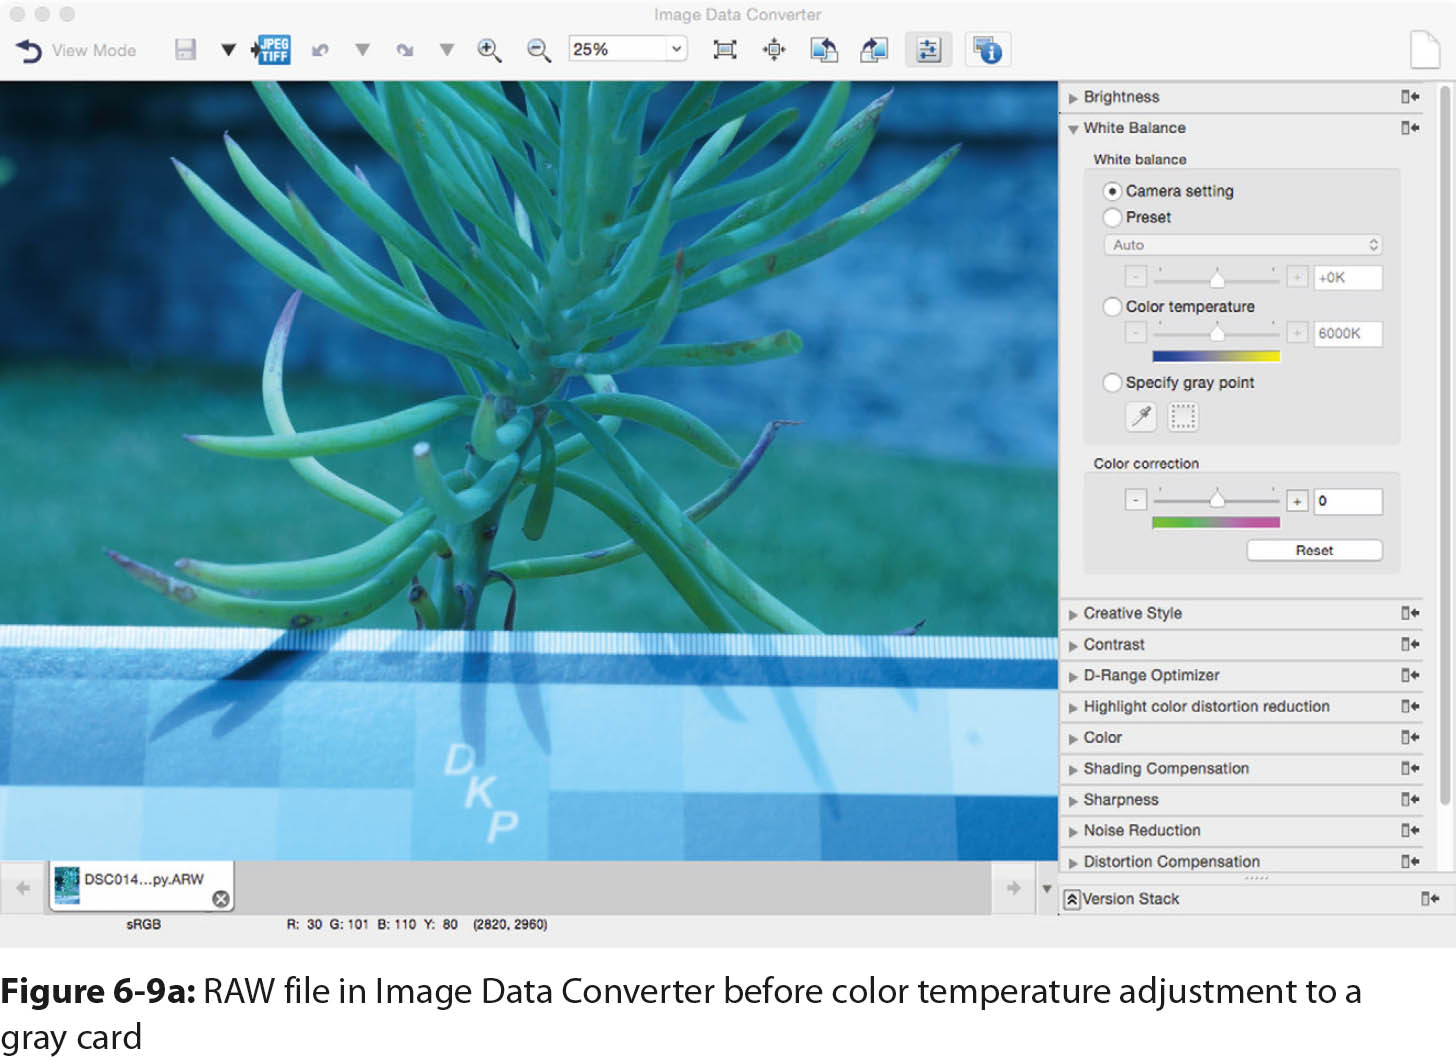
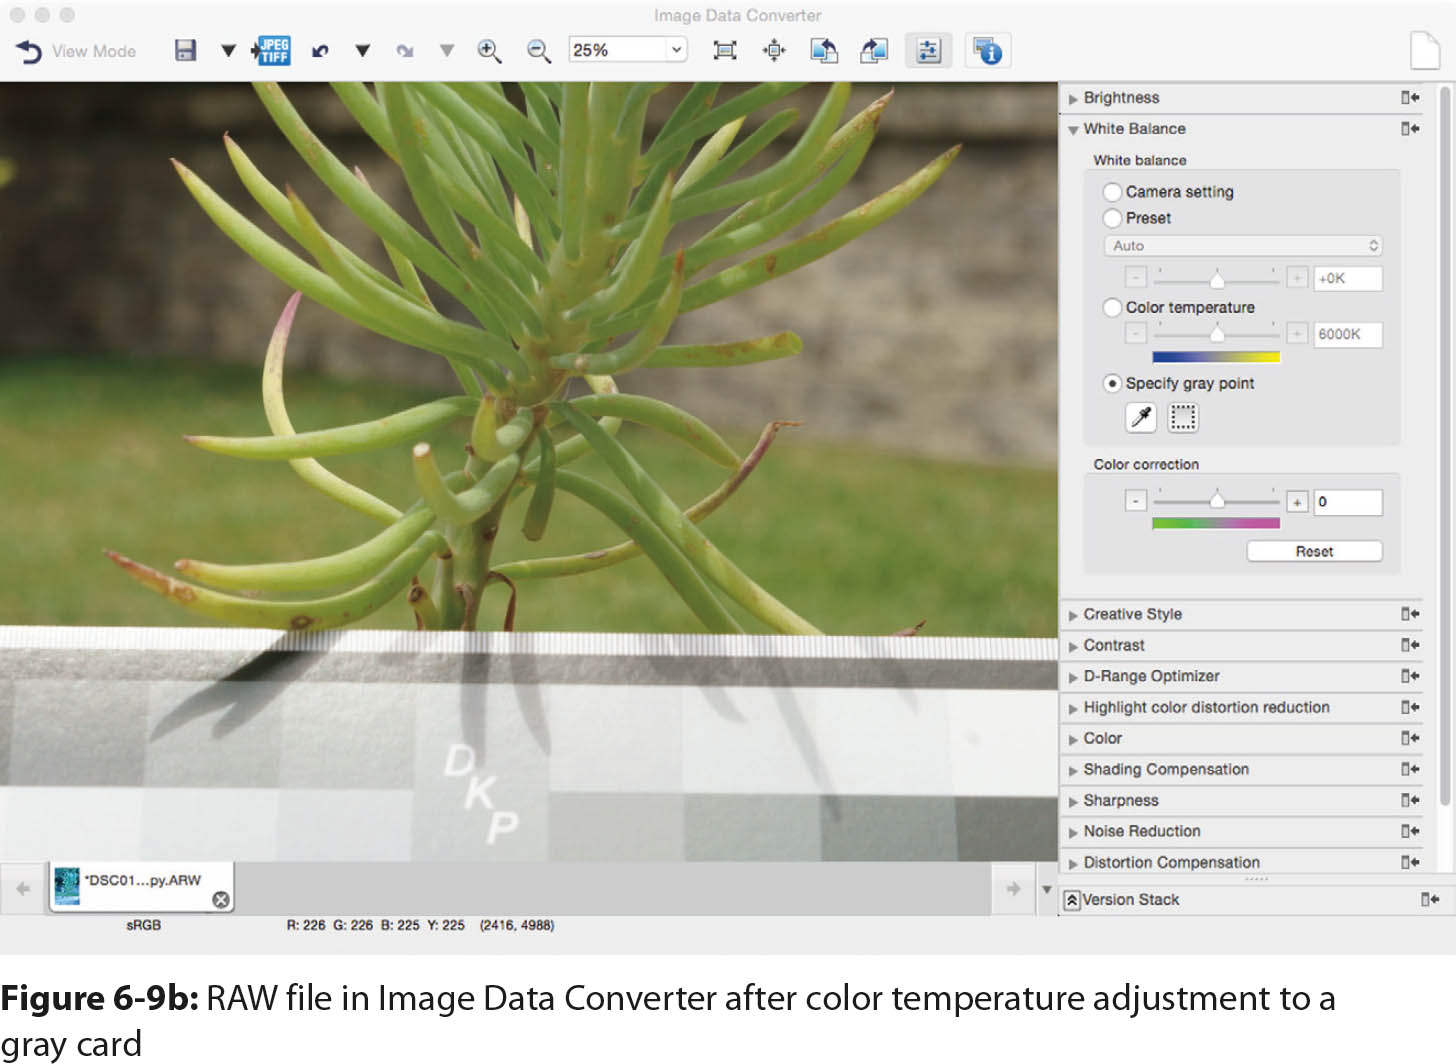
When you save your images in RAW format, it is easy to fix WB problems during post-processing. You can use either Sony Image Data Converter or third-party software, such as Adobe Photoshop or Apple Photos. Figure 6-9a shows an image opened in Image Data Converter. Note that the White Balance menu is open on the right side of the image, and there is a slider for the color temperature scale. The slider makes it easy to evaluate different color temperature settings. If you select the Preset option near the top of the White Balance menu, you can see a variety of light sources and select a specific type of illumination.
If you record an image of an 18 percent gray card, you can quickly calibrate an image in Image Data Converter. Use the card as a target for the Specify gray point option (figure 6-9b). Because the card serves as a neutral reference, the software attempts to render it as gray with no color casts. Notice the icons under the Specify gray point option; you can select either the eyedropper or the selection box and target part of the 18 percent gray card. The eyedropper is basically a pointer. When you select it, you can click a point on the gray card image that you want to use for the white balance. Keep in mind that you should use an image that has little chroma noise. If the picture was taken in poor light and you see colored speckles on the gray card, use the selection box instead of the eyedropper. The larger area will average the chroma noise and provide a more accurate measurement of the gray card, and the image will have more accurate colors (figure 6-9b).
Lens Compensation
To obtain the ultimate in picture quality, the a7 II has software that corrects lens imperfections, such as vignetting (peripheral shading), distortion (geometric distortion), and chromatic aberration (color fringing). Vignetting is a common defect in wide-angle lenses. It causes the edges of an image to be darker than the center. Distortion causes parallel lines to bow in (pincushion distortion) or bow out (barrel distortion). Finally, chromatic aberration causes the edges of subjects in an image to have red or blue fringe because the lens does not bring all light wavelengths to the same point of focus.
These problems can be corrected in the camera’s software. The camera has a database that catalogs lens defects and algorithms to correct images. Sony periodically releases updates for the camera firmware as new lenses are introduced to its product lineup. Remember that the correction is a software alteration that modifies the image file. If you require unaltered images, you should turn off the corrections, even if the recorded image shows all the lens defects.
The default setting for chromatic aberration and shading correction is [Auto]. If the lens you use is included in the camera database, the optical faults will be corrected in JPEG files. RAW files will not be corrected; they will include the lens defects. Curiously, at the time of this writing, when we mounted the 28–70mm Sony FE lens and the Carl Zeiss 24–70mm zoom lens, the Distortion Comp. was grayed out and not available for adjustments. Normally, you would choose this option and set it to [Auto].
Here are the three lens compensation commands and their options:
MENU > Custom Settings (6) > Lens Comp. > Shading Comp. > [Auto], [Off]
MENU > Custom Settings (6) > Lens Comp. > Chro.Aber. Comp. > [Auto], [Off]
MENU > Custom Settings (6) > Lens Comp. > Distortion Comp. > [Auto], [Off]
DRO/Auto HDR Function
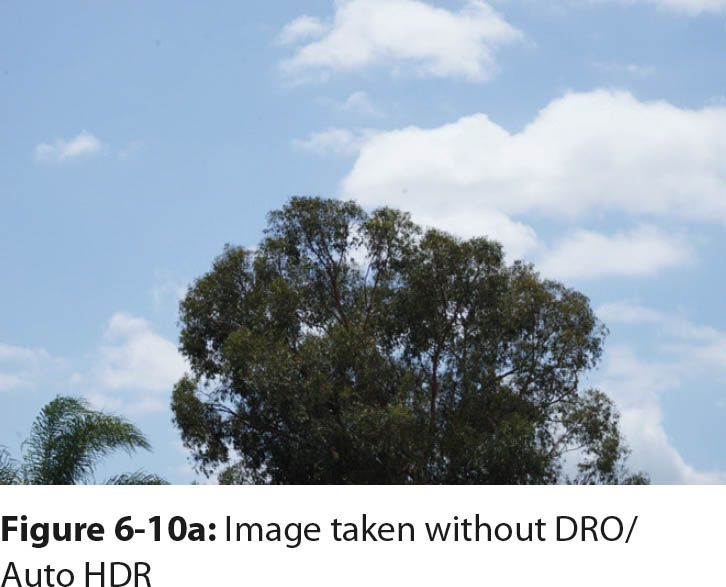
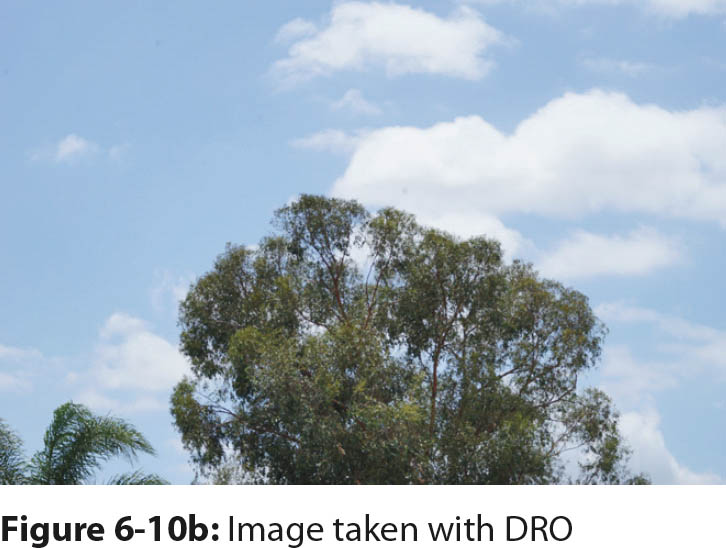
When you shoot pictures, you sometimes encounter a scene with overly bright regions that show little or no detail. Or you might encounter a subject with deep shadows that look like featureless black masses (figure 6-10a). Many of these problems can be corrected or improved in computer software like Adobe Photoshop or Apple Photos. Or you can use two processes in the a7 II to reduce the problems: D-Range Optimizer (DRO) (figure 6-10b) and Auto High Dynamic Range (Auto HDR) (figure 6-10c). When you select either of these operations, the camera will automatically process the image and save it to your memory card.
Use DRO when one exposure can record all the intensity values for a scene. If the scene has too much variation in intensity values and extreme light levels overwhelm the sensor, use Auto HDR. This setting employs three exposures taken in rapid succession: one for recording highlights, one for recording midtones, and one for recording shadows. By using multiple exposures, the camera can record a greater range of intensities than in a single photograph. The camera combines the images to create a composite that has lighter shadows, darker highlights, and preserved midtones.

You can access the DRO and Auto HDR functions with the following command :
MENU > Camera Settings (4) > DRO/Auto HDR > [D-R Off], [DRO], [HDR]
Note that the previous command is a gateway to further adjustments, and that the Off option for these two features is found at this gateway.
DRO Function
Access the DRO function submenu with the following command:
MENU > Camera Settings (4) > DRO/Auto HDR > [DRO]
When you select [DRO], press the right or left buttons to display its options:
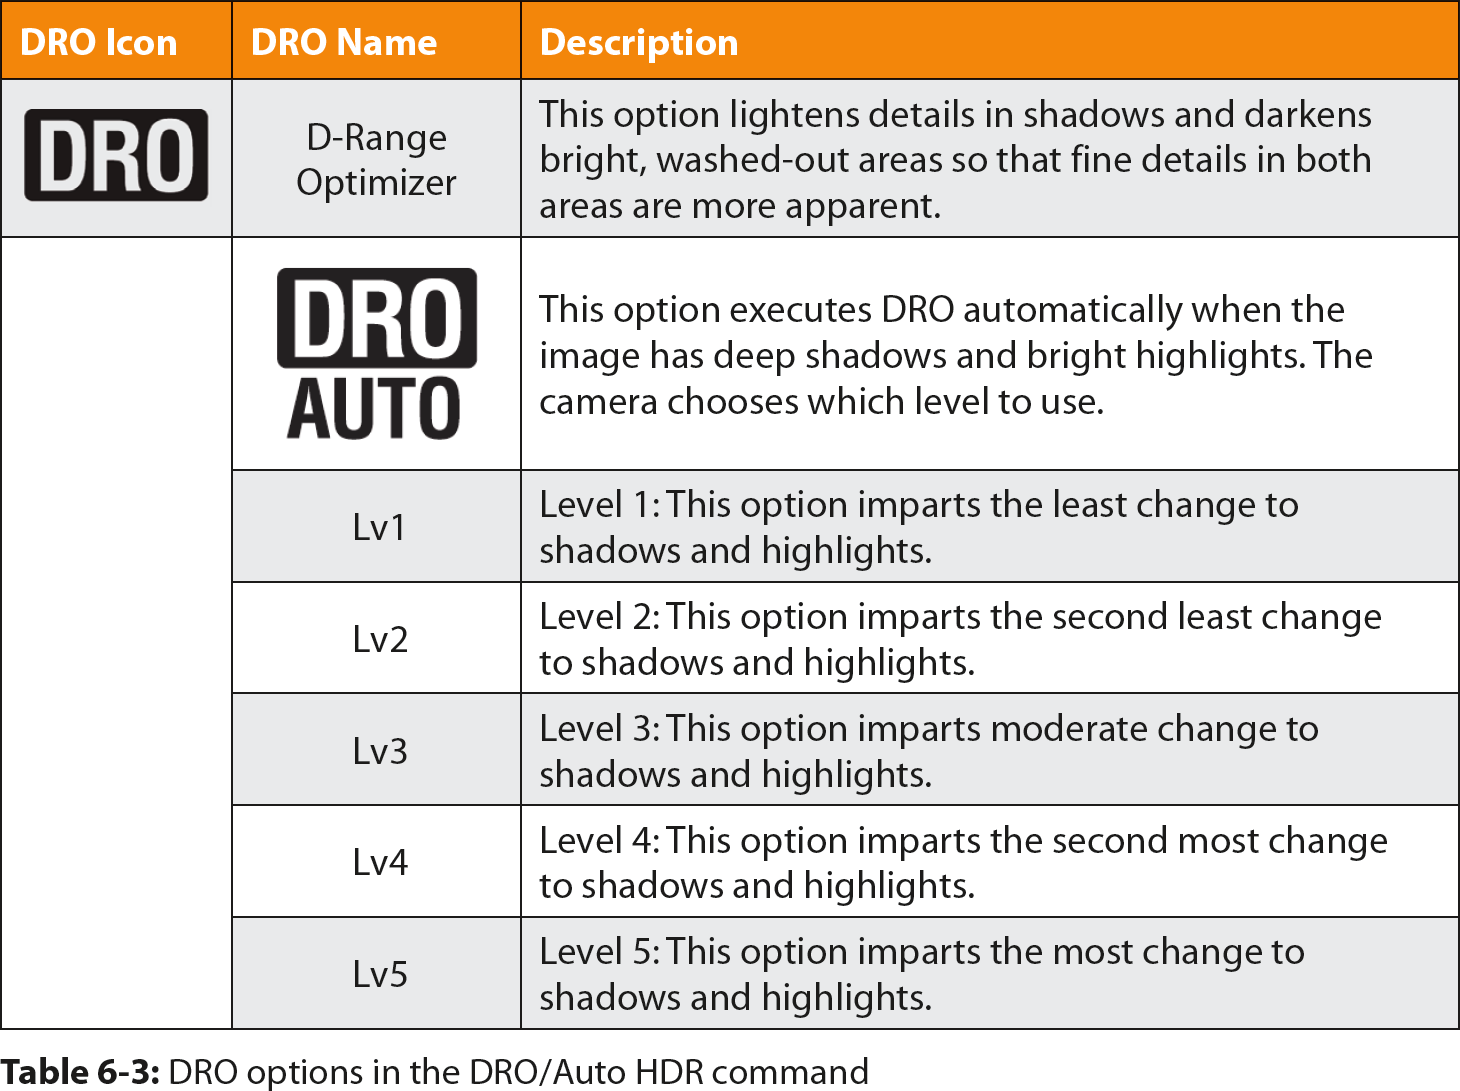
MENU > Camera Settings (4) > DRO/Auto HDR > DRO > [AUTO], [Lv1], [Lv2], [Lv3], [Lv4], [Lv5]
The submenu options for the DRO function are shown in table 6-3. The Lv (level) options determine the extent to which shadows are lightened in an image; the maximum effect occurs at [Lv5], and the minimum effect occurs at [Lv1]. If you cannot decide which Lv value to set, you can try [AUTO]. The camera will lighten the shadows to a level it thinks is appropriate.
The problem with using DRO is the amount of time it takes to view the scene and get a feel for which level of DRO is needed to improve the image. For still photography, it is better to do this type of image manipulation on a RAW file in good post-processing software. We find that even when we use a computer, it is difficult to find the right balance between shadows and highlights. It takes considerable practice to select the correct DRO option. We recommend that you try each of the levels until you can predict the results. With practice, you should be able to implement this function to your liking. In [AUTO], the camera decides which level to use, but you may not like the results.

When you select a specific level, the DRO icon will appear in both the [Display All Info.] and [For viewfinder] formats, along with the level you chose (figure 6-11).
The DRO command is available only in P, A, S, M, and Movie modes. For still pictures, you can shoot in RAW, JPEG, or both. When you open RAW files in most post-processing software, you cannot see the effects of DRO. When you record images in [RAW & JPEG], you can see the DRO effects in the JPEG file, but not the RAW file. However, Sony Image Data Converter 4.0 emulates the contrast changes in RAW files so you can see the effect of a DRO setting.
You can use DRO with a Creative Style, but not with a Picture Effect. When DRO is active and you select a Picture Effect, the DRO value will change to [D-R Off]. It will change back to its previous value when you set the Picture Effect command to [Off].
Auto HDR Function
HDR photography usually involves downloading pictures taken at different exposures and combining them in a computer to form a composite image that has all the intensity levels from the scene. The photographer then manipulates the composite image with tone mapping, which allows adjustments to the contrast, brightness, and color. The final product is an image that has details in the brightest and darkest areas of the scene.
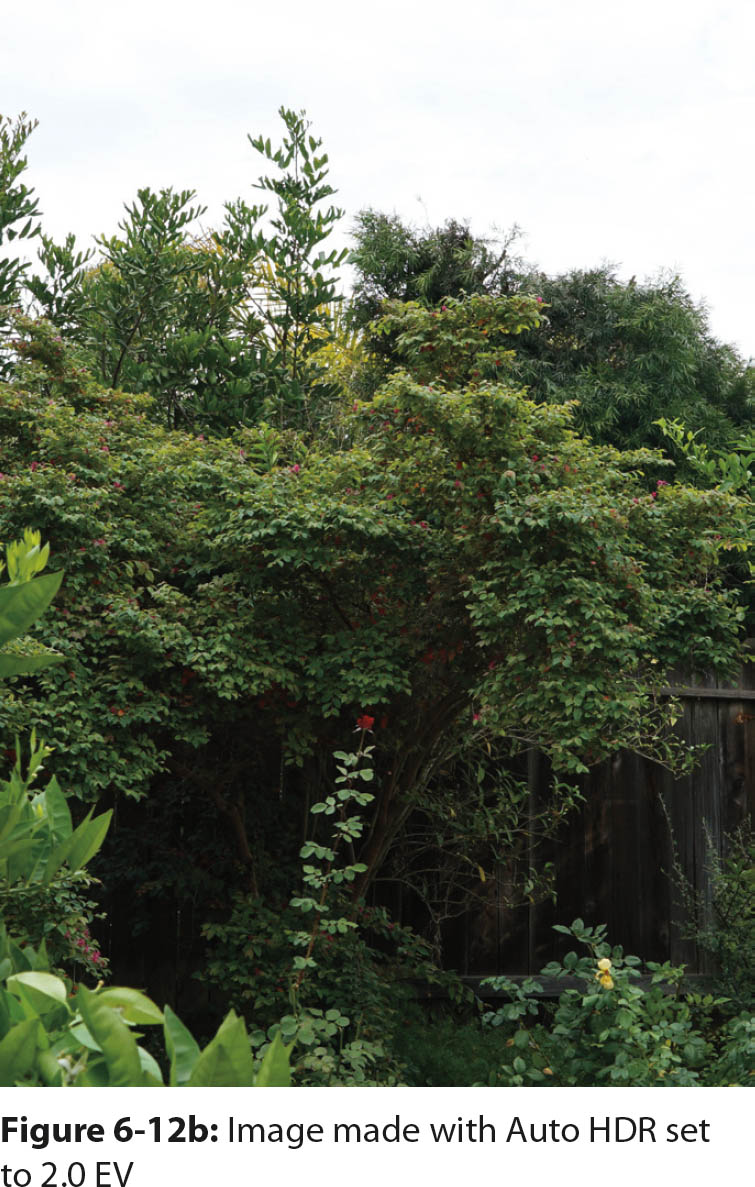
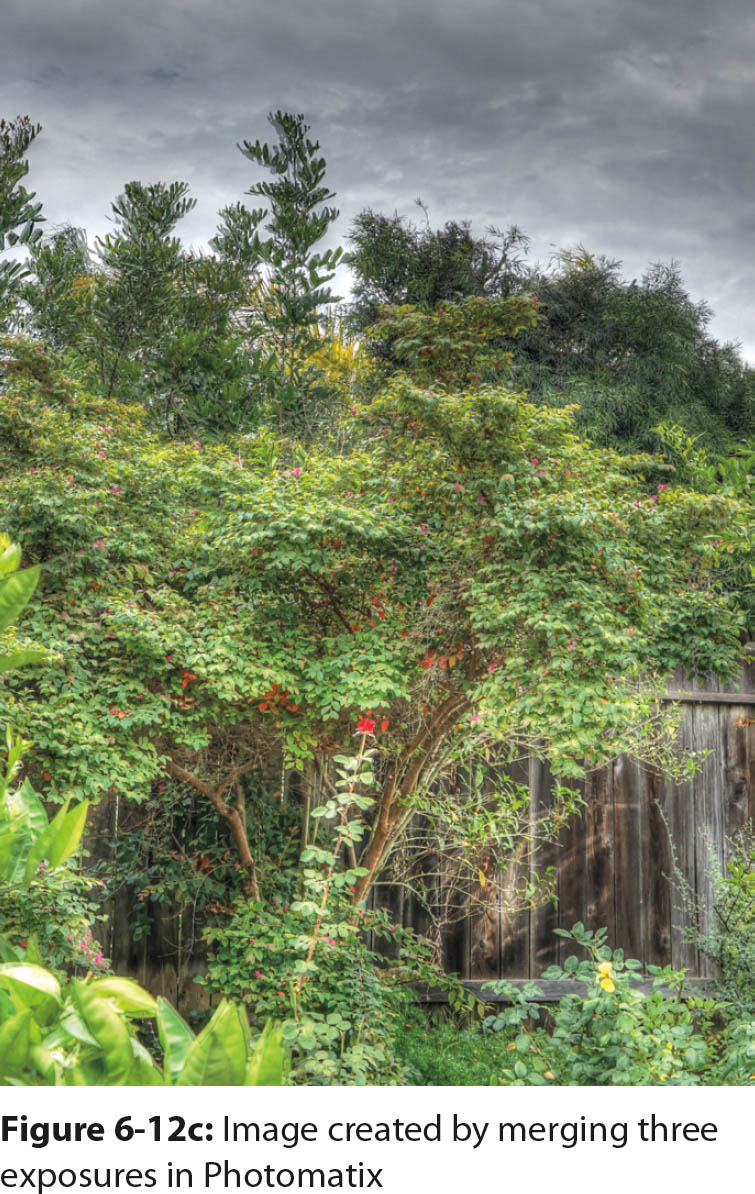
If a scene has a wide range of intensities, HDR photography frequently results in an image with oversaturated colors, which gives it a surreal appearance. For example, when you merge three exposures in third-party software like Photomatix, the final composite image can have dramatically different colors than the original scene. You can aggressively enhance the dark tones and reduce the bright tones to create an image.
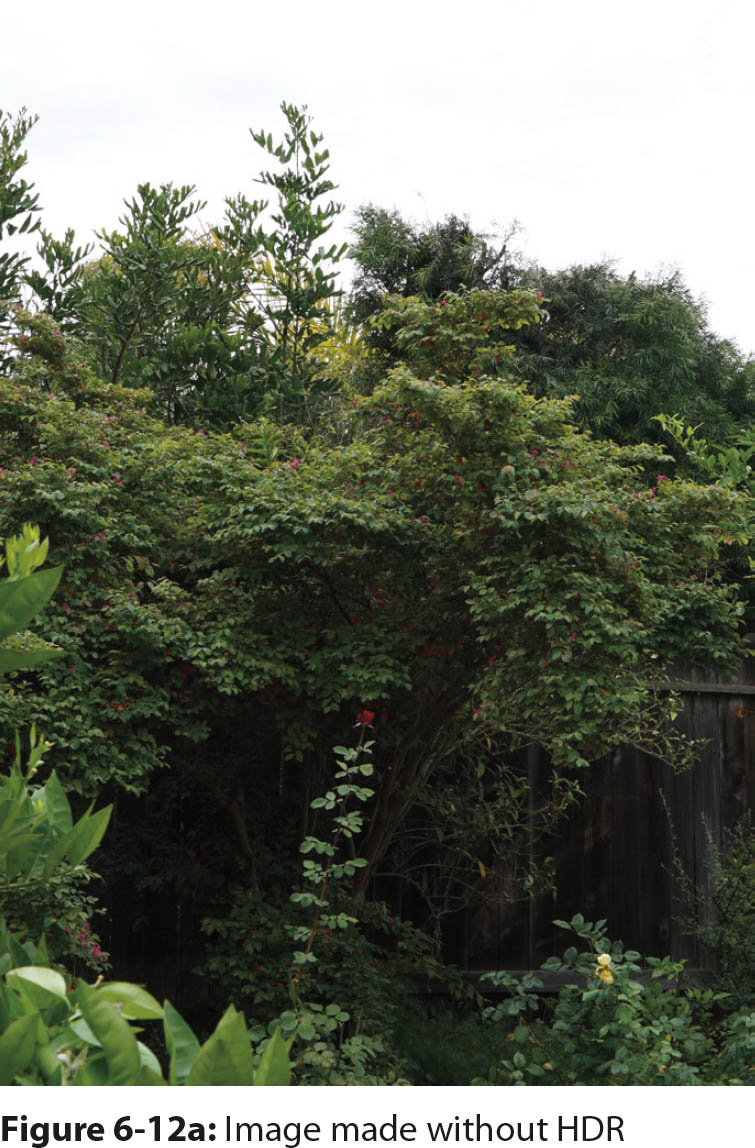
When you use the Auto HDR function on the a7 II, you might be surprised to find that the final image does not have supersaturated colors like an image that is processed in Photomatix. Instead, the color balance and saturation resemble a conventional image (figure 6-12a). Sony engineers appear to have adjusted the Auto HDR output so the final image retains the color balance and tonality of a typical photograph (figure 6-12b). Figure 6-12c is a typical HDR image created in Photomatix.
The following command enables the Auto HDR process, and the options are described in table 6-4. Like DRO, the HDR command has suboptions you can choose.
MENU > Camera Settings (4) > DRO/Auto HDR > HDR > [AUTO], [1.0EV], [2.0EV], [3.0EV], [4.0EV], [5.0EV], [6.0EV]
After you select the Auto HDR command, you can choose [AUTO] and let the camera determine the EV. Or you can take control and select a specific EV from 1.0 to 6.0. The selected value becomes the ± range over which three shots are taken. Use a low EV when the scene has a moderate range of light intensities; use a high EV when the range of intensities is more extreme. To select a specific EV, press the right button to access the submenu. Use the right and left buttons to navigate through the options. Press the center button to apply your choice to the HDR function.
The Auto HDR function is available only in P, A, S, and M modes, and it can only save JPEG files with a Quality of [Extra fine], [Fine] or [Standard]. If you enable Auto HDR and set the Quality to a RAW option, the value of the DRO/Auto HDR command will automatically be changed to the DRO [On] option, but it will not automatically change back if you reset the Quality command to a JPEG-only value.
As with DRO, you can use Auto HDR with a Creative Style but not a Picture Effect. When Auto HDR is active and you select a Picture Effect option, the Auto HDR value will change to [D-R Off]. It will change back to its previous value when you set the Picture Effect command to [Off]. When you select a specific EV, the HDR icon will appear on the display screen along with the level you selected for both the [Display All Info.] and [For viewfinder] data display formats.
DRO/Auto HDR Comparison
Even though Auto HDR and DRO address the same problem of intensity extremes, there are important operational differences. First, DRO images can be captured in RAW format, and Auto HDR images cannot.
Second, DRO works on the information obtained from one image, and Auto HDR works with three images. DRO images will therefore have higher noise levels in deep shadows than Auto HDR images. Remember that one of the three exposures in Auto HDR is used to capture shadow detail, so noise will be reduced in those areas. In contrast, DRO uses image processing to increase brightness in shadow areas, which amplifies the appearance of sensor noise.
Third, DRO works with scenes that have moving subjects, including movies. Because Auto HDR uses three exposures of the scene, the subject must be stationary. Curiously, of the three pictures used for Auto HDR, only two are saved on the memory card: the image with a normal exposure and the merged image.
Experimenting with DRO and Auto HDR
If you want to understand how to use different DRO levels, use Sony Image Data Converter to work on your RAW files. We prefer it to the camera’s internal processor. Even though the effects of Image Data Converter are not identical, it can improve your images. Also, its action will let you try several levels of DRO on one image so you can decide if you want to apply it to your image.
We do not use DRO in the camera because it requires considerable skill to predict its effect before you take a picture. We find it simpler to take RAW images with DRO off, then improve the image on our computer in either Image Data Converter or Photoshop.
Like DRO, Auto HDR can improve an image; also like DRO, it is difficult to anticipate the appearance of the recorded image. We prefer to shoot in RAW format, which is not available with Auto HDR. Instead, we bracket multiple images in RAW format then post-process them on our computer with Photomatix. This allows us to experiment with different interpretations of the composite image.
Bracketing and Dynamic Range
The a7 II has a special feature called bracketing that deals with unusual lighting conditions. It can be set to capture three images, each recorded with a slightly different setting. Bracketing is a shotgun approach to finding the ideal setting. The bracket options are included in the Drive Mode command; they vary the exposure, light values, and WB (table 6-5).
Cont. Bracket and Single Bracket
Press the Drive Mode button to display the options in the Drive Mode command. Scroll through the options with the control wheel until you highlight a rectangle that contains the letters BRK. The letter C outside the rectangle indicates [Cont. Bracket]. Press the right button to scroll through the following options: [0.3EV 3 Image], [0.3EV 5 Image], [0.5EV 3 Image], [0.5EV 5 Image], [0.7EV 3 Image], [0.7EV 5 Image], [1.0EV 3 Image], [2.0EV 3 Image], and [3.0EV 3 Image]. Your selection will be displayed along the top of the screen.
The EV values refer to the ± variation in exposure that will be applied, and the number preceding Image indicates the number of pictures that will be taken. In the case of [1.0EV 3 Image], three pictures will be taken: one that is underexposed by 1.0 EV, one at the recommended exposure, and one that is overexposed by 1.0 EV.
After you set the exposure variation you want to use, press the center button. To take the picture, press the shutter button and hold it down until all the shots are taken. If you let go too soon, the series will be interrupted.
You can specify the order in which pictures will be saved to the memory card. The default is to first save the camera-recommended exposure (normal exposure), then save the shortest exposure (underexposure), then save the longest exposure (overexposure). This mirrors the order in which the camera takes the pictures. However, you can save the pictures from underexposed to overexposed with the following command:
When you use HDR software, you usually use A mode to bracket, but the a7 II allows you to use Auto HDR, or exposure bracketing, in M mode. The camera software uses the following strategy to vary the exposure: If you set the ISO to [ISO AUTO], the camera will vary the ISO setting to alter the exposure, and the aperture and shutter speed will stay constant. If you set the ISO to a specific value, the camera will vary the shutter speed to bracket the exposure. The monitor and viewfinder will display the exposure range the camera will use when the exposures are bracketed. In other words, the camera will try to keep the depth of field constant by not changing the aperture to vary the exposure.
MENU > Custom Settings (5) > Bracket order > [0/–/+], [–/0/+]
Although you can shoot bracketed images to fine-tune the exposure, we prefer to use them for HDR photography. We download the bracketed exposures to our computer and use HDR software to combine them into a composite image. With tone-mapping software, we can alter the color and contrast to produce images with surreal colors. This differs from the camera’s built-in Auto HDR function, which renders a more realistic image without extreme coloration.
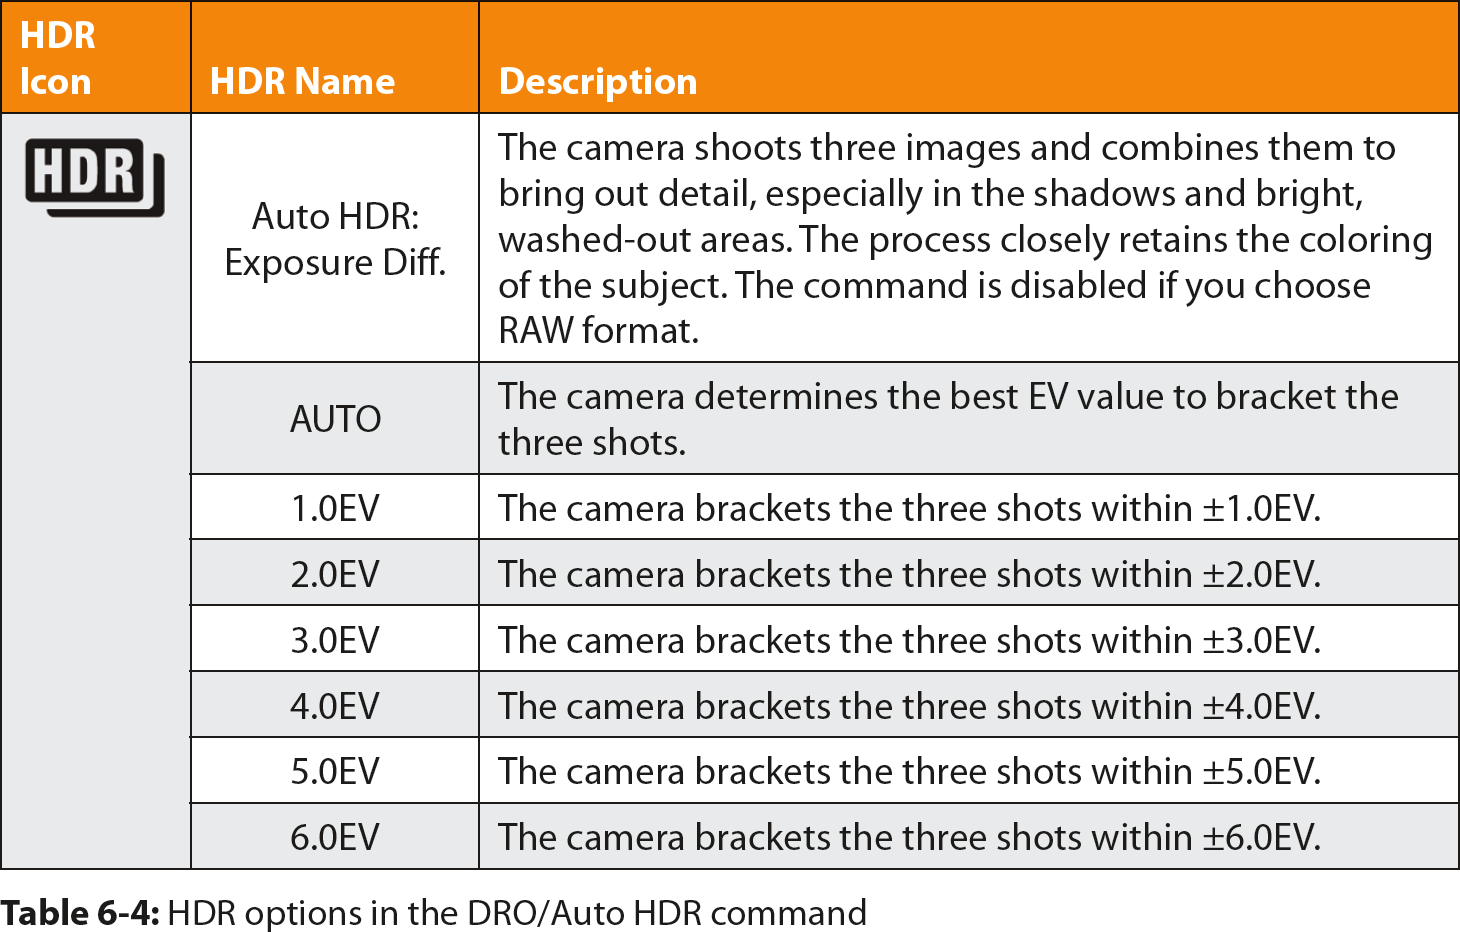
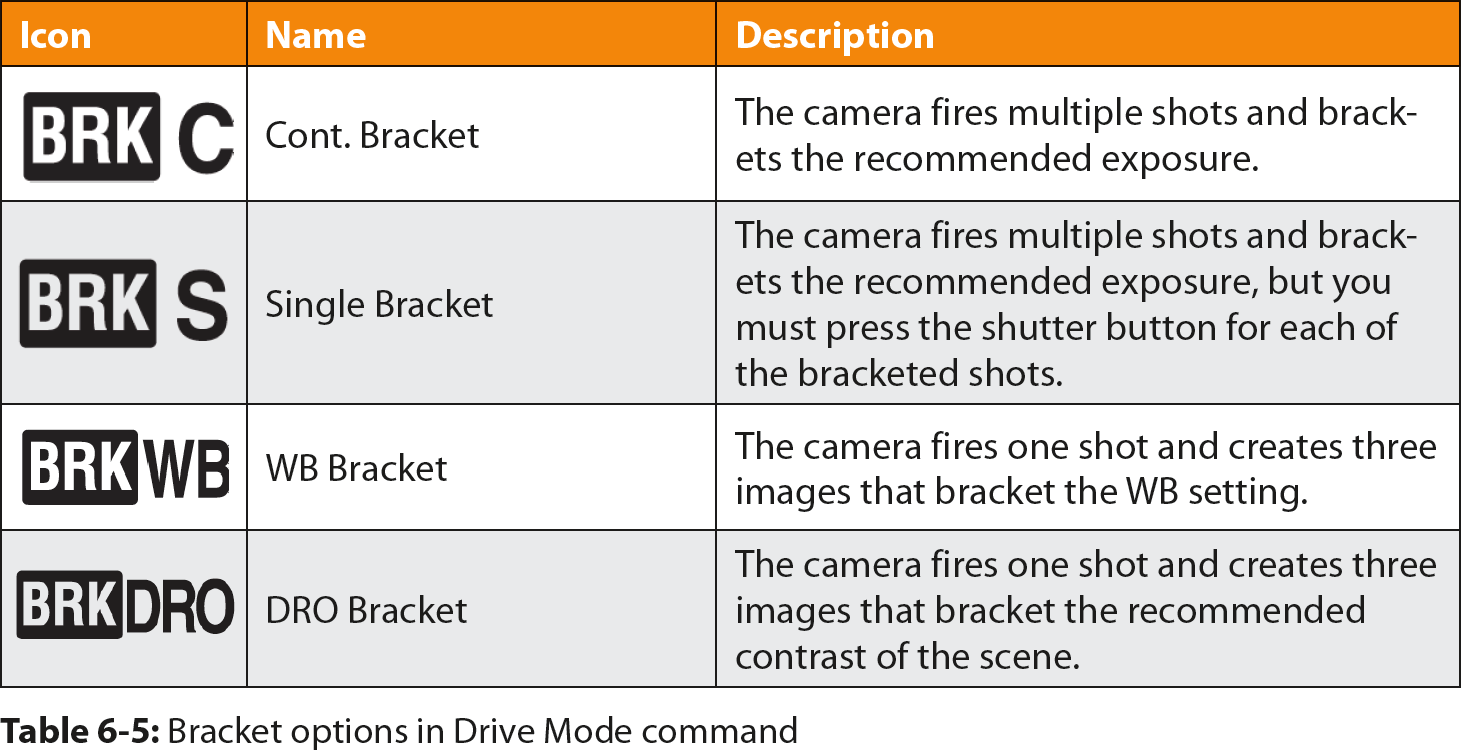
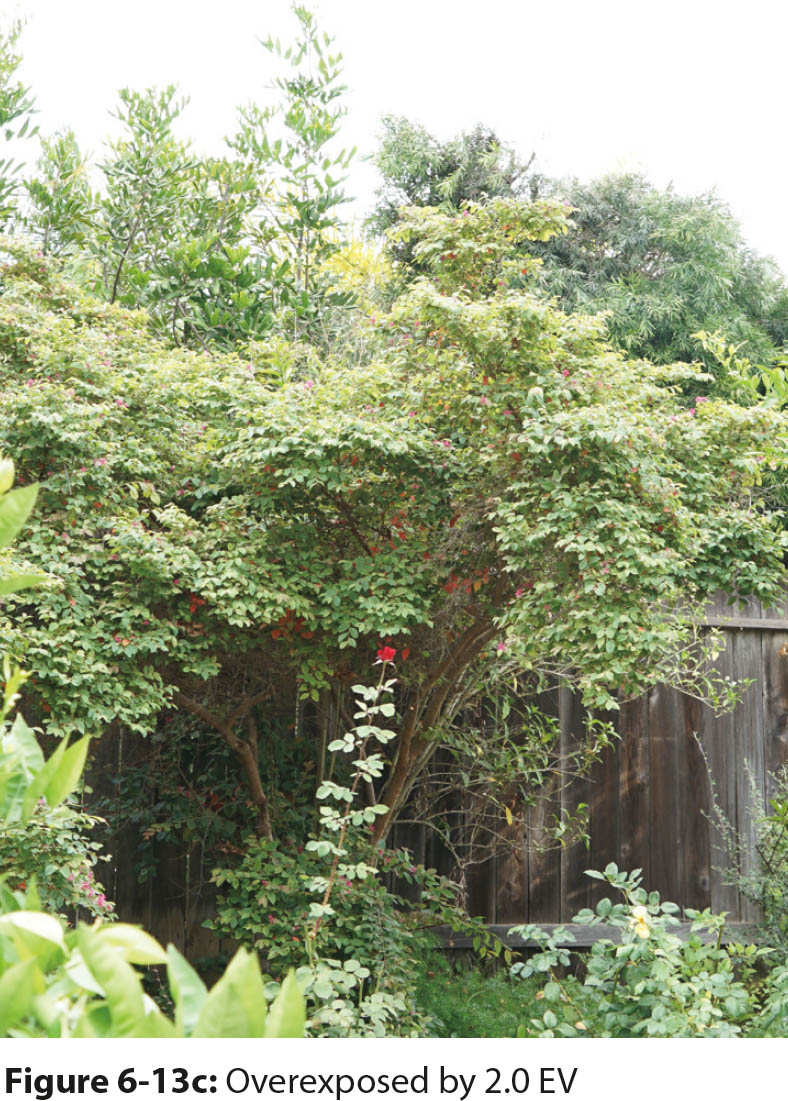
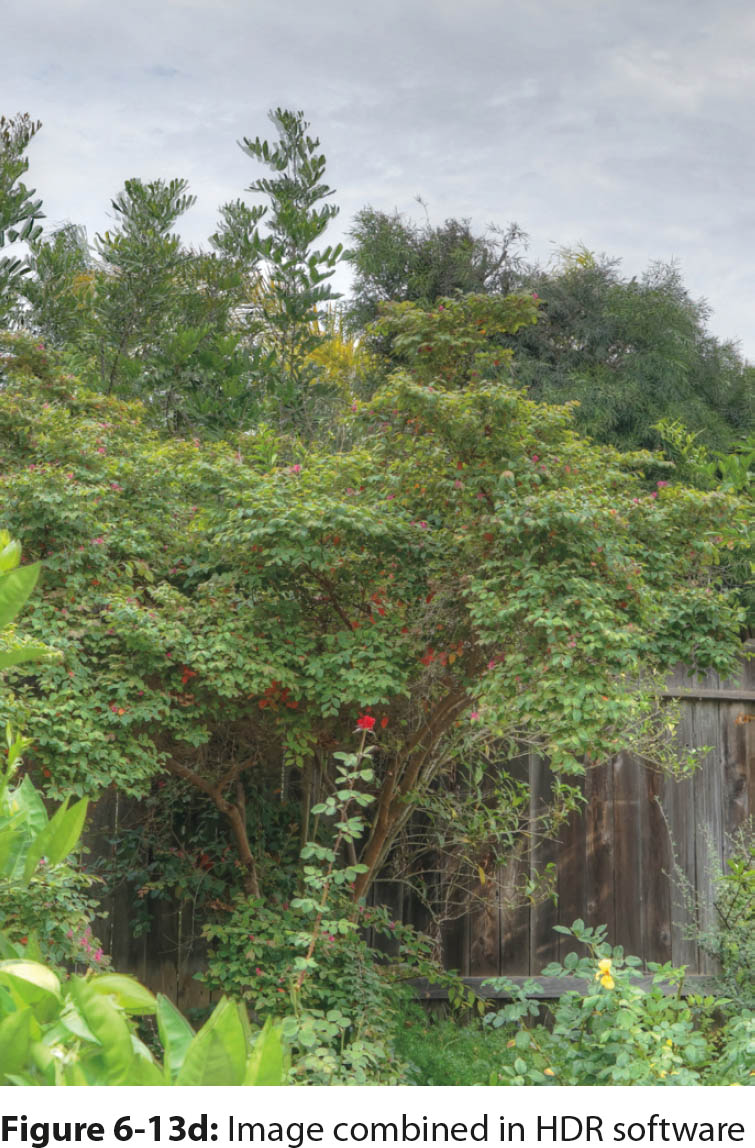
If you shoot a single exposure without bracketing, the camera exposes for the midtones in the scene; therefore, a bright sky may be overexposed, and deep shadows may be underexposed. Bracketing and HDR processing overcome these limitations. If you set the Bracket order to [0/–/+], the first shot records the optimum exposure (figure 6-13a); the second shot records detail in the highlights (figure 6-13b); and the third shot records detail in the shadows (figure 6-13c). The final composite HDR image shows detail in both the highlights and the shadows (figure 6-13d).
Another option when you bracket exposures is to use the BRK icon followed by S (Single Bracket). This is the same as Cont. Bracket, except the camera does not fire all the shots automatically; you have to press the shutter button three times to take the sequence of images.
WB Bracket and DRO Bracket
WB Bracket and DRO Bracket are unusual in that they take a single shot and create three images with adjustments to either WB or DRO, regardless of whether you shoot in RAW or JPEG. The bracket commands have two options: [Lo] and [Hi]. The former applies a small adjustment, and the latter applies a large adjustment.
When you shoot in [RAW & JPEG] with these commands, they generate six files: three RAW and three JPEG. If you open the files in Photoshop, you can see the DRO variations in the bracketed JPEG images, but no changes appear in the RAW files.
Vibration and Shutter Control
You will probably never notice this in the menu, but you can turn off the first curtain electronic shutter with the following command:
MENU > Custom Settings (4) > e-Front Curtain Shut. > [On], [Off]
The default is [On], which ensures that there is no vibration when the camera fires. This helps you capture steady pictures, which is invaluable if you work with long telephoto lenses, microscopes, or telescopes.
Sony cautions that with this shutter, some lenses (Minolta, Konica Minolta) will provide uneven illumination, and others will result in inaccurate automatic exposures. If you have this problem, you can set e-Front Curtain Shut. to [Off]. We have not had these problems.
Recommendations
Manual camera operation is for photographers who want the best possible exposure and focus. When compared to the automatic modes, manual operation is slower, but it provides advantages that are otherwise unattainable. For example, if you need an exposure longer than 30 seconds, you have to use M mode.
For our work with telephoto and closeup lenses, we rely on MF in the Focus Mode. We’ve found that when the depth of field is shallow, AF mode often fails to lock on to the correct region of the subject; instead, it focuses on a background or foreground structure.
When we shoot on assignment, we do not have time to navigate through the menu to access commands. To speed up the process, we use the Fn button and Quick Navi screen. To use the latter, make sure the [For viewfinder] data display format is checked in the DISP Button > Monitor command. This format displays all the camera settings instead of a live view of the subject. Then we can press the Fn button to transform the screen into a portal to alter most of the displayed settings.
When we shoot outdoor scenes, we turn off AWB and set WB to one of the preset values. For example, when we photograph sunsets, reds are more saturated when we set the WB to Daylight. When we work indoors with incandescent lights, we use Custom WB. We do not use the fine color adjustments; instead, we make any needed changes to RAW files on our computer.
When we shoot movies, we use [DRO Auto] to lighten dark shadows. If you decide to use an Lv option instead, experiment with different degrees of DRO and find the one that best suits your needs. For our still photography, we think the DRO Auto effect is insufficient by itself, so we dial in an Lv of [4] or [5]. We think DRO is difficult to use within the camera because you have to estimate its effect before you take a picture. We prefer lightening shadows in a picture by post-processing it in Image Data Converter or Photoshop. We can more easily obtain the effect we want during post-processing. Image Data Converter is a convenient way to create DRO-like effects on still photographs. Similarly, we prefer to use Photoshop to alter the contrast in our images. Although Photoshop does not have a DRO option, we find that we can select areas of the image and use layers to generate an image that has a satisfactory appearance.
We tested the Auto HDR function of the Sony a7 II and had very good results. However, Auto HDR images can be saved only as JPEGs, and we prefer to generate HDR images by bracketing RAW images and combining them in our computer. RAW format provides the most data for maximum post-processing capability. We merge our images in third-party software, such as Photomatix, then render the tones. We recommend that you run two tests to see which approach you prefer: (1) generate an HDR image with the camera’s Auto HDR function, and (2) generate an HDR image of the same subject in third-party software.