11Chapter 11: Making Movies

Introduction
The Sony a7 II is a hybrid recorder that is capable of taking excellent still photographs and movies. Switching between the two recording modes is as easy as pressing the movie button (figure 11-1).
This chapter introduces how to record movies and is intended for still photographers who wish to shoot movies, rather than professional videographers who need a dedicated camcorder. We’ll explain file formats and the commands you use to record movies.
There are two ways to initiate a recording. The first is by pressing the movie button with the camera options set to the same settings you last used for still photography. If you last set the shooting mode to Intelligent Auto, Superior Auto, P, A, S, or M, the camera will use that mode to shoot the movie. When you shoot movies in Intelligent Auto or Superior Auto, the camera functions as an automatic camcorder and sets the ISO value, shutter speed, and WB for you. Fortunately, the automatic modes are so reliable that you will get great-looking movies. This may be all you need to record family events.
However, when you use the P, A, S, or M shooting modes on the mode dial, you may not be pleased with the results. This is because the camera prioritizes its settings for still photography and not for movie taking. These shooting modes can be set to shutter speeds that work for still photography but are inappropriate for recording a video. Remember, a video is recorded at 30 frames per second (30 fps) or 60 frames per second (60 fps). This means that the slowest shutter speed that can be used is 1/30 second or 1/60 second, respectively. When taking still photographs in dim light, the camera will set its aperture wide open and adjust its shutter speed for long exposures. When you press the movie button the camera will maintain the wide open aperture but will not be able to use long shutter speeds because of its fps rate. Your settings will result in a well-exposed still photograph but an underexposed video.
The second method to initiate a movie recording is to set the mode dial to the Movie icon. When you do this, the camera cannot be used for still photography; it can only record videos. In this case, to select the shooting mode you will press the Fn button and then select a Movie shooting mode—P, A, S, or M—on the screen. Shooting in Movie mode and selecting P, A, S, or M in this manner is advantageous because it only allows you to use shutter speeds fast enough for recording videos. Under dim light conditions, you cannot use overly long exposures. This ensures you are working with a shutter speed that is fast enough for recording a video. In contrast, when you set the mode dial to P, A, S, or M and then press the movie button, the camera will attempt to use values prioritized for still photography.
Video versus Still Photography
One thing that surprises many still photographers is the amount of preparation needed to take a high-quality movie. Because camera movement can alter the frame of the scene within the borders of the viewfinder, it is not ideal to handhold your camera while you record a scene. Hand and body tremors jiggle the camera, and the recorded scene will have awkward changes to the framing. To keep a steady composition, you should mount your camera on a tripod. Positioning your tripod and camera requires planning.
Also, lighting is a dynamic attribute in a movie. As the subject or scene changes, the ratio of highlights to shadows will change. You must make sure these changes do not obscure subjects within the scene, although it may be unavoidable. If the framed image has extremely bright or dark areas, you may need to sacrifice details in either the highlights or the shadows. You could use the special camera commands DRO or Picture Profile (discussed later) to bring out shadow detail. Consider the mood you intend to create. For example, dark shadows can add an ominous feeling to a video. You may wish to underexpose a sequence and use the Creative Style [Black & White] option to make a film noir.
You need to decide what emotions you want to evoke. If you want to create a sense of action and tension, you may decide not to use a steady camera support. You can see the effect in some professionally made movies when a handheld camera is used to follow the action. The subject appears to bounce around in the frame, which generates a sense of tension-filled action. This technique was used in Saving Private Ryan to show the chaos and action when US troops landed on Omaha Beach.
Other recordings benefit from having a stable camera platform that keeps the subject centered within the frame. If the subject moves—perhaps a man is walking outdoors—aim your camera and follow the man so he stays centered in the frame.
You can use accessories to reduce jittery camera movements when you record a movie. Some accessories can cost thousands of dollars because they use gyroscopes to maintain the position of the camera. Others are simpler and less expensive, such as a Steadicam, which is sold by Tiffen. In either case, the goal is to avoid random, abrupt changes in framing when you follow a moving subject. For still photography, a tripod is the most common tool for stabilizing a camera, and you can use a tripod to improve your videos as well. Preplanning is important because it is difficult to correct errors after you shoot a movie, which is unlike still photography, where you have some latitude to adjust your pictures during post-processing.
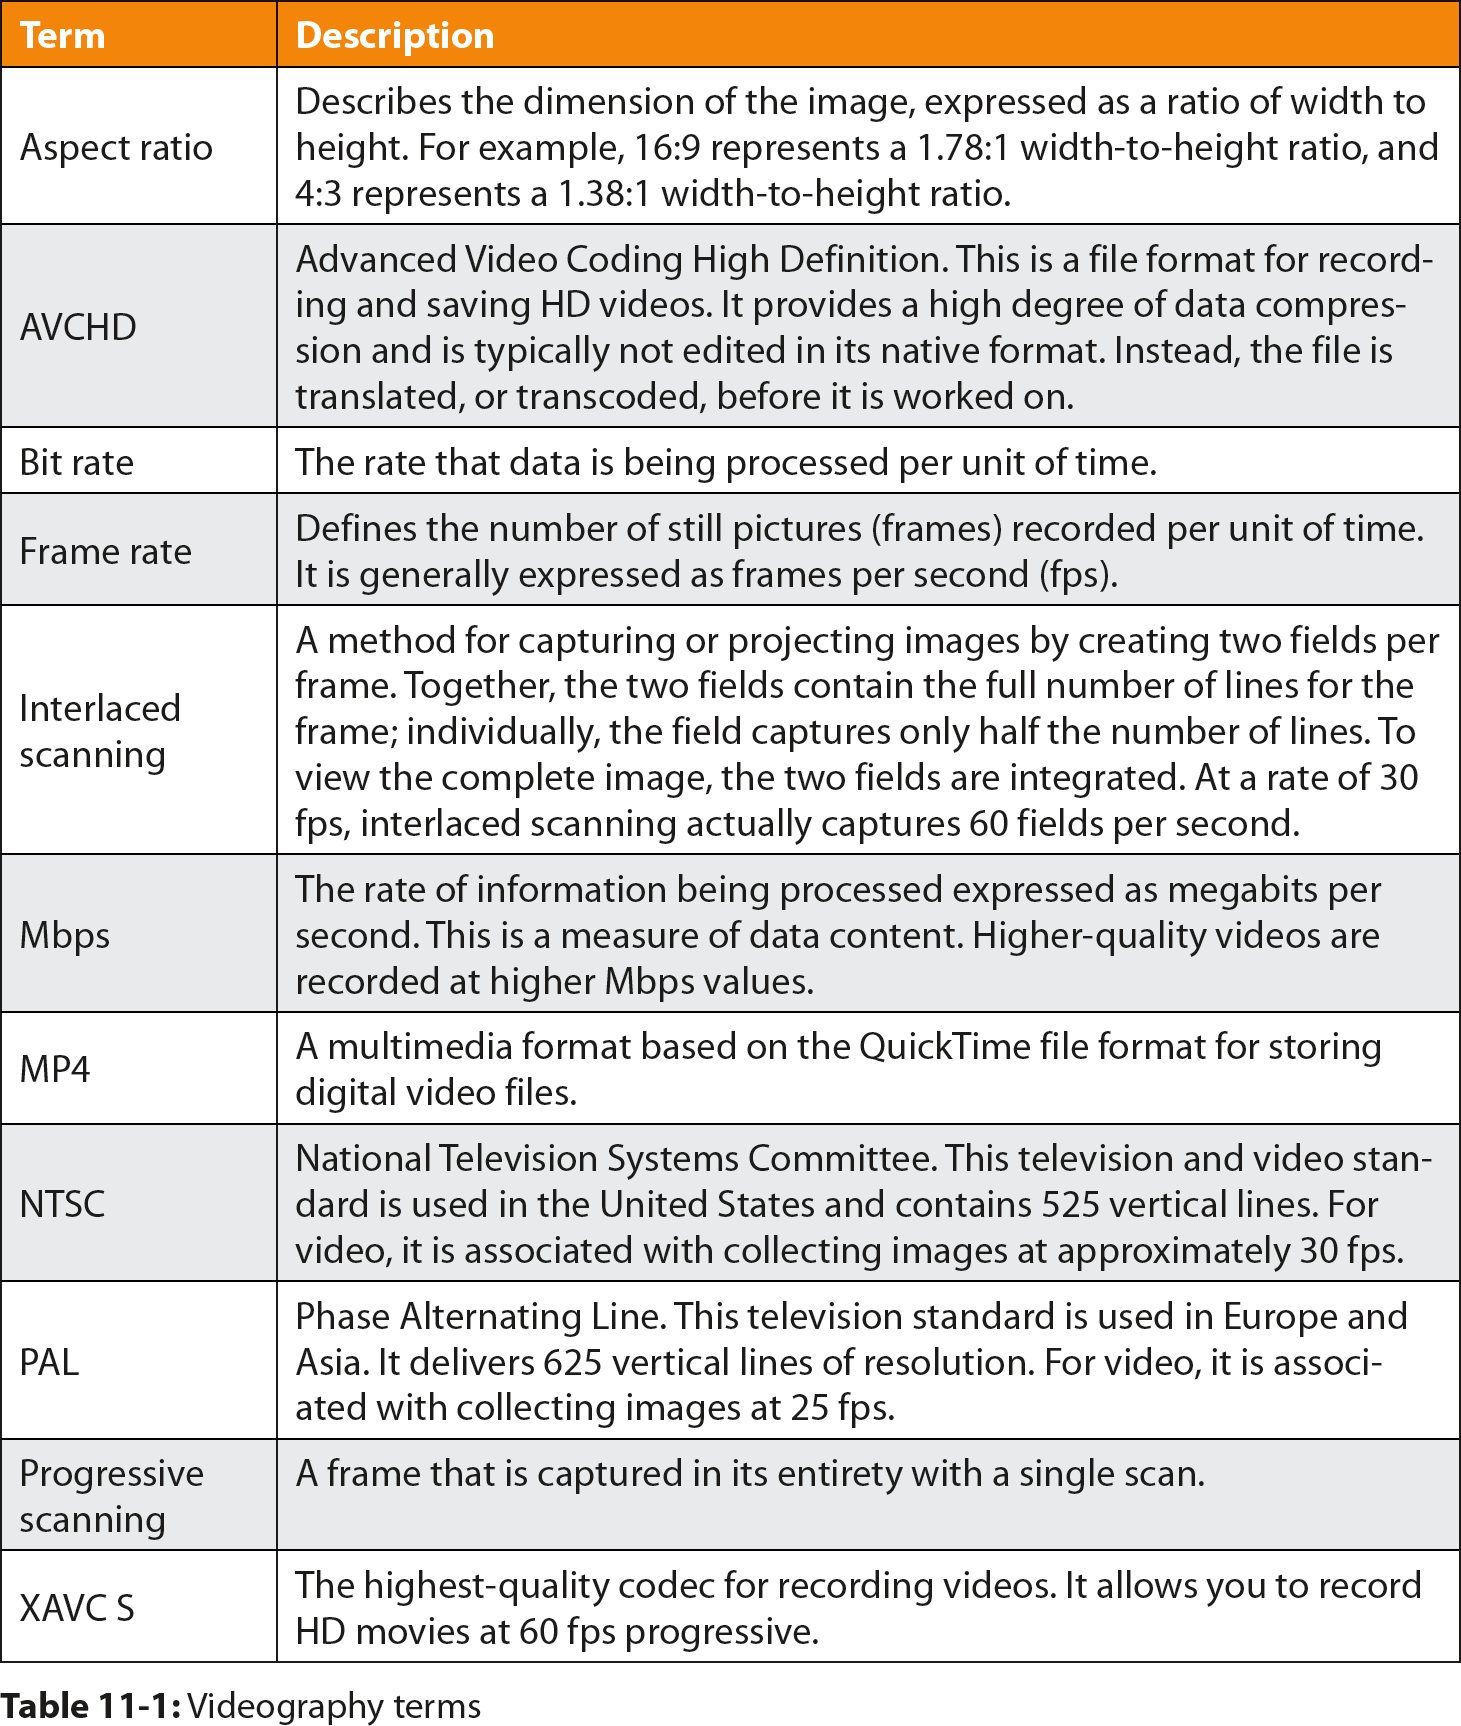
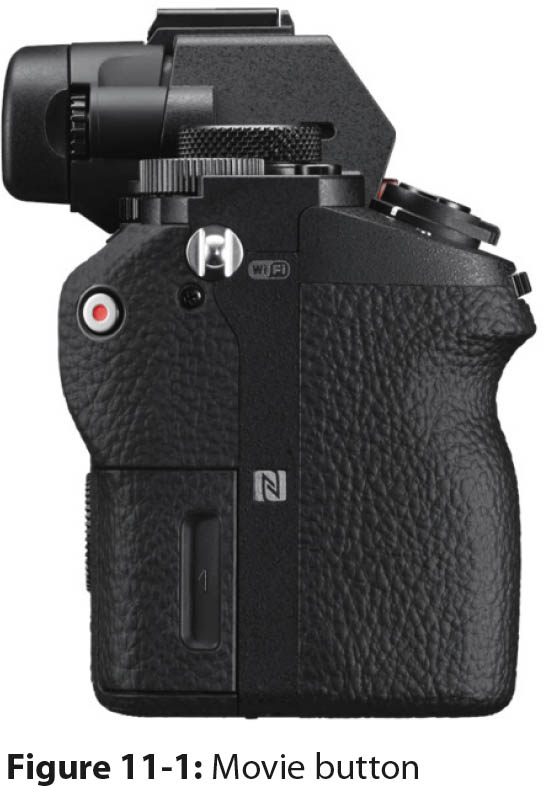
Table 11-1 provides definitions for many terms that are commonly used in videography. You can refer to the table while you read this chapter.
Making movies requires a different mindset than still photography. In the latter, you need to be concerned about recording only an instant in time. In the former, you must always remember that you are shooting a sequence of images (frames) that span a prolonged interval. Distractions that are of little importance in still images can be annoying in a movie. We mentioned that it can be distracting to have the subject bounce around in a movie. The same is true when there are sudden changes in the brightness of a scene; if you rotate the exposure compensation dial, the continuity of the video is disrupted. It can also be distracting if you adjust the focus while you shoot a movie.
Frame Rate versus Shutter Speed
When you shoot videos, you need to become familiar with the camera frame rate. This setting can vary from 24 fps to 60 fps, and you need to decide which frame rate to use. Movement appears smoother at higher frames rates, and a higher frame rate gives you greater versatility during post-production. You can manipulate the frame rate for special effects, like slow motion, where movement looks slower than in real time. To shoot in slow motion, you record at 60 fps and play back at 30 fps, which reduces the apparent movement by 50 percent. Or, if an actor has a hard time holding a steady gaze, you can record at 60 fps and play back a portion of the video at 30 fps; a recording of two seconds will last four seconds during playback.
You may wonder why playback devices are not standardized to a single frame rate. In part, the flexibility reflects the capabilities of modern technology and allows you to explore how playback rates affect aesthetics. When played back at 24 fps, a scene is considered cinematic because this is the frame rate that is typically used by theaters to show feature films. A playback rate of 30 fps looks more like TV because this is the frame rate used for broadcast recordings. A playback rate of 60 fps makes a scene look as though it was recorded with the most advanced video technology. This has become a popular way for directors to create new looks for their films. Peter Jackson’s movie The Hobbit was shown at 48 fps, and many reviewers noted the effect.
In summary, there is no best playback frame rate. It is an artistic decision that you must make. Although it may seem logical to always record at 60 fps, it may not be practical because it will take up more space on your memory card. If you want to burn standard DVDs of your movie, PlayMemories Home cannot burn a movie recorded at 60 fps.
NTSC and PAL
The number of frames per second your camera uses depends on where you purchased it. The standard in the United States, NTSC, is 30 fps; the standard in Europe, Asia, and other countries, PAL, is 25 fps. As a matter of convenience and to avoid confusion, we use the NTSC standard in this book. If you purchased your camera in the United States, 60i will be displayed on the bottom of it, and it cannot be switched to the PAL standard. If your camera says 50i on the bottom, it is compatible with PAL, and it can be switched to the NTSC standard.
There is an interrelationship between shutter speed and frame rate. The most obvious is how long of a shutter speed you can use. If you are recording a sequence of shots at 30 fps, you cannot use a shutter speed longer than 1/30 second, which limits your ability to work in low-light situations. To get around this, your Sony camera has a unique feature that allows you to record with a shutter speed longer than 1/30 second. This feature is available only if you use S or M Movie modes. We will describe this setting later when we discuss Movie modes for setting the exposure. In A or P Movie modes, you cannot use longer shutter speeds.
Another concern is how short a shutter speed you can use. If it is too short, movement looks jerky or saltatory. Although this is generally undesirable, you can use it to create an effect in action sequences when you want the audience to be caught up in the action. The effect is created with a shutter speed of 1/1000 second.
If you want movement to look fluid, smooth, and normal, use a shutter speed of 1/60 second (for 30 fps) or 1/125 second (for 60 fps). Fluidity is created when individual frames are recorded and the moving edges are blurred. In contrast, when you use a fast shutter speed, say 1/1000 second, the individual frames record the edges of a moving object as a sharp, distinct border. When the movie is played back, the sharp edges create a strobe-like effect.
Special Note about Shutter Speeds
This chapter describes how to set the shutter speed so motion appears normal. However, in some cases you may decide to break the rules. In surveillance or scientific work, you may want to see all detail in individual frames, so you would use a fast shutter speed to freeze motion. For example, in surveillance work you may wish to read the license plate of a speeding car. To get the most out of your camera, you should learn to use it in M Movie mode so you can set the aperture and the shutter speed separately.
You may read that some videographers set their shutter speed to 180 degrees. This rule of thumb creates the correct degree of blur at a given frame rate. You set your shutter speed to 1 ÷ (2 x fps). For example, if you shoot at 60 fps, use the shutter speed closest to 1/120 second.
Slow shutter speeds can be problematic when you work in bright daylight because you may want to create a shallow depth of field by using a large aperture, such as f/1.4. Unfortunately, the nominal exposure at ISO 100 is f/16 at 1/100 second. The problem is there’s too much light.
The solution is to attenuate the light with neutral-density filters so you can use the larger aperture. Professional camcorders have built-in neutral-density filters for this purpose. However, for your Sony a7 II, you’ll have to purchase filters and screw them to the front of the lens. A more convenient approach is to use a variable neutral-density filter. You screw the filter onto the lens then rotate its adjustment ring to vary how much light reaches the sensor. If you are an enthusiastic videographer, we recommend that you get one of these filters. Be sure to get one that is made by a reputable filter company, such as Tiffen, Hoya, or B+W. A variable neutral-density filter is essential if you want to limit the depth of field with a larger aperture.
Neutral-Density Filters
You can buy variable neutral-density filters, or you can buy one or more single neutral-density filters that each has a specific optical density. If you buy multiple single filters, you screw the one you want to use onto your lens; if you need to make a change, you unscrew it and mount a different filter. With a variable filter, you rotate it to change its optical density. Singles filters are not convenient because you have to switch filters, or stack them, to get the density you want. They can also be expensive because you may need several filters. Variable filters are more flexible because you can dial in the density you need. Variable filters are made of two polarizer filters that are mounted in a rotating ring. When you rotate one filter, it begins to alter the intensity of light that passes through the second filter. You can attenuate the light from 2 to 8 f-stops.
Neutral-density filters are useful for both videos and still photography. Many photographers attenuate the light so they can take one-second exposures of running water to blur movement and create an ethereal effect. Inexpensive neutral-density filters can cause a color shift, but this defect is minimized with more expensive filters. We are happy with the performance of Tiffen filters. Filters made by Hoya, B+W, Singh-Ray, and Heliopan also perform well.
Choosing a File Format
You can choose from three movie file formats: AVCHD, MP4, and XAVC S (table 11-2). AVCHD and MP4 are available on all Sony a7 series cameras, but XAVC S is new and made its first appearance in the a7S. This will likely become a standard feature in future a7 series cameras since it has been added as a menu command in the a7 II and a7R II cameras. XAVC S provides the highest quality for both sound and video recording and is the best format for video editing. It provides the maximum flexibility in frame rate; you can use 24, 30, or 60 fps. In addition, it provides superior encoding on the audio track to produce superior sound. Its major disadvantage is that because it produces such high quality, you need to use an SDXC card with a capacity of at least 64 GB (U1 or faster). If you are serious about shooting videos and want to edit your movies, this file format is the best choice. However, when you record videos in this format, you cannot burn them to DVDs or Blu-ray disks with the Sony PlayMemories Home software.
If you want to create optical disks, you will need to save the files as AVCHD. This allows PlayMemories Home to create a Blu-ray disk, an AVCHD recording disk, or a DVD-Video disk.
If you want to use your movie on your computer or attach it to an email, record and save the file in MP4 format. This format is useful when you want to work quickly with a video file on your computer and don’t want to purchase complex, expensive video editing software. This file format can be opened and manipulated with QuickTime, an inexpensive software package for both PC and Mac. QuickTime allows you to eliminate unwanted portions of a video and splice clips together to make longer videos.
You can record MP4 files at the same time as AVCHD or XAVC S formats by using the following command:
MENU > Camera Settings (2) > Dual Video REC > [On]
MP4 files are smaller than AVCHD or XAVC S files, so they are easier and faster to use on a computer. It is easier to upload an MP4 file than an AVCHD or XAVC S file to a social media site. Dual Video REC creates a copy of the video in MP4 format so you can use your camera’s Wi-Fi capability to upload the file.
Although this is a convenient feature, we rarely take advantage of it. We prefer not to tie up our camera to upload files to social media sites. Instead, we transfer our files to our computer and use it to upload files.
To select the file format for your movies, use the following command:
MENU > Camera Settings (2) > File Format > [XAVC S], [AVCHD], [MP4]
Keep in mind that you cannot set movie commands with the Quick Navi screen or the Fn button. You must use the camera menu.
You can download AVCHD and XAVC S movies from your camera to your computer with Sony PlayMemories Home software or third-party software like iMovie or Final Cut Pro. PlayMemories Home includes options to cut, copy, and delete sections of a movie. You can also merge the best clips to make a longer movie with a coherent theme. When you are done, you can save your AVCHD movies to a DVD or a Blu-ray disk, but you cannot save your XAVC S movies to either format.
MP4 files are much smaller and easier to work with. You can copy them with your computer operating system to your computer hard drive then edit them in QuickTime Pro, which costs $29.95 and is available for both PCs and Macs. QuickTime Pro is an inexpensive tool sold by Apple for editing movies. It provides additional controls for the soundtrack (volume, balance, bass, and treble) and video stream (brightness, color, contrast, and tint). When you are satisfied with your movie, you can resize the file so it can be emailed.
Compared to MP4 files, AVCHD and XAVC S files provide higher fidelity and potentially smoother movement. However, they make greater demands on your computer and software. Although you can work with these files on an older computer, a newer computer with plenty of RAM and a large, fast hard drive makes it more enjoyable. If you decide to work with these file types, you will eventually want to buy a more capable software package. We have edited our AVCHD files with iMovie (Mac) and PlayMemories Home (Windows). Both are basic editors. PlayMemories Home comes free with your camera, and Apple users can download iMovie for $15. If you decide to work with a higher-end movie editor, such as Final Cut Pro or Adobe Premier Pro CC (Windows or Mac), you will have to pay considerably more: $300 and $240 (for a one-year subscription), respectively.
Record Setting for AVCHD and XAVC S
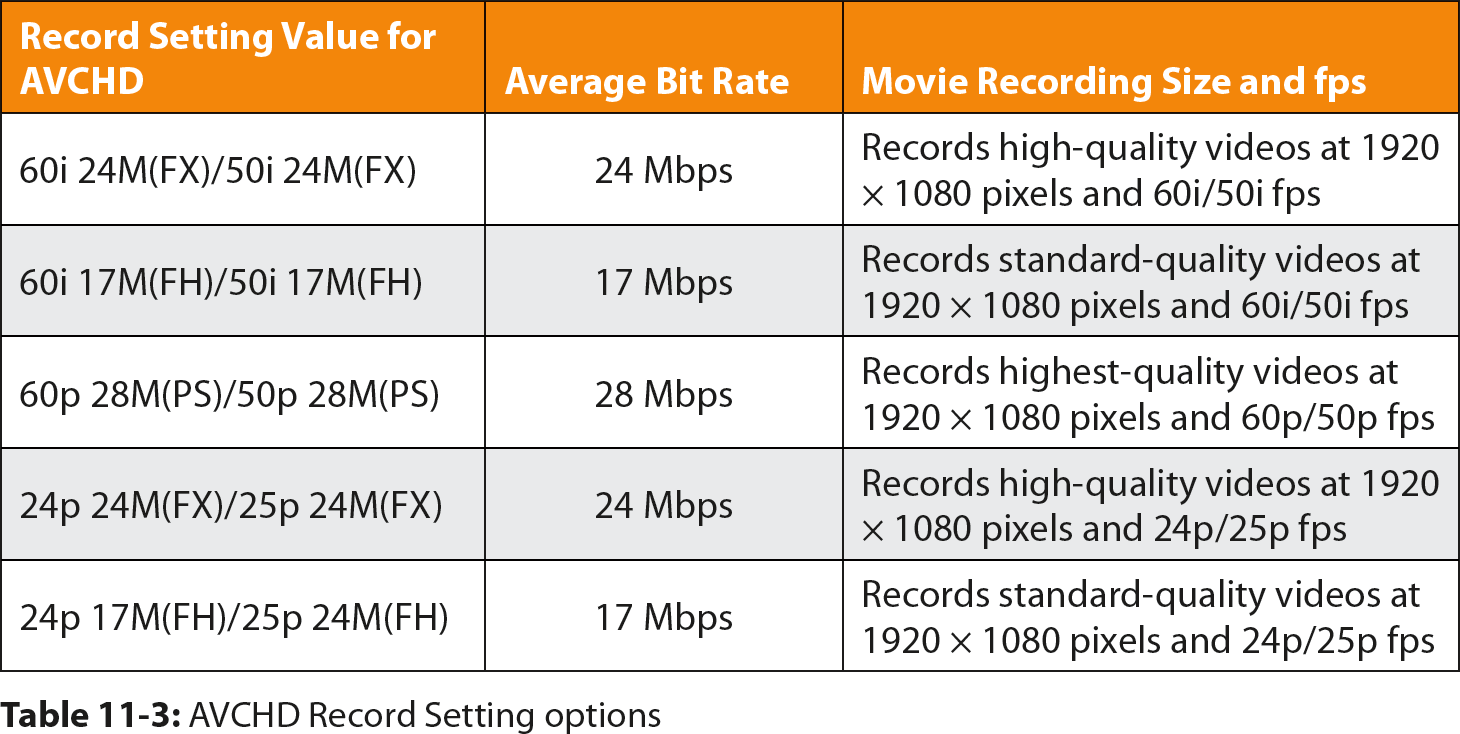
After you select a movie file type, you have to fine-tune its settings. We already mentioned that you have to choose the frame rate, and you also have to choose a bit rate. In addition, for AVCHD, you need to choose either interlaced or progressive scan mode. These settings are located at the following command:
MENU > Camera Settings (2) > Record Setting > [command option from table 11-3]
Bit Rate and Frame Rate
AVCHD and MP4 files are highly compressed, and you can control the degree of compression. The amount of data that is preserved is determined by how much data is processed—more data means more fine detail. In computing, the speed of data processing is called bit rate and is expressed in bits per second. In a movie, so much information is processed that you need to express the data in terms of millions of bits per second, or megabits per second (Mbps). The Sony a7 II processes movies from 50 Mbps (highest quality) to 3 Mbps (lowest quality). The settings available for AVCHD files are shown in table 11-3.
These data rates are influenced by the frame rates you choose. For example, XAVC S files that are recorded at the highest frame rate, 60 fps, generate the greatest amount of data and have the highest Mbps value. MP4 files are created with the lowest frame rate and bit rate.
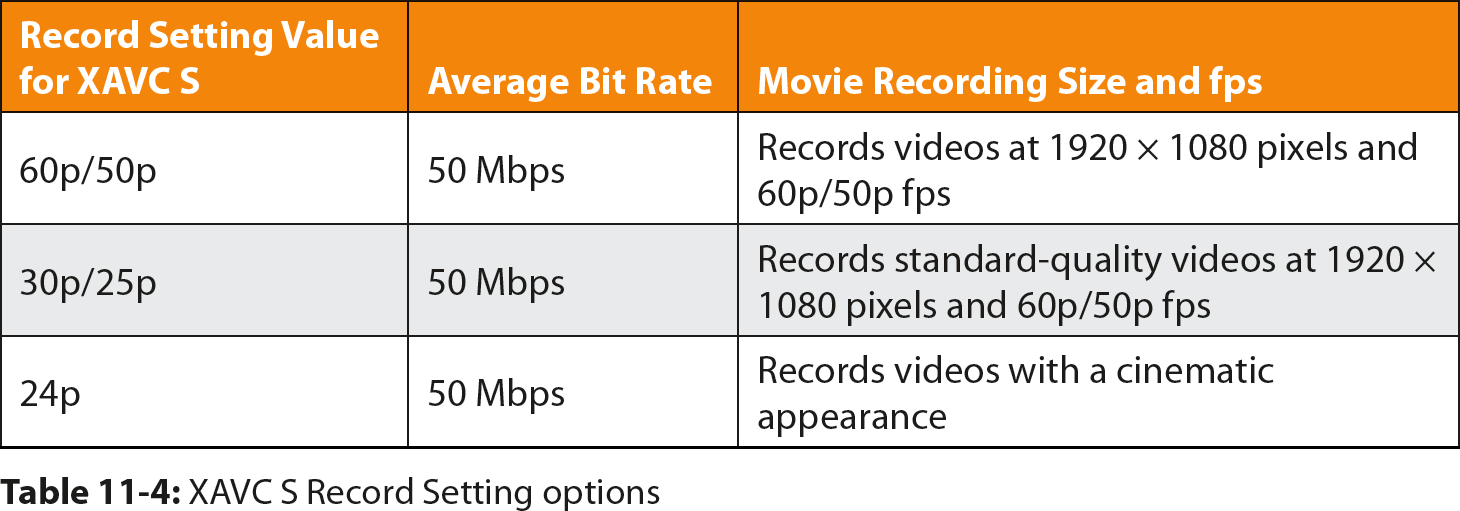
The XAVC S file format does not vary the Mbps when you change the Record Setting. Instead, it always records at 50 Mbps. When you change the setting, you effectively choose the fps, which can be 60, 30, or 24 fps (table 11-4).
Which file format and setting should you choose? There is no clear answer because it depends on what you plan to do with your movies. If you want to view them directly on your TV or make them into playable DVDs, select AVCHD and use the highest recording quality your playback device will support. Also, the highest values are useful for video editing.
If you decide to use PlayMemories Home and burn your movies to a DVD, you must record at 24p 17 Mbps or 60i 17 Mbps. For Blu-ray, you can take advantage of your camera’s capabilities and record with the higher-quality settings.
MP4 Record Setting Command
When you select the MP4 file format, you will have two Record Setting command options to choose from. The one you select depends on the number of pixels you wish to display (table 11-5).
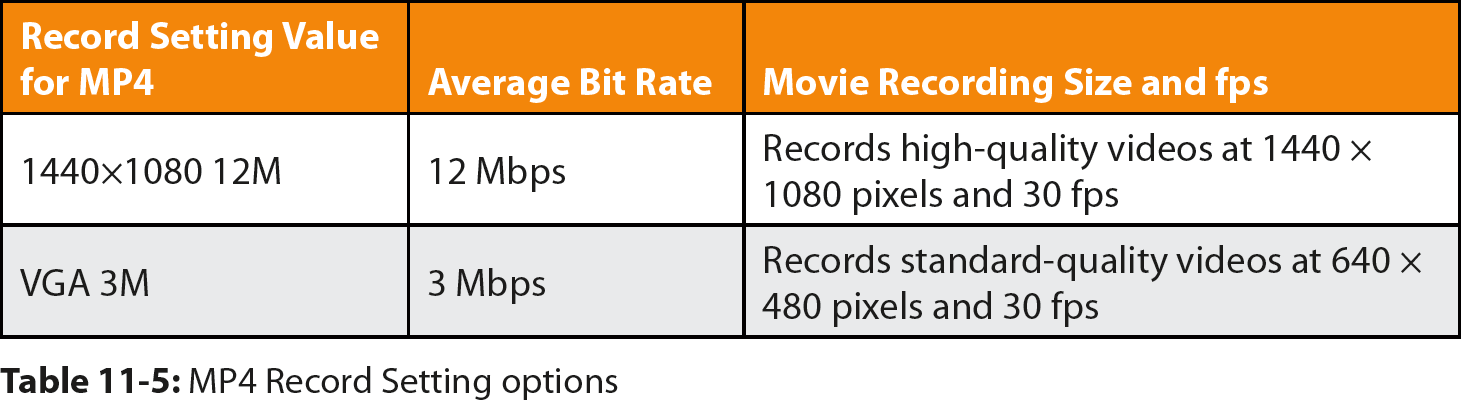
MENU > Camera Settings (2) > Record Setting > [1440x1080 12M], [VGA 3M]
The first option, [1440x1080 12M], is straightforward; the pixel array will be 1440 x 1080 pixels. The second option, [VGA 3M], is a bit cryptic. The letters VGA refer to an old monitor resolution standard, Video Graphics Array, which uses a 640 x 480 pixel array. VGA provides a much smaller movie frame and generates a small movie file that can be emailed.
Interlaced Scanning
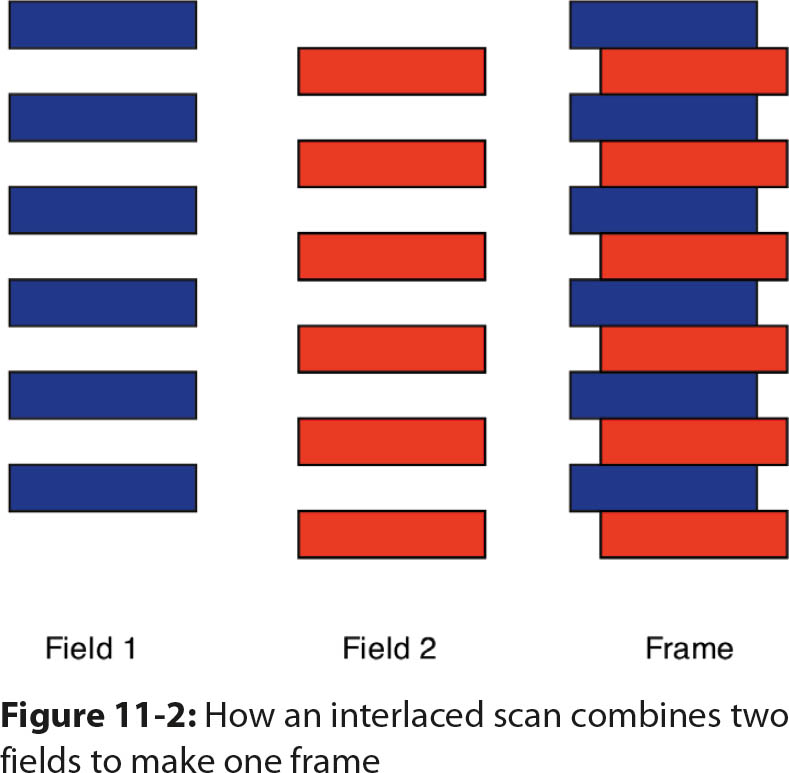
Due to technological limitations, older analog cameras and displays for broadcast television formed images with interlaced (i) scanning. To display images sequentially and convey smooth movement, a television camera used two fields to make a single frame. The interlaced scanning method is still used and is an option on the Sony a7 II.
With interlaced scanning, a recording device with a spatial resolution of 600 horizontal lines collects only 300 lines in one scan, which is called a field. The first field starts with the top line and then collects every other line to create a field with 300 horizontal lines. Then the sensor collects the remaining 300 lines for the second field. The two fields are combined to yield a single frame of 600 lines (figure 11-2). In essence, to display a movie at 30 fps, a camera or television has to collect 60 fields per second; that is, two sets of 30 fields per second that are interlaced to form 30 frames per second.
If you see the letter i with an fps number in the viewfinder or on the monitor, it indicates interlaced scanning and means that two fields were combined (interlaced) to form a single frame. If one of the fields recorded a moving subject, its edges will display an offset. This blurs the edges of the moving subject, but the human eye perceives that the motion is smooth.
Progressive Scanning
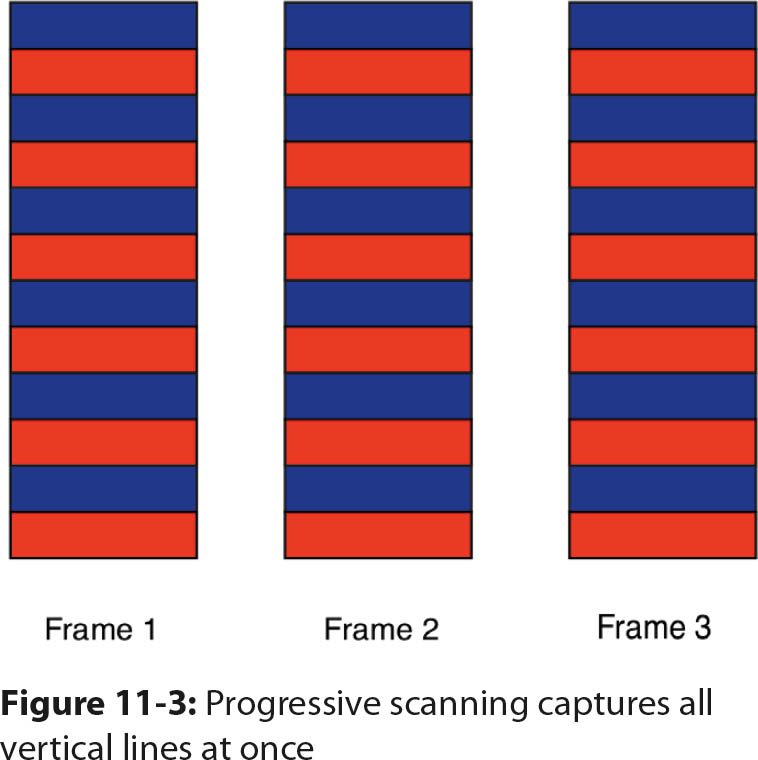
If you see the letter p with an fps number in the viewfinder or on the monitor, it indicates progressive scanning, which is the modern way to record and play back movies. All computer monitors use progressive scanning to display images. Newer video cameras, such as the Sony a7 II, can use progressive scanning to record videos. The a7 II’s XAVC S files are recorded using progressive scanning exclusively.
Progressive scanning is pretty straightforward. Basically, the movie camera and the display device collect all the vertical lines of a frame in sequence and display them all at once (figure 11-3). Moving subjects have sharper edges. If you look at a single frame, you will see that it provides the highest definition for regions that move from frame to frame. Progressive scanning is preferred if you plan to edit your movies.
Progressive scanning is considered the ultimate in image quality. However, it has one peculiarity. Because of the sharpness of the individual images, movement during playback may not be perceived to flow as smoothly as with interlaced scanning. This is most apparent when you record at 24 fps with a fast shutter speed. If you look at the shutter speeds you used when you recorded movies in Intelligent Auto, you can see that the camera tries to keep the shutter speed duration longer than 1/125 second when you shoot at 60 fps. This is to ensure smooth movement from frame to frame during playback. If you select a shutter speed of 1/1000 second, the motion looks strobe-like, and a single frame of the movie will show a subject with high definition in the moving parts. This can be desirable when you record a fast-paced sports event and you decide to replay a clip in slow motion.
Should you use interlaced or progressive scanning? For video editing, it is tempting to use the highest quality mode. However, the slight blurring of moving edges with interlaced scanning helps hide the transition from frame to frame. The overall perception of movement looks better. In contrast, at the level of an individual frame, an image obtained with progressive scanning is sharper. For video editing, we suggest you use progressive scanning. If you will simply view your movie and are not interested in freezing frames to study fine details, you will probably be satisfied with interlaced scanning. Experiment with each option and decide which you prefer.
The following are some general guidelines to help you choose settings:
• For movie editing, choose XAVC S file format. In the Record Setting command, you can select one of three fps options: 60p, 30p, or 24p.
• For editing AVCHD files on your computer, use the highest movie quality your software or device can read. If shooting movies is new to you, make sure that your software can handle 60p before you use this option. Sony uses PS, FX, and FD to specify how many Mbps are encoded in AVCHD format: PS is 28 Mbps, FX is 24 Mbps, and FD is 17 Mbps.
• To burn a movie to a DVD, choose the lowest quality settings (24p 17M, 60i 17M). Use any Record Setting option that has the letters FH.
• To burn a movie to a Blu-ray disk, choose the medium (60i 24M) to high (60p 28M or 24p 24M) quality settings. PlayMemories Home will allow you to burn these disks. Use any Record Setting option that has the letters PS, FX, or FH.
• To play a movie on an HDTV, find out what standard your TV uses and select the Record Setting option based on what the HDTV can accept.
Putting It All Together
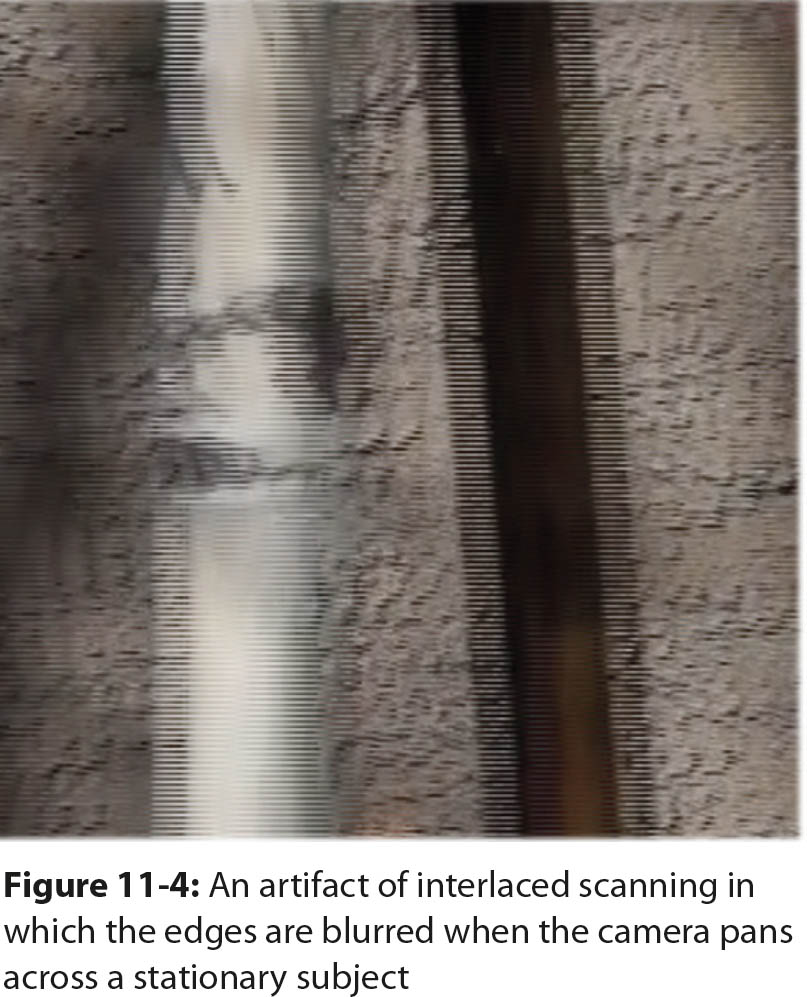
The File Format and Record Setting are two of the most complicated a7 II commands. Most of these options seem cryptic to still photographers, but the selections can be summarized by their bit rates as displayed earlier in tables 11-3 and 11-4. The maximum quality is 50 Mbps, [60p 50M], which records at 60 fps in progressive mode with 50 Mbps of data. The individual frames will display sharper edges on moving objects when they are taken in 60p. An interlaced scan blurs the edges of a moving subject, as you can see in figure 11-4, where the shadow of a tree was recorded while we panned the scene. Remember that i stands for interlaced scanning, where two fields are combined to form a single frame.
The 24p frame rate is referred to as cinematic because it is used in theatrical motion pictures. If the subjects are rapidly moving, such as at a sporting event, we do not recommend this frame rate. You will get better results with 60p fps, which depicts rapid motion more realistically because it gathers more images. At 24p fps, you may find that the playback looks jittery. This may be even more apparent if you select a very fast shutter speed that freezes motion in individual frames. However, for an artistic rendition of a scene, and to present a movie that looks like a Hollywood director created it, try 24p.
Additional Movie Controls
Some additional controls are available when you record movies. The first deals with recording sound. The default configuration for the microphone is [On]. Because audio can be removed later during post-production, you can capture the audio then decide later whether or not to keep it, but if you would rather turn it off, use the following command:
MENU > Camera Settings (8) > Audio Recording > [On], [Off]
If you are recording on a windy day, the camera microphone can pick up the sound of the wind. To reduce this annoyance, you can use the wind noise reduction feature:
MENU > Camera Settings (8) > Wind Noise Reduct. > [On], [Off]
We recommend selecting [Off] for Wind Noise Reduct. when you shoot indoors. Turn it [On] only when you shoot outdoors and there is noticeable wind noise. Otherwise, the quality of your audio recording may be compromised.
You can also adjust the sound level of your movie. Depending on your data display format settings, you may have noticed the horizontal Ch1 and Ch2 audio recording scales displayed on the left side of the screen (figure 11-5). You will see these audio recording scales under two conditions: first, when you press the movie button and the mode dial is set to AUTO, P, A, S, or M; and second, when you turn the mode dial to Movie. The two scales reflect the input from two stereo microphones that are located within the camera body. You can adjust their recording level with the Audio Rec Level command:
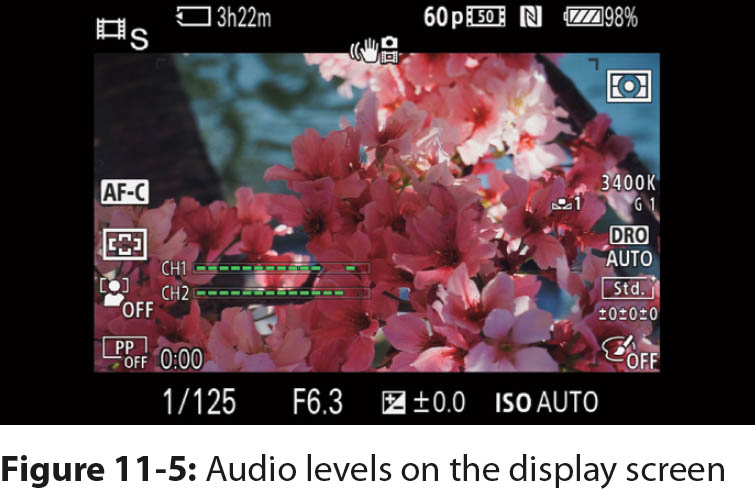
MENU > Camera Settings (8) > Audio Rec Level > [a value from 0–31]
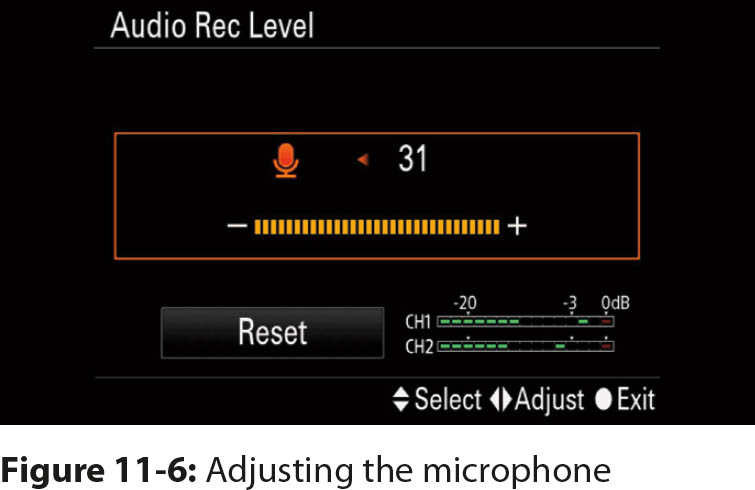
You can also change the audio recording level by altering the sensitivity of the microphone. We prefer to do this before we record a video, so we turn the mode dial to Movie. Inspect the audiometers in Live View and see whether the green bars extend to the 0 dB (decibels) mark (figure 11-6). If they don’t, use the Audio Rec Level command to make the adjustment. When you activate this command you will see a screen with an orange bar that represents the gain of the amplifier (figure 11-6). Press the right and left buttons to increase or decrease the gain and watch the audiometers. The goal is to use as little gain as possible to reach a recording level of 0 dB. Higher values will increase the sound of electronic hiss.
Framing and Starting the Movie
To start recording a movie, you press the movie button (figure 11-1). If the mode dial is set to P, A, S, M, or AUTO, the screen will change. This is because for still photography the Sony a7 II Live View is set to a 3:2 aspect ratio, and the aspect ratio for recording a movie is 16:9. This can be disconcerting, so you can set the mode dial to Movie to generate an accurate preview screen with borders that clearly delineate the edges of the movie frame.
Improving Sound in Your Movie
You can record sound directly with your a7 II. It has a pair of built-in microphones that record stereo sound, but you may be disappointed in the quality of the audio. To improve this, we first recommend that you buy either earphones or earbuds and plug them into the headphone jack on the left side of the camera so you can hear how the camera records sound while you shoot a movie. This will help you set the sensitivity of the microphone. You can also hear how much the wind affects your recording and if the wind noise reduction command improves the recording. In addition, you can monitor if camera and lens sounds are picked up on the audio track.
If you must record accurate and clear sound, you may need an external microphone. It will do a better job of recording sound. Some units, such as the Sony stereo microphone model ECM-XYST1M, are so compact that they will mount on the a7 II hot shoe. The Sony microphone has electrical contacts in its foot, and when it is mounted in the hot shoe the audio signal is passed directly to the camera. Some third-party microphones require a cable that must be plugged into the socket on the side of the camera.
After you frame the scene, you can start recording with a single press of the movie button. The maximum length of a single recording session is 30 minutes. This may seem like a handicap, but it’s not. You can get around the time limit by shooting multiple clips. The number of clips you can shoot is limited only by the capacity of your memory card. During post-production, you can splice the clips together to make a movie that lasts for hours.
The a7 II has two commands to help you frame a video:
MENU > Custom (1) > Marker Display > [On], [Off]
MENU > Custom (1) > Marker Settings > [Center], [Aspect], [Safety Zone], [Guideframe]
When Marker Display is [On], the Marker Settings command is activated. The four Marker Settings options are independent so you can activate them all at once. Briefly, [Center] places a cross in the center of the viewing screen; [Aspect] allows you to select one of seven different aspect ratios; [Safety Zone] generates a border marker so you can make sure the movie will be displayed correctly on devices that crop off a portion of the viewing area; and [Guideframe] displays a rule of thirds matrix to help you with composition.
P, A, S, or M to Control Your Recording
When you shift from Intelligent Auto or Superior Auto to P, A, S, or M mode, you gain control of the aperture, shutter speed, ISO, WB, and exposure compensation settings. You can also give your movie a unique appearance by using the Creative Style or Picture Effect options.
When you press the movie button, the camera will capture the movie in whichever shooting mode you selected on the mode dial. If you turn the mode dial to Movie, you can select whether you shoot in P, A, S, or M mode, but in this case, you must press the Fn button, then select the mode.
As with still photography, P (Program Auto) mode is fully automated, and the camera selects both the aperture and the shutter speed. If the camera is set to [ISO AUTO], you will see the same settings as if you had set the camera to Intelligent Auto or Superior Auto then pressed the movie button. The primary difference is the greater control you will have over your camera. Use A (Aperture Priority) mode to select the lens aperture and control the depth of field. Use S (Shutter Priority) mode to select the shutter speed, which will determine how much you wish to freeze motion in the movie frame. Use M (Manual Exposure) mode to adjust both the aperture and the shutter speed.
To avoid flickering when you shoot under fluorescent lights, you can regulate the shutter speed. Fluorescent bulbs have a cyclic output with a frequency that can, at certain shutter speeds, cause a distracting brightening or fading in a movie. If this occurs, try selecting a shorter or longer shutter speed to counter the effect. You might find that a shutter speed of 1/100 or 1/125 second will record more uniform light. Also, if you use M or S mode, you can select a shutter speed longer than 1/30 second when you shoot at 30 fps, or 1/60 second when you shoot at 60 fps. In fact, you can use a shutter speed as long as 1/4 second by turning the rear dial or front dial in S mode or by turning the rear dial in M mode.
This is an unusual feature that is absent in many camcorders. It uses a temporal averaging algorithm to combine several frames. The effect reduces the appearance of noise in the picture. This technique is used in scientific photography and is known as a running frame average. In essence, four to six images are collected in a buffer, and they are averaged to reduce noise. When the camera records a new frame, it is inserted into the buffer, and a frame from the buffer is outputted to the display and transferred to the memory card. This can cause an interesting artistic effect with motion. The moving subject is blurred and has a ghostly trail behind it.
Zebra
Zebra is a command that is familiar to videographers, but not to still photographers. You set the command with the following menu:
MENU > Custom Settings (1) > Zebra > [Off], [70–100 in increments of 5], [100+]
The Zebra command puts a series of black and white stripes over areas of the scene, and the stripes are triggered when a certain light value is met. Typically, the numbers refer to the saturation percentage of the pixel’s capacity. In other words, the number refers to pixels that have reached the indicated percentage of their maximum intensity. If you set the option to 100, the pattern appears for pixels that are 100 percent saturated, but you typically do not set the option that high. We find that a setting of 70 is more useful. At this setting, stripes appear over a person’s face when attractive skin tones will be recorded.
For example, to use a setting of 70 to record certain features at a set brightness, you first frame the scene and start at an exposure level where there are no stripes. The image will be dark in Live View. Then increase the exposure and watch the scene brighten. Eventually the stripes will appear. Stop increasing the exposure when stripes appear over the facial features of the subject.
The numeric setting requires some experience, and you may prefer a value other than 70. To record a portrait of someone standing in front of a white background, you may wish to record the background as brilliant white. To do so, you would use a setting of 100 and adjust the exposure so the background has stripes.
Time Code/User Bit
The Time Code/User Bit (TC/UB) command is for multiple camera setups and allows you to use a time code stamp to synchronize, or at least order, videos recorded with those cameras. When you initiate the command, a timer begins and starts at 00:00:00:00. The time code stamp is accurate to 0.01 second. It is included in the video and can be read by video post-production software. We let the time code free run; that is, we allow it to keep running even when the camera is not recording. With this approach, and assuming the cameras are synchronized, you can order the clips according to the time they were recorded.
The TC/UB command has seven subcommands that span two menu pages:
MENU > Setup (3) > TC/UB Settings (1) > [TC/UB Disp. Setting], [TC Preset], [UB Preset], [TC Format], [TC Run], [TC Make]
MENU > Setup (3) > TC/UB Settings (2) > [UB Time Rec]
It’s fairly daunting to learn all the commands. The following sections provide brief descriptions of all seven commands, their options, and what they do.
TC/UB Disp. Setting
This allows you to access three additional options as shown in the following command:
MENU > Setup (3) > TC/UB Settings (1) > TC/UB Disp. Setting > [Counter], [TC], [U-bit]
• Counter: This is an elapsed time counter that indicates a video is recording. When you stop recording a video and start recording another one, Counter will restart at 0. This is not useful for synchronizing several cameras.
• TC: This is the time code that allows you to synchronize multiple cameras. A clock starts running when you press the center button to initiate the TC Preset function. This command operates in one of two ways. The first is Free Run, in which the clock immediately starts and keeps running. The other is Rec Run, in which the clock starts when you begin a recording; when the recording ends, the clock stops and does not resume until you start to shoot a new video.
• U-bit: The user bit (U-bit) is a code you incorporate with your recording that serves as an identifying marker for the camera. For example, if you use both a Sony a7S camera and a Sony a7 II camera, you can incorporate one user bit code into the a7S recording and a different user bit code into to a7 II recording.
The remaining commands for the TC/UB Settings allow you to format and use the time code and the user bit.
TC Preset
This allows you to start the time code at a value other than 00:00:00:00. You can specify a start value in hours, minutes, seconds, and hundredths of a second. The command is as follows:
MENU > Setup (3) > TC/UB Settings (1) > TC Preset > [Hour], [Minute], [Second], [1/100 second]
When you enter this command, you adjust the time with the up and down buttons and select the time units (hour, minute, second) with the left and right buttons. The default values are 00:00:00:00. When you press the center button, the counters will start. If you set the values to 00:10:00:00, the counters will start at 00:10:00:00.
UB Preset
This is used with the TC/UB Disp. Setting U-bit option and provides the identifying code for your camera. Many professional videographers do not bother with this because it is not recognized or read by all video editing programs. The command is as follows:
MENU > Setup (3) > TC/UB Settings (1) > UB Preset > [00], [00], [00], [00]
You change the values in the same way as the TC Preset values. Select a field with the left and right buttons, and adjust the value of that field by pressing the up and down buttons. When you are done, press the center button.
TC Format
This command is not active when you record at 24 fps. It is active only when you record at 30 fps or 60 fps. It ensures that the time code accurately reflects the elapsed time because when you record at 30 fps or 60 fps, the camera actually records at 29.97 fps or 59.94 fps, respectively. For simplicity, let us consider what this means when recording a video at 30 fps. If you record for 100 seconds, you have not captured 3,000 frames as you might expect. Instead, you have captured only 2,997 frames. This may seem like a trivial difference, and most people ignore it. However, in certain situations, such as broadcast television, the stop time of a video is critical.
When a camera is actually recording 30 fps, then in one hour the time code should indicate 01:00:00.00. In terms of the physical frame, this would be frame number 108,800. But since the camera is actually recording at a slightly lower rate (0.03 fps fewer), the frame number after one hour of recording is only 107,892. If you want the time code to correctly register the passage of time, a correction factor needs to be applied. This is known as drop frame. It can be confusing because a frame is not physically deleted from the video. Instead, certain points in the time code are altered so that it reads 1:00:00:00 after 108,800 frames are recorded.
To alter the TC Format, use the following command:
MENU > Setup (3) > TC/UB Settings (1) > TC Format > [DF], [NDF]
• DF: The drop frame algorithm is used to provide the correct time reading.
• NDF: A drop frame is not used to correct the time reading.
TC Run
This command determines how the time code generator runs:
MENU > Setup (3) > TC/UB Settings (1) > TC Run > [Rec Run], [Free Run]
• Free Run: The time code generator operates continuously, even if a video is not being recorded.
• Rec Run: The time code generator runs only when a video is being recorded. It stops when the recording stops.
TC Make
This command controls the starting point of the time code:
MENU > Setup (3) > TC/UB Settings (1) > TC Make > [Preset], [Regenerate]
• Preset: When you start to record a video, the camera will use the running time code as the starting point. This assumes that the TC clock was started earlier and is running. For example, if you started the clock an hour prior to taking the video, it indicates an initial time code of 1 hour when you actually start recording.
• Regenerate: The camera looks at the time code from the last recorded video and uses that video’s stopping point as the starting point for a subsequent video recording.
UB Time Rec
This command sets whether to record time along with a User Bit.
MENU > Setup (3) > TC/UB Settings (2) > UB Time Rec > [On], [Off]
When implemented, you can replay the video on the camera by setting the following command:
MENU > Setup (3) > TC/UB Settings (1) > [TC]
You will see the Time Code as the movie is played back. To see the U-bit during playback, set the following:
MENU > Setup (3) > TC/UB Settings (1) > TC/UB Disp. Setting > [U-bit]
There are two things worth noting about this command. First, the command to record both time and U-bit requires that UB Time Rec is set to [Off]. Second, the U-bit may not be seen by most video editing software.
Picture Profile
Picture Profile is a new feature on the Sony a7 series cameras, starting with the a7S, that makes the camera suitable for professional video projects. Picture Profile, in conjunction with the XAVC S file format, allows the a7 II to take superior HD videos.
We will describe the importance of Picture Profile and the advantages of learning how to use it. However, the learning curve is steep, and it may not be worth it for some people. You will have to experiment to learn how to use it effectively. If you use it incorrectly, the results will be worse than if you hadn’t used it.
First, to appreciate Picture Profile, it is helpful to envision the workflow of professional videographers. We mentioned that professional videographers may use several cameras when they record complex scenes. The cameras can be set up to record different angles. For example, one camera may face a person and record his or her movement toward the camera, and a second camera may be aimed at the person’s back and record the movement away from the camera. If you splice the two clips together, you can create a scene with the person first moving forward and then away from the viewer. To maintain realism, it is important that the two cameras record the scene identically. The shadow and highlight details must be the same, as well as the contrast, color, and sharpness. If the shots differ, the continuity of the spliced scene will be broken, and it will distract the viewer. To maintain continuity, the two cameras use the same Picture Profile.
Second, professional videographers have to complete their work by specific deadlines. As a deadline approaches, they have to decide how to get the video to the client as quickly as possible. There may be minimal time for post-processing, and the recording has to be good enough as shot. This is where Picture Profile can be handy. Sony provides seven variants of Picture Profile, and one may be sufficient to generate a video whose qualities require minimal processing for contrast, color, and sharpness (grading).
You access Picture Profile from the menu with the following command:
MENU > Camera Settings (5) > Picture Profile > [PPOff], [PP1], [PP2], [PP3], [PP4], [PP5], [PP6], [PP7]
The [PPOff] option disables the Picture Profile command; selecting [PP1] through [PP7] enables a Picture Profile. You can fine-tune the Picture Profile settings by pressing the center button and activating nine options that adjust the appearance of the image, plus two options that do not adjust the image. Each Picture Profile has the same options, so we will use PP1 in the command lines throughout this discussion:
MENU > Camera Settings (5) > Picture Profile > PP1 > [Black Level], [Gamma], [Black Gamma], [Knee], [Color Mode], [Saturation], [Color Phase], [Color Depth], [Detail], [Copy], [Reset]
Most of the options in Picture Profile are set to values assigned by Sony to serve as example settings. The videographer can alter any of these settings. Perhaps the most important values are those for the [Gamma] and [Color Mode] commands (table 11-6). These provide a color and contrast that affect the overall appearance of the video.

The Gamma command value sets the overall distribution of light within the scene and determines how the Picture Profile should be used. The rest of the commands support how the Picture Profile will enhance and affect the still picture or video. You adjust the overall contrast by changing the selection of Gamma. By doing so, you can, for example, generate a video that looks cinematic, like a feature film. These commands require minimal video editing.
The PP7 Picture Profile is just the opposite. It uses the Gamma S-Log2, which generates a video that must be edited. Gamma S-Log2 generates a very flat, underexposed image when viewed directly. Its image contains all the intensity and color information that is recorded by the sensor, and it is mapped in such a way that you can adjust PP7’s [Black Level], [Black Gamma], and [Knee] to control the appearance of shadows, midtones, and highlights. In addition, the colors can be adjusted with [Color Mode], [Saturation], [Color Phase], and [Color Depth]. These camera adjustments will ensure that the maximum amount of information can be displayed satisfactorily during grading.
Finally, you can adjust the rendering of minute detail with the Detail command.
The following sections describe each of the Picture Profile’s commands, subcommands, if applicable, and their options.
S-Log2 is a Gamma setting that excites many videographers. It is used in PP7 and requires a minimum ISO of 1600. When you first use PP7 and view the resulting images, you will be sadly disappointed. The images are darker than they should be, the colors seem faded, and the contrast is low. But S-Log2 is intended for use in video editing so you can get the maximum quality from your video recordings.
To use S-Log2 effectively, you should be familiar with advanced video editing software, such as Final Cut Pro, and you should use a calibrated monitor so you can see the nuances in image quality and critically judge the image. This type of color grading must take into account the display device that viewers will use to see the final product. The PP7 Picture Profile allows you to edit your recordings and ensure that the output will maximize the quality of the display device.
Black Level
Black Level defines the intensity value that is used for the darkest black. It can be set to values from +15 to –15.
Gamma
Gamma provides the overall contrast to an image. It deals with how variations in light intensity will be displayed in an image. Gamma contains the following options:
• Movie: This maps out the intensities that viewers expect to see in a movie.
• Still: This maps out the intensities that viewers expect to see in a still photograph.
• Cine1, Cine2, Cine3, Cine4: These gamma curves provide softer contrast than Movie. Cine1 has the softest contrast, and as you move toward Cine4, the dark regions get increasingly darker. However, even in Cine4, the contrast in the dark regions is lower, and the contrast in the highlights is greater than in Movie. These gamma curves provide greater flexibility for grading the movies.
• ITU709: This gamma curve corresponds to HDTV. It must be used with ISO 400 or higher.
• ITU709 (800%): This gamma curve is also used for HDTV, but it allows you to capture a wider range of intensities within the video file for editing. It must be used with ISO 800 or higher.
• S-Log2: This gamma is used for editing and retains the maximum amount of data that is captured by the camera sensor. It should be matched with the Color Mode’s S-Gamut option, and it must be used with IS0 1600 or higher.
Black Gamma
Black Gamma is an adjustment to the contrast in the darkest areas of the image. It has the following subcommands:
• Range: You can specify the range of darkness to be adjusted—[Wide], [Middle], [Narrow].
• Level: This ranges from –7 to +7. Lower values provide the greatest compression and hide fine gradations in darkness. Higher values reveal fine gradations in darkness.
Knee
Knee controls the rendering of intensities in highlights. Essentially, it is the selected intensity at which changes in the highlight brightness are dampened. Knee has the following subcommands:
• Mode, which has the following options:
• Auto Set: This sets the parameters for Knee automatically.
• Manual: You manually set the parameters for using Knee.
• Auto Set, which has the following options:
• Max Point: This is the white level, which is set to 100 percent. If a lower value is used, the highest intensities in the highlights tend to become gray.
• Sensitivity: This establishes the luminance level at which the Knee automatic adjustment starts. When it is set to [Low], the automatic adjustment starts at lower input signal levels than normal. When it is set to [High], the automatic adjustment starts at higher input signal levels than normal.
• Manual Set, which has the following options:
• Point: This sets the position of the Knee point output level. You can set it up to 109 percent.
• Slope: This determines the inclination of the Knee slope. A negative setting results in a gentler Knee slope, which expands the dynamic range but reduces rich gradations. A positive setting results in a steeper Knee slope, which shrinks the dynamic range but bolsters gradations.
Color Mode
Color Mode sets the colors that are suitable for the Gamma value:
• Movie: Sets the recommended colors when Gamma is set to [Movie].
• Still: Sets the recommended colors when Gamma is set to [Still].
• Cinema: Sets the recommended colors when Gamma is set to [Cine1].
• Pro: Sets the recommended color tones to the standard image quality of Sony professional cameras (when combined with ITU709 gamma).
• ITU709 Matrix: Sets the colors to correspond with the ITU709 HDTV standard (when combined with ITU709 gamma).
• Black & White: Sets the saturation to zero for shooting in black-and-white.
• S-Gamut: Sets the colors based on the assumption that the video will be post-processed. It is designed to be used when Gamma is set to [S-Log2].
Saturation
Saturation increases or decreases the intensity of all colors. You can set it from –32 to +32.
Color Phase
Color Phase alters the colors slightly and shifts them from magenta to green. You can set it from –7 to +7.
Color Depth
Color Depth sets the intensity of colors from a high of +7 (strongest colors) to a minimum of –7 (weakest colors). This function is effective even if you set the Color Mode to Black & White. You can adjust the following colors:
• [R]: Red
• [G]: Green
• [B]: Blue
• [C]: Cyan
• [M]: Magenta
• [Y]: Yellow
Detail
Detail is a digital sharpening filter that enhances the perception of fine structures. To make linear structures more obvious, it enhances edges by darkening one side of the border and lightening the other side. When Detail is applied in moderation, it brings out fine details. However, if it is overdone, it can obscure edges and hide fine details.
There are six subcommands in the Detail command:
MENU > Camera Settings (5) > Picture Profile > PP1 > Detail > [Level], [Adjust]
These subcommands and their options are discussed in the following list:
• Level: You can specify the level of sharpening by setting values from +7 (more sharpening) to –7 (less sharpening).
MENU > Camera Settings (5) > Picture Profile > PP1 > Detail > Adjust > [Mode], [V/H Balance], [B/W Balance], [Limit], [Crisping], and [Hi-Light Detail]
• Adjust has the following options for controlling sharpening. It can be done automatically or you can take control and adjust it manually:
• Mode:
• Auto: This automatically applies sharpening, and the camera determines the optimal setting.
• Manual: You manually control and fine-tune sharpening.
• V/H Balance: This sharpens detail in linear structures. The values range from +2 to –2. Higher values emphasize vertical details, and lower values emphasize horizontal details.
• V: This affects vertical structures. You can set the values from +2 to –2.
• H: This affects horizontal structures. You can set the values from +2 to –2.
• B/W Balance: This changes the balance between the amount of black detail in low-light areas and the amount of white detail in bright areas. The setting is expressed as Type1, Type2, Type3, Type4, or Type5. Type1 has a higher proportion of black detail, and Type5 has a higher proportion of white detail.
• Limit: You can restrict the amount of black detail in low-luminance areas, and the amount of white detail in high-luminance areas, by setting a maximum value. The values range from 0 (no restriction) to 7 (greatest restriction).
• Crisping: This function reduces the appearance of noise when you use the Detail function (which usually emphasizes noise). The values range from 0 to 7. At 0, the noise will be most obvious, and it will be progressively reduced at higher values. Excessive Crisping will cause a loss of fine detail.
• Hi-Light Detail: This adjusts the detail that is revealed in bright objects. The values range from 0 (minimum detail) to 4 (maximum detail).
Reset and Copy
The final two commands in Picture Profile are Reset and Copy. Neither of these commands affects the appearance of a video.
Because you can customize each Picture Profile, Sony has provided the Reset command so you can restore a specific Picture Profile to its default settings:
MENU > Camera Settings (5) > Picture Profile > PP1 > Reset > [Enter]
You can Reset only one Picture Profile at a time. Also, if you reinitialize your camera with the Reset Settings [Initialize] function, the Picture Profile settings are not returned to their default values.
If you customize a Picture Profile and want to copy it to a different Picture Profile number, use the following command:
MENU > Camera Settings (5) > Picture Profile > PP1 > Copy > [select the destination Picture Profile]
Recommendations
We enjoy shooting movies with our Sony a7 II. If we have time, we plan carefully before we record, and we meticulously execute the shoot with the camera mounted on a tripod or other stabilizing device. We prefer to use a tripod with a fluid pan head. For greater mobility to follow a subject with the camera, we use a Tiffen Steadicam. It costs about $300, but it makes a difference in our movies. Because of the expense, we recommend that you first use tools you already have, such as a tripod, to get a feel for working with video. We cannot overemphasize the importance of using a tripod to obtain professional-looking movies. Although you can certainly create a pleasing movie without one, the subject may bounce around within the frame.
The beauty of the a7 II is that you can act on impulse and shoot a video while you are taking still pictures. There are plenty of times when we want to shoot a video, even while we handhold our camera. This happened on our trip to Denali. We were photographing a grizzly bear and simply switched to Movie mode to capture a video, and the camera performed well. When you work without a tripod, it is helpful to use the viewfinder so your camera is close to your face to provide added stability. You can also get added stability if you hold your camera against a tree or a table.
Don’t be afraid to work with the XAVC S file format. If you shoot short movies, you can edit them successfully in iMovie ($15). At the time of this writing, the program will read the highest-quality (60p 28M) recording from the Sony a7 II. If you own a PC, be sure to install the provided PlayMemories Home software. You can use it to work with AVCHD files and create DVDs.
You can create special effects for your videos and maximize the capabilities of your camera sensor with a Picture Profile, but these menu commands are complex and are more suitable for video enthusiasts or professional videographers. To use Picture Profiles you will need to become an expert with video grading and using your computer to enhance your images. This is especially true if you use a Picture Profile with S-Log2 gamma. The videos you capture with this setting cannot be directly played back. They need to be graded with software to provide increased exposure and brightness. However, learning to use S-Log2 allows you to exert maximum control over your videos.