5Chapter 5: Using the Semiautomatic Modes
Introduction
This chapter is about taking greater control of your photography. Intelligent Auto, Superior Auto, and the SCN modes automatically set the focus mode, shutter speed, and aperture. Although they yield sharp and properly exposed images, they prevent you from adjusting the camera settings and improving your photos based on your artistic designs. The shooting modes described in this chapter—Program Auto (P), Aperture Priority (A), and Shutter Priority (S)—give you increased control with a degree of automation. Essentially, these modes allow you to set the aperture, shutter speed, and ISO independently while the camera automatically adjusts the exposure. Hence, these shooting modes are semiautomatic.
If they are used incorrectly, these controls will record blurred or out-of-focus pictures, which are inferior to what you can achieve with fully automatic settings. However, when they are used with care, the semiautomatic modes can create pictures that you would otherwise not be able to capture. Because the settings for ISO, aperture, and shutter speed are coordinated, it is possible to obtain the best quality for a given situation. Although Manual Exposure (M) mode gives you slightly more control, it takes longer to get a proper exposure. We use the semiautomatic modes more frequently than manual mode, which we describe in chapter 6.
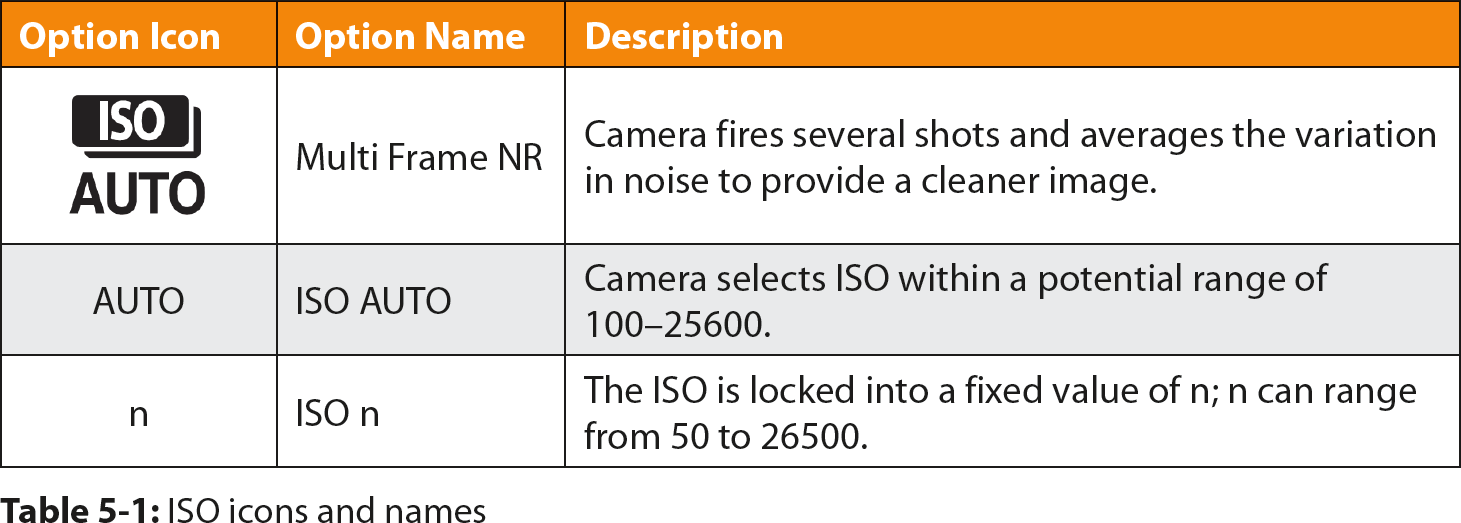
It’s particularly valuable that you control how the ISO is set in P, A, S, and M modes. You can select a specific gain (ISO), or the camera can set it for you within a range of ISO values. The ISO command has two icons that are easy to get confused: [ISO AUTO] and [AUTO]. The Sony a7 II users manual refers to these icons by their descriptive names: [Multi Frame NR] and [ISO AUTO] (table 5-1). To prevent confusion, we will reference these options by their descriptive names. Also, when we refer to the selection of a specific ISO value, we will display it as ISO 100 (rather than ISO [100]).
ISO AUTO adjusts the gain of the sensor. Multi Frame NR implements a special noise reduction strategy that is used in scientific imaging. It requires the camera to take several pictures, and by averaging the signal from those pictures, the camera can reduce the punctate appearance of noise.
P (Program Auto) mode allows the camera to set both the aperture and the shutter speed for the correct exposure. Unlike in automatic modes, in P mode you can set the ISO and the white balance. To use P mode and all the semiautomatic modes effectively, we recommend that you set the ISO to a specific value. We also recommend that instead of using AWB, you should set the white balance to a preset or enter a custom value for the scene. When you handhold your camera instead of using a tripod, monitor the shutter speed. Make sure it does not get so long that camera movements will soften the image.
Although the camera sets both the aperture and the shutter speed automatically, you have a degree of control because you can choose different combinations of these settings, and the camera will provide a balance. For example, the camera may initially set the aperture to f/4.0 and the shutter speed to 1/125 second. You don’t have to use these values. You can rotate the front or rear dial to change the combination to other values, such as f/2.8 and 1/250 second, or f/5.6 and 1/60 second. Sony calls these changes Program Shift. The settings shift in equal increments to maintain an equivalent exposure.
If you want to take more direct control of the lens opening, turn the mode dial to Aperture Priority (A) mode. You select the aperture, and the camera sets the shutter speed that is needed for a correct exposure. Similarly, in Shutter Priority (S) mode, you select the shutter speed, and the camera sets the aperture that is needed for a correct exposure. In P, A, and S modes, you can override the camera’s recommendations by turning the exposure compensation dial to increase or decrease the exposure.
An advantage of using A and S modes is that they allow you to control the depth of field or the appearance of moving subjects, respectively. In macro photography, portraiture, and landscapes, the aperture should be set to a constant value, so you can use A mode. Conversely, you need to control the shutter speed to properly capture a moving subject, so you can use S mode. This level of control is not possible in Intelligent Auto and Superior Auto modes.
After you evaluate your pictures, you may decide to take greater control of the camera settings, and you gain an awareness of what you should focus on in a scene. In automatic modes, the camera defaults to a wide field of view for focusing. This is suitable for moving subjects when you don’t have time to carefully select a focal point. In this chapter we will discuss how to target automatic focus and how to override it so you can focus manually.
This chapter also includes detailed descriptions of shutter speed, white balance, ISO, and Focus Area. These command functions are yours to control, and you will have to decide when to choose predefined values and when to alter the automatic functions.
Recommended Exposure versus Exposure Compensation
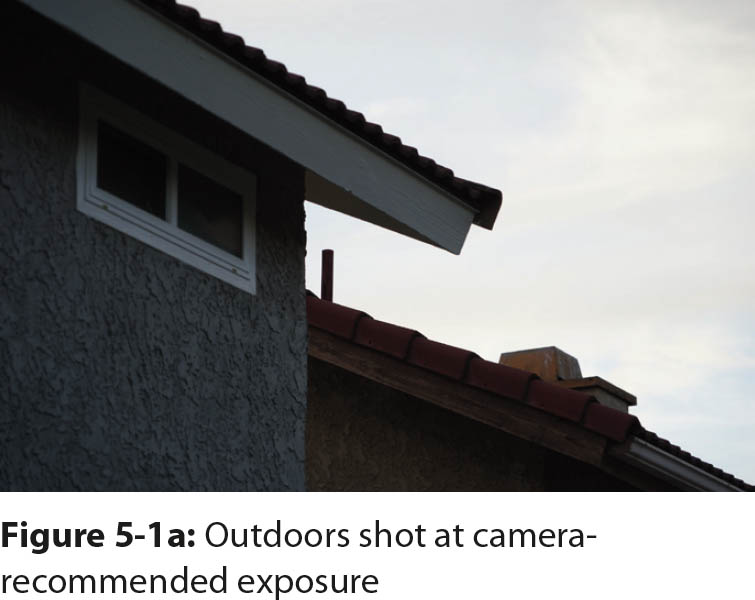
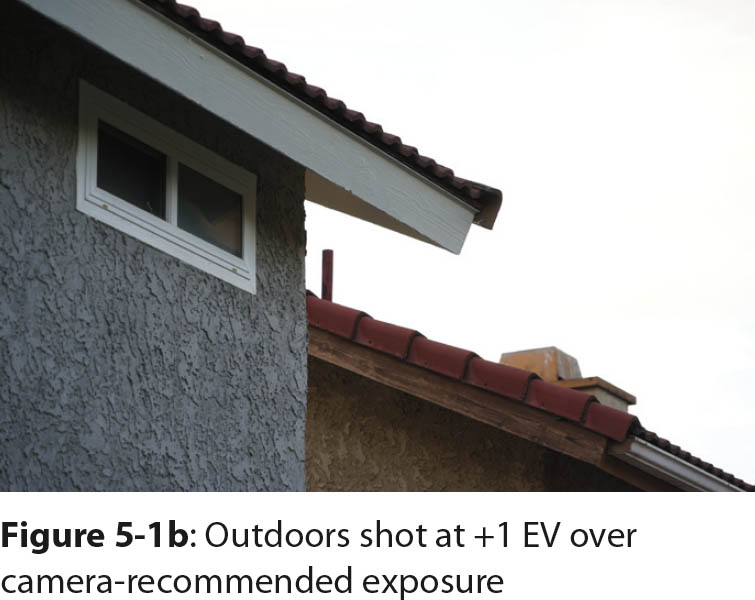
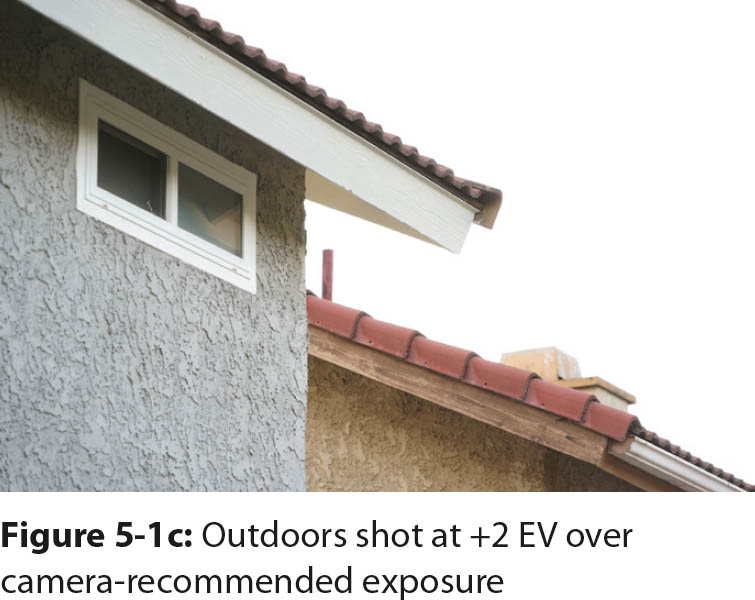
The camera’s light meter suggests a combination of shutter speed, aperture, and ISO for an exposure. Generally, these settings will result in a bright image in which most of the details within the scene can be seen. However, this exposure may not be ideal. For example, if you take a picture outdoors on a cloudy day, the light may not be distributed evenly, especially if you photograph a subject against the sky. The recommended exposure balances the bright sky against the dark foreground subject (figure 5-1a). Thanks to the EVF, you can study the image as it will be recorded. You may decide to see what happens if you increase the exposure by 1 EV (figure 5-1b). This is where the exposure compensation dial comes in. You can rotate it clockwise to see how the foreground and background become lighter. The exposure compensation dial will allow you to adjust the exposure beyond what your camera recommends. In this example, as you increase the exposure, both the subject and the sky become brighter. Figure 5-1c shows the image recorded with 2 EVs of additional exposure. Of these three figures, figure 5-1b seems to provide the best view of the foreground without overexposing the highlights.
Program Auto (P)
Program Auto (P) mode sets both the shutter speed and the aperture, and it keeps the two in balance. As you turn the front or rear dial, you will see the shutter speed change. To maintain a constant exposure, there will be a corresponding change to the aperture. If you want to use a different shutter speed, turn the front or rear dial to the value you want to use. Sony refers to this process as Program Shift. The same principle applies to the aperture. If you want to use a different aperture, rotate the front or rear dial to choose the setting you want to use. The camera will change the shutter speed to maintain a constant exposure.
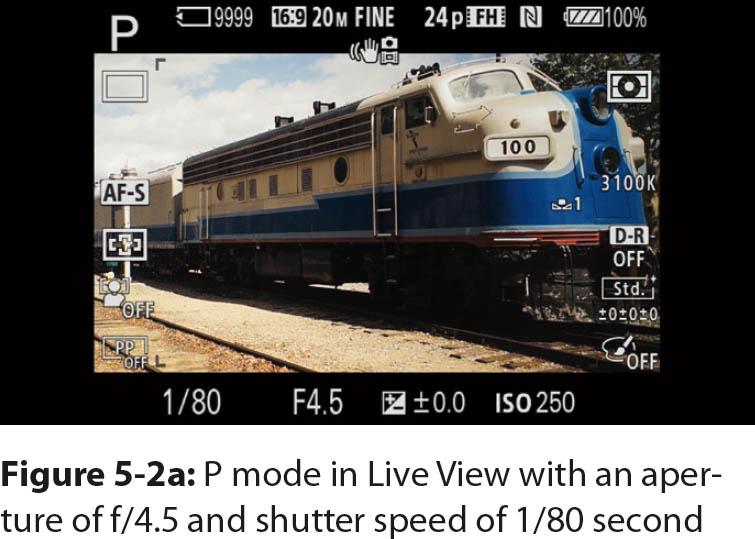
When you turn the mode dial to P, you will see the letter P in the upper-left region of the screen, and the aperture and shutter speed the camera selected is displayed along the bottom (figure 5-2a). The letter may disappear in certain display formats. If the camera is set to [ISO AUTO], you can take pictures under a greater range of light intensities; unfortunately, you won’t know what ISO value will be used until you press the shutter button halfway, at which time the ISO value will be displayed along the bottom of the screen.
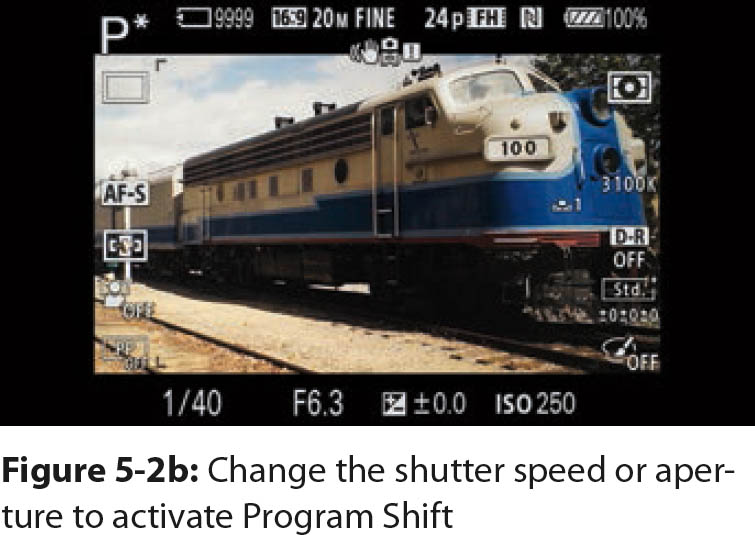
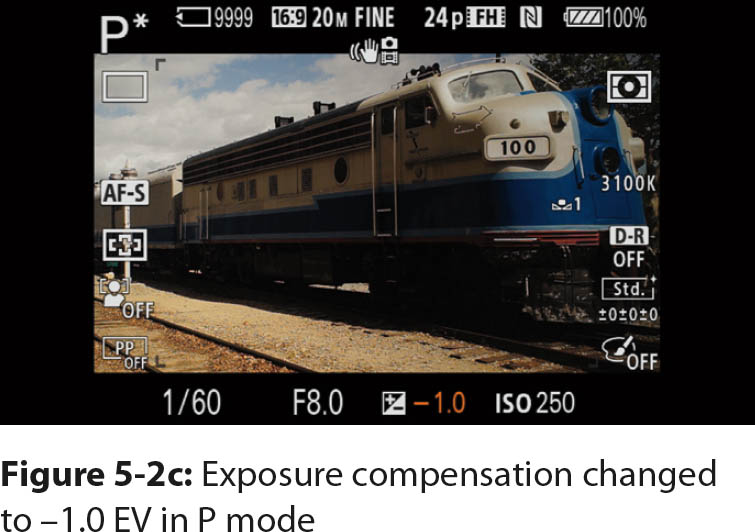
If you depart from the camera’s recommended settings by rotating the front or rear dial, the P is replaced with P* (figure 5-2b), which indicates Program Shift. If you decide to change the exposure from the camera’s recommendation, rotate the exposure compensation dial. When you apply exposure compensation, either the aperture or the shutter speed will be altered from the original values. If the shift is great enough, both the aperture and the shutter speed will be altered. The exposure compensation will be shown at the bottom of the screen in orange (figure 5-2c). The numerals will be orange for about 10 seconds, then they return to white.
Exposure compensation is displayed differently in the viewfinder and on the monitor. On the monitor, it is a single ± number at the bottom of the screen. In the viewfinder, it is represented by a triangle on a scale. Although the scale spans ±5 EV with the added feature, the exposure compensation dial is limited to ±3 EV. The expanded range from ±3 EV to ±5 EV is available only through the menu.
If you use [ISO AUTO], the camera will set the aperture, shutter speed, and ISO. If you use [ISO AUTO] in P mode, it is equivalent to Intelligent Auto with the added ability to alter your exposure. With experience, you can easily duplicate and improve on the automatic settings and use P mode for quick shots.
Aperture Priority (A)
Aperture Priority (A) mode allows you to select the aperture, and the camera sets the shutter speed for the correct exposure. This allows you to lock in the depth of field when you take multiple exposures, which is critical when you use software to either extend the depth of field or broaden the dynamic range in HDR images. Both of these techniques require several shots that can be combined in post-processing. To create an extended depth of field, the focus is changed slightly with each shot, but the depth of field remains constant to ensure sharpness between adjacent images. If the depth of field varies, there will be blurred regions in the final processed image. For an HDR image, you expose the scene at multiple exposures without changing the focus or aperture. The depth of field must remain constant to prevent variations in sharpness between adjacent images, which will cause blurred regions in the final processed image.
It’s also important to control the aperture in single photographs. When you restrict the depth of field, you emphasize the subject and direct the viewer’s eye toward it. For portraits, you want the viewer to notice the model’s face, so you focus on the model’s eyes and use an aperture with a narrow depth of field that blurs the background and foreground.
To use Aperture Priority mode, turn the mode dial to A. An A will appear in the upper-left corner of the screen. Again, the letter may disappear in some display formats. The f-stop value turns orange when you turn the front or rear dial. As it changes, so does the shutter speed. When you apply exposure compensation, the shutter speed varies, and the EV numbers temporarily turn orange.
We use A mode when we take scenic and macro photographs, and whenever we want to control the depth of field. We also use A mode in our scientific photography when we take pictures through microscopes and telescopes. If you use legacy lenses, use this mode for automatic exposures. If the lens has a diaphragm that you can close down, the camera will adjust the shutter speed to provide the correct exposure.
Depth of Field Preview and Shooting Modes
The A mode provides a real-time depth of field preview because it closes down the aperture as you turn the front or rear dial. To measure the exposure, the camera notes the changing light intensity that results from the changed diameter of the aperture. This is called stopped-down metering because it measures the actual intensity of light when the aperture is either closed or opened.
This is in contrast to how P mode works, where the lens stays at the maximum, or widest, aperture. In P mode, when you turn the front or rear dial, the camera calculates the degree to which the light intensity changes. This calculation is needed because the light intensity that falls on the sensor is constant when the aperture remains at the maximum value. This is called open-aperture metering.
These two metering strategies influence how you preview the depth of field. Recall from chapter 2 that depth of field is the zone of sharpness that changes as the lens aperture changes. To see the effects, view the scene with the lens stopped down. In A mode, the camera generates a real-time depth of field preview on the display screens. You don’t have to do anything else. In contrast, when the camera is set to P mode, the lens is set to its maximum aperture. To see the depth of field, you have to manually stop down the lens. You can customize a button that stops down the aperture when you press it. We will discuss how to assign this function to a button in chapter 7.
Depth of field preview is important for landscape or portrait photographers who use aperture to limit or expand the zone of sharpness within a picture. It is critical for applications in which the depth of field is limited, such as macro photography.
Shutter Priority (S)
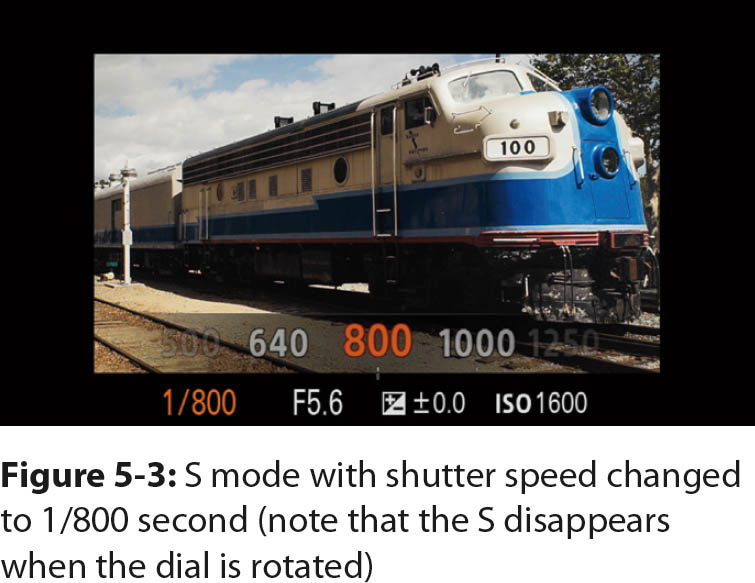
Shutter Priority (S) mode requires you to set the shutter speed, and the camera sets the aperture for a correct exposure. When you select S mode, you will see the letter S displayed in the upper-left corner of the preview screen. Depending on the display format, the letter may disappear after a few seconds. As you turn the front or rear dial, the shutter speed value at the bottom of the screen turns orange, and the number changes (figure 5-3). The aperture value will also change, but it remains white. When you exceed the maximum or minimum aperture, the aperture value will blink to warn you that it is over or under the limit. To override the recommended exposure, rotate the exposure compensation dial, and you will see the aperture value change on the screen.
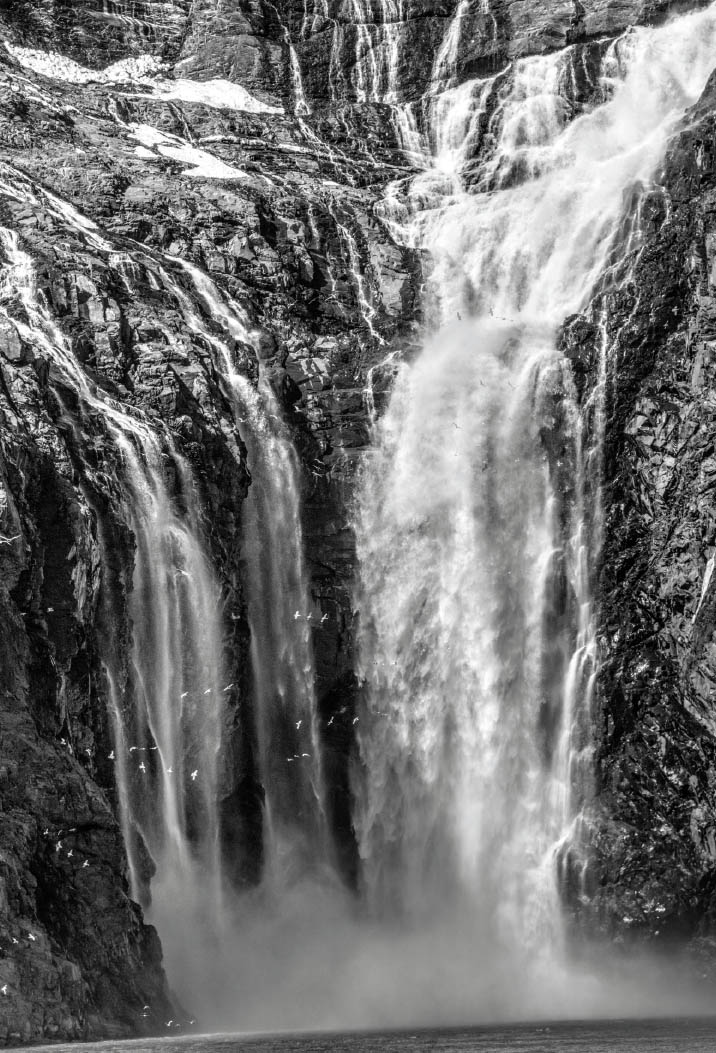
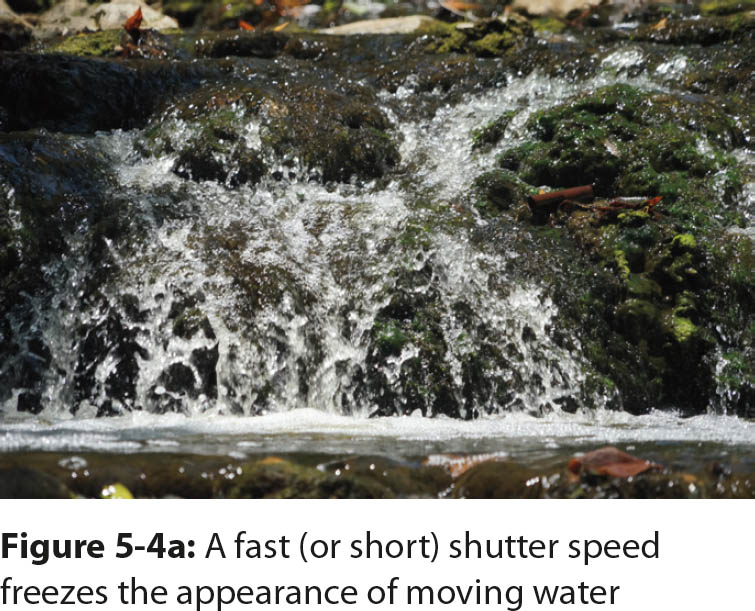
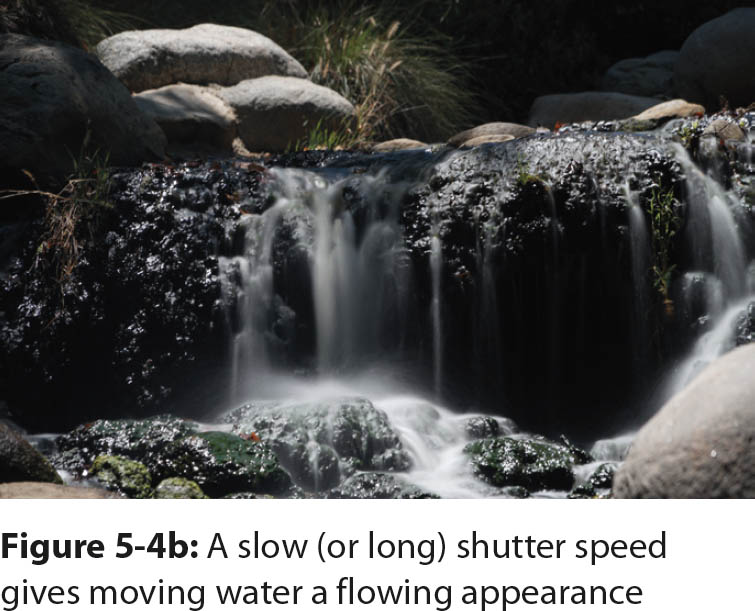
Action photographers prefer S mode because such images require fast (short duration) shutter speeds to freeze motion (figure 5-4a). Artistically, you may decide you want to blur movement (figure 5-4b). Landscape photographers often blur movement when they shoot streams or waterfalls so the water will look smooth. When the water is frothing, it takes on a cotton-like appearance.
Keep in mind that when you use a faster shutter speed, you must increase the light that falls onto the sensor. You accomplish this by either using a flash or opening the aperture. If neither option is suitable, you may need to increase the ISO.
For exposures that require the shutter to be open longer than 1/30 second, you should mount your camera on a tripod and turn SteadyShot [Off]. When you are done with the tripod, be sure to turn SteadyShot back [On].
MENU > Camera Settings (7) > SteadyShot > [On], [Off]
Fine-Tuning Automatic Exposure
You usually use the exposure compensation dial to fine-tune the exposure. However, you can also use the menu system to override the camera’s recommended exposure:
MENU > Camera Settings (4) > Exposure Comp. > [Exposure EV]
This command brings up an EV scale that ranges from -5 EV to +5 EV. Each tick on the scale represents a fraction of an EV that you can use to override the camera’s recommended setting. Rotate the control wheel or the front or rear dial to move the indicator right or left along the scale. You can see the adjustment on the monitor and in the viewfinder.
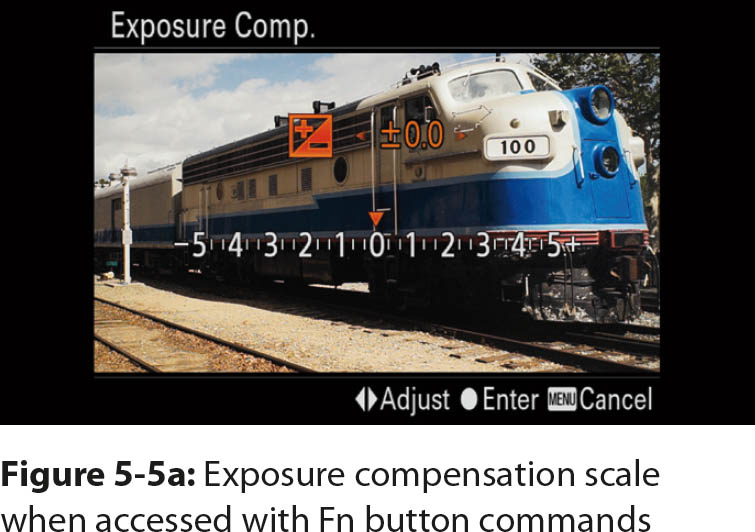
We never access Exposure Comp. through the menu system. Instead, we use the Fn button or the Quick Navi Screen, which are gateways to that command. When the camera is new from the factory, the Fn command includes [Exposure Comp.] as an option. You highlight the icon and press the center button, then you alter the exposure by rotating the front dial, rear dial, or control wheel. The exposure compensation scale is visible on the live preview screen, so you can evaluate the effects of altering the exposure (figure 5-5a).

When you access exposure compensation from the Quick Navi screen, you lose the advantage of seeing the scene’s brightness change in real time as you alter the exposure. There is a delay caused when switching from the Quick Navi view to a live preview. This disadvantage is countered by the Quick Navi screen’s ability to override the exposure of the flash in addition to the ambient light. There are two exposure compensation scales. The top scale is used to override the overall exposure, and the bottom scale is used to override the flash exposure. When you adjust the exposure, make sure you select the top scale. You can tell it is selected when the tick marks are bright white (figure 5-5b). As with the Fn button, after you highlight the exposure compensation icon, turn the front dial, rear dial, or control wheel to apply an EV offset. The primary advantage of these software controls is they allow you to change the exposure to ±5 EV, rather than ±3 EV, which is available with the exposure compensation dial.
You might be concerned that the camera will get confused when you alter exposure via the Quick Navi screen, the Fn screen, or the exposure compensation dial. This is not the case. There are only two ways to override the exposure: with the exposure compensation dial or through software. The Fn button and the Quick Navi screen are shortcuts to access the menu and both alter the exposure via software.
When you turn off the camera, the Reset EV Comp. command governs whether the exposure compensation value returns to 0 or is retained.
MENU > Custom Settings (5) > Reset EV Comp. > [Reset], [Maintain]
If you want the camera to retain the exposure compensation value you’ve entered, select [Maintain]. If you want the camera to return the value to 0, select [Reset].
The exposure compensation dial has priority over the menu command. If the exposure compensation dial is set to a value other than 0, you will find that the menu command is disabled, and you cannot override the setting on the dial. This means you cannot use the Quick Navi screen or the Fn button to apply exposure compensation. Also, if you have set the menu command to alter the exposure, then you turn the exposure compensation dial, it will reset the menu command to match the exposure compensation dial. The exposure compensation dial trumps the menu command.
Always Use the Exposure Compensation Dial
When you override the camera’s recommended exposure, use the exposure compensation dial instead of the Fn button or the Quick Navi screen so you can see a live histogram as you adjust the exposure. The histogram allows you to see how far you can decrease or increase the exposure. Many photographers adjust the exposure as high as possible to minimize noise in the shadows. If you alter the exposure with the Fn button or the Quick Navi screen, you will not see the live preview and the histogram when you fine-tune the exposure.
A Video Control for Still Photography
A useful command called Zebra will help you avoid blowing out the highlights in your pictures. When Zebra is active, it generates a moving set of diagonal black lines across areas in which a certain light intensity is reached. Videographers commonly use this command, and still photographers can use it too:
MENU > Custom Settings (1) > Zebra > [Off], [Values 70 to 100+]
This command is available in Live View, so you can take action before you shoot a picture. If you are shooting a snow scene, you can use Zebra to adjust the exposure so the snow is rendered with subtle shadows and textures, or you can raise the exposure so the snow will be a featureless mass of white.
If you use Zebra, you may want to dedicate a button to access the command. The diagonal lines can be distracting when you compose a picture, but they are invaluable to show you where overexposure will occur and where overexposure will be most detrimental. You can then decide whether to reduce the exposure to record highlight details or to retain, or even increase, the exposure if the highlights do not contain details you wish to record.
Autofocus Area: Identifying Where to Focus
The Sony a7 II has one of the most complex focusing systems on a digital camera. It is a hybrid system that integrates phase detection and contrast detection sensors to determine focus. Phase detectors determine how far and in which direction the subject is out of focus. If the object is far from the camera, the phase detectors will cause the motor to bring distant objects into focus. In addition, they determine how fast the motor drives the lens. The further out of focus the subject is, the faster the motor will obtain focus.
Although phase detectors provide fast autofocus, they can be unreliable in achieving accurate focus. This is evidenced by cameras that rely exclusively on this type of focusing, such as the Nikon D810, Canon EOS 5D Mark III, or Sony a99. Each of these professional cameras have menu commands that allow the photographer to fine-tune the point of focus. You may have read that some photographers must adjust the back focus or front focus of a lens. This refers to automatic focus when a lens consistently focuses just in front of or just behind the subject. These controls are not necessary in the Sony a7 II because in addition to phase detectors, it also uses contrast detection to make sure the lens achieves perfect focus.
For this reason, many photographers believe the a7 II provides a unique combination of focusing accuracy and speed. Theoretically, this should make the camera equally adept at focusing for sports and landscapes. You can find out where the 115 phase detector elements are located by using the following command:
MENU > Custom Settings (3) > Phase Detect. Area > [On], [Off]
This command displays a pair of lines that indicate where the phase detectors are. If you want to follow a moving subject, keep it between the lines so the phase detectors can try to accelerate the autofocus. Having said this, we prefer to leave the Phase Detect. Area command set to its default value of [Off]. Generally, when you track a moving subject, you try to center it instead of keeping it at the borders of the frame. If you center the subject in the live preview screen, it will be in the area where the phase detectors are concentrated.
A similar command shows which focus detectors are being used to establish focus:
MENU > Custom Settings (3) > Disp. cont. AF area > [On], [Off]
This command is normally on, and you can see it in action when you put the camera in AF-C (continuous autofocus). When it is activated, you will see several small squares blinking over the region. The small squares have green borders that indicate the phase detectors are being used to establish focus. We think this information is distracting, so we turn it off.
As an aside, the Disp. cont. AF area command works when the Focus Area is set to [Wide]. Although it is not mentioned in the users manual, this command works in [Zone] when the focusing zone is limited to the center of the screen. If you select a zone that is off center, the command does not work.
Phase Detectors and the LA-EA4 Adapter
We mentioned that the Sony a7 II normally does not need commands to adjust the front and back focus. Strictly speaking, this is not quite true because the camera can be used with the LA-EA4 phase detection adapter that takes over the autofocus function. You can use the adapter to attach Sony A-mount lenses in conjunction with the following command:
MENU > Custom Settings (5) > AF Micro Adj. > [AF Adjustment set], [amount], [Clear]
The AF Micro Adj. command acts on the adapter and modifies its phase detectors. You can register and provide correction for up to 30 lenses with this command. The corrections for the lenses will not be lost if you initialize the camera with the following command:
MENU > Setup > Setting Reset (7) > [Initialize]
Limiting Autofocus by Area
One problem with any autofocus camera is telling it what area should be in focus. In its default mode, the a7 II uses the entire screen as a focus area. For new photographers, this is good enough; however, as you become more knowledgeable, you may notice that your pictures will be unsatisfactory because the camera does not focus on the right part of the scene. This problem gets worse when you work with telephoto lenses or lenses that have a narrow depth of field. It’s especially obvious when you work under low light conditions and have to use the maximum lens aperture. Under these conditions, you must decide how you will use automatic focus and take an active role to help the camera select the correct region.
To help you get a feel for this process, we will describe how the autofocus mechanism works in the default mode with two options: [AF-S] in the Focus Mode command, and [Wide] in the Focus Area command. In AF-S, the camera will find focus then stop. In Wide, the entire area is available for focus.
Wide, Center, and Flexible Spot Focus Areas
Sony designers divided the screen into a series of 25 AF regions that are distributed across the viewing screen. When the camera establishes focus, one or more of the focus rectangles will turn green. This is a signal, along with a green circle and a sharp beep, that the camera has established focus. Nine of the autofocus regions are in the middle of the screen, and they see the same area as the phase detectors; this central region uses both phase detection and contrast detection to establish focus. The other focus areas see only the peripheral areas of the screen, and they use contrast detection only. The camera tends to automatically focus on objects in the center of the screen, but that is not always the case.
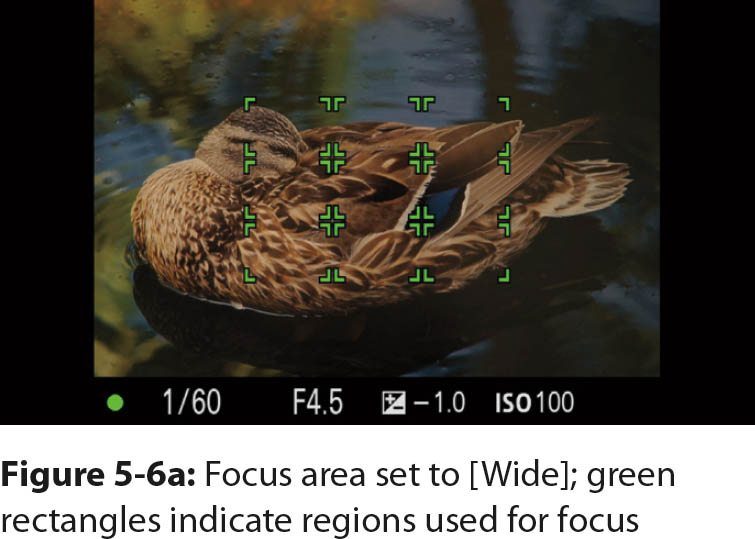
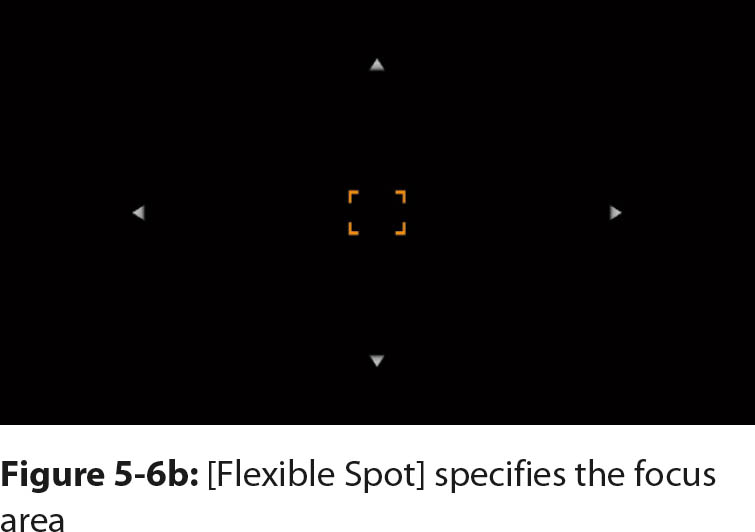
In figure 5-6a, nine focus areas were used to establish focus. When using [Wide], it is not necessary to carefully aim your camera to lock focus; you can quickly frame a shot, and the camera will find focus on something. This is an advantage when you have to shoot quickly, but sometimes the point of focus will not be on the subject of interest. You can focus with greater precision if you use the Flexible Spot option (figure 5-6b) because the focus is limited to one region.
The following Focus Area command allows you to control the point of focus:
MENU > Camera Settings (3) > Focus Area > [Wide], [Zone], [Center], [Flexible Spot], [Lock-on AF]
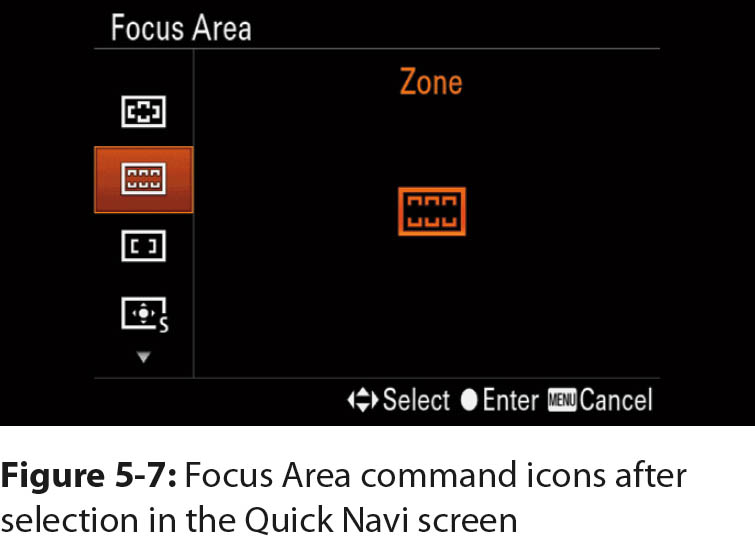
You can use the Quick Navi screen instead of the menu. Select the Focus Area icon and rotate the control wheel or the front dial to scroll through the command’s options on the left side of the screen (figure 5-7, table 5-2). Press the center button to make your selection.
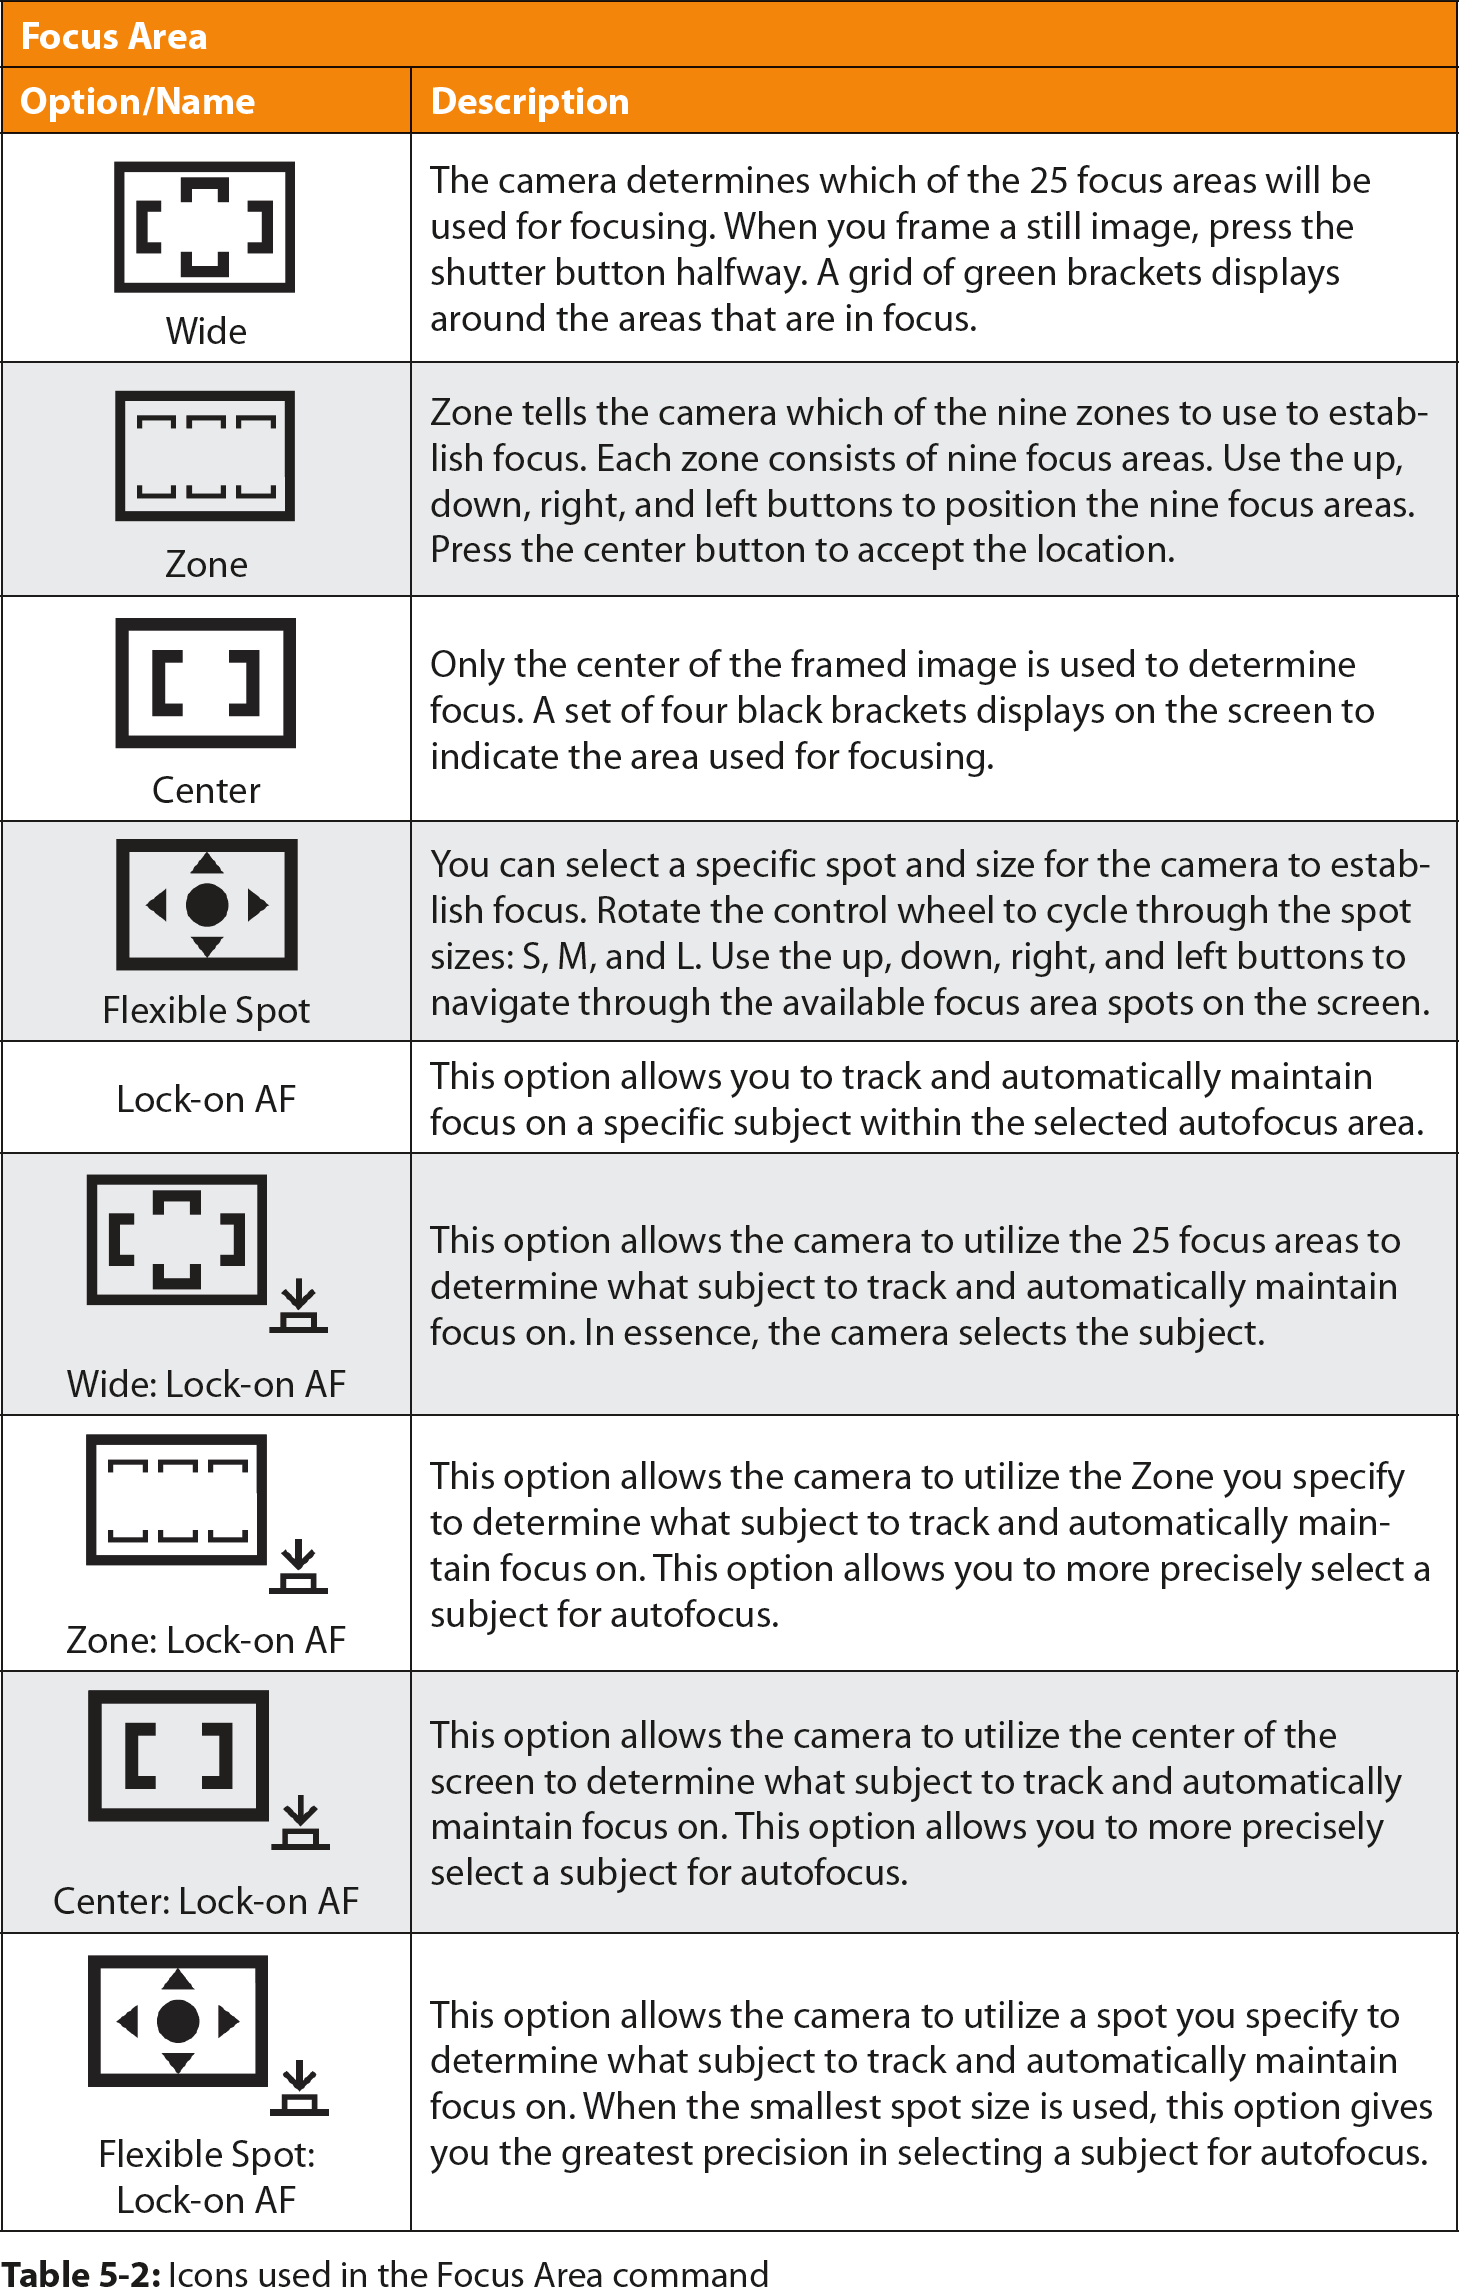
With the [Wide] option, you don’t have to carefully aim your camera to lock focus; instead, you can quickly frame a shot, and the camera will find focus on something within the screen. Unfortunately, there is a chance that the point of focus will not be on the subject of interest.
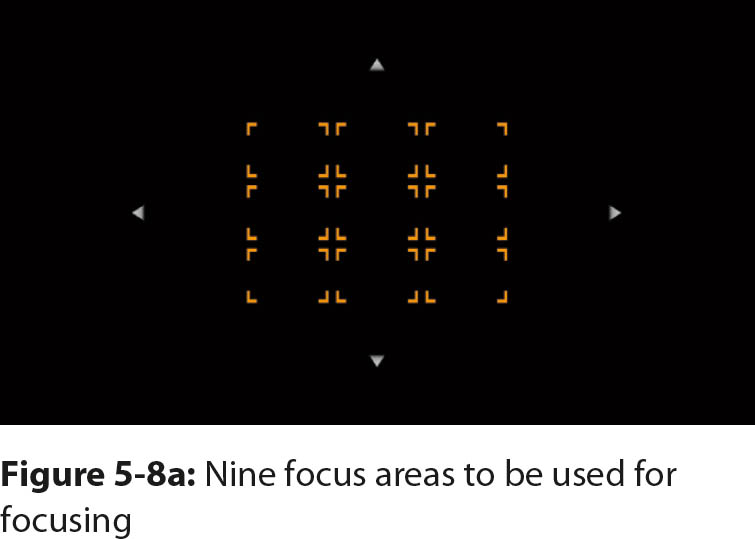
The [Zone] option gives you more control because it limits the number of focus detectors to nine, and you can specify their locations (figure 5-8a). When you activate this option, you will see the focusing brackets as orange outlines. The arrows indicate the directions in which you can move the Zone. After you position the Zone to your liking, press the center button to lock the position. In Live View, you will see four brackets that indicate the area where focus will be established. They aren’t always easy to see, so figure 5-8b shows them against a gray card.

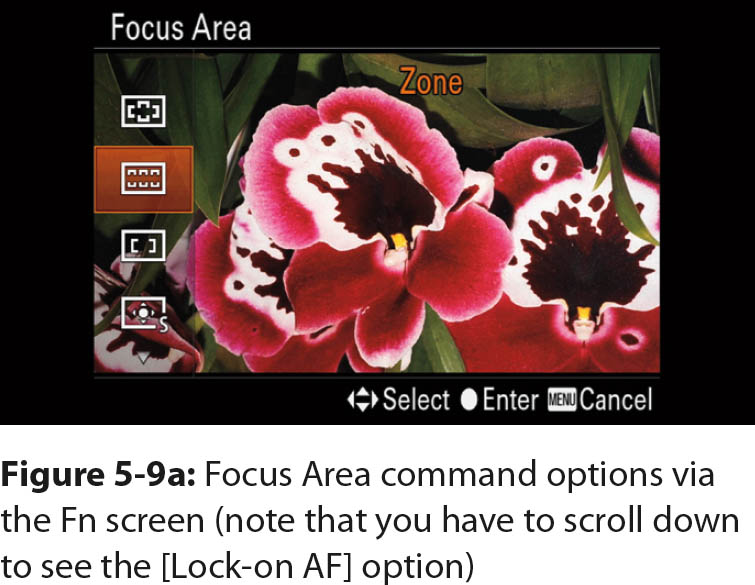
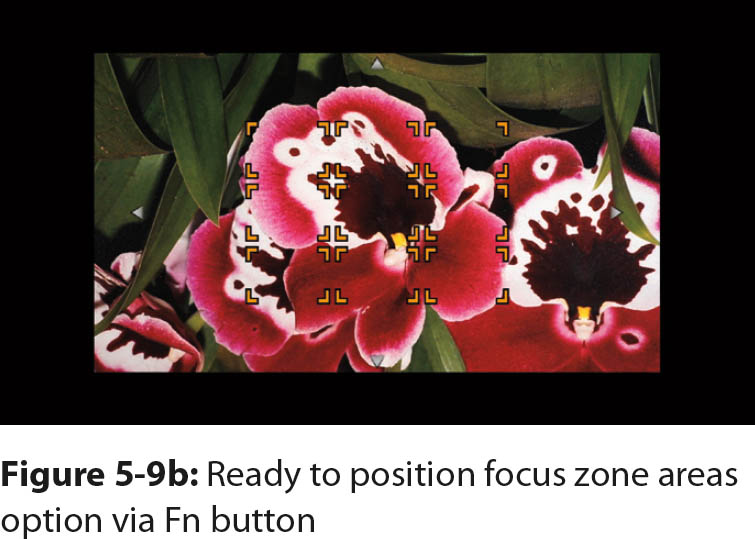
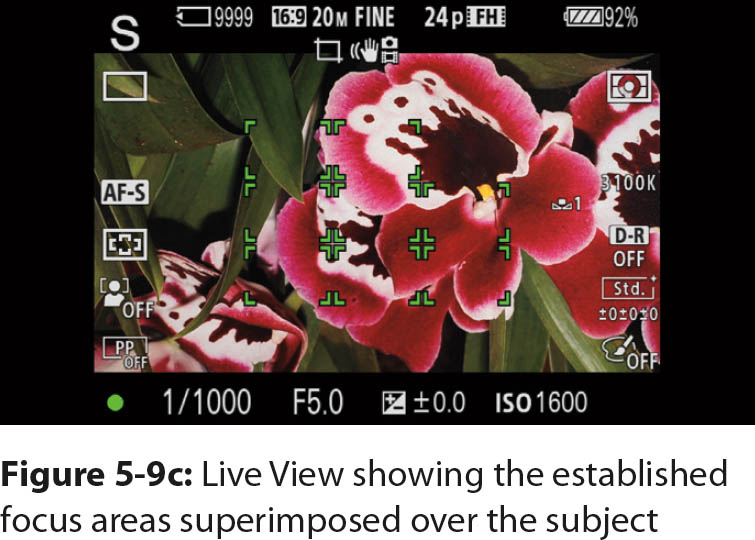
We prefer to access the Zone focus area by pressing the Fn button. After you press the Fn button, locate the icon that represents the focus area being used by the camera. When it is highlighted, the words Focus Area display on the screen just above the top row of the Fn command. Press the center button to display the options for the command: [Wide], [Zone], [Center], [Flexible Spot] and [Lock-on AF] (figure 5-9a). Highlight [Zone] and press the center button. You will see the selected regions overlaid on the Live View screen (figure 5-9b). This allows you to position the Zone while you study its location over the scene. The nine focus sites are surrounded by orange brackets. You can shift them up, down, left, or right with the corresponding buttons. When you are satisfied with the position, press the center button. The brackets will be replaced by four brackets that mark the position of the focusing zone. When you press the shutter button halfway, the camera will attempt to establish focus within these brackets. When one of the activated areas finds focus, its borders will turn green (figure 5-9c).
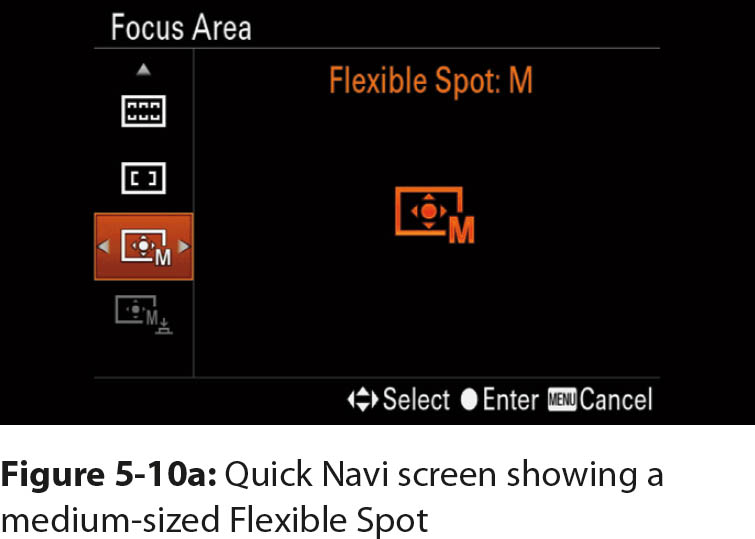
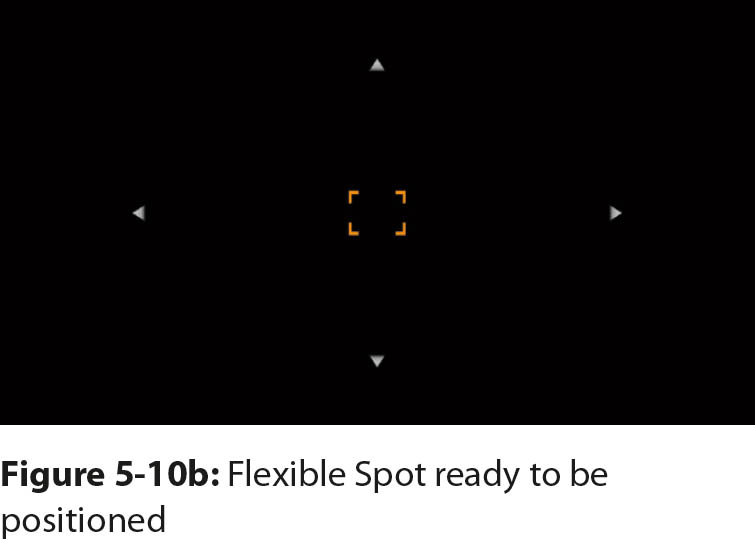
The Zone option is imprecise. You can make a more accurate selection with the Flexible Spot command. You choose from three spot sizes—small (S), medium (M), and large (L)—and you can position the spot anywhere on the screen. When you highlight Flexible Spot on the Quick Navi screen (figure 5-10a), you will see an orange letter (S, M, or L) that designates the size of the spot; you can change the size of the spot with the right and left buttons. When you are happy with your selection, press the center button. Orange brackets will surround the spot (figure 5-10b), and you can position it with the up, down, left, and right buttons.
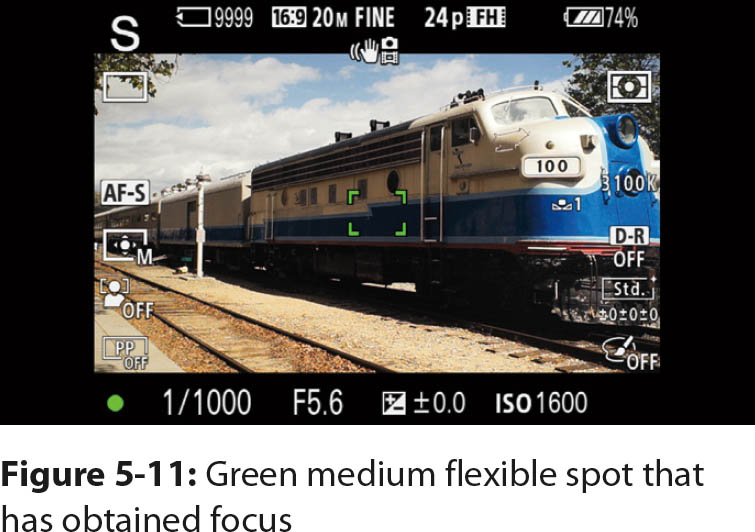
The orange brackets indicate that you can control the size of the spot. Turn the control wheel to expand or contract the brackets, and choose the spot size you want to use. When you are done, press the center button. When you look through the viewfinder, the brackets will be black, which indicates the corresponding area will be used to establish focus. In Live View, press the shutter button halfway to initiate focus. When focus is achieved, the brackets will turn green (figure 5-11).
There is a faster way to select the focusing area. In Live View, press the Fn button. Select the box that contains a Focus Area icon. You can change the focus option (area) by rotating the front dial or the control wheel. This allows you to quickly move among different Focus Area options, such as [Wide] and [Center], but it does not allow you to reposition where the Focus Area [Zone] and the [Flexible Spot] will look for focus, nor will it let you set the size of the Flexible Spot.
Lock-on AF Subject Tracking
One of the most impressive focusing selectors Sony has devised is Lock-on AF. Basically, this tracking system can identify the subject you want to focus on, and if the subject moves, the camera will follow it and maintain focus. This command works only in continuous autofocus [AF-C]. It will not work in single shot autofocus [AF-S].
When you use this command, lightly press the shutter button to select a subject, which will be selected and surrounded by a double rectangle with green lines. In theory, as the subject moves within the screen, and as it moves toward or away from the camera, it will remain in focus.
A couple of points should be noted. First, the camera guesses what you want to focus on and automatically selects it. The targeted site can be much larger than what you expect, so this command can be somewhat imprecise. For example, you may want to focus on and track a small spot in the center of the screen, but when you press the shutter button halfway, the camera may select a much larger subject.
Second, the selection depends on how unique the subject is. The color or intensity of the subject must differ from the background, foreground, and surrounding objects. It helps if the subject has a unique color. Otherwise, the camera may select something else that it can readily identify.
To use this command, first set your camera to continuous autofocus:
MENU > Camera Settings (3) > Focus Mode > [AF-C]
Then make the following selection:
MENU > Camera Settings (3) > Focus Area > Lock-on AF > [Wide], [Zone], [Center], [Flexible Spot]
Lock-on AF is actually a gateway that opens a selection of areas. The camera will use these areas to try to identify a subject. If you choose [Wide], the camera will use the entire scene to identify the subject. If you select [Flexible Spot], the camera will try to identify the subject that the spot is aimed at. But remember that this process is unreliable, and you may find that the camera selects a much larger area than you intend. When we use this command, we use [Flexible Spot] and hope the camera will precisely target the subject we are interested in. However, as mentioned earlier, the subject the camera selects is usually much larger than what we intend.
Fn Button or Quick Navi Screen for Choosing a Focus Area?
You can choose a focus mode by either pressing the Fn button or using the Quick Navi screen. Of the two, we prefer the Fn button because it overlays the focusing area on the Live View screen. This makes it easy to adjust the size and position of the focus area. There is no Live View for the Quick Navi screen, so you see the focus area indicators as orange outlines over a black background.
Limiting Autofocus by Area Summary
The [Wide] option for the Focus Area command tells the camera to use any of the 25 areas to determine focus. When you press the shutter halfway, green brackets mark the area that the camera will use to establish sharp focus. The subject may be out of focus if it is not surrounded by green brackets.
To increase focusing precision, limit the region to be used for the task. The [Zone] option narrows the available focusing areas from 25 to 9. The [Flexible Spot] option narrows it further by letting you choose only one focus area, which can be varied in size from [L] to [S].
When the subject is active, we use the [Zone] option, which rapidly acquires focus without the need for us to aim the camera precisely, plus it uses a narrower selection field than [Wide]. Unfortunately, it doesn’t always record the best picture. You may want only the subject to be in focus and the rest of the image to be blurred. When the subject is stationary, we prefer to use a single focus point, so we select either [Center] or [Flexible Spot] to choose a focus point outside the center of the screen.
When we photograph an animal from a distance, we like the animal’s eyes to be recorded sharply with a reflective glint. We accomplish this by setting the Focus Mode (described next) to [AF-S] and choosing [Flexible Spot]. We can aim the focus target at the animal’s eyes and lock focus with a half press of the shutter button. While we hold the shutter button down halfway, we can adjust the composition and know that the eyes will stay in focus. When we are satisfied with the composition, we capture the image by fully depressing the shutter button. Sometimes we choose to use the smallest [Flexible Spot] to accomplish this goal.
Focus Mode
The Focus Mode command specifies how focusing is implemented when you press the shutter button:
MENU > Camera Settings (2) > Focus Mode > [AF-S], [AF-C], [DMF], [MF]
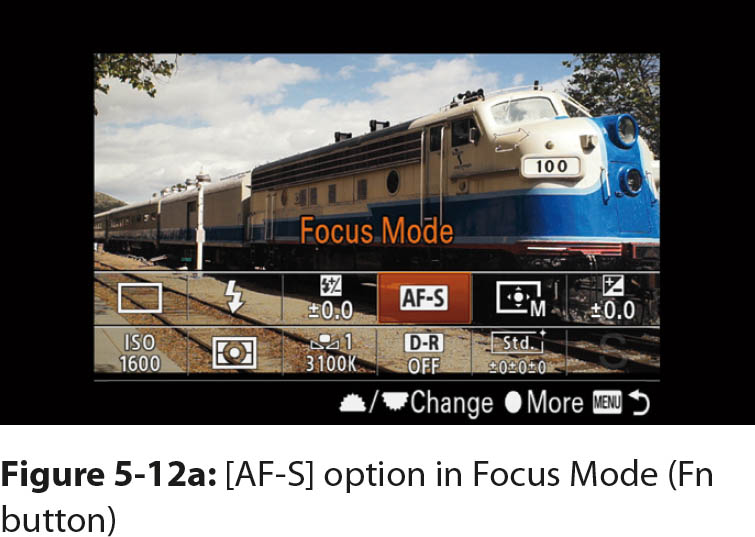
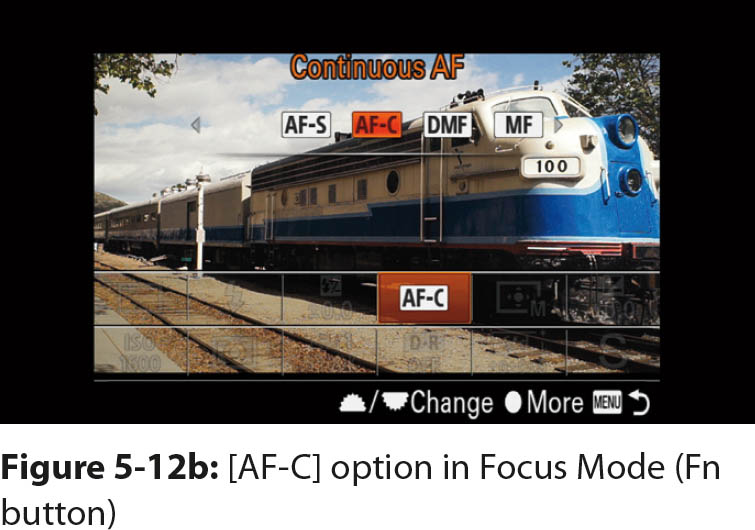
We mentioned in chapter 2 that when the [AF-S] option is used, the camera will identify focus, lock focus, then shoot. If you partially depress the shutter button, the focus will remain locked. In contrast, when you use [AF-C], the camera’s focusing motor stays active so it will continually refocus. This constant focus updating helps keep subjects sharp as they move away from or toward the camera.
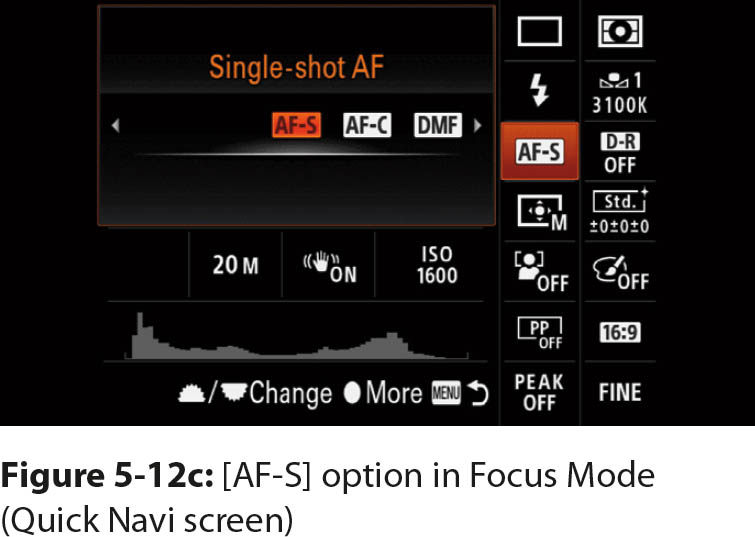
A faster way to select these commands is to press the Fn button and select the Focus Mode icon at the bottom of the screen. The default option is [AF-S] (figure 5-12a). You can quickly switch it to [AF-C] (figure 5-12b) by rotating the control wheel or front dial. The Focus Mode command is also available on the Quick Navi screen (figure 5-12c).
There are two additional options: [DMF] and [MF]. The former option is a rapid way to transition to manual focus after autofocus is achieved. The latter option immediately switches the camera to manual focus. We will discuss both of these manual focusing options in the next chapter, where we cover M mode.
Autofocus in Dim Light
You may find that in a dimly lit scene, the camera projects a beam of red light from the front of the camera. The beam illuminates the subject so the camera can identify its features. At short distances, this is enough to aid automatic focusing. However, in some dimly lit environments, such as theaters with performers on stage, a red light can be disruptive, so you should disable the AF Illuminator with the following command:
MENU > Camera Setting (3) > AF Illuminator > [Auto], [Off]
The default is [Auto], which allows the camera to use the AF Illuminator in low-light situations. The [Off] option means the light will never turn on. If you disable this command, the focusing will become slower and more hesitant before it locks. To counter this effect, you can try a couple of strategies. First, make sure the camera is set to the widest possible lens aperture. You will have better luck with prime lenses—35mm f/2.8 and 55mm f/1.8 lenses. Both lenses will provide more light to the sensor than zoom lenses, and the additional light can make a difference in automatic focusing. Second, regardless of which lens you use, make sure the camera is set to the widest aperture. This is especially important if you use M or A mode. In those modes, the camera meters and focuses at the set aperture of the lens. If the aperture is slightly closed, the sensor will receive less light.
As an informal test, we experimented with autofocusing our a7 II and a 24–70mm f/4.0 Zeiss lens under low light conditions. When we used the Zone focusing mode, we obtained reliable autofocus at ISO 6400, f/4.0, and 1/80 second shutter speed. At this light level, we found the Flexible Spot Focus Area function to be less reliable than Zone mode, so we made Zone mode our standard choice when the light is low.
ISO
The default ISO for the camera is [ISO AUTO]. The camera sets the sensitivity of the sensor within a range from 100 to 6400. Many photographers, ourselves included, do not care for the maximum limit. We prefer to set the maximum ISO to 3200. In this section, we will describe how to define the range.
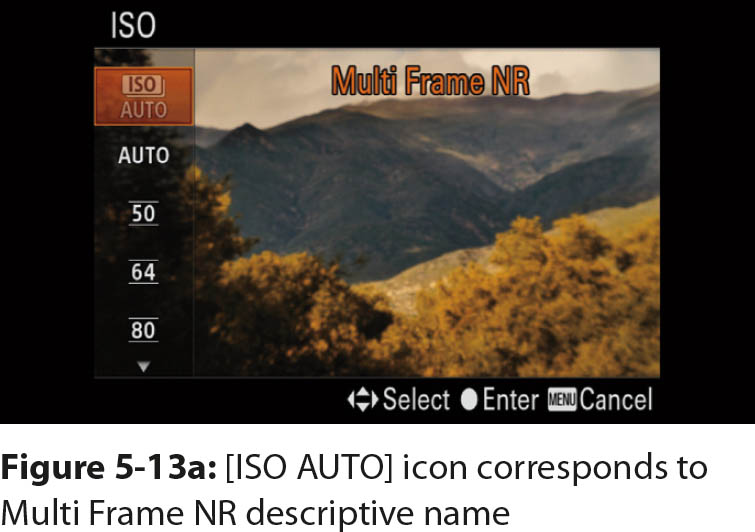
As mentioned earlier, rather than referring to the first two ISO command options as shown on their icons, ISO AUTO and AUTO, we will refer to them by their descriptive names, Multi Frame NR and ISO AUTO. This is consistent with the a7 II users manual.
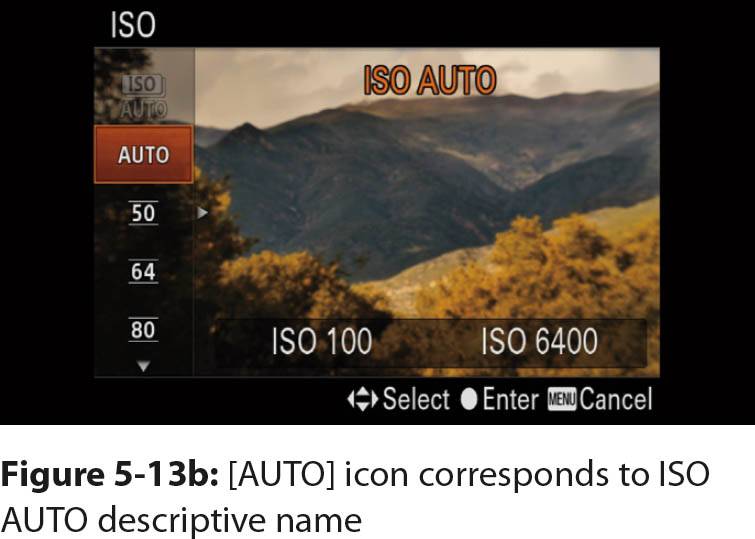
When you highlight the ISO command icons from the menu and press the center button, you will see a screen with a series of numbers or letters on the left side. If you select the ISO AUTO icon on the left side of the screen, you will actually select the [Multi Frame NR] option (figure 5-13a). When you highlight AUTO on the left side of the screen, you will actually select [ISO AUTO] (figure 5-13b).
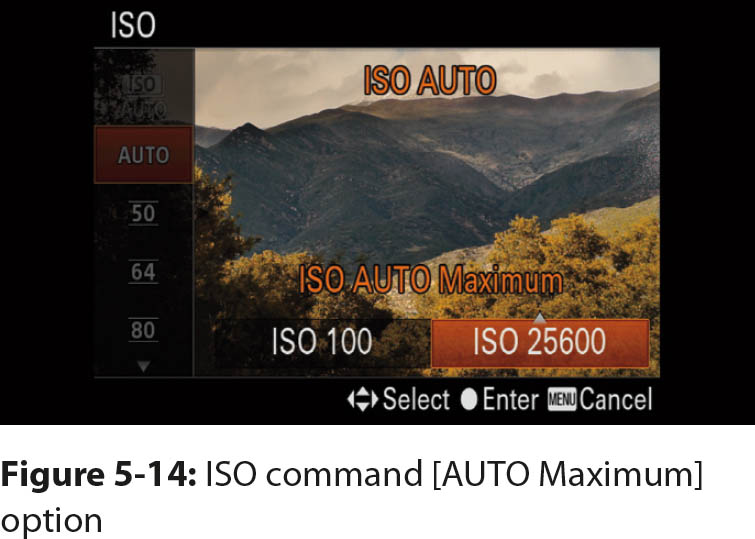
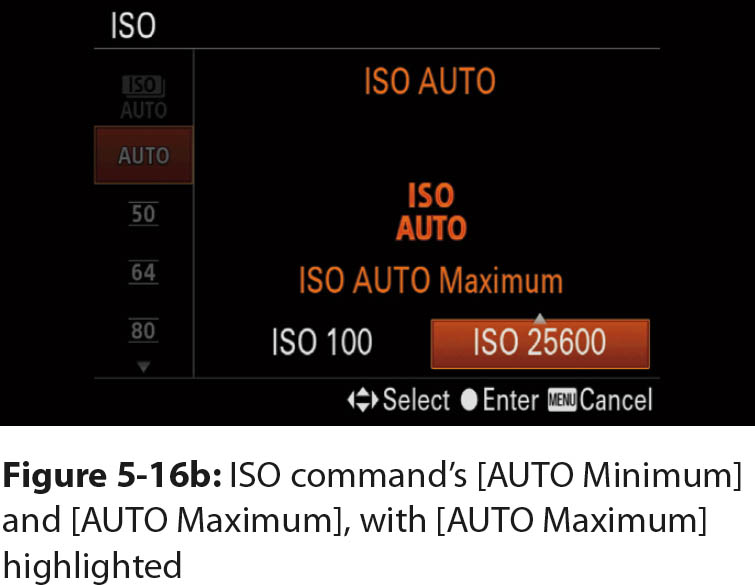
The command you will use the most is [ISO AUTO]. It allows you to set the minimum and maximum limits (range) from which the camera can select an ISO. The screen prompts indicate that you can press the right button to reach the screen where you can set the AUTO Minimum and AUTO Maximum values from 100 to 25600. Highlight one of the fields, and use the up and down buttons to change the value (figure 5-14). When you are done, confirm the settings by pressing the center button.
There are four ways to access the ISO command and adjust its limits. The first method is to use the following menu command:
MENU > Camera Settings (4) > ISO > [ISO AUTO]
The second way is to use the right button on the rim of the control wheel, which is labeled ISO. When you press the button, you can adjust the ISO values.
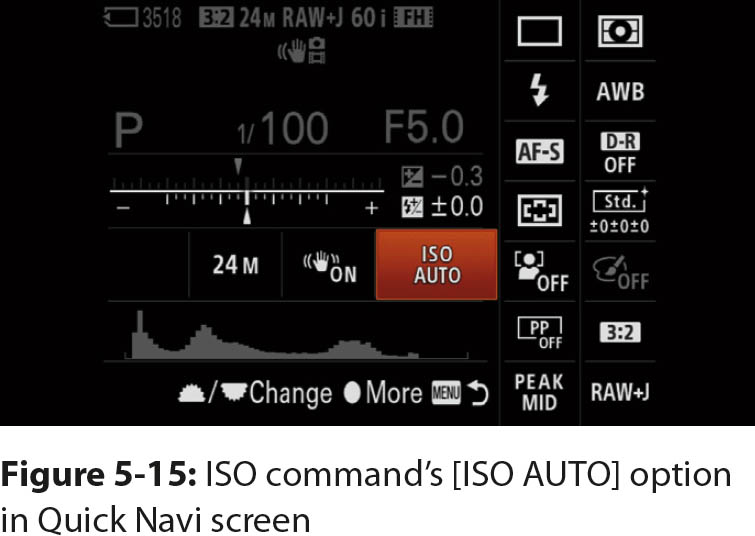
The third method is to use the Quick Navi screen. Highlight the region labeled ISO and press the center button. When the menu appears, you will see the screen shown in figure 5-15.
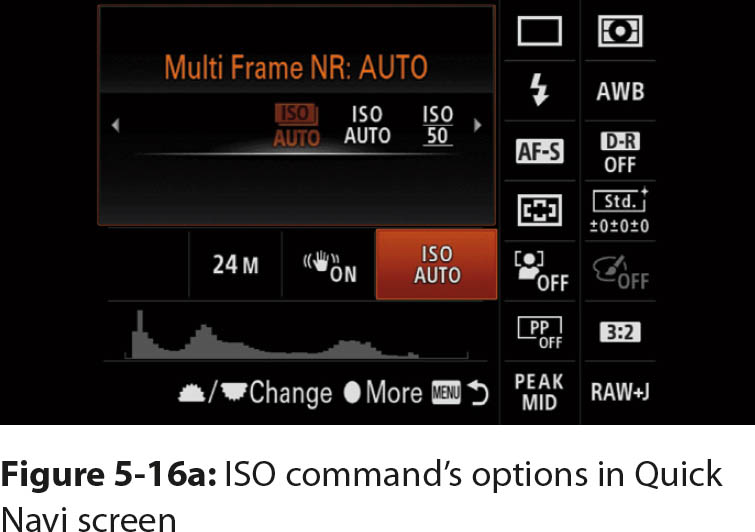
The final way you can change the ISO is to use the Fn button. Highlight the ISO icon and press the center button to see the available ISO values (figure 5-16a). Again, when you select [ISO AUTO], you can press the right button to see screens for setting the maximum and minimum [ISO AUTO] limits (figure 5-16b). This is similar to the Quick Navi screen, except you see a live preview with the ISO values superimposed.
After you activate the ISO command, you will see that you can set the gain of the sensor to 50. This setting is used to increase the range of shutter speeds or apertures you can select. It does not improve the quality of your still photographs. This setting can be used when you need a longer shutter speed under bright daylight conditions. When you set the ISO to 50 instead of 100, you can use a shutter speed with twice the duration. Similarly, if you need a shallow depth of field for a given shutter speed, you can use an aperture that is one f-stop larger.
This slow ISO setting is important to videographers. In video, you must maintain a shutter speed near 1/30 second to record smooth motion. The ISO 50 setting gives videographers more flexibility to adjust the exposure.
Multi Frame Noise Reduction
Multi Frame NR is a special ISO setting that reduces the appearance of noise in stationary subjects. Its associated icon uses the words ISO AUTO, where ISO is set against a white field that appears to have two layers.
The name Multi Frame Noise Reduction, refers to the process of taking four photographs, combining them, and averaging the intensity values of each pixel. Because noise is random, treating it as a statistical problem can reduce its appearance within the scene. This is the only ISO setting that requires you to shoot only JPEG files.
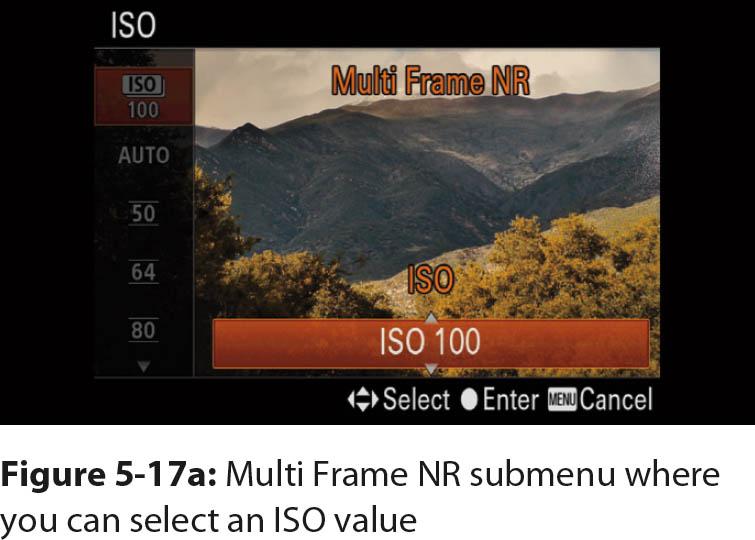
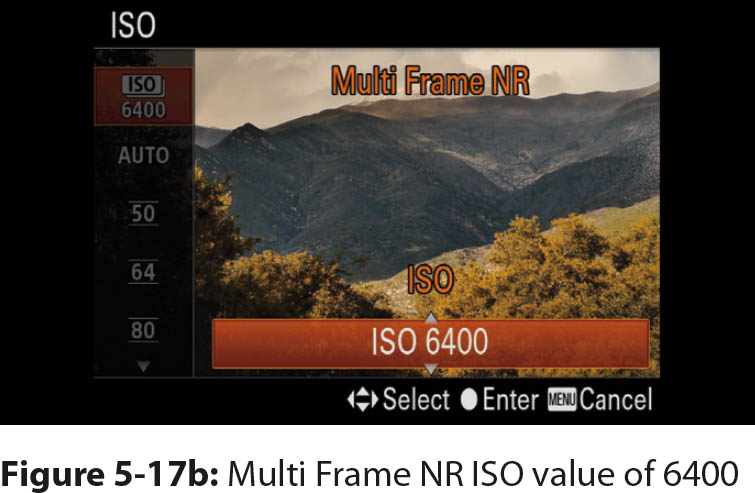
The [Multi Frame NR] option has a submenu that you access by pressing the right button. You will see either ISO AUTO or ISO with a number in an orange bar (figure 5-17a). You can let the camera choose an ISO value by selecting ISO AUTO, or you can choose a specific value. Press the up or down button to access a series of numbers ranging from 100 to 51200. Choose the ISO value you want to use with Multi Frame NR (figure 5-17b), and press the center button to accept your selection. With experience, you can judge how high an ISO you can use in extremely low light conditions. We have used an ISO as high as 51200. However, we prefer to use an ISO no higher than 12800. The highest setting will generate a noisy image. We find that images taken at 12800 exhibit acceptable noise levels.
If you have used either the [Hand-held Twilight] or the [Anti Motion Blur] SCN mode, you may have already used this function. The factory default is for Multi Frame NR to automatically set the ISO from 100 to 51200, and you won’t know which value will be used until you take a photograph. In P, A, S, or M mode, we prefer to set the ISO manually.
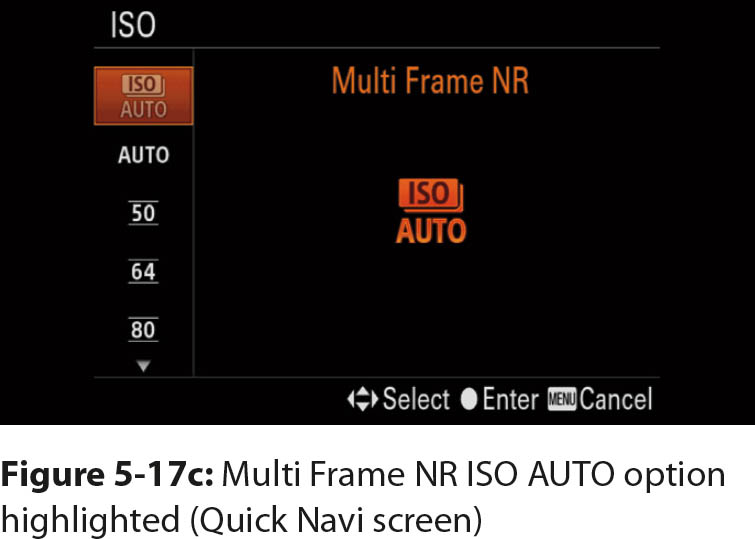
When you access the Quick Navi screen to set the ISO, you will see the ISO settings on the left side of the screen. Select the icon at the top of this list, which shows ISO set against a layered white field (figure 5-17c).
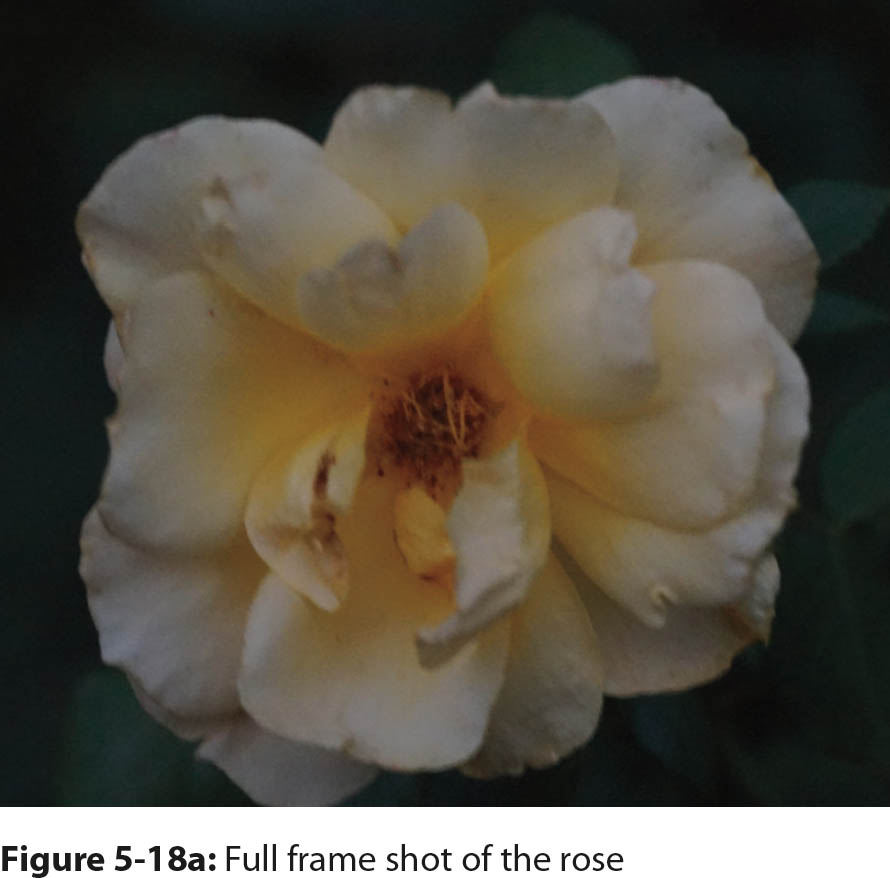
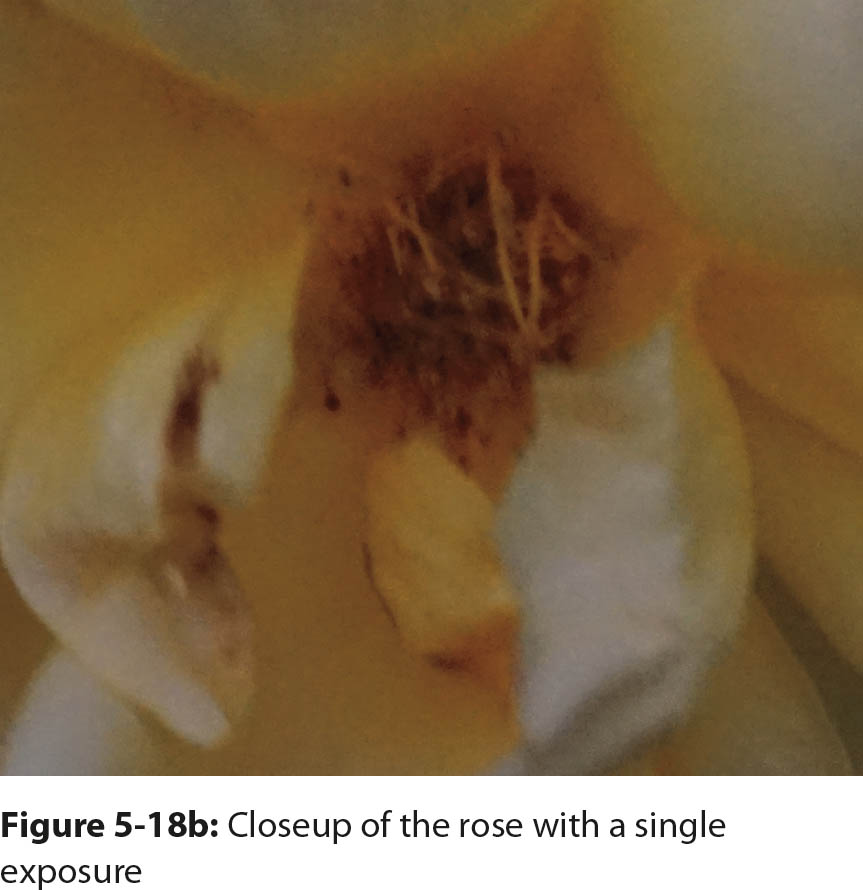
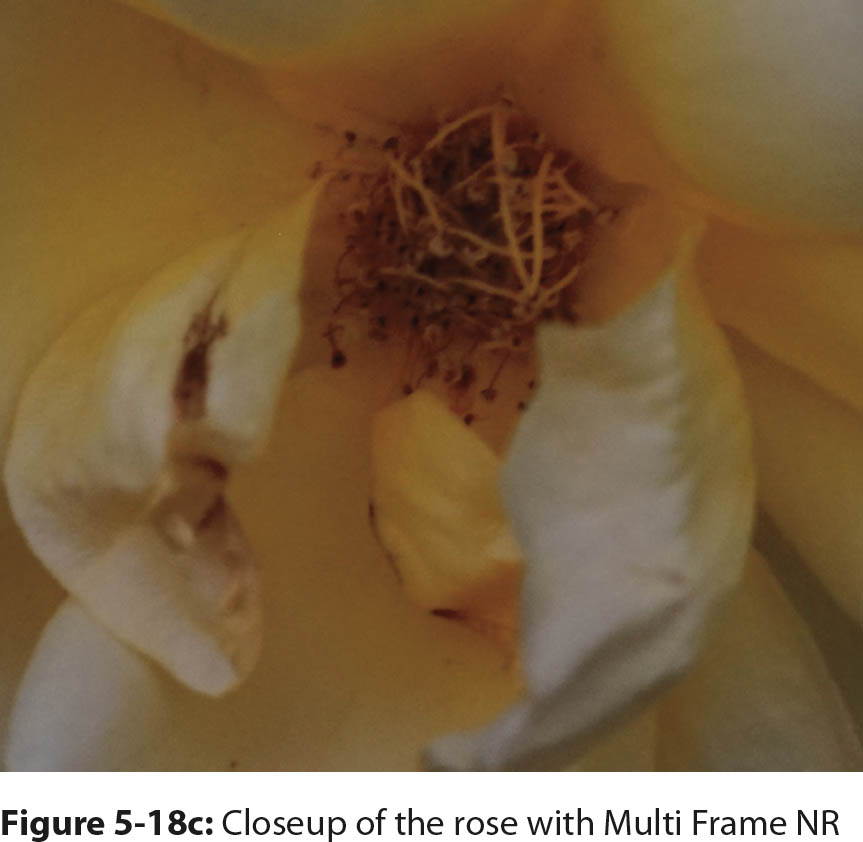
This option is useful when you shoot at high ISOs under low light conditions. Here is an example of what you can achieve with this technique. Figures 5-18a through 5-18c are photographs of a rose taken at ISO 6400 with a shutter speed of 1 second and an aperture of f/6.3. Figure 5-18a is the overall shot of the rose. Figure 5-18b is a closeup of the central portion of the rose, which was taken with a single exposure. The noise from the sensor is readily apparent, and the details in the center of the flower are obscured. Figure 5-18c was taken with Multi Frame NR at the same camera settings. The noise is dramatically reduced, and the fine details within the flower are readily visible. We took all three photographs with manual focus, and the camera was mounted on a tripod. The photographs were underexposed by one f-stop to show the noise.
Steady Shot
As mentioned earlier, when you manually set the ISO value, you need to keep an eye on the shutter speed. If the shutter speed is too slow (becomes too long), it is more likely that you will move the camera during the exposure and blur the image. When you shoot hand-held, a rule of thumb with 35mm film is to use a shutter speed that is the reciprocal of the focal length of the lens. For example, if you use a 100mm lens, you should set a minimum shutter speed of 1/100 second. This guideline does not account for Sony’s Steady-Shot feature (the default is [On]), which allows you to use longer shutter speeds.
SteadyShot has been improved for the a7 II. It provides stabilization in five axes. More important, it can now provide stabilization for legacy lenses. However, SteadyShot is no guarantee that you will get sharp handheld pictures. If you move slightly during the exposure, SteadyShot may not be able to counteract the motion, which will result in a blurred photograph. Also, under certain conditions the blur may be caused by subject movement. Keep in mind that when you shoot at the outer limits mentioned in review articles or in this book, you will always get some technically unacceptable shots. Don’t hesitate to take multiple shots of a scene and review them to make sure you capture satisfactory images.
Many variables affect how slow the shutter speed can be before an image will blur. One of the easiest ways to work with longer shutter speeds is to brace the camera while you take a picture. It helps to use the viewfinder because you can press the camera against your face for increased stability. Try holding your camera with two hands (one underneath the lens), and press your elbows against your body for even more stability. Of course, it’s best to use a tripod, but it’s not always convenient when you photograph on the go.
White Balance
The Sony a7 II has to be calibrated so it can accurately record colors. In effect, the camera must be told what type of light is illuminating the subject. With film cameras, you purchase a specific type of film to use under a particular light source.
A digital camera has an automatic white balance (AWB) option that allows the camera to calibrate itself to the light source. In essence, this feature takes a statistical sampling of the light in the image and makes a best guess about what type of light is illuminating the scene. AWB is automatically chosen when you use Intelligent Auto, Superior Auto, or one of the SCN modes. Many photographers use AWB because it is the default setting.
All things considered, AWB does a good job, and many photographers use only this setting. But, like all statistical sampling techniques, it is not foolproof. This is most evident when you work with indoor lighting, which can give your images a ruddy color cast. Another example is when you photograph a sunset and the rose-colored clouds are not recorded properly; they look washed out and lack the deep, saturated colors you saw when you composed the picture. Fortunately, you can compensate for these variations by taking control and setting the White Balance yourself when you shoot in P, A, S, M, or Movie shooting modes. Use the following command to set the White Balance:
MENU > Camera Settings (4) > White Balance > [multiple options]
There is a long list of White Balance options. Rather than list them on the command line, we prepared table 5-3, which contains the available options. For many users, the preset options are sufficient. The remaining White Balance settings require input, such as a color temperature value, and will be discussed in chapter 6.
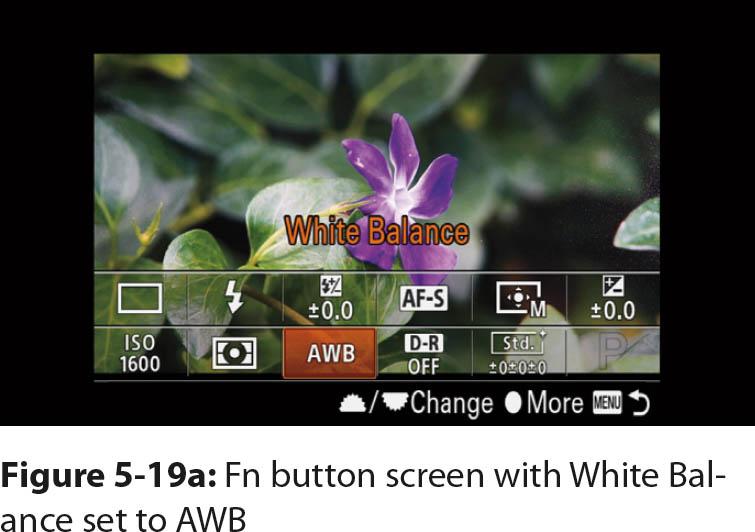
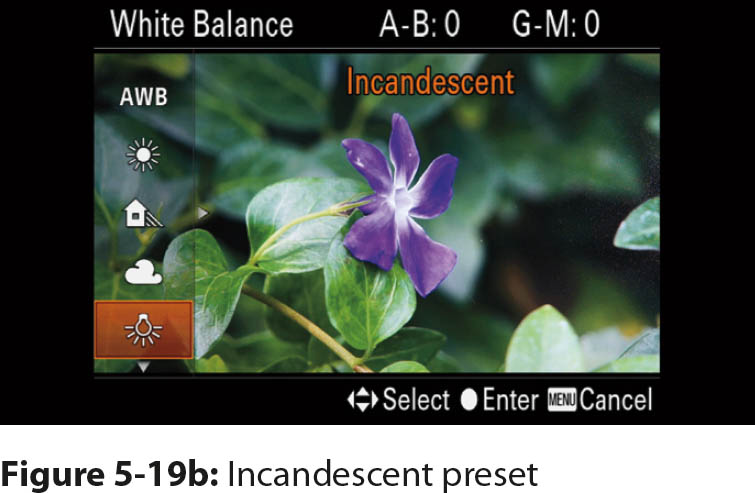
You can set the White Balance through the menu, the Fn button, the Quick Navi screen, or by pressing the C1 button if it is still set to its default customization. When you use the Fn button, find and press the White Balance command (figure 5-19a). The White Balance screen displays icons on the left, and the name of the highlighted option appears in orange at the top center of the screen (figure 5-19b). There is a long list of White Balance options; rotate the control wheel to scroll through them. You will see the effect of the highlighted White Balance option on the Live View image as you cycle through the White Balance presets. This gives you an appreciation of the effects of different light sources on a scene. Highlight the White Balance preset you want to use, and press the center button.
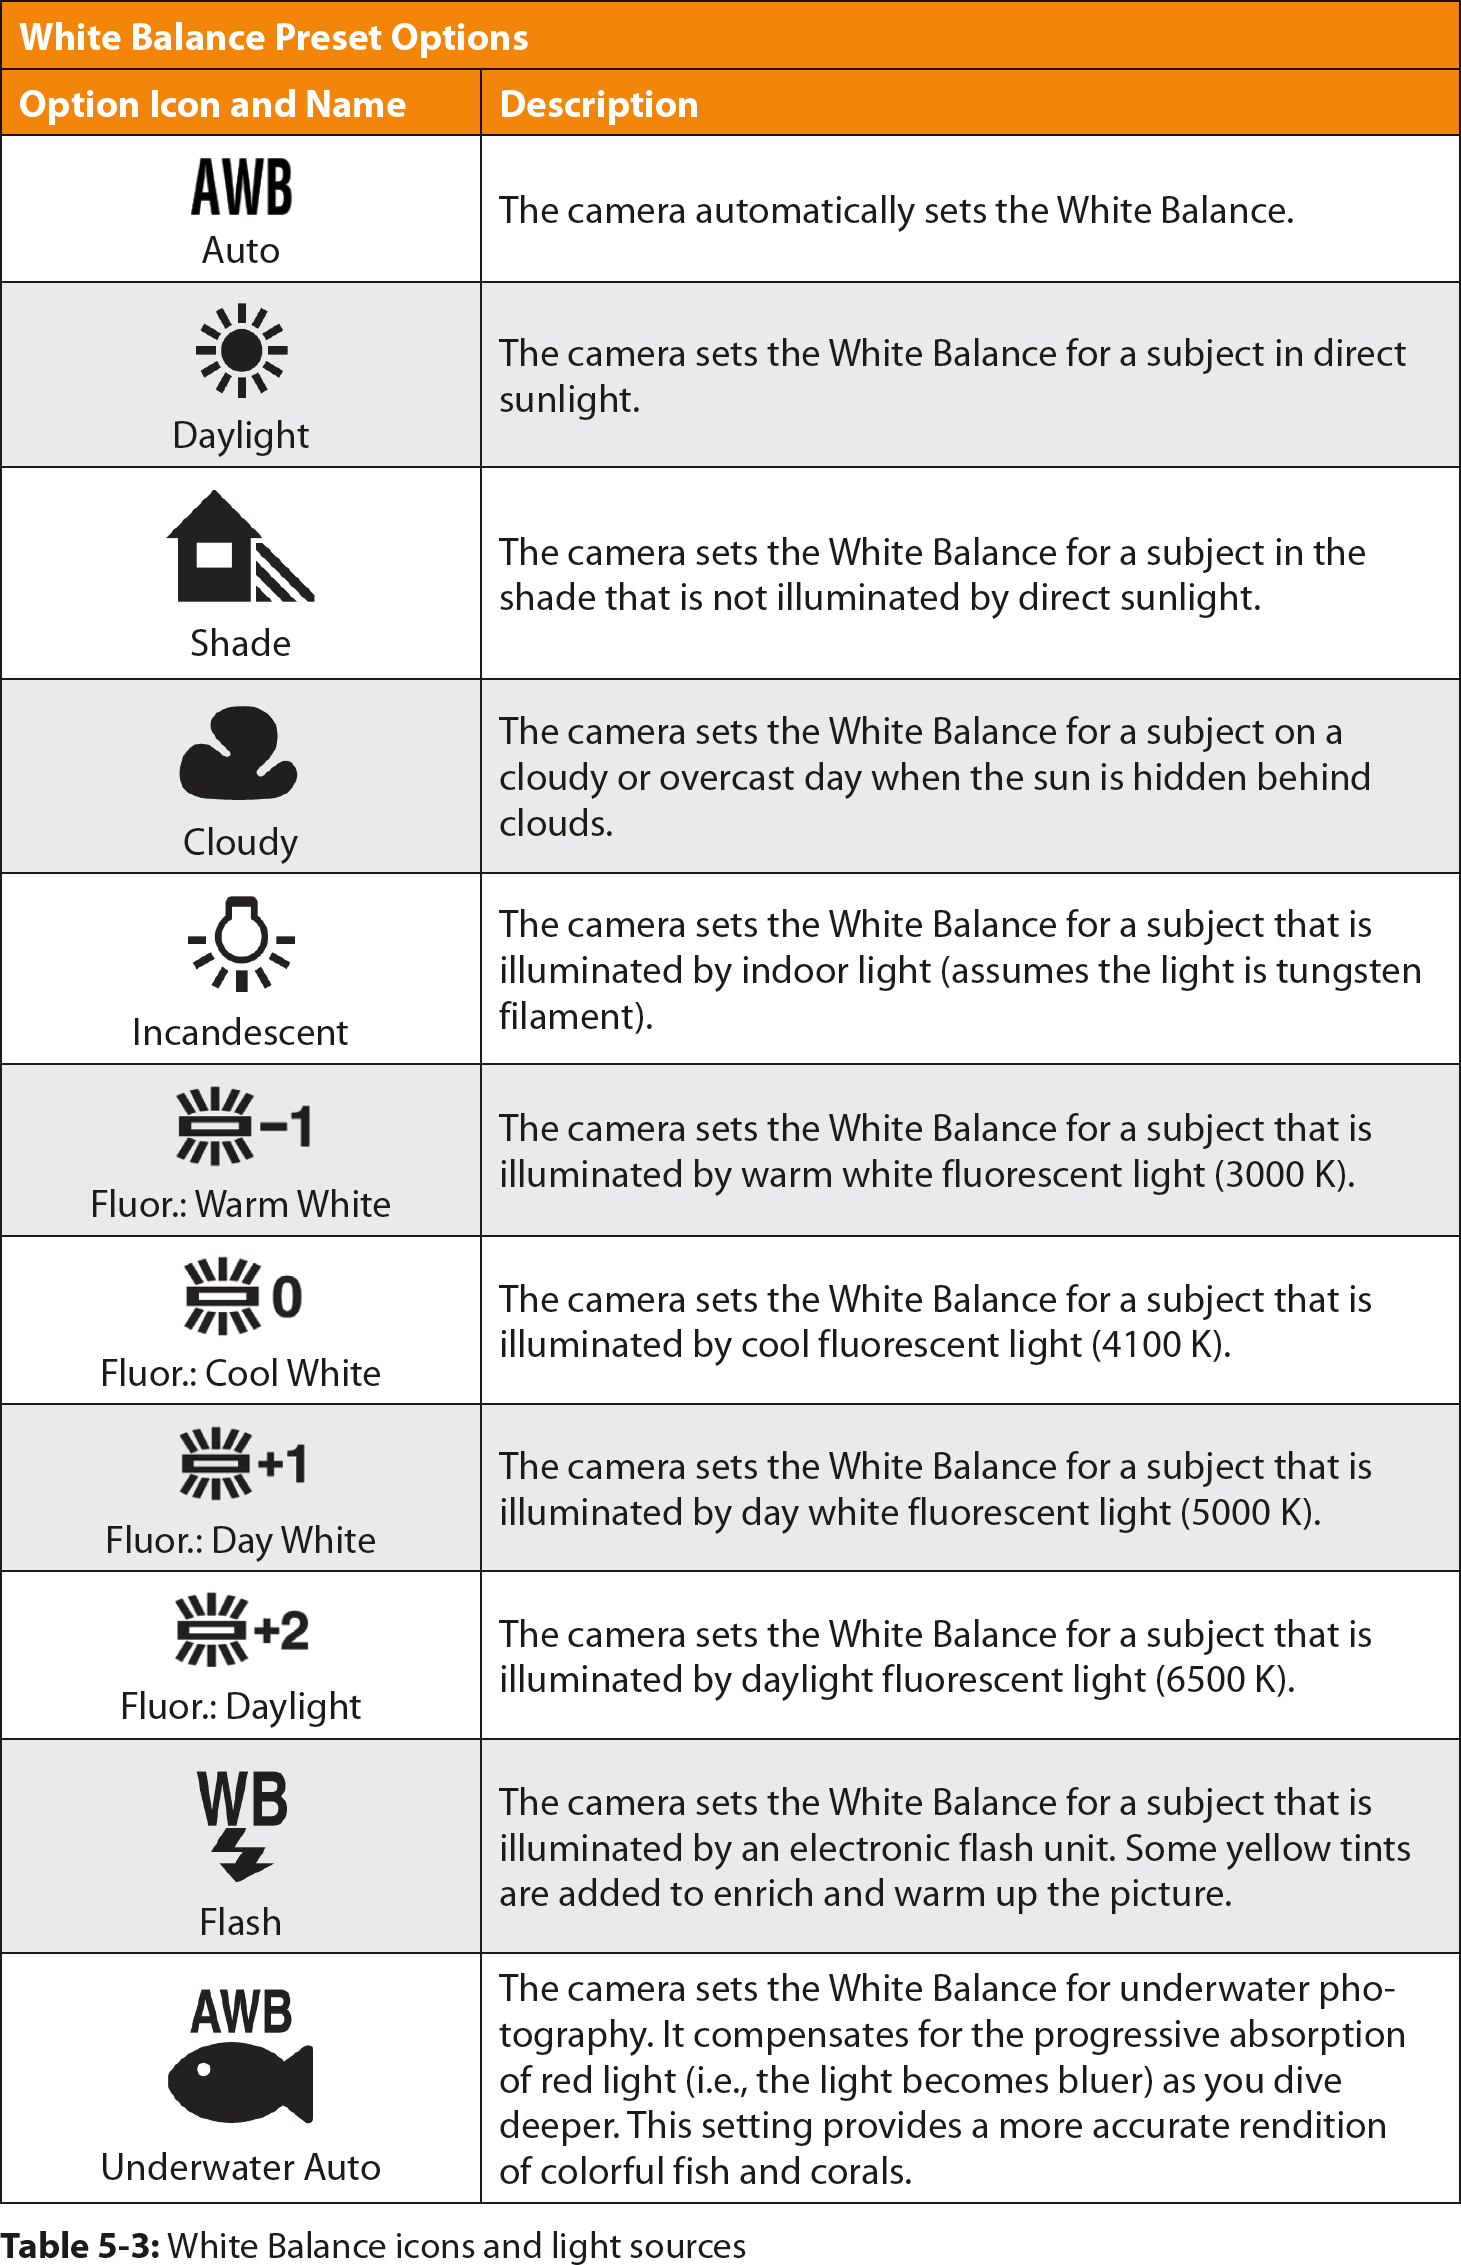
Underwater Auto is an interesting White Balance preset. If you get an underwater housing for your camera so you can take pictures while you snorkel or scuba dive, you will use this preset. As you submerge into the depths, water absorbs red light and gives a blue tinge to the scene. The coloration is strong enough that AWB cannot render sea creatures in their natural colors. Set your camera to Underwater Auto, which subtracts the excessive blue in the scene.
How to Set White Balance: C1, Fn, Quick Navi Screen, or Menu
When we reviewed how we set the White Balance, we noticed that we use only two of the four methods. We use either the Fn button or the C1 button. When you set the White Balance with either of these methods, you will see the effect of the White Balance setting on the Live View screen as you scroll through the presets. This gives you immediate feedback about which preset you should choose. In contrast, the Quick Navi screen and the menu do not provide a live preview. You have to select an option and return to Live View to see the effect.
Remember that the White Balance presets approximate color. For example, the [Incandescent] preset assumes that an ideal bulb emits a specific color of light. In fact, general-use bulbs for indoor lighting have a wide range of color values, and only specialized technical bulbs are rated for specific colors. In many homes, the brightness of an incandescent light can be dimmed, which shifts the color from brilliant white to ruddy red. The camera’s White Balance is often inaccurate under fluorescent bulbs. The color output of fluorescent bulbs varies so much that the a7 II has four presets for them.
The easiest way to decide which setting to use is to cycle through them to see which one provides the most neutral color. Although Sony characterizes the presets as warm white, cool white, day white, and daylight color, you will find that these settings frequently do not match the manufacturer’s description of a bulb. To deal with such conditions, chapter 6 describes how to manually adjust the White Balance.
Recommendations
When you use the P, A, or S modes on your a7 II, you start taking greater control of the camera settings. Many controls that are not available in the automatic modes are accessible in these semiautomatic modes, and you can develop your own artistic style. You can adjust the exposure, ISO, and WB.
When you want to use your camera for point-and-shoot work, you can set it to P mode and set the ISO to [ISO AUTO]. The camera sets the aperture, shutter speed, and ISO. If you don’t care for the shutter speed, you can rotate the control wheel to select a new combination of shutter speed and aperture. If the exposure is not to your liking, you can alter the exposure with exposure compensation. You can also select a white balance to fit the scene. This takes some thought; for example, if you photograph a sunset and set the White Balance preset to [Daylight], the red hues will be recorded with greater saturation than if you set the camera to [AWB], which will attempt to neutralize the predominant red hues and capture a neutral shade.
If you are concerned about depth of field, use A mode because you can select the aperture, and the camera adjusts the shutter speed to provide the correct exposure. A narrow aperture increases the depth of field. A wide aperture reduces it. Most DSLRs and Sony SLT cameras require you to stop the lens down manually by pressing a depth of field preview button. This is not necessary when the a7 II is set to A mode. With this setting, the camera provides a real-time depth of field preview. As you close or open the aperture, the display screen shows the depth of field as the sensor sees it.
When you photograph moving subjects or use a long telephoto lens, set the camera to S mode and set the shutter speed yourself. The camera will adjust the aperture for a correct exposure.
You can set the ISO to adjust the sensitivity of the sensor. Use ISO 100 for the highest-quality images. Use higher ISOs, such as ISO 400–1600, for rapidly moving subjects in daylight. For photography in dim light, use ISO 3200 or, rarely, ISO 6400. You can process images that were taken with a high ISO in third-party noise reduction software, such as Noise Ninja. We recommend that you save all images in RAW format. Virtually all programs that read RAW files have a straightforward command you can use to adjust the white balance if it was set incorrectly in the camera.