7Chapter 7: Additional Features
Introduction
The Sony a7 II has features that make it faster to set up your camera, plus it has commands that add style and pizzazz to your photographs. In this chapter we will cover both how to customize your camera and features that allow you to enhance your pictures.
When you customize your camera, you can quickly access the settings you use most frequently. This makes your photography more enjoyable because your camera becomes an extension of your eye. We will cover the two memory recall options, M1 and M2, on the mode dial. These register settings are stored in the camera’s internal memory. You can also store four customized camera configurations on the memory card, making a total of six memory registers. You can use a different group of saved settings for specific shooting tasks. For example, you can save a group of camera settings for macro photography and another set for scenic shots. Because we do a mix of scientific and artistic photography, we use one memory register for our scientific photography—manual focus, manual exposure, spot metering, custom WB, and ISO 100. We use another memory register for our artistic photography—continuous autofocus, continuous shooting, face recognition, and ISO 400. When we want to switch registers, we turn the mode dial from M1 to M2 and press the center button to load the settings.
You can also assign a function to one of the many customizable buttons. When you want to use the function, you just press the customized button. In addition, you can customize the Fn button so your frequently used commands will be available and you won’t need to search for them in the menu.
All these features allow you to tailor your camera to suit your needs and save you time. How you customize your camera will depend on how you use the camera features, your willingness to learn shortcuts, and your patience to navigate the menu structure. If you are just starting to use your Sony a7 II, we recommend that you limit the number of modifications for now. Change the button assignments gradually as you develop your photographic style. As you gain experience and learn to enjoy your camera, you can customize it as your needs develop.
If you are a new user, you can control how much on-screen help is available. In addition, the Sony a7 II has many exciting features that allow you to generate unique pictures. In this chapter we will cover two features that affect the color and style of an image: Picture Effect and Creative Style. These two features allow you to capture a unique image that would be difficult and time-consuming to create with more conventional photographic methods and post-processing techniques, such as intensifying or muting colors or removing colors entirely to create a monochrome image. The Picture Effect and Creative Style features can inspire you to try different techniques.
We will also cover the remaining still picture shooting mode on the mode dial: Sweep Panorama. This mode allows you to capture wide still pictures. It can take some experimentation, but the results can be very rewarding.
Finally, we will discuss the Auto Obj. Framing command, which attempts to improve your image composition. It provides a good introduction on how to crop an image for the best presentation.
Customizing the Camera Controls
There are 12 buttons that can be customized to execute menu commands. The way you customize them is controlled by two commands in the Setup menu: Function Menu Set. and Custom Key Settings. Together, they can control 23 menu commands. Without customization, you may find that you constantly have to navigate the menu structure to find a command you want to change.
Fn Button
In chapter 5 we talked about how to use the Fn button to make changes to command settings. Now we will cover how to customize the button. Keep in mind that there is little reason to customize the Fn button to access a command that is already assigned to another button. Also, if you reset your camera to the factory defaults with the Setting Reset’s [Initialize] function, the Fn button commands will return to their default assignments. If you customize the Fn button, you should write down the custom settings in case you need to reinitialize your camera.
To change the Fn button values, use the following command (figures 7-1a and 7-1b):
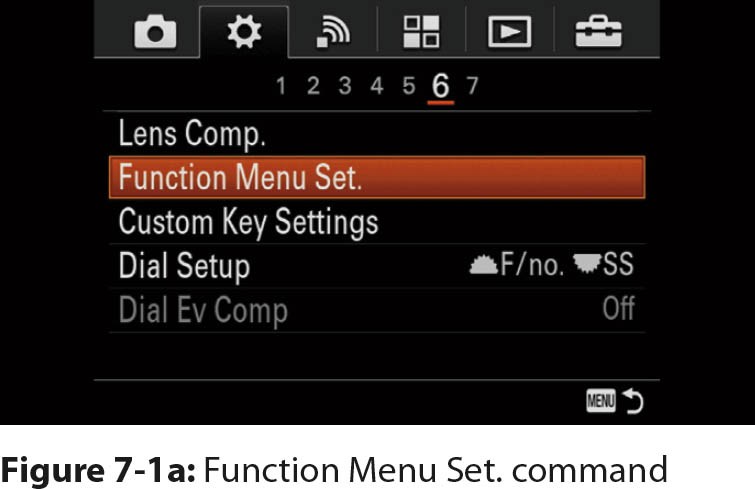
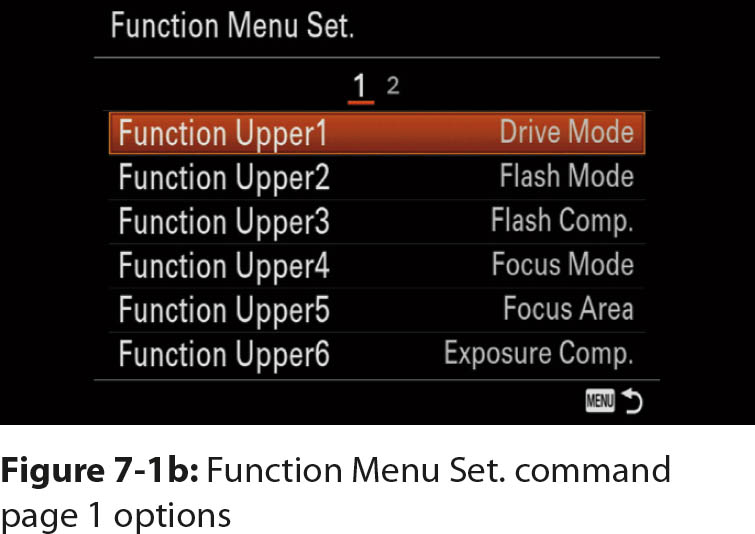
MENU > Custom Settings (6) > Function Menu Set. (1) > [Function Upper1], [Function Upper2], [Function Upper3], [Function Upper4], [Function Upper5], [Function Upper6]
MENU > Custom Settings (6) > Function Menu Set. (2) > [Function Lower1], [Function Lower2], [Function Lower3], [Function Lower4], [Function Lower5], [Function Lower6]
The following is a list of the available options. Each of the Function Menu Set. commands have the same options:
Drive Mode
Flash Mode
Flash Comp.
Focus Mode
Focus Area
Exposure Comp.
ISO
Metering Mode
White Balance
DRO/Auto HDR
Creative Style
Shoot Mode
Picture Effect
Picture Profile
Center Lock-on AF
Smile/Face Detect.
![]() Soft Skin Effect
Soft Skin Effect
![]() Auto Obj. Framing
Auto Obj. Framing
![]() Image Size
Image Size
![]() Aspect Ratio
Aspect Ratio
![]() Quality
Quality
SteadyShot
SteadyShot Adjust.
SteadyS. Focal Len.
Audio Rec Level
Zebra
Grid Line
![]() Marker Display
Marker Display
Audio Level Display
Peaking Level
Peaking Color
Not set
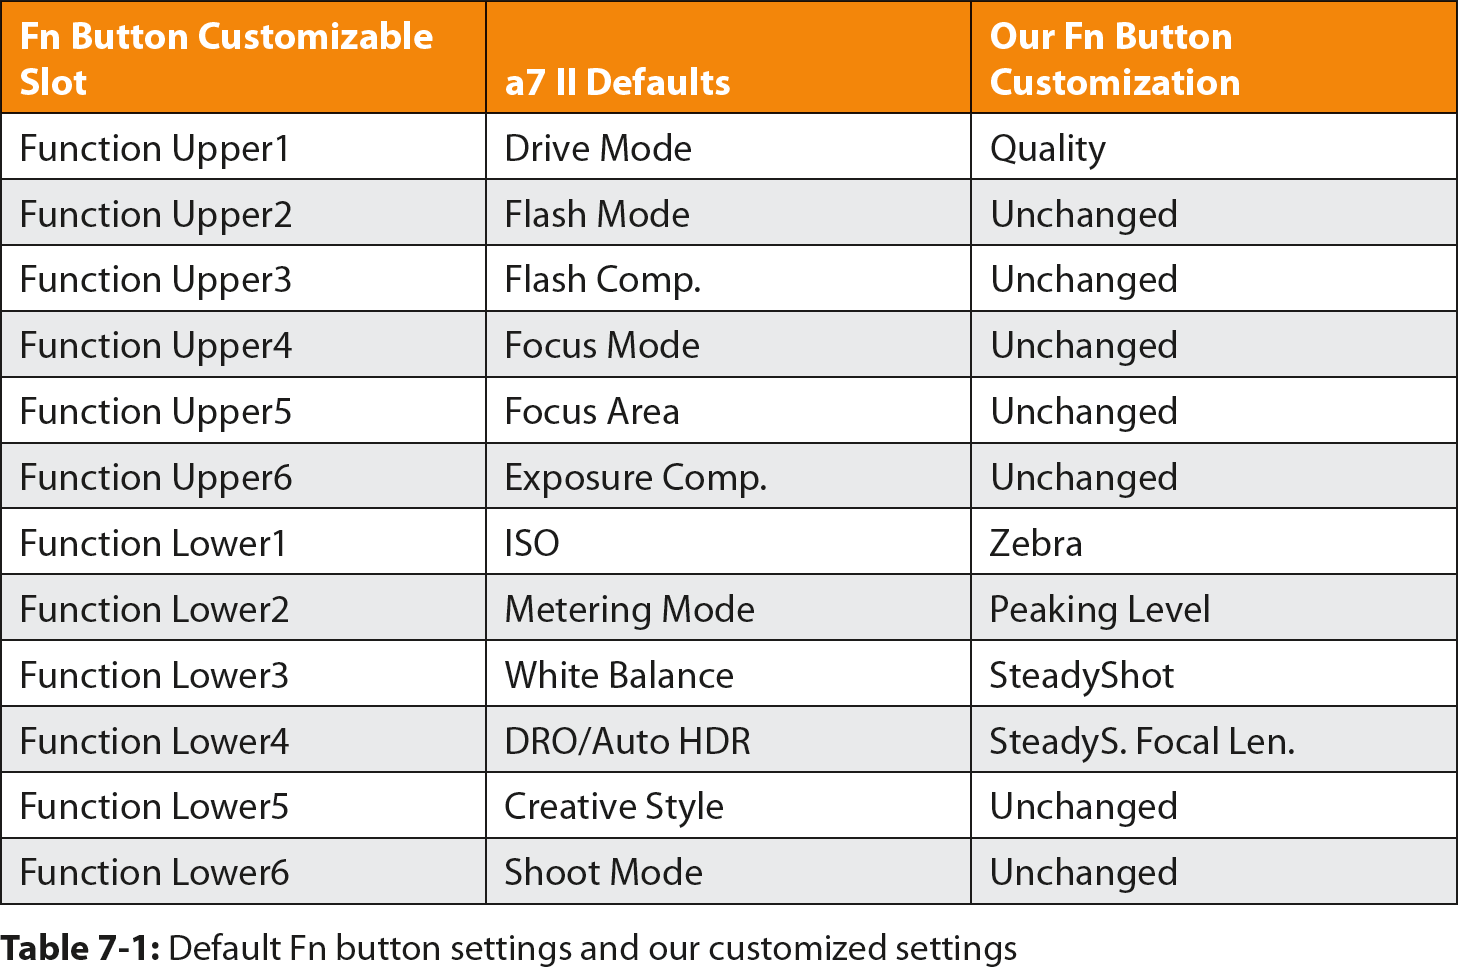
Table 7-1 lists the camera defaults and our Fn button settings. The way we customize the Fn button may not work for the types of pictures you take. You may need to change one or more of the settings because you use different commands more frequently for specific shooting styles, such as indoor portraits and daytime landscapes.

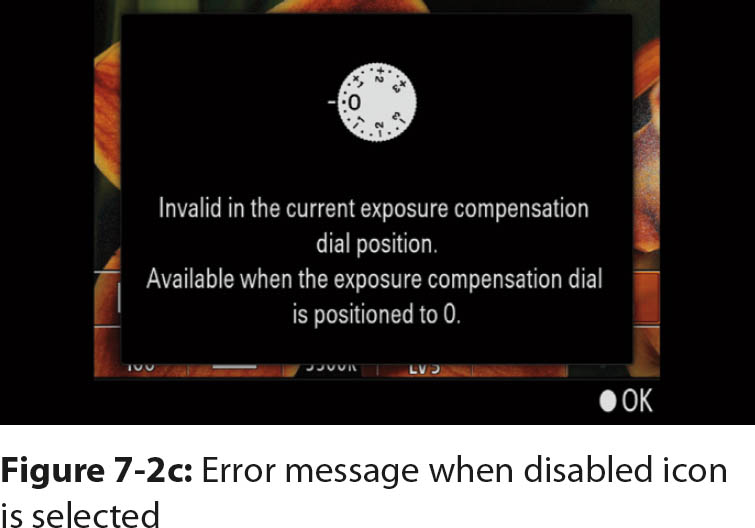
If you set one of the Function Menu Set. commands to the [Not set] value, the slot will be void, and no command icon will be displayed in that position along the bottom of the screen (figure 7-2). Keep in mind that not all commands will be enabled; it depends on the shooting mode and other menu settings. For example, if the Picture Effect command is assigned to one of the Fn button fields, the command icon will be disabled (grayed out) if the Quality command is set to [RAW] or [RAW & JPEG]. An error message will appear if you press the center button to select a disabled icon (figure 7-2c). As you navigate the Fn icons, you will automatically skip over any slots that are set to the [Not set] option.
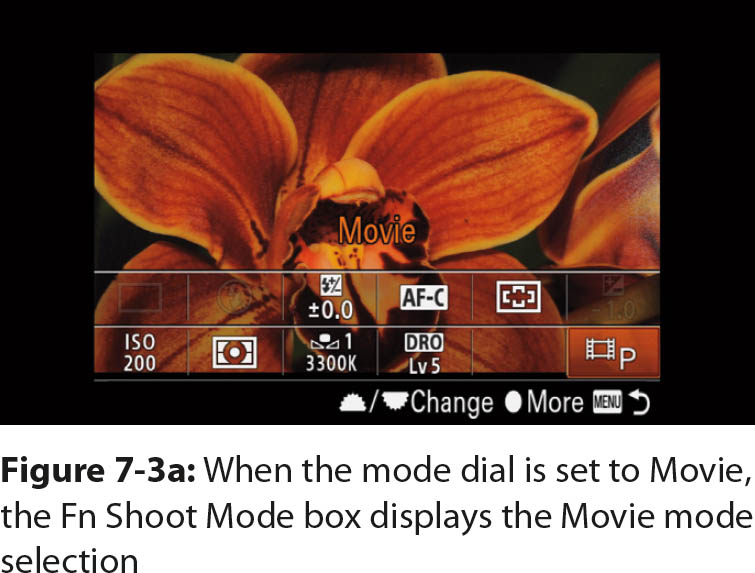
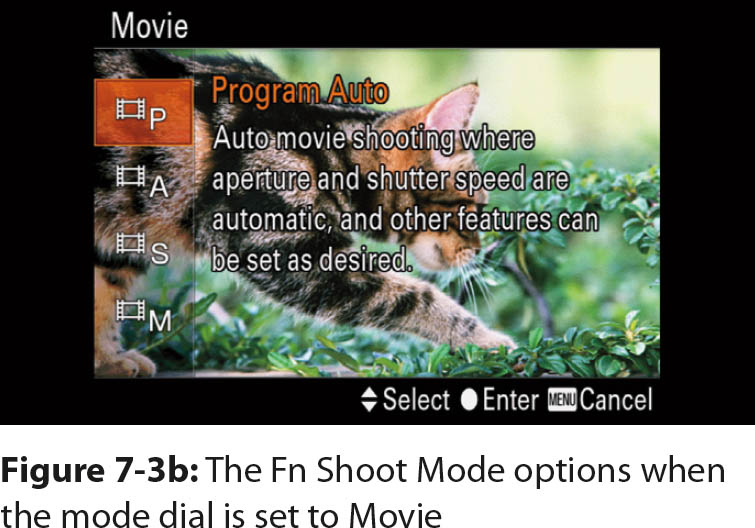
If you assign either Shoot Mode or Exposure Comp. to the Fn button, be aware that they work differently than when you navigate to them in the menu. When the Shoot Mode option is assigned to the Fn button, it covers three menu functions: Auto mode, where you can select either Intelligent Auto or Superior Auto; SCN selection, where you can select one of the nine predefined scene options; and Movie mode, where you can select P, A, S, or M mode. The Fn button’s Shoot Mode icon is enabled only when the mode dial is set to AUTO, SCN, or Movie. In these cases, the selection on the mode dial will be reflected in the assigned Fn box (figure 7-3a). Highlight the Fn box and press the center button, and the associated mode dial options will be displayed so you can select a value (figure 7-3b). Otherwise, the Shoot Mode Fn button’s assigned box is disabled with the mode dial selection displayed in the box.
When the Exposure Comp. command is assigned to an Fn button option, the associated Fn box is enabled only when the exposure compensation dial on top of the camera is set to zero. Otherwise, the nonzero exposure compensation value will be grayed out in the associated Fn box. Keep in mind that the exposure compensation dial has a smaller range, ±3 EV, than the Exposure Comp. menu option, which is ±5 EV. The Fn button option will use the menu’s Exposure Comp. command and allow you to vary the exposure up to ±2 EV more than the corresponding dial.
Other Customization Options
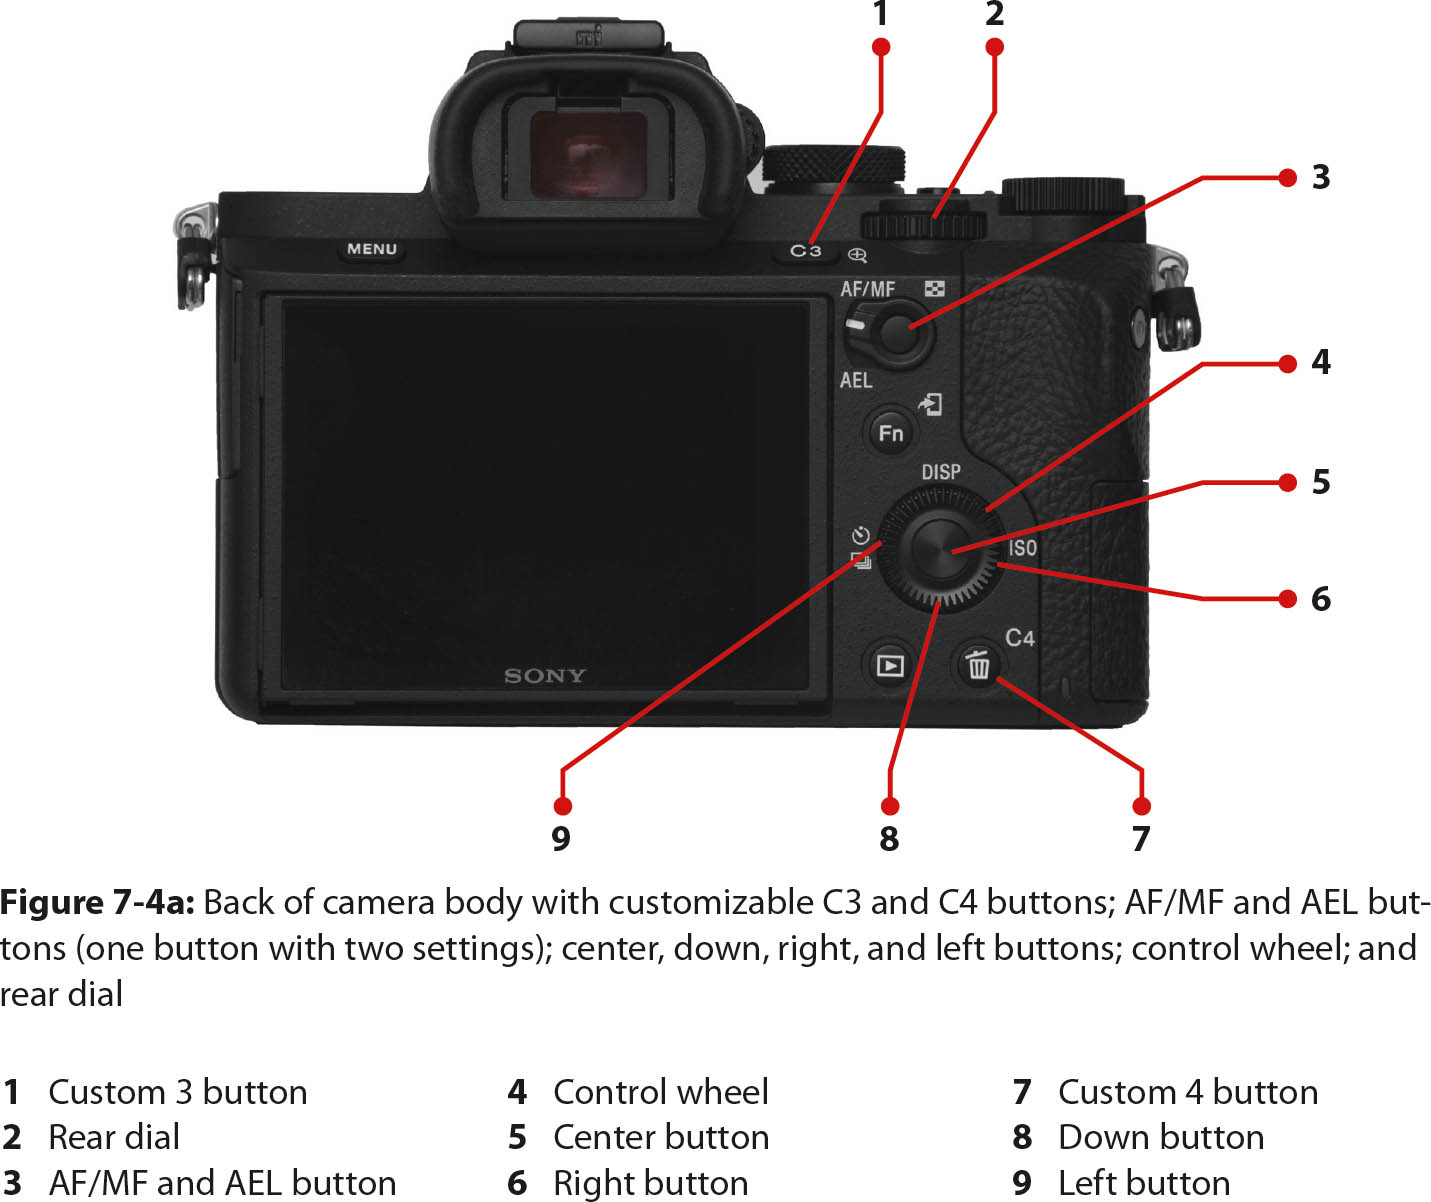
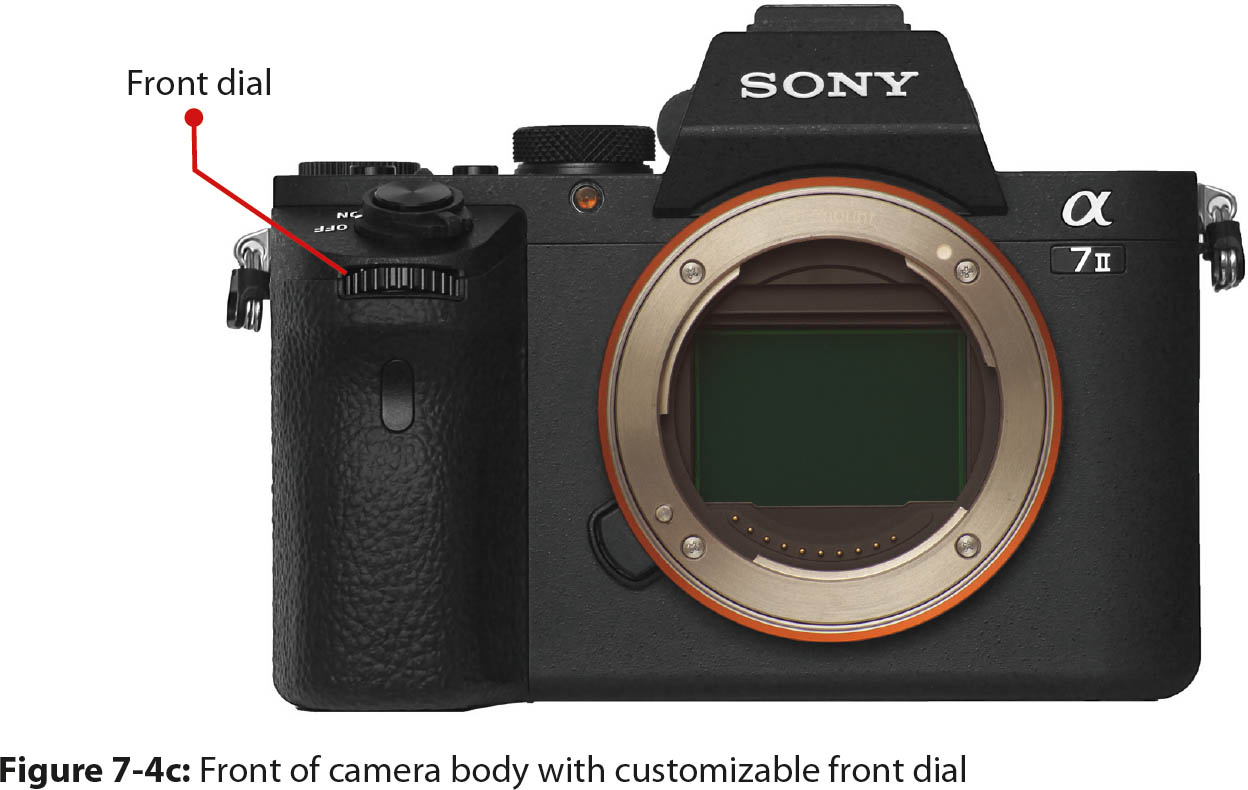
In addition to customizing the Fn button, the Custom Key Settings and Dial Setup commands allow you to further modify your camera. You can assign functions to 14 additional buttons, wheels, and dials (figures 7-4a, 7-4b, and 7-4c). The Focus Hold button, not shown in the figures, resides on an interchangeable lens.
Custom Key Settings Command
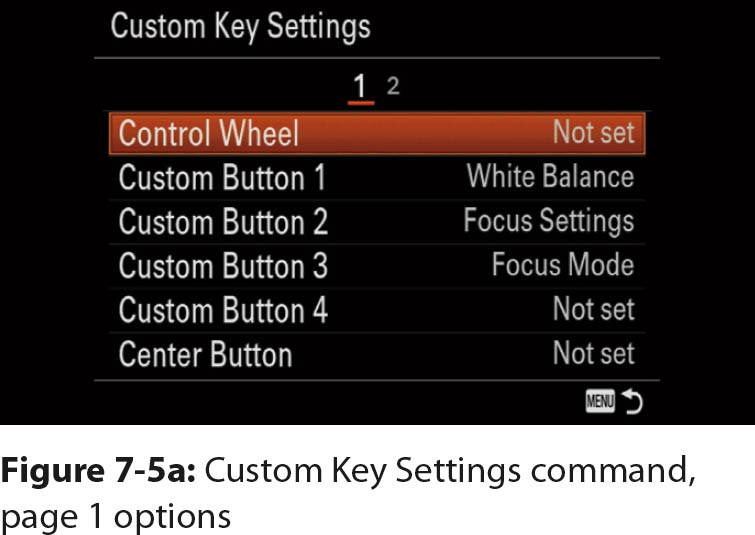
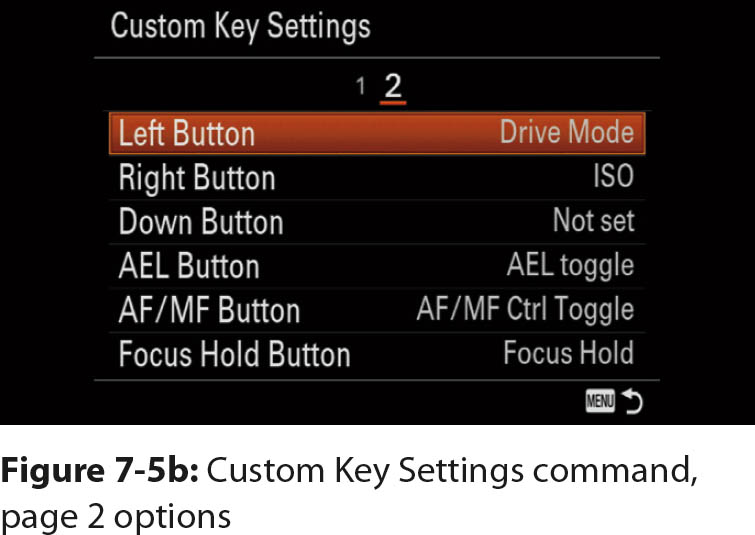
The Custom Key Settings command controls most customizations (figure 7-5a and b):
MENU > Custom Settings (6) > Custom Key Settings (1) > [Control Wheel], [Custom Button1], [Custom Button2], [Custom Button3], [Custom Button4], [Center Button]
MENU > Custom Settings (6) > Custom Key Settings (2) > [Left Button], [Right Button], [Down Button], [AEL Button], [AF/MF Button], [Focus Hold Button]

Some of the customization commands have only a few choices, and others have many. The Control Wheel command has five options:
MENU > Custom Settings (6) > Custom Key Settings (1) > Control Wheel > [ISO], [White Balance], [Creative Style], [Picture Effect], [Not set]
Most of the Control Wheel command settings display their assigned menu along the bottom of the screen when you rotate the control wheel in Live View, unless the command is not active because of another setting. For example, if Control Wheel is set to display the Picture Effect command, and Quality is set to RAW, nothing will happen when you rotate the control wheel in Live View. The [Not set] option works the same way; it deactivates the control wheel when you rotate it in Live View, regardless of other camera settings.
The other customizable buttons within the Custom Key Settings command work the same except for the AF/MF and AEL buttons. Technically, they are the same button. You move a lever to determine if the button activates the AEL or AF/MF function. By default, the AEL button controls how the camera’s recommended exposure will be retained when you press the button. The AF/MF button allows you to switch from automatic focus to manual focus.
If you don’t often use the AF/MF or AEL functions, you might want to customize these two buttons so you can easily access commands you use more frequently. Since we do use these functions, we changed the AF/MF button from its default [AF/MF Control Hold] to [AF/MF Ctrl Toggle]. We find it cumbersome to continually press the button to keep the lens in manual focus mode. It’s too easy to release the button while you turn the focus ring and therefore mistakenly switch to automatic focus. If you use the toggle command, one press enables manual focus, and another press enables automatic focus.
The following list shows the options you can choose for all the Custom Key Settings commands except the Control Wheel:
Drive Mode
Flash Mode
Flash Comp.
Focus Mode
Focus Area
Focus Settings
Exposure Comp.
ISO
Metering Mode
White Balance
DRO/Auto HDR
Creative Style
Picture Effect
Picture Profile
Smile/Face Detect.
![]() Soft Skin Effect
Soft Skin Effect
![]() Auto Obj. Framing
Auto Obj. Framing
SteadyShot
SteadyShot Adjust.
SteadyS. Focal Len.
Audio Rec Level
![]() Image Size
Image Size
![]() Aspect Ratio
Aspect Ratio
![]() Quality
Quality
In-Camera Guide
Memory
AEL hold
AEL toggle
![]() AEL hold
AEL hold
![]() AEL toggle
AEL toggle
FEL Lock hold
FEL Lock toggle
FEL Lock/AEL hold
FEL Lock/AEL tggle.
AF/MF Control Hold
AF/MF Ctrl Toggle
Center Lock-on AF
Eye AF
AF On
Focus Hold
Aperture Preview
Shot. Result Preview
Zoom
Focus Magnifier
Deactivate Monitor
Zebra
Grid Line
![]() Marker Disp. Sel.
Marker Disp. Sel.
Audio Level Display
Peaking Level
Peaking Color
Send to Smartphone
Download Appli.
Application List
Monitor Brightness
TC/UB Disp. Switch
Not set
There are a few exceptions. One additional option, Standard, is available only for the Center Button command, and the following options are not available for assignment to the Right Button, Left Button, and Down Button commands:
AEL hold
![]() AEL hold
AEL hold
FEL Lock hold
FEL Lock/AEL hold
AF/MF Control Hold
Eye AF
AF On
Aperture Preview
Shot. Result Preview
When you press a customized button or turn a customized wheel, it will activate the command exactly the same as if you access it through the menu. There are some exceptions because several commands are not available in the menu: [Standard], [In-Camera Guide], [AEL hold], [AEL toggle], [FEL Lock hold], [FEL Lock toggle], [FEL Lock/AEL hold], [FEL Lock/AEL tggle.], [AF/MF Control Hold], [AF/MF Ctrl Toggle], [Eye AF], [Aperture Preview], [Shot. Result Preview], [Deactivate Monitor], and [Download Appli.]. We will discuss many of these functions in the following sections.
Standard Command
When the center button is set to the [Standard] option, it acts as an Enter button when you press it.
In-Camera Guide Command
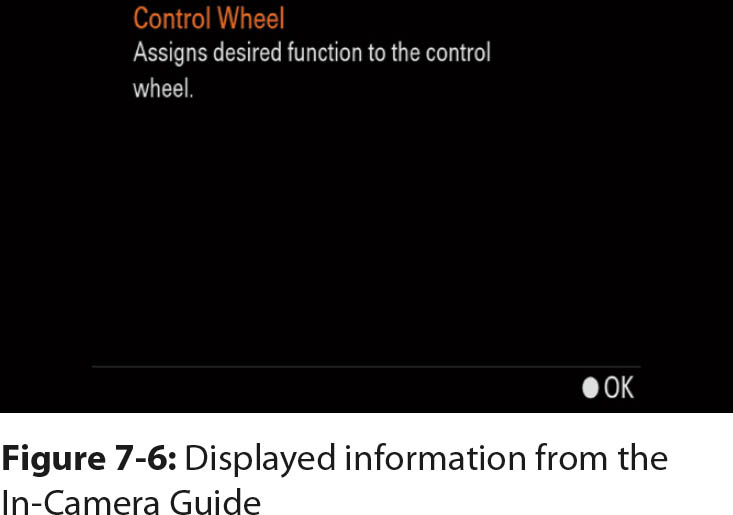
If this is your first Sony camera, you might want to display help information about a selected command and its associated options. You set it up with the [In-Camera Guide] option in the Custom Key Settings command. If you assign this function to one of the customizable buttons or the control wheel, every time you view a command or one of its options through the camera menu, Fn button, or one of the other buttons, you can press that customized key to view a short description about the command or menu option (figure 7-6). It isn’t much information, but it may be enough to remind you what the command or option does and how to use it. Press the customized key again, or press the MENU button, to return to the command or its option.
AEL Hold Command
The AEL hold option allows you to retain the exposure setting for a scene while you move the camera to another scene. Set the AF/MF/AEL lever to AEL and continuously press the AEL button. To keep the exposure locked, maintain pressure on the AEL button. This command works only if you set the AEL Button option within the Custom Settings command.
AEL Toggle Command
The AEL toggle option ensures you can lock the exposure with one press of the button. If you want to remove the lock, press the button a second time. This can be helpful because it is tiresome to maintain pressure on the AEL button for a long time. The exposure setting will be retained even if you press the shutter button. One press of the button locks the exposure, and it won’t be released until you press the button a second time. To activate this function, set the AF/MF/AEL lever to AEL.
AF/MF Control Hold and Toggle Commands
The AF/MF Control assignments allow the designated button to switch your camera from autofocus to manual focus. It requires a Sony AF lens to be attached. When the AF/MF Control Hold command is assigned, you have to keep the customized button depressed to use manual focus. If you release the button, the camera will return to AF. In contrast, the AF/MF Ctrl. Toggle switches your camera from automatic focus to manual focus with a press of the button; that is, if you press the button to switch from AF to MF, the camera will remain in MF until you press the button again. With both the hold and toggle commands, a distance scale will appear when the camera is in manual focus and you turn the lens focus ring.
Eye AF Command
The Eye AF function gives you increased focusing precision because the camera will focus on the eye of a detected face. When face detection is active and the camera identifies a face, press the center button. The camera will attempt to find, then focus on an eye. When the operation is successful, a small green square will appear over the eye. The Custom Key Settings default for the center button in Live View is Eye AF, but you can assign it to another button.
Deactivate Monitor Command
Sometimes you may not want the light from the camera monitor to come on. You can customize a button for the Deactivate Monitor option so you can toggle the monitor on and off. Even when you toggle the monitor off with this command, the bottom row of basic camera settings (shutter speed, aperture, exposure compensation, and ISO) will still be displayed. The only data display format that does not include this row is [For viewfinder]. In that case, the Deactivate Monitor option displays a completely blank screen.
Aperture Preview and Shot. Result Preview Commands
Both of these commands close down the aperture and provide a depth of field preview on the monitor and in the viewfinder. These commands are necessary when you use P or S mode. In both modes, the lens aperture is maximally open during live preview, so the lens aperture has to be stopped down to provide a depth of field preview. This function is enabled with the Aperture Preview and Shot. Result Preview commands so you can see if the background and foreground are sufficiently focused or blurred.
These two commands are not needed when you shoot in M or A mode. These modes use closed aperture metering, which means the lens is always stopped down to the working aperture. Both modes provide a real-time depth-of-field preview in the viewfinder or on the monitor.
You may prefer to use Shot. Result Preview because it provides a preview of the effects of long shutter speeds. At shutter speeds longer than 1/30 second, many moving objects will be recorded as a blur. You can see the blur when you activate Shot. Result Preview.
Download Appli. Command
Although you can execute an application through the menu, the Download Appli. command allows you to assign a specific application to a key for faster execution. We do not execute downloaded applications often enough to warrant a dedicated key for this command.
Customizing the Front and Rear Dials
You can control which function the front and rear dials execute in Live View with the following command:
MENU > Custom Settings (6) > Dial Setup > [![]() ], [
], [![]() ]
]
(SS represents the shutter speed, and F/no. represents the aperture or lens opening.)
The ![]() option causes the front dial to change the shutter speed and the rear dial to change the aperture. The
option causes the front dial to change the shutter speed and the rear dial to change the aperture. The ![]() option reverses the options; the front dial changes the aperture and the rear dial changes the shutter speed.
option reverses the options; the front dial changes the aperture and the rear dial changes the shutter speed.
Customization Summary
You can access the camera commands through the menu structure, but this approach is tedious and impractical when you are photographing in the field. For example, to turn on the Creative Style function, you press the MENU button, navigate to page 5 in the Camera Settings menu, scroll down to Creative Style, and press the center button to access the submenu. It’s faster and more convenient to assign the command to a button so you can access the Creative Style menu with a single press.
Keep in mind that assigning a command to a button does not set a value; you simply access the command so you can set a value. Also remember that the customized buttons, dials, and wheel work only in Live View. For example, the Center Lock-on AF command uses the center button to assign an object for tracking. You are not considered to be in Live View at this point since you are actually in the menu activating a command. After you select an object, the camera returns to Live View, and the customized button and wheel assignments will be active.
If you need to reinitialize your camera to return it to the factory defaults, your customized settings will be lost. Keep notes on your customized settings so after you reinitialize your camera you can restore them.
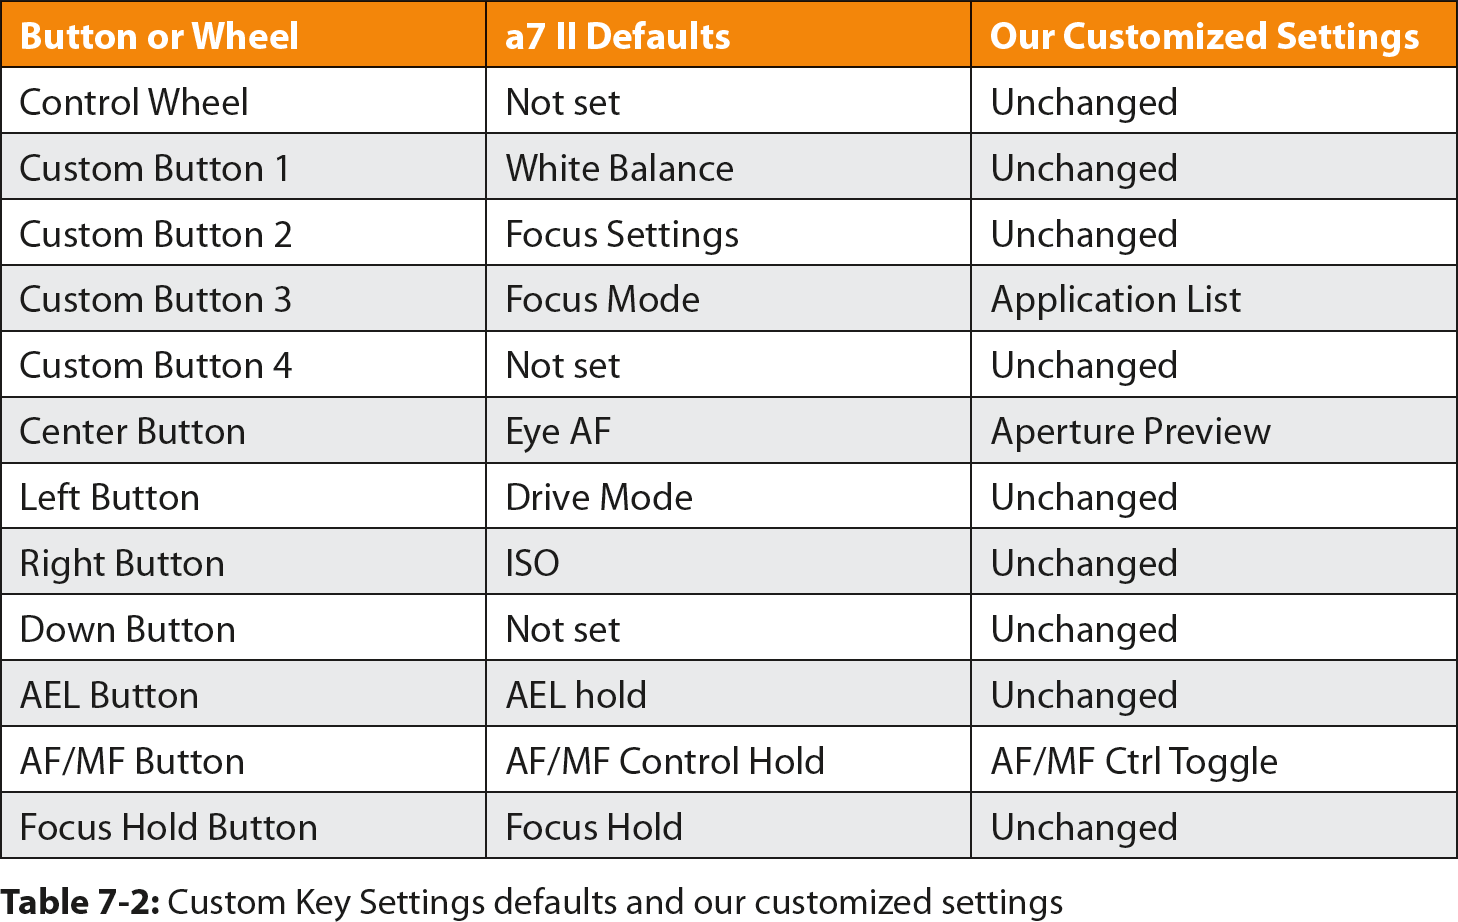
Table 7-2 contains a list of the Custom Key Settings command’s customizable buttons and control wheel defaults. We have included our own settings. They work well for us, but if our needs change we can easily make adjustments to quickly access the commands we need.
Memory Recall Shooting Modes
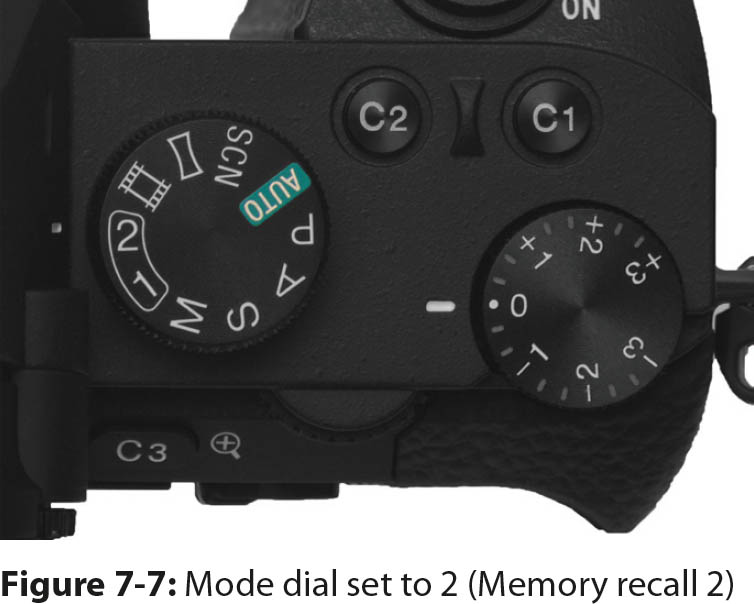
The mode dial has two customizable options: [1] and [2] (figure 7-7). They each represent a set of registers where you can store command settings. The settings are saved in the camera’s internal memory, and they are recalled and applied when you make the corresponding selection on the mode dial.
You can also save up to four additional groups of memory settings on the memory card: M1, M2, M3, and M4. You can recall and apply these settings. First, establish a set of command values you want to recall, then save them with the following command, which is available from any shooting mode on the mode dial:
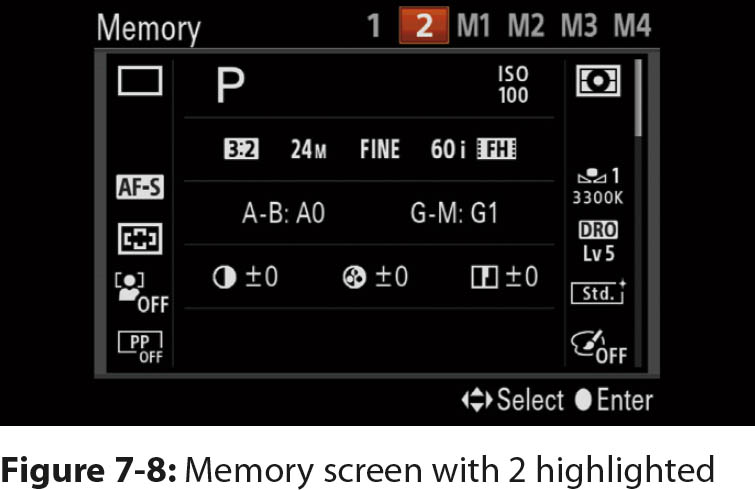
MENU > Camera Settings (9) > Memory > [1], [2], [M1], [M2], [M3], [M4]
The settings will be displayed on the screen, and a list of available registers will appear across the top of the screen (figure 7-8). Use the control wheel or right and left buttons to move to the register you want to use, and press the center button to save the settings in that register. Remember, the [M1] through [M4] registers are stored on the memory card, and their settings can be transferred to another Sony a7 II by inserting the memory card into that camera.
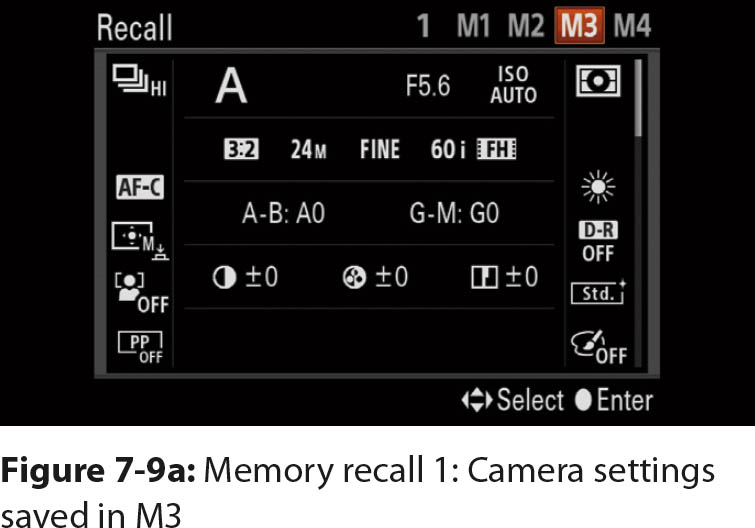
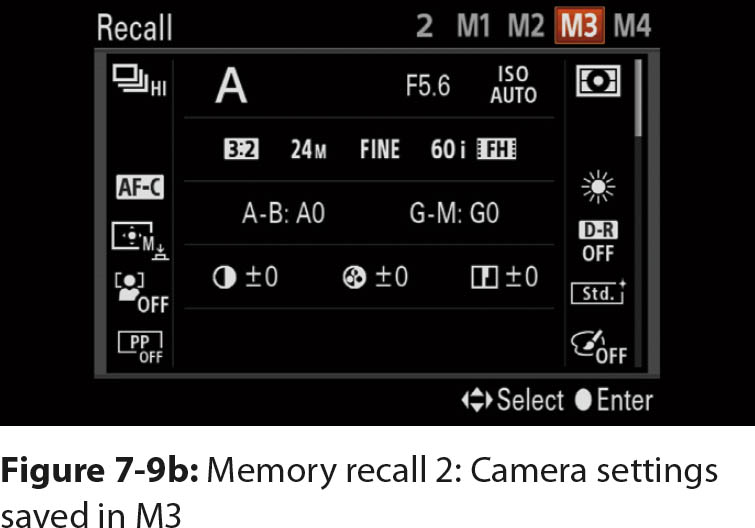
To use the saved camera settings, rotate the mode dial to 1 or 2. Because M1 through M4 are saved on the inserted memory card, you can access them when you select either Memory recall 1 or Memory recall 2 (figures 7-9a and 7-9b).
Use the left and right buttons to navigate through the memory registers, and highlight the register you want to recall. Press the center button to apply the settings to the camera and return to Live View so you can compose your picture and shoot.
Remember that registers 1 and 2 retain settings in the camera’s internal memory, so they will be deleted if you execute the Reset Settings command. M1 through M4 are stored on the memory card, so they will not be affected if you reset the camera. However, if you format the memory card, they will be deleted.
The a7 II menu also has a Memory recall command:
MENU > Camera Settings (9) > Memory recall > [mode dial number], [M1], [M2], [M3], [M4]
This command is enabled only when the mode dial is set to either 1 or 2. It functions exactly the same way as when you initially turned the mode dial to 1 or 2. You can use Memory recall if you want to change which memory register is in use. For example, if you are using the settings in M3 and want to use the settings in M4, you can execute the Memory recall command and select M4. However, because you can’t assign this command to a customized button, we find it easier to move the mode dial off then back on to the Memory recall option.
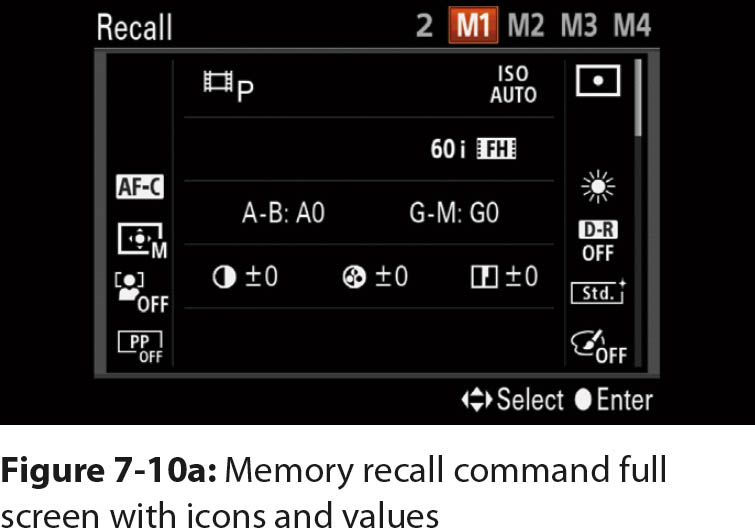
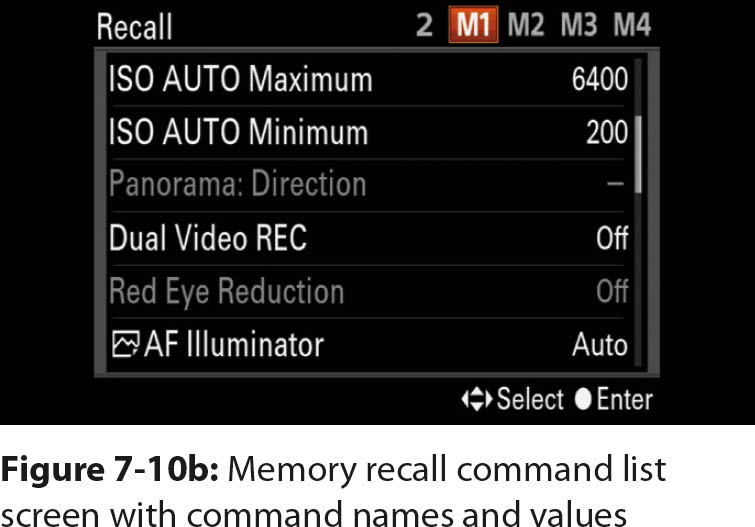
For the highlighted memory option, you can view a list of commands and their settings by pressing the up or down button (figures 7-10a and 7-10b).
You can make adjustments to the applied Memory recall settings, but unless you go back and reenter the Memory command and save the settings, the changes will be temporary.
How Many Groups of Camera Settings Can I Save?
The number is unlimited. You can store only two in the camera’s internal memory, and M1 through M4 are stored on the memory card. You can have multiple memory cards that each have M1 through M4 settings. If you use multiple cards, we recommend that you designate them for specific types of shooting. For example, you might have one memory card for movies, another for indoor photography, and a third for outdoor photography. You can organize the M1 through M4 registers to contain specific settings for those types of shooting. This might seem over the top, but if you want to repeatedly use special settings, this is a good way to organize them. Use permanent ink to label each memory card with the type of photography you will use it for. Then remember to insert the correct memory card for the types of images you want to shoot.
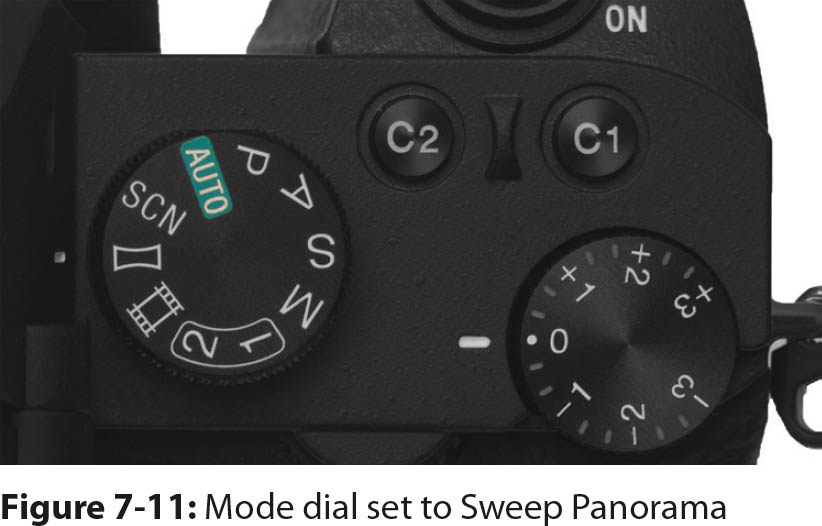
Sweep Panorama Mode
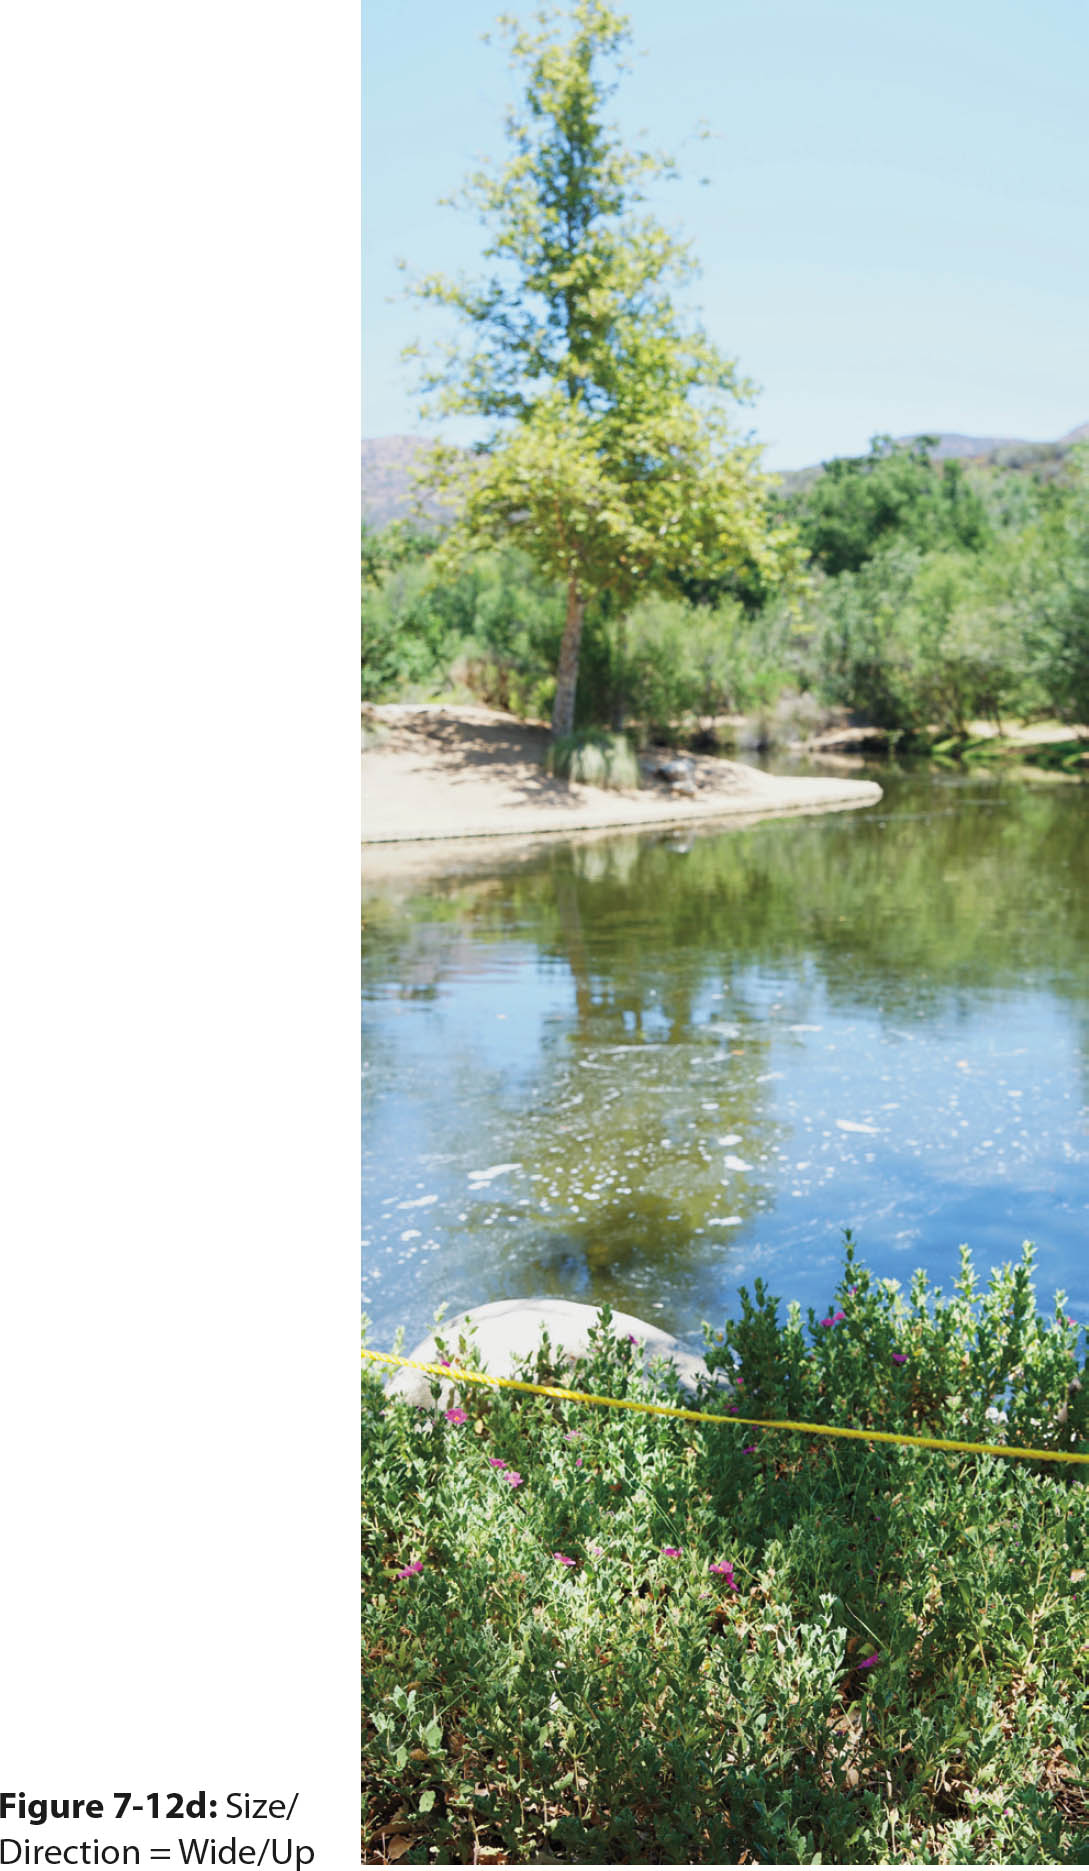
With the Sony a7 II, you can use Sweep Panorama mode (figure 7-11) to build a wide view of a scene.
You can create a panoramic picture by slowly and smoothly panning (sweeping) a large area either horizontally or vertically. The camera takes a series of shots as you sweep, then it stitches them together to form a panoramic image.
To capture a good panoramic image, pan the camera at a fairly constant rate—neither too fast nor too slow—on a level horizontal or vertical plane. If there is substantial variation in the speed or if you don’t keep the camera level, it will stop shooting and display an error message. This is a great time to use the Level we described in chapter 3.
The camera automatically sets the shutter speed, ISO, and aperture at the beginning of the sweep. These settings remain fixed throughout the recording, so if the lighting conditions change as you sweep, there may be under- or overexposed areas, which can result in an unacceptable image. You can also select and apply the WB and a Creative Style option.
The camera does an excellent job of stitching the individual shots to form a wide-frame picture. The software tolerates small variations in the sweep rate and deviations from a level sweep. The camera will not use a shutter speed slower than 1/60 second. Although this helps reduce blurring caused by movement within the image, it can sometimes cause intriguing images of moving objects when you sweep in the direction of their travel. For example, if you photograph cars speeding along a road, you may capture the same cars in different areas of the pan, so they appear multiple times in the final picture. It’s certainly worth experimenting with this mode.
There are some limitations. You cannot use the following commands in Sweep Panorama mode: Flash Mode; any Drive Mode options except Single Shooting; Picture Effect; Center Lock-on AF; Focus Area command’s Lock-on AF option; Smile/Face Detect.; Auto Obj. Framing; and DRO/Auto HDR.
As mentioned in chapter 3, during playback, panorama pictures are first displayed in their entirety. Press the center button to enlarge the image and view the picture sweeping across the screen. There are two ways to enlarge the picture. First, after you initiate playback, press the center button to pause, then press the C3/Enlarge button to magnify the image. Second, you can enlarge the image after you enter Playback mode (but before you start playing back the picture) by executing the Enlarge Image command:
MENU > Playback (2) > Enlarge Image
With both methods, after you initially enlarge the image, you can continue to press the C3/Enlarge button to further magnify it. If the magnification is too high when you press the C3 button several times, you can reduce the power by rotating the control wheel. You can also press the right or left buttons to move through the image. In both cases, you can press the Image Index button to decrease the size of the image, or press the center button to exit the magnification, and return to Playback mode.
Sweep Panorama Mode Commands
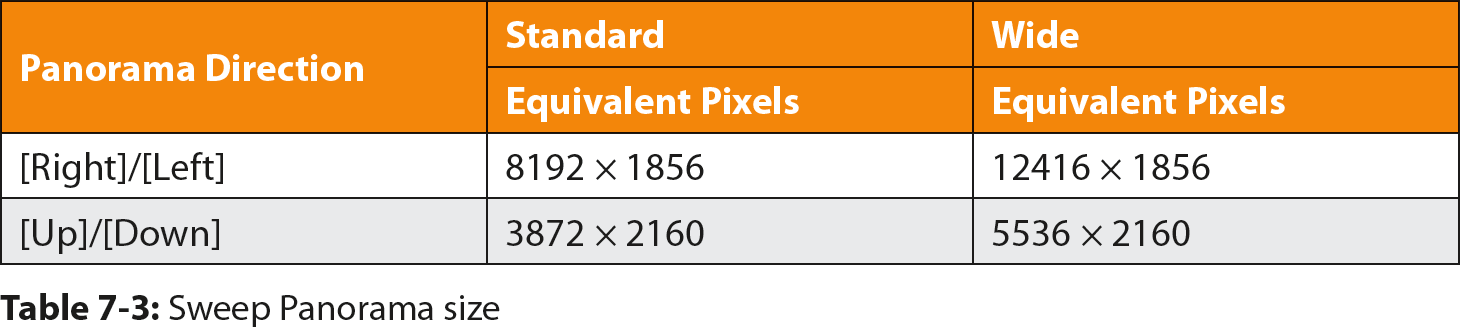
Two menu commands are associated with panorama shots: Panorama: Size and Panorama: Direction. Both are enabled when the mode dial is set to Sweep Panorama. These commands control the width of the panorama and the direction you sweep the camera:
MENU > Camera Settings (1) > Panorama: Size > [Standard], [Wide]
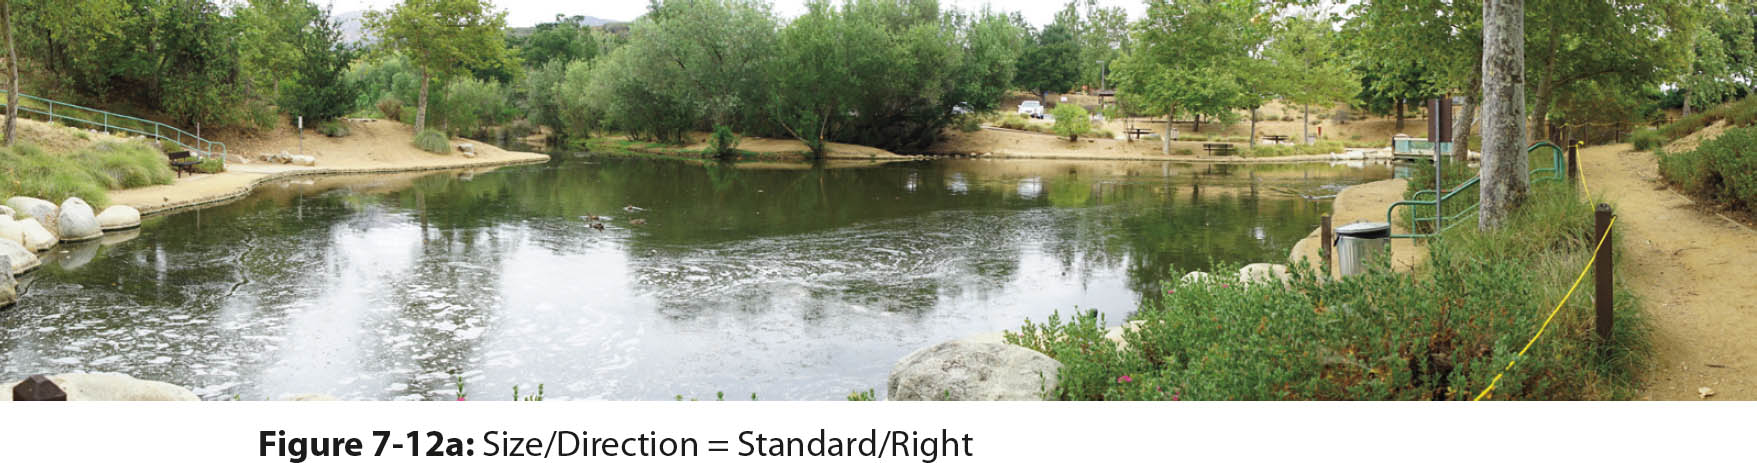
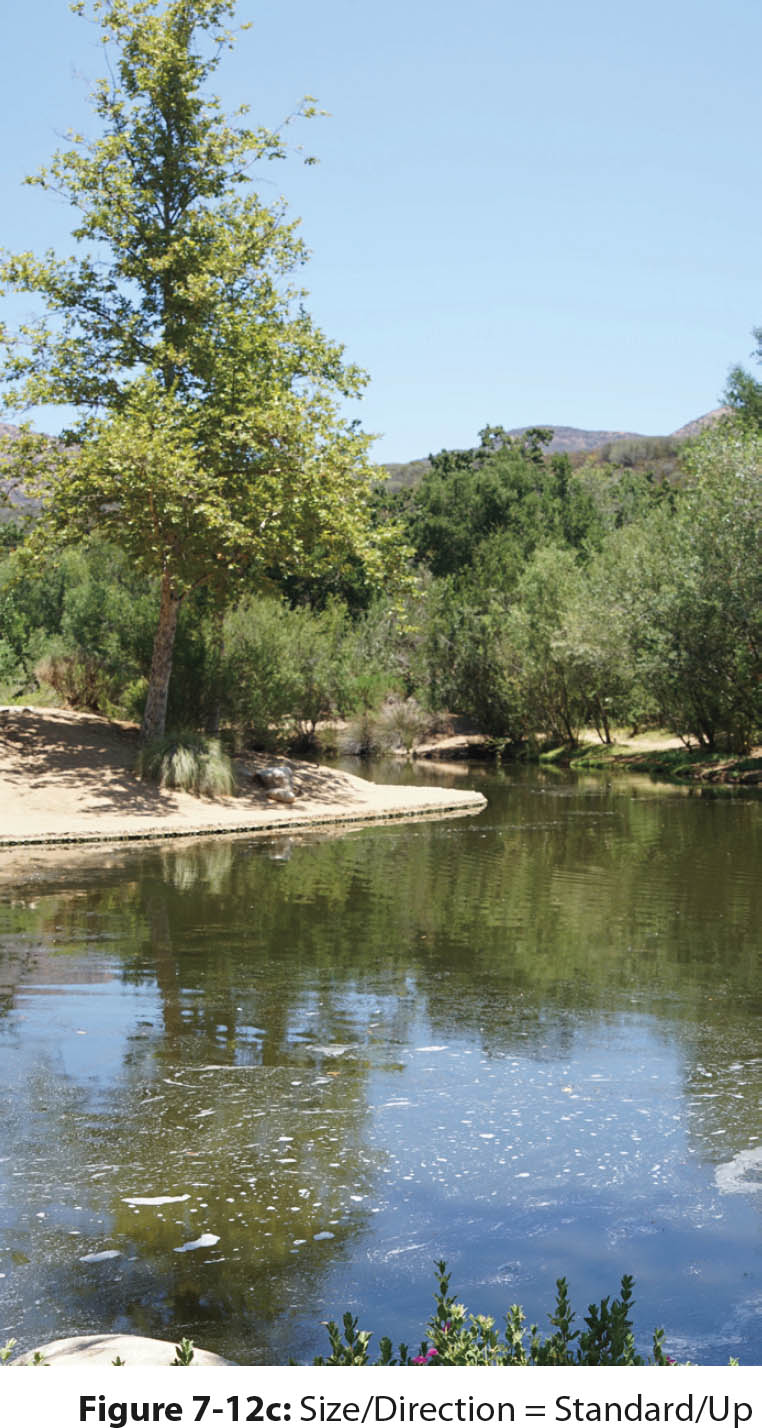
MENU > Camera Settings (1) > Panorama: Direction > [Right], [Left], [Up], [Down]
Sweep Panorama has two sizes: [Standard] and [Wide]. The [Wide] option increases the width of the panorama, and the pixel count is greater than in [Standard] (table 7-3). With [Wide], you can pan farther and get much wider coverage in the resulting picture.
Note that the [Standard] and [Wide] options produce pictures at the same height. Although the height of the [Wide] playback version looks shorter on the screen, it isn’t. The whole picture is displayed at a lower magnification so you can see all of it on the screen.
The Panorama: Direction command allows you to set the direction to sweep the camera: [Right], [Left], [Up], or [Down]. After you choose an option, an arrow is displayed on the screen to show you which direction to pan. An easier way to set the Panorama: Direction command is to rotate the front dial, which cycles through the options in Live View. Remember to set the mode dial to Sweep Panorama first. You can see the directional arrow on the screen change with each turn of the front dial. Sweep Panorama mode works whether you hold the camera in landscape or portrait orientation, but remember to pan the camera in the direction of the arrow.
More Than One Way to Sweep
Most people take panorama pictures by holding the camera in the landscape (horizontal) orientation and panning in the direction of the displayed arrow. But you can also record a panorama with the camera in portrait (vertical) orientation. Set the Panorama: Direction command to [Up] or [Down], rotate the camera 90 degrees so the directional arrow is horizontal, then sweep the camera right or left according to the direction of the sweep panorama arrow. The picture will be taller and narrower than if you held the camera horizontally and panned. You might also find the aspect ratio more pleasing than in a wider view with the camera held horizontally.

Shooting a Panoramic Picture
After you select a panorama size and choose the sweep direction, the camera will display three things in Live View: an arrow that corresponds to the selected panning direction; a message informing you to sweep according to the arrow; and a two-tone screen. On the two-tone screen, one side of the Live View display is dull gray, and the other side is normal. The line where the two sides meet is the point where the panorama will start.
Frame the image so the point where you want to start the sweep is positioned just inside the normal side of the display. Which side is gray depends on the panorama direction you select. If you select [Right], the gray side is on the left; if you select [Up], the gray side is on the bottom.
Now you can add a Creative Style and make adjustments to the WB and exposure. You can make changes with the menu, with the Quick Navi screen, or by pressing a customized button or the Fn button (depending on any customizations you’ve made). You can also use the exposure compensation dial to change the EV. Make sure to evaluate the adjustments on the normal side of the display because this is where the sweep will start recording. After you complete the adjustments, press the shutter button halfway to make sure the focus is correct.
There is one more step before you take a panoramic shot. Getting a realistic photo depends on a smooth, level, constant sweep. It also depends on a very tight radius when you sweep. As you pan the camera, hold it as close to the center of the sweep as possible. Either hold the camera to your eye and use the viewfinder as your sweeping guide, or mount your camera on a tripod and pan in a vertical or horizontal direction. These two methods will keep the pan in a tight, short radius. If you hold the camera away from your body and use the monitor as a guide, the final image can be distorted because the shooting radius is larger.
Now you are ready to record. Hold your camera steady, press the shutter button and hold it down, and start panning. As you pan, you will notice that the arrow moves across the screen along a Guidance bar. The bar represents the amount of time you need to hold the shutter button down and pan the camera. Continue to pan until the arrow has traveled the full distance. If you take your finger off the shutter button while the camera is firing, the process will stop and generate an error message.
Panorama Results
It’s always a mystery to see what a panorama will capture. You can end up with a flawless panorama in which everything is a true representation of the scene. Most of these images are of stationary landscapes. Experiment with taking panoramas of moving subjects. Depending on the speed of the subject, if you pan in the direction of the movement, the subject may be shortened or truncated; if you pan in the opposite direction, it may be lengthened or elongated. As mentioned earlier, a moving subject may even appear multiple times. Panoramas of stationary objects can also give you interesting results. While you pan, the camera takes overlapping images. The camera’s stitching software usually eliminates the overlap and creates a smooth image, but sometimes the picture will contain multiple images of the same stationary subject.
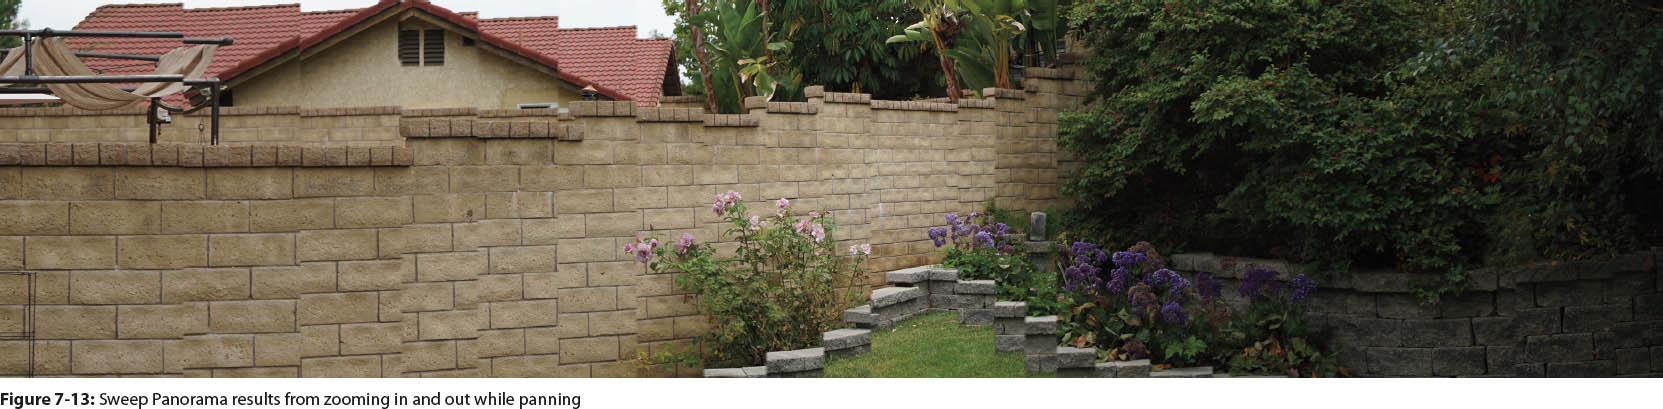
You can take a panorama picture with either a wide-angle or a telephoto lens. Interestingly, you can even zoom the lens while you sweep, although it’s not easy to coordinate both sweeping and zooming at the same time while you maintain a smooth, even sweep (figure 7-13). If you want to try this and see the effect, mount your camera on a tripod to keep it level.
Panning Problems
It may take some trial and error before you take a successful panoramic image. If the camera detects inconsistent panning—too fast, too slow, or not level—or if you don’t start panning after you press the shutter button, the camera will stop recording and display an error message. The camera displays the following message if you pan the camera too slow or not in a straight line: “Could not shoot panorama. Move straight in the direction of the arrow.” If you pan the camera too fast or in the wrong direction, the following message will appear: “Could not shoot panorama. Move camera slowly.”
It can be difficult to pan at a consistent speed each time you record. If the picture has a section of gray at the end of the panorama, you panned too slowly. The final portion of the allotted image size did not have anything to fill the space. Retake the picture and pan a little faster.
As mentioned earlier, the exposure of the panorama is set at the beginning of the sweep. If the scene you plan to sweep contains darker and brighter areas, you can set the exposure based on an average portion of the area you will sweep, lock the exposure with AE lock, then move the camera back to the area where you will start the sweep and begin the shooting process.
The results can also be affected by lighting that is insufficient, extreme, or intermittent. For example, if you shoot under fluorescent lights, if objects are too close or are moving, or if the scene has complex patterns or monotone colors, the camera’s stitching program may not be able to effectively process the captured data. The closer an object is, the more likely it is to be distorted, especially if it has straight lines or if you handheld the camera away from your body while you recorded the image. It might be frustrating to learn how to shoot an effective panorama, but with practice we are sure you’ll enjoy using Sweep Panorama.
Automatic Object Framing
Beginning photographers commonly have too much extraneous area in their images. To help you improve the composition of a picture, Sony provides a cropping and resizing function. To allow the camera to automatically frame the subject, use the following command:
MENU > Camera Settings (6) > Auto Obj. Framing > [Off], [Auto]
For this command to work, the shooting mode and several other command settings must be correct. If the subject is a person, the Smile/Face Detect. command must be set to detect faces. If the subject is not a person or if you don’t want the camera to focus on a specific face, execute the Focus Area’s Lock-on AF command and track the subject. Regardless of whether or not the subject is a person, a few other conditions need to be met for Auto Obj. Framing to work. The Quality command must be set to a JPEG value—[Extra fine], [Fine], or [Standard]—and the Focus Mode must be set to [Continuous AF]. In addition, the Auto Obj. Framing command works only in P, A, S, M, Intelligent Auto, Superior Auto, and all SCN predefined modes except Sports Action, Anti Motion Blur, and Hand-held Twilight. One final condition is that the camera cannot be set to a multiple-shot mode, such as Auto HDR. If these conditions are not met, Auto Obj. Framing will be disabled.
When Auto Obj. Framing is enabled and the camera detects and focuses on a face or the tracked subject, press the shutter button. The camera will take a picture, enlarge the face or tracked subject, and crop and resize the image in portrait orientation.
Here is a typical scenario: If you shoot a portrait in landscape mode, extra space will surround the subject. But if you use Auto Obj. Framing, the camera will take the picture, enlarge the image, change it to portrait (vertical) orientation, and frame the subject within the borders.
Auto Obj. Framing records two images: the original image as you see it on the display screen; and the enlarged, cropped image. If the subject is far away, the enlarged image may be unsatisfactory. Move closer to the subject and try again.
You may find Auto Obj. Framing useful, but there are several drawbacks. You cannot record the image in RAW format, so you will not have full access to all the recorded data for digital enhancements. Also, you must accept how much of the original image is enlarged and saved, as well as the exact position. As you become more familiar with your camera, you will be able to frame and take your own portraits without help from this command. If you frame the subject yourself, use a zoom lens, control the aperture (and thus the depth of field), and save the image in RAW format, you will have more control over your portraits. Auto Obj. Framing may be handy for quick snapshots, but we suspect that most a7 II users prefer to do their own manipulations on their computers in third-party software.
Predefined Color Schemes
With the Creative Style and Picture Effect options, the Sony a7 II lets you apply predefined color schemes to your pictures and movies. You can see how the altered effect or color scheme will enhance your images before you start recording.
Creative Style Function
Recording a picture or a movie can be all about creating a mood or expressing an emotion. An easy way to do this is to apply a Creative Style to your images. In essence, these styles change and strengthen colors to add emotion to your pictures and movies.
The Creative Style command has 13 styles to choose from (table 7-4a). Each style applies a different mood or creative twist to your movies and pictures, including panoramas. Each Creative Style option can add fine adjustments to the contrast, saturation, and sharpness of an image, with some exceptions. In addition, six of the Creative Style options allow you to save a second set of customized, fine-adjustment settings that you can recall and use later (table 7-4b).

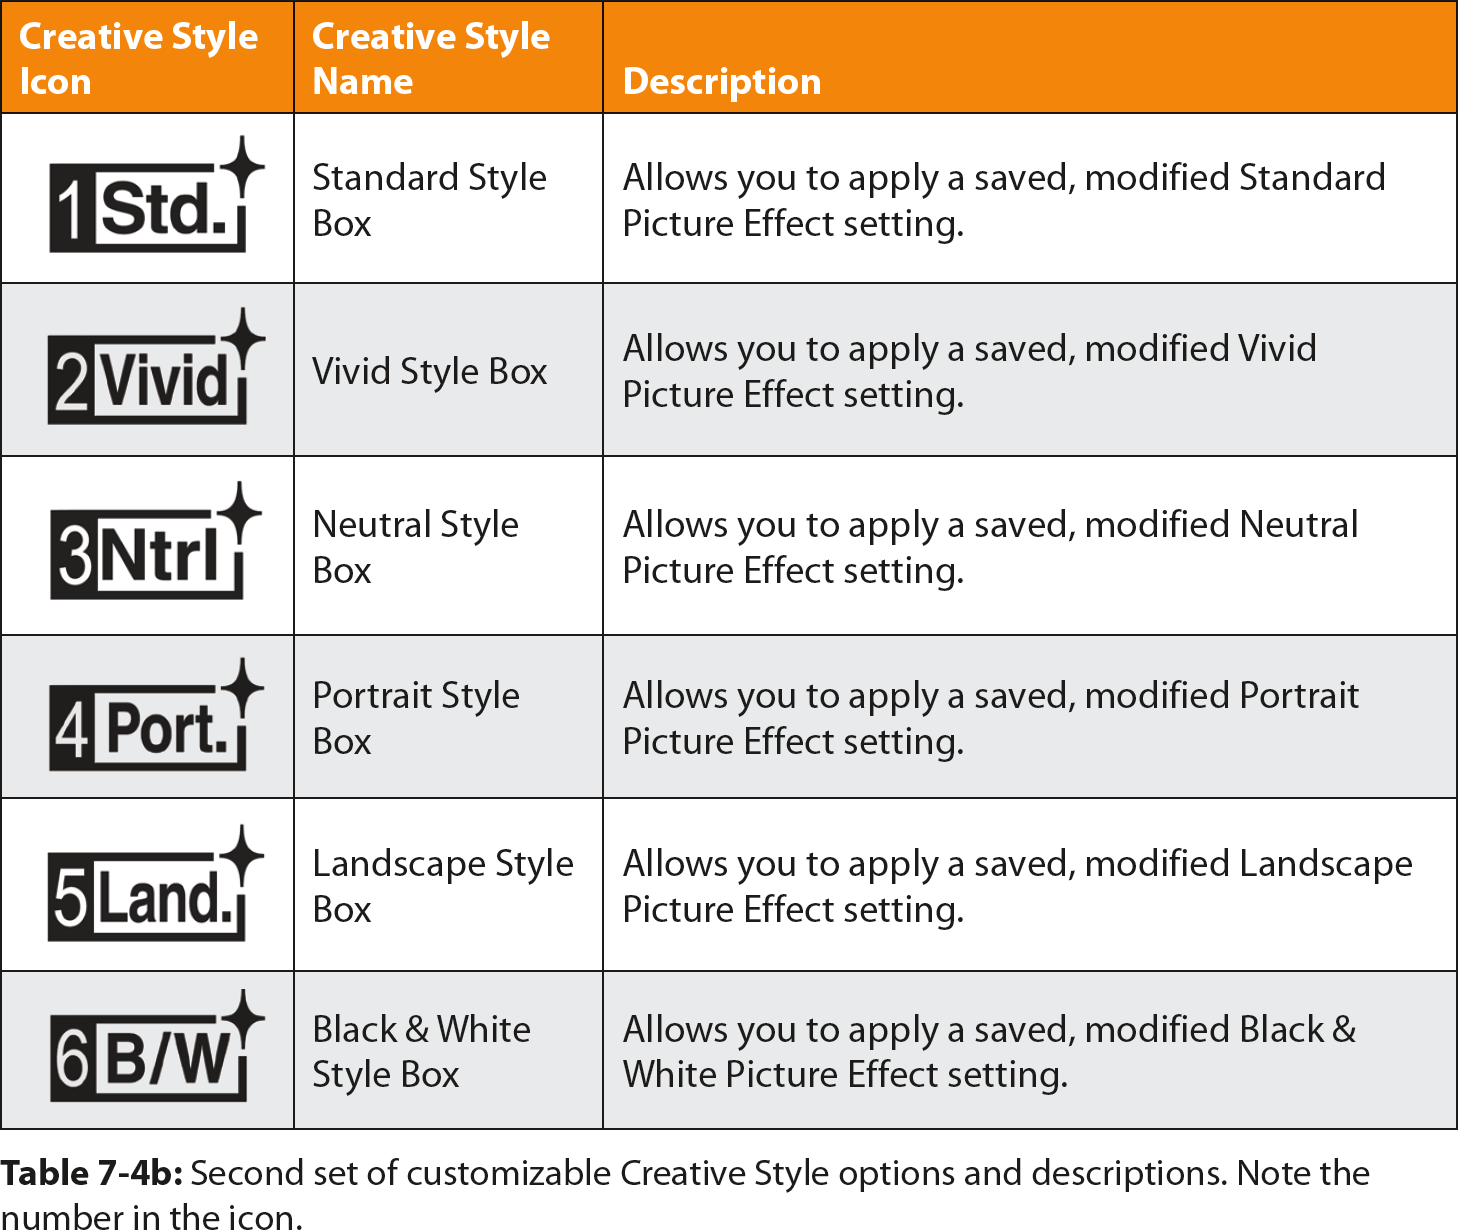
Each of the second Creative Style sets has a number in front of the icon. The icons are so similar that it is easy to get confused and not realize which setting you chose.
If you like to apply Creative Styles to your images and movies, you will appreciate the additional six settings for certain options. We don’t know why Sony provides a second set of fine adjustments for only six of the Creative Styles; perhaps they are the most commonly used options, and it is more convenient to save another set of adjustments than to change the settings each time you want to apply a Creative Style.
To select a Creative Style, enter the following command:
MENU > Camera Settings (5) > Creative Style
When you select the Creative Style command, the list of options is displayed at the left of the display with the command’s current setting positioned at the top (figure 7-14). Rotate the control wheel or front dial, or press the up and down buttons, to navigate through the 19 options.
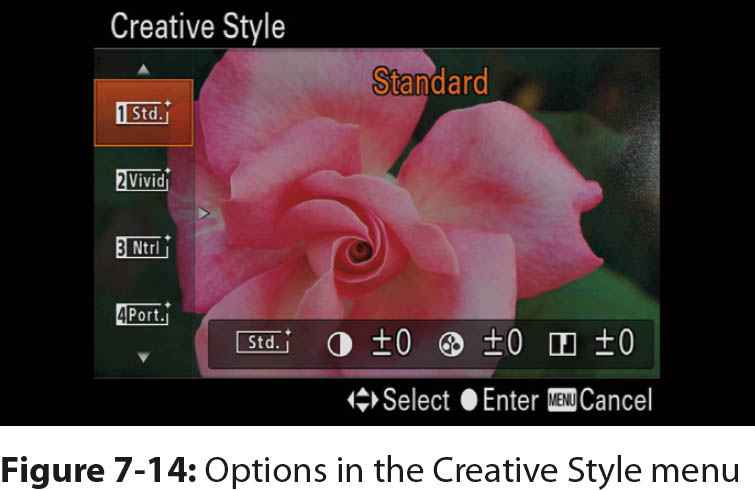
Although the name of each style hints at how the image will be affected, the only way to be sure is to preview the image. As you navigate through the Creative Style options, the camera applies the color scheme in Live View so you can see the results. If you apply [Vivid] to a multicolored floral scene, it will look different than if you apply [Vivid] to a scene with only one or two colors. For the latter scene, a different Creative Style may be more appealing.
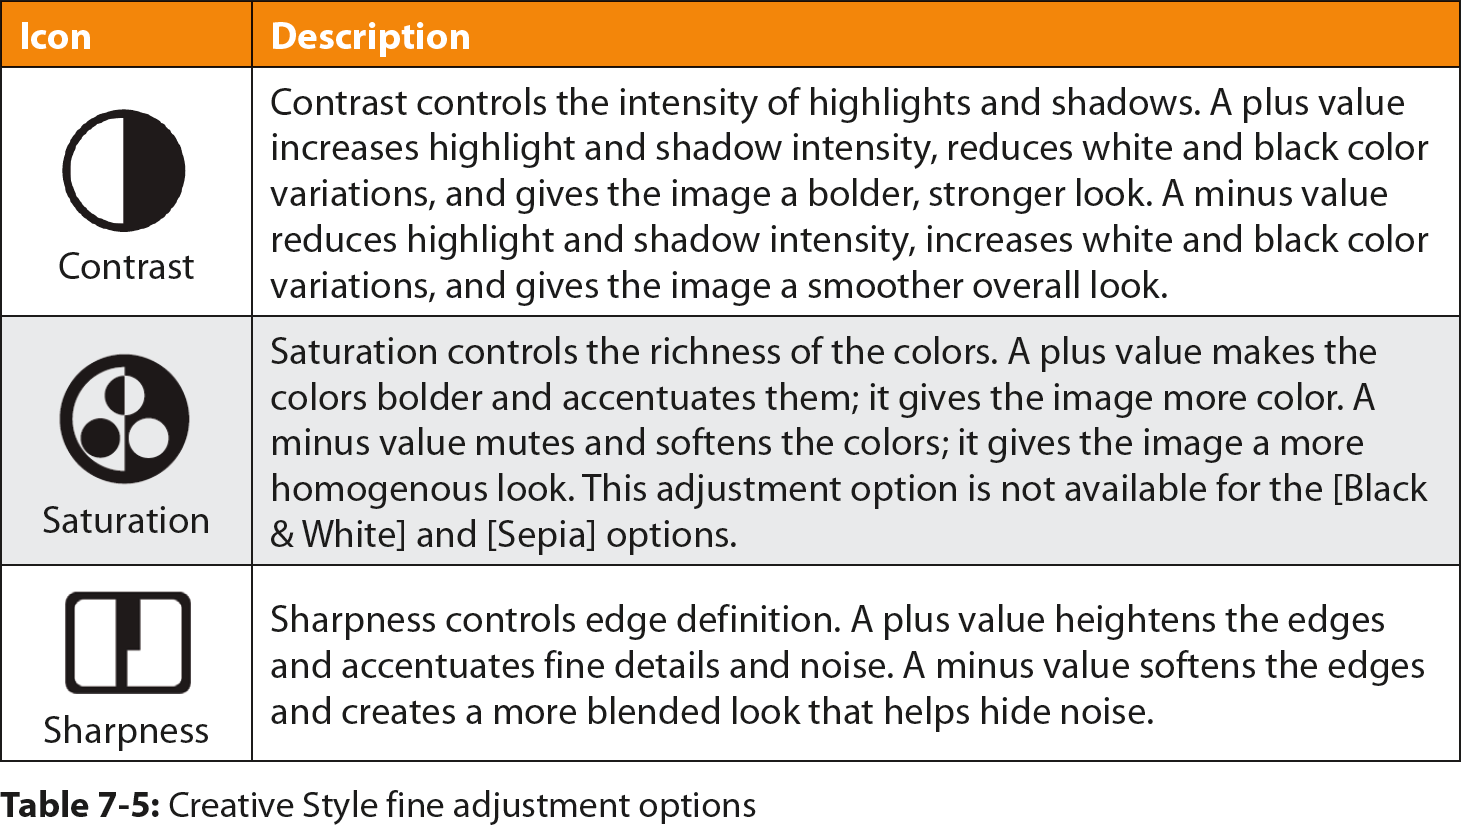
The command goes a step further and allows you to fine-tune the contrast, saturation, and sharpness (figure 7-15) for all Creative Style options except [Black & White] and [Sepia]; for those options, only the contrast and sharpness can be adjusted. Each fine adjustment has a range of ±3 in increments of 1; that is, you can increase or decrease the option by a factor of 1, 2, or 3.
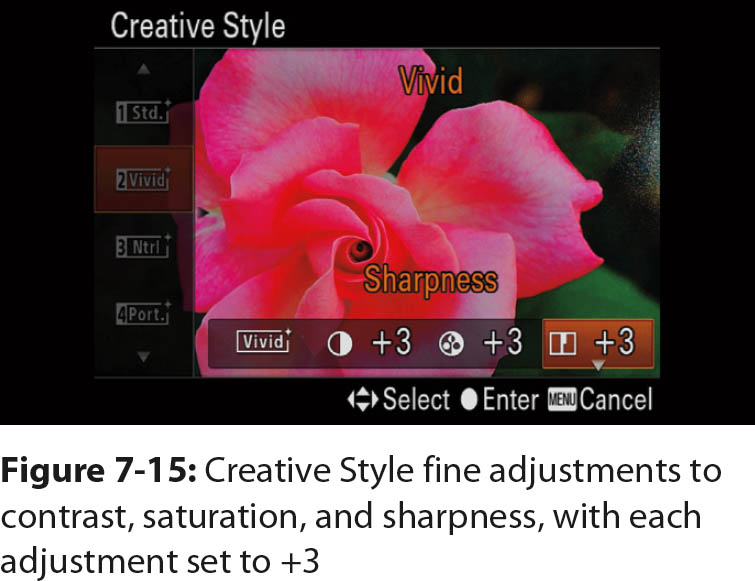
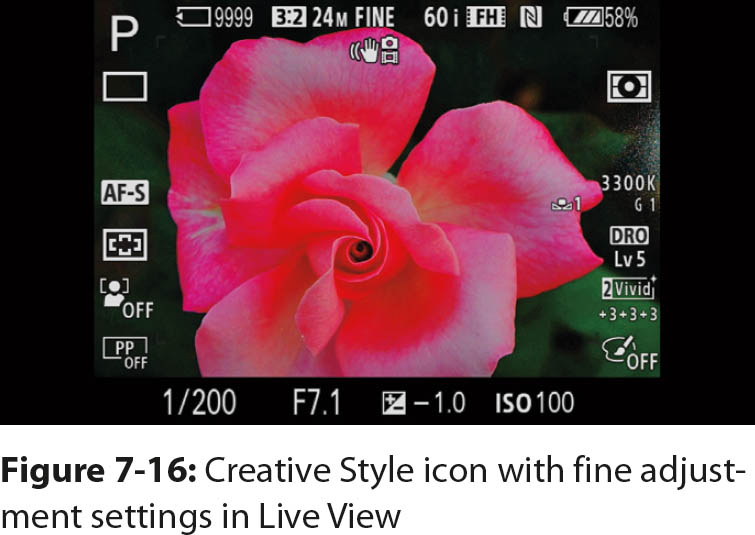
To enter the fine adjustments menu, highlight the Creative Style option you want to adjust and press the right or left button, or rotate the rear dial. Continue to use the buttons or dial to move through the options; use the up and down buttons to change the value of a specific fine adjustment. When you are done, press the center button to accept the values. The Creative Style icon and the fine adjustments will be displayed on the [Display All Info.] and [For viewfinder] data display formats in Live View (figure 7-16).
It’s best to view the effects of the color scheme and fine adjustments on the camera monitor. Table 7-5 describes each of the fine adjustments and how they affect the image.
This is where the six customizable Creative Styles options come in. For example, if you typically switch back and forth between two variations of the [Vivid] option, you can save both in the camera’s internal memory: one in the customizable [Vivid] option and one in the regular [Vivid] option. They will be erased if you execute the Setting Reset command. You can even switch to a Picture Effect or turn off the camera then come back to Creative Style and still access both of your [Vivid] fine adjustment settings.
Here are some important points to remember:
• The Creative Style command is not available in Intelligent Auto, Superior Auto, or the SCN modes.
• You can set a Creative Style when Quality is set to [RAW] or [RAW & JPEG]. However, your ability to see the effects of the Creative Style when you download the files to your computer depends on the file type and the software you use to view your images. Image Data Converter shows the Creative Style effects in both RAW and JPEG files. If you use third-party software, the RAW files may not show the effects of the Creative Style, but the JPEG files will. For example, if you use the Adobe DNG (Digital Negative) Converter, you can translate an a7 II RAW file so it can be read in older versions of Photoshop. When you open the file, the original colors are included in the file, rather than those imparted by the Creative Style.
• Creative Styles are available for all movie files.
• When you use a Creative Style, you can adjust the exposure compensation, ISO, shutter speed, white balance, and aperture.
• The Creative Style command is automatically set to [Standard] and disabled when you select a Picture Effect option other than [Off]. The Creative Style command will be enabled and restored to its previous value when you set Picture Effect to [Off].
• The saturation adjustment is not available for the [Black & White] and [Sepia] options.
• Both the regular and customizable Creative Style settings and their adjustments are retained if you switch to another shooting mode or if you turn the camera off and back on.
• The Creative Style command is reset to [Standard], and all Creative Style adjustments are returned to zero, when you execute the MENU > Setup (6) > Setting Reset command.
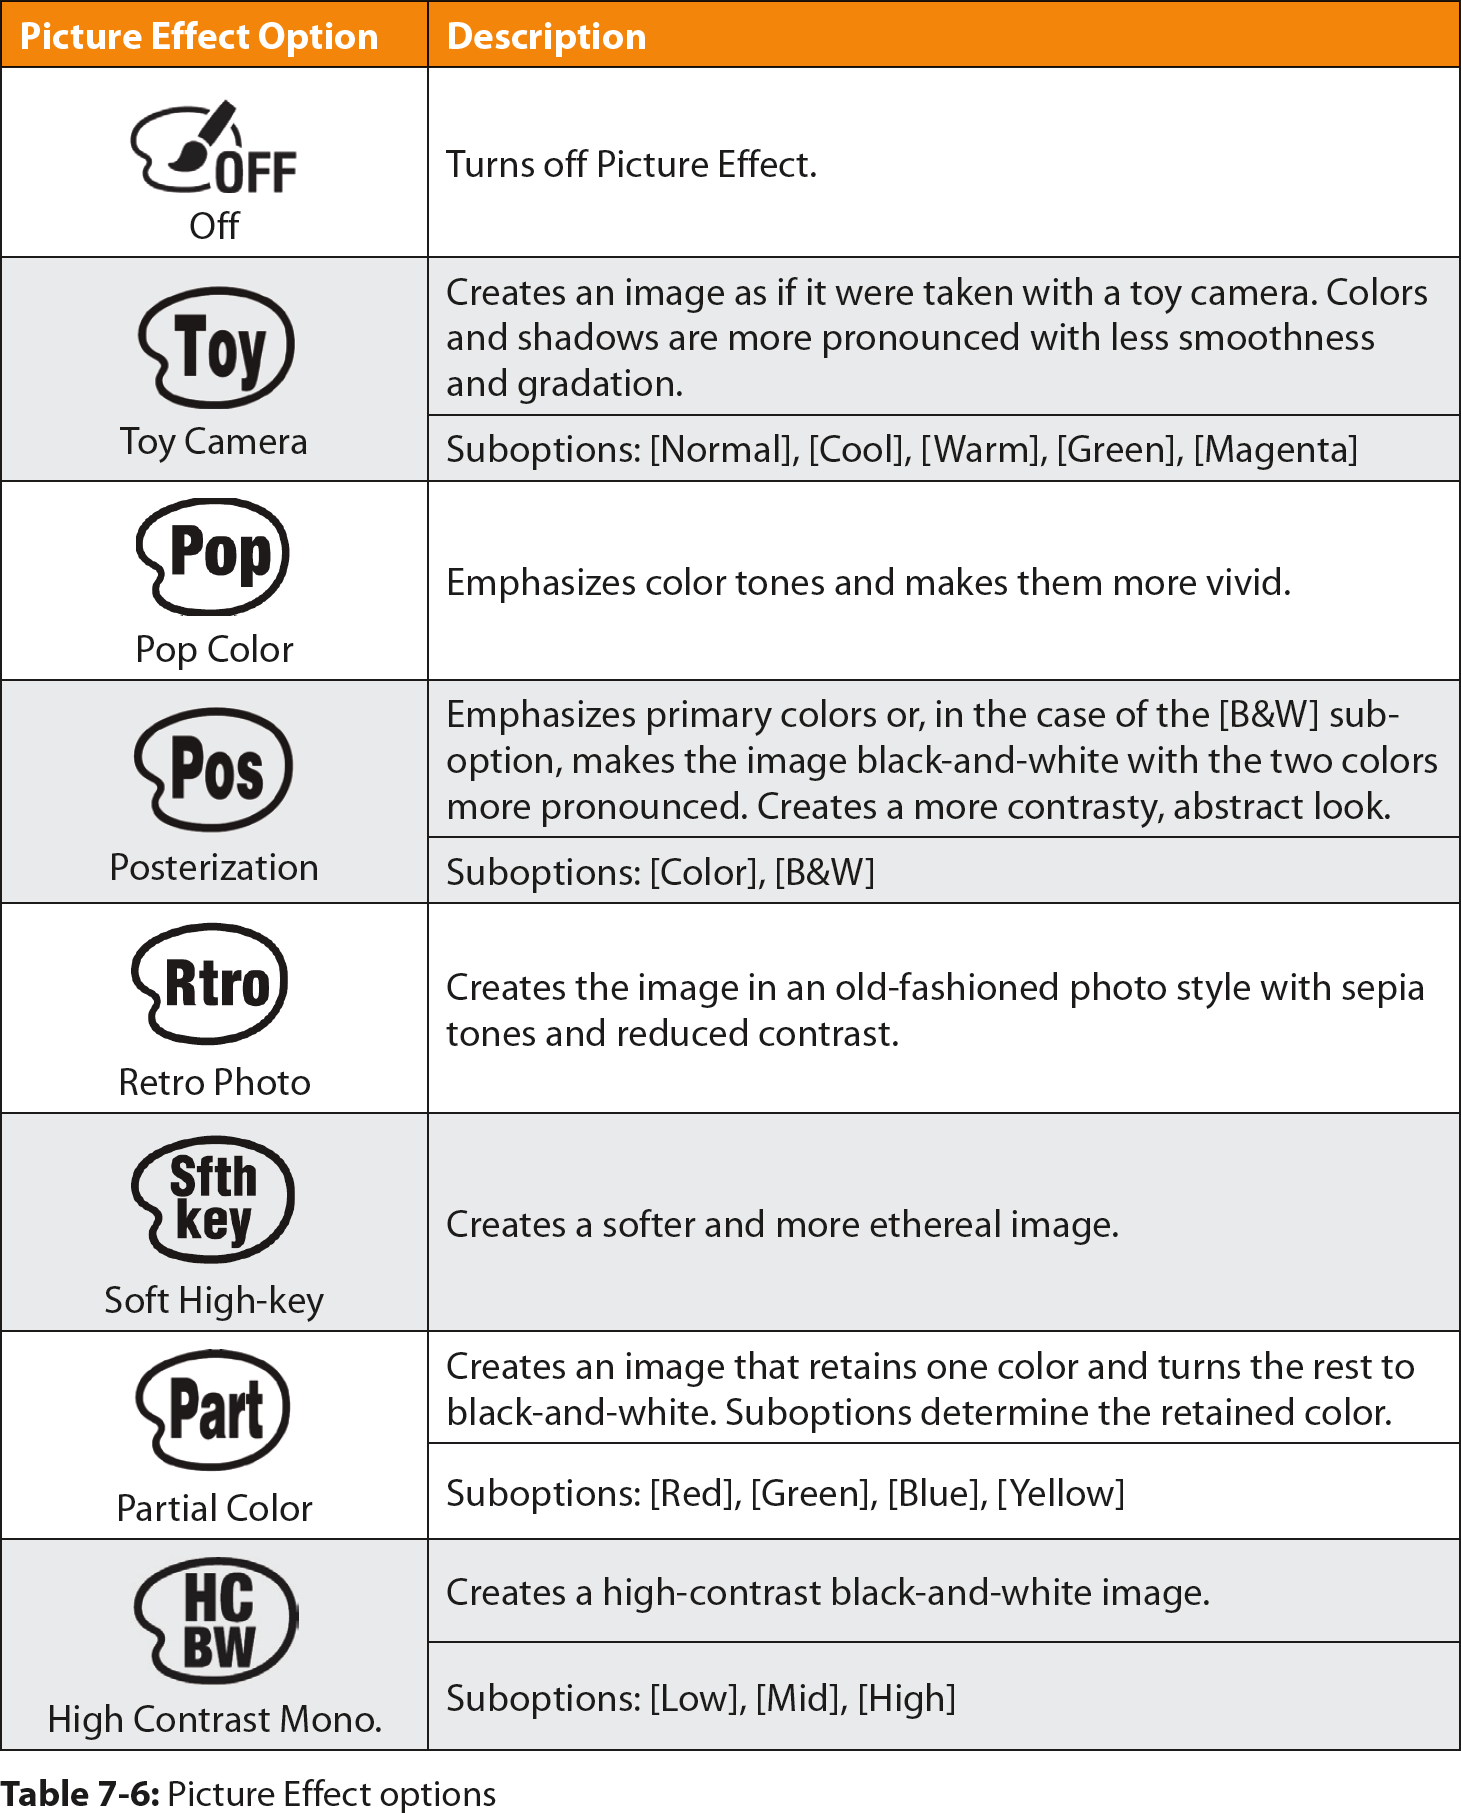
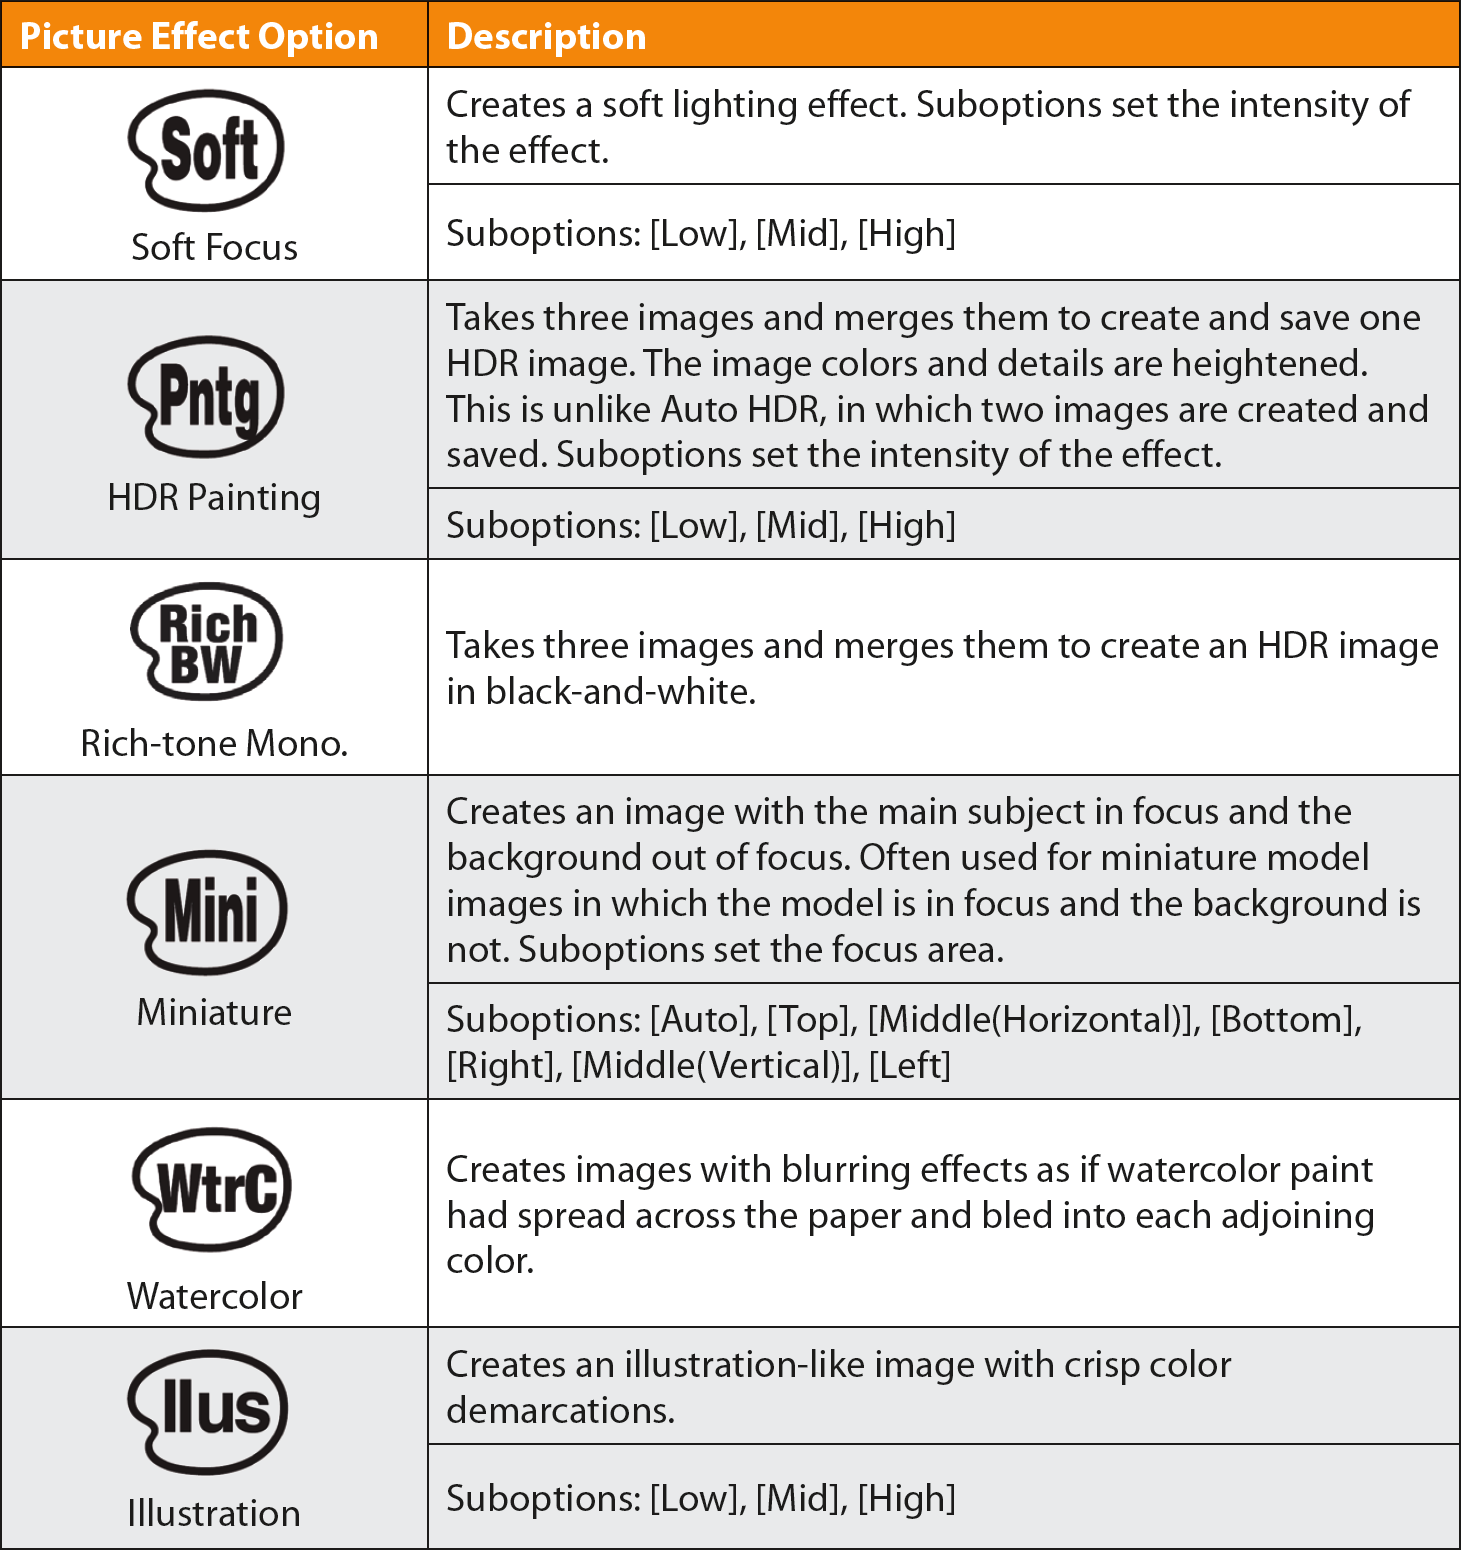
Picture Effect Function
The Picture Effect function lets you apply a predefined effect filter when you record movies and JPEG pictures. It is disabled when you shoot panoramas and when Quality is set to [RAW] or [RAW & JPEG]. There are 14 Picture Effect options (table 7-6). Several of the options have suboptions so you can further alter how the camera will record the image. For example, the Toy Camera option has the following suboptions so you can apply a color tint: [Normal], [Cool], [Warm], [Green], and [Magenta].
Here are some important points to remember:
• Picture Effects can be applied only when Quality is set to JPEG-only files. If Quality is set to [RAW] or [RAW & JPEG], the Picture Effect command is disabled.
• Picture Effect is automatically disabled when the shooting mode is set to Intelligent Auto, Superior Auto, SCN, or Sweep Panorama. It will return to its previous value when you switch the camera back to P, S, A, M, or Movie mode.
• The selected Picture Effect and its suboptions are retained when you switch to another supported shooting mode (P, S, A, M, or Movie) and when you turn the camera off and back on.
• Picture Effect is reset to [Off], and the suboptions are returned to their default values, when you execute the MENU > Setup (6) > Setting Reset command.
• While you use a Picture Effect, you can adjust the exposure compensation, ISO, shutter speed, white balance, and aperture.
It’s easy to select a Picture Effect. Enter the following command:
MENU > Camera Settings (5) > Picture Effect
Rotate the front dial or control wheel, or press the up or down buttons, to navigate through the Picture Effect options (figure 7-17). If you want to apply a suboption, press the right or left button, or rotate the rear dial, to navigate through the suboptions for the highlighted Picture Effect. Press the center button to apply the suboption and return to Live View.
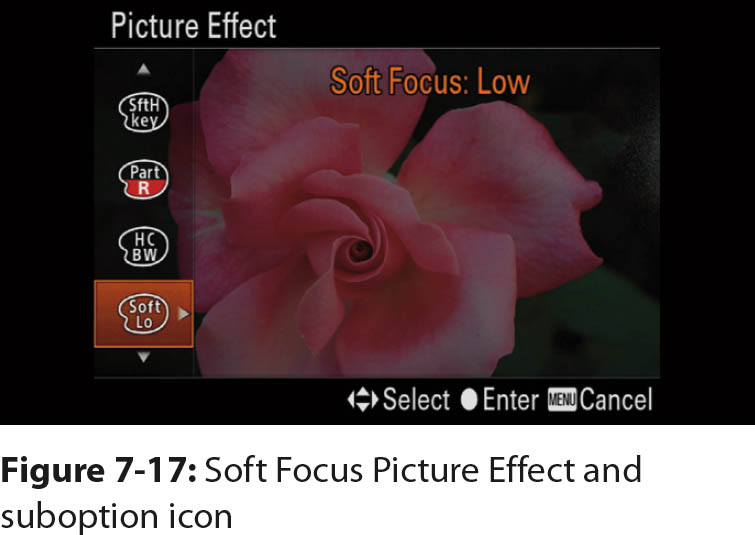
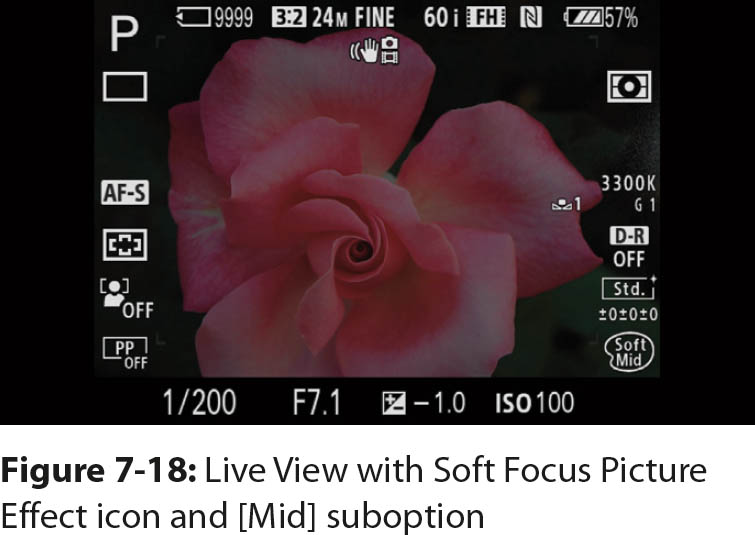
In Live View, an icon in the [Display All Info.] and [For viewfinder] data display formats (figure 7-18) indicates the selected Picture Effect and suboption.
Creative Style and Picture Effect Differences
At first, the Picture Effect function seems to duplicate the Creative Style function. However, many of the Picture Effect options allow you to select regions within an image to apply an effect. For example, with Picture Effect [Miniature], you select an area to keep in focus while the rest of the image is blurred. You can use Creative Style options with all Quality settings, but you cannot use Picture Effect options when the Quality is set to capture RAW files. You can use Creative Style options in Sweep Panorama mode, but you cannot use Picture Effect.
Both the Creative Style and Picture Effect functions colorize images, but the two commands cannot be operational at the same time. The Creative Style command is automatically turned to [Standard] when any Picture Effect option is used, and it will automatically return to the previous Creative Style setting when Picture Effect is turned [Off]. In other words, each function defaults to a noncompeting value when you set the other to a nonstandard option.
Recommendations
How you customize your camera depends on your personal preferences. We recommend that you become familiar with your camera and learn which commands you use frequently before you extensively modify the standard settings. You can always change or add settings later. After you have selected customizations, your camera will be a more responsive tool that can quickly adapt to a variety of photographic requirements.
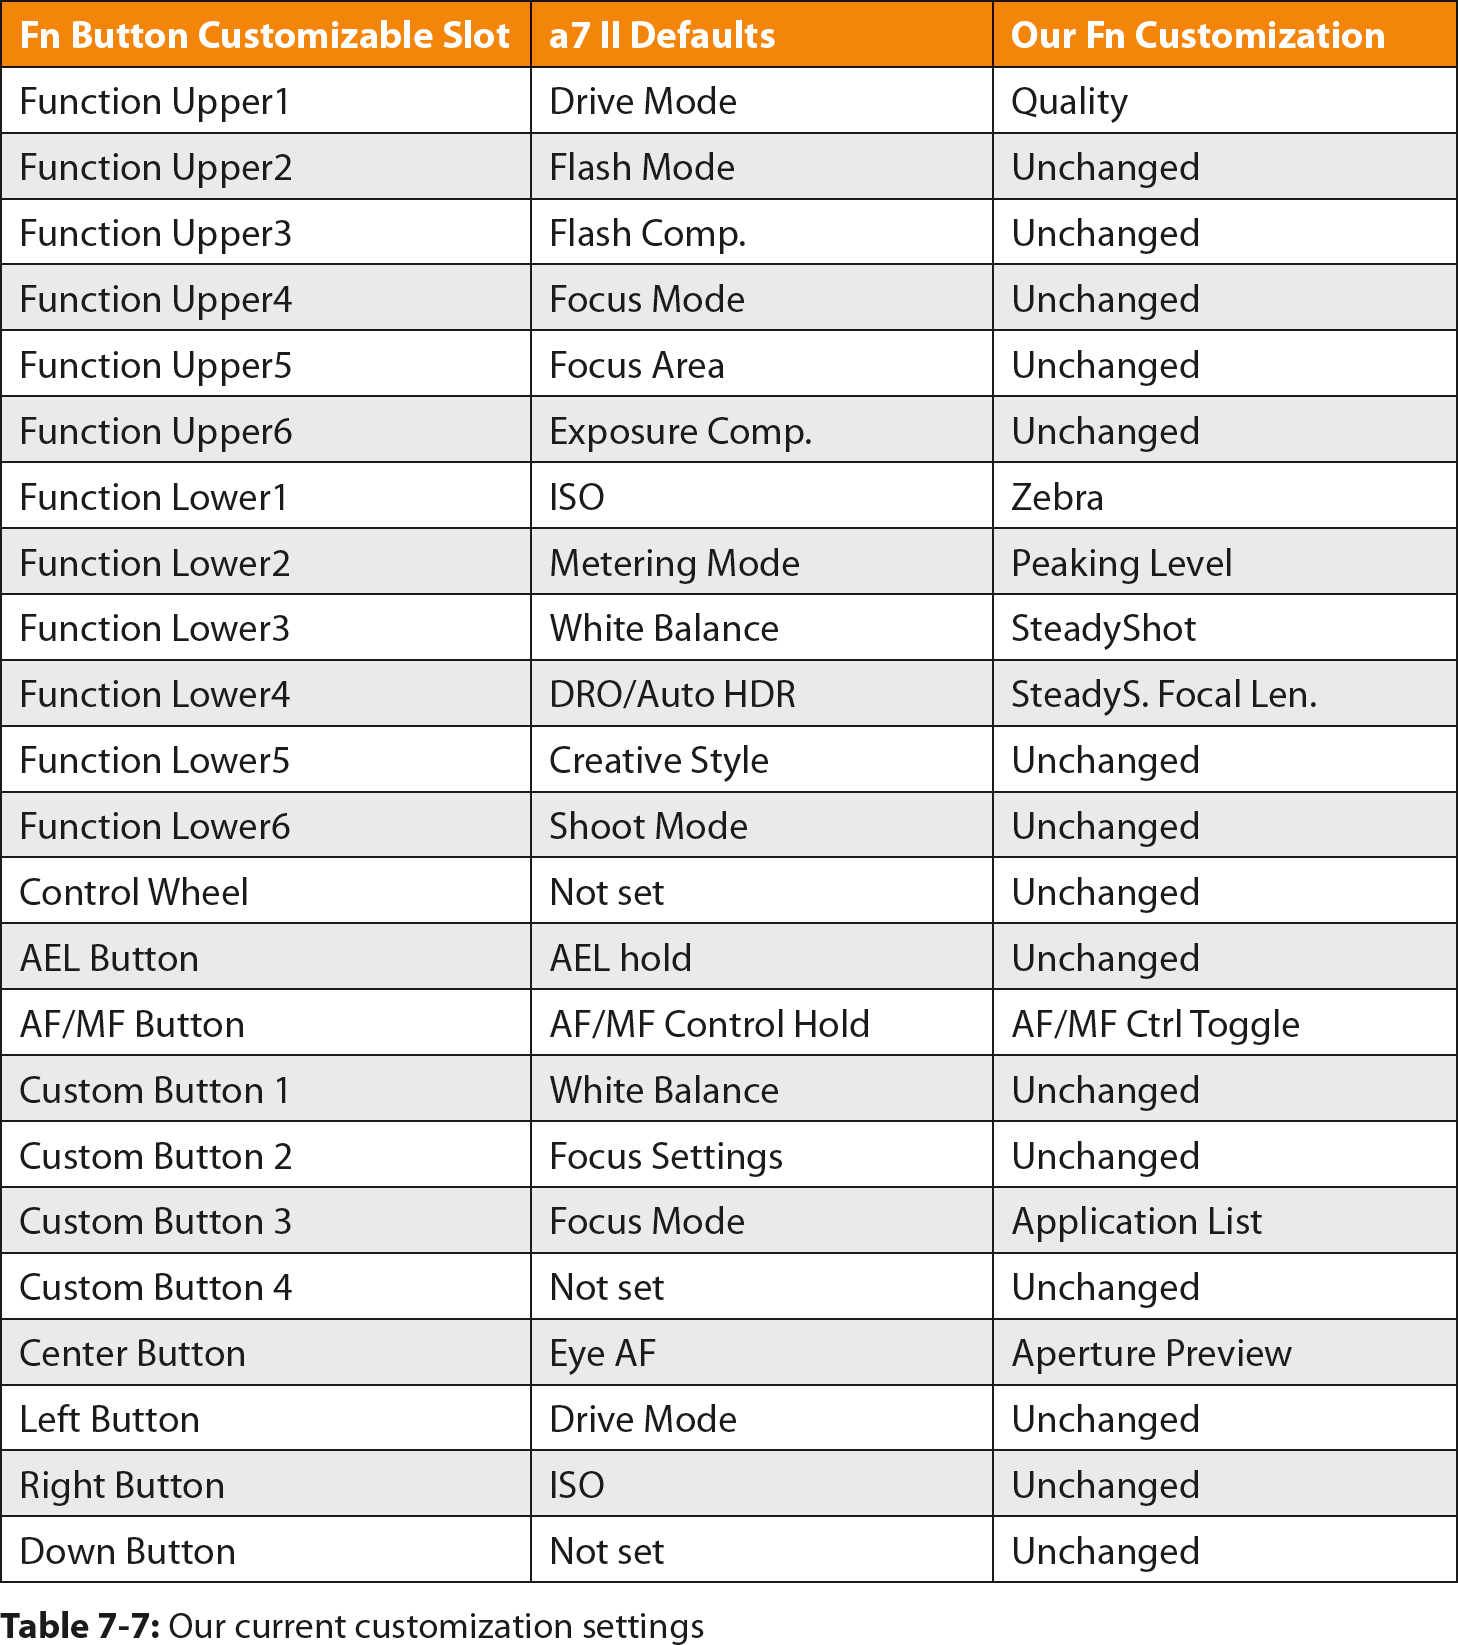
After we became comfortable with our camera and knew what settings we liked, we came up with a set of functions and commands that we use often and want to easily access. Table 7-7 is a list of our settings for each customization command. This may not be how you want to set things up, and we might change our minds six months from now, but for the types of shots we currently take, these settings work well.
We love panoramic shots. They are fun to shoot, and the results are impressive. We have experimented with many different shots, varied the level and panning speed, and taken shots of moving and stationary subjects, which gives us a variety of results. We’ve taken panoramic shots with the lens fully zoomed, set to wide angle, and a variety of settings in between. We have also applied Creative Styles to the panoramic pictures to add some punch to the results.
The Auto Obj. Framing command is a quick and easy way to create a closer image of a specific subject, but we frequently have to shoot the image multiple times before we are satisfied with the results. We prefer to control the camera settings and frame our shots during post-processing with RAW files.
The Creative Style and Picture Effect options provide interesting color effects, with some limitations. Although you can modify the contrast, saturation, and sharpness of a Creative Style in-camera, the allowable range is less than what is possible in post-processing software. When you select a Picture Effect with a high, middle, and low option setting, start with the high setting. Often the low setting is too subtle to judge in the camera.
Creative Style allows you to capture the image in both RAW and JPEG formats, which gives you more opportunity to process your pictures outside the camera. Picture Effect allows you to apply expressive filters to your pictures, but only to JPEG files. We recommend that you play with both functions to see if any of the special styles and effects create results you like. We caution that many Creative Style options are subtle. The Picture Effect command has an [Off] option, but the nearest equivalent option for Creative Style is [Standard]; however, be aware that the [Standard] option has adjustments for contrast, saturation, and sharpness. If you don’t want a Creative Style to affect your images, make sure the adjustments are set to zero. Although we enjoy the opportunity to save two fine-adjustment settings for six of the Creative Styles, we find that the icons are so similar that we sometimes choose the wrong one.