Chapter 3: Managing Your Images

Introduction
The Sony a7/a7R electronic display screens serve two purposes. The first is to compose and preview the subject before recording it to the memory card. The second is to evaluate the recorded picture or movie after it has been captured. In both cases, you can check the image’s quality, ensuring that focus, exposure, and coloration are suitable. Previewing the image in the electronic finders assures that egregious errors can be avoided. Reviewing the captured image allows you to fine-tune the camera settings to ensure that your next images will have the results you want.
Only one of the display screens work at a time. The default is to have the electronic viewfinder (EVF) enabled when the camera senses an object, presumably your eye, in front of the eyepiece. When this happens, the viewfinder turns on and the LCD screen turns off. This feature prevents the battery from being drained unnecessarily.
Although they both serve the same purposes, each display has its advantages. The value of using the LCD screen is that it can be extended out from the body of the camera and tilted to face up or down so you can view your scene from above or below the level of the camera. Using the LCD screen also allows you to view both the subject and the back of the camera at the same time. This is an advantage when you are manipulating the camera’s controls or navigating through its menus. When the camera is mounted on a tripod, the rear LCD screen provides a particularly convenient means of aiming and adjusting the camera.
The first benefit of using the viewfinder is that the positioning of your eye blocks the ambient light from impacting your ability to view your subject. Intense noonday sunlight can swamp the brightness of the LCD screen, making it difficult to see and therefore to frame or compose the subject. A second advantage is the added steadiness gained when the camera’s viewfinder is held against your face. Be flexible and use whichever display provides the best results in a given situation.
This chapter covers how to preview and review your still pictures and movies, and offers useful tools to use when evaluating your images. As with most functions on the a7/a7R, there is often more than one way to accomplish your photographic goals. It is best to experiment. Over time, you will develop preferences that work well for you.
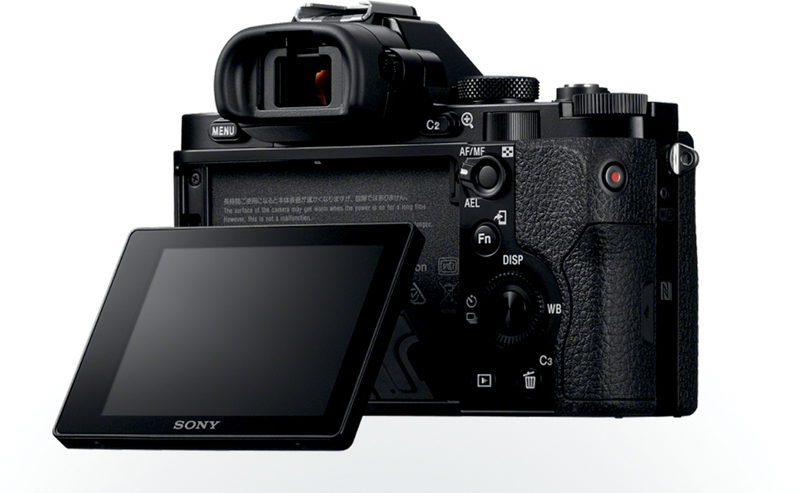
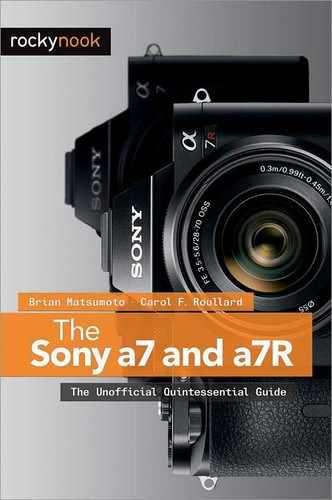
Figure 3-1: Tilting capability of the LCD screen
The LCD Screen
The Sony a7/a7R uses a large, high-quality liquid crystal display (LCD) composed of 921,600 dots, located on the back of the camera (figure 3-1). It has a diagonal measurement of 3 inches (7.5 cm), which is large enough to provide a clear view at arm’s length.
The LCD screen’s hinged display and ability to extend out from the camera body give you flexibility when working in cramped or awkward locations. For example, to frame a photograph over a crowd, raise the camera above your head and tilt the LCD screen down so you can look up and compose the image. To get the same shots with a DSLR that does not have a tilting LCD screen, you would need to raise the camera above your head and shoot blind.
We already mentioned that a benefit of using the LCD screen is that you can view the camera commands and buttons simultaneously with your scene, making it easier to navigate the camera’s functions and set them at the same time. In addition, its more comfortable to view your framed image on the LCD screen when the camera is tripod-mounted.
You can set the LCD monitor’s brightness using the Monitor Brightness command:
MENU>Setup (1)>Monitor Brightness>Brightness Setup>[Manual], [Sunny Weather]
This command is only available if you are viewing the LCD monitor. If you attempt to execute the Monitor Brightness command while looking through the viewfinder, you will see an error message instructing you to use the LCD screen.
Along with the command’s options, a color grid and grayscale step wedge are displayed to give you an indication of how the selected level of brightness affects your view of all the colors and shades in the range from black to white on the screen.
Using the [Manual] option on the Brightness Setup allows you to adjust the screen from -2 to +2 units of brightness (figure 3-2). Note the color grid and grayscale will change as you press the right or left buttons. Use these color indicators to set the brightness to a level suitable for the ambient lighting.
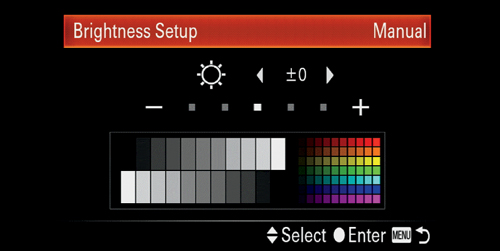
Figure 3-2: Brightness Setup command’s Manual screen
However, this control may be insufficient for working under bright outdoor conditions. If this is the case, set the command to [Sunny Weather], which maximizes the screen brightness. This setting is useful when you are working with the camera on a tripod, since you will probably be framing the image with the LCD. Keep in mind, you will deplete the batteries quickly if you use this setting frequently. But when handholding the camera, it is simpler and faster to use the EVF, which isn’t affected by bright sunlight.
The Viewfinder
The Sony a7/a7R’s electronic viewfinder is a half-inch screen made up of 2,359,296 dots. A focusable magnifier enlarges the screen for your eye. Like the LCD monitor, it provides a live view, with the camera settings reflected in the image prior to taking the picture. Its function is analogous to that of a DSLR optical viewfinder. The advantage of the electronic viewfinder is that it provides an excellent, enlarged, and bright image, making composition easier. The magnifier allows you to view fine details. As described in Chapter 1, you should focus the viewfinder display to your eye by using the diopter adjustment dial. To do this, use the letters and numbers that are displayed in the viewfinder as your focus points. This will give you an easy reference object to help you decide when you have focused the viewfinder for your eyesight.
Unlike a DSLR’s optical viewfinder, you can display the camera’s menu commands and options in the a7/a7R viewfinder, as well as histogram information and graphical displays of intensity levels. The control wheel, dials, and custom buttons all function the same way as they do for the LCD screen. For example, when you review the available menu, rotate the control wheel or press its up or down buttons to move through the menu structure and command settings.
You can adjust the viewfinder screen’s brightness by using the Viewfinder Bright. command:
MENU>Setup (1)>Viewfinder Bright.>Brightness Setup>[Auto], [Manual]
Set the Brightness Setup option to [Auto] to let the camera determine the brightness level of the viewfinder screen. If you are unhappy with this setting, set the option to [Manual] to be able to adjust the viewfinder screen from -2 to +2 units of brightness.
The Viewfinder Bright. command works only when you are looking through the viewfinder. If you are viewing the LCD monitor, an error message will display informing you to use the viewfinder.
There are situations when it is advantageous to use the EVF instead of the LCD, for example, when photographing a stage production, where the glow from the camera can distract the subject or annoy the audience. Another important advantage of using the viewfinder is the stability gained by holding the camera against your face. This is beneficial for low-light photography, and situations when you are using long shutter speeds or working with a long telephoto lens, where the slightest tremor is magnified. Steadiness is even more critical when capturing movies since all camera movement is recorded.
LCD Screen versus Viewfinder
As mentioned before, you can have only the LCD screen or the viewfinder active at one time. Which option you use in different situations depends on your personal preference. When you have determined your style, you can set the FINDER/MONITOR command to conform to your needs.
MENU>Custom Settings (3)>FINDER/MONITOR>[Auto], [Viewfinder], [Monitor]
The command’s [Auto] option is the default setting. This option switches between the LCD and the viewfinder, depending on which screen you happen to be using. This switching can be disruptive when you are entering menu commands on the LCD screen. If your hand passes close to the viewfinder, it may turn off the LCD and activate the EVF. Also, if you are shooting in an environment where the onset of light could be distracting, you don’t want the LCD screen to turn on when you remove your eye from the viewfinder. In these types of situations, you can avoid this by setting the FINDER/MONITOR command to either [Viewfinder] or [Monitor], depending on which screen you want to be enabled exclusively. Then, only the selected screen will be active, and the other will remain dark.
Data Display Formats
Reviewing the camera settings in Live View prior to and after recording in Playback gives you the opportunity to adjust the settings and to improve your image. However, you may find this data distracting if it clutters your preview screen when you are concentrating on composing the picture. The following sections cover data display formats prior to and after recording a still picture or movie. Become familiar with each format. You may find that certain data display formats work best for you in different shooting scenarios.
Previewing Data Display Formats
There are six display formats. Five of them are used for previewing or composing your subject from the LCD screen. The sixth display option, [For viewfinder], shows no image—only numerical data. This screen provides a quick summary of the camera settings. When used with the Fn button, it provides a fast and efficient way to change settings. In contrast, the display formats for the electronic viewfinder are used only for previewing your subject—the [For viewfinder] option is not available. With this many choices, deciding which to use can seem like a daunting task. The following information will simplify the selection process.
First, let’s review all six of the data display formats:
• Graphic Display: Displays a full-size image with major shooting settings and two horizontal scales, one for shutter speed and the other for aperture, with the current setting indicated on the scale with a vertical line. These are displayed on the bottom-right side of the screen (only for still picture shooting modes). When in Movie mode, two horizontal audio recording scales, Ch1 and Ch2, are displayed on the screen’s left side. Note, Graphic Display is not a default option for either LCD or EVF, and you will have to enable it if you wish to use it.
• Display All Info.: Displays a full-size image with camera shooting settings superimposed around three of the image’s border. When the mode dial is turned to Movie, Ch1 and Ch2 horizontal recording sound scales are displayed on the screen’s left side. This is a default setting for the LCD, but not for the EVF. The overlay of data and settings over the screen tends to be distracting when composing the image, but for scientific or technical work, having these settings visible is advantageous.
• No Disp. Info.: This format displays the image with shooting mode and battery power superimposed over the image at the top of the screen. These will disappear after a few seconds, leaving a clear screen, ideal for careful composition and framing. Additional shooting settings are displayed in the borders outside the image area. When viewing through the viewfinder, this format also displays and retains additional shooting information in the borders around the image. This is a default setting for both the LCD and the EVF.
• Histogram: Displays the full-size image, shooting mode, and exposure settings. A real-time histogram occupies the lower-right of the screen. When the mode dial is turned to Movie, Ch1 and Ch2 horizontal recording sound scales are displayed on the screen’s left side. Additional shooting settings are displayed in the viewfinder. The shooting mode and battery power superimposed over the image at the top of the LCD screen disappear after a few seconds. This is a default setting for both the LCD and the EVF. The histogram helps the expert photographer adjust his exposure under difficult lighting conditions.
• Level: Displays the full-size image, shooting mode, exposure settings, and the digital level-gauge tool in the center of the screen. The gauge’s indicator turns green when the camera is level, both horizontally and front to back. When the mode dial is turned to Movie, Ch1 and Ch2 horizontal recording sound scales are displayed on the screen’s left side. Additional shooting settings are displayed in the viewfinder. The shooting mode and battery superimposed over the image at the top of the LCD screen disappear after a few seconds. This is a default setting for the EVF but not for the LCD. For shooting with wide-angle lenses in interiors or for architectural photographs, the level information is useful for eliminating perspective distortion that arises from tilting the camera.
• For viewfinder (LCD only): For still picture modes, this option only shows data and does not display the subject. There is a histogram, level, and exposure settings. This data display format has an extra feature. When used with the Fn button, the screen is referred to as the Quick Navi screen since it provides a convenient way to change camera settings. Pressing the Fn button highlights one of the settings displayed in the screen. You can now navigate using the control wheel. Pressing the center button activates the highlighted command for selecting a new value. This display format is a default for the LCD screen but is not available for the viewfinder or when the mode dial is set to Movie mode.
There are two exceptions. When in Sweep Panorama mode, the [Graphic Display] format displays without the two scales, and the Histogram data display format is replaced with the [No Disp Info.] format. Plus, when in Movie mode, the [For viewfinder] slot is replaced with the [Display All Info.] format on the LCD screen.
To summarize, each format has its benefits. When you are carefully composing a landscape or a portrait, an unobstructed preview of the image is important, so you might use [No Disp. Info.]. When keeping the camera level is important—such as when taking a panoramic picture, using extreme wide-angle lenses, or architectural photography—use [Level]. When you want to have easy access to your settings, use the [For viewfinder] to initiate the Quick Navi screen. You will probably have a favorite or two, but switching them is easy with the DISP button, so you will most likely use each of the display formats frequently enough to see the worth in having them all turned on.
Activating Data Display Formats
The data display formats on the LCD screen and in the viewfinder work independently of each other. For example, you can have three formats selected for the monitor and five for the viewfinder. Scrolling through the activated data display formats also works independently of the other display screen. You can have Graphic Display format on the monitor and No Disp. Info. on the viewfinder.
Use the DISP>Monitor command to select which data display formats to have available for previewing your images via the LCD screen.
MENU>Custom Settings (2)>DISP Button>Monitor>[Graphic Display], [Display All Info.], [No Disp. Info.], [Histogram], [Level], [For viewfinder]
When you enter the DISP>Monitor command, each of the data display format options are preceded by a check box. As you scroll through the options, a sample display screen appears in the lower left corner (figure 3-3). This shows the appearance of the display format to help you decide if you wish to use it. Press the center button to check or uncheck an option. You can check up to six of the options for the Monitor. Navigate to [Enter] and press the center button to save the option changes. Only the checked data display formats will be available in preview mode.
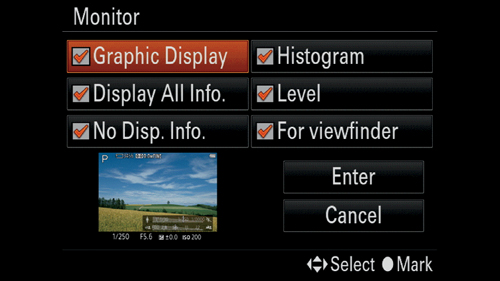
Figure 3-3: DISP>Monitor command positioned on [Graphic Display]
After you select your data display formats, go to preview mode and press the DISP button to cycle through the various views. For example, say you select DISP>Monitor>[Display All Info.], [Histogram], and [Level]. Each time you press the DISP button while previewing a framed image, you will cycle through these three display designs. Choose which screen display to use based on personal preference. For example, you may feel that the preview image is too cluttered with information, so you can select [No Disp. Info.]. Doing so, your framed image will be displayed on the LCD screen without an overlay of numbers or letters. The shooting mode and the battery level is displayed briefly, but disappears in less than 5 seconds.
A similar strategy is used to select the data display formats available on the viewfinder:
MENU>Custom Settings (2)>DISP Button>Finder>[Graphic Display], [Display All Info.], [No Disp. Info.], [Histogram], [Level]
Framing for a Movie Recording
When you start to record a movie while the camera is set to a shooting mode other than Movie, the preview image on the screen will change from a 3:2 to a 16:9 aspect ratio. This means that the framing of your movie image may not be what you had originally seen in your LCD monitor or viewfinder. If being exact is important, we recommend you record a test movie first to determine adequate scene framing. Even better, switch to Movie on the mode dial and you can compose with precision.
Playing Back Saved Still Picture Data Display Formats
When you play back your still pictures for review, there are three data display formats available:
• Image with recording data (figure 3-4a)
• Image with histograms (figure 3-4b)
• Image only, no data (figure 3-4c)
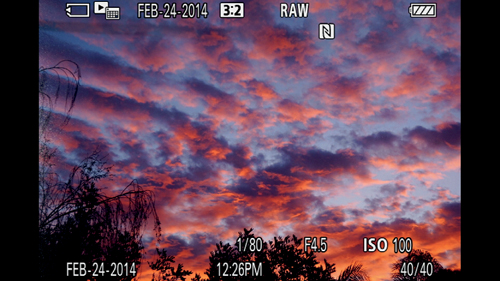
Figure 3-4a: Data display with recording data
After you press the playback button to review your saved pictures, cycle through the three display formats by pressing the DISP button.
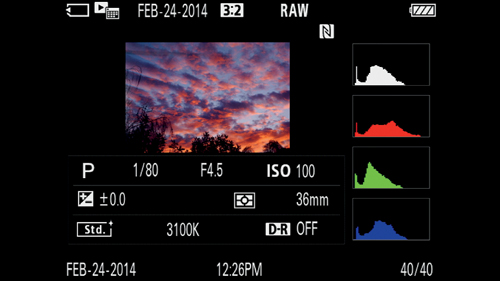
Figure 3-4b: Data display with histograms
Each playback display layout has its benefits. The recording data consists of the camera settings used to produce the image. This is invaluable when reviewing images for determining which camera settings work and which might need to be adjusted to improve the next shot.

Figure 3-4c: Data display of recorded image only
The histogram view displays the intensity range of the luminosity and the three-color channels (red, blue, and green) of the recorded picture. Thus, you can see if the sensor failed to capture all of the light and color information of the scene. This is important because if the full range of all colors was not captured, a color shift may be introduced if you change the brightness of the image during post-processing.
You will also see any overexposed, or blown-out, areas blinking from white to black, and any underexposed, dark areas blinking from black to white. This is an excellent way to determine what areas of the image have details that were not recorded by the sensor. Highlights will be predominantly white with a few intensity transitions, and underexposed areas will display noise and no detail.
Reviewing Movie Data Initial Display Formats
Although there are three data display formats initially available when you first press the playback button to review your movie, there are really only two playback formats when the actual movie is played. After you press the playback button but prior to playing back the movie, pressing the DISP button will cycle through the following formats:
• Movie with recording data displayed within the picture’s border (figure 3-5a)
• Small thumbnail image of the movies first frame, with recording data displayed outside the picture frame.
• Movie without recording data (figure 3-5b)
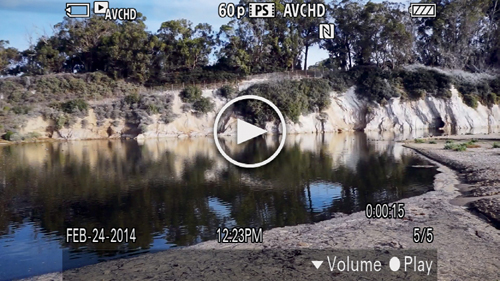
Figure 3-5a: Data display with recording data
All three of these will display the first frame of your recorded movie with a playback arrow in the center of the screen. When you start the movie by pressing the center button, the DISP button only has two formats to cycle through: one with the recording-data display and one without.
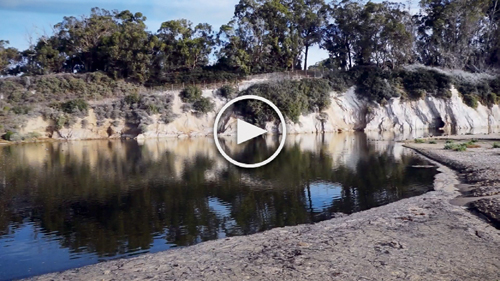
Figure 3-5b: Data display of recorded image only
Preview Image Overlays for Composition
In addition to data, the camera can project lines and grids onto the screen to aid you with composition. These overlays help you align and frame your pictures and movies. They are not recorded on the image file and are not visible when you review the image in playback.
Use the following command to set these lines and grids:
MENU>Custom Settings (1)>Grid Line>[Rule of 3rds Grid], [Square Grid], [Diag. + Square Grid], [Off]
The three Grid Line options each have specific patterns and benefits. The [Rule of 3rds Grid] pattern consists of a 3x3 array of rectangles (figure 3-6). This pattern allows you to position the main subject one-third or two-thirds of the way from any side of the screen. Many artists feel this helps in providing a balanced composition. The next two patterns are more useful for our scientific photography. [Square Grid] pattern divides the screen into an array of 6x4 squares to help you make sure the picture is well balanced and not tilted. The final pattern, [Diag. + Square Grid], divides the screen into an array of 4x4 rectangles with diagonal lines from the center to each corner, which helps you center the image in the frame. No grid lines are shown when the command is set to [Off].

Review Recorded Images
Displaying Recorded Images
You should review the results after you have recorded a still picture or a movie. This will give you the opportunity to improve your shot by adjusting composition or exposure and reshooting. There are a couple of tools to help you do this. Keep in mind that when we refer to still pictures, we include panorama shots.
Auto Review or No Auto Review
The Auto Review command allows you to view a picture immediately after it has been taken. You can choose to have the camera display the picture for 2, 5, or 10 seconds, or you can eliminate the review by using the [Off] option.
MENU>Custom Settings (1)>Auto Review>[10 Sec], [5 Sec], [2 Sec], [Off]
You will be automatically returned to Live View when the display time has elapsed or when the shutter button is pressed at least halfway.
We always turn this command to [Off] so the camera will return to Live View immediately after taking a picture. This eliminates any interruption to picture taking and enables you to continue viewing your object on the display screen. This is very important when shooting action or sports photographs where you need to follow a subject. For example, you might be photographing a your child’s soccer game, and he’s passed the ball and is advancing on the goal. An interruption to Live View could cause you to miss your next great picture. Since reviewing pictures is easily accomplished by simply pressing the playback button, we feel that keeping Auto Review on just slows down our photography.
Reviewing Files with the Playback Button
You can review your still pictures using either the Slide Show command, discussed later in this chapter, or the playback button, which puts the camera in Playback mode. Beware: some of the camera applications create files that are not recognized through Playback. For example, when we created a time-lapse movie using the Time-lapse app, the only way to review this movie on our camera is to use the Time-lapse app. If you have exited this app, pressing the playback button will not display the time-lapse movie in Playback mode.
The type of file displayed when you press the playback button—still pictures or movies—is dictated by the type of image you dealt with last, either the last type of recorded image, the last played-back image when you ended the Playback function, or the last selected View Mode command option. For example, if your last action was to take a picture, you will be presented with that image when you press the playback button. Likewise, if you were in Playback mode, exited, and then re-entered, the image displayed will be the last one presented to you.
The View Mode command makes you first define what type of files to display, and then decide the order you wish to view your images.
MENU>Playback (1)>View Mode>[Date View], [Folder View(Still)], [Folder View(MP4)], [AVCHD View]
The advantage of using this command is that it allows you to specify whether you want to view images from a given date, still pictures, HD movies (AVCHD files), or computer movies (MP4 files). If you want to playback images recorded on a specific date, for example your child’s birthday, select View Mode command’s [Date View] option, navigate to the specific date on the calendar, and press the center button to select.
Regardless of which of the four View Mode options you select, you will be presented with a screen consisting of three parts. On the left is the File Type Select bar, which contains the icons for each of the four View Mode options. This allows you to change your file type selection without having to go back to the beginning of the menu (figure 3-7a).
What you see in the second and third portions of the screen depends on whether you selected a View Mode option that is date specific or folder specific. The [Date View] and [AVCHD View] are date specific and the [Folder View(Still)] and [Folder View(MP4)] are folder specific. The second portion of the screen contains either a month bar or a folder icon depending on the file type selected. The third portion of the screen contains either a calendar for you to select a specific date or a grayed-out preview of the files to be displayed in the highlighted folder (figure 3-7a).

Figure 3-7a: View Mode – select folder name
Use the right button to move from the File Type Select bar to the next portion of the select screen. Use the up or down buttons to navigate through the list of months or folders, depending on the selected View Mode option. As you move through the months or folders, the calendar to the right changes to match the month, or the grayed-out image preview changes to match the highlighted folder. Once you select a folder, you will be presented with the folder’s images for you to view. If you selected a month, you’ll have one additional step to select the specific date within the month. Use the right button to enter the calendar and navigate to the specific date (figure 3-7b). Press the center button and you will see your images presented to you by date with the selected date first (figure 3-7c).
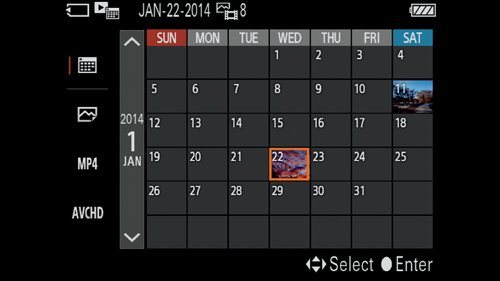
Figure 3-7b: View Mode – select specific date
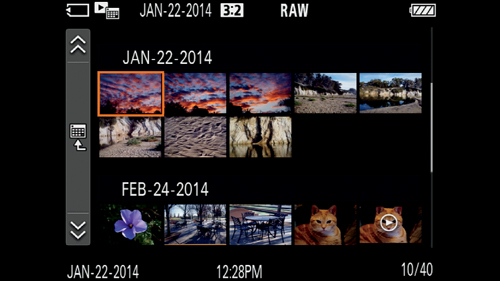
Figure 3-7c: View Mode – displayed files by date
If you are already in Playbook mode, a faster way to enter View Mode and change between folders is to press the index image button, which will also act as the AF/MF and AEL buttons when outside of Playback mode (figure 3-8). This function will take you directly into the activated View Mode display file option and will operate in the same way as if you had entered the command through the camera’s menu.
Once you have activated the Image Index function, rotate or press the control wheel’s rims to navigate through the images. The vertical bar on the right side of the screen changes as you move through the images, indicating the relative position of the displayed images within the total number of images for the selected file type saved on the memory card. Use the vertical File Type Select bar on the left to change the file type.
Sometimes when you enter Playback mode, you don’t see the images you expect. This is because the View Mode command is set to a different file type. To correct this problem, enter the View Mode command and select the desired file type. An easy way to have Playback return to a specific file type is the brute force strategy of snapping a quick image. If you snap a still picture, you will reset the folder type back to still pictures. Similarly, quickly starting and stopping a movie will reset the playback button’s folder type to the type of movie file that you just recorded. The problem with this strategy is its lack of precision. Although selecting still pictures this way is straightforward, it does not allow you to specify which type of movie file (MP4 or AVCHD) you wish to view, and therefore you may open the wrong file folder. In the case of movies, it is best to switch file types by executing the View Mode command through the menu or image index button directly.
Playing Back Still Pictures
When you are positioned to display still images, press the playback button. Either the last recorded or the last played-back still picture will be displayed first. Rotate the control wheel clockwise or counterclockwise to display the next or previous saved picture, respectively. You can also press the right or left buttons or rotate the front dial to navigate through saved pictures. Note that the displayed images wrap around as you continue to rotate the wheel. Remember to use the DISP button to view the recorded image data through the different data display formats.
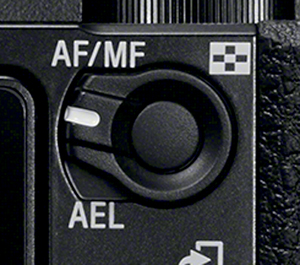
Figure 3-8: Image Index button
Playing Back Panoramic Pictures
Sweep Panorama images play back differently than regular still pictures. When you first see it, the image appears small since the entire panorama is displayed (figure 3-9a) with dark borders filling the rest of the screen. When you press the center button, the image enlarges to fill the screen, and starts to pan through the panoramic in the direction it was recorded (figure 3-9b). After the camera has played to the end of the sweep, the image is zoomed out so that its entirety is displayed again as seen in figure 3-9a. This gives you both the overall view of the panorama as well as a closer view of the image.
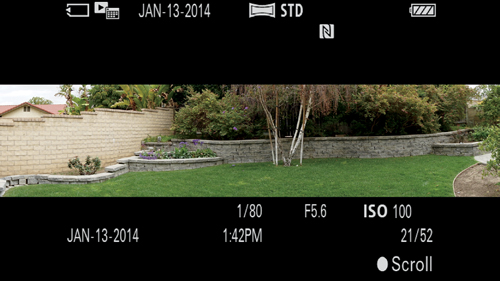
Figure 3-9a: Sweep Panorama playback; initial and final display

Figure 3-9b: During the playback sweep portion of a Sweep Panorama image
Playing Back MP4 or AVCHD Movies
As you cycle through the memory card files in Playback mode, you will only see the first frame of each movie. Press the center button to play the movie. Pressing the DISP button toggles between playing back the movie with operational information displayed and playing back the movie (figure 3-10a) by itself, without overlays.
Figure 3-10a: Movie played back with no data displayed
The operational data displayed prior to initiating the playback includes the date and time the movie was taken, the movie file type, and the prompts to adjust the volume (down button) and to start movie playback (center button). Once the movie starts playing, you will see the prompts for Fast Rewind (left button), Fast Forward (right button), and Pause (center button). The down button icon is present and labeled “Control Panel” (figure 3-10b). You can set the movie’s audio volume either before you start the playback of the movie (center button) or during playback via the Control Panel. Both methods display the same screen (figure 3–10c). Use the right and left buttons to raise or decrease the volume respectively.
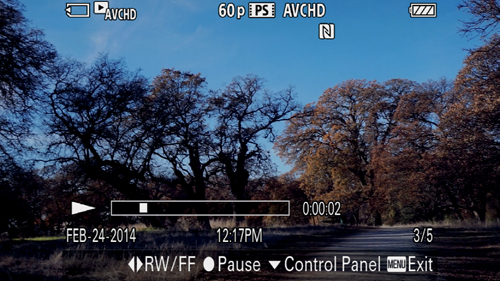
Figure 3-10b: Movie played back with operational data and Control Panel option displayed
You do not have to completely play the first movie to see the next recorded movies. While the first movie is playing, press Pause (center button). Press the right button to advance to the first frame of the next movie. You can move to subsequent recorded movies by simply continuing to press the right button. If you wish to back track and view a previous movie, press the left button. When you are ready to play back a movie, press the center button.
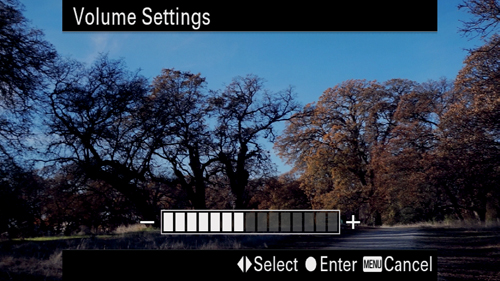
Figure 3-10c: Volume control horizontal scale displayed
When you play the movie without any data, pressing the down button brings up the Control Panel for controlling the movie. It should be noted that Fast Forward and Rapid Rewind are still available even though there is no visible icon. Just press the right and left button respectively.
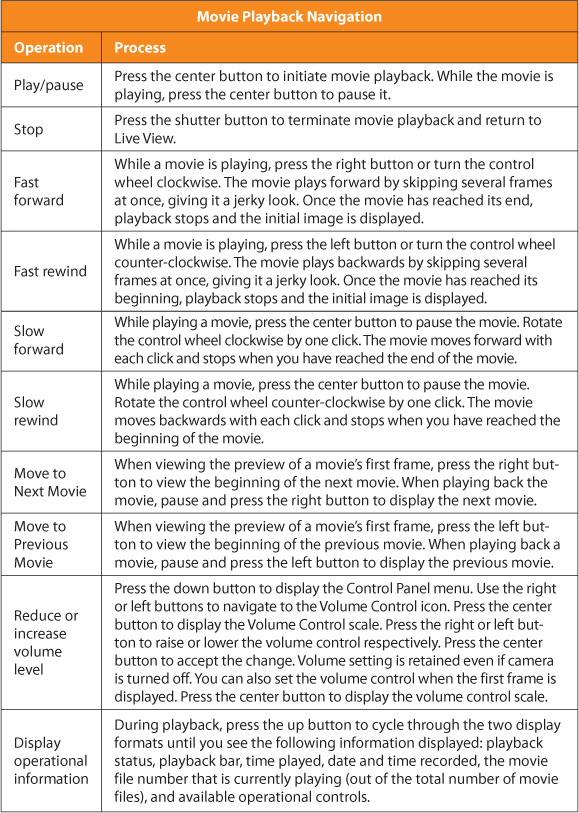
Table 3-1: MP4 and AVCHD movie playback navigation controls
You can also use the Control Panel menu to navigate and execute the movie playback operations. While a movie is playing, press the down button. The Control Panel menu will be displayed on the bottom of the display screen (figure 3-11). Depending on what you wish to do, you may find that you have to go back and forth to the pause icon in order to execute one of the other icons. Other than using this menu for setting the volume control, we found that executing the operations without the icons was actually easier for us. Use table 3-1 to become familiar with available movie operational controls.
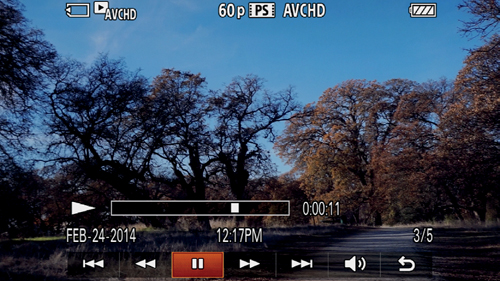
Figure 3-11: Movie Playback Control Panel menu
Reviewing Several Pictures and Movies
Use the Image Index command to select between displaying 9 or 25 thumbnail images (still pictures and/or movies) within a folder at one time:
MENU>Playback (1)>Image Index>[9 Images], [25 Images]
The selected Image Index value is applied regardless of the displayed file type, although there is the difference between displaying the files by date or by folder. In the case of displaying files by a specific folder, up to 9 or 25 images are displayed at one time. When you display files by date, the number of images displayed might be less because some of the screen will be taken up by displaying the date. The main thing to keep in mind is more images are displayed if you select [25 Images] instead of [9 Images] The assigned option also applies to the number of thumbnail images that are displayed when you push the Image Index button while in Playback mode.
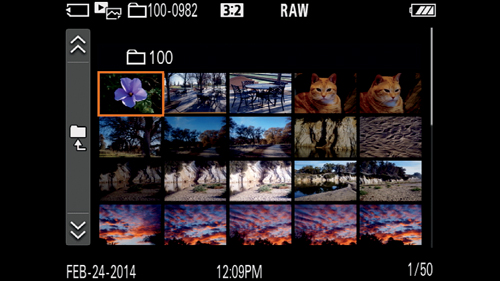
Figure 3-12: Image Index screen with thumbnail images
As before, use the control wheel to navigate through the displayed thumbnail images (figure 3-12). To view a specific image, navigate to the image you’d like to see, and press the center button when that image is highlighted. The highlighted image will be displayed at the full-screen size. You can continue to scroll through the images one by one, or return to the multiple-image view by pressing the image index button again.
You may see fewer than 9 or 25 images displayed when you first enter the Image Index screen. This is because there are fewer than 9 or 25 images saved, you are seeing the last few saved images that can be displayed, or you have chosen to view the images by date. If this is the case, you can determine the total number of images by scrolling or looking at the bottom-right corner of the screen where the image number (out of the total number of images) is displayed.
Reviewing Still Pictures with the Slide Show Command
The slide show function can be a fun tool to test out. You can play the slide show on either your camera’s display screen or on a compatible TV by connecting it to your camera with an HDMI Type D (Micro) connector.
The Slide Show command is heavily dependent on the View Mode command’s setting. First, the Slide Show command is enabled or disabled based on the selected View Mode value. The command is enabled when View Mode is set to [Date View] or [Folder View(Still)], but it is disabled when View Mode is set to [Folder View(MP4)] or [AVCHD View]. Second, the Slide Show command plays back only the images on the camera’s inserted memory card in sequence, starting with either the last played back or last recorded image based on the selected View Mode. Although Slide Show does not let you specify creating a show of movies, since [Date View] also includes AVCHD and MP4 movies, they are included in the slide show when View Mode is set to [Date View].
To build and initiate a slide show, navigate to the following command:
MENU>Playback (1)>Slide Show>[Repeat], [Interval]
After you enter the Slide Show command, you will see two options: Repeat and Interval along with [Enter] and [Cancel] operations (figure 3-13).
The Repeat [On] option enables the slide show to loop back through the pictures continuously. The [Off] value executes the slide show only once and then exits to Live View.
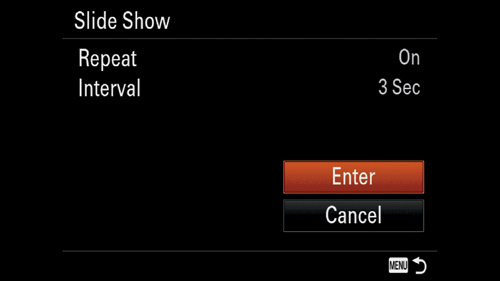
Figure 3-13: Slide Show command screen
MENU>Playback (1)>Slide Show>Repeat>[On], [Off]
The Interval option allows you to set the length of time each picture is displayed (from 1 to 30 seconds).
MENU>Playback (1)>Slide Show>Interval>[1 Sec], [3 Sec], [5 Sec], [10 Sec], [30 Sec]
To initiate the slide show, navigate to [Enter] and press the center button or select [Cancel] to exit the Slide Show command.
After a slide show begins, you have a couple of navigational options. Press the right or left buttons to navigate forward or backward through the slide show. You can also rotate the control wheel clockwise or counter-clockwise. The front or rear dials on the top of the camera will give you the same results.
Since movies also play in the slide show when View Mode is set to [Date View], there is a volume control option to raise or lower the sound. You must first pause the movie, then press the down button. Press the right or left buttons to raise or lower the volume. The volume change is retained even after the slide show finishes.
To terminate the slide show, press the MENU button or the shutter button halfway to return to Live View, or press the center button to enter Playback mode. There is no way to pause the slide show when still pictures are playing.
The disadvantage of creating a slide show with your camera is it is inflexible and temporary. The command plays back all of the saved images—the good and the bad. Primarily, in-camera slide shows are a quick way to view each image without having to manually scroll through them. Keep in mind that the Slide Show command only uses images and movies on the memory card within the camera. For a more permanent and flexible solution, download your images to your computer and use software to create slide shows. This way you can combine images from multiple memory cards, order the images to your liking, add image transitions, and maybe even music, depending on the software you are using.
There is one major benefit in using the in-camera slide show function: being able to see your still images on a big television screen. This requires that you have an HDMI cable (not supplied with the camera) to connect to your HD television. Use the following steps to connect the camera to the television:
- Turn off both the camera and TV
- Connect an HDMI cable to your Sony a7/a7R; then connect the other end of the cable to your HD television.
- Turn on the TV and make sure the HDMI input selection is set appropriately.
- Turn your camera on. If the TV input is set properly (input matched to the port being used by the camera’s output), you will see an image of what the camera is displaying.
- When you press the MENU button on the camera, you will see the menu commands appear on the television.
- Note: If you have a suitable 4K television, you can see your still images at 3840x2160 pixels. This is twice the pixel count of a true HD television, so you will see finer detail than you would on an HD television. To activate this feature, use the following menu command:
MENU>Playback (2)>4K Still Image PB>[OK]
If the command is grayed out, the television is not compatible with 4K operation. If the command is accessible, select OK.
Zooming In on Recorded Still Images
Sometimes you need extra magnification to see if the fine details in a recorded picture are clear. Although you cannot enlarge movie files, you can enlarge all types of still pictures, including panoramas. To do so, press the C2 button while in Playback mode (figure 3-14). This initial press of the button will enlarge the image significantly. You can continue to enlarge the image in smaller increments by pressing the C2 button multiple times, depending on the recorded file’s Image Size. Regardless of the Aspect Ratio, if you have recorded a small image, you will be able to enlarge the image up to nine times during playback. Large and medium image-size pictures can be enlarged up to eight times.
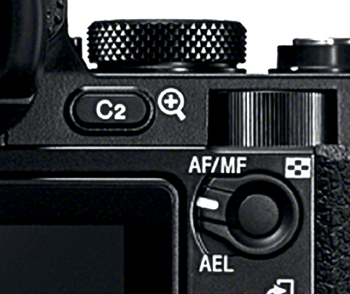
Figure 3-14: C2 button with the Enlarge Image icon
After the image is enlarged, a white box containing a picture of the original image is superimposed in the lower quadrant of the screen. It shows the entire image with a small orange box on it indicating the portion of the image that is enlarged (figure 3-15).
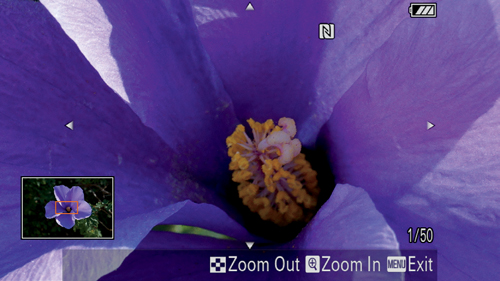
Figure 3-15: Enlarged image with original image box superimposed
Remember that each subsequent press of the C2 button increases the magnification of the image in small increments. To decrease the magnification, press the AF/MF (or AEL) button. Unlike the initial press of the C2 button, there is no initial large decrease in magnification. Instead, each press of the AF/MF button decreases the magnification by a small amount. The orange box enlarges as the magnification decreases, reflecting the viewable area on the LCD screen.
Four arrows surrounding the enlarged image indicate the directions you can move the displayed portion (by pressing the corresponding right, left, up, or down buttons). Note that the small box within the full image display moves in tandem with the button’s direction, indicating what portion of the image you are viewing on the display screen. You can also enlarge the last viewed image without entering the playback mode by initiating the Enlarge Image command:
MENU>Playback (2)>Enlarge Image
This command works in the same way as entering Playback mode and pressing the C2 button to enlarge the image. Either method yields the same results. We prefer using the C2 button instead of the Enlarge Image command because we don’t have to go through the camera’s menu.
Evaluating Exposure with Histograms
A histogram is a tool that helps you evaluate exposure. It’s a graphical representation of the range and distribution of light-intensity values recorded by the sensor. Intensity values are represented on the horizontal axis (black to white), and the numbers of pixels are represented on the vertical axis.
Theoretically, a histogram has the shape of a classic bell curve, with the maximum values near the center, indicating that the brightness level of most pixels is in the middle—not too bright, not too dark. However, in practice, a histogram’s shape may be distorted and irregular. Figure 3-16 shows three histogram plots taken from the Sony a7/a7R LCD screen.
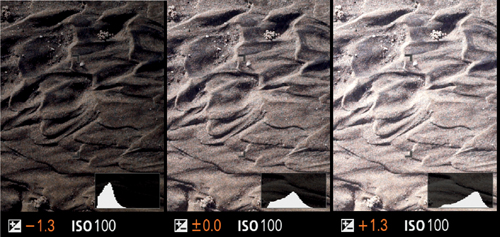
Figure 3-16: Histogram examples of an image that is underexposed, properly exposed, and overexposed
The left histogram indicates that the image is underexposed, meaning that not enough light is hitting the sensor; the middle histogram shows a properly exposed image; and the right histogram indicates that the image is overexposed, meaning that too much light is hitting the sensor.
As you do more photography, you’ll realize that you should watch for large numbers of pixels appearing at the extreme ends of the graph. If the histogram is skewed with the curve piling up on the right side of the horizontal axis, then the some of the pixels are receiving too much light and the sensor cannot record all the intensities in the brightest region of the scene. If these areas are large, they will appear as a white mass. However, if there were only a few pixels that are over exposed and they are widely separated, the picture would still be acceptable.
Conversely, if the histogram is piled up against the left side of the horizontal axis, it indicates underexposure. Many pixels are not receiving sufficient light to generate an electrical signal. Again, if there are many underexposed pixels grouped together, that means dark regions of the scene are not being recorded. Such an area will not reveal fine details and will exhibit increased noise. Either way, you will have problems—at the extreme right, the image will have burned-out highlights; at the extreme left, the image will have impenetrable black shadows that lack detail.
Histograms in Preview Mode
The Sony a7/a7R displays a histogram when you preview your shot so you can adjust the camera settings prior to taking the picture. This histogram is a rough guide. To display the histogram during preview, make sure the Histogram data display format box (figure 3-17) is checked in the DISP Button>Monitor or Finder command covered earlier in this chapter. You can even see a histogram while taking a movie or just before taking a panorama. In the case of a panorama, the DISP’s Histogram data display format does not work, but you can review the histogram prior to starting a panorama shot via the [For viewfinder] data display format on the LCD screen.
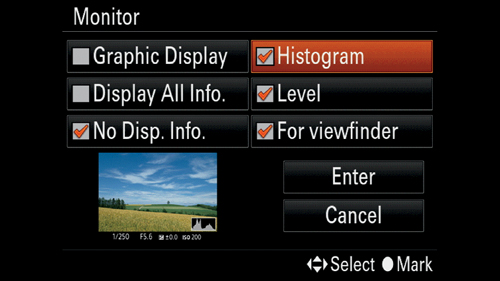
Figure 3-17: Histogram box checked in DISP Button>Monitor command
Keep in mind that a histogram is a real-time measurement of light at the moment you take the photograph. It will change to match changes in the lighting or when you change the camera’s settings. Different scenes will usually show varying histograms. Since panoramas involve shooting multiple locations, you can first pan the intended area to view for excessive exposure issues through the preview histograms and make any adjustments prior to shooting the scene.
The live histogram is an approximation—it only displays luminosity. Also, the live histogram cannot show the results of a flash exposure.
A more accurate way to evaluate the exposure is to study the histogram that is displayed when you use the playback button. This displays four histograms: one for luminosity, a second for the green color channel, a third for the red color channel, and the fourth for the blue color channel.
Histograms in Playback Mode
You can obtain more information by studying histograms in playback. For example, you can see how the color channels responded to your exposure. Here, along with the overall intensity histogram, you will have additional color-channel histograms (red, green, and blue) to help you further evaluate the image (figure 3-18). Each color channel has a different sensitivity to light. When you view individual color-channel histograms, you can see how intensity values “pile up” at the ends of the intensity axis. An imbalance in the color-channels’ histograms indicates that there will be a color shift in either the image’s highlights or shadows.
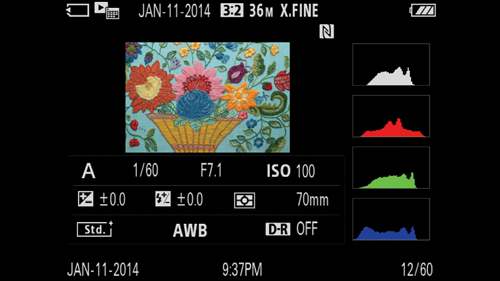
Figure 3-18: Histograms available when reviewing a picture
If one channel is over- or underexposed, as evidenced by its histogram, your picture may take on a color cast in either the highlights or shadows. The luminosity (white) histogram may miss this detail. Luminosity is, at best, an average of the light intensities from the red, green, and blue photosites. For example, underexposed images show intensity values accumulating and spiking on the left border of the graph. This can be corrected by reshooting with an increased exposure. The reverse is true for overexposure.
Protecting Saved Pictures and Movies
Have you ever intended to save a picture and inadvertently deleted it? It’s frustrating when this occurs. The Protect command guarantees this won’t happen when you tag the images that you do not want to accidently erase with the Delete command.
MENU>Playback (2)>Protect>[Multiple Img.], [All with this date], [All in this Folder], [Cancel All with this date], [Cancel All in this Folder]
This command can easily cause confusion. The Protect command’s menu has five different options, but only three will be available in the menu at any one time. This is because the displayed Protect command’s options are dictated by the View Mode command’s value. If you are not seeing what you expected, go back to the View Mode command and set it to the date or folder in which you wish to protect images.
Protect command’s [Multiple Img.] option always displays, but the rest will vary:
• When View Mode is set to [Date View] or [AVCHD View], the Protect command displays the following:
MENU>Playback (2)>Protect>[Multiple Img.], [All with this date], [Cancel All with this date]
• When View Mode is set to [Folder View(Still)] or [Folder View(MP4)], the Protect command displays the following:
MENU>Playback (2)>Protect>[Multiple Img.], [All in this Folder], [Cancel All in this Folder]
The [Multiple Img.] option displays all of the saved files on the memory card regardless of their file type, starting with the last one recorded or played back. To protect specific images, do the following:
- Select Protect’s [Multiple Img.] option. The recorded images are displayed with a check box in the middle-left side of the display screen.
- Scroll through the images to find an image you wish to protect.
- Press the center button when the image you would like to protect is highlighted. An orange check is entered into the check box to indicate the image should be protected. To unprotect, uncheck the image by pressing the center button again.
- Once you have indicated all of the images you wish to protect, press the MENU button to enter the checked images.
- Select [OK] to protect the files and then press the center button.
- Once the process is completed, press the center button to exit.
When you select the [All with this date] option, a message displays informing you of the date it will use to determine what images to protect. If you agree, select [Enter]. Otherwise select [Cancel] to exit the command. The displayed date is selected based on the View Mode’s last date value.
The [All in this Folder] option works the same way, but protects files in a specific folder. In both cases, if you aren’t seeing the images you expected when you select [All with this date] or [All in this Folder], exit the Protect command, go to the View Mode command, and modify it to your desired value.
There are two ways to unprotect images:
• Reenter the Protect command, select the [Multiple Img.] option, and uncheck the checked boxes one at a time.
• Execute the available cancel option: [Cancel All with this date] or [Cancel All in this Folder], depending on the camera’s View Mode value.
All image and movie files, protected or otherwise, will be erased when you reformat the memory card using the Format command. In addition, the Protect command is enabled only if there is at least one image stored on the memory card for the selected View Mode.
Deleting Saved Pictures and Movies
Not every picture or movie will be a keeper. As you view the saved images on the camera, you may want to delete one or more.
There are multiple ways to delete files. One way is to use the Delete button to delete one image at a time while in Playback mode. The Delete function screen will be displayed with the Delete and Cancel options. Navigate to the option you want and press the center button to execute. The Delete option deletes the image and displays the next image within Playback mode. The Cancel option exits out of the Delete function and continues to display the image.
Another way to delete images is to use the Delete command in the Playback menu. This method allows you to delete multiple images at the same time. But, like the Protect command, the Delete command’s options are at the mercy of the View Mode command’s value.
MENU>Playback (1)>Delete>[Multiple Img.], [All with this date], [All in this Folder]
This command’s [Multiple Img.] option is always displayed, but the [All with this date] or [All in this Folder] options are dependent on which View Mode is set:
• When View Mode is set to [Date View] or [AVCHD View], the Delete command displays the following:
MENU>Playback (1)>Delete>[Multiple Img.], [All with this date]
• When View Mode is set to [Folder View(Still)] or [Folder View(MP4)], the Delete command displays the following:
MENU>Playback (1)>Delete>[Multiple Img.], [All in this Folder]
To delete specific images, do the following:
- Select Delete’s [Multiple Img.] option. The recorded images are displayed with a check box in the middle-left side of the display screen.
- Scroll through the images to find an image you wish to delete.
- Press the center button. An orange check is entered into the check box to indicate the image should be deleted (figure 3-19). You can uncheck the delete indicator by pressing the center button again.
- Once you have indicated all of the images you wish delete, press the MENU button to enter the checked images.
- Select [OK] to delete the files and press the center button.
- Once the process is completed, press the center button to exit.

Figure 3-19: Image selected for deletion. Note the checked box on the left.
When you select the [All with this date] option, a message will be displayed informing you of the date it will use to determine which images to delete. If you agree, select [Enter]. Otherwise select [Cancel] to exit the command. The displayed date is selected based on the View Mode’s last date value.
The [All in this Folder] option works the same way, except it deletes files in a specific folder.
In both cases, if you aren’t seeing the images you expected when you selected [All with this date] or [All in this Folder], exit the Delete command, go to the View Mode command, and modify it to your desired value.
A third method is to reformat the memory card to delete all saved files regardless of file type:
MENU>Setup (5)>Format>[Enter], [Cancel]
Executing this command will delete all stored files (even protected files) on the memory card.
The most important thing to remember is when you delete a saved file, it is permanently gone from the memory card. The Format command erases everything on the memory card regardless of whether it is protected or not. The Delete function does not erase files that are protected. In addition, the Delete command is enabled only if there is at least one image stored in the appropriate folder or date on the memory card. For example, if you have stored still picture images but there are none in the MP4 folder, you will find the Delete command grayed out if you select the MP4 View Mode, but enabled when you select the still images folder.
Recommendations
We recommend leaving the FINDER/MONITOR setting to [Auto] so the automatic switching between the LCD screen and the viewfinder is operational. This way, you can quickly switch between the two display screens without making a change through the menu structure.
We usually turn off the Auto Review command. Having the Auto Review command only slows up the operation of the camera and disrupts the flow of capturing pictures. Also, we shoot a series of pictures and then review them as a group. Some of the pictures take only a second to review; some take longer. Setting Auto Review to [Off] puts the review process in our hands.
The need to retake pictures is reduced because the display screen allows us to evaluate our image for exposure, white balance, and focus before taking the picture. Unlike a DSLR’s optical viewfinder, the more egregious errors of incorrect WB or exposure can be identified immediately and corrected before taking the picture. This makes picture-taking very efficient, and allows us to have a good success rate in the field.
It might seem like overkill, but we have concluded that it is best to select all of the data display formats for previewing the images. Although we have our preferences, we find that we use each of the display formats at least occasionally. Therefore, checking them all gives us the flexibility to use what we want at the time we need it without having to change any settings. If we decide we need the Level gauge, it’s already available. We just have to press the DISP button to get the desired format.
We recommend that you review your histograms frequently. A histogram is an excellent tool for reviewing an exposure, both before and after recording. We use them often, especially in the camera’s semiautomatic and manual modes.
We set the grid line command to the [Rule of 3rds Grid] option. This helps us balance the image composition with a minimal number of lines. The grid lines are prominent enough that you can see them when you want them, but faint enough to overlook when you don’t need them.
Be aware that by itself, the LCD or EVF does not provide sufficient magnification to evaluate image sharpness critically. We frequently enlarge the image before and after taking a picture. It allows us to confirm that the image detail is in focus. Rather than spending money to print out the image only to find that important parts of it are not actually in focus, get in the habit of enlarging the image on the LCD screen. If it isn’t in focus, you will most likely have time to make some adjustments and recapture the image.
Don’t forget about the View Mode select bar in the Image Index screen. Several camera functions work based on the current View Mode file type. It is easy to get confused about why your movies aren’t showing up on the Image Index screen. It may be that the camera is not set to your expected file type. Also remember that if you have created files via a camera application, that file might not show up in the View Mode.
On occasion, we will take time to protect our images. You may need to do the same, especially if you share your camera with someone else.
We are judicious about deleting files while photographing in the field. We occasionally weed out unacceptable images directly from the camera, but we find it much easier to do this cleanup process later when we view the images on our computer.