Chapter 2: Basics of Digital Photography

Introduction
The Sony a7/a7R has scores of menu commands and options, which can discourage even the most experienced user, let alone someone attempting to move beyond a simple point-and-shoot camera. This should not prevent you from immediately taking pictures. You can start by treating the camera as a point-and-shoot. By using the Auto modes, you don’t need to worry about things like aperture, shutter speed, or ISO. Even expert photographers may still find these automatic settings useful.
The best way to learn about photography is to take pictures, study your efforts, and then figure out how you can improve your images. You can experiment with the options on the camera, and then analyze your results to learn photographic tools that will allow you to override automatic settings and impart your artistic interpretation of a scene. On the other hand, if you are an expert photographer, you may enjoy delving into the automatic settings. You may find that there are automatic settings and options that can be incorporated into your photographic arsenal.
This chapter describes how the camera settings affect exposure, depth of field, shutter speed, and sensor sensitivity. Our goal is to provide an intuitive, rather than scientific, explanation of how the camera renders a sharp and detailed image so you can more thoroughly understand what the automatic settings are doing. You will learn what a technically good picture is and how you can modify the camera settings to create an artistic image that is imbued with your vision of the scene. The most important thing to realize is that there are several ways to get a sharp picture, and the options you choose will depend on your subject. The best settings for portraits are not the same as for scenic or action shots.
In both the Intelligent Auto and Superior Auto modes, the camera decides all of the settings. Your camera identifies the scene you are shooting, and then applies the appropriate settings for that subject. For example, if the camera focuses on the horizon hundreds of feet away, it assumes you are photographing a distant scene and taking a scenic shot, and will employ the best settings for that type of image.
Unfortunately, the camera’s scene identification is not foolproof, and it can choose a less-than-optimal combination of settings for your subject. The resulting picture might be adequate, but it could have been improved by using more appropriate settings to bring out the subject’s best features. To gain more control and improved accuracy, use the SCN mode to match your subject to a predefined scene category, such as sports activities, portraiture, or low-light conditions. Switching from the Auto modes to the SCN mode will increase your percentage of good photographs. Eventually, you may want to take over the process entirely by looking at the scene, pre-visualizing the picture, and setting the camera controls to record your subject.
Many of the topics we will cover in this chapter are handled in depth in later chapters. This chapter will cover the locations and high-level descriptions of the camera’s operations.
Basic Photography Concepts
A photograph is a two-dimensional rendering of a three-dimensional object. The camera’s light detector, called a sensor, is flat. A lens projects light from the subject onto the sensor. If the distance between the lens and the sensor is not adjusted precisely, the image will be blurred. Only one plane that is parallel to the sensor is rendered at maximum sharpness—in other words, the subject will be in focus only if it occupies this plane. Objects in front of or behind this plane become progressively blurred as their distance from the in-focus subject increases. When the distance is great enough, the out-of-focus portions of the image appear as a complete blur.
The diameter of the lens aperture will extend or limit the range of sharpness. By reducing the aperture’s opening, you create an image in which both nearby and distant objects appear sharp (large depth of field). By opening the aperture wider, you create a shallow depth of field in which you pick the plane that will be sharp, and the objects outside that plane are blurred. This concept is illustrated in figure 2-1. The image on the left was photographed with the aperture set to f/2.8, leaving only the balcony in sharp focus. By closing the aperture to f/16, we increased the depth of field to sharply record a larger area in front of and behind the balcony, as shown in the image on the right. Not only is the intended object sharp, but the background and foreground areas are sharp, as well.

Figure 2-1: Shallow versus large depth of field
What Are Sensors and Images?
A digital camera uses a solid-state device with millions of individual photosites for converting light into an electrical signal. An individual photosite is the physical basis of a pixel, the smallest unit for sensing light. In the Sony a7R, there are more than 36 million pixels in a 7360x3264 rectangular array. For the Sony a7 there are 24 million pixels in a 6000x4000 rectangular array. Signals from these sensors are transmitted to the camera’s display screen. Together they make up the mosaic of intensities and colors that become an image. The viewed image is a numerical expression that can be manipulated mathematically. This enables the camera to alter the image’s appearance. Then it can be stored on a memory card.
The sensor can record only a limited intensity of light. If there is too little light, you will record a black photograph; if there is too much light, your image will be a brilliant white. In either case, little to no detail will be recorded, and you will not be able to resurrect your picture with image processing. This differs from our visual perception of the world, in which we can view a much broader range of light intensities. To record these intensities in a picture, you have to adjust the amount of light that reaches the sensor to ensure proper exposure. If you provide the correct amount of light, the camera’s sensor will record a picture that is rich in detail in both the brightest and darkest regions.
Three factors control exposure. The first is lens aperture, which regulates how much light enters the camera body. The second is shutter speed, which regulates how long the sensor is receptive to light. A short shutter speed of 1/1000 second provides less light to the sensor than a long shutter speed of one second. The final control is ISO, which is essentially an electronic gain that increases or decreases the signal from the sensor. Think of it as a sensitivity control—the higher the ISO, the more sensitive the sensor is to light.
In summary, to record a technically sharp picture, you must properly focus the subject onto the sensor and ensure that the intensity of collected light lies within a prescribed range. The camera does this on its own when you set it to an automatic shooting mode, and the process is refined enough that most people are satisfied with the results. However, photography is an artistic endeavor, and there is no universal setting that always renders an image with emotional impact. To create an artistically satisfying image, you may have to set the controls differently than the optimum settings for sharpness or exposure. For example, a running athlete can be photographed with a relatively long shutter speed to blur the arms and legs, creating the impression of movement, or he can be photographed with a short shutter speed to freeze all motion. In the former, the picture you create has an impression of speed; in the latter, you sacrifice this component to record fine details.
Basic Photographic Terms
To capture an image that records the entirety of the subject’s detail, the sensor must register all of the light levels within the scene. This requires adjusting the amount of light that falls on the sensor by regulating the shutter speed and aperture opening. If these adjustments fail to provide enough light, the signal from the sensor will be insufficient and the recorded image will be overly dark. To ameliorate this situation, raise the camera’s ISO setting. Basically, this amplifies the sensor’s output signal to brighten the recorded image.
The aperture controls the quantity of light passing through the lens. The degree of transmission is defined as the f-stop—the ratio between the diameter of the lens and its focal length. The important thing to realize is that a lens set at f/5.6 transmits the same intensity of light whether it is a telephoto or a wide-angle lens.
One thing to be aware of is that f-stops on many zoom lenses vary depending on where you set the zoom ring. Usually the lens is more open when it is used at wide-angle settings, and less open when you use a telephoto setting. Fortunately, because your Sony a7/a7R measures light at the sensor, the camera compensates for these variations in the amount of light. Those zoom lenses, which maintain a constant aperture as you change their focal length, are premium designs and can be very expensive ($1000). Such lenses are usually heavier for a given zoom range and have better optical quality than the variable aperture lenses.
Another way to regulate the amount of light falling on the sensor is by controlling the duration of the exposure. This is the role of the shutter. The shutter speed reflects the time the sensor is exposed to light. An exposure of 1/30 second allows the sensor to receive twice as much light as a shutter speed of 1/60 second.
There are technical and artistic advantages to be gained by varying the aperture and shutter speed to control aspects of the exposure. First of all, you have control over a much broader range of light intensities. Closing the aperture and shortening the shutter speed are additive; doing both reduces the effect of the light more than doing just one or the other. The intensities you can work with range from using the longest shutter speed with the widest aperture opening to the shortest shutter speed with the narrowest aperture opening. Aperture openings are expressed in numbers, with the smaller numerical values indicating that the lens transmits more light. Shutter speeds are typically expressed as a fraction of a second.
Several combinations of aperture and shutter speed settings can produce an equivalent exposure. Setting the aperture to f/2 and the shutter speed to 1/60 second provides the same exposure as setting the aperture to f/16 and the shutter speed to 1 second. With a shutter speed of short duration, a flying bird can be rendered tack-sharp while suspended in space. With a shutter speed of a longer duration, the same bird’s flapping wings will appear blurred, giving the impression of rapid movement. To obtain an equivalent exposure with these two shutter speeds, you’ll need to the use appropriate lens aperture setting for each. The faster shutter speed requires the lens aperture to be opened up to admit more light, and the slower shutter speed requires the aperture to be closed down to admit less light.
Another artistic advantage of varying the aperture is the ability to control the depth of field. Depth of field can be increased by closing down the aperture and decreased by opening it. In regards to maintaining exposure, using a small aperture requires using a slower shutter speed so enough light still reaches the sensor.
You can use depth of field to direct the viewer’s attention to the subject. In the case of a portrait, you can focus on the subject’s face and blur the background by opening the aperture to provide a shallow depth of field. To offset the increase in aperture, use a shorter shutter speed to reduce the amount of light falling on the sensor. Again, the dual control of shutter speed and aperture is an important concept to master so you have the most influence over the design of your image.
There are times when you may need to raise the shutter speed or narrow the aperture to reduce the intensity of the light that reaches the sensor. You can offset this by increasing the ISO. However, increasing the ISO reduces the range of light (the dynamic range) that the sensor can record, which sacrifices some image quality. The image becomes granular—that is, areas that should be rendered as smooth tones become speckled with blotches of color, and the overall definition is reduced. This is referred to as image noise, and is most easily seen in the shadowed regions of the image. Many expert photographers prefer to set the ISO manually to ensure that they use a value that best balances between high image quality and proper light sensitivity.
In conclusion, you have three variables for controlling exposure: aperture, shutter speed, and ISO. These three variables allow you to impart an ambience to your pictures. Intelligent Auto and Superior Auto modes try to identify the subject, and they will set the three variables to produce a final image based on that identification. However, compared to the photographer, the Auto modes have a limited capacity to identify the scene, so the ability to manually control exposure is important.
To improve the quality of your pictures, you can take advantage of the SCN mode and select a predefined scene mode that matches your subject. In these modes, there is a bias for certain settings. For example, when you select Sports Action mode, the camera increases its ISO and uses a fast shutter speed. In contrast, if you select Landscape mode, the camera uses a lower ISO for improved image quality and a slower shutter speed to compensate for the reduced light intensity. The Intelligent Auto, Superior Auto, and SCN modes try to find the best combination of these three controls. However, as you gain experience, you will discover that you can improve on their recommended settings. This is the main reason to go beyond the automatic modes and start experimenting with the P, A, S, and M modes.
White Balance and the Appearance of Colors
We live in a world of color, in which our eyes and brain work together to ensure that we identify hues correctly in all lighting conditions, whether it be direct sunlight, indirect sunlight, shade, or artificial light. Our vision works so well that we don’t expect an object’s appearance to vary based on light—the human eye is able to identify color in all of these conditions.
However, when you’re using a digital camera, the recorded image reflects the object’s appearance based on variant lighting scenarios. If nothing is adjusted within the camera, an object will look different when shot in different lighting conditions. For example, indoor light makes objects appear ruddy; sunny outdoor light makes them look white; and indirect sunlight from the sky makes them look blue. To match our visual impression of what the object should look like, digital cameras use automatic white balance (AWB), which adjusts the balance of colors so that when an image is saved, the object’s hues look consistent with our expectations, regardless of the lighting condition (figure 2-2).

Figure 2-2: Automatic white balance setting
However, AWB is imperfect, and the photographer must know when and why to override it. There are several ways to do this and we will discuss the various techniques later in the book. The methods range from selecting a WB icon whose name indicates the type of ambient lighting (Chapter 5), to a quantitative technique where numerical values describing the color are used to calibrate the camera (Chapter 6).
ISO
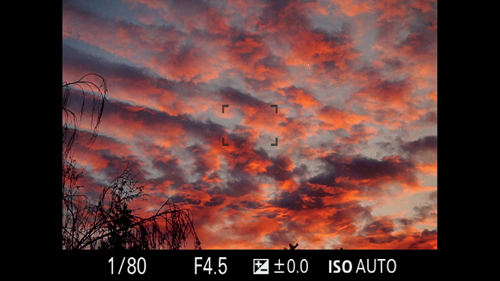
Figure 2-3a: When in Live View, the ISO values are in white letters (ISO AUTO)
Figure 2-3b: Rotating the control wheel allows you to select the ISO value, in this case 1000
You can select the camera’s ISO by rotating the control wheel or selecting ISO through the Fn button, Quick Navi screen, or the menu. In the default configuration of your camera, you will see ISO AUTO in white letters at the bottom of the Live View screen (figure 2-3a). In the automatic modes and SCN modes, the camera only uses ISO AUTO. You can only change the value of the ISO in P, A, S, and M modes, which are covered in Chapters 5 and 6. In these modes, when you rotate the control wheel, the ISO setting at the bottom of the screen will turn orange and you will scroll through a series of numbers. In figure 2-3b, the number is set to 1000. After a few seconds, the orange coloring will disappear and the numbers will turn white. This color change is a visual prompt to aid you when you’re altering your camera settings.
ISO AUTO sets the ISO value in a default range from 100 to 6400, with the low values providing the least sensitivity and the high values providing the greatest. ISO AUTO sets the sensitivity automatically and you will not know what value is set until you press the shutter button halfway. The highest-quality images are obtained with ISO 100. This setting provides the least amount of image noise and the greatest dynamic range. However, ISO 100 may be unsuitable for handheld photography under dim lights because the shutter speed may be so long that either camera movement or the movement of the subject blurs the photograph.
How far ISO can be increased is dependent on the photographer’s acceptance for the appearance of noise. This in turn depends on the subject and how the recorded image will be displayed. If the intent is to provide images for viewing on a computer screen via email attachments or web page pictures, you can raise this value aggressively. The smaller the final picture size, the less obvious the noise, so the increased ISO value can be tolerated. We found that an ISO of 8000 will provide acceptable results if the subject occupies most of the sensor. When the photo was displayed on our computer as a full-screen image, we did not feel that the image’s appearance was detracted by noise. However, when the image is destined to be printed as artwork at 24x36 inches or larger, we will invariably set the ISO to 100. Being able to set your own ISO is important so you can control your image quality. This is one of the major reasons to forego the automatic or the SCN modes. We will discuss adjusting ISO in Chapters 5 and 6.
Drive Mode Button
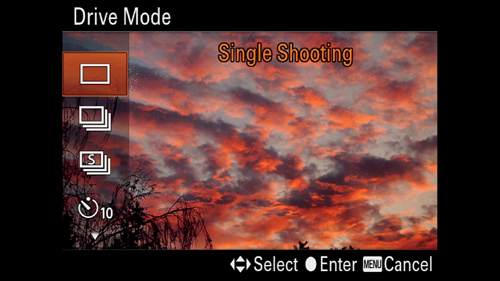
Figure 2-4: The preview screen after pressing the left button
The Drive Mode command allows you to specify how the camera will act when you fully depress the shutter button. You will have a varying degree of control over this command depending on whether you are in the Auto or the SCN modes. You can use most of the Drive Mode settings in Intelligent and Superior Auto, but in the SCN modes, some of them will be inaccessible for change. When in Live View, press the left button (note the associated Drive Mode icon) and the Drive Mode command’s options will appear along the left side of the screen (figure 2-4). Rotate the control wheel to navigate through the command options. Press the center button to select the highlighted value. Table 2-1 contains a summary of the commands.
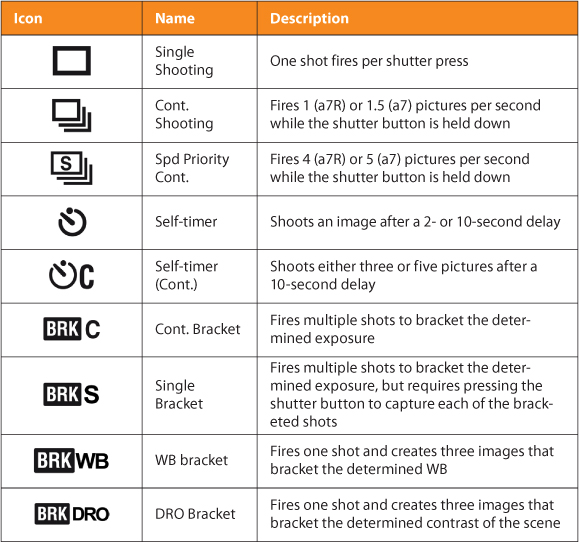
The Drive Mode options can be broken into three types: immediate non-processed (single/continuous) shooting, delayed shooting, and image-processed (bracket) shooting. A more detailed discussion of each of the Drive Mode options will occur later in the book when we cover automatic, semi-automatic, and manual shooting modes.
Single and Continuous Shooting
The Single Shooting setting instructs the camera to fire one shot for each press of the shutter button. The Continuous Shooting setting (Cont. Shooting) instructs the camera to fire continuously when the shutter is held down. Continuous Shooting can fire at a rate of about two frames per second for the a7, or 1.5 frames per second for the a7R. The Speed Priority Continuous (Spd Priority Cont.) setting will increase the continuous shooting rate to five frames per second for the a7 and four frames per second for the a7R. In a perfect world, using a continuous shooting mode would mean the camera would keep taking pictures until it filled the memory card. Unfortunately, this is not always the case. The memory card is limited and does not have the speed to accept new pictures as fast as the Sony a7/a7R can generate them.
To alleviate this deficiency, Sony has engineered a fast memory buffer that rapidly accepts and stores pictures generated from the sensor. When this buffer is filled during a rapid-fire sequence of shots, the buffer cannot accept new pictures, and it slows the firing rate of the camera. The buffer must be cleared to maintain a fast continuous firing rate. When using Spd Priority Cont. mode, we can usually obtain 13-19 pictures before the buffer is filled. The variation in the number of pictures is due to file size. Because of their smaller size, more JPEG pictures can be stored in the fast memory buffer than the larger RAW files.
Delayed Firing of the Camera
To include yourself in a picture, you can use either of the following two Drive Mode commands. One is Self-timer and the other is Self-Timer (Cont.). There are two options under Self-timer: a 10-second or 2-second delay between pressing the shutter button and the camera firing (table 2-2). The 10-second delay affords you sufficient time to race out to the front of the camera to be included in the photograph. The 2-second delay option allows the camera to avoid the effects of the movement caused by pressing down the shutter button.
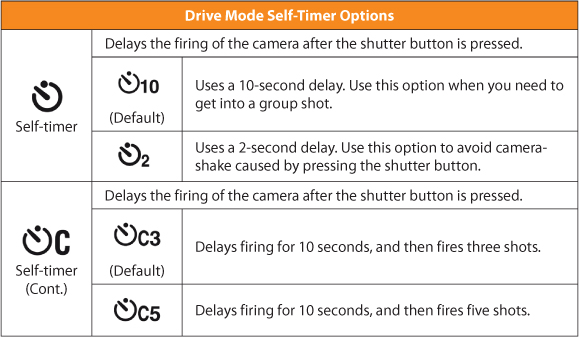
Table 2-2: Delayed Drive Mode command options
Self-timer (Cont.) instructs the camera to fire a burst of either three or five photographs after a 10-second delay. The rationale is that in a group shot, someone frequently commits a faux pas that is captured by the camera. The miscreant may look away at the wrong time, blink just as the shutter fires, or fail to smile. Working on the assumption that these problems occur randomly, Sony uses a statistical approach to allow you to get the perfect shot. Self-timer (Cont.) gives you the option to fire three or five shots in the hope that one of these pictures will be perfect.
Both commands work better with the a7 than the a7R. In the a7, no vibration results from the movement of the electronic first curtain, so the camera only needs to recover from the vibration or movement induced by pressing the shutter button. The a7R has a mechanical first curtain, and its movement creates enough motion to blur a photograph taken through a microscope or a long telephoto.
Using remote triggering devices creates the least amount of camera vibration by preventing inadvertent jarring and avoiding the movement from pressing the shutter button. We apply additional anti-vibration measures when we shoot with the a7R by mounting the camera on a tripod. Chapter 9 covers different types of tripods and associated equipment.
Bracket Firing
We will defer discussing this feature in depth until we reach Chapter 6, which describes Manual Operation of the camera. These manual options are specialized for the user who needs precise settings for exposure, white balance, and contrast.
File Formats
Your digital camera records your images on a memory card, and at some point you’ll transfer these files to your computer. From there, you may want to prepare the pictures for printing, e-mails, or posting to social media sites. The same is true with the movies you record. You may download them to your computer for editing, or you may compress them to send as attachments or upload them to the Internet. Either way, knowing how you are going to work with your recordings will determine your file format type.
File Formats for Still Photography
An advanced camera such as the Sony a7/a7R allows you to choose to record and save your images as either RAW or JPEG files. RAW files are the equivalent of digital negatives since you cannot use them directly on your computer—first you have to develop them with special software. This means either acquiring third-party software, such as Photoshop, or working with the Sony supplied software, Image Data Converter version 4.02. The advantage of the RAW format for those who like to process their images is that RAW files provide the greatest flexibility for post-processing. These files contain all of the information collected by the sensor, some of which cannot be seen directly when viewed on a computer monitor. RAW files are stored in a 14-bit format while JPEG files are stored in an 8-bit format. This means that for each of the three color channels in a RAW image, the intensity values are recorded within a range of 1 to16,384. In contrast, JPEG files’ data is stored in a courser fashion: each of their three color channels stores intensity information within a range of only 1 to 256. RAW’s increased precision in recording intensity level information allows the photographer to process their images so as to reveal subtle details in the highlights and shadows. Such details cannot be revealed when working with JPEG files. This increased precision of RAW images facilitates correcting errors in white balance and effectively adjusting contrast. Because of the high information content, these files are large.
In contrast, working with JPEG files is very straightforward. Almost all computers and image-processing packages can open and work with JPEGs. For these files, the camera processes and compresses the sensor data before storing the image. In essence, the files are already processed and are available immediately for viewing or attaching to e-mails. Because JPEGs are compressed, you are limited in what enhancing you can do to the files. For this reason, many people feel this file format does not generate the highest quality picture from a camera.
When you first use your Sony a7/a7R, your pictures will be saved as JPEG files. This is logical, since some of the most advanced camera features for capturing, processing, and manipulating the image can only be done when saving pictures as JPEGs. When using the JPEG file format, you have the option, before taking the picture, to specify the degree of sharpness, contrast, or color rendition you want applied to the image. Quality photographs can be achieved directly out of the camera, but to get the best results, the photographer has to understand how these settings will affect the final picture. There will be less flexibility in correcting mistakes in exposure or color balance when processing these files.
So, which file type should you use? The simplest answer is to use both. The Sony a7/a7R allows you to simultaneously record an image in both RAW and JPEG formats, giving you the best of both worlds—the full image processing potential of a large RAW file and the convenience of a generally accessible, small JPEG file. To record an image in both RAW and JPEG formats, press the MENU button, follow the subsequent command path, and select the [RAW & JPEG] option:
MENU>Camera Settings (1)>Quality>[RAW], [RAW & JPEG], [Extra fine], [Fine], [Standard]
However, using both formats is not always available, nor is it always desirable. The selection of Sony’s file types is a tool—we recommend making a pragmatic decision that reflects what you want to accomplish with your photography. Keep in mind that Sony has several unique features, such as Sweep Panorama mode and Multi Frame NR, that are recorded only as JPEGs. Since these techniques are valuable for shooting broad vistas or recording under low-light conditions, you may decide to use JPEG to avail yourself of these features. These special features will be disabled if you choose the RAW & JPEG option. As a rule of thumb, any operation that involves combining several different exposures into a single processed image will require the file to be saved only as a JPEG. To effectively use all of the Sony a7/a7R features, you must be prepared to switch from RAW to JPEG.
Choosing JPEG requires additional decisions, such as selecting which Quality to use. You have the options of [Extra Fine], [Fine], or [Standard], depending on how much detail you wish to retain in the image. Please avoid the assumption that JPEG images are of lesser quality than RAW images. When properly prepared, a print generated by a JPEG file is indistinguishable from one generated from a RAW file.
To record the most detail, choose [Extra Fine]. If you plan to save a large number of images on your memory card, you might decide to reduce the file size by compressing it more, thereby recording less detail. To do this, set the Quality value to [Standard]—the greatest degree of software compression is applied to Standard images. We choose the [Fine] option since these JPEG files are small enough for our purposes, and we see little value in further compressing the files. We should note that the option called [Standard] is a misnomer—it is not the default setting used in this camera. Instead, the default setting is the [Fine] file type, which is also the chosen JPEG format when the [RAW & JPEG] file type is selected.
You can also shrink the file size by reducing the number of pixels saved in the file. You can do this with the Image Size command:
MENU>Camera Settings (1)>Image Size>[L], [M], [S]
The RAW files’ default image size for the a7/a7R is [L], and this cannot be altered. For JPEGs, the default size is also [L], which is 24 megapixels (6000x4000 pixels) for the a7, and 36 megapixels (7360x4912 pixels) for the a7R; however, you can downscale the JPEG image size to either an [M] or [S] (table 2-3). It is important to note that the megapixel count (M preceded by a number) will vary between the a7 and a7R. On the a7R, the [L] size will be 36M, while on the a7, the [L] size will be 24M. The abbreviations used in the camera’s display are shown in the parenthesis in table 2-3. You can also change the Image Size value through the Quick Navi screen.
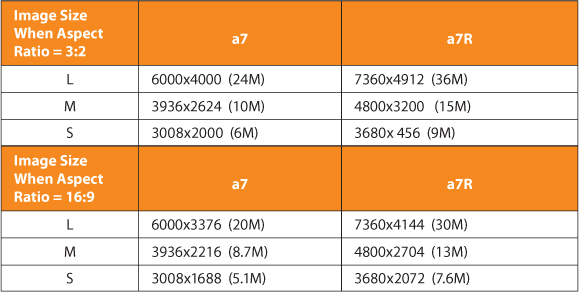
Table 2-3: Sony a7 and a7R image pixel sizes
It is unnecessary to save the files with a smaller pixel count if you post-process your images on a computer. Most independent programs, like Photoshop or Gimp, will allow you to resize your picture and reduce its file size.
Reducing Noise in JPEG Files
If you want to only work with JPEG files on your camera, it’s important to understand how the camera processes these files so you can achieve the best quality. When shooting at ISOs of 1600 or greater, Sony uses NR (Noise Reduction) software to remove the appearance of punctate dots (noise) in the image. This ensures that areas such as a painted wall with a smooth surface are recorded as having an even tone. However, noise reduction can, if employed aggressively, destroy fine details. This can be seen in images of an animal’s fur where the individual hairs become indistinguishable from each other and take on a smeared appearance.
Sony has designed their cameras to employ NR at high ISOs to remove the punctate artifacts resulting from sensor noise. Unfortunately, Sony’s default option, [Normal], removes fine details as well. This degradation is usually acceptable if you do not enlarge the picture too much. Many viewers will not see this lack of fine detail in a scene that is composed to fill the whole frame of the sensor, and whose enlargement is kept smaller than 8x10 inches. However, if you intend to make larger prints or crop the image to enlarge only a small region of the image, areas containing fine details will appear blurred.
To avoid this problem, go to the High ISO NR command and switch it from its default value [Normal] to either the [Low] option or the [Off] option. We set it to [Off], and if the punctate appearance on the image is too annoying, we reduce it by using a third-party noise-reduction software, like Noise Ninja.
The command path for controlling in-camera noise reduction is:
MENU>Camera Settings (5)>High ISO NR>[Normal], [Low], [Off]
Before leaving the topic of JPEG files and noise reduction, there is one setting that we should briefly mention: Multi-Frame Noise Reduction. This setting provides even greater noise reduction than that which can be achieved with High ISO NR. Rather than relying on one exposure, Multi-Frame Noise Reduction takes four exposures and uses image processing to further reduce noise. It is available on the ISO selection only if Quality is set to a JPEG file format. This option is best used when you tripod-mount your camera and focus on immobile subjects. It can be used for handheld photography, although the results obtained this way can be problematic. We will discuss this option in detail later in Chapter 5.
Image Size and Digital Zoom
When composing a scene using live preview, you can magnify the image. Perform the following command to set the limits on how far you can magnify the preview image:
MENU>Custom Settings (3)>Zoom Setting>[Optical zoom only], [On:ClearImage Zoom], [On:Digital Zoom]
The Zoom Setting command’s default option is [Optical zoom only] and serves as a place marker: its selection ensures that the digital zooms are off. Any changes in the image magnification will occur only if the lens is capable of varying its focal length, meaning you can physically zoom in by turning the lens’s zoom ring.
The [On:ClearImage Zoom] and [On:Digital Zoom] are software commands that set the limits on how much the image recorded by the sensor can be enlarged. Functionally, they are distinct from the [Optical zoom only] in that the enlarged image is degraded by the software when magnified.
The degradation arises because digital zooming takes the pixels from the sensor and, in effect, increases the separation between neighboring pixels. Rather than display the separation as being empty, the camera’s software fills in this created space with a guess of what it thinks it should be. This is only an interpolation, and as a consequence, digitally enlarged images will appear increasingly fuzzy as the magnification is increased. In contrast, when using [Optical zoom only] the image size is enlarged by increasing the magnification optically on the sensor. This option does not change the relationship between adjacent pixels, so the enlarged image should not become fuzzy as the image size is increased.
The predominant difference between [On:ClearImage Zoom] and [On:Digital Zoom] is the extent of enlargement being allowed. This is where the options become confusing because the limit of these zoom features is not fixed, but varies depending on the JPEG file’s size, if you are using an APS-C NEX lens rather than an FE lens, or if you are using the a7 or a7R. To keep things simple, we will restrict our discussion to the [L] image size for JPEG options. Using the [On:ClearImage Zoom] limits the increase in the image magnification from its original size (1x) to twice its original size (2x). Increasing the magnification beyond this requires [On:Digital Zoom]. Selecting [On:Digital Zoom] will also activate [On:ClearOptical Zoom] so you can seamlessly go from 1X to 2X and then from 2X to 4X. Sony’s rationale for distinguishing these two settings is that they employ a different means to interpolate the increasing separation between the individual pixels. Basically, [On:ClearImage Zoom] is supposed to do a better job in rendering a sharp image than [On:Digital Zoom].
Once you have set the limits on the zoom settings, activate the zoom with the following command:
MENU>Camera Settings (4)>Zoom>[Desired value]
The [Desired value] can be set by pressing the left or right button, which respectively lowers or raises the zoom. If you are using an E-mount lens that has a power zoom lever, you can implement the zoom with this lever.
Before closing this section, we need to describe the Smart Zoom. This only can occur when you set the JPEG size to either [M] or [S]. This is not a Zoom Setting command option that you activate directly. As you increase the zoom, you will see a set of changing icons. First, there will be one for Smart Zoom, which will be replaced by the one for [On:ClearImage Zoom], which in turn will be replaced with the one for [On:Digital Zoom]. Keep in mind that the camera always records the data collected by the individual pixels or photosites that make up the sensor. To keep the example simple, we will use the a7 sensor, which has a maximum of 6000x4000 pixels with the Aspect Ratio set to [3:2]. When Image Size is set to [M] or [S], the sensor pixels are grouped or binned so that the 6000x4000 pixel sensor appears to generate either a 3936x2624 (if the image size is set to [M]) or a 3008x2000 pixel sensor (if the image size is set to [S]). You might think of this as binning or grouping adjacent, individual pixels to form a larger, superpixel. The 3936x2624 or 3008x2000 image is comprised of these superpixels.
When you first zoom an [M]- or [S]-sized image, you are increasing the separation between the superpixels. However, in this case, the newly formed space is being filled in with data collected by the original single pixels. In other words, there is no interpolation—real data is used to fill the new space. As a result, there is no breakdown in the image and Sony claims that enlargements done this way do not show any degradation. Eventually, as the magnification increases, the camera can no longer fill in the space with data. This occurs when [On:ClearImage Zoom] is operating and the image quality becomes degraded.
We recommend sticking with the camera’s default setting and just using [Optical zoom only]. You will obtain the same results by enlarging the image with post-processing software.
A summary of how much magnification the digital zooms provide is listed in table 2-4.
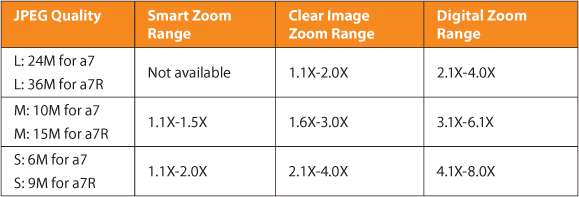
Table 2-4: Digital Zoom magnifications as measured from the Sony a7/a7R using the 28-70mm zoom
File Formats for Movies
For recording movies, there are two different file formats: AVCHD and MP4. AVCHD stands for Advanced Video Coding High Definition and has the highest spatial and temporal resolution for recording movies (1920x1080 pixels at 60 frames per second). There are two types of AVCHD: 60i/60p or 50i/50p. The former is the standard used in North America and parts of South America, while the latter is the standard used in Europe, Africa, and the Asia-Pacific region. Where you buy your camera determines which of these two formats are used. Files stored in these formats can be used to project your movie directly from your camera onto your television. With Sony’s PlayMemories Home software, you can also burn the movies onto discs for playback on a DVD player.
The advantage of the MP4 file format is that you can edit these types of files in readily available programs, such as QuickTime 7 Pro. The output of MP4 files has lower resolution (table 2-5), but, like JPEG files, they are simpler to work with on your computer. The main disadvantage is that you cannot burn MP4 files to discs for playback on a DVD player.

Table 2-5: Movie format options
You must set the movie file format type through the camera’s menu. It is not in the Quick Navi screen, nor can you customize the Fn button or other buttons to provide a gateway to this command.
MENU>Camera Settings (1)>Movie File Format>[AVCHD], [MP4]
Note: Sony uses an icon, which looks like a short length of a filmstrip, for all commands dealing with movies. We have substituted the word “Movie” for this icon.
The movie’s record size has a long list of options to choose from. At this stage in handling your camera, we advise against altering the Movie Record Setting command. Changing its default option, 60i 17M(FH), can prevent you from being able to save your movies to a DVD. The default option provides a good-quality HD movie that can be burned to a DVD for playback. We will cover how to create higher quality movies in other formats in Chapter 11.
Shutter Button
The shutter button is located on the camera’s top-right panel (figure 2-5). When you press it down halfway, you will feel an increase in resistance. Even though the camera has not fired, you can stop there and hold this position. This halfway press is a control point that initiates many of the camera’s settings. It also can serve to lock focus and exposure.
Typically, pressing the shutter button halfway starts the automatic focusing process. When focus is obtained in Focus Mode’s [Single-shot AF], the lens is locked and a green circle lights up in the lower-left corner of the screen (table 2-6). As long as you keep the shutter button at its halfway point, you can aim the camera to another area without the camera refocusing. To take the picture, press the shutter button down fully. This is a useful technique to master for those times when the camera does not focus on the intended subject. This can occur when the subject has no fine details or when the scene is cluttered with material in front of and behind your desired subject.
If the camera’s Focus Mode is set at [Continuous AF], the camera’s automatic focusing does not lock when you push the shutter button. Instead, the focus will change if the subject moves closer to or father away from the camera. A green focus indicator surrounded by green colored brackets on the display screen tells you that the camera is maintaining focus as the subject’s position changes. If the green circle is not lit, the camera has not found focus.
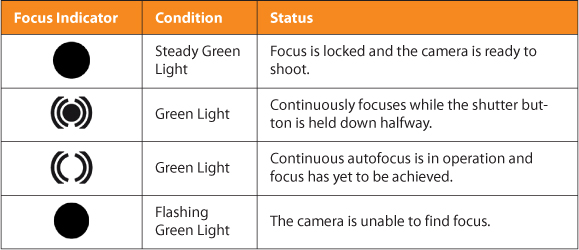
Table 2-6: Display screen focus indicators
As we mentioned earlier, the camera lens focuses the scene onto the sensor. When these cameras are taken off automatic modes, i.e. they are being used in P, A, S, and M modes, the a7 differs from the a7R in that it uses the [Wide] option for specifying the focusing area. There are 25 rectangular regions distributed throughout the sensor and used for establishing focus. You won’t know which focusing region will be used until you press the shutter button. Then the camera focuses, and the areas that are used to establish focus are indicated with green brackets.
In contrast, the a7R uses [Flexible Spot], which is a single focus point in a small region of the screen. This spot has to be aimed onto the target for accurate focusing, and there is no question of what will be focused on in the scene.
In Intelligent Auto or Superior Auto mode, both cameras use the [Wide] option for focusing. In these modes, the camera tends to focus on objects in the center of the field of view. This is a logical strategy because the center is the most likely place for your subject. However, this setting covers a large area and may focus on the wrong region, thereby blurring the region of interest. To get more directed focus, the camera can be set to use facial detection. When the Face Detection command is activated, the camera identifies a face, and uses it for the focus point. In the camera’s default configuration, the center button will provide even more accurate focus by targeting and focusing on the eye. Many professional photographers believe that the most critical region to record sharply in a portrait is the eye.
Working with autofocus requires understanding the cues for judging what is in focus. For the Sony a7/a7R, the final determination for focus is contrast. When an object is out of focus, its edges are blurred and the transition between light and dark is gradual. When it is brought into focus, the object’s edges are sharply defined, emphasizing the transitions from dark to light. In essence, a sharp, in-focus object has a greater range of intensity values than a fuzzy, out-of-focus object. To achieve accurate focus, you have to find a subject that has some variation in light and dark. Trying to find focus on a blank wall can be impossible.
The a7 camera uses phase detection to initiate focus and contrast detection to finalize focus. Phase detectors provide faster initiation of focusing, although they are less accurate in identifying the final point of focus. The mechanism for phase detection determines the direction and extent that the focus needs to be changed to ensure a sharp image. However, focus can be off, and in some cameras, such as the Sony SLT cameras (which uses phase detectors), the camera’s focus may be imperfect. Such cameras have a menu setting that allows you to calibrate the phase detectors to compensate for a lens that consistently misses hitting perfect focus. In the case of contrast detectors, there is a 50 percent chance that focusing will move in a direction that renders the image out of focus. When this occurs, the contrast drops and the sensors, having noted this, will instruct the focusing mechanism to reverse its action. In half of the cases, contrast increases and focus is achieved. The other half of the time, focusing is delayed while the focusing mechanism determines it is blurring the image and backtracks to achieve the sharpest image. Cameras equipped with this type of focusing mechanism have greater accuracy in finding focus, but achieving the point of focus is delayed. The Sony a7’s advantage in achieving rapid focus is by using a hybrid focusing scheme. The a7R is a bit slower in finding focus because it relies solely on contrast detection.
Both the a7 and the a7R can be set to focus continuously:
MENU>Camera Settings (2)>Focus Mode>[Single-shot AF], [Continuous AF], [DMF], [MF]
In [Continuous AF] mode, the camera updates its focus in between shots if the object moves toward or away from you. This is a handy feature for shooting action shots since the camera will try to keep everything in focus as the subject moves about. The camera has green icons on the display screen (viewfinder and LCD screen) to tell you how automatic focusing is doing (table 2-6). If you see green brackets, the camera is in [Continuous AF]. If a green circle appears within the brackets, the camera has found focus. If the green circle flashes, the camera is unable to maintain focus on the subject.
In Intelligent Auto, Superior Auto, and many of the SCN predefined scene modes, the camera determines the Focus Mode for you. Most of the time it is set to autofocus and shoot one image: [Single-shot AF]. However, if you choose the predefined [Sports Action] SCN mode, the camera will use [Continuous AF]. This makes sense for a situation in which you expect the subject to be moving about and you need the camera to maintain focus.
As well as autofocusing works, you may need to take over and focus manually. There is no button for directly switching to manual focus on this camera’s body, so you can make the switch using the menu. Turn off the AF, and set the camera to the Direct Manual Focus (DMF) option or the Manual Focus (MF) option with the following command:
MENU>Camera Settings (2)>Focus Mode>[DMF], [MF]
This command can also be executed by using the Quick Navi screen. Both of these options involve manual operation, and we will cover these in more detail in Chapter 6.
Advanced Focusing Features: Face Detection and Object Tracking
Although we will discuss them in more detail in Chapter 4, this is a good place to mention advanced focusing features so you can watch out for them as you experiment with your new camera.
Face Detection identifies a human face and then focuses on it. By default, this command is [Off] in all of the shooting modes, even when you would think it should be automatically activated, such as in the SCN [Portrait] mode.
MENU>Camera Settings (5)>Smile/Face Detect.>[Off], [On (Regist. Faces)], [On], [Smile Shutter]
(Where Smile Shutter has three suboptions of its own: [On: Big Smile], [On: Normal Smile], and [On: Slight Smile])
When you select Face Detection’s [On (Regist. Faces] or [On], you will see a frame surrounding each of the detected faces. The frame’s color indicates the Face Detection status. A white square frame indicates that the face has been identified and the camera can focus on it. When you lock focus by pressing the shutter button halfway, the frame turns from white to green. When several faces are in the viewfinder, they may each be surrounded with a frame. The gray frames indicate a face has been detected but will not be used for focusing. If the face has been registered but is not being used for focus, the square will be magenta. If no faces are detected, the camera will still focus on the scene; the only difference is that the faces won’t be the preferred targets.
The [On (Regist. Faces)] command is for faces you have taught the camera to recognize. When this command is used, the camera focuses on and exposes for these preferred people. This command has some limitations—we will discuss those limitations and how to register faces in greater detail in Chapter 4.
The other advanced focusing mode is Lock-on AF, which will track a specific subject as it moves about within the display screen.
MENU>Camera Settings (5)>Lock-on AF>[Off], [On], [On (Start w/shutter]
When this command is activated, the camera attempts to follow an object for focusing, which can be a useful feature for photographing active children or pets.
Recommendations
If you want to take pictures immediately, set the mode dial to Auto and select either Intelligent or Superior Auto. In these modes, the camera determines the settings and options it uses, which provides you a good opportunity to review the images and decide what you could have done better or differently by using alternate options. As you use the camera and move into other shooting modes, you will need to become familiar with additional tools for controlling the appearance of your images. This chapter provided some instruction on selecting the camera’s options; however, remember that the automatic settings work well.
As you explore the camera’s manual settings, you will find that some menu commands are accessed frequently. You can access these commands more immediately if you assign their execution to a press of a button. If you decide to customize the control tools, as described in Chapter 7, you’ll hardly ever have to dive into the camera menus. Instead, you’ll be able to access the functions that are most important to you by using the external dial and buttons.