Chapter 11: Making Movies
Introduction
The Sony a7/a7R is a hybrid recorder capable of taking excellent still pictures and movies. As such, you do not have to carry both a camera and a camcorder on those assignments when you need to take movies as well as still photographs. To switch from taking still shots to shooting movies, press the movie button (figure 11-1). The movies are of excellent quality and can be played on HDTVs or recorded to DVD discs.
In this chapter, we introduce the movie operation of the Sony a7/a7R, and approach the topic at the level of a still photographer who occasionally needs to take a movie rather than a professional videographer who needs a dedicated camcorder. We will provide an explanation of file formats and the commands that are used to record movies.
The general rule to remember when taking movies is that the camera uses the settings that you last used for still photography. If you have set the shooting mode to Intelligent Auto, Superior Auto, P, A, S, or M, those setting modes are used for shooting the movie. When you set the camera to Intelligent or Superior Auto, your camera is a completely automatic camcorder and sets the ISO value, shutter speed, and WB for you. Fortunately, the automatic mode is so reliable that you will get great-looking movies. This may be all you need for recording family vacations.
Eventually, you will decide to take more control. By using the P, A, S, or M modes, you gain control of the shutter speed, aperture, ISO, and WB. In addition, you can modify the exposure—increasing it to brighten or dimming it to darken the image. This will create the desired mood for your movie. You can also tame extremes in brightness by using DRO, or you can introduce unique coloration by using the Creative Style or Picture Effect options.
One thing that may surprise you is the amount of preparation that is needed to take a high-quality movie. It is necessary to preplan the scene and spend time to ensure camera stability and correct lighting. Just like with still pictures, recording a good movie benefits from using a tripod and some careful planning. The placement of lights (and the shadows they produce) influences the quality of your movie. If your framed image has areas that are extremely bright or dark, you may need to sacrifice details in either the highlights or the shadows. This is when you could use the DRO command to bring out shadow detail. Consider the mood you intend to create. For example, dark shadows can add an ominous feeling to a clip. You may wish to underexpose this sequence and use the Creative Style’s [Black & White] option to make a film noir.
As popularized in some professionally made movies, there is a technique of shooting handheld movies where the videographer rapidly shifts position to provide diverse vantage points. The subject appears to bounce and jitter about within the frame, providing a powerful effect of tension-filled action. However, this technique is unsuitable for most tasks. It would not be used for recording a documentary movie and it would detract from recording a family birthday party. Such recordings benefit from having a stable camera platform which keeps the subject centered within the frame. If the subject moves, say walking outdoors, you should aim your camera and follow the subject so it stays centered within the frame of the picture. You will be disappointed in your results if you do not mount your camera on a tripod, because hand tremors will make your subject appear to jitter about within the borders of the screen, which can be distracting to your audience.
Preplanning is important because there is little opportunity for correcting errors in the final movie. Unlike still photography, where you have some latitude in adjusting your pictures with post-processing, you do not have such luxury when shooting movies.
Frame Rate versus Shutter Speed
To introduce still photographers to movies, we compiled table 11-1 to define many of the terms we use. You can refer to this table while reading the chapter.
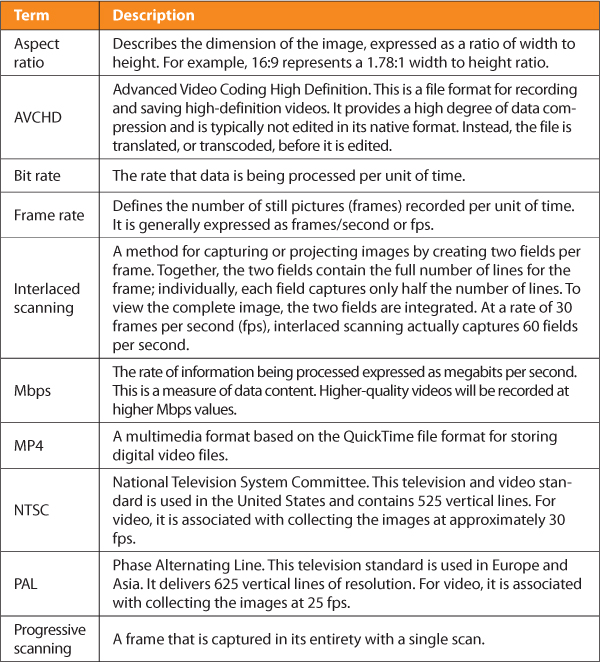
Table 11-1: Movie-related terms
Recording movies requires a new perspective. You must always be conscious that you are taking a sequence of images (frames) that, when played back, give the viewer a prolonged interval to study the subject. Distractions that are of little importance in still images can be disturbing and annoying in a movie. We mentioned that the subject moving about the frame could be disconcerting; also annoying are sudden changes in the scene’s brightness when the exposure compensation dial is rotated. Even the task of focusing the image can be disruptive.
Because you are capturing at a certain number of frames per second (fps), you must be cognizant of your shutter speed. You will be limited on how long it can be can set. If you are recording a sequence of shots at 30 fps, you cannot use long shutter speeds (such as 1 second). This limits your ability to work in low-light situations. Occasionally, new videographers think that using a short shutter speed means that their frame rate goes up. This is not the case. You can set a shutter speed of 1/8000 second on your Sony, but the limit in frame rate cannot be higher than 60 frames per second.
The shutter speed you use for each frame can create different effects. When you shoot at 24 or 30 fps in modes where the camera sets the shutter speed, you will see that the camera attempts to keep the shutter speed at 1/30 second or 1/60 second (depending on the shooting mode), and it avoids shutter speeds shorter than 1/125 second. In part, this is done to provide the smoothest perception of motion. When you take control of the shutter speed in M or S mode, you may be surprised that you can set the shutter speed to as long as 1/4 second. This not only gives you better low-light capability with very slow moving subjects, but it also provides a special effect. A rapidly moving subject will be seen as a blur with a ghostly tail extending behind it. This longer shutter speed is a feature of digital sensors. In the days of film cinematography, the longest shutter speed you could use was 1/30 of a second.
There is a bit of image processing invoked when using longer shutter speeds. If there is no moving subject in the video frame, the slow shutter speed reduces the appearance of sensor noise so that smooth tones don’t take on a punctate appearance. At the opposite extreme is using a fast shutter speed of 1/8000 second. When you play a movie recorded at this shutter speed at 30 fps, instead of smooth motion, the action appears to move in jumps, and has a strobe-like appearance. This effect is derived from having sharply defined edges recorded within each individual frame; because of this, the change in position of the edges in adjacent frames can be perceived. Since the movie is being displayed at 30 fps, a crisp edge exaggerates the fact that you are seeing a series of individual frames. This is one reason videographers recommend setting the shutter speed duration to twice the frame rate. The slight blurring that can occur during rapid motion helps the impression of smooth movement in the finished movie.
While this crisp rendering is disconcerting during playback of movement, it is desirable if you need to see all the details within a frame. For example, in surveillance work, it is advantageous for reading the numbers and letters off the license plate of a speeding car. For home movies where you want the movement of your subject to appear smooth and seamless between frames, the slower shutter speeds are preferred. For most videographers, a good starting place for setting your shutter speed is about 1/60 second if you are shooting at 30 fps, or 1/125 second if you are shooting at 60 fps. This is a good compromise for providing both a sense of sharpness and smooth movement.
Choosing a File Format
Because the frame rate is important for what you will record, you have to decide whether you want to record at 24, 30, or 60 fps. Then, decide the file format you would like to use. There are two file formats available: AVCHD and MP4 (table 11-2).
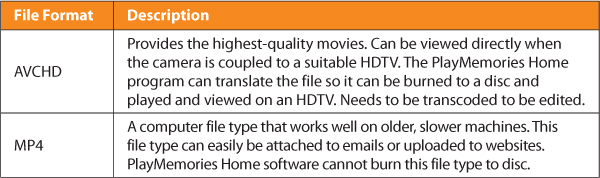
Table 11-2: Sony a7/a7R movie file formats
When you use AVCHD, you can record at either 24 or 60 fps. If you are using MP4, you will record at 30 fps. If you are new to recording movies, we recommend choosing AVCHD if you wish to view the movie at its highest resolution on your HDTV. You can, with the aid of your Sony PlayMemories Home software, create DVDs or Blu-ray Discs for playback on a suitable player. If you think you would like to use the movie for computer-related activities, such as attaching it to an email, record and save the file in MP4 format.
As you gain more experience, you may decide to use your computer to edit and work with AVCHD files. To get a feel for this, download your movies and work with them in the PlayMemories Home software. The Windows version of this program provides some limited movie-editing capabilities. You can shorten the movie by removing extraneous material and then merge the clips to make a coherent, succinct story. If you have an Apple computer, we recommend buying the iMovie program for working with your AVCHD files.
To select the movie’s file format, use the following command:
MENU>Camera Settings (1)>File Format>[AVCHD], [MP4]
Keep in mind that the movie commands cannot be set via the Quick Navi screen or the Fn button. They must be changed using the menu.
At least two camera manufacturers recommend using AVCHD for directly viewing your movies on a TV or making playable DVDs for an HDTV. They do not recommend using this file format for editing. This suggestion is very conservative, so you may wish to ignore it if you want to edit your movie files. After all, Sony does provide PlayMemories Home, which can serve this purpose. However, for most computers, it is easier to work with the MP4 format. Essentially, this is a simple file type and is a sequential series of still images. Such a file can be simply copied to the hard disk of your computer and worked on with QuickTime Pro, which costs $29.95 and is available for both Apple and Windows operating systems. Like PlayMemories Home, QuickTime Pro provides an inexpensive way to edit movies. It includes options to cut, copy, and delete sections of a movie, and to merge the best sections of the movie to make a longer production with a coherent theme. Unlike PlayMemories Home, you have additional controls with QuickTime Pro, such as audio-video controls for adjusting the volume, balance, bass, and treble of the audio track, as well as the capability to adjust the brightness, color, contrast, and tint of the video stream. When the movie is edited to your satisfaction, you can resize the file to be emailed directly to your recipient for easy viewing.
AVCHD
AVCHD files provide the highest fidelity and smoothest perception of movement for your movie. However, they make greater demands on your computer and software. Although you can work with these files on older computers, newer computers with plenty of RAM and large, fast hard drives make working with these files a more enjoyable experience. If you decide to work with AVCHD files, you will eventually want to buy a more capable software package. We use Final Cut Pro X, which can read Sony’s 60p 28 Mbps (megabits per second) files directly. At the time of writing this book, our more affordable software, iMovie ’11, could also import this file type. We can edit our AVCHD files with either iMovie or PlayMemories Home (Windows). Both of these software packages are basic editors; PlayMemories Home comes free with your camera, and Apple users can download iMovie ’11 for $15. If you decide to work with a higher-end movie editor, such as Final Cut Pro X or Adobe After Effects for Windows, you will have to pay considerably more: $300 and $240 (for a 1-year subscription), respectively.
MP4
The MP4 movie file format is the easiest one to work with, since it can generate data files that are easily read by other software programs. There are free programs available for opening and viewing MP4 files, such as Apple QuickTime. If you decide you want more power to edit your movies, you can buy QuickTime Pro from Apple for only $30 from the following website:
http://store.apple.com/us/product/D3381Z/A
The vertical number of pixels is the same for both MP4 and AVCHD, so if you choose MP4 format, you do not give up much in regards to resolution. What you do lose is some width in the image, which becomes a concern if you want to display the movie in a widescreen 16:9 format. Also, you have the option of saving MP4 files in a 640x480 pixel display, the smallest pixel array for saving your movies. This is an advantage if you intend to attach the movie file to an email. MP4 files are recorded at 30 fps.
Record Settings AVCHD (PS, FX, FH)
Several things determine the clarity of the movie playback: fps, bit rate, and format type. We have talked about the format type already (AVCHD or MP4). The Record Setting command determines the quality retained in these file types. Selecting the option for this is more complex because of the bewildering number of choices available, especially with AVCHD file format, where you have five possible Record Setting command options to choose from:
MENU>Camera Settings (2)>Record Setting>[Command Option (see table 11-3 for the command’s options)]
Here are some general guidelines to simplify the selection task:
• For editing AVCHD files on your computer, use the highest movie quality your software can read. Most likely this will either be 60p 28M or 60i 24M. If you are new to taking movies, make sure that your software can handle 60p before using this option.
• When burning a movie to a DVD, choose the lowest quality settings (24p 17M, 60i 17M). Use any Record Setting option that has the letters FH.
• For burning a movie to a Blu-ray Disc, choose the medium (60i 24M) to high (60p 28M or 24p 24M) quality settings. PlayMemories Home will allow you to burn these discs. Use any Record Setting option that has the letters PS or FS.
• For playing a movie back on an HDTV, find out what standard your TV uses and select the Record Setting option based on what the HDTV can accept.
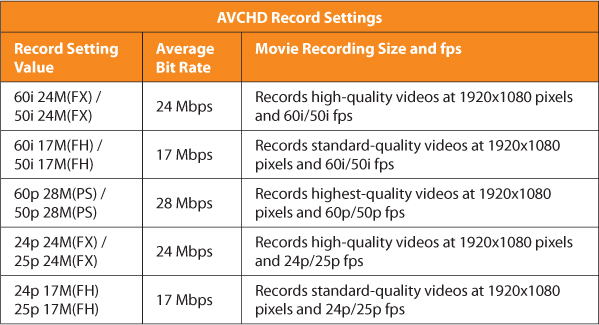
Table 11-3: AVCHD file recording settings
The number of bits being processed determines how finely the details are rendered. If there are too few, the movie will have unsatisfactory definition and detail.
MP4 Record Setting Command
When you select MP4 for your file format, you will have two Record Setting command options to choose from. The one you select depends on the number of pixels you wish to display (table 11-4).
MENU>Camera Settings (2)>Record Setting>[1440x1080 12M], [VGA 3M]
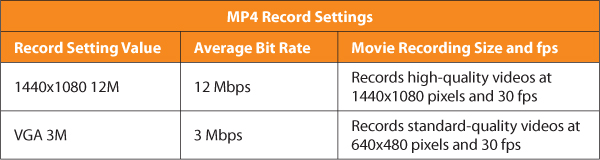
Table 11-4: MP4 Record Setting options
The first option, [1440x1080 12M], is easy to understand; your pixel array will be 1440x1080 pixels. The second option, [VGA 3M], is a bit cryptic. The letters VGA refer to an old monitor resolution standard, Video Graphics Array, which had a 640x480 pixel array. VGA provides a much smaller movie frame and generates a small movie file that can be emailed.
Interlaced Scanning (i)
Due to technological limitations, older analog cameras and displays for broadcast television relied on forming an image by interlaced scanning. To display enough images sequentially for a smooth perception of movement, a television camera would use two fields to make a single frame. This strategy would allow the viewer to see an object moving smoothly across the screen. The interlaced scanning method is an option on many cameras, including the Sony a7/a7R.
With interlaced scanning, a recording device with a spatial resolution of 600 horizontal lines actually collects only 300 lines, which is considered a Field. Two fields are collected to make a frame. The first field starts with the top line and then collects every other line to create an image with 300 horizontal lines (figure 11-2). Then the sensor collects the remaining 300 lines for the second field. The two fields are combined to yield a single frame of 600 lines. In essence, to display a movie at 30 frames per second, a camera or television has to collect 60 fields per second—meaning two sets of 30 fields per second to be interlaced to form 30 frames per second.
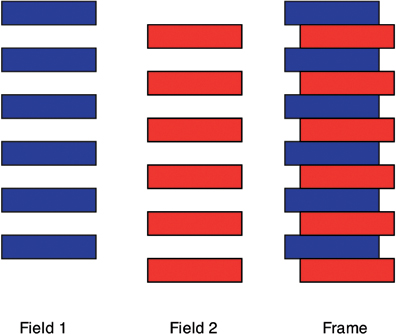
Figure 11-2: How an interlaced scan combines two fields to make one frame (from left to right: Field 1, Field 2, Frame)
If you see the letter “i” with an fps number in your viewfinder or on the LCD screen, it means interlaced scanning, indicating that two sets of fields were combined (interlaced) to form a single frame. If one of the two fields has a moving object, its edges will display an offset. This blurs the edges of the moving object, but due to how the human eye works, the motion will be perceived as smoother.
Progressive Scanning (p)
If you see the letter “p” with an fps number in your viewfinder or on the LCD screen, it stands for progressive scanning. Progressive scanning is the modern way of recording and playing back movies. All computers use this method to display images on their monitors. The newest video cameras, such as the Sony a7/a7R, also have the progressive scanning option.
This method is pretty straightforward. Basically, the movie camera and the display projector collect all the vertical lines of a frame in sequence and then display them all at once (figure 11-3). For a moving object, this provides a sharper display of its edges. If you had to deal with a single frame, that frame would provide the highest definition for regions that move from frame to frame. If you plan to image process your movies, this is the preferred movie type.
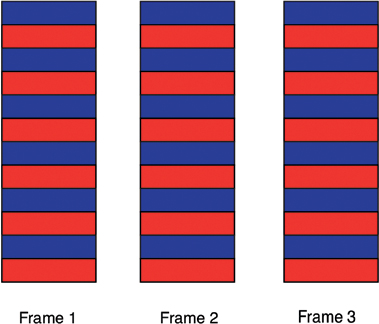
Figure 11-3: Progressive scanning format (from left to right: Frame 1, Frame 2, Frame 3)
Progressive scanning is considered the ultimate in image quality. However, it has one peculiarity. Because of the sharpness of the individual images, movement during playback may not be perceived to flow as smoothly as with interlaced scanning. This is most apparent when you record at 24 fps with a fast shutter speed. If you look at the shutter speeds used when you take movies in Intelligent Auto, you will see that the camera tries to keep the shutter speed duration longer than 1/125 second when shooting at 60 fps. This is to ensure smooth movement from frame to frame during playback. If you select a shutter speed of 1/1000 second, the motion appears strobe-like. However, a single frame of a movie captured with progressive scanning will show a subject with high definition in those parts that are moving.
So, should you use interlaced or progressive scanning? For video editing, it is tempting to simply use the highest quality mode. However, the slight blurring of moving edges with interlaced scanning helps hide the transition from frame to frame. The overall perception of movement looks better. In contrast, at the level of an individual frame, an image obtained with progressive scanning is sharper. For video editing, we suggest you opt for progressive scanning. If you are just viewing the movies and are not interested in using the freeze frame to study fine details, most people will be satisfied with interlaced scanning. Experiment with each and decide which you prefer.
Bit Rate and Frame Rate
AVCHD and MP4 files are highly compressed. The amount of data that is preserved is determined by the amount of data being processed—the more data being processed, the more fine detail is being preserved. In computing, the measure of data being processed is called bit rate (bits/second). In the case of a movie, so much information is processed that you need to express the data in terms of millions of bits per second, or Mbps (megabits per second). The Sony a7/a7R processes movies from 28 Mbps (highest quality) to 3 Mbps (lowest quality).
These data rates reflect the fact that movies are a sequential series of images recorded at different frame rates. AVCHD files recorded at the highest frame rate, 60 fps, generate the greatest amount of data and have the highest Mbps value.
So, which file format should you chose? There is no clear answer to this question, simply because it depends on what you plan to do with your movies. If you intend to view the files directly on your TV or make them into playable DVDs, then select AVCHD and use the highest recording quality your playback device will support. If you like to use the freeze frame and carefully study the details in the individual frame, then you should use the highest Mbps data. Also, the highest values are useful for video editing.
Remember, if you decide to use PlayMemories Home and burn your movies to a DVD, you must record at 24p 17 Mbps or 60i 17 Mbps. For recording to a Blu-ray Disc, you can take advantage of your camera’s capabilities and record using the higher-quality record settings.
Putting It All Together
The File Format and Record Setting are two of the more complicated commands of the a7/a7R. Most of these options appear cryptic to a still photographer, but the selections can be summarized by their bit rates (table 11-3). The maximum quality is 28 Mbps, which is described as [60p 28M]. Refer to table 11-1: this translates into a format that is recording at 60 frames per second in progressive mode, with 28 megabits of data per second being recorded. You may wish to contrast [60p 28M] with the next highest resolution mode, [60i 24M]. The difference between these file formats can be subtle if your goal is to observe the movie stream on your television. The individual frames will have sharper edges on moving objects when they are taken in 60p. An interlaced scan blurs the edges of a moving object, as can be seen in this case of the shadow of a tree that was recorded while panning the scene (figure 11-4). Remember, “i” stands for interlaced scanning, where two fields are interlaced to form a single frame.
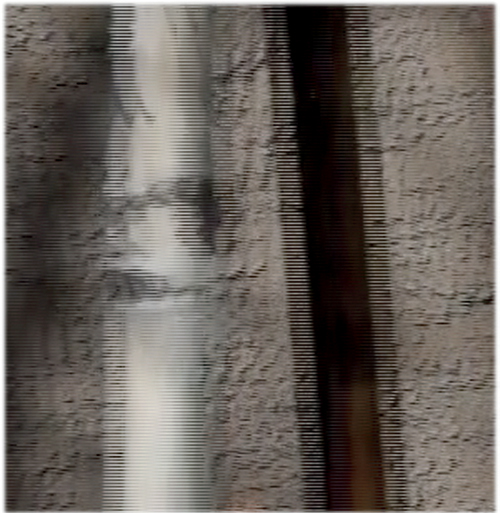
Figure 11-4: An artifact of interlaced scanning. The edges are blurred when the camera pans across a stationary object.
The 24p frame rate is referred to as cinematic because it is used in theatrical motion pictures. If your subjects were rapidly moving about—for example, at a sports event—we would not recommend this frame rate. You would get better results if you used 60p fps, which renders rapid motion more realistically by gathering more images. At 24p fps, you may find that the playback looks jittery. This may be even more apparent if you select a very short shutter speed, which freezes the subject’s motion in the individual frame. However, for an artistic rendition of a scene, and to present a movie that looks like a Hollywood director created it, try 24p.
Additional Movie Controls
There are some additional controls available when you record movies. The first deals with recording sound with your movie. The default configuration for the microphones is [On]; you can turn them off with the command below. Since audio tracks can be removed later through editing, you can always capture the audio and then decide later whether or not to keep it.
MENU>Camera Settings (7)>Audio Recording>[On], [Off]
If you are recording on a windy day, the camera microphone can pick up the distracting sound of the wind. To reduce this annoyance, you can use a wind noise reduction feature with the following command:
MENU>Camera Settings (7)>Wind Noise Reduct.>[On], [Off]
We recommend selecting [Off] for the Wind Noise Reduct. command when you are recording indoors. Set it to [On] only when you shoot outdoors and there is noticeable wind noise. Otherwise you may cut down on the quality of your audio recording.
Finally, you have the ability to adjust the sound level of your movie. Depending on your data display format settings during still photography, you may have noticed two audio bars (figure 11-5). These reflect the input from two stereo microphones located within the camera body whose recording level can be adjusted with the Audio Rec Level command.
Figure 11-5: Audio levels in display screen
MENU>Camera Settings (7)>Audio Rec Level>[n] (Where n is a value from 0 – 31)
Normally this command is only available under two conditions. The first is when you press the movie button. You can set the audio level while recording the movie. The second is when you turn the mode dial to Movie. When in this mode, the audio level can be adjusted prior to pressing the movie button. This is our preferred method of adjusting the microphone. It is convenient and efficient to set your sound levels prior to recording the scene. When setting the sound level, watch the signal bars and try to set it so that the loudest sound extends the green bars to the 0 db (decibels) mark (figure11-6). We find it advantageous to dedicate a custom button to access this command.
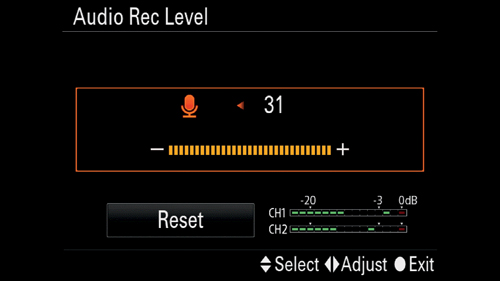
Figure 11-6: Adjusting microphone audio.
Framing and Starting the Movie
The Sony a7/a7R Live View is set at a 3:2 aspect ratio for still photography. When you press the movie button, the appearance of your display screen will change. The field of view becomes smaller, and your frame drops to a 16:9 aspect ratio. This can be disconcerting. In our earlier books on the Sony NEX-6 and NEX-7, we recommended using the small “tic” marks on the screen for framing the movie. We no longer recommend this since these marks are too small to assure accurate framing. Instead, we set the camera’s mode dial to Movie. This provides an accurate preview screen with borders that delineate the edges of your movie frame clearly.
After you frame your scene, you can start recording with a single press of the movie button. The maximum length of a single recording session is 30 minutes. At first, the 30-minute clip may be viewed as a handicap. It really isn’t. It is easy to get around this time limit by taking multiple clips, all lasting less than 30 minutes. The only limit for repeating this process is the capacity of your memory card. During post processing, you can link the separate clips together to make a movie that lasts for hours.
P, A, S, or M for Controlling Your Recording
When you shift from Intelligent Auto or Superior Auto to P, A, S, or M mode, you gain control of your aperture, shutter speed, ISO, WB, and exposure compensation settings. You can also give your movie a unique appearance by using the Creative Style or Picture Effect options.
There are two ways to select these modes. If you simply press the movie button, the movie will be taken in whichever shooting mode the mode dial is set to. Another way is to turn the mode dial to Movie. Then you can select the shooting mode icon by using the Fn button and dial in P, A, S, or M with the control wheel. We prefer doing it this way because it provides an accurate framing of our scene for taking a movie.
Basically, P (Program Priority) mode is fully automated, and the camera selects both the aperture and the shutter speed. If the camera is set on [ISO AUTO], you will see the same settings that you would expect had you set the camera to Intelligent or Superior Auto and then pressed the movie button. The primary difference is the greater control you will have over your camera. The A (Aperture Priority) mode is used for selecting the lens aperture and controlling the depth of field. The S (Shutter Priority) mode is used for selecting the shutter speed, which will determine how much you wish to freeze the motion in the movie frame. The M mode (Manual) is used to adjust both the aperture and the shutter speed.
Controlling the shutter speed can be useful to avoid the flickering caused by recording under fluorescent lights. Fluorescent bulbs have a cyclic output with a frequency that can, at certain shutter speeds, cause a distracting brightening or fading in the movie. If this occurs, try selecting a shorter or longer shutter speed to remove this effect. You might find that adjusting the shutter speed to 1/100 or 1/125 second will record more uniform lighting. Also, by using M or S mode, you can select a very long shutter speed (up to 1/4 second). This can create an artistic effect where motion is recorded as a blur and moving objects have ghostly images trailing behind them.
Zebra
Zebra is a command familiar to the videographer, but not to the still photographer. This command is set via the menu using the following:
MENU>Custom Settings (1)>Zebra>[Off] [n] [100+] (Where n = 70 to 100 at +5 increments)
This command puts a series of black and white stripes over areas of the scene. The trigger for their appearance is the attainment of a certain light value. Typically, the numbers refer to the saturation percentage of the pixel’s well capacity. In other words, the number refers to pixels that have reached that percentage of their maximum intensity. If you set the option to 100, the pattern appears for those pixels that are at 100% saturation. Typically, you do not set this option that high. We found a setting of 70 to be more useful. When the exposure is adjusted so that zebra stripes appear over a person’s face, this indicates an attractive recording of skin tones.
To illustrate this point, we will describe how to use a setting of 70 to record facial features. First, frame your scene and start at an exposure level where there are no stripes. The image will appear dark in the viewfinder. Then, increase your exposure, watching the scene brighten. Eventually zebra strips will appear; stop increasing exposure when the stripes overlie the facial features of your subject. If you continue to increase the exposure, the pattern will disappear from the face and move to another part of the scene—and the recorded skin tones will be too light and unflattering. To effectively use this command, you need to study the scene while changing the exposure. Stop changing the exposure when the bands appear over the subject you wish to record.
The setting of [n] requires some experience, and you may prefer a value other than 70. To record a portrait of someone standing before a white background, you may wish to render that background a brilliant white. To do so, you would set [n] to 100 and adjust the exposure so that the background has the zebra stripes.
Adding Creative Style, Picture Effect, or DRO
Since PlayMemories Home does not allow you to digitally enhance your recorded movies, using the Creative Style, Picture Effect, and DRO commands will be helpful. By using these commands, you can create movies with modern, supersaturated color, or with warm sunset-type colors. If you wish to create a film noir effect, you can record in black and white. In order to use Picture Effect, make sure that you set Quality to a JPEG value before starting to record a movie. Creative Style is more forgiving because it can be used in either RAW or JPEG.
Under extremely harsh lighting conditions that produce deep shadows, DRO can lighten the shadows and reveal details within them. Setting this command requires some practice, and there are no rules to guide you.
Recommendations
We enjoy taking movies with the Sony a7/a7R. In some cases, we planned carefully prior to recording, and meticulously executed the movie shooting with the camera mounted on a tripod. In other cases, we acted on an impromptu desire to record an event by handholding the camera. In both cases, the Sony a7/a7R has performed well. For the most professional-looking movies, you should mount the camera on a tripod. Although you can certainly create a pleasing movie without this accessory, failing to use a tripod may result in a movie where the subject appears to bounce around within the frame.
Do not be afraid to work with AVCHD. If you take short movie recordings, you should be able to easily edit these files on your computer. In the case of Mac computers, you will have to buy additional software; however, the cost is nominal. You can download iMovie ’11 for $15; at the time of this writing, the program will read the highest-quality (60p 28 Mbps) recording from the Sony a7/a7R. If you own a PC, be sure to load Sony’s supplied program, PlayMemories Home, and use it to work with AVCHD files and to create DVDs.
If you simply want to dive in and play and edit your movies on your computer, then use the MP4 file format. Using this format is straightforward and requires minimal software and hardware upgrades, in comparison to the AVCHD format.