Chapter 1: Getting Started

Introduction
This book covers two similar Sony camera models: the a7 and the a7R. When we use the term camera or a7/a7R, we are referring to both cameras. The differences between the two are mainly with their sensors and a few commands. When covering a specific feature belonging to just one of the cameras, we will refer to the camera as either a7 or a7R.
Using This Book
The Sony a7/a7R is a versatile camera for photographers of all levels of expertise. If you are a beginner who does not know about exposure values (EV), sensor sensitivity (ISO), or shutter speed, you can set the camera to Intelligent Auto or Superior Auto mode and use it as a point-and-shoot. As you gain experience, you can improve your images by using the camera’s SCN mode and selecting the type of subject you intend to photograph. At this level, your input tells the camera how it should fine-tune its settings for recording a specific type of subject. For example, when you select the Sports Action icon, the camera will use a faster shutter speed and a higher ISO to freeze rapid motion. When you select the Landscape icon, the camera uses a slower shutter speed and a lower ISO to capture a noise-free image.
Even professionals will find the automatic modes valuable. Frequently, when the camera has been tuned for a specific photographic assignment, you might need a fast way to return to a generic setting to capture a shot. This can be accomplished effectively by turning the mode dial to the automatic modes to grab a quick shot.
The majority of expert photographers will use the mode dial to take control of the camera. They will select from the P, A, S, and M modes for still photography. For taking movies, they can set the mode dial to Movie mode and use P, A, S, and M.
In short, because of the multitude of camera commands and features, learning how to use the a7/a7R can be confusing. To help you learn, this guide has been structured so that the topics follow a natural progression. First we will introduce the most important features so you can start operating the camera with minimum effort. This will allow you to start taking pictures right away. A description of how to navigate through the camera’s menus is included in this chapter. This will prepare you to use the camera to its fullest potential.
For those who are experienced photographers or who have owned a previous Sony camera model, you may decide to glance through the early portion of the book and concentrate more on the sections that deal with semi-automatic and manual exposure (Chapters 5 and 6). With that said, we still recommend reading this chapter to learn how to navigate through the menus. In addition, because menu navigation can be slow, we describe the importance of the Fn button and the Quick Navi screen. These serve as gateways into the menu and provide a faster means to change settings. If you understand the menu system and how to use the Fn button and Quick Navi screen, you will have fast access to almost all of Sony’s features.
Chapter 2 covers photographic basics and expands on the camera’s basic controls. The chapter gives you an intuitive feel for what the camera does and the importance of different types of settings in pictorial composition. Chapter 3 describes how to manage your images: it covers topics from how to customize your view through the display screens to organizing your saved images. We describe in later chapters how to get the most out of your camera: we progress from the automatic modes in Chapter 4 to the semi-automatic modes in Chapter 5. Chapter 6 discusses how to take full control of the camera settings. Later chapters explore the accessories and advanced features of your camera.
The Camera
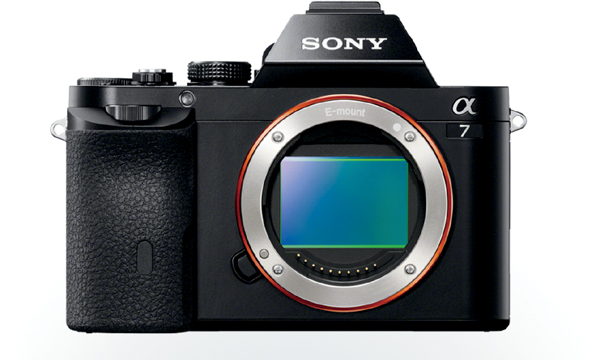
The a7/a7R is Sony’s first E-mount camera to do away with the NEX designation, have a full frame sensor (36x24mm), and require a new lens line—the full frame E-mount (FE mount). This is a breakthrough design—it’s the first to incorporate a full frame sensor in a compact, mirrorless camera equipped with an electronic viewfinder (EVF).
There are theoretical and practical advantages in using a larger-size array to contain the pixels. Chief among these is that larger individual photodiodes can be used to capture photons. The common APS-C sensor has an overall size of 16x24mm, and when compared to a full frame sensor (36x24mm), it is evident that for a given number of pixels, the individual photosites of the APS-C sensor must be smaller.
For a 24-megapixel sensor, simple geometry predicts that a single photodiode of the a7 will be 1.5x greater in size than that of the NEX-7, which uses the APS-C sensor. For a photographer, this means that both the a7 and NEX-7 will make the same size publication print of 20x13 inches at 300 dots per inch (dpi). However, the larger-sensor a7 camera will make a print that has lower noise in the shadows and an increased dynamic range. Having this capability in a camera that is smaller than most APS-C cameras is incredible.
In the case of the a7R, its photosite is the same size as that used in the 16-megapixel NEX-6, which means the noise characteristic and dynamic range should be the same as with that camera. However, while retaining the same level of noise and dynamic range, the a7R has a higher overall pixel count. It is 36 megapixels to the NEX-6’s 16 megapixels. If you are making a print for publication at 300 dpi, the a7R will make a print that is 24x16 inches, while the NEX-6 will make a print that is 16x11 inches.
The a7 and a7R are the smallest full frame sensor cameras with interchangeable lenses currently on the market. Table 1-1 compares their weights, prices, and pixel counts to those of the competitors. In terms of price, both of these models are economical options for a full frame sensor camera. The 36-megapixel a7R is $600 less expensive than the Nikon 800E. Both cameras lack an anti-aliasing filter, which is incorporated in most sensors to reduce moiré. However, this filter will also reduce pixel-to-pixel resolution—without it, you will achieve a higher level of sharpness. The 24-megapixel Sony a7 is a cost-effective alternative for those who do not need the higher pixel count. In comparison to its competitors, its price is also very reasonable. In addition, the light weight of both these camera bodies makes them easy to carry.
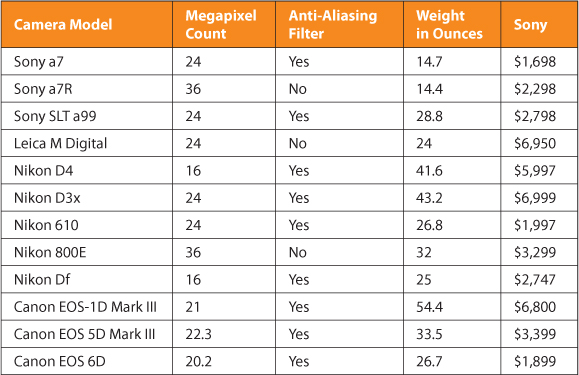
Table 1-1: Comparison of full frame sensor cameras
Which camera should you buy? That depends on your photographic skills and needs. If you are just entering the field, the 36-megapixel higher resolution has to be matched to your photographic skills. Recording the finest details of your subject requires not just the best lenses, but also meticulous technique. We frequently used a tripod to achieve the fine definition promised by the a7R’s sensor. If using a tripod for your photographic session is a major obstacle, then think carefully about whether or not you would benefit from using this model. The less-expensive a7 might be a better choice for you. Also, consider how often you make big prints. Previously, we described how large a publication print could be made at 300 dpi. This serves as a good guide for the advantages to be gained by buying the a7R. The a7’s sensor can be used to make a 20x13-inch print at 300 dpi, while the a7R’s sensor can easily be used to make a 24x16-inch print. So the question you have to ask yourself is whether the increase in 25% in print area is worth the $600 price differential between the a7R and the a7.
It should be noted that the a7 has features that give it advantages over the more expensive a7R. First, its shutter is designed to be virtually vibration-free, which is advantageous for imaging with extreme telephotos or microscopes. Second, the a7’s sensor uses a hybrid autofocusing design that provides faster focusing when shooting continuously. Third, since it uses slightly larger pixels, its noise is lower and its dynamic range is slightly greater. Fourth, the a7 fires more frames per second in continuous shooting conditions. In other words, the a7 is the camera for those users who feel handicapped by using a tripod with the a7R. It can adapt a bit more quickly to changing situations and is still capable of making prints that would match those taken with a Nikon 610 or a Canon EOS 5D Mark III.
The main disadvantage of both cameras is the limited number of available autofocus, full frame lenses. At the time of writing, there are only five, which rules this camera out for many professionals. However, for those who do not need immediate access to a variety of lenses, either of these two cameras can be considered an investment for the future. The two standard zoom lenses that are currently available will cover your needs for most situations. The fixed focal length prime lenses, 35mm and 50mm, are good for low-light work. The recently released 70-200mm f/4.0 telephoto zoom is a popular and useful telephoto zoom. These five lenses will cover the needs of most photographers. However, what will be missing from this lineup are some of the more specialized lenses found in the Nikon or Canon lens line. What will be lacking are extreme wide angles with a focal length shorter than 20mm, shift tilt lens for architectural photography, and long telephoto zoom lenses for nature photography.
This deficiency can be circumvented, in part, by using lenses designed for other camera bodies. Owners of Sony’s Alpha SLR or SLT cameras can use these lenses on the a7 and a7R with a Sony LA-EA3 or LA-EA4 adapter. The latter makes the camera the equivalent of the a99, Sony’s full frame SLT camera. The major feature you lose by doing this is Sony’s sensor stabilization feature. Note that the cost of the a7R plus the LA-EA4 adapter is less than the a99, and you gain the advantage of the 36-megapixel sensor (the a99’s sensor is 24 megapixels). Also, the autofocusing speed is enhanced by using the LA-EA4 adapter. Manual focus lenses from other manufacturers can be easily used on the Sony a7 and a7R; although you sacrifice automatic focusing, this is a small disadvantage for those who do macro photography or need to use perspective control or tilt lenses.
In regard to competing camera models, a couple of points should be noted. First, the cost of the Sony a7R is significantly lower than the cost of the 36-megapixel Nikon D800E. Even when equipped with the LA-EA4 adapter, which provides compatibility with Sony’s A series lenses, the camera’s cost and weight is still less than the D800E. The a7 is also less expensive than its competitors. It can also be equipped with the same adapter. These two cameras have created tremendous excitement in the photographic community because of their utility and value. This is not to say these cameras are without imperfection—there have been complaints about slowness in focusing and shutter bounce, but this book will help you use these two cameras to the best of their capabilities by circumventing their limitations.
Description of the Camera and Its Features
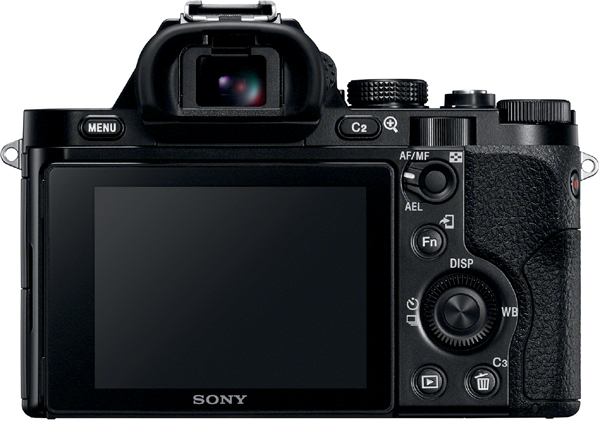
Unlike a DSLR, which uses a mirror to direct light to an optical viewfinder, the Sony a7/a7R is mirrorless. Light goes directly to the sensor, which drives one of two electronic displays—either the 3-inch rear LCD screen or the electronic viewfinder (EVF), both shown in figure 1-1. Having two ways to view your subject enhances the camera’s versatility. You can use the electronic viewfinder for stability or use the LCD when the camera is mounted on a tripod.
These electronic displays provide extensive data about your scene, enabling you to work more efficiently. You can view a histogram of the overall light intensity while studying the subject. Additionally, you have an accurate gauge of the appearance of the scene before it is captured by the sensor. If exposure is set lower than the camera’s recommendation, the viewfinder shows a darkened image. As you increase exposure, the scene in the viewfinder becomes progressively brighter in proportion to the opening of the aperture or the slowing of the shutter speed. This is advantageous because errors in exposure or white balance can be corrected before the shot is taken, which promotes an efficient workflow since the need to review shots is reduced.
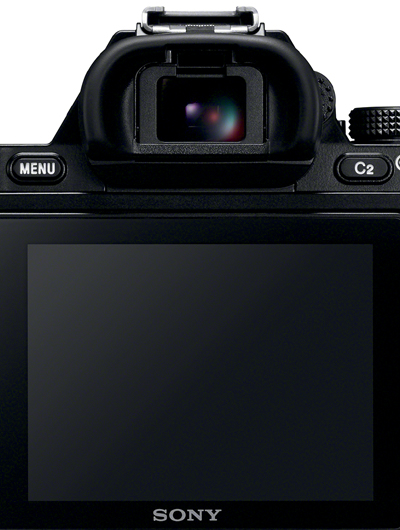
Figure 1-1: Back of camera body showing the two electronic display screens
The electronic displays provide greater precision for manual focusing. You can selectively enlarge portions of the screen to ensure that the finest details are visible for focusing. This advantage is especially critical for long telephoto work where there is little depth of field. You can also apply a colorization scheme that highlights the borders of the subject when they are in focus.
Finally, both of the electronic finders can provide a real-time preview of depth of field. When the camera is set to Aperture Priority (A) mode, it displays the image at the working aperture of the lens, so you can estimate if the background or foreground surrounding the subject is rendered sharply or if it’s blurred. You can do this with a digital SLR optical viewfinder, but it requires that you press a button to physically close down the lens’s aperture. This is disadvantageous because as you close the aperture, the viewfinder becomes progressively dimmer, making it difficult to see fine details. This is not the case with an electronic finder in A mode. The screen maintains a constant brightness so you can see clearly how fine details are rendered at various aperture settings.
The absence of the mirror makes the a7R less prone to blurring the image during the exposure than a DSLR, whose body vibrates as a result of the upward movement of the mirror and the mechanical movement of the shutter’s first curtain. In this regard, the a7 is even more advantageous than the a7R because it replaces the mechanical first curtain shutter with an electronic one, which makes it virtually vibration free when the exposure is taken.
Because the a7R does not use an electronic first curtain shutter, some owners have claimed that when it is fired, its mechanical shutter creates enough vibration to blur even pictures taken with the aid of a tripod or a long telephoto lens. This has not been our experience. These types of shots can be accomplished with good photographic technique, such as holding the camera correctly and practicing situational awareness of the shutter speed value. We use both cameras for work that involves microscopes and telescopes and have developed techniques that provide sharp images. These techniques will be described in Chapter 7.
For capturing movies, the absence of a hinged mirror in the a7 and a7R provides several advantages. Perhaps the most obvious is the ease with which movies can be taken—simply press a button to start recording. In contrast, a DSLR must have its mirror raised before you can record.
Dual Viewing System
The Sony a7/a7R has two electronic displays: an EVF with an eyepiece and an LCD screen on the back of the camera. Most digital camera users are familiar with the latter.
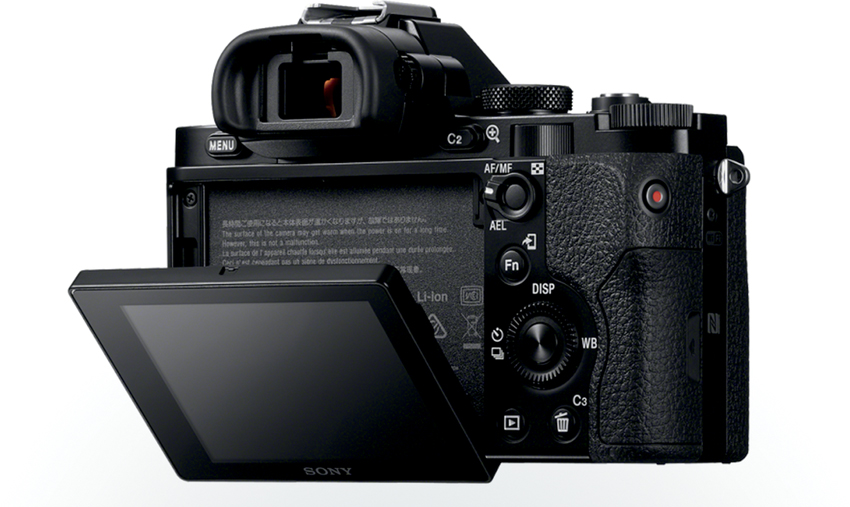
Figure 1-2: Back of Sony a7/a7R camera showing tilted LCD screen
The LCD screen can be viewed when the camera is held at arm’s length and is convenient to use when the camera is mounted on a tripod or copy stand. For those subjects that are difficult to access, you can take advantage of the tilting feature of Sony’s rear LCD to take photographs from unusual angles (figure 1-2). For example, suppose you are in the middle of a crowd and have to photograph someone at its periphery. You can grab your shot by tilting the camera’s LCD and holding the camera over your head. This way, you can look up and view the screen in order to point and aim your camera onto the subject.
The Sony a7 and a7R’s electronic viewfinder is one of best of its kind—it is extremely sharp and has a good refresh rate. It uses the same screen as the Sony SLT-a99. It is invaluable when working in bright sunlight where ambient light overwhelms the view on the rear LCD. It is also convenient in a darkened auditorium when you can’t disturb your surroundings with the light from the LCD screen. Also, and perhaps most importantly, having the camera pressed up against your face helps steady the camera, ensuring a sharper photograph.
The Sony a7 and a7R provide a different view of the camera settings depending on whether you use the viewfinder or the LCD screen. There are advantages and drawbacks to each of the viewing displays. For example, the view through the viewfinder appears larger, making it easier to study fine details. However, if you are using the menu to review or change settings, the advantage of using the rear LCD screen is that you can see the buttons and press them while you are reading the screen. As you use the camera and become familiar with its settings and buttons, you will develop personal choices as to which viewing system works best for you. In Chapter 3 we will cover details about the LCD screen and the viewfinder and discuss how to display information on each of them.
To conserve battery life, the EVF and the LCD screen are never on at the same time. When one is on, the other is off. The viewfinder is enabled when the camera senses that your eye is close to the eyepiece. When you move your eye away from the EVF, the LCD screen takes over and turns on when the EVF turns off.
Diopter Adjustment Dial
To effectively use the viewfinder, you need to know that it has a magnifier that must be precisely focused for your eyesight. To the right of the EVF is a small wheel called the diopter adjustment dial (figure 1-3). Rotate the dial up or down until the objects in the viewfinder appear maximally sharp. If you wear eyeglasses with either progressive or bifocal lenses, you must take care to position the corrective lenses for your eyes at the same point over this magnifier.
If you share your camera with others, they may need to change the viewfinder’s focus to work for their eyes. If one user is nearsighted and the other user is farsighted, the diopter adjustment dial will have to be fine-tuned whenever they exchange the camera.
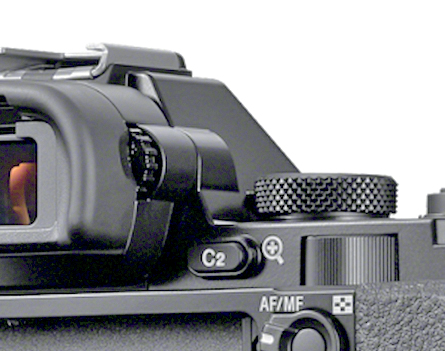
Figure 1-3: The diopter adjustment dial to the right of the viewfinder
Setting Up Your New Sony a7/a7R
When you take your camera out of the box, you will have the following components:
• Camera body
• E-mount 28-70mm zoom lens for the a7 kit (no lens is supplied with the a7R)
• Front and rear lens caps
• Body cap
• Accessory shoe cap
• Rechargeable InfoLithium (NP-FW50) battery
• AC adapter
• Shoulder/neck strap
• Micro USB cable
Make sure you have everything before you assemble your new camera. Attach the lens and insert the battery and a memory card on which to store your pictures and movies. We recommend attaching the shoulder/neck strap to give you added security when carrying your camera around. Before using the camera, make sure the battery is fully charged.
Battery
The supplied InfoLithium (NP-FW50) lithium ion battery should be fully charged before use. Plug the Micro USB cable into the AC charger, and then plug the charger into an outlet. Then insert the opposite side of the cable into the camera. Just above the camera’s USB port is a small LED that indicates how the charging is progressing (figure 1-4):
• Steady yellow glow: the battery is charging.
• Yellow light flashing: charging is not occurring, probably because the ambient temperature is too low or too high (50°F to 86°F).
• No light: the battery is fully charged.
It is important to charge the battery completely before using it in the camera. Also note that batteries can be damaged if you allow them to drain to depletion. Rechargeable lithium batteries will last longer if you partially discharge them and then recharge them fully. This is a good reason to have more than one battery: you can replace the partially depleted battery with a fully charged battery and continue shooting without the fear of running out of power.
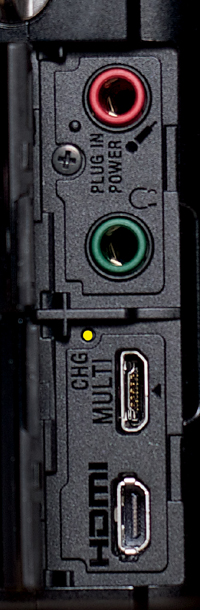
Figure 1-4: The charge lamp will glow yellow while the battery is charging
When you buy a spare battery, we recommend purchasing Sony batteries. Using uncertified batteries from third-party manufacturers will void your warranty if they damage your camera. For the active photographer, it’s not a question of if you will need to buy a spare battery; it’s a question of when. These batteries do not have an indefinite lifespan: generally, with heavy use, the battery’s capacity to hold a full charge will decrease and it will have to be replaced in about three years.
Memory Card
You will need a memory card to use with this camera. Unlike some point-and-shoot consumer cameras, the a7/a7R has no internal memory for storing images. You may already have a compatible memory card from a previous camera.
The a7/a7R uses a Secure Digital (SD) memory card, which is about the size of a postage stamp. They come in many varieties with various memory capacities and data transfer speeds. They are designated as SD, SDHC, or SDXC, which refer to the card’s potential maximum memory capacity (see the “Memory Cards” sidebar later in this chapter). Don’t be too concerned about these designations because your camera can handle all of these memory cards. Before purchasing an SDXC type card, which has a potential capacity of 2-terabytes (TB), make sure your computer can read it. Computers using early versions of Windows will not be able to use this type of card. If in doubt, stick to the SD or SDHC category; their memory capacity is sufficient for most photographers. The class rating of the card is more important.
Memory cards are categorized into classes (2, 4, 6, 8, and 10); the higher the class, the faster the card can receive and record data. The size and class of the memory card you buy depends on how you will use the camera and how you plan to maintain the stored pictures and movies. If you plan to record a lot of movies, you will need a high-capacity memory card with a fast speed rating. Although the manual says a Class 4 rating is sufficient for recording movies, Sony’s technical support recommends buying a Class 10. We advise using at least 8 gigabytes (GB) to give you plenty of storage space. If you are going to take only still photos, you can economize by using a 4 GB Class 4 card.
You can use any manufacturer’s SD, SDHC, or SDXC memory card of Class 10 or faster for both still pictures and movies. Sony currently sells an SDHC Class 10 card that holds 64 GB of data for about $40. You can also opt for a 32-GB card (about $19) or a 16-GB card (about $13) instead. The SDXC cards are the most expensive and can have the highest memory rating. We do not use these because we find the 32-GB SDHC cards to be a perfect economical choice for a day of shooting or recording movies. A potential problem with high-capacity memory cards is that a failure in the card can result in a greater loss of data. For this reason, many photographers use several smaller-capacity memory cards so that if one goes bad, the loss of pictures is limited to that one card.
Instead of using an SD card, you may wish to use a Sony Memory Stick card. They are not as common, and are a bit more expensive in terms of their memory capacity. However, if you already own these cards, you may wish to use them in your new camera. Note that if you want to record both still pictures and movies on a Memory Stick PRO Duo, it must be the Mark 2 version. The Memory Stick PRO-HG Duo and the Memory Stick XC-HG Duo record both still pictures and movies.
At the end of each shooting day, get in the habit of downloading the images from your camera to your computer. After the files are downloaded, erase the images on the card by using the camera’s Format command. This allows you to start fresh the next day, minimizing the risk of running out of memory.
MENU>Setup (5)>Format
Although you can connect your camera to your computer with a cable and transfer the stored files directly, we prefer to download the files with a card reader. Remove the memory card from the camera and insert it into a card reader that is connected directly to your computer with a USB cable. We recommend doing it this way because if your computer has USB 3.0 port and you have a suitable card reader your download speeds should be faster.
Assembling the Camera
Make sure you have the camera turned off before you insert or remove the battery, memory card, and lens.
The battery and memory card occupy different positions in the camera. The battery chamber’s door is on the bottom. When you invert the camera, you will see the cover with a sliding switch for opening the compartment. Slide the battery in the direction of the arrow painted on its side. The battery can be fully seated only one way; a set of ridges surrounding the contacts helps you orient the battery properly. You will hear a solid click when it is properly seated. You can now close the battery cover. To remove the battery, open the compartment to expose a small blue lever that blocks the removal of the battery. Push the lever to the side, and the battery will pop up for easy removal.
The memory card compartment is on the right side of the camera and can be opened even if the camera is mounted on a tripod. You can open the hinged door with a push of your finger toward the rear of the camera to expose the slot for the memory card. Insert the memory card with the metallic reading bars going in first. It will lock into position with a click. The card can only be loaded in one direction—it should not be forced. If the memory card is defective or if its contacts are dirty, a NO CARD message will be displayed on the LCD screen when you turn on the camera. If this occurs, remove the memory card, check it, brush off dirt if there is any, and reinsert. The message should go away. If it doesn’t, the card may be defective and will have to be replaced. To remove the card, gently push its top down to release the lock. The card will pop up for easy removal.
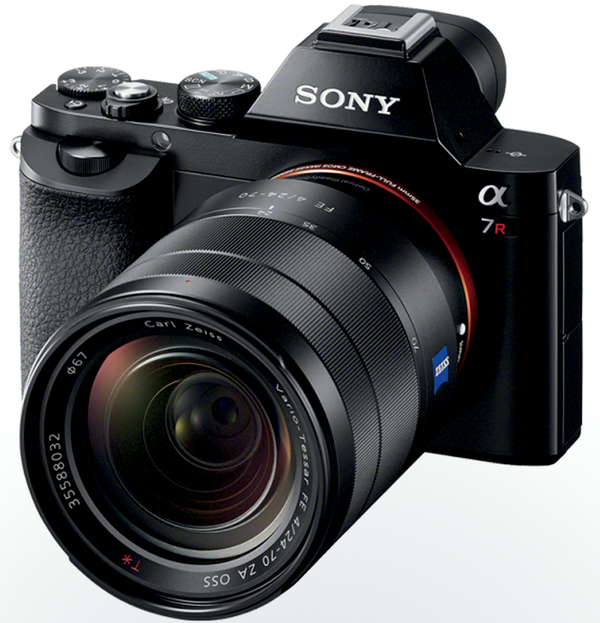
Figure 1-5a: Side of camera and lens showing white index bump on the lens
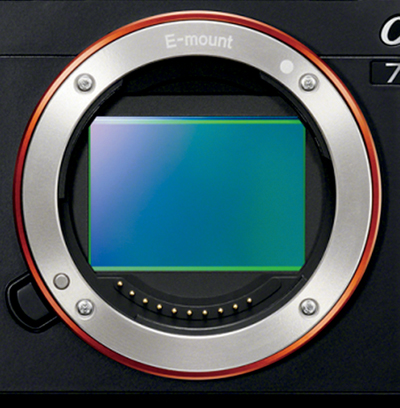
Figure 1-5b: The camera body without the lens, showing the white alignment dot
Next, attach the lens to the camera body. Remove the rear lens and camera body caps. Store both caps in a safe place for future use. Inserting the lens is a two-step process. There is a white bump on the barrel of the lens (figure 1-5a) and a white dot on the rim of the camera body’s lens mount (figure 1-5b). Align these two indicators, insert the lens, and then rotate the lens clockwise until you feel and hear a click. The lens is now locked in position and ready to use.
Last but not least, attach the camera strap. It should always be secured to the camera and placed either around your neck or over your shoulder when you’re carrying or using the camera.
Protecting the Lens
There are several ways to protect your camera lens from damage. The first and most obvious is to keep the lens cap on when you are not using your camera. The second is to use a lens hood. It not only reduces glare, it recesses the lens so the front element is shielded.
The third way is to put an ultraviolet (UV) filter in front of the lens. These are threaded and can be screwed onto the lens to serve as a clear optical lens cap. Sony sells these filters, but if you know the thread diameter of your lens, you can buy the filter from Tiffen, Hoya, or B+W (Schneider). In the case of the new 28-70mm zoom lens, buy a 55 mm diameter filter. For the Carl Zeiss 24-70mm for the a7/a7R, use a 67 mm diameter filter.
Using these filters is controversial. Some claim it’s a good idea, while others claim the protection is minimal and the filter degrades image quality. There is an element of truth in both viewpoints. We find inexpensive, off-brand UV filters to be problematic, and the worst examples of these cheap filters will reduce the sharpness of the image. This can be avoided by using high-quality filters made by reputable manufacturers. Filters made by Tiffen, Hoya, and B+W are of excellent quality and do not degrade lens performance. You may be surprised at their expense, but considering they are optically ground and made of polished, coated optical-grade glass, their price is reasonable. We routinely mount high-quality UV filters on our lenses. Although there is a theoretical chance of losing some image sharpness, it’s so slight that we don’t notice it. It is cheap insurance.
An advantage of these optical lens caps is the ease with which they can be cleaned. When working in the field, we simply wipe the dust off the filter’s surface with a quick pass of a lens tissue or a microfiber cloth. Such a cavalier practice is not advisable for the front element of a lens. A piece of grit can scratch the glass or damage its coatings. If we damage the front surface of a filter, we can easily afford to replace it, which is not the case with an expensive lens.
Protecting the LCD Screen
Although the Sony a7/a7R LCD screen is made of durable material, it can still be scratched. This won’t affect the camera’s ability to take good pictures, but it can affect your ability to know when you need to improve focus. We recommend that you buy an LCD screen protector. Sony offers them for the a7/a7R at a nominal cost. We purchased the semi-hard plastic model. It is sticky and is applied directly to the LCD. The adhesive is not a permanent bond, so if the protector gets scratched, it can be replaced. Another nice feature of the protector is that it resists picking up smudges from fingerprints.
Turning On the Camera
After you have assembled your camera, you are ready to turn it on. The ON/OFF power switch is on the top-right side of the camera, beneath the shutter button (figure 1-6). Move the lever so the indicator matches up with the ON option.
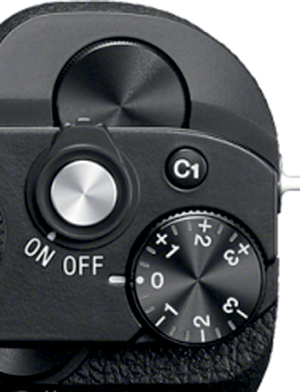
Figure 1-6: ON/OFF power switch set to ON
Setting the Camera Date, Time, and Area
The first time you turn on the camera, you will be asked if you want to set its internal clock. The information from the clock is recorded with each picture and movie—a valuable detail if you wish to organize your recordings later by date and time. Entering the date and time for your camera is a great way to learn about maneuvering through the menu options and using the controls. It also illustrates how Sony provides plenty of prompts to help you execute a command.
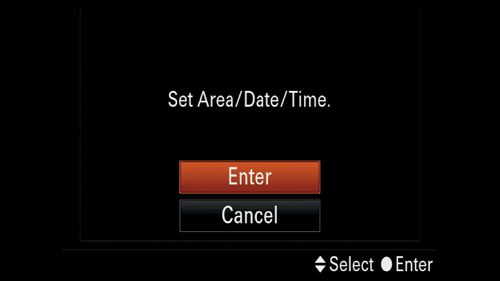
Figure 1-7a: First menu screen for setting area, date, and time
The screen you will see when you first turn on the camera will be Set Area/Date/Time (figure 1-7a). Notice the prompts directing you how to maneuver through the screen. At the bottom of the screen is the Select prompt with two arrows, one up and one down, representing the control wheel’s up and down buttons. The second prompt, a circle, represents the center button as the method to enter your selected value. Your cursor is a red rectangle that highlights the choice to be executed. In this case, the cursor is on Enter. Press the center button and the Area Setting screen is displayed for you to select your current time zone (figure 1-7b).
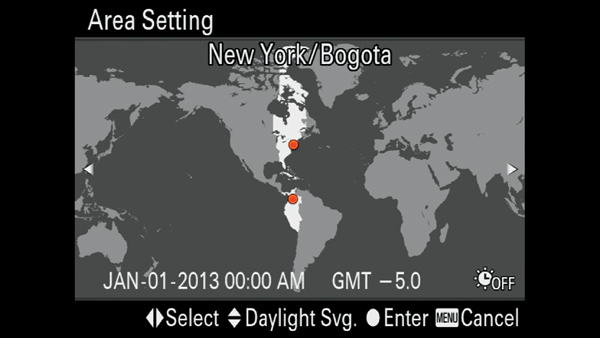
Figure 1-7b: Menu screen for showing area setting (Eastern Standard Time selected)
Looking at the world map screen, you will see plenty of prompts. The current time zone is highlighted in white. The horizontal arrowheads at the bottom of the screen are reminders that pressing the left and right buttons on the control wheel will move the highlighted area east or west so you can navigate it to correspond with your current location. You can set the Daylight Savings (Daylight Svg) indicator from this screen by using the up and down buttons. Once the current time zone and Daylight Savings indicator are selected, press the center button to accept your settings.
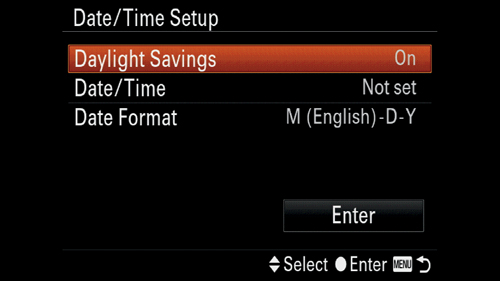
Figure 1-8a: Menu screen with the Daylight Savings option highlighted
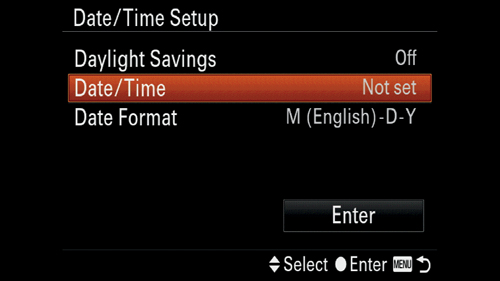
Figure 1-8b: Menu screen with the Date/Time option selected
After you select your time zone, the Date/Time Setup menu screen is displayed with the Daylight Savings option highlighted (figure 1-8a), giving you a second chance to change this value. Press the down button once to highlight the Date/Time option (figure 1-8b). Press the center button to select the Date/Time option, and you’ll see a new screen where you can actually set the time (figure 1-9). Use the right and left buttons to navigate through the fields. As the prompts suggest, use the up and down buttons to change the fields’ values. When you finish entering the information, press the center button to save it, thus completing the process. A half press of the shutter button returns you to Live View and you can start taking photographs.
You can use this same process if you reinitialize your camera with the Setting Reset command.
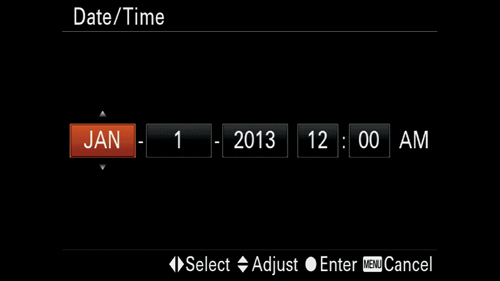
Figure 1-9: Menu screen to enter date and time information
Introducing Menu Navigation
Although most of the important camera operations can be quickly changed using the buttons and dials, you should become familiar with using the menu system because there are commands that can only be accessed by navigating through the menu.
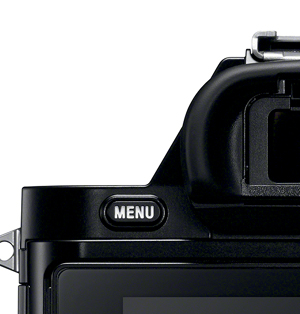
To enter the menu, press the MENU button on the left side of the camera’s back (figure 1-10). You will see a screen with six icons along the top. From left to right, they are Camera Settings (camera symbol), Custom Settings (gear symbol), Wireless (radiating radio waves), Application (matrix symbol), Playback (video play symbol), and Setup (tool box symbol). Use the left or right buttons to position the cursor over the Setup icon (figure 1-11). Note the row of numbers just below the menu icons. They indicate the screen pages within the selected menu, and will be different for each icon. If the numbers are grayed out, press the down button to make them active (figure 1-12). Once the numbers are enabled, the commands on the screen become enabled too, and your cursor will be positioned on the first command. Use the right and left buttons to scroll through the screen pages. As you navigate, each page’s commands will be displayed with the top option highlighted. Use the up and down buttons to navigate through the screen’s commands. You may notice that some of the commands are grayed out. Those commands are not available with the camera’s current settings.
Press the center button to enter a command. You will be presented with either a list of available command options or another screen to navigate through. Use the up/down buttons to navigate through the list of options. You may see horizontal arrows indicating that you should use the right and left buttons to see and set values.
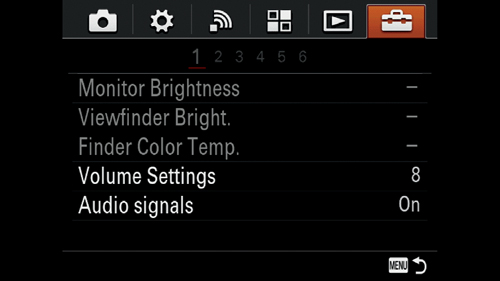
Figure 1-11: Selecting the Setup icon

Figure 1-12: Setup menu with page numbers enabled
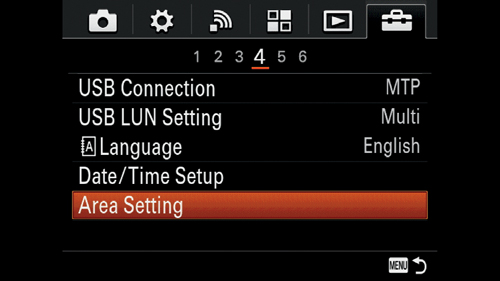
Figure 1-13: Setup menu with Area Setting selected
Let’s return to the task of changing the camera’s date and time information. Press the MENU button. Use the left or right buttons to position the cursor over the Setup icon. In the case of the Setup menu, there are six screen pages. Press the down button to enter into the page bar. Note that the page number you are on turns white and the remaining page numbers are a deep gray. In this case you are on page 1. Press the right button to navigate to page 4. At this point you will see a screen that shows the Date/Time Setup and Area Setting commands (figure 1-13). If you highlight either of these commands and push the center button, you will access their respective set-up screens.
Menu Navigation Commands
Throughout the book we reference commands and explain how to locate them within the menu. To do this, we use a shorthand command path that reflects the menu’s structural flow. Using the same example of setting the camera’s date and time, you will want to find and use the following command path:
MENU>Setup (4)>Date/Time Setup>Date/Time>[Month], [Day], [Year], [Hour], [Minute]
This is our shorthand for specifying the series of commands and options you would choose to find and set a command through the camera’s menu. Sony engineers have provided page numbers to help you locate a pertinent command (we list those page numbers next to the main menu in parentheses). We use the “>” to indicate the level within the command structure. In the case of “Date/Time Setup>Date/Time,” the “>” indicates you will need to move into the submenu “Date/Time” from “Date/Time Setup”. We use square brackets to encase values you can select. In the case of Date/Time command path, all of the listed values in brackets at the end of the path are available for you to set. For most commands, the end options are [On] and [Off], which means only one can be chosen at a time.
Error Messages
The Sony a7/a7R has a number of self-explanatory information and error messages to help guide you through setting up and using the camera.
As mentioned earlier, some of the menu commands are grayed out because they are not available with the camera’s current settings. If you press the center button while one of these options is highlighted, you will receive a command-specific error message indicating that the command is unavailable. The error message will also include the menu command that is preventing the entered command from being enabled. For example, you cannot choose Drive Mode when the mode dial is set to Sweep Panorama. If you try, you will receive the error message screen in figure 1-14.
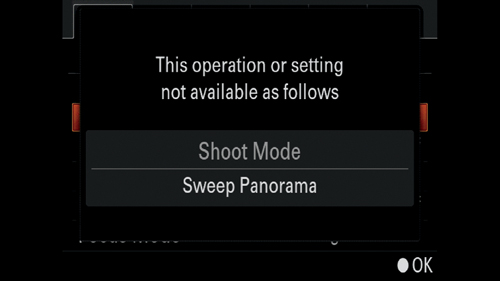
Figure 1-14: Error message screen when accessing a disabled command
There are also many non-command-specific error and warning messages that are covered in Appendix B.
Getting out of Trouble by Reinitializing Commands to Their Default Values
You will set and change command values frequently as you use the camera. At times, the camera may get confused. In computer jargon, it will “hang” and not respond to commands, you may find that familiar commands do not work as you expect. If this occurs, take the following steps to get the camera operating again.
The first and easiest step is to simply turn the camera off and then back on to see if the problem disappears. If this does not work, turn off the camera and remove the battery for about 10 seconds, then reinsert the battery and check again to see if the problem is resolved. If the camera is still not responding, you can start over with the camera’s default values by executing the following command:
MENU>Setup (6)>Setting Reset>[Camera Settings Reset], [Initialize]
Execute the [Camera Settings Reset] option first. This option resets all the menu items listed under the Camera icon (Camera Settings) to their default values. This includes commands such as ISO, Quality, Image Size, and DRO. None of the command settings in the other menus are affected. Check to see if the camera starts operating as expected.
The last possible way to solve the problem on your own consists of executing the Setting Reset command’s [Initialize] option. The [Initialize] option is much more aggressive—it not only resets the camera to all of its default values, but also deletes stored information in the camera’s internal memory. Face registration, Date/Time settings, Area location and downloaded apps are erased and have to be restored manually. Obviously, the [Initialize] option should be used only as a last resort. If losing internal memory data is unacceptable, contact Sony technical support for advice prior to executing the Initialize function. If you choose to execute the Setting Reset command’s [Initialize]option, check again to see if the camera’s problem has been rectified. If not, you will have to contact Sony technical support for advice.
Introduction to Buttons, Dials, and Controls
Using the a7/a7R’s menu commands provides access to all the operational controls and features of the camera. However, the sheer number of options prevents the active shooter from changing settings rapidly. Fortunately, there are 16 buttons, one control wheel, and three dials for quickly selecting, initiating, and choosing menu command options. For the active photographer who needs a fast change in the camera settings, these controls are invaluable. See table 1-2 for a list of these controls and their functions. Note that this table lists the default camera settings, most of which can be customized to execute different commands.
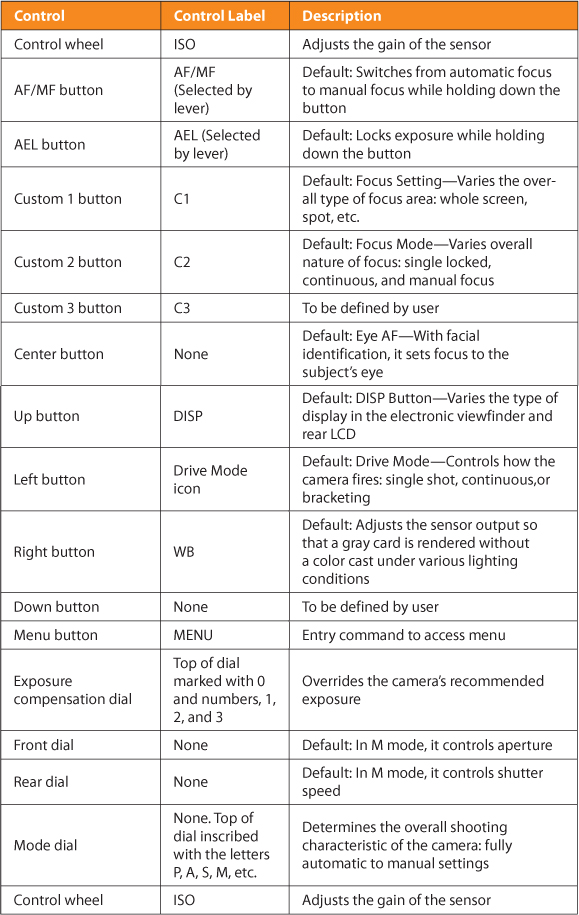
Table 1-2: Default camera settings for the camera’s buttons, dials, and control wheel
Spending time to learn the standard camera settings is important because of the complexity of the default button assignments. Depending on your camera settings, many of the buttons and dials perform two functions. For example, when you are taking a picture, the left button serves as a way of changing the Drive Mode. However, when you are in a menu, it serves as a navigation control to move through menu selections. This maximizes the number of commands that can be accessed by pressing the buttons without having to increase the physical number of mechanical switches. This puts you in greater control of your camera; however, before customizing the controls, we recommend you first become comfortable with the command assignments. You do not have to customize every control from the beginning. Our experience was that the customization process occurred in stages. First, we took our time to figure out which commands we used the most and which we used the least. If we thought we would need a command not currently assigned to a button, we assigned it first to one of the two buttons without a defined value: the down button and C3 button. This was a temporary assignment. If we found this assignment helpful to our workflow we would assign the function to a permanent location. We would select a button whose commands we did not use and replace it with the more useful command. We would then restore the down and C3 button to their unassigned status. By doing this, we could assign the buttons with our most-used commands while gradually eliminating those assignments that we hardly used. Once you have developed your own shooting style, you will know which commands you need to access quickly.
This is why we recommend that you assign commands to the down button and C3 button for a “trial period” until you can decide if you want to assign the command to a customized key. If you customize more than two buttons, you will displace some of the assignments that Sony had made with their buttons. Just make sure you keep a written record of your customizations in case you need to reset some temporarily or have to execute a Setting Reset’s [Initialize] option. You always have the option of reassigning customizations if you later find you need a different function more frequently. We will cover customization of these entry points in Chapter 7.
Fn Button
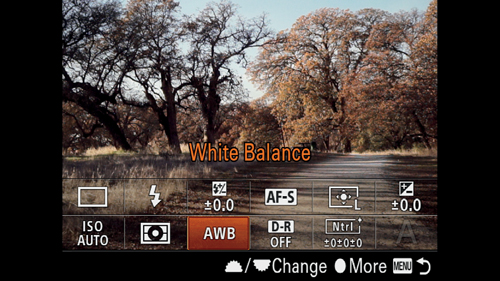
Figure 1-15: The screen after pressing the Fn button: 12 functions are available at the bottom of the screen
The Fn button is on the right side of the back of the camera. This is the button that can initiate the most commands. Pressing it accesses up to 12 commands, displayed in two rows of six commands each on the bottom of the screen. In its default mode, the first row consists of: Drive Mode, Flash Mode, Flash Comp., Focus Mode, Focus Area, and Exposure Compensation. The second row consists of ISO, Metering Mode, White Balance, DRO/Auto HDR, Creative Style, and Shoot Mode. This command menu is superimposed over the preview image (figure 1-15). Use the up, down, right, and left buttons to navigate though the command icons.
When a command is selected for modification, it is highlighted in orange and a description of the command appears on the screen above the top row. Different commands are selected by using the right, left, up, and down buttons. You can change the values within the highlighted commands by turning the front control dial or the control wheel. If you select a complex command that adjusts several parameters, such as WB (white balance), pressing the center button takes you into the list of the command’s options. From here, press the right button to enter into the submenu to adjust the white balance’s selected tint.
Not every command on the Fn screen will be enabled all the time. There are times when some of the Fn button’s 12 commands are grayed out—disabled commands are unavailable in the camera’s current shooting mode and settings.
Again, we recommend you use the camera for a while to see which commands you most frequently access. If you want to play with different settings, many of the commands are represented on the buttons on the back of the camera. For example, Drive Mode, ISO, and WB already have dedicated keys, so you may want to eliminate these and customize the Fn button to display other commands. Chapter 7 will describe how to customize the Fn button.
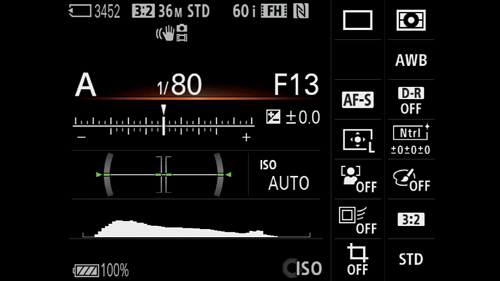
Figure 1-16a: [For viewfinder] display screen
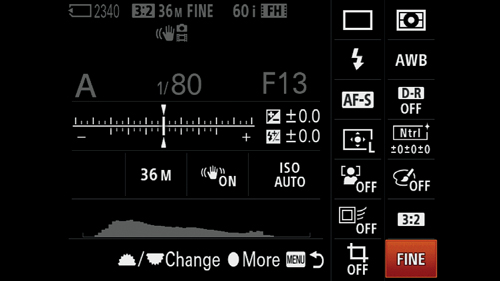
Figure 1-16b: Quick Navi screen with the Quality’s [Fine] option highlighted
DISP and Quick Navi Screen
When in Live View, press the DISP button (up button) to cycle through the various data display formats for the LCD monitor and the viewfinder. Although we will describe the different display formats in more detail in Chapter 3, we need to mention one display, [For viewfinder], for entering commands. The [For viewfinder] format, which works with the Fn button, is readily recognizable because it is the only screen that does not display what your camera sensor sees (figure 1-16a). Instead, is has numbers, letters, and a graph providing an immediate readout of all your camera settings. When you see this screen, press the Fn button and the screen becomes the interactive Quick Navi screen (figure 1-16b), which provides a convenient and fast way to select commands and alter their settings. Press the up, down, right, and left buttons to navigate through the screen. Your position is highlighted in orange. To change a highlighted value, turn the control wheel or the front dial to select different options (figure 1-16c). Or, press the center button and you will see a screen with available options for the selected command. Select a value and press the center button to return to the [For viewfinder] display with the accepted value.
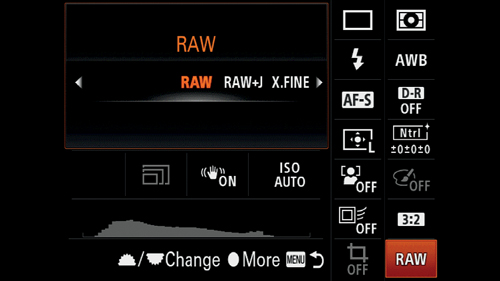
Figure 1-16c: Quick Navi screen with the Quality’s [RAW] option selected
Control Wheel (ISO)
When you’re framing and composing an image, rotating the control wheel provides ISO options for adjusting the sensor’s sensitivity. A high ISO number makes the sensor more sensitive to light, allowing you to take pictures in low-light situations. Conversely, a low ISO number means the sensor is less sensitive, which enables you to take detailed pictures in bright daylight. We will discuss ISO functionality in greater detail in Chapter 2.
Left Button (Drive Mode)
Press the control wheel’s left rim (left button), and the Drive Mode command’s options will appear along the left side of the screen. Rotate the control wheel to navigate through the command options. Press the center button to select the highlighted value. These options enable you to determine how the camera will fire when the shutter button is depressed. We will discuss Drive Mode in greater depth in Chapter 2. Just know that you can access the Drive Mode command by pressing the left button in Live View.
Right Button (WB)
When the right button is pressed while in Live View, it displays the White Balance (WB) command. The default setting is [AWB], or Auto White Balance. With this option, the camera tries to adjust its sensor output so that the colors appear natural. Navigate through the WB options and press the center button to accept a value.
The Dials (Front, Rear, and Exposure Compensation)
You will use these three dials most frequently when you set the camera’s mode dial to P, A, S, or M and take an active part in adjusting the exposure. The front and rear dials adjust either the lens opening or the shutter speed. When you wish to depart from the camera’s recommended exposure, use the exposure compensation dial. When you are navigating through the menus, the front dial will move the cursor up and down the screen, and the rear dial will move the selection to the left and right. This is particularly convenient if you are using the viewfinder to change menu settings—for example, when you are shooting in sunny daylight conditions and the rear LCD screen is difficult to read.
Cleaning the Sensor
When you change the lens, dust particles can enter the camera body and land on the sensor. On the recorded image, they can be seen as blurred shadows. You can limit this problem by removing and replacing the lens quickly and in environments with no wind. You should also try to make the switch while holding the camera body with the lens opening facing downward. This will help to prevent dust from falling into the body cavity.
However, the entry of dust is inevitable. The Sony a7/a7R dislodges dirt from the sensor by shaking it off at high speed. Each time you turn the camera off, it automatically cleans the sensor with ultrasonic vibrations. There may be times when you think an extra cleaning is needed, and you can accomplish this using the following command:
MENU>Setup (3)>Cleaning Mode>[Enter]
Note that this command for cleaning the sensor will not work if the battery level is low. You will need three or more bars on the battery icon to perform this operation; Sony recommends connecting the camera to its transformer.
If foreign particles still remain, you can do a manual cleaning. First, take off the camera lens. Use a manual bulb blower to clean the sensor’s surface. It is best to hold the camera with the lens opening facing down so the dust particles can fall out of the camera. Do not touch the image sensor with your fingers or the blower. Sony does not recommend “wet” cleaning, which entails using solution to wipe the surface of the sensor clean. If the dirt persists, Sony recommends using their service facility.
We do not recommend using a can of pressurized gas to blow out the camera’s interior because any dirt in the nozzle can be blown into the camera body with enough force to damage the sensor. Also, if propellant is expelled, it will be difficult to remove from the sensor’s surface. If you have any problems or concerns, take your camera to a professional service center.
Recommendations
It turns out that charging the camera battery by plugging your camera into your computer via the USB cable is possible, but we do not recommend it because some computer USB ports do not deliver enough power to accomplish this task. Also, the camera may not recharge if it is turned on, so make sure it is off. If you are a photographer who takes hundreds of pictures a day, we recommend that you always have at least one fully charged spare battery and an additional memory card. Use only Sony-certified batteries in order to maintain your camera’s warranty. If you get a spare battery and you use it frequently, you should also buy the AC charger (BC-VW1). This allows you to use your camera while you charge your spare battery outside your camera body.
If you want to take pictures immediately, set the mode dial to Auto and select either Intelligent or Superior Auto. As you use the camera and move into other shooting modes, you will need to become familiar with additional control tools. This chapter provided some instruction on changing the camera’s options to get you started. We will build on these instructions in the later chapters.
In Auto mode, the camera determines the settings and options it uses based on the situation. It is a learning experience for you to review the images you took in Auto mode and judge whether you could have done better by using different options. As you begin to choose your own settings and options rather than rely on the camera, you will find that you access some menu commands frequently. You can assign these commands to certain buttons in order to access them more easily. If you decide to customize the control tools, as described in Chapter 7, you will find that you’ll hardly ever need to dive into the camera’s menu. Instead, you’ll be able to access the functions that are most important to you by using the external dials and buttons.