Chapter 4: Automatic Settings
Introduction
How you use the Sony a7/a7R depends on your expertise, your desire to control aspects of picture taking, and your creativity. Even if you do not know such photographic terms as f-stop, shutter speed, ISO, or EV, you can still take technically excellent pictures and movies using the automatic modes. As mentioned in Chapter 2, automated camera settings can take excellent pictures; however, the settings you use depend on the type of subject (i.e. landscape, person) in your image. With the Intelligent and Superior Auto modes, the camera software automatically tries to identify the subject and match it to one of the scene types, thereby ensuring that the most efficient combination of settings are used to create the image. However, you can improve upon these results by choosing a specific scene identification option—turn the mode dial to SCN and choose the predefined automatic mode that is most appropriate for your subject.
The difference between Superior and Intelligent Auto is subtle. Intelligent Auto uses simpler software and restricts itself to working within a single shot. It adjusts the lens opening, the shutter speed, ISO, and white balance to provide an optimum exposure for the scene it identifies. In contrast, Superior Auto uses complex image-processing software that can expose several shots of the same scene and combine them so that the final image is superior to any of the single shots. For example, the camera may fire four shots under low light conditions at high ISO and use them to reduce the appearance of sensor noise in the final picture. This is a major advantage when photographing dimly lit scenes requiring high sensor sensitivity. For example, using multiple shots and combining them mathematically is commonly used in astrophotography.
In many respects, Superior Auto can employ techniques similar to those used by an experienced photographer who is making adjustments to an image in Photoshop. For example, to adjust for extremes in lighting, the camera will employ Auto HDR, firing three shots—one exposure for the highlights, another for the mid-tones, and a final for the shadows. The three exposures are combined within the camera, resulting in an image showing details in all three regions: a feat that cannot be accomplished with a single exposure.
So why does the a7/a7R have two separate auto modes, rather than a single intelligent mode? Sony does not clearly answer this question. From our perspective as users, there’s a pragmatic reason for having two such modes: the available speed with which you can capture a follow-up shot. When the camera decides to use the multi-shot strategy in Superior Auto, the camera can spend several seconds processing the images and saving them to the memory card. This can take as long as 10 seconds, and the camera is inoperable for this time. This makes using Superior Auto problematic when you are in a situation where you need to take several shots in quick succession. When you need to grab the next photograph quickly, set your camera to Intelligent Auto.
We start this chapter by discussing the automatic modes, and then cover several menu functions that are available for both Auto and SCN modes to help you plan which automatic mode will suit your workflow.
Shooting Modes
The shooting mode dial (figure 4-1) is the starting point for exerting control over how you shoot your pictures and movies. It provides you with a mixture of automatic and semiautomatic settings and additional artistic features.
The mode dial has ten shooting mode options. Table 4-1 lists these along with a brief description. Rotate the mode dial to activate each shooting mode. If you are new to many of these shooting modes, you can activate the Mode Dial Guide command so a brief description will be displayed for the selected mode (figure 4-2). By default, this option is set to [Off].
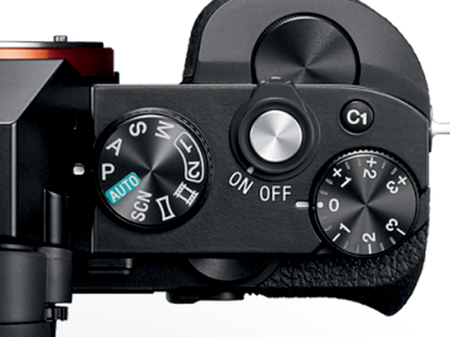
Figure 4-1: Shooting mode set to P
MENU>Setup (2)>Mode Dial Guide>[On], [Off]
To exit out of the description screen, press the center button or shutter button halfway. The selected shooting mode’s icon will be displayed in the upper-left corner of the display screen.
The Scene Selection (SCN) shooting mode has a submenu. To select a predefined SCN shooting mode, rotate the front dial (next to the mode dial). Note that the shooting mode icon changes each time the option changes. Stop rotating the dial when it is positioned on the desired SCN shooting mode.
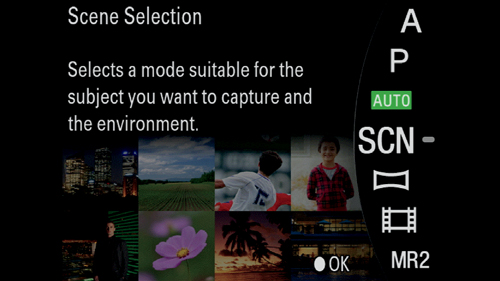
Figure 4-2: Mode Dial Guide description screen
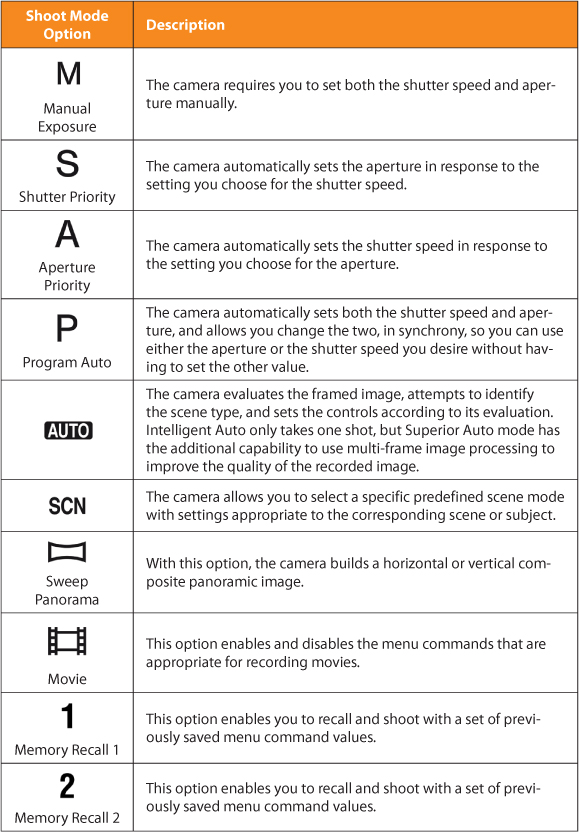
Table 4-1: Shooting mode options
Intelligent and Superior Auto Modes
A single mode dial icon, AUTO, controls both the Intelligent and Superior Auto modes. Once the mode dial has been turned to the Intelligent/Superior Auto icon, you are able to use the camera’s menu to select the Auto mode you wish to use.
MENU>Camera Settings (6)>Auto Mode>[Intelligent Auto], [Superior Auto]
We recommend retaining the Shoot Mode command as one of the Fn button options so you can avoid having to navigate through the menu to select an Auto mode. You can also access the Shoot Mode on the Quick Navi screen. Both of these options are easier and more straightforward than using the menu. We will cover more about the Fn button in Chapter 7.
Both the Intelligent and Superior Auto modes evaluate the framed image, assign a scene type, and then determine the proper exposure, ISO setting, WB, aperture, and focus for the image based on that assigned scene (table 4-2). When the scene type is determined, the camera displays a corresponding green (Intelligent Auto) or yellow (Superior Auto) icon in the upper-left corner of the display screen.
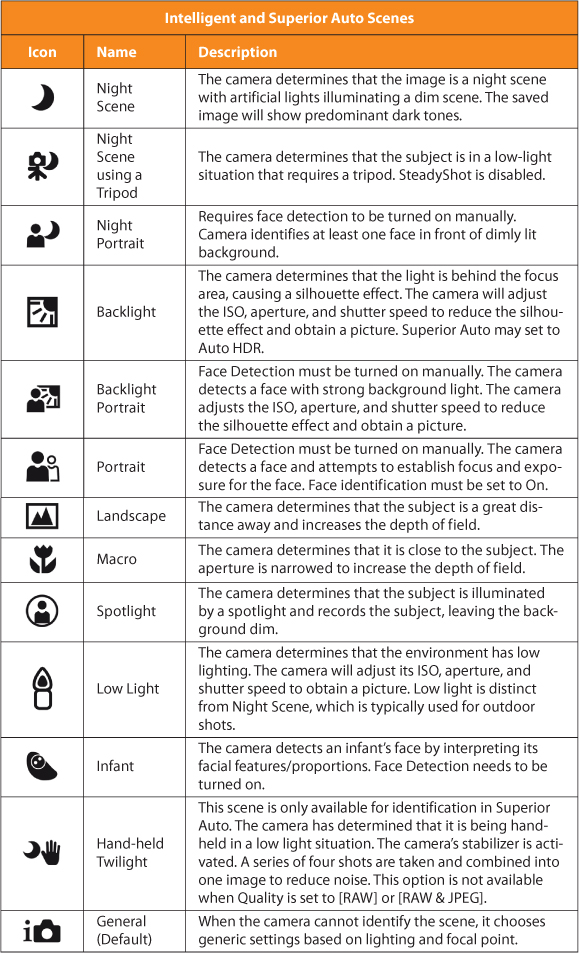
Table 4-2: Intelligent/Superior Auto scenes, icons, and descriptions
So how does the camera select the scene mode? Sony engineers and their technical staff do not describe how this is accomplished, but its criteria for choosing a scene can be inferred by using the camera and noting the conditions that are associated with the selected scene. For example, say the camera determines that the framed image’s subject is very close (that is, within about a foot to the lens). The camera’s software will set the scene type to Macro and sets the camera controls to the best values for a close-up picture. Alternately, if the camera focuses on a subject but detects a lot of light in the background, it would assign Backlight (or Backlight Portrait if the camera perceives the subject to be a person). This brings us to Face Detection and some of the inconsistencies in the design of the [Intelligent Auto] and [Superior Auto] modes. There are four different portrait modes: Portrait, Night Portrait, Backlight Portrait, and Infant. You would think that the camera would be designed to automatically have Face Detection function to [On], but this is not the case. None of these portrait modes can be automatically assigned by the camera’s software unless you first set the Smile/Face Detect. command to [On] (figure 4-3).
There are times when the camera’s software is unable to determine a specific scene type. In this case, the General Auto icon is displayed on the screen and the camera chooses generic settings (figure 4-4). You will get a good exposure, but the shutter speed, aperture, and ISO may not be optimal for the subject that you are recording.
There are several camera functions that are unavailable in both the Intelligent and Superior Auto modes:
• None of the brightness/color related menu commands, such as White Balance, Creative Style, or Picture Effect, are available.
• Exposure compensation is not available.
• Commands to establish the focus area is unavailable.
• Light metering commands are unavailable.
• The bracket-related Drive Mode options are disabled.
• The Slow Sync., Rear Sync., and Wireless Flash Mode options are disabled.

Figure 4-3: Intelligent Auto with Smile/Face Detect. Off, so Macro scene was selected Instead of a Portrait scene

Figure 4-4: Intelligent Auto with General scene selected
Superior Auto Mode Added Features
Although Intelligent Auto mode can produce great results, Superior Auto mode has an added feature that is able to fine-tune the camera settings to create a better-quality image. Superior Auto determines the same scene modes as Intelligent Auto (table 4-2), but it can also determine if the image would benefit from applying one of the following six shooting functions: Auto HDR, Slow Sync., Daylight Sync., Slow Shutter, Cont. Shooting, or Hand-held Twilight. Some of these shooting functions involve multiple images and/or additional image processing, which means the camera will need more time to take and record the shot. How Superior Auto determines which features to use seems to be proprietary information—after speaking with Sony Technical Support and shooting an immense amount of different shots in different scenarios, we still find it to be a well-kept secret. With that said, don’t be surprised if, while in Superior Auto mode, one of the additional shooting functions is displayed briefly along the top of the display screen for a few seconds before you press the shutter button (figure 4-5).
There is a useful command you might want to deploy to get a glimpse of the behind-the-scenes workings of what Superior Auto’s multiple-shot shooting functions do to the combined images:
MENU>Custom Settings (4)>S. Auto Img. Extract.>[Auto], [Off]
When the S. Auto Img. Extract. command is set to [Auto], all of the shots taken in a multiple-shot burst are saved, including the resulting combined shot. When the S. Auto Img. Extract. command is set to [Off], only the resulting combined shot is saved on your memory card. We set S. Auto Img. Extract to [Auto] because the allure of seeing all the shots that were used to create the combined shot is just too great to pass up. Keep in mind that if you turn this command on, you will see the multiple shots along with the combined picture when you playback your images.
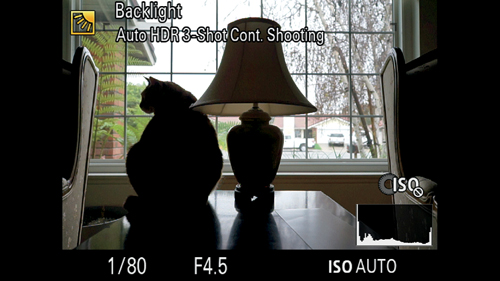
Figure 4-5: Superior Auto’s shooting function, displayed on the screen
Intelligent/Superior Auto Mode Summary
Scene identification in both Intelligent and Superior Auto modes is imperfect. It should be used as an aid to help you to quickly capture images without having to consider camera settings. Many aspects of these Auto modes prompt the camera to extrapolate the necessary settings for a particular image, and then reset the command settings for your convenience. One exception is the Smile/Face Detection command; you will have to inform the Auto modes to look for faces by manually turning the Smile/Face Detection command on. We can only presume this is a design error in version 1.02 that will be corrected in later bios upgrades for the a7/a7R.
As you become more comfortable with using the camera, you can categorize the subject and select the appropriate predefined scene mode using the SCN mode option without aid of the Auto modes. For more creative photography, you will want to learn how to use the P, A, S, and M modes.
SCN Predefined Scene Modes
When you turn the mode dial to SCN, you will have access to nine predefined scene modes to choose from (table 4-3). Using the SCN’s predefined scene modes gives you more control than using the Auto modes because the camera will make setting decisions, such as ISO, exposure, shutter speed, and aperture, based on your selected predefined scene mode and how it interprets the image when you obtain focus. This is an excellent way to help increase your percentage of satisfactory images.
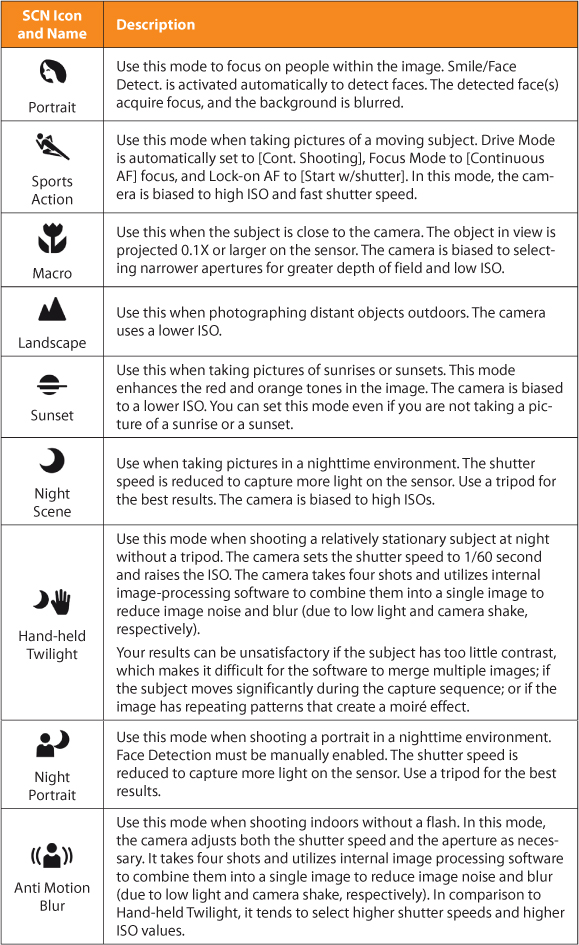
Table 4-3: SCN predefined scene modes
You must always have the mode dial turned to SCN in order to view and select a predefined scene mode. When you select SCN mode, the last selected predefined scene icon will be displayed in the upper-left corner of the display screen. Rotate the front dial (next to the mode dial) to move through the available predefined scenes. As you scroll through the scene options, the scene mode’s icon changes. The camera will automatically apply the camera settings for the selected scene option when you focus and take the picture.
Another way to access the SCN options is through the Shoot Mode command. This is one of the Fn button’s default options. If you select the Shoot Mode through this method and the mode dial is set to SCN, the predefined scene modes will be displayed in a vertical list along the left side of the display screen. Rotate the control wheel to move through the list. If you have the Mode Dial Guide command set to [On], each highlighted, predefined scene mode will include a brief description to help you decide if it best suits your image (figure 4-6). Press the center button to select a scene mode. Again, we recommend retaining the Shoot Mode command as one of the Fn button options rather than navigating through the menu using the front dial. We will cover more about the Fn button in Chapter 7.
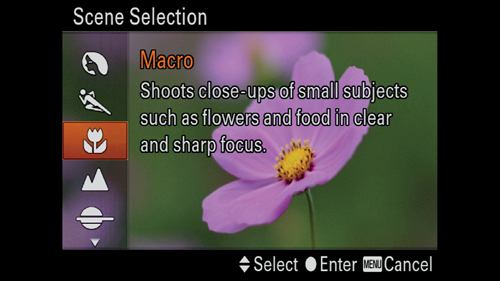
Figure 4-6: Description of Macro predefined scene mode
Most of the predefined scene modes are straightforward. Two of the options, Hand-held Twilight and Anti Motion Blur, are not so easily distinguished. Both modes fire multiple shots and average them into a single image to reduce noise and blurring caused by slight camera movements. The other predefined scene modes allows you to record the images in RAW format, but these two modes only allow [Extra Fine], [Fine], or [Standard] JPEG, thus limiting your ability to do post-processing outside of the camera. If you had the Quality command set to [RAW] or [RAW & JPEG], the camera temporarily changes the Quality value to [Fine]. The original Quality value will be restored when you move out of this SCN option.
Generally, low light causes noise to be recorded within the image. Use the Hand-held Twilight mode when you are photographing an outdoor scene in dim light without a tripod. When this mode is activated, the camera takes four shots at high sensitivity and merges them to form a single image with reduced noise.
Use Anti Motion Blur mode when you are shooting indoors in low-light environments or when there is slight camera movement, usually caused by holding your camera in your hand while shooting. As with Hand-held Twilight, the Anti Motion Blur mode takes four shots and averages the results into one image, thus reducing the slight blurring due to camera movement.
Both of these commands prompt the camera to adjust the shutter speed and aperture as necessary for the framed image. The difference between the two commands is that Anti Motion Blur is far more aggressive in raising the ISO than Hand-held Twilight. It is our belief that the former must contend with subject motion (hence, Anti Motion) and small degrees of motion are more easily corrected with a shorter shutter duration. In contrast, Hand-held Twilight makes the assumption that the scene is mostly static and is therefore less concerned about freezing movement.
Neither Hand-held Twilight nor Anti Motion Blur is effective in all situations. In order to align the multiple exposures into one, the image has to have sufficient color contrast so the camera can match up the objects in each image and merge them together to build a final photograph. This will be difficult if the subject moves or if the light source flickers, such as with fluorescent lights. In addition, problems can occur when the color scheme in the image is monotone or has repeating patterns; this will confuse the camera when it is trying to align the subject to merge the multiple images.
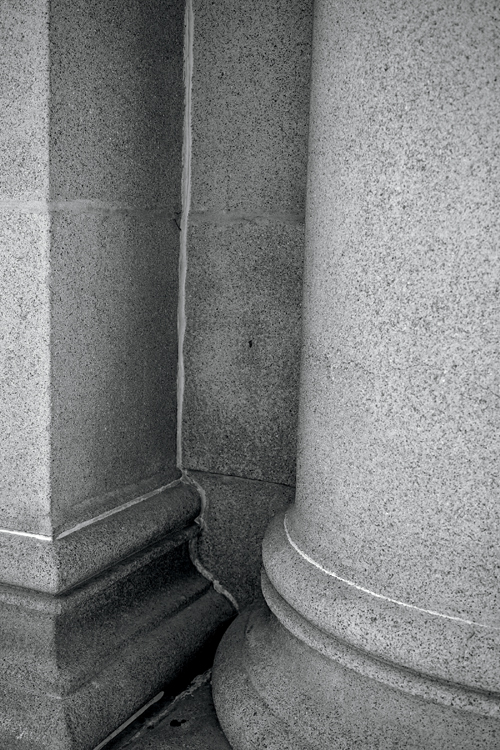
Figures 4-7a and 4-7b are a comparison between Anti Motion Blur and a single shot image taken in a low-light environment. Both images have been enlarged to show the amount of noise.
Functions Available for Automatic Modes
The automatic modes do not provide the full range of controls that you have available when shooting in P, A, S, or M mode. Fortunately, they do allow you to adjust the Drive Mode, Flash Mode, Lock-on AF, and Smile/Face Detect. We will cover these options in this section since you can change them in the automatic modes, but we will discuss them in greater detail in Chapters 5 and 6 when we discuss P, A, S, and M modes.
Figure 4-7a: Low-light Anti Motion Blur mode results

Figure 4-7b: Low-light P mode results
Drive Mode Command
The Drive Mode command allows you to specify how the camera will act when you fully depress the shutter button. The Drive Mode has a total of nine options, but not all are available within the automatic modes. In this section we will cover the options that are available for modification within the automatic modes. The remaining, unavailable options will be discussed in Chapter 6.
MENU>Camera Settings>Drive Mode (1)>[Single Shooting], [Cont. Shooting], [Spd Priority Cont.], [Self-timer], [Self-timer(Cont.)], [Cont. Bracket], [Single Bracket], [White Balance Bracket], [DRO Bracket]
Table 4-4 shows which Drive Mode options and sub-options are available in the Intelligent Auto, Superior Auto, and SCN modes. Keep in mind that the Drive Mode setting has no effect when recording a movie.
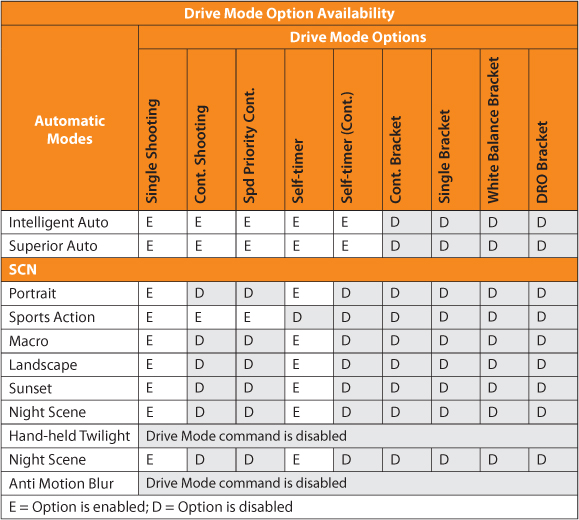
Table 4-4: Drive Mode options available in automatic modes
The following icons represent the available options:
![]() Single Shooting—The camera fires one shot per press of the shutter button.
Single Shooting—The camera fires one shot per press of the shutter button.
![]() Cont. Shooting—The camera shoots continuously as long as the shutter button is held down and the memory card has room to store images. The camera maintains this firing rate until the memory buffer is filled. If the flash is operational, the firing rate slows down to allow the flash to recharge in between shots.
Cont. Shooting—The camera shoots continuously as long as the shutter button is held down and the memory card has room to store images. The camera maintains this firing rate until the memory buffer is filled. If the flash is operational, the firing rate slows down to allow the flash to recharge in between shots.
![]() Spd Priority Cont.—The camera shoots continuously at a higher speed than [Cont. Shooting] as long as the shutter button is held down and the memory card has room to store the images. The camera maintains this firing rate until the memory buffer is filled. After that, the rate of firing drops. When using the flash, the continuous shooting rate is slowed to allow the flash to recharge before firing.
Spd Priority Cont.—The camera shoots continuously at a higher speed than [Cont. Shooting] as long as the shutter button is held down and the memory card has room to store the images. The camera maintains this firing rate until the memory buffer is filled. After that, the rate of firing drops. When using the flash, the continuous shooting rate is slowed to allow the flash to recharge before firing.
![]() Self-timer—When operational, this option delays firing the camera either two or ten seconds after the shutter button is pressed, at which time it fires a single shot.
Self-timer—When operational, this option delays firing the camera either two or ten seconds after the shutter button is pressed, at which time it fires a single shot.
![]() Self-timer (Cont.)—This option delays firing the camera until ten seconds after the shutter button is pressed, at which time the camera fires a continuous set of three or five shots.
Self-timer (Cont.)—This option delays firing the camera until ten seconds after the shutter button is pressed, at which time the camera fires a continuous set of three or five shots.
Flash Mode Command
The Sony a7/a7R does not have an internal flash unit of its own. Instead it has a multi interface shoe on the top of the camera to hold an external flash. How it fires will be controlled by the Flash Mode command:
MENU>Camera Settings (2)>Flash Mode>[Flash Off], [Autoflash], [Fill-flash], [Slow Sync.], [Rear Sync.], [Wireless]
Because the Sony a7/a7R lacks a built-in flash unit, these options all pertain to a compatible, attached accessory flash. Even though the Flash Mode allows you to specify how and when this attached flash will fire, not all of the command’s options are available in the automatic modes. See table 4-5 for a list of the available options.
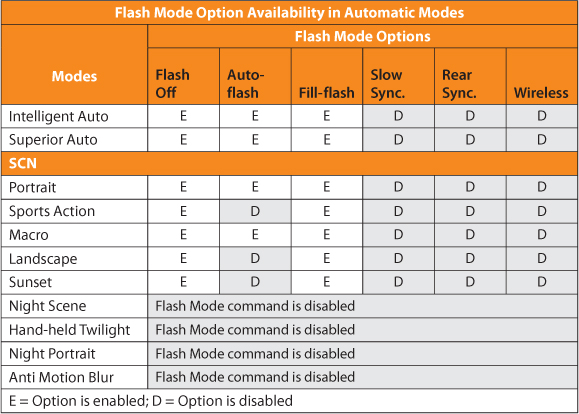
Table 4-5: Flash Mode options available in automatic modes
The following icons represent the available command’s options. They are accompanied by a high-level description. Chapter 10 will cover the flash functionality in more detail.
![]() Flash Off—This option prevents the attached flash unit from firing.
Flash Off—This option prevents the attached flash unit from firing.
![]() Autoflash—With Autoflash, the camera decides when the level of light is low enough to fire the attached flash.
Autoflash—With Autoflash, the camera decides when the level of light is low enough to fire the attached flash.
![]() Fill-flash—When this option is selected, the attached flash always fires.
Fill-flash—When this option is selected, the attached flash always fires.
Face Detection and Registration Functionality
Cameras equipped with Live View frequently have Face Detection software, which can be quite elaborate, with many options for memorizing a face and prioritizing its value for focusing. Sony Face Detection and registration is straightforward and easy to use.
There are two aspects of the Face Detection process. The first is to simply identify a face within the frame by turning on the Face Detection feature. The second is to ensure that the camera recognizes a specific face. This requires that you register faces into a library stored within the camera’s internal memory. Once this is done, the camera will remember a person’s face, and when it is recognized, that face becomes the focus point of the image. When there are multiple faces within the image, the camera will focus on a registered face before a nonregistered face. Then, the camera prioritizes focus of registered faces based on how you rank those faces in the library, making the highest-prioritized face the focus point.
The value of this feature is that it prevents the camera’s software from choosing a random stranger as the focal point of your picture. For example, if you are taking a picture of your child at a park, you want the camera to focus on your child’s face, not on the strangers standing around him. You can be assured that this will occur if his face is registered in the camera’s memory.
In order to be recognized, the person must be facing the camera so that their facial features are clearly presented. The software bases its determination of a face on detecting two eyes, a nose, and a mouth. Facial recognition will fail if all the camera sees is a person’s profile. Also, certain conditions, such as the face being too small in the frame or harsh shadows falling on the person’s face, may interfere with face recognition.
Face Registration requires that you to assemble a library of portraits for the camera. You can register up to eight faces and order them by their importance. This way, if you have a group picture, the camera will focus on the person most important to you (based on your rankings within the registration library). To increase the probability of focusing on the right person, you can register multiple images of the same person.
Important points:
• Up to eight faces can be detected within one framed image.
• Face Detection functionality is enabled for single still picture shooting modes. It is disabled when the image is magnified by any Digital Zoom option; or when the camera is in Sweep Panorama mode; or when either SCN’s Hand-held Twilight or Anti Motion Blur predefined shooting modes are activated.
• Face Detection can be activated when taking movies but registered faces are not prioritized.
• Animal faces cannot be detected.
• Face Detection and/or registration may fail if facial features are obscured—such as when the person is wearing sunglasses or a hat. Poor or bright lighting that casts unusual shadows can prevent the successful recognition of a face.
• Face Registration information is not deleted when you execute the Setting Reset command’s [Camera Setting Reset] option, but will be deleted if you execute the [Initialize] option.
Registering Faces
To register faces within the registration library, first access the Face Registration command through the MENU button:
MENU>Custom Settings (5)>Face Registration>[New Registration], [Order Exchanging], [Delete], [Delete All]
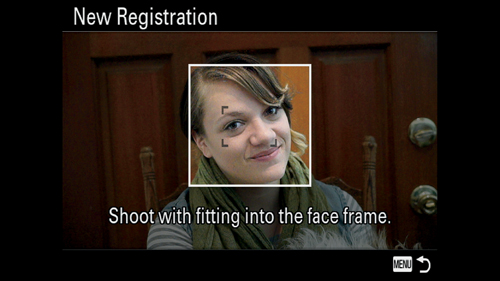
Figure 4-8a: Face framed for registration
Make sure your subject is brightly and evenly illuminated without pronounced shadows. They should be looking into the camera and should not be wearing sunglasses or hats. Then execute the following steps:
- Enter the following command:
MENU>Custom Settings (5)>Face Registration>[New Registration]
- Frame the person’s face you wish to register (figure 4-8a). Make sure the person is facing the camera so you can capture the entire face. A white box will display in the center of the screen. Position the camera so that the person’s face is within the white box.
- Press the shutter button halfway to establish focus. Adjust the framed face to ensure the person’s eyes, nose, and mouth are centered within the cornered brackets.
- Press the shutter button to take the image.
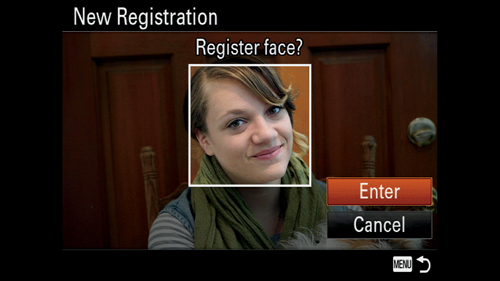
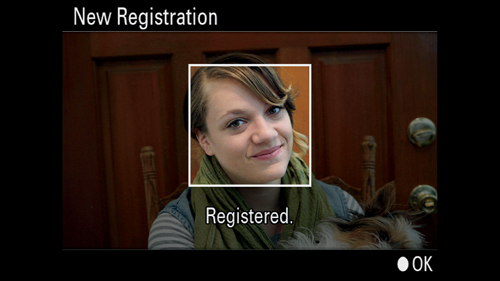
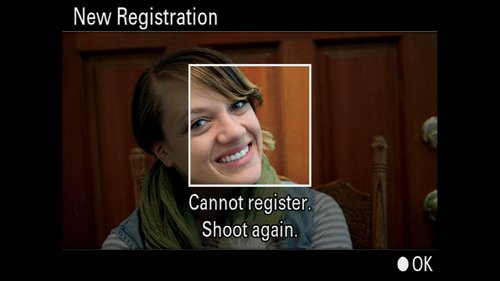
- The camera will determine if there are sufficient facial characteristics to register the face. If there are, you will be asked if you want to register the face (figure 4-8b). To accept, press the center button to select Enter. If there is sufficient information to register the face, the camera will indicate it is registered (figure 4-8c). If there is insufficient information, the camera will inform you that it cannot register the face and ask you to start again (figure 4-8d).
You can register up to eight faces. The [New Registration] option is enabled only when there is at least one empty slot available. If all eight slots are filled, you must remove at least one registered face (using the [Delete] option) in order to register another face.
Assigning Priorities to Registered Faces
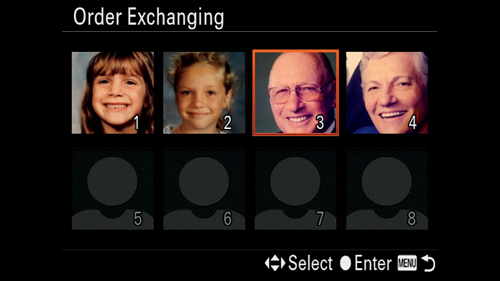
Each time you register a face, the image is stored in the next available slot. You can see the order when the [Order Exchanging] option is selected. Each slot is numbered with its priority, starting with first priority in the top-left slot and so on down to the bottom-right slot, which is ranked eighth priority. To change the order of the faces in the slots, follow these steps:
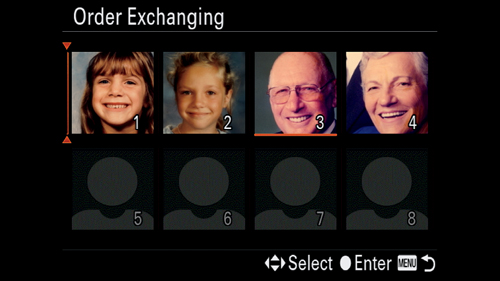
Figure 4-9b: Pending location for selected face
- Enter the following command:
MENU> Custom Settings (5)>Face Registration>[Order Exchanging]
- Highlight the face you wish to reorder (figure 4-9a). The face will be enclosed in an orange box. Press the center button to select the face. The face will be underlined with an orange line. An orange double-arrow vertical bar will be displayed to the left of the selected face.
- Using the right or left button, navigate the double-arrowed bar to the left of the slot where you wish to move the image (figure 4-9b).
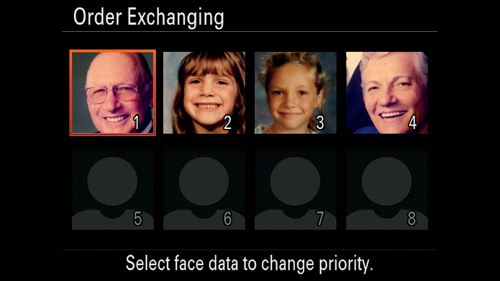
- Press the center button and the selected image will be moved to its new location (figure 4-9c).
The [Order Exchanging] option is enabled after at least one face is registered.
Deleting Registered Faces
As your children get older, you will need to update your library register by replacing their registered image with a more recent image. Remember, you can register only eight faces— you’ll probably need to delete out-of-date faces at some point.
To delete a registered face, follow these steps:
- Enter the following command:
MENU>Custom Settings (5)>Face Registration>[Delete]
- Eight boxes are displayed on the screen. The first box is enclosed in an orange frame. Each box contains an image of a person you have registered, or the box is empty. Navigate to the image you wish to delete. The orange box moves to each selected slot. Press the center button to select the image for deletion.
- A confirmation menu will be displayed.
- Select the [Enter] option to delete the selected face, or the [Cancel] option to cancel the deletion. Press the center button to complete the process.
To delete all of the registered faces at one time, follow these steps:
- Enter the following command:
MENU>Custom Settings (5)>Face Registration>[Delete All]
- A confirmation menu will be displayed.
- Select the [Delete] option to delete all of the registered faces or the [Cancel] option to cancel the deletion. Press the center button to complete the process. The [Delete] and [Delete All] options are enabled after at least one face is registered.
Activating Face Detection
As mentioned earlier in the chapter, Face Detection defaults to [Off] in most modes, even in situations when you’d assume it to be automatically activated. Fortunately it’s easy to activate Face Detection by selecting the following command:
MENU>Camera Settings (5)>Smile/Face Detect.>[Off], [On (Regist. Faces)], [On], [Smile Shutter]
The Face Detect. command portion has three options (table 4-6). Select the [On] or [On (Regist. Faces)] option and press the center button to activate Face Detection.

Table 4-6: Face Detection command options
Using Face Detection and Registration
When Face Detection is set to [Off], no faces will be detected and focusing will be managed by the Focus Mode and Focus Area command settings. When Face Detection is set to [On], and the camera detects one or more faces, it will surround each face with either a white or gray box. A white box indicates that the face will be used to establish focus; gray means that the face is detected, but is not being used for focusing.
If Face Detection is set to [On (Regist. Faces)], focus will be established based on the focus priority in the registry. If a single face is detected, a white box encases the face. When you press the shutter button halfway and the camera locks focus on the face, the white box turns green. If several faces are detected within the frame, boxes surround each of the faces. Each box is colored white, gray, or magenta. A white box indicates the face that the camera intends to focus on. A gray box indicates the face is detected, but will not be used for focusing, and magenta indicates a registered face that will not be given focus priority. We’ve found the Sony a7/a7R to be inconsistent—the identified-face boxes sometimes changed colors while we were framing the image.
The Face Detection function is available in Manual Focus Mode, but although faces are detected, they cannot be used to automatically establish focus.
Smile Shutter Functionality
How many times have you said, “Say cheese,” and still found that your subject failed to smile when the picture was taken? The Sony a7/a7R has a function to help prevent this. After focus is obtained, the Smile Shutter command instructs the camera to automatically take a picture when it detects that a person is smiling. Furthermore, you can set the degree of smile sensitivity the camera will use to trigger the shutter (table 4-7).
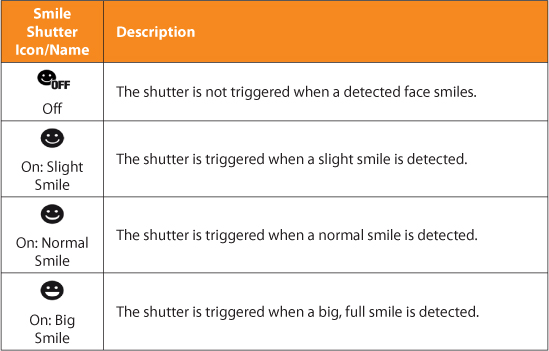
Table 4-7: Smile Shutter command options
Enter the following command to access the Smile Shutter options:
MENU>Camera Settings (5)>Smile/Face Detect>Smile Shutter>[On: Big Smile], [On: Normal Smile], [On: Slight Smile]
Activating Smile Shutter can be a bit confusing. The command’s Smile Shutter On option activates the function, but there is no Off option. When the On value is selected, use the left or right buttons to move through the smile sensitivity submenu. Regardless of which Face Detection option you select, once you select the Smile Shutter option, Face Detection is set to [On (Regist. Faces)] and a smile sensitivity bar will be displayed vertically on the left side of the screen. To turn off the Smile Shutter functionality, press the MENU button, use the mode dial to change the shooting mode, or press the playback button. Entering and exiting any of these three functions will be enough to turn the Smile Shutter functionality off.
Figure 4-10 shows the resulting display screen after [On: Slight Smile] is selected. Note the vertical smile sensitivity meter on the left side, with the arrow indicating the level of smile sensitivity that needs to be reached to trigger the camera to take the picture.
The next time the camera detects a face and obtains focus (indicated by the box around the face turning orange), it will try to interpret the person’s level of smile. If the smile meets or exceeds the selected sensitivity level, the camera will automatically take the picture and will continue to take pictures until the person’s smile no longer meets the selected level.

Figure 4-10: Smile Shutter display screen with Slight Smile selected
You can still manually take a picture even if the smile does not meet the chosen sensitivity criteria. Maybe you have Smile Shutter turned on, but your subject starts frowning. You may feel that this serious expression will make a great portrait. To capture this moment, press the shutter button and take the picture. After this, the camera will resume taking pictures automatically when it detects a smiling face that meets or exceeds your chosen smile sensitivity level, regardless of whether the face had been registered or not. If you find that the subject’s smiles are not meeting the sensitivity level, select a lower sensitivity option.
Important points:
• When Smile Shutter is active, the camera does not go into sleep mode. You can run down the battery very quickly while the camera looks for qualified smiles for a prolonged amount of time.
• Smile Shutter functionality does not work in Manual Focus Mode or when Face Detection is turned off or is unavailable, such as when the Zoom feature is being used, or when the camera is in Sweep Panorama or SCN’s Hand-held Twilight or Anti Motion Blur predefined shooting modes.
• Once activated, the Smile Shutter command remains active until the shooting mode is changed, you have entered the menu, or you press the playback button.
• Turning on Smile Shutter automatically turns on Face Detection and Registration recognition. Turning Smile Shutter off will cause Face Detection to revert to its previous value.
• Smile Shutter is inconsistent. Sometimes your subject gives a big smile, and it does not trigger a shot.
• When Smile Shutter function is activated, the Drive Mode option is automatically set to [Single Shooting] and will change back to its previous setting once Smile Shutter function is deactivated.
• If the DRO/Auto HDR command is set to [Auto HDR], Smile Shutter will take three shots and create an HDR image.
Tracking Objects with Lock-on AF Command
The Lock-on AF command allows the user to select a subject for the camera to track. If the subject moves within the frame, the camera maintains focus on it and retains the set exposure values. This command is not available when the Focus Mode command is set to Manual Focus [MF], when in Sweep Panorama shooting mode, or in SCN’s Anti Motion Blur or Hand-held Twilight predefined shooting modes.
Select the command through the menu:
MENU>Camera Settings (5)>Lock-on AF>[OFF], [ON], [On (Start w/shutter)]
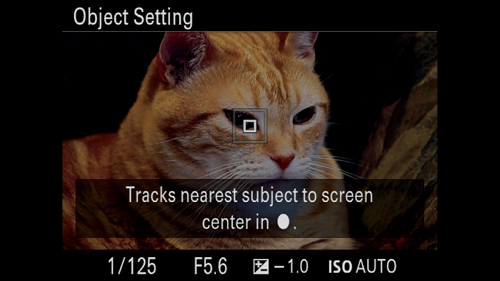
Figure 4-11a: Lock-on AF Object Tracking selection screen
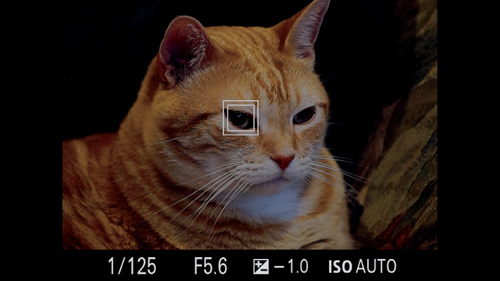
Figure 4-11b: Object selected for tracking
When the Lock-on AF function is initiated, a small white box with a larger gray box surrounding it is displayed in the center of the screen (figure 4-11a). Frame the image with the subject you wish to track in the center of the white box. Press the center button to initiate tracking the object. A white double box (a box within a box) will frame the selected object, and it will follow the subject as it moves within the screen (figure 4-11b). Press the shutter button halfway to focus. If focus is obtained, the double box will turn green, and you can take the shot.
The camera should continue to track the subject, allowing you to take shot after shot until the camera no longer has sight of the subject, the Lock-on AF command has been turned off through the menu or by pressing the center button, or the camera is turned off. If you wish to start tracking another subject, return to the Lock-on AF command, select [ON], position the white and gray boxes over your subject, and press the center button.
The [On (Start w/shutter)] option gives you a faster way to establish tracking. This Lock-on AF option is enabled only when the Focus Mode command is set to [Continuous AF]. In this case, frame the object you wish to track in the center of your screen and press the shutter button halfway. When focus is established (double green box surrounding your subject), tracking is initiated. Since you have continuous autofocusing turned on, the camera will continue to track your subject and try to maintain focus as long as you hold the shutter button down halfway. When you are ready to take the shot, fully depress the shutter button.
If you want to start tracking another subject, frame it in the center of your screen and press the shutter button halfway to establish focus. Now the camera will track this new subject.
Successful object tracking requires the camera to be able to distinguish the selected object’s colors and details from the background. You will most likely select only a portion of the subject you want to track. Make sure the part you select is detailed and can be easily differentiated from other objects within the scene; otherwise the camera may lose its target.
Lock-on AF command’s [On (Start w/shutter)] option is automatically enabled when shooting in SCN’s Sports Action predefined shooting mode, but is disabled in Sweep Panorama and SCN’s Anti Motion Blur and Hand-held Twilight predefined shooting modes, and unusable if the Focus Mode command is set to Manual Focus [MF].
We had great hopes of using the Lock-on AF functionality, especially due to the ease of initiating it with the shutter button. Theoretically, this could be a great feature to utilize. Unfortunately, we had difficulty making this command work consistently, and therefore rarely use it. This command frequently lost tracking of the object—even slow-moving subjects could not be followed consistently.
Recommendations
If you want to take technically good images without having to choose any of the settings, we recommend that you try the Intelligent Auto, Superior Auto, and SCN predefined scene modes. Although it’s likely that eventually you will want to take control of the camera settings yourself, these automatic modes are excellent for capturing a picture on the spur of the moment when you don’t have time to evaluate the camera settings and lighting.
It’s not always obvious how the camera software determines its automatic settings. As you take pictures, instead of just accepting the results, review your work and think about how the image could be changed and whether the changes improve or weaken the picture. For example, is it better to show action shots as frozen images, with all their details rendered sharply, or is it better to use a longer shutter speed to blur portions of the image to suggest speed? Check out the nuances of camera command settings for specific predefined scene modes. You can always view the settings for an image in the data display screen format described in Chapter 3. Keep in mind that the camera software makes its best guess about the settings to be used for a particular scene, and implements decisions based on what is considered typical for that situation.
We have used the Hand-held Twilight and Anti Motion Blur predefined scene modes to reduce image noise in dim lighting while doing handheld photography. Our concern about using these modes is that they both capture only JPEG files. We recommend that you try both and see which suits you best in various scenarios. Although these modes are valuable features for those who shoot handheld, keep in mind that a tripod is a great way to stabilize the camera for shooting with long exposures in dim light. If you’re in a situation in which you must rely on a single exposure of your subject, we think the better course of action is to capture a RAW image rather than a JPEG. RAW images have more image data, which gives you the option of using third-party software to reduce noise and ultimately get better resolution than the combined JPEGs processed by Sony’s in-camera noise reduction software.
Both the Smile Shutter and Face Detection/Registration functionality clearly have value and can help you capture great pictures. We’ve found that Face Detection/Registration sometimes misidentifies which face to focus on first. Several times we’ve seen a nonregistered face gain focus over one that was registered. This may be due to the nonregistered face being closer to the camera.
If you find that the results are satisfactory, you may remain an avid user of the automatic modes. However, remember that the image-processing algorithms used in these modes can also be applied to your images outside of the camera. By using image-processing software with your RAW-format files, you can bring out the finest nuances, details, and contrast in your images. To accomplish this, you’ll have to use the semiautomatic and manual modes described in Chapters 5 and 6, respectively. These modes afford you more control over your photographic results. Granted, there is a learning curve, but everything you are learning now provides the groundwork for later lessons on how to have more manual control of your photography.