Chapter 9: Accessory Lenses

Introduction
To get the most out of the Sony a7/a7R cameras, you have to use the highest quality lenses. Sony currently sells five lenses for full frame coverage and promises to release 10 more lenses by the end of 2014. Although they use the NEX E-mount, this is a new line of lenses. Their optics can fully illuminate a 24mm x 36mm sensor, which is 1.5X larger than the sensor traditionally used in the NEX camera bodies. As a consequence, the new lenses are classified as belonging to the FE series. The 24-70mm and the 70-200mm zooms cost more than $1200 and are designed for high-resolution imaging. We assume that the other, not-yet-released lenses will also be expensive. While this can be daunting for those building a complete system, keep in mind how expensive it is to produce excellent optical lenses. This high quality is necessary if you want to fully exploit the capabilities of the a7 and a7R sensor.
The 28-70mm Sony zoom is the lowest-priced lens of the FE series. It is a good performer but it is not built to the same standard as the 35mm and 50mm lenses, and the 24-70mm zoom. The Zeiss 24-70mm f/4.0 lens has a wider zoom range and a fixed aperture as you vary its focal length. The 35mm and 55mm lenses have high-resolution and a large maximum aperture for work under low light conditions.
Although the lens line is limited, the a7/a7R can use a full frame lens that is not designed specifically for the camera. With the appropriate adapter, you can use virtually any manufacturer’s lenses; however, this practice involves some sacrifice in convenience, such as autofocus, automatic exposure, or image stabilization.
There is one adapter that allows the retention of autofocus and autoexposure: Sony’s LA-EA4, which costs $349. This adapter has a focusing motor, phase detectors, and electrical contacts that allow the use of the full frame lenses Sony makes for their SLT and DSLR cameras. This adapter will also provide automatic focus and exposure with the AF lenses made by Minolta and Konica Minolta. There is a less expensive adapter, the LA-EA3, for $200, but it cannot autofocus any lens that does not have its own internal focus motor, which means that Minolta and Konica Minolta lenses will have to be focused manually. When the LA-EA3 can provide autofocus, its focusing speed is slow. For this reason, we feel it worthwhile to spend an additional $150 to buy the LA-EA4. There are 22 full-frame lenses that can be used with the LA-EA4, ranging from a 16mm wide angle zoom to a 500mm f/4.0 super telephoto.
Using E-mount Lenses for the APS-C Sensor
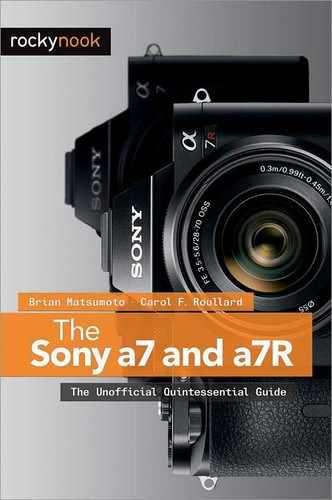
Sony has officially announced that they will abandon using the term “NEX” for describing their new cameras using the E-mount. The replacement for the NEX-3, NEX-5, NEX-6, and NEX-7 will be designated as being Alpha-series. Historically, these cameras and their lenses were designed to work on an APS-C-sized sensor (24x16mm). With the advent of the a7/a7R, you have a camera whose sensor is 36x24mm. As a consequence, the NEX lenses would not fully illuminate the sensor (figure 9-1). Instead, its central portion would be illuminated while the periphery would be dark. However, Sony engineers designed the a7/a7R to be able to use the NEX lenses. Basically, the camera detects when the NEX lens is mounted and then records the central part of its sensor (figure 9-2). The image appears larger in the viewfinder because the camera magnifies the image by 1.5X. By using only the central 24x16mm rectangle, the camera functions like the NEX-series cameras. There is, of course, an associated reduction in the number of pixels recording the image. In the case of the a7R, the cropped image is 15 megapixels, while in the case of the a7, it is 10 megapixels.
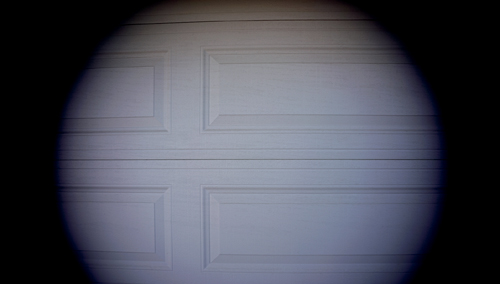
Figure 9-1: A lens designed for an APS-C sensor vignettes when its image is projected onto a full-frame sensor
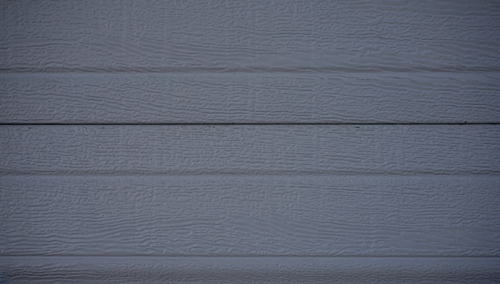
Figure 9-2: When the [Auto] option is used on the command APS-C Size Capture, it crops out the periphery of the full-frame sensor to hide the vignetting
Commands for Using Lenses Designed for APS-C Sensors
When using zoom lenses on the a7/a7R that were originally designed for the NEX cameras, the potential of vignetting is reduced as you increase the lens focal length and the imaging circle is enlarged. As the imaging circle’s size becomes greater, it is possible to collect light from areas that had previously been darkened by the shorter focal length. Sony’s engineers had not taken advantage of this characteristic. You, however, can gain more pixels for imaging by overriding Sony’s software and setting the option for the command APS-Size Capture to [Off]. Doing so enables you to record more than the a7R’s 15 megapixels or the a7’s 10 megapixels when using a zoom lens. In the case of the a7, we were able to record a picture of about 15 megapixels with our NEX kit lens (16-50mm) at its maximum zoom (figure 9-3). Admittedly there is some vignetting at the corners of the image; however, you seldom print at a 3:2 aspect ratio and these corners can easily be cropped out. You can attain a similar increase in usable pixels if you have an a7R. If recording the maximum number of pixels is important to you, be aware that you can turn the APS-C Size capture to [Off]. The increase in recordable pixel count will vary with the design of the lens, so be prepared to experiment with this option.
To take advantage of this, the a7/a7R has a very useful command to vary the size of the area recorded by the sensor:
MENU>Custom Settings (5)>APS-C Size Capture>[On], [Auto], [Off]
Normally this command is set to [Auto], which is the default option. If you mount a NEX lens onto the camera body, it will crop down the image to avoid vignetting. The [On] option, regardless of the lens type, forces the camera to reduce the area of the sensor that will be used.
If you mount a full-frame Sony lens on the camera, the APS-C Size Capture command can be useful for shooting movies if you need additional magnification in your telephoto shot. If you set this command to [On], it will crop the image down to the center of the sensor. It is a useful means of getting a 1.5X increase in magnification with little sacrifice in the quality of the video recording. There is no loss of resolution for an HD recording. However, it makes no sense to use this option when taking still pictures with a lens designed to work with a full-frame sensor, because this will result in a loss of resolution.
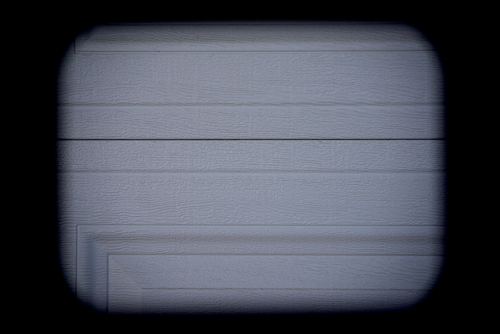
Figure 9-3: An APS-C zoom lens will show less vignetting when using its maximum focal length
The [Auto] command also works when a Sony APS-C lens is mounted, it detects and records only the center of the sensor to avoid recording the massive vignetting that results from using a non-full-frame lens. Not only does this work with the series of E-mount lenses, it also works with the A-mount lenses that can be attached with the LA-EA3 or the LA-EA4 adapter.
The [Off] option allows the camera to use the sensor’s entire area for recording an image. This is advantageous when using zoom lenses designed to cover an APS-C sensor because it gives you the option to crop the image and have access to more pixels than if you had selected [On] or [Auto]. However, there is no advantage to using the [Off] option with a NEX lens with a fixed focal length.
Adapters for Sony’s SLT and SLR Camera Lens
Sony makes and sells two adapters for attaching A-mount lenses to the a7/a7R. The least expensive adapter is the LA-EA3 model ($200), which allows automatic exposure, diaphragm control, and limited autofocus capability where the autofocus either will be slowed to an unacceptably low rate or it will be lost if the lens lacks a built-in focusing motor.
The second Sony adapter model is the LA-EA4 ($349). In our opinion, this more expensive adapter is superior and worth the increased price over the LA-EA3. First, it can focus all Sony lenses, including those that do not have a built-in focusing motor. The adaptor has its own motor, so it can drive the focus mechanism of older lenses such as Minolta and Konica Minolta AF. This also includes those Sigma and Tamron lenses that require the focusing motor to be contained in the camera body. Second, the focusing speed is very fast. Subjectively, it focuses as rapidly as a Sony a77; in essence, it converts the mirrorless design to that of an SLT camera (figure 9-4). A semitransparent mirror directs one third of the light to a set of phase detectors for focusing and the remainder goes to the imaging sensor.
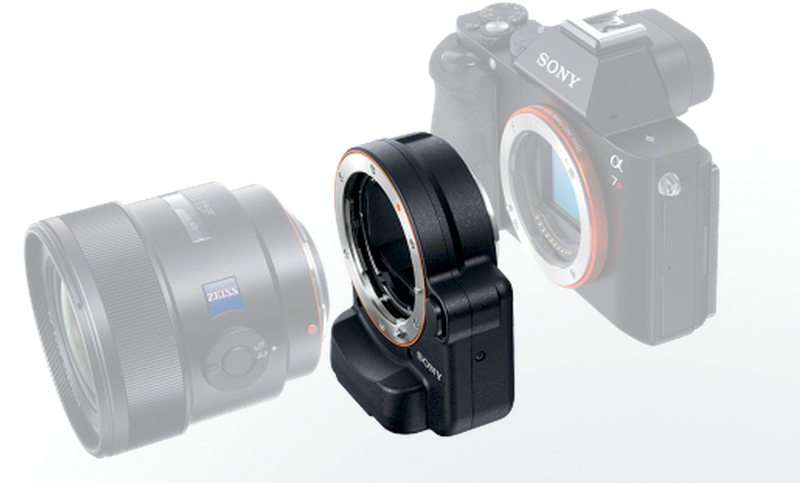
Figure 9-4: A diagram showing how the LA-EA4 fits between body and A series lens
The LA-EA4 adapter’s design allows the use of the older Minolta or Konica Minolta lenses. These can be extremely good optically. For example, we bought an outstanding 100–300mm Minolta APO lens, and we use it on our Sony a7/a7R for still photography. It is very compact, very sharp, and can autofocus with the LA-EA4 adapter but not with the less expensive LA-EA3 adapter.
The following list is of some of the Sony descriptions for their A-mount lenses:
• G: Premium optics and superior mechanical design.
• D: Distance Encoder. This allows the camera to modify the flash output based on the distance of the subject from the camera.
• DT: Digital Technology. These lenses were designed to be used on cameras with APS-C sized sensors. They were not designed to fully illuminate a 24x36mm area.
• HS: High Speed. HS is found on lenses that rely on a motor in the camera body. The gears for moving the lens are optimized for speed. This is relevant only when using the LA-EA4 adapter.
• SSM: Super Sonic-wave Motor. This motor resides in the lens body and provides quiet operation. The lack of noise is important for taking movies since its presence would corrupt the audio files recorded with the movie. The LA-EA3 can autofocus this lens.
• SAM: Smooth Autofocus Motor. This motor resides in the lens body. It tends to be noisier than lenses with SSM and is associated with lower-priced lenses. The LA-EA3 will enable autofocus for this lens.
Most Sony interchangeable lens camera aficionados know that Sony’s DSLR and SLT cameras can use the autofocus lenses made by Minolta or Konica Minolta. During the days of film photography, Minolta made many excellent lenses for the single lens reflex cameras. Many of these are optically excellent and designed to give full frame coverage. As a result, these lenses can be used with the LA-EA4 or LA-EA3 adapters on the Sony a7/a7R. We have successfully used a 100-300mm APO telephoto zoom and have been impressed with its performance when used with the LA-EA4 adapter. The lens autofocuses quickly and its optical quality is excellent. Similarly, we have used a 90mm f/2.8 Tamron macro lens and can vouch for its performance. The main disadvantage of using lenses designed for the SLT/SLR cameras is that image stabilization is unavailable.
Legacy and Used Lenses
A major advantage of the a7/a7R is the ability to use any lens that has a manual focusing ring and an external control for adjusting the diaphragm size. All that is required is an adapter. This can be as simple as an extension tube: one side having the mount to accept the legacy lens, the other side having a mount for the E-mount. These adapters take advantage of the short distance between the body flange and the sensor. The adapter’s length ensures that the lenses’ normal focusing range is maintained; specifically, it ensures that when the infinity focus mark is set, the image is in focus on the sensor. These adapters range in price from $20 to $250.
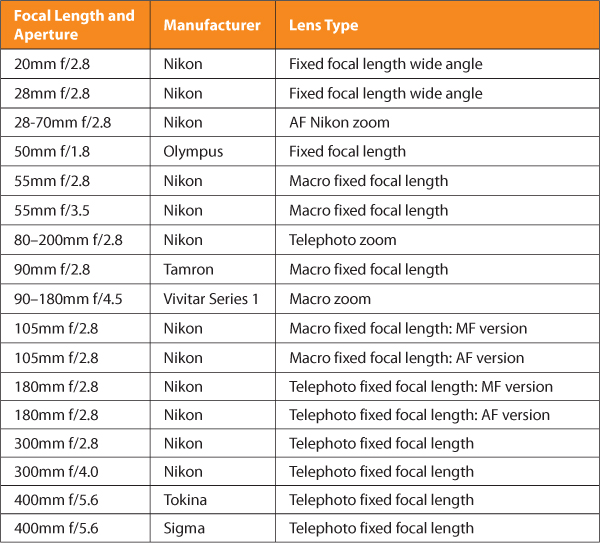
Table 9-1: Legacy lenses that can be used with the Sony a7 and a7R
A glance at an online auction site reveals an abundance of used manual focus lenses, which can be fitted to the Sony body with the aid of an adapter. Such lenses can be very inexpensive since they are regarded as being obsolete. Many of the camera bodies these lenses were designed for used film instead of digital sensors. As such, these camera bodies have been out of production and their owners have sold these lenses. We tested several legacy lenses on our a7/a7R. Table 9-1 lists the lenses we found satisfactory. This list is not comprehensive—it only represents the lenses we had easy access to. Nikon, Minolta, Canon, Leica (M & S mounts), Leicaflex, and Pentax K or Pentax screw mounts are among the manual focus lenses that can be used on the a7/a7R.
You should approach adopting legacy lenses with caution. The most satisfactory lenses were the ones that were expensive when purchased new. This was especially noticeable for zoom lenses. An expensive 80-200mm f/2.8 Nikon zoom was satisfactory, but we were disappointed by the less expensive 70-210mm from an independent lens manufacturer. Be careful when selecting lenses with a wide range of focal lengths; we found that these lenses provided lower resolution than those with a more limited range. Nikon’s 80-200mm f/2.8 zoom was satisfactory, but the older the 80-400mm f/4.5-5.6 zoom version was not, even though the latter was more expensive than the former. The important thing we noted is that our best performing lenses were not zooms—they were fixed focal length lenses.
We recommend you search the online forums for user evaluations to learn about other users’ experiences. For example, many of the 500mm f/8.0 mirror lenses were found to be of poor quality. Also, many users dislike this lens’s bokeh. Bokeh is the appearance of out-of-focus regions of the picture. Good bokeh is evidenced by a gradual loss of sharpness at the edges. For example, specular highlights appear as enlarged circles with soft edges. In contrast, a mirror lens renders out-of-focus specular highlights as bright donuts with sharp edges. In general, the images from mirror lenses were soft, and the contrast was lower than the contrast on images taken with refractor-type lenses.
The manual focus macro lens provides excellent performance. Olympus, Pentax, Canon, Minolta, and Nikon consistently made excellent lenses of this type. While they were designed to give the best results for close-up photography, their performance in distance photography is also excellent.
Manual Focusing Legacy lenses
There are several strategies to make the task of manual focusing easier. First, make sure the diopter adjustment control on the viewfinder’s eyepiece is set properly. Since you will need to evaluate image sharpness from the screen, you cannot afford to have the finder’s magnifier generate a fuzzy image to your eye. It should be noted that the viewfinder provides a sharper image than the LCD screen so the former is more reliable for obtaining accurate focus. Second, turn the lens’s aperture ring to its smallest value, ensuring that its iris diaphragm is fully opened. This narrows the depth of field so that the image will blur rapidly when you turn the focusing ring. If you have the lens stopped down, the depth of field will be large and the image will not snap in and out of focus as obviously. If possible, focus with the widest aperture and then stop down the iris just before pressing the shutter button. A slight error in focus may not be as apparent due to the larger depth of field of the smaller aperture.
In addition to using these physical controls, take advantage of the two software features of your camera: Peaking function and the MF Assist. Both were described in Chapter 5. Peaking is good for rapidly identifying focus; however, it is less precise than using MF Assist, which provides an increase in the preview magnification, revealing the subject’s finest details.
If you have not altered the Custom Key Settings, you will find an advantageous feature when using the C1 button. This is normally set for the Focus Settings command. When you mount a legacy lens, pressing the C1 button will put you immediately in MF Assist. Two presses on the C1 button will provide you a magnified view of your preview image, which is sufficient for obtaining critical focus.
Exposure Adjustment on Legacy Lenses
Aperture Priority is the most efficient mode to use. When using a fixed ISO value, this mode provides automatic exposure by altering the shutter speed to capture sufficient light for the sensor. Since the lens diaphragm’s opening controls light throughput, the shutter speed changes in response to changes in the aperture. Overriding exposure is done with the exposure compensation dial, which brightens or darkens the image by using slower or faster shutter speeds. In contrast, when using [ISO AUTO], exposure compensation is accomplished by changing the sensitivity of the sensor. The gain, as indicated by the ISO used when taking the picture, is raised or lowered as you rotate the exposure compensation dial. In this case, the shutter speed stays at a fixed value.
The disadvantage of using these legacy lenses is that you lose Sony’s SteadyShot feature—this is the stabilization mechanism that removes minute camera movement. For handheld shooting, remember not to select a shutter speed with a duration long enough that hand tremors move the sensor and induce blurring. For long telephoto work, we recommend that you either use a tripod or, if handholding the lens, set your shutter speed faster than 1/focal length. For example, for sharp results, a 400mm lens can be handheld at 1/400 second or faster.
The results from our experiments were so gratifying that we do not hesitate to recommend utilizing a legacy lens for your a7/a7R. We have an excellent Tokina 400mm f/5.6 lens that provides crystal-sharp images. Considering that there is no E-mount lens with this long of a focal length, this legacy lens can provide unique images. The optical quality of these lenses can be superb. They are compact and light and have precision focusing helicoids, making them a premium addition to your lens collection.
Adapters for Legacy Lenses
Table 9-2 contains a list of the lens adapters available for the a7/a7R whose prices range from $40 to $350. The most expensive is the one made by Sony for converting the a7/a7R camera to an SLT-type camera. It has a motor for autofocusing and the electrical connections to ensure automatic exposure. There is an adapter, manufactured by Metabone ($400) that will accept Canon EF lenses and provide AF, automatic exposure, and image stabilization. We have not tested this adapter.
Most adapters are much simpler in design and are little more than extension tubes. For many users, the $40 Fotodiox adapters are perfectly serviceable for most lenses. The more expensive Novoflex, Rayqual, and Voigtländer adapters (each approximately $200) have a better fit and finish. Their dimensions are precisely controlled so that when attached to the camera, the flange to sensor distance matches the requirements specified by the legacy lens’s manufacturer. Setting this distance precisely enables the lens to reach infinity focus when it reaches the infinity mark on the lens barrel. In some of the older designs, there is a “hard” stop that is placed at this point. This is handy because it allows the photographer to quickly turn the focusing ring to its end point and be assured of having the most distant objects in focus. Its advantage is most evident in astronomical work where there is not enough light to focus manually. This feature can be indispensible when photographing the Milky Way.
If the distance from flange to sensor is shorter than factory specifications, the lens can still reach infinity focus before it hits the stop. Operationally, if you are using manual focus, you won’t notice this since the lens will still focus to infinity. The stop will only be noticed if you rely on focusing scales. Since most photographers seldom do this, it can be regarded as a minor deficiency, especially since many modern lenses are equipped with a hard stop that is past the infinity mark.
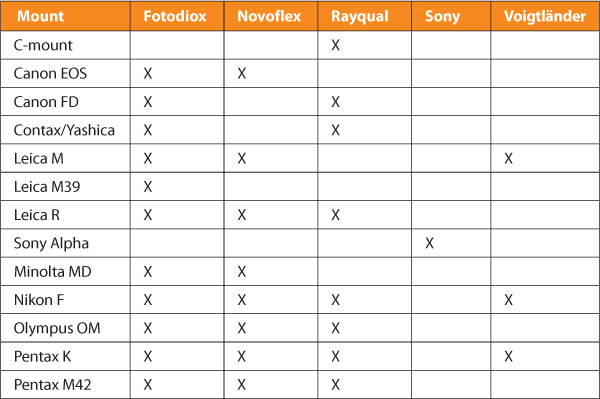
Table 9-2: Lens mount categories and Sony a7/a7R adapter manufacturers
So how much should you pay for an adapter? This is a matter of personal preference and need. If you want to use the SLT series of lenses (A-mount) and use automatic focus and automatic exposure, it will cost you around $350. For our microscope work, our adapters have to hold the camera’s sensor perpendicular to the optical axis of the microscope at a precise distance from the projection eyepiece, so we buy the expensive adapters by Rayqual, Novoflex, or Voigtländer. These do not have focusing mechanisms or electrical contacts and cost about $200. Considering the high cost of the camera and lens and the need for high quality in our work, it is unreasonable to risk degrading our results by using a cheap adapter. We have tested some of the low-cost adapters ($20) from eBay; some were adequate even though the machining was poor. Having said that, we also had units that fell apart or would not fit the camera body.
A Checklist for Using Legacy Lenses
If you want to try legacy lenses, here is a list of camera settings and lens requirements:
• A legacy lens must have a smooth-focusing helicoid ring.
• A legacy lens must have a diaphragm ring that closes down the aperture. Otherwise, make sure the adapter has a way to manipulate the diaphragm.
• Turn the Peaking Level to [Mid]. The default for this is [Off].
• Set the Peaking Color to red or yellow.
• Be sure MF Assist is readily accessible by customizing a button to activate it. This is accomplished easily by NOT altering the assignment for the C1 button. The camera’s default settings uses the C1 button for this purpose.
• The default setting for this camera allows it to fire with a legacy lens. If you find the camera is not firing, make sure the following command is set:
MENU>Custom Settings (3)>Release w/o lens>[Enable]
Telescopes
Long-distance photography fascinates many photographers. The thought of obtaining a closeup of the moon makes some photographers long for a super telephoto lens. The longest a7/a7R lens is 200mm (figure 9-5a), and the longest A-mount lens is 500mm (figures 9-5b).

Figure 9-5a: View from the longest full frame E-mount telephoto lens (200mm)
To get a “long view,” you may consider using an apochromatic spotting scope or a telescope (figure 9-5c). These can be expensive, but they are more economical than the long telephoto lenses sold by camera manufactures. In most cases, telescopes can be adapted to fit an a7/a7R.

Figure 9-5b: View from the longest telephoto lens (500mm) in the Sony A-mount lineup
Figure 9-5c: View from a telescope with a camera adapter (1600mm)
Sony sells a 500mm f/4.0 long telephoto for $13,000. This lens is for their SLT series of cameras, but you can buy the LA-EA4 Sony adapter for attaching it to the a7/a7R camera for $349. Or you can attach the camera to a scope like the Tele Vue apochromatic refractor telescope. A new 85mm Tele Vue costs about $2,500 and has a 480mm focal length. Though this is still expensive, it serves a dual function. Not only are such refractors good photographic accessories, they can also be used in their intended role as visual instruments for long-distance viewing (figure 9-6). The Tele Vue is a favorite among telescope aficionados for its clarity and its ability to provide high-contrast images of the night sky. With this telescope, the moon can be recorded in amazing detail (figure 9-7).

Figure 9-6: With the aid of a telescope, the a7/a7R can record the entirety of the moon

Figure 9-7: A close-up of a lunar mountain range recorded with a Sony camera and a TeleVue 8,5 with the aid of a 2X eyepiece
Another option is to purchase a catadioptric system, made popular by Meade and Celestron. These units tend to be less expensive and use a combination of lenses and mirrors to fold the optical path length into a relatively short tube. The popular eight-inch diameter telescopes can fold a 2,000mm (79-inch) focal length into a tube only 432mm (17-inch) long. Purchased new, these telescopes range in cost from $600 to $2,500. If you have friends who are astronomy buffs, they can guide you on the selection of a telescope, and in most cases these telescopes can be fitted to an a7/a7R with simple adapters. Optically, the main weakness of catadioptric telescopes is that they have less contrast than a telephoto. Also, many photographers do not like these lenses because of their bokeh. Most of these telescopes are equipped with a focusing tube that takes either 1.25-inch or 2-inch diameter eyepieces. The 1.25-inch diameter eyepiece holder is commonly found on those telescopes that are designed primarily for visual observation. There are simple adapters that fit within these eyepiece tubes (figure 9-8). When you equip these adapters with a bayonet mount for the a7/a7R, you are ready to mount your camera to the telescope and take pictures. We recommend you use a telescope that has a 2-inch diameter eyepiece holder: these telescopes have wider diameter camera adapters that are less prone to vignetting.
You may have heard of digiscoping, where a point-and-shoot camera is held over a telescope eyepiece. Results from this simple technique are quite impressive, but you can obtain better pictures by removing the camera lens and the telescope eyepiece, and attaching it directly to the telescope. The object lens will project an image directly onto the camera’s sensor, and you will not have any image degradation resulting from an extraneous camera lens (which was not designed for this use) in the optical path.
The first step is to find a telescope that can be used with your camera. Today there are a tremendous number of telescopes in a variety of sizes to choose from, so we will restrict our discussion to smaller telescopes that can double for terrestrial fieldwork. These telescopes typically have lenses with a front element ranging in diameter from 50 to 100mm (2 to 4 inches). Telescopes smaller than this can be matched by the performance of a telephoto lens. Although they are usable, telescopes with an objective larger than 100mm are too cumbersome to carry and difficult to handle for fieldwork. You will need a sturdy tripod to support your telescope; you will be working at high enough magnification that it is difficult to handhold the telescope and camera while taking pictures.
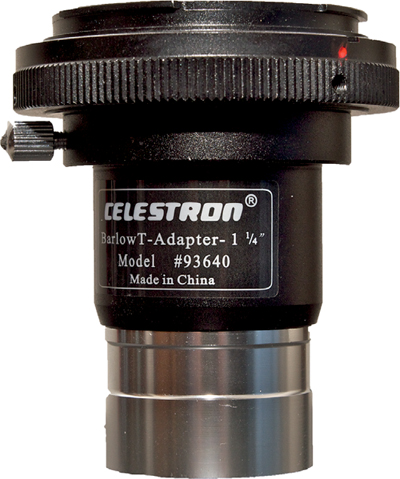
Figure 9-8: This adapter fits in a 1.25-inch eyepiece holder, and can carry an a7/a7R body
We have used Tele Vue’s 60mm, 76mm, and 85mm telescopes for photography, and they have all provided exceptionally high resolving power. The 60mm telescope (360mm f/6) sells for less than $1,000; the 76mm telescope (480mm f/6.3) sells for $2,000; and the 85mm telescope (600 mm f/7) sells for $2,495. Their optical performance rivals, and perhaps exceeds, that of the finest Nikon or Canon telephoto lenses, whose 500mm optics cost $6,000 to $8,000. We have used teleconverters (in this case, Nikon and Tokina) in the optical path to further increase the magnification from the telescope.
This is not to say that these telescopes can replace a professional telephoto lens. They cannot. For one thing, they lack an iris diaphragm, so you need to shoot wide open. In terms of sharpness, this is not a disadvantage; these telescopes are designed to give their best performance when used at full aperture. Unfortunately, you cannot increase your depth of field by stopping down the lens. Also, they are not compact. Most professional telephoto lenses are physically shorter than their focal length, enabling them to be used in the field for handheld photography without a tripod. Finally, the telescopes do not have autofocusing, but considering their relatively low cost, they provide a good introduction to long-distance photography.
We have tested the Sony a7/a7R extensively on a Tele Vue 85 and a Tele Vue 60. The Tele Vue 85 has a 2-inch eyepiece holder, and the Tele Vue 60 has a 1.25-inch eyepiece holder. Both telescopes can accept camera adapters that fit in the eyepiece tube, and they have T-mounts for attaching a Sony E-mount. We have also experimented with the Borg 400mm f/8.0 telephoto. This telescope is remarkably lightweight, and it is unique in that it can be equipped with an iris diaphragm for stopping the lens down. Using these telescopes with the Sony a7/a7R requires only that the eyepiece holder be removed and replaced with the adapter. The camera should be set to A mode and manual focusing.
We typically use the viewfinder when aiming the telescope at terrestrial objects because ambient daylight can obscure the LCD screen. Make sure the Peaking function is active to allow for rapid identification of when the camera is in focus.
Long distance photography requires that nothing move during the point of exposure. In this respect, the a7 is a superior choice for this application, since its electronic first-curtain shutter does not jar the camera body. In contrast, there is a noticeable vibration imparted by the mechanical first-curtain shutter of the a7R.
Microscopes
For more than 50 years, SLRs have been used on microscopes to take high magnification pictures of single-cell plants and animals, as well as slides of human tissue. Nikon, Leitz, Zeiss, and Olympus used to sell elaborate and expensive accessories for mounting film cameras onto microscopes. However, their SLRs (film and digital) were ill suited for the task, and it was necessary to add expensive accessories to overcome their limitations. For example, special viewfinders and viewing screens replaced the camera’s optical viewfinder. In addition, to avoid the movement of the mirror and the camera’s shutter, which generates vibration and blurs the image during exposure, the adapters were equipped with their own swing-out mirror and vibration-free shutter mechanism. Essentially, the camera body had its mirror locked up and the focal plane shutter held open: functionally, it was a simple but expensive film carrier.

Figure 9-9: An arrangement of 100 individual diatoms; the whole array is 1/32 inches across
These deficiencies are remedied in total or in part with the a7/a7R. The camera’s Live View finders allow you to ensure accurate focusing. The lack of a moving mirror means it cannot cause vibration. The a7 has an additional advantage of having an electronic first-curtain shutter. This eliminates vibration when the shutter is actuated. The a7R is not as well suited for this task because vibration is imparted to the microscope by the movement of its mechanical first-curtain shutter. Using long exposures of 1 second or more can mitigate this problem. Figure 9-9 is an example of what can be recorded with a microscope. This is a diatom slide prepared by Klaus Kemp, who arranged more than 100 diatoms in this star pattern. The whole pattern has a diameter of only 1/32 of an inch.
To aid focusing, the Live View screen can work at an increased magnification, thanks to the MF Assist command. The Peaking function provides an additional focusing aid. The small size of the image on the Live View monitor or viewfinder is a deficiency that can be remedied by using the camera’s HDMI output and connecting the camera to an HDTV or other large monitor. Also, if you have downloaded the Sony App (Smart Remote Control), you can view your specimen with a tablet computer whose larger screen facilitates focusing and composing the image.
Microscopes designed for photography are equipped with a trinocular head: two of its eyepieces are used for viewing the specimen and the third is used to mount the camera. Due to the multitude of microscope designs, it is difficult to provide an accurate, universal description of how to mount a camera to a microscope. Most modern research microscopes can be equipped with a photographic port. Generally this is a vertical 30-50mm-diameter tube with a bayonet mount for a digital SLR. One can mount the Sony a7/a7R to this tube. Older microscopes require an adapter, which is fitted to a smaller diameter (25mm) photographic port that includes an eyepiece. This adapter carries a bayonet mount to which you can attach a Sony a7/a7R. Martin Microscope Company (www.martinmicroscope.com/MMSLR.htm) makes adapters to fit microscopes. This company has an adapter for about $500 that can make it easy to mount the Sony a7/a7R onto your microscope.
If you are interested in obtaining a home microscope, you can find affordable used microscopes on eBay; however, we recommend finding a seller who specializes in microscopes. Unless you are very experienced, avoid buying from online auction houses. If at all possible, try to buy from a reputable establishment that sells directly and has a record of selling good products. The cost will probably be higher, but you will have more assurance that the microscope has been checked and adjusted for proper operation. We have purchased used microscopes and cameras from Bunton Instrument Company (www.buntgrp.com/used_microscopes.htm). The instruments sold by this company were excellent. Many professional microscopists use older microscopes (30 years old or older). When equipped correctly, these older models can provide excellent performance. We use both modern research microscopes and a set of older microscopes (made in the 1960s); for most of our photographic work, the older instruments do as well as the modern research microscopes that cost twenty times as much.
For older microscopes, there are simple and inexpensive accessories for mounting the camera. You can find simple adapters that clamp onto the vertical tube. At the opposite end of the adapter is a male screw threaded to take a variety of bayonet mounts. This is usually a T-mount, and you can easily find adapters for this.
Follow these steps when you use the Sony a7/a7R on a microscope:
• Adjust the microscope to get a sharp image of the slide through the eyepiece.
• Adjust the microscope’s light source intensity so the view through the eyepiece is comfortable. If the light is controlled with a voltmeter, run it at the voltage recommended by the manufacturer. If it is too bright, reduce the light intensity with neutral density filters.
• Set the camera’s ISO to 100.
• Set the camera’s Peaking Level at the medium setting.
• Set the Peaking Color to red or yellow.
• Set the camera to A mode.
• Set the camera to fire without a lens:
MENU>Custom Settings (3)>Release w/o Lens>[Enable]
• Set the WB to [Incandescent], or set the color temperature scale to [3200 K]. If this does not work, use Custom WB as described in Chapter 6. To do this, find a clear area on the microscope slide and set the WB to on this area. This will calibrate WB directly to the light source.
• Focus the image using the microscope control while viewing it on the LCD screen.
• Fire the camera with a remote release or set the camera’s self-timer to a 2-second delay. This keeps any vibration caused by manually pressing the shutter button from disturbing the picture.
• If you are using the a7R, adjust the light intensity so that the camera uses an exposure of 1 second or longer. Its mechanical first-curtain shutter generates brief camera body movement at the onset of exposure. By using a long exposure of at least 1 second, the majority of the exposure will be taken at a time when the vibration has died out and the camera is steady. You do not need to do this if you are using the a7, because it has an electronic first-curtain shutter that does not cause this brief movement.
For more information on taking pictures with a microscope, we recommend our book, Practical Digital Photomicrography, which can be found on Amazon.
Macro Photography
The a7/a7R cameras are beautifully suited for macro photography. The Nikon, Canon, Olympus, Pentax, and Minolta legacy macro lenses are perfect for this application. In fact, they are more convenient to use than the modern autofocus lenses. When working at high magnification, we found autofocus to be unreliable; it tends to “hunt” and take too much time to find focus. It is more convenient and reliable to use manual focus. In this respect, the a7 and a7R are ideally suited for this type of work. Their live display is essential for precise and accurate composition, especially when using MF Assist. The cameras are particularly convenient for this type of work when linked to a tablet computer.
When used in this manner, we found that depth of field is extremely limited at 1X magnification. The a7/a7R’s Live View preview coupled with A mode provides a real-time depth-of-field preview that allows us to determine what is sharp and what is blurred. At 1X, the sharp area is a perpendicular plane to the optical axis of the lens and can be described as an optical section. It is impossible to record the entire three-dimensional structure with one photograph.
To record the subject in its entirety, a combined mechanical and software approach is needed. Record several pictures at different focus points. If enough optical sections are captured, it is possible to use software to merge them to reconstruct the entire three-dimensional subject that your eye sees. Basically, you create an image with an extended depth of field. To accomplish this, you’ll need 40 or more sections.
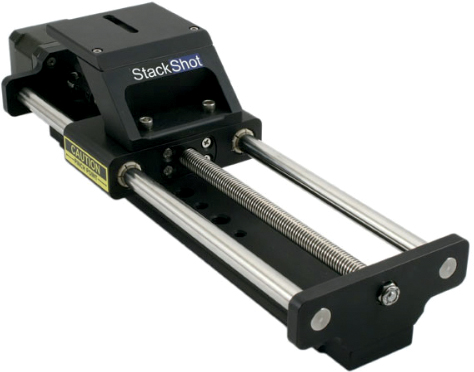
Figure 9-10: Motorized focusing rail StackShot made by Cognysis
This can be done manually, but it is tedious. It is more efficient to use StackShot, (figure 9-10) which is made by Cognysis. StackShot is a tool that automates firing the camera and changing its focus. The camera and lens are mounted on a motorized rail that is connected to a controller box. This allows the photographer to set the point of focus and program how many focus points will be taken. Photographers who need to make award-winning macro photographs have accepted this process enthusiastically. By using the Sony a7 with a good macro lens, it is easy to collect 40 optical sections that can then be merged to provide an image whose depth of field is an order of magnitude greater than what can be attained by a single photograph. Figure 9-11 shows a single section of a close-up subject taken with the Sony a7 and a Vivitar Series 1 90-180mm macro zoom lens at f/16. The limited depth of field throws the foreground and background out of focus. Figure 9-12 shows the results of using StackShot for generating a focus series and using the program Helicon Focus to combine the individual shots to render an image where the depth of field is expanded tenfold. Compare this to figure 9-11, which shows only a single section from that focus series and the limited depth of field of a macro shot. In figure 9-12, both the foreground and background foliage is clearly seen.

Figure 9-11: A single shot illustrating limited depth of field

Figure 9-12: Multiple shots combined for extended depth of field
Remote Release
As mentioned in Chapter 6, Sony sells a cable release (the RM-VPR1) for the a7/a7R. This is easily attached via the Multi terminal (USB port). We strongly recommend getting this accessory because it allows you to lock the shutter release when you use the Bulb shutter setting. Without a cable release, you would have to hold down the shutter button to keep the shutter open. This can be difficult when you want to use an exposure of a minute or longer. The cable release has a lock mechanism, which keeps the shutter depressed, making it easy to take exposures of over a minute. This accessory also has a separate movie button so you can start recording a movie remotely.
In addition, you can purchase the RMT-DSLR1 infrared Remote Commander. This small accessory resembles a television remote and emits infrared light that is detected by a sensor located on the front of the camera. If you owned a Sony NEX camera you may already have this accessory. To use it on the a7/a7R, set the following command:
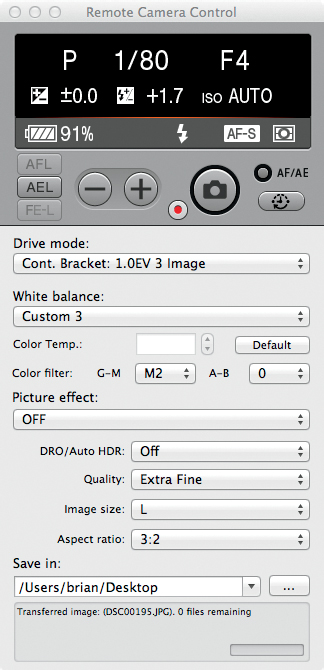
Figure 9-13: Screenshot showing the controls of Sony’s Remote Camera software
MENU>Setup (3)>Remote Ctrl>[On]
Use the remote to fire the camera. At first, you might think that you have to aim the remote directly at the camera’s sensor. This is not the case when you’re indoors. The beam is sufficiently intense, and the sensor is sufficiently sensitive, so the infrared beam can be detected after it is reflected off the walls of the room. When you use the camera outdoors, you can employ this strategy by placing your hand in front of the camera (outside the view of the lens) and aiming the remote at your hand.
With software you can download from the Sony website, you can also use your computer to fire the camera. This software is available for computers operating Windows OS and Mac OS. Once downloaded, you will find it as an application (in the case of Mac it is RemoteCameraControl.app). You can then fire and make some adjustments to the camera from your computer. It will require turning on the program, connecting your camera to the computer via a USB cable, and setting this command sequence:
MENU>Setup (4)>USB Connection>[PC Remote]
While you can set several camera settings as well as trigger the camera with this software, it has one omission: it does not provide a preview of the image on the computer screen (figure 9-13). We prefer to use the simpler IR or cable remote commanders described previously.
Our favorite and most-used remote firing strategy is the Smart Remote Control app. This takes advantage of the Wi-Fi capability of the camera and its ability to communicate to a smartphone or a tablet computer. This application provides a preview screen for viewing the subject and the controls for firing the camera. When used with our iPad, this application aids our macro photography work by providing an enlarged live view of the subject. We describe this, and other apps, in Chapter 8.
If you forget to pack your remote release, remember that you can eliminate vibration from pressing the shutter button by setting the Drive Mode command to [Self-timer], and set it for a 2-second delay. This works well with the a7; however, it is not so useful when using the a7R. The former camera has a first curtain electronic shutter, which is vibration free. The latter camera has a mechanical first curtain, and its movement may cause shutter vibration. This is not so much of a problem with a moderate telephoto of 100mm, or with normal and wide-angle lenses. However, it can be a problem when used with a long telephoto, especially one that has a collar for attachment to a tripod. The longer 200mm lenses with this configuration can show vibration-induced blurring even when using the 2-second delay.
Tripod
You may already own a tripod, but if you don’t, this section is for you. To fully take advantage of the 24 or higher pixel count Sony sensor, you need to get a tripod and a good head. This accessory is often overlooked when you first start taking pictures and movies. For a light, small camera like the a7/a7R, using a tripod seems cumbersome since it is bulky, reduces mobility, and hinders spontaneous photography. However, a steady support for the camera is necessary when taking pictures requiring long exposures and for extreme telephoto work—in short, for any type of work that demands recording maximally sharp images. In fact, the inconvenience of using a tripod may be its strongest benefit because it forces you to work at a deliberate pace—carefully framing the subject, evaluating depth of field, and ensuring that the horizon is not tilted. This methodical procedure trains you to study the image critically before taking the picture.
Professional tripods are usually sold in two parts: the legs and the head. The legs provide the support, but they do not have a mechanism for aiming the camera. The head, which is attached to the legs, is the actual aiming mechanism. Although you can buy a complete tripod with legs and head, many, if not most, serious photographers buy the two components separately. This way, you have a custom unit that suits your personal photographic style.
A good tripod can easily cost $300, with more expensive units running over $1,000. Although it is initially expensive, a good tripod will outlast a camera and lens. One of our tripods is more than 40 years old and is still in use. Our tripod collection grows with our experience in photography. We have a heavy studio tripod for the laboratory; although its weight discourages us from taking it into the field, we appreciate its stability when we work with high-magnification close-up shots. Such a tripod will be rock solid, and its adjustments are smooth and precise. For fieldwork, we take a lightweight tripod wherever we go. Its legs are made of carbon fiber, so it weighs only a few pounds, but it can aim and hold steady a 400mm telephoto with precision. However, the light weight of these tripods does sacrifice some ability to dampen vibration. We carry a canvas shopping bag and attach it to the center column of the tripod by the handles. By adding rocks to the canvas bag, we can increase the tripod’s stability.
Do not skimp on expense. Low-cost tripods are not only flimsy, but they take longer to set up and are sometimes subject to drift, which is when the camera slowly shifts out of position after you aim and compose your picture in the viewfinder. If your equipment is awkward and irritating to handle, it guarantees that you won’t use it. A good tripod allows you to aim your camera smoothly. When you lock the controls, there is no observable shift in the viewfinder. Your camera will remain steady and you will take tack-sharp pictures.
Plan to spend a minimum of $300 for the tripod’s two components: the legs for support and the head for aiming the camera. The head can be surprisingly expensive, especially if you tend to use long telephoto lenses.
There are two major categories of tripod heads: pan and tilt heads, and ball heads. Pan and tilt heads are heavier and less expensive (about $65 for the Manfrotto 804RC2). They allow you to pan across the scene (horizontal movement) and tilt the camera (vertical movement). To lock the head, you must tighten two knobs: one for the pan and the other for the tilt. Operating two separate controls slows you down when taking pictures, but these systems have the advantage of increased stability when working with heavier lenses. Ball heads (figure 9-14) are lighter and more expensive (about $350). They allow you to move the camera smoothly in any direction. They are locked with a single knob; you loosen it to aim the camera and tighten it to lock it into position. We started out more than 40 years ago with a Bogen 3047 pan and tilt head, but we have since replaced it—we prefer the speed of working with an Acratech ball head.
We use an older Acratech GV2 ball head for our photography. It has a nifty design feature: a gimbal mechanism that is engaged by rotating the ball 90 degrees to the side. This limits the head movement along a vertical plane while the base rotates independently along a horizontal plane. In essence, it works as a pan and tilt head. This provides increased stability when working with heavy lenses whose tripod mount is on the lens body. When a long telephoto lens is attached to the camera, Acratech’s gimbal feature places the center of balance closer to the swivel point for much better balance and control.
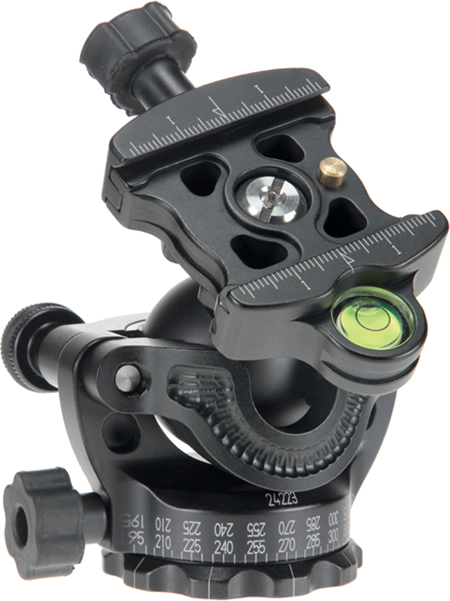
Figure 9-14: Acratech GP-SS ball head
This wonderful feature is carried over into newer Acratech models. If you attempt to use a regular ball head without this feature, the center of balance of a heavy telephoto lens is over the ball head. This weight generates sufficient torque that the lens flops over, making it difficult to aim. By using the gimbal, the telephoto’s center of balance is lowered and displaced to the side. Since the tripod collar is at the telephoto lens’s center of gravity, the lens is balanced along the axis of the gimbal and can be easily tilted up or down along this axis. This feature is advantageous when using a heavy telephoto lens whose focal length is greater than 200mm.
When we use lenses with a focal length ranging from 18 to 105mm, we do not need to use the gimbal feature. Instead, we use it as a ball head that has two tightening knobs. One is applied to smoothly dampen the movement of the ball for aiming the camera. When we release the camera from our hold, the first tightened knob is sufficient to maintain its position so that it does not flop to its side. This allows us to quickly aim the camera. It can then be locked into position by tightening a second knob. After taking the shot, this second knob can be loosened to frame a new scene, and then tightened again to lock the camera down. You only need to work one knob to aim and lock the camera’s position.
We recommend that you get a quick-release clamp for your tripod head. Typically, a basic head allows you to attach the camera to the tripod head with a quarterinch threaded screw. Attaching and detaching the camera can be time consuming and awkward. To speed up the operation, use a tripod head with a quick-release clamp (figure 9-15). This clamp engages a plate that is attached to the bottom of your camera so attaching and detaching the camera from the tripod becomes fast and simple. To attach the camera, simply place the plate into the head’s quick-release clamp and lock it in with a press of the lever. Acratech makes plates specifically for the a7/a7R camera body, which allow free movement of the tilting LCD screen. The plates are equipped with a lip that engages the front surface of the camera body and prevents it from rotating on the plate.
Figure 9-15: Quick-release clamp for attaching the tripod head to the camera
The next thing to consider is the tripod legs. Fortunately, their connection to the tripod head is standard; a screw secures the head of your choice. The price of tripod legs ranges from $200 to more than $1000. Premium models are made of light, durable carbon fiber. Typically, the legs collapse for convenient transport. Gitzo makes some of the best legs—rigid and light. However, they are very expensive and may cost over $500.
We use the less expensive legs by Manfrotto (about $300) and combine them with an Acratech ball head. Several of our colleagues have been satisfied with Velbon, Slik, and Hakuba carbon fiber tripod legs that cost about $200 to $300.
Vibration and the a7R
In comparison to the a7, movement of the a7R’s mechanical shutter can generate significant vibration, which can blur the image. We have noted this in our work with telescopes, telephotos, and microscopes. Nonetheless, we have been able to capture high resolution images with this camera by taking some additional steps in our photographic techniques.
When using the camera with lenses whose focal length is less than 100mm, we attach the camera directly onto the tripod. Some legacy lens adapters come with a tripod collar for mounting the camera lens combination on the adapter. We have had increased vibration when using this type of mounting system.
When we use a tripod, we do everything we can to increase its stability. In our laboratory work, we use a Manfrotto, which is a heavy aluminum tripod. It weighs over 13 pounds, and is frequently used with medium format or four-by-five cameras. It is capable of supporting 26 pounds of weight. When we use this tripod, we have no problem with shutter bounce for the kit lens and short telephotos. We have used this tripod effectively with a 300mm f/2.8 Nikon telephoto with the gimbal mounting system. This tripod’s weight makes it unsuitable for fieldwork. Under these conditions, we use a lightweight carbon fiber tripod and increase stability by adding weight to a canvas bag that we hang from the tripod’s handles. We lower the center column to its lowest point to keep camera and lens close to the tripod legs.
When working with lenses longer than 100mm, we use additional strategies to dampen shutter bounce. We have used lenses as long as the 300mm f/2.8 Nikon AIS lens with the Sony a7R on our carbon fiber tripod. We do not use a conventional ball head for this lens. A heavy lens such as this comes with a collar for attaching it to the head. However, this type of attachment does not dampen vibration-inducing blur, so we use a gimbal-type head to counter this; it can be tilted 90 degrees to the side and its gimbal engages a slot. This converts the Acratech to a pan and tilt head that easily handles a 300mm lens. We have found this set-up to be very resistant to vibration.
When using the camera at shutter speeds as slow as 1/30 second, we dampen the shutter vibration by holding onto the lens and camera body, and using the viewfinder. We do this even when the camera and lens are mounted on the tripod. By applying pressure with our hands, we can effectively take pictures at these slow shutter speeds. Presumably, by maintaining contact with the camera body and lens, we help dampen the vibration arising from the mechanical first-curtain shutter. This is not effective when the shutter speed is longer than 1/30 second. For this, we raise the ISO of the camera to ensure we use a shutter speed 1/30 second or faster.
With microscopes, we avoid the detrimental effects of vibration on image sharpness by using shutter speeds of 1 second or longer. This works on stained histological slides, which do not move. If we have to use a faster shutter speed, we will use the a7 over the a7R. For our work with telescopes, we also prefer the a7 to the a7R. For all the above work we turn off Sony’s SteadyShot.
Recommendations
Thanks to Sony’s mirrorless design technology, the a7/a7R is a remarkably versatile working tool. It can be used effectively on specialized optical instruments such as telescopes and microscopes. In the case of the a7, the absence of vibration due to the electronic first-curtain shutter and the ability to precisely focus on the subject lends itself to photomicrography and telescope work. As your expertise increases along with your desire to explore new types of photography, you may spend more on accessories than the camera; however, these accessories allow you to exploit the camera’s full potential.
The Sony a7/a7R kit lens is an excellent photographic tool. We recommend that you get to know the strengths and limitations of this lens before you acquire any additional lenses. If you decide to buy more lenses, consider Sony’s (including Zeiss lenses sold by Sony) first. Optically, these lenses are high quality, and you can be confident that they are fully functional with your camera. Also, you can use the A-mount Sony lenses with the LA-EA4 adapter. This provides a rapid-focusing accessory that enables you to use lenses ranging from a 16mm wide angle to a 500mm telephoto.
One very important advantage of the E-mount is that you can use legacy lenses made for Canon, Nikon, Olympus, Pentax, and Minolta. If it has a good mechanical helicoid and an external aperture ring, you can take excellent pictures with it. You do lose autofocus capability and image stabilization; however, by using a tripod and cable release you can still take pictures that reveal the finest details within a scene.