Putting on the Steadicam®
balancing with the rig

The sight of an experienced Steadicam operator in action is truly awe inspiring. The seemingly weightless rig floats effortlessly here and there. The operator guides the rig — focused, intense, yet strangely calm and self-assured.
Walking with a Steadicam is much like walking without one. Once the rig is balanced, the operator mounts the Steadicam on the arm, linking two masses: the rig and the operator's body. The movement of the Steadicam is now controlled through the movement of the operator.
The Steadicam arm adds lift and acts as a kind of shock absorber, but does not ensure the rig hangs next to your body. It does not balance the rig for you. In fact, if you are not balancing the rig properly, the arm will not be able to function optimally.
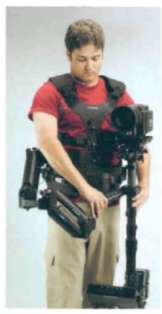
You will adjust the vest so that when you stand most comfortably, the rig hangs inches from your hip all weight channeled down through your legs to the center of the Earth. You then can move around normally
Sounds simple enough but because of so many new sensations many find it a struggle to pick the rig up and settle comfortably into a good posture

The operator stays in good form (posture), regardless of the position of the rig.
myth-buster
“That must hurt your back.”
Not so! With the proper fit of the vest and adjustment of the arm, the weight is distributed evenly to your legs. It's even good for your back…
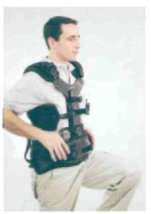
Fitting the vest
The vest must fit you like a second skin. There is no space between your shoulders and the shoulder pads. The chest pads grab you around the thick pan of your ribs. The hip pads are centered over your hip bones. A good, snug fit allows instant feedback from the rig and will help you adjust your posture to easily balance the rig.
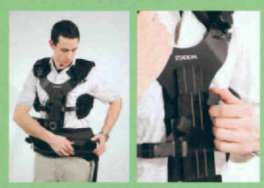
Step by step: putting on the vest

1. Loosen all the straps, including the cross-back straps. Open the left side of the vest — the shoulder, chest, and hip buckles.

2. Slip the vest over your right shoulder Connect the left shoulder buckle.
3. Before continuing, pull the vest firmly down on your shoulders. Keep the spar vertical

4. Buckle the chest strap around your ribs. Snug.
5. Pull the vest down onto your shoulders.
6. Engage the hip pads by buckling the lower left buckle. Your hip bone should be centered behind the hip pad. If the vest is too long or short, you can adjust the length by releasing the lock on the spar and sliding the “Y” plate up or down.

7. Close the four buckles on the front of the vest — two at the chest, two at the hips.
8. Connect and snug up the cross straps on the back of your vest. These prevent the vest from slipping and ease some of the sideways pull of the rig.
Tip; Everyone is not the same size or shape. You may need to make further adjustments to your vest for a proper fit. Feel free to add or take away padding, lengthen or shorten straps, etc. Your goal is a perfect fit.
The first few times you put on your vest, it's a good idea to look in the mirror.
If your reflection looks like this, loosen all the straps and try again.
Make sure the center spar is vertical, the shoulder pads are snug on your shoulders, the straps are properly aligned and tight.

- The overall length of the vest should allow you to naturally lift your legs to walk up stairs without disturbing the vest.
- Remember, the chest and hip pads must be snug before you engage the secondary clips It may feel tight at first, but once you pick up the rig, the weight will pull the vest away from your chest.
- The vest should never feel like a straight jacket; you should be able to move and breathe freely.
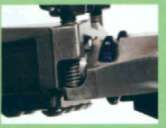
The socket block is the interface between the arm and the vest
Two sets of screws adjust the angle of the arm to the vest, side to side and in and out.

In and out is controlled by two thumbscrews that press against the mating plate of the arm.
When the top screw is wound in, the angle of the arm (and therefore the rig) is pulled toward the operator. As the top screw is wound out, the rig tends to fall away from the operator.


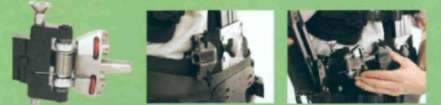
• The arm to vest plug on the arm slides into the socket block on the vest
• Two screws secure the arm in place.
• Both screws must be pressing against the mating plate of the arm in order to secure the arm to the vest.
• Once your in and out screws are set for a proper balance, you need only to unscrew one to disengage the arm.
• There is no need to tighten the screws down hard.
To start. set your in and out screws so that you can see about five threads on the top screw. If you have a big belly, you should only see about one or two threads.

Typical threads

Big belly threads

We alter the threads so the arm (purple) exits the socket block cocked slightly back, regardless of the belly size.
Two larger screws in the arm control the side to side adjustment. The bottom screw is always wound all the way in and then backed off a quarter turn to prevent binding. The top screw is wound out between one and three turns. Start with two and a half turns out.
The in and out and side to side threads depend on the body shape of the operator. Once you establish your personal threads, they will not change no matter what rig or camera you are lifting.

The side to side adjustments on some arms are tool-free, but when carrying the sled, these screws still must be adjusted using a 1/4 inch Allen wrench.
Other arms always need the wrench.
Picking up the rig
When you are first learning to operate a Steadicam, picking up the rig does not always immediately feel comfortable. Keep in mind: Lactic acid is going to build up in some muscles, especially “that muscle” in your back (see page 102). However, there should be no acute pain.
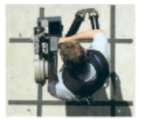
Approach the stand. Hold the arm close to the arm post with your right hand. Use your left hand to place the gimbal handle onto the arm post. Do not bend your knees. Instead, bow at your waist and slip the arm post into the gimbal.
Hold the gimbal handle off to the right side for docking and undocking.
Note: When you first pick up the rig, the arm mayneed to be adjusted to carrythe load. See page 46 fordetailed instructions.
Once the gimbal is engaged, the left hand moves to the post just below the gimbal, and the right hand grasps the gimbal handle. With your right hand, push down and hold the Steadicam in place as you straighten your back and step toward the stand. You can relax your grip when you are standing up straight.

The arm will take the weight of the rig as you step forward.
Release the lock on the stand and step back, bringing the rig with you. Immediately place the Steadicam to your left side, approximately 6 inches off your hip.
You will feel the weight of the Steadicam and its accessories on your legs. The rig should not pull you off balance, forcing you to lean or bend your back to compensate.
correct
Stand with your hips at a slight angle toward the rig.
Do not force yourself to be perpendicular to the rig.

⃠ incorrect
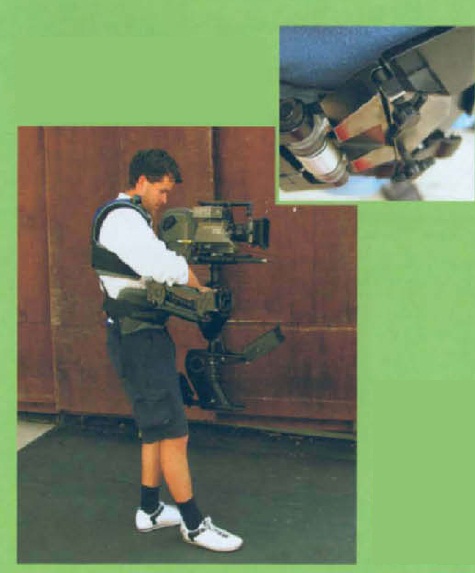
Note how the arm is angled when standing normally. The gimbal handle is cocked at about a 45° angle relative to the arm section nearest the sled. This position gives the operator a better view of the monitor. It also aligns the gimbal handle with the operator's right hand, enabling a morecomfortable (and stronger when needed)grip on the gimbal handle.

Always stand up straight and dean slightly
away from the sled.
You want to float the rig next to you with the least amount of effort. This is the easiest and “free” way to counteract the torque the Steadicam exerts on your torso.
Your body is not entirely straight and certainly not rigid. Most of the time your torso is almost vertical. Bending over is awful and makes it impossible to properly fly the Steadi-cam. It hurts, too.
Don't bend your knees. There is a tendency in the beginning (especially for those used to handheld operating) to walk with your knees bent. Don't overwork your muscles to do something the Steadicam is already doing for you. Stand up straight, and lean back. Good posture makes it easy and gives you more control.
The first few times you put on the rig, you want to play around a little. Try to get the rig more or less under control, take some steps, boom up and down, tilt and pan, etc., but don't worry too much about what happens. As you get more comfortable, work on specific tasks, but don't take everything on all at once. Play and experiment a bit. Breathe. Laugh. Enjoy the magic.
In and out adjustments:
- If the rig is falling away from you, the top screw needs another turn in.
- If the rig is falling toward you, loosen the top screw
Below, with properly set threads (right), the operator stands correctly.

Above, with incorrect threads (left), the operator must lean way back to balance the rig.
- If the rig is falling away to the left, turn the top screw out (counterclockwise).
- If the rig is falling away to the right, turn the top screw in (clockwise).
- Never adjust the bottom screw, it should always be wound all the way in and backed off a quarter turn to prevent binding.

With side to side screws adjusted properly (inset: bottom all the way in, top out two turns) the operator can balance the rig without strain on his body or the vest.

Unscrewing the bottom screw changes the angle of the arm.

The operator is forced to lean sideways, expending a lot of energy to balance the rig.
Note how the weight of the camera now pulls his vest sideways.
Fine tune your socket block adjustments
Standing with good posture, try to float the rig next to you. Release the tension in your arms and note where the rig wants to go. If it falls quickly or violently away from you, toward you. or to either side, adjust the socket block screws to compensate.
Keep in mind: The goal is to adjust the threads of these four screws so that when the operator is standing with good posture, comfortably, the rig floats next to him.
Once you can float the rig next to you, try floating it farther away or in a different spot. You will have to lean slightly back as the rig moves away from you; otherwise you will have to hold the rig in place with your hands.
While operating, you should always be in balance with the rig: holding the weight with your body, not your hands.

Compare these photos. Even though Laurie is “leaning back” her back is almost at the same angle in both cases “Leaning back” is more about moving your torso away from the camera.
How do you know you are in balance with the sled?
When you are standing still and the sled stays next to you, you will notice a precise amount of pressure high on your back, and another pressure on your lower stomach and hips in the front. These pressures change depending on how heavy the sled is and exactly where the post is in relation to your body. You will also notice that there is almost no pressure on either hand.
Try closing your eyes as you balance with the Steadicarn. Feel what happens as you slowly move the rig around. What does it feel like to be off balance? In balance?
As you move the camera, try to have one part of your brain monitoring these pressure points and keeping them constant so that the rig floats next to you.
Jerry's standard “in and out” threads:
Note:The ends of both in and out screws have been rounded on a belt sander so that the threads aren't destroyed in use.
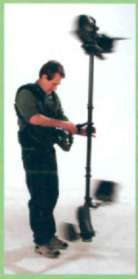
Rest position
There are times when you have the rig on but are not actively framing a shot. You might have a long walk back to your stand at the end of a shot. You sometimes stop to discuss the shot with the director. In order to conserve energy, put the rig in the rest position whenever possible.

When the Steadicarm moves away from your body, more effort is required to balance it. Therefore, the rest position for the Steadicarn is close to your body. You can pull the rig toward you until it leans against your side. Or better, let the rig rest on your shoulder. This way the weight is supported entirely with your legs, you feel no pressure in the vest, there is no force pulling on yourback Give your muscles a moment to' relax between takes.
If you find yourself doing repeated takes of a long shot, have either your assistant or a grip cany the rig back to the stand for you.
Adjusting the arm to carry the load
At this point, you may find that you need to adjust the lift capacity of the arm. Different Steadicam arms have different weight carrying capacities. In other words, each Steadicam arm is built to lift a specific range of camera weights. Each time you change to a different camera, or even add or remove an accessory, you will have to adjust the lift of the arm.
The Master Series, Ultra, G-Series, and Flyer arms are all adjusted the same way. The key is to have both arm segments working together to carry the load and dampen the operator's movement.
definition
Isoelastic: adj., an arm is isoelastic when the force required to lift the arm all the way up or push it all the way to the bottom of its range is small.
Older arms like the IIIA arm, are much less isoelastic than the Steadicam G-series arms especially when not lifting theirmaximum capacity.
When you mount the Steadicam on the arm, the rig may pop to the top or fall all the way to the bottom. If this is the case, then you will need to make a big adjustment.
Each arm section has a small vertical knob to control lift capacity The knob will turn easily only when the arm sections are at a slight up angle. For more strength, turn the knob to the right (tighten). For less lift, turn the knob to the left (loosen).
First, adjust the tension in the arm section closest to gimbal (forearm). The arm should hold the weight of the sled at a slight up angle.


Next, adjust the arm section closest to the vest (upper arm). Here, find the proper strength that allows the upper arm to “follow” the forearm section. The two arm sections should work closely together, with neither section leading or lagging behind the other.
Note: The G-50 and G-70 arms have an additional adjustment to change the isoelastic feel of the arm. See page 264 for details.
If you find the upper arm following along, then suddenly “clunking” up or down (i.e., going over centers), it is probably a result of your posture, not the arm tension. Readjust your stance, relax, and try booming up and down again. This usually solves the problem.
Just as in life, when you become fatigued, your body starts to slouch — you lean on a chair or table. This kind of faltering while wearing a Steadicam will quickly lead to a bad end. If you are tired, hang the rig up. Don't learn bad habits because you are tired!