Variations
on the line dance
The line dance has many variations, designed to give you the basic skill set to move the Steadicam with precision. Mastering the line dances will help you take maximum advantage of the Steadicam's unique qualities
Positioning your body
In this exercise, you will practice turning your body to accommodate the camera's direction of travel. This may involve a switch or a partial switch. Ideally, as the camera tracks along the line, your hips should turn toward the rig so that you are walking forward or backward. Do not cross your legs over each other. This will introduce a lot of bounce and require your arm hand to do extra work.

Here, the operator makes a switch in order to continue the shot walking forward. The camera travels along its path, undisturbed.
As you come to a stop, prepare yourself for your next move. For example, there are times where the camera's next move is toward the operator. Stop with the Steadicam a few inches farther away from you in order to have room to start the camera in motion before you take a step. You can either pull the camera toward you and start to walk backward, or pull the camera toward you and make a switch to walk forward.
Exercise #3: Walk around the square
With tape or chalk, make a large square with one diagonal line. This time, your target is a horizontal line on a wall at camera height.
In this exercise, you wil again be concentrating on precisely starting and stopping the camera. However, as you come to the comer of the box, you will have to adjust your stance (relationship to the rig) slightly in order to change the direction of the camera.


Two sections of the square are similar to exercise one: starting and stopping along a straight line walking forward and backward. However, on the other two sides of the square, you must turn your body toward the ng and walk forward and backward.


Add a switch along each line.
Have someone give you instructions as you come to each corner: “Go across the diagonal with a switch. Go forward with no switch. Go to the right with a switch”
When you come to a stop, you must be prepared to continue in any direction.
With a line as a target, you don't pan the camera. Change the line to a single target (crosshair). Now you have to pan to keep the target in frame.
When you start to feel confident, zoom in. Move the single target closer to the box for an even bigger challenge!
Have fun controlling the small pans.
Maintaining lens height
If we walked along doing nothing with the arm hand the Steadicam would rise and fall with our steps. For vertical stillness, it's important to hold a relatively constant force with your arm hand for a given lens height. While walking or moving, the arm hand works like a shock absorber to stop up and down movements.
The Steadicam is often the tool of choice because the camera must move over uneven ground, cross over a curb, over a threshold, even travel up a flight of stairs. In these instances, the arm hand must work to minimize the effect of the changing terrain on the frame.
Here's a very typical use of the Steadicam: crossing the street preceding an actor. The operator must maintain the smooth flight as his body steps up onto the curb. There's no reason for the camera to “step up” before the actor does. Therefore, as the operator steps onto the curb, he must boom down with his arm hand almost the equivalent of the height of the step. He then booms back up as the actor steps onto the curb.
Exercise #4: Stepping on and off apple boxes
in this exercise, you will learn to maintain a specific lens height as you encounter vertical changes in your path.
Use the same line as for your line dance. Tape down a series of apple boxes directly in your path.
This exercise can be done with the camera pointed ahead of you, and also pointing the camera 90° to your right or left to create a tracking shot.

Give yourself a horizontal line target (with camera facing sideways) or use your original target (camera pointed forward).
As you fly the camera along the line, you must step up onto the box, booming down to maintain lens height. As you step off the box, you will boom up to keep the camera at the correct level.
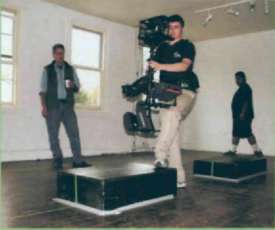
Note how the boxes are taped to the floor.
When shooting to the side, you must push the camera ahead to avoid hitting your knees as you step up.
Always walk forward in this exercise. Step on and off the boxes facing forward. Use a spotter until you feel comfortable doing
Concentrate on precisely starting and stopping the camera at your end marks.
Make switches at either end of your line. But only switch when the camera is in motion.
When you start to feel confident, zoom in.
Changing lens height
In addition to maintaining the boom height, the arm hand is responsible for any required spatial movement on this same axis, or simply booming up or down.
Some specific booming techniques:
- Stay in form. Make the sled float at all times.
- Do not bend over to get the camera lower or lean back when shooting up.
- Lift the rig with your arm hand, not your operating hand.
Exercise #5: Boom up and down
In this exercise, yoy will boom the camera up and down in order to keep the target in the frame.
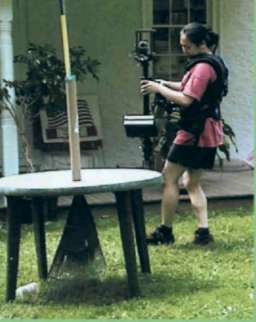
Rig a rising line (a rope works well) several feet away from and parallel to the line.
The camera flies over the line on the ground. Point the camera at the rising line 90° to your left or right.
As you walk forward you will boom the camera up. As you walk backward you will boom down.

Next, make a switch as the camera travels on the line. You'll have to switch while the camera is booming up and booming down. Keep your target in frame.
Always concentrate on precisely starting and stopping the camera.
Zoom in. Add boxes. Close your eyes.

Maintain good posture and switch when the Steadicam is near the middle of the boom range.
How to pan precisely
Let the gimbal do the work. If you have balanced your rig well, you can deliver beautiful pans with very little effort. Simply squeeze the post between your thumb and first finger and give it a spin. The speed of the pan will depend on how much force you use. If your rig is dynamically balanced and you give it an even spin, the rig will pan flat.
As the post is turning, maintain a comfortable hand position. Do not pan your hand with the camera. If you do, you will end up with your elbow jabbed into your side or sticking way out, and your wrist bent at a 90° angle. This is uncomfortable and makes it almost impossible to keep the shot level. Instead, walk your fingers around the gimbal handle, or for faster pans, just let the post slip through your grip. The trick is to keep your grip and wrist at the same comfortable position relative to you.

When it is time to stop the pan, apply some friction with your fingers. If the pan has a lot of momentum, as you stop the pan with your fingers, kiss off the move in space with the arm hand. This is just like the slight movement of the rig when you are starting or stopping in the line dance, except here the camera is moving sideways. Once stopped, the grip goes back to the lightest possible touch.
Exercise #6: Starting and stopping a pan
In this exercise, your “line”is actually a circle around a target (a fountain is fun). Keep the target in frame while starting, stopping,and switching along the circular path.

Variation: Circle with an actor
Create a circle and central target. Set the lens to a fairly wide angle and have the actor walk on the circle, more or less opposite the camera.

Work on various framing relationships between the actor and the central target. For starters, fix the actor and target in the frame as you walk around
Then try changing the relationship. Move only one element around the frame and fix the other. Change which element you keep fixed, and where it is in the frame. Then move both at once. Try moving them together across the frame, and then move them in opposite directions. The idea here is to freely move your lens to change the relationship between two objects on the screen.
Like all line dances, be sure you go in both directions and add switches. Also change the speed of your framing shifts.
If you like, you can complicate the whole exercise by adding boxes or momentarily dosing your eyes.
How hard do you want to work at this? How good do you want to be?
How to tilt well
Tilting is affected by the bottom heaviness of the sled. It takes a lot of effort and concentration to get the tilt started and to bring it to a nice stop. Holding a tilt at an angle (other than the one it is balanced for) requires a constant effort; the rig always wants to aim in another direction. The more bottom heavy the rig, the bigger the effort required to hold a tilt.
For extreme tilts, it is a good idea to rebalance the rig, making it less bottom heavy (slower drop time). A sled with a motorized stage also can be rebalanced for each part of the shot, making tilting much easier and more precise.

The good news: the same basic handgrips for starting and stopping the rig become the handgrips for tilting up and down.
To tilt up, simply place your pinkie in the center behind the post. Push. The farther your pinkie is from the gimbal, the less force is required. But don't let your thumb and forefinger drop below the gimbal. This can lead to loss of control and a bad horizon. Practice placing your pinkie in the right spot. If it is not dead center on the post, the rig will want to roll off to one side or another.

To tilt down, move your fingers around to the front of the post. Pull or lift mosdy with your ring finger. Again, centering your grip on the post will guarantee success. If you miss the center, the rig will want to roll off to one side.

You will note that the more extreme your tilt, the more difficult it becomes to maintain a proper handgrip. Whenever possible, you should both boom and tilt in order to maintain balance and expend less energy. As you tilt up extremely, boom up As you tilt way down, boom way down.
End a tilt precisely moving spatially —
either by booming and/or moving your
feet to land the final frame.
Using boom to help tilt up or down
Extreme tilt ups: As you tilt up, boom the camera up and over your shoulder, almost into the rest position. As you tilt back down to level, aim the base of the sled at your target and you will be level when you arrive.
Extreme tilt downs: As you tilt down, bring the sled in close to you. Do not push it way out in front of you. Do not bend over.


As you boom up or down, try to keep the angle of your elbow constant

Exercise #7: Push in add circle a target
In this exercise, the camera follows a path that start out straight and then circles a center target Keeping the lens pointed at the target you will hone your many skills: walking, switching and panning with your operating hand.


Follow the arrows in the diagram add then stop. Hold tee frame. Now reverse direction add end up where you started. All line dances are ontinuous — use the time in the rig to really work on controlled, precise, starts and stops.
Zoom in. Add boxes Make switches.
Close your eyes. Are you still on target? On the path?
Exercise #8: Tilt and switch
In this exercise, you will till from one target to another: a high target at one end of the line, and one low one at the other.
As you get good at this exercise, change your speed moving along the line Slow way down. Speed way up. When can you make a switch?

Design your own line dances
Feel free to design your own exercises at this point: Combine different skills, change the height of the target, alter the speed of the camera.

Practice all the line dances and change the position of the target on your monitor. Make the target move around the frame in a predetermined pattern as you do the dance. You might try moving the target horizontally, vertically, at an angle or in a circle or figure eight. The idea is to be able to place the target anywhere in the frame as you work on other skills. You might also try having multiple targets, shifting from one to another, and varying your speed during the line dances. Practice so you can move the Steadicam as you want in space and change the framing at the same time