Video and Steadicam®
One really great thing about video shoots is the quality of the image you get on the monitor — it's as sharp and clear as it's ever going to be. If you've got a big, bright color monitor, so much the better!

There are, of course, many issues and concerns related to working with video cameras and the specific video environment in which you'll be working. Here are just a few: Are you working with a camcorder or just a video head? Either way, how are you connected to the truck or video village? Wireless or cabled? Is it a multi-camera shoot? Live? Live to tape? High def or standard def? What sort of high def? How are you going to focus, iris, and/or zoom? Will you have an assistant? A cable puller?
These questions are primarily related to specific gear you must have to survive, but they also have implications for operating.
The last thing you want is any techcical concern
reducing the quality of your shooting.
That may seem obvious, but sometimes all the nuts and bolts, especially in live shows, can overwhelm the best of us. So think ahead, do your homework, be prepared, and arrive early, because there's always something new in the video world.
Mount the camera to your sled
This might seem easy, but there are often many difficulties. The typical “tripod adapter” that comes with most handheld video cameras often has a lot of flex. They might be fine for working on a tripod, but they aren't so hot for Steadicam. Find a way (wedges, gaffer tape, something!) to get rid of the slop. If you are using an on-board battery, microphone, Obie light, etc., check those mounts for slop as well.
All cables on the sled should be tied or taped down and immobilized, as any loose cable will flop and upset your critical balance.
Low mode can be really easy or very tough. The quickest and most secure way is just to flip the camera over and reorient the image in post (and at video village for the director). See the low mode section for some details, special brackets, and concerns.
Get the image to your monitor
If you are shooting standard definition (NTSC or PAL), there's no problem. If you're shooting HD, things get tricky. Hopefully, the camera has a standard definition output, or maybe you're lucky and have a monitor that works in SD and all flavors of HD. If not, you've got to get a down-converter, or if you are sending an HD signal by wire to video village, it might be possible to send a standard def signal back to your monitor. Regardless, you've got to make it work.
HD, monitor, and related technologies are changing rapidly, so you've got to do some research to find out how your Steadicam equipment is going to work with a particular camera on your shoot day. Fortunately, the web makes finding the information you need easy, and you can get advice on the latest widgets from experienced operators.
Sending your signal
Sometimes you have to get your high quality signal out to the world, either for monitoring, broadcasting, or recording. There are two basic possibilities, wired or wireless: wireless is generally preferred from an operating point of view — one is free to roam without the influence of cables or the danger of inattentive cable pullers. There are worries, however. A broadcast quality microwave transmitter weighs a bit, consumes more and sometimes the “auto-receiver-locator” in the dome gets the jitters, making it impossible to deliver smooth shots. On a multi-camera shoot, just swap your camera with one of the handheld operator's cameras, and test for the jitters again. Newer Wi-Fi transmitters may work just fine without the aiming required of microwave transmitters. Again, technology in this area is racing forward, so do your homework.
Your other option is to be cabled to the rest of the world.
I used to do a lot of TV, specially live TV, and being one of the first I was able to insist to what I thought I needed to do it properly, Properly meant that no one at home would be dble to spot a difference in video quality, ana the level of control of the shotshould not appear different from other moving cameras thai sere generally being operated on a crane of some tort (wit( lot zooming to enhance the restrictions of their physical moves)
I wanted to offer roves that they could not make, albe,t with judicious of zoom as well, especially savoring moves that crossed the boundary of stage and audience. My intent was to make the use of Steadicam the same quality as the other cameras, aesthetically and technically and at the same time break downestablished barriers to where the camera amid go. Along the way directors and I had to create a new aesthetic, a new languagecamera moves, that could be incorporated seamlessly into the preexisting structure.
All this meant that 1 had to avoid any Steadicam-centric operating flaws from being evident (floating horizon, shiftless frametiues, wandering headroom, inconsistent focus, falling on my ass). So, particularly for the live shows, my primary goalnot to fall, then to stay out of the other shots, to minimize control problems, ana finally do something spectacular looking, in that order.
— Larry McConkey, June 21,204, on the Steadicam forum
Cable running technique
It's imperative to minimize the influence of the cable(s) on the Steadicam and to be sure the cable will not compromise your safety.
Typically, try to get the most flexible (not necessarily the thinnest!) cable you can. Most operators carry several 12 foot lengths of really flexible coax cable with BNC connectors on each end in their kits. In standard definition situations, this cable is used as an extension of the main (heavy and stiff) coax from video village to the camera or with two special triax to coax adapters.

Tip: Consider balancing your sled a bit more bottom heavy than normal when using cables (and/or a gimbal mounted zoom controller). The lighter your top to bottom balance, the more influence the cables will have.
Most importantly, the way you attach even the most flexible cable to the Steadicam will have a great effect on the quality of your shots.
Here's the best method for cabling: run the flexible cable down from the camera next to the lens and make a small loop that passes through your operating hand on the gimbal. This loop does not change much as you operate — and you can easily control its influence on the sled.
For years, we had the cable exit the operating hand into a bigger loop on the side and tucked it under the vest or belt, and from there the cable ran back to the truck or video village. Some folks ran the cable on the inside; some ran it up the arm. But recently, while working with the Panavision Genesis camera — which had two video cables, one audio cable, and one extra thick and stiff external power cable — we were forced to learn a new trick.
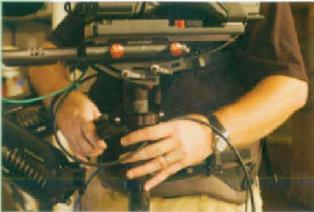
Before picking up your rig, wind a turn or two of the cable(s) around your forearm as shown in the bottom photo, and then pass the cable through your operating hand to create the small loop forward and up to the camera. The other end of the cable leaves your forearm, loops to your vest or belt as before, and on to the cable puller and video village. When you get the loops right, put a tag or two of tape on the cable so you can recreate the loops each time you lift the camera.This cabling method almost eliminates any influence from cables on your rig, and we recommend it no matter how small and flexible a cable you use.
Cable running for low mode
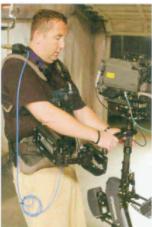
Note how the cable is laced up to the monitor rods and secured by a yellow strip of Velcro. A small-as-possible loop drops down to the operating hand, the cable is wound around the operator's wrist, and then it is looped again to the vest.

All too often proper cable running is ignored when shooting in low mode. Take the time to re-string the cables. Don't let bad cabling diminish your operating!
Gear unique to video shoots:
- A spare Sony or Ikegami camera mounting plate in case they want to swap your camera from the Steadicam to sticks. Otherwise, use the mounting plate that comes with the camera.
- A remote tally light system
- A small LCD monitor with both power and video inputs from your sled. You will use this monitor for “Program.”
- A set of triax to coax barrel adapters
- Several right-angle BNC adapters
- 2 carabiners
- Aselection of 3.6, and 20 Ohm BNC jacked attenuators Sometimes your video transmitter will interfere with the camcorder record heads or with the audio receivers on the camera. Suppressing the strength of your video transmitter may cause a messy monitoring image, but it will ensure clean audio.
- A 6 foot length of ultra-flexible silicone-jacketed triax cable
- 10 to 12 feet of ultra-flexible coax cable. Mogami makes an excellent neoprene jacketed cable, number 2964. Do not use the “spaghetti” BNC cable typically supplied with Steadicams. They do not have enough copper wire running through them to safely handle the 165 volts that is passed down to power your camera.
- An HD to SD (NTSC or PAL) down converter
- A monopod with a spare Steadicam docking bracket on it
- A wireless belt pack for your audio. In the case of loud shows, a double-muffed headset that has a straight cable. Most headsets are single-muffed because the handheld camera is pressed against the right ear. Not so with Steadicam Both ears need to be muffed, but a coiled cable will wreck the trim of the Steadicam sled.
Multi-camera and live productions
When you get hired, you need to ask which camera and lens you'll be using. Is it high def or standard def? Is it multi-cam orcamcorder? Fiber optic or triax? Does the HD camera have a built-in down-converter to give you an NTSC or PAL image? What lens will you be using? You need to determine the proper gear pitch for follow focus as well as the proper cable for your J-7.

Many of your questions can only be answered by other technical personnel. Get the phone number of the company supplying the truck and the contact personnel. They are your key for prepping. The sooner you make contact with the truck's video engineer, the happier everyone will be.
Triax and coax adaptors
If the job is triax, talk to the video engineer. Tell him you are using triax to coax adapters. The engineer knows you are going to say this, and he will give you one of three responses:
•I've already set the base station up for your adapter, you'll be fine.
You say. “Thank you”
•Or, “Okay, I will go short the base station no you can use your adapter.”
Again, you say. “Thank you”
•Or he says, “You are not allowed to use that setup. You have to use our triaxial cable. A triaxial to coaxial cable is a safety hazard and not permitted”.
You say, “Thank you. I understand.”
Then you go off and cry.
In some houses, that last answer is not negotiable. This is usually the result of a cracked cable or a person being shocked while using the adapter method. It is not inherently dangerous, but if the cable is torn, you can get a jolt.
Plug in the coax cable coming off the camera so the truck can be sure everything is working and adjust your camera properly. Be sure your monitor and focus gear and other accessories arc on and running during these tests — you don't want any surprises just as you are about to go live.
Sound issues: If they want you to have a microphone on your camera, 90 meet the sound person and have him mount it up for you before you build the rig. A gentle reminder: the mic on your camera is live when your camera is on Everything you say is heard in the truck. Everything Fair warning.
Tally light
Take the remote tally light and carefully tape the sensor over the rear tally. This way the talent can still see the tally on the camera's front. Run the LED down to your monitor. Many newer sleds have a tally system built in, with internal electronics, wires down the post, and LEDs built into the monitors.
The camera tally light is your only safe way to know if you are “on-air” or not — unless you use a Program monitor on your rig. If you cannot rig up a second Program monitor, the tally light is your god.
It's one thing to hear in your double-muffs, “Dissolve Camera 4 to Camera 11.” It's another to see your tally light fade in or out as the dissolve occurs. You are clean and off-air only when your tally is totally off.
Program monitor
It's a good idea to rig a small LCD monitor as a Program monitor so you can see what is on-air. Attach it close to your Steadicam monitor. Some sleds have two monitor mounts built in, so they can be easily configured to hold a small program monitor. You can avoid showing up in other cameras' shots and create images that cut easily into the fabric of the show.
Your assistant
Bring a focus puller. Some producers try to get away without assistants or insist that they always use Steadicam operators who are one-man bands. Don't go for that. Your focus puller may also act as your first cable puller, but be sure that does not interfere with the primary job — keeping everything in focus and assisting you. Usually you will be assigned one or more video utility folks to pull your cable.
Teleprompters

Many prompters are not made to fly on a Steadicam. They're either lightweight with flimsy bracketry or heavy and unwieldy. Almost all require an additional cable and consume some power.
The front-to-back profile of your camera might increase 12 inches or more, and you will need longer dovetail plates to balance the camera.
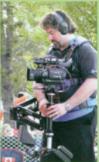
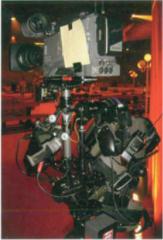
Panasonic DVX-100A, SteadiPrompt, two wireless mic receivers, stick mic for reference audio just in case. The thin wire is the prompter feed.
Getting the shots
On live multi-camera Steadicam jobs, it's all about fitting in and still shining when your tally light is on.
Most of the time, we are given small bits of time to show flawless work that cuts well. Framing; the pacing of tilts, pans, and zooms to match the mood of the scene; and a willingness to at least try to be invisible all contribute to a good live TV experience.
Fipping to low mode generally takes too much time for a live show, but see if they can flip your image “live” in the truck. A simple move of the gimbal and you've got a new range of lens heights to give them for that one weird song about a Chihuahua.
Regarding zooming: I came of age in the movie business operating Steadicam with prime lenses. On One From the Heart, we tried the Cooke 20-60 mm on my BL III, but it had to be zoomed by my assistant, and the combination was mortally heavy, Finally, on La Traviata, Live from Paris, 2000 (also for Vtitorio Storaro), I got control over my own lens and could move and zoom at will.
In a tiny apartment on Île St. Louis, I had the joy of shooting the entire finale of Act IV in a single, 23 minute, uncut one-takeSteadicam shot, as Violetta approached her death at the window on the stroke of Notre Dame's midnight bell. I made hundreds of undetectable adjustments in focal length, watching the images unfold on my monitor, as moment, place, lens angle, and motion came together time and again.
Though perhaps routine for our brothers and sisters who operate pedestal-mounted TV cameras, the understated art of the movel zoom combination was a revelation to me. (As write this, eerily,up on my satellite radio come Violettla and Alfredo and their last fateful waltz before that window overlooking Notre Dame.)
— Garrett Brown,
from part two of his moving camera article for Zerb
Zoom control
You can zoom using a J-7 or similar device with the proper cable to the lens. If you are not familiar with using a J-7 zoom control, get one early on and play around with it.
The camera lens has a zoom-speed adjustment. Unless you are shooting for MTV, production won't want snap zooms. The control is typically just behind the handgrip on the right side of the lens. Back it all the way down to slow.
Production will be happy to see zooms and moves that solve problems. If you are throwing a shadow on talent or so close that you risk being in another camera's shot, back off a bit and zoom in to compensate. A lot of stuff looks nicer or tells the story better at a longer focal length, so why cut yourself off at the knees? There was a time when some Steadicam operators would say, “I don't zoom; you hired a Steadicam. Zoom from tripods, not with me.” That was a highly non-productive approach.
A wonderful little bonus: The J-7 has two “on/off” switches. One is a small button, and one is a rocker switch. The camera record button can be made to trigger your headset mike. When you hit the record button on your J-7. you can talk to the truck without taking your hands off the rig and disturbing your shot.
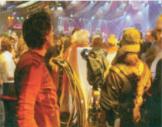
Interacting with the audience
If they plant you in the audience, anything can happen. We've had disgruntled audience members try to trip us as we went past, steal our batteries, yank on the cable, etc. We're blocking their view, and they're not pleased. If they're drunk, there's not much you can do about it. You can try to be nice, smile as you fly past, duck out of the way to change batteries, and try to keep your cable pullers out of their view. Shooting the audience around you usually gets them into the proper spirit of the show, but not always. Keep a watchful eye on the big, mean-looking guy with the “Tripods Rule” tattoo.
I haven't a thing to wear
If you are shooting inside or at night, you might be expected to wear “show blacks” so you are clothed in black from head to toe. Ask if you and your focus puller are required to wear show blacks Some shows don't care. Other shows are rather sticky about it, and will make your life miserable if you show up unprepared.

The SteadiTux had its debut on the 2001 Hispanic Heritage Awards at the Kennedy Center in Washington, DC Snappy.
Customized tuxedo with slit lined with satin, allowing the arm to pass through from the vest underneath.