Camera Cables and Cabling Points
Unless operating a camera/recorder there is a need to connect the camera- head to its camera control unit and hence to the switcher and videotape recorder, or simply to connect the output of a camera to a portable videotape recorder. In the latter case the connecting cable will need to carry the vision signal from the camera, possibly a sound signal, remote start/stop signals for VTR, and a reverse vision circuit. With a ‘full facilities’ camera the cable will also include circuits for talkback, cue lights, synchronising pulses, power, control facilities etc. This is achieved either with a multi-core cable or tri-axial cable. The multi-core cable must be used with great care, because it is expensive and can be damaged easily. The systems using a tri-axial cable (a coaxial cable with an extra outer screen) have the advantage of a slimmer cable, lighter than multi-core, more robust and relatively cheap. However, they have the complication of requiring a special coding system to enable all the facilities to be provided along what is virtually a single circuit.
Cable care
If the camera cable is to be disconnected and stored, even for a few days, it is essential to fit its protective caps over each end to prevent dirt or moisture entering the socket-end or pins being bent at the plug-end. If caps are not available, cable ends should be wrapped in clean cloth and taped up.
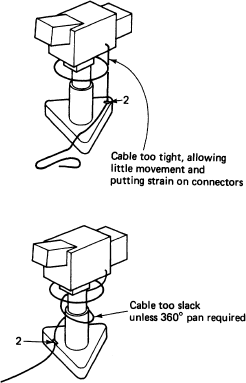
Damage to the camera cable-end or to the entry socket on a television camera may occur if the cable is clamped to the pedestal body and the camera head then elevated with insufficient slack cable.
This form of damage can also occur with a clamped camera cable if the panning head is turned continuously in one direction and the camera cable becomes snarled up around the column of the pedestal.
Similarly, a cable should not be made to follow acute bends or twists in use because, if it is subsequently pulled tight, damage to the internal wires can result.
When the pedestal plus camera are pushed away to the side of the studio for storage at the end of the studio day, the cable should be coiled up in a figure-of-eight configuration alongside the camera.
Cabling points
The camera cable plugs into a cabling point on the studio wall. Alternative points are generally distributed around three or four studio walls. Some well- equipped studios have more cabling points than studio cameras. This enables each camera to route its cable to meet the production requirements of a particular programme, and so avoid long loops of straggling cable around the studio floor.
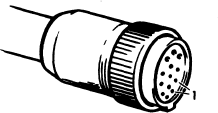
The camera cable is fitted with a plug at either end, housing many small pin connections (1). Take care when attaching the cable, to avoid bending pins. Also ensure that the cable is pushed fully home and screwed up firmly.

Cable care
Anticipate possible cable damage by allowing sufficient cable length for column elevation and panning movements. Cable clamps (2) are usually fitted to the camera mounting.

Cable plugging
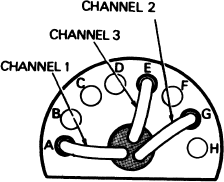
In small interview studios the cameras are connected to their CCUs through dedicated wall sockets. In larger studios camera cables plug into distribution boxes located at intervals along studio walls. These sockets are permanently routed to a communal patch panel (with point locations) near the camera control units. Here, flexible cables from these units plug into their associated camera’s wallpoint link.

