
CHAPTER 54. Migrating from NetWare to Windows 2000 or Windows 2003
SOME OF THE MAIN TOPICS IN THIS CHAPTER ARE
Windows Protocols and Services 994
Microsoft’s Services for NetWare Version 5.0 (SFN) 1000
When Windows NT 3.51 was released, one of the default network protocols installed during initial installation was Microsoft’s implementation of Novell’s IPX/SPX protocol, NWLink. It easily can be assumed that at that time Microsoft perceived that Novell was its most important competitor in the network operating system (NOS) marketplace. With Windows NT 4.0, the TCP/IP protocol suite, along with the Internet Information Server (IIS) and a host of utilities for creating applications for the Internet, moved that focus away from Novell to the then-fast-growing Internet market.
Yet, over the years, Microsoft Windows has continued to dominate the desktop, from Windows 95 to Windows XP and beyond. So one has to consider what benefits Novell’s eDirectory and related networking products are worth, when most of the functionality that Novell provides is already present in Windows Server 2000 and Windows 2003 Servers.
Novell has recently concentrated its efforts on a new and improved NetWare 6.x. But whether that remains the focus of the company is somewhat in doubt. Parts of NetWare 6.x have been removed from the base OS and made into separate modular products, such as iPrint, iStorage and iFile. As newer versions of NetWare are released, there is more of a focus on Linux and the offering of not only the base OS and eDirectory but all the modules as well. Each of these modules is installed on top of the Linux kernel. This brings Novell into the realm of Open Source computing where they have their products all lined up and channeled to compete in any market space—]closed source, or open.
This chapter covers ways to migrate your network from Novell NetWare to Windows 2000 by doing the following:
![]() Examining features of the Windows operating system that help provide connectivity between Windows and NetWare computers.
Examining features of the Windows operating system that help provide connectivity between Windows and NetWare computers.
![]() Looking at Microsoft Windows Services for NetWare 5, which can be very useful, along with other tools for performing a migration to a version of Microsoft Windows Server.
Looking at Microsoft Windows Services for NetWare 5, which can be very useful, along with other tools for performing a migration to a version of Microsoft Windows Server.
You can take a gradual approach, slowly integrating Windows into important roles in the network, or you can take the all-at-once approach. The former probably would be cheaper in the long run (you can lose NDS servers by attrition and you don’t need as many people devoted to the migration if you have more time). And, if you take the slow road, you can learn from your experiences. The latter approach might be a lot more costly, because you’ll need to have a larger team of trained professionals to get the job done quickly. Using the all-at-once approach also is riskier. If something goes wrong, or if your capacity planning or organizational planning is faulty, you’ll need a good back-out plan (and probably another job).
Note
When planning any migration or upgrading project, you should carefully consider your choices and experiment in a lab situation to ensure that your solution works, among other things. Chapter 4, “Upgrading Strategies and Project Management,” may be useful reading before this chapter.
Windows Protocols and Services
Although earlier versions of NetWare use Novell’s IPX/SPX network protocols, the TCP/IP protocol suite is supported with NetWare 6.x and beyond. Although Novell started to implement its own version of TCP/IP into NetWare versions 4 and 5, this wasn’t true TCP/IP. This was Novell’s version of that suite called NetWare IP (NWIP).
You can configure a Windows server to use the NWLink protocol, and it then can be used as a server for NetWare clients. If you’re taking the gradual approach for your migration, this is the easiest way to introduce Windows servers into older versions of NetWare. Otherwise, if you already are using TCP/IP on your NetWare clients, Windows also has a full-featured TCP/IP protocol stack and supports many related protocols and services, such as DHCP and DNS, as well as the Active Directory, which can be used to replace most functions provided by Novell Directory Services (which was named NDS, and is now called the eDirectory).
Windows 2000 provides two basic services that allow NetWare and Microsoft clients to access servers that reside in both environments. These tools are listed here:
![]() Client Services for NetWare (CSNW)—This tool enables the Microsoft client to directly connect to a service offered by a NetWare server.
Client Services for NetWare (CSNW)—This tool enables the Microsoft client to directly connect to a service offered by a NetWare server.
![]() Gateway Services for NetWare (GSNW)—This utility also enables a Microsoft network client to access file and print shares offered by NetWare servers. The services are provided to the Microsoft clients through a gateway Windows NT Server computer that is used to communicate with the NetWare servers.
Gateway Services for NetWare (GSNW)—This utility also enables a Microsoft network client to access file and print shares offered by NetWare servers. The services are provided to the Microsoft clients through a gateway Windows NT Server computer that is used to communicate with the NetWare servers.
Looking first at these two services and then exploring some other utilities you can use to further integrate Novell NetWare with Microsoft Windows computers will help you understand this migration path.
Client Services for NetWare (CSNW)
This service can be installed on Windows NT Workstation and Windows 2000 Professional computers to enable them to connect to file and print services provided by NetWare servers on the network. By using CSNW, you can begin by gradually adding Microsoft Windows 2000 Professional and XP Professional clients to your network, and they can access services on your existing NetWare network. This can allow you the time to hone your Windows networking skills, while still allowing users access to the same NetWare resources they are used to.
Installing CSNW on Windows 2000 Professional Clients
To install CSNW on Windows 2000 Professional or Windows XP, these are the steps to follow:
1. Click Start, Settings, Network and Dial-Up Connections.
2. Right-click the Local Network icon and select Properties from the menu that appears.
3. From the Local Area Network Properties sheet General tab, click the Install button. The Select Network Component Type dialog box pops up. Click once on Client to highlight it, and then click the Add button.
4. In the Select Network Client dialog box, click Client Service for NetWare and click OK.
5. When the Select NetWare Logon dialog box appears, fill in the fields for the preferred server if you are going to use the client to connect to a bindery-based NetWare server. If you are going to use the service with NDS, click the Default Tree and Context button and enter the NDS tree and context names. If you want to use a logon script, select Run Login Script. When you’ve made your selections, click OK.
When you have finished, you’ll be prompted to reboot the computer. You can do so at that time or wait until a more convenient time for the reboot. After you’ve rebooted your workstation, you’ll be able to connect to the preferred server or authenticate yourself to another.
Caution
If you have previously installed Novell’s client software on a Windows 2000 Professional or Windows XP Professional computer, you’ll have to uninstall that client before you can install Microsoft’s version. The two are not compatible and will not run on the same computer at the same time.
Gateway Services for NetWare (GSNW)
Microsoft employs two methods to enable its networking clients to connect to services offered by a NetWare server. Client Services for NetWare, discussed in the previous sections, allows each client to make connections directly to NetWare servers, just as though they were ordinary NetWare clients. This method has advantages, in that only the Microsoft client and the NetWare server are involved in processing the exchange of data. However, in a network where the interaction between Microsoft clients and NetWare servers will not be large, and many clients might need to make the connection at one time or another, a better solution might be the Gateway Services for NetWare (GSNW) product. Another benefit of using GSNW is that, because the gateway server makes requests on behalf of the clients, the users would not need to have logon accounts on both Windows and NetWare networks.
Keep in mind that accessing resources through the gateway service will be a little slower than access by clients that have the CSNW service installed. If you have clients on the network that have differing needs to access NetWare resources, you can install CSNW on those that most frequently use those resources, and let others use the gateway service.
Note
Gateway Services for NetWare uses Microsoft’s implementation of IPX/SPX, called NWLink, to communicate with NetWare servers. For Windows 2000 and Windows 2003 Servers the NWLink protocol is installed automatically when you perform the GSNW installation.
When using GSNW, a system with Windows Server 2000 or Windows 2003 Server acts as a link between Microsoft clients and the NetWare Server. Microsoft clients continue to use the Server Message Block (SMB) protocols to access network resources, with the gateway server performing the bridging function to the NetWare servers, which use the NetWare Core Protocol (NCP) for file and print functions.
The gateway server does this by redirecting a drive to the NetWare volume. It then offers the drive as a share to Microsoft clients. You can treat this share just like any other share offered by the server, when it comes to management utilities.
Another feature that GSNW provides is the capability for the Windows Server system that are hosting the gateway software to make direct connections to NetWare services, just as workstations do when using the Client Services for NetWare product. A local user on the server can elect to connect to NetWare resources without offering them to other clients through the gateway.
Installing GSNW on Windows Server
You must be a member of the Administrators group on the Windows server to install the gateway service. Use the following steps to install GSNW on a Windows Server:
1. Click Start, Settings, Network and Dial-Up Connections (or Start, More Programs).
2. When the Network and Dial-Up Connections window appears, right-click the local area connection icon that you want to use for the service. From the menu that appears, select Properties.
3. From the Local Area Connection Properties dialog box that appears (see Figure 54.1), click the Install button.
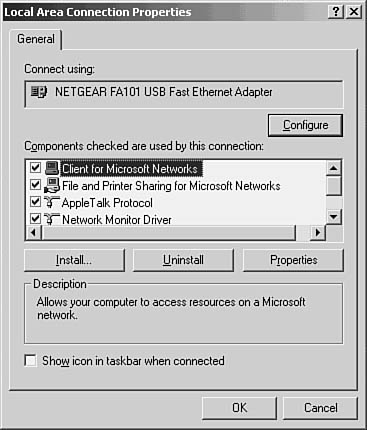
Figure 54.1. Click the Install button on the Local Area Connection Properties page to install the GSNW service.
4. The Select Network Component Type dialog box appears (see Figure 54.2). Click once on Client to highlight it, and then click the Add button to add a new service.
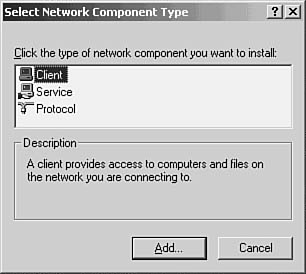
Figure 54.2. Use the Add button to add the new service.
5. When the Select Network Client dialog box appears (see Figure 54.3), highlight Gateway (and Client) Services for NetWare, and then click the OK button.
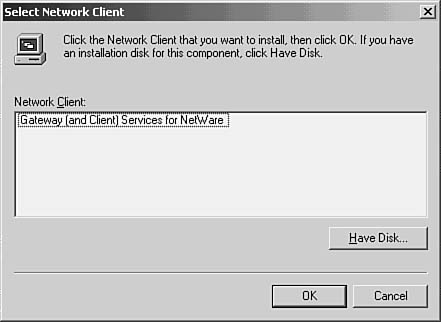
Figure 54.3. Select the gateway service and click the OK button.
6. Use the Select NetWare Logon dialog box (see Figure 54.4) to choose a preferred server (if you are using a bindery-based NetWare network), or select the radio button labeled Default Tree and Context (if you are using NDS) and fill in the appropriate information. When finished, click the OK button.
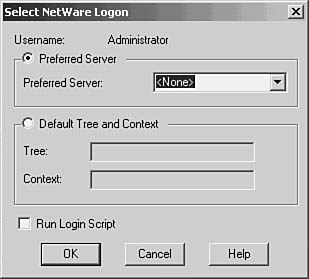
Figure 54.4. Choose the method you will use to log on to the NetWare server or NDS.
Note
If you do not have available at installation time the necessary information for logging on to a NetWare server or NDS, you can perform this step after you’ve installed GSNW and rebooted the server.
7. Finally, you are prompted to restart your computer before the changes you have made will take effect.
After the server reboots, using the following command at the command prompt should display a list of servers available to your gateway:
net view /network:nw
After you reboot, you’ll notice that, in addition to installing the gateway service, these NWLink components also have been installed for you:
![]() NWLink NetBIOS
NWLink NetBIOS
![]() NWLink IPX/SPX/NetBIOS Compatible Transport Protocol
NWLink IPX/SPX/NetBIOS Compatible Transport Protocol
You can see these in the Properties page for the local area connection.
Configuring GSNW on Windows Server
After you have installed the software and have entered the authentication information needed to access services on the NetWare network, there are several things you need to do to make NetWare resources available to your Microsoft clients. First, you must be sure that there is a user account on the NetWare network that has the needed access rights to the resources for which you want to create a gateway. On the NetWare side, there must also be a group named Ntgateway that has the needed rights for the resources. The NetWare user account that you will use must be a member of this group.
To create the gateway, you must take the following actions:
![]() Enable gateways on the server that is running the GSNW software. This needs to be done only once to establish the gateway.
Enable gateways on the server that is running the GSNW software. This needs to be done only once to establish the gateway.
![]() Activate each file or print resource gateway. This must be done for each resource you want to offer to Microsoft clients.
Activate each file or print resource gateway. This must be done for each resource you want to offer to Microsoft clients.
To enable a gateway, double-click the GSNW applet that is now found in the Control Panel, shown in Figure 54.5. Click the Gateway button to bring up the Configure Gateway dialog box (see Figure 54.6).

Figure 54.5. The GSNW applet in the Control Panel enables you to configure the gateway service.
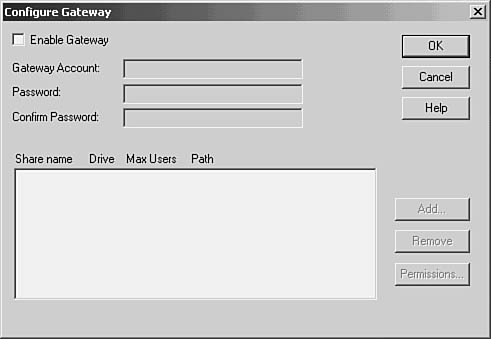
Figure 54.6. Use the Gateway button on the GSNW dialog box to bring up the Configure Gateway dialog box.
In the Configure Gateway dialog box you will again have to enter a method and the information required to access the resources you require on a NetWare server. This is in addition to the account that you supplied when Windows Server was first rebooted after the gateway service was installed. That first logon information is used to enable the server to log on as a user to the NetWare account. The second account will be used here to actually access the needed resource.
After you supply a gateway account and password and type the password again in the confirm box, click the Add button to add a NetWare file share resource that you want to add to the gateway.
You also can place comments in the appropriate field and elect to limit the number of simultaneous users that can connect to the share when it is offered to Microsoft clients through the gateway.
Setting up a printer that allows Microsoft clients to send documents to NetWare printers or print queues through the gateway is performed in a manner similar to setting up other printers in Windows. The difference is that you must correctly specify the port for the printer. To make a NetWare printer available through the gateway, follow these steps:
1. Click Start, Settings, and then Printers.
2. From the Add Printer Wizard dialog box that appears, select My Computer. Do not select Network Printer Server.
3. The next dialog box shows available printer ports on the server. Click the Add Port button.
4. Depending on the network protocols and services installed on the computer, you then are shown a list of printer ports that can be added. Select Local Port from this list and click the New Port button.
5. Finally, in the Port Name dialog box that pops up, enter the UNC pathname that is used to designate the NetWare Printer resource (\servernameprintername).
The remainder of the Add Printer Wizard works just as it does for any other printer. You must select a driver for the printer and specify the name to be used when it is offered as a share on the Microsoft network.
Microsoft’s Services for NetWare Version 5.0 (SFN)
Besides the client and gateway services (and the NWLink-compatible transport protocols) that come with Windows 2000, you can purchase an additional product called Services for NetWare Version 5.0 (SFN). The CSNW and GSNW products enable your Windows clients to connect to and use resources that reside on NetWare servers. SFN does the opposite. It enables you to let NetWare clients access resources that reside on Windows NT/2000 servers. When you first start to introduce Windows clients into your NetWare environment, CSNW and GSNW make replacing desktop systems for your users an easy task. When it comes time to begin migrating files and other services from NetWare servers to Windows servers, SFN gives you the capability to do this. You can use SFN to grant access to NetWare clients to newly created services in the Windows domain, and you can finish off the migration by using the File Migration Utility to move any files that remain on NetWare servers to Windows 2000 servers.
SFN gives you the following features:
![]() File and Print Services for NetWare 4.0 (FPNW)
File and Print Services for NetWare 4.0 (FPNW)
![]() Directory Service Manager for NetWare (DSMN)
Directory Service Manager for NetWare (DSMN)
![]() Microsoft Directory Synchronization Services (MSDSS)
Microsoft Directory Synchronization Services (MSDSS)
![]() File Migration Utility (FMU)
File Migration Utility (FMU)
![]() File and Print Services for NetWare version 5.0 (FPNW version 5)
File and Print Services for NetWare version 5.0 (FPNW version 5)
Of these, the first two are intended mainly for use with Windows NT 4, whereas the last three are exclusively for use on Windows Server (2000 and 2003). Version 5 of SFU contains the earlier versions of FPNW and the Directory Services Manager for NetWare so that you don’t have to buy both versions 4 and 5 of this product. It’s all on the 5.0 CD.
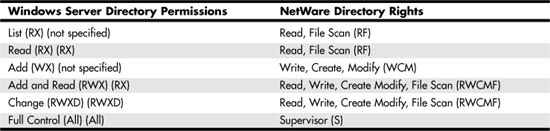
Comparison of Windows Server and NetWare File Permission Rights
When using FPNW 5.0, trustee rights for directories for NetWare clients can be mapped to those used on Windows Server 2000 and 2003 Server systems, as shown in Table 54.1. Table 54.2 shows the same thing in reverse, or how FPNW5 translates Windows 2000/2003 permissions for directories to NetWare directory rights.
Table 54.1. Mapping NetWare Trustee Rights to Windows Server Permissions in FPNW5 for Directories
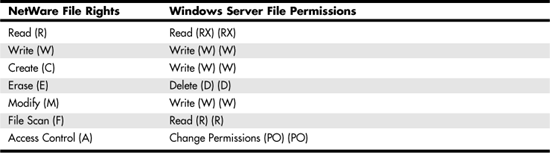
Table 54.2. Mapping Windows Server Permissions to NetWare Trustee Rights in FPNW 4.0 for Directories
For files, Table 54.3 shows the mapping done by FPNW from Windows Server to NetWare, and Table 54.4 shows the mapping done from Windows NT to NetWare. Note that Windows uses directory permissions to grant the Create and File Scan equivalent rights that NetWare uses as file rights.
Table 54.3. Mapping NetWare File Trustee Rights to Windows Server File Permissions
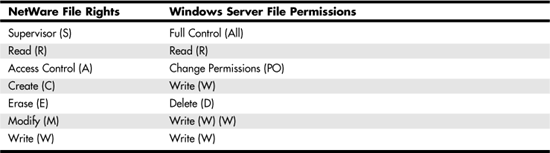
Table 54.4. Mapping Windows NT File Permissions to NetWare File Trustee Rights

Besides having to translate between the rights and permissions used on each system, FPNW5 also translates between the different kinds of file attributes that both systems use at the file level. Table 54.5 shows the translation mapping that FPNW performs.
Table 54.5. Mapping File Attributes Between Windows Server and NetWare
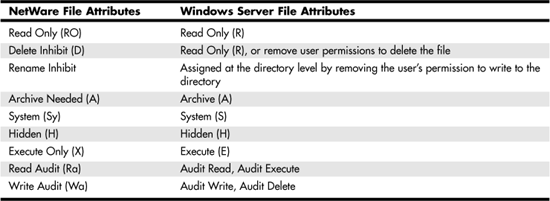
However, FPNW 5.0 does not provide support for the following NetWare attributes:
![]() Don’t Compress
Don’t Compress
![]() File Migrated
File Migrated
![]() File Compressed
File Compressed
![]() Immediate Compress
Immediate Compress
![]() Can’t Compress
Can’t Compress
![]() Purge
Purge
![]() Index FAT Entries
Index FAT Entries
![]() Transactional Tracking
Transactional Tracking
![]() File Migrated
File Migrated
The Shareable attribute can be set only on a per-server or global basis when using FPNW 5, and cannot be set on an individual file.
You should carefully examine how security is currently enforced for clients on the existing NetWare network before beginning to decide how to offer file shares from a Windows NT Server. Understanding the mapping between the two systems can prevent unexpected access violations or errors from compromising security on the network.
Installing File and Print Services for NetWare Version 5.0 (FPNW 5.0)
To install FPNW 5.0 on a Windows Server, follow these steps:
1. Right-click My Network Places on the desktop. From the menu that appears, click Properties.
2. In the Network and Dial-Up Connections window (see Figure 54.7), right-click Local Area Connection and select Properties from the menu that appears.
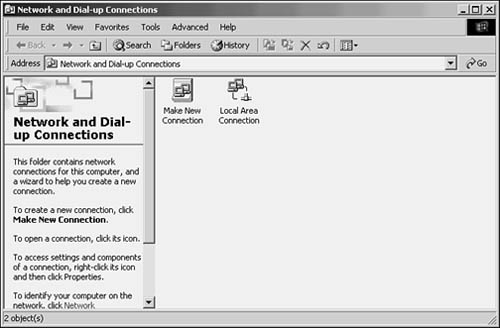
Figure 54.7. Right-click the Local Area Connection icon and select Properties.
3. Click the Install button on the connection’s Properties page (see Figure 54.8). The Select Network Component Type dialog box pops up and prompts you for the component type to install. Select Service and click Add.
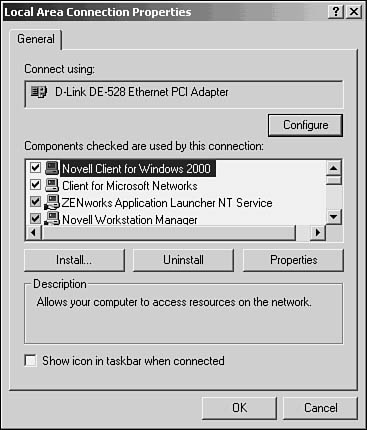
Figure 54.8. Click the Install button on the Properties page for the local connection.
4. The Select Network Service dialog box appears (see Figure 54.9). Click the Have Disk button.
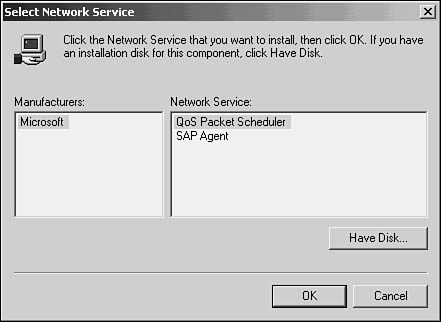
Figure 54.9. Use the Have Disk button to install the FPNW service.
5. The Install from Disk dialog box prompts you to enter the path for the service. Enter the drive letter for the CD-ROM drive that contains the SFN disc, followed by the pathname FPNW, as shown in Figure 54.10, and then click the OK button.
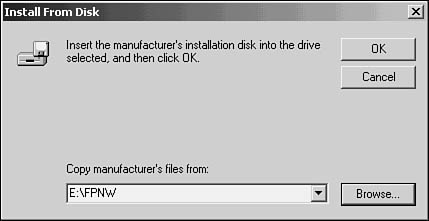
Figure 54.10. Enter the path that contains the FPNW files.
6. The Select Network Service dialog box prompts you for the service to install. The only service that appears in this dialog box is File and Print Services for NetWare. Highlight this service and click OK.
7. The Install File and Print Services for NetWare dialog box pops up (see Figure 54.11). Enter the necessary information for the volume you want to create for NetWare users, along with the password that will be used for the FPNW supervisor user account that will be created. You also can use the Tuning section on this dialog box to determine how memory use is allocated to users of the service. Click OK when you’ve supplied the necessary information.
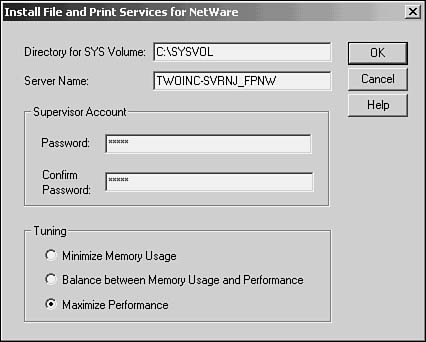
Figure 54.11. Enter the information for the services you want to offer to NetWare clients along with a password to be used by the account that will be used to manage the service.
Note
If you are installing FPNW in a domain, another dialog box will pop up and ask you to enter the password that will be used to run the service. In a domain setup, use the same password on all domain controllers that you set up to offer FPNW to NetWare users. Click OK to dismiss this dialog box.
8. When the Local Area Connections Properties sheet reappears, click Close. You’ll be prompted to restart your server before the FPNW service runs. You can click Yes to reboot immediately, or simply wait until a more convenient time by clicking No.
9. If you chose to wait until later for the reboot, click the Close button that appears on the Local Area Connection Properties dialog box.
You’ll find an icon in the Control Panel titled FPNW that can be used to manage the service. In Figure 54.12, you can see the File and Print Services for NetWare dialog box used in version 5.
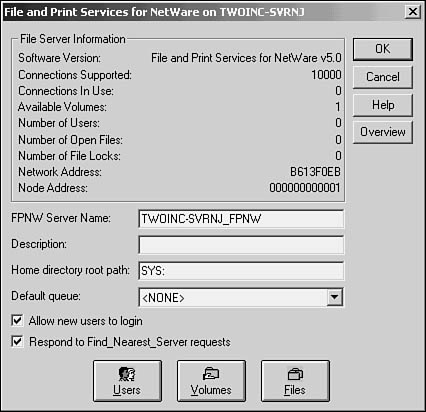
Figure 54.12. The FPNW dialog box, accessed from the FPNW Control Panel icon, enables you to manage the FPNW service.
Statistical information is displayed in the File Server Information section, showing data about the current connections, open files, and so on. You also can use the fields under this section to set up a print queue, a home directory path, or a description for the service on this server. Three buttons at the bottom allow you to view more information about users, volumes, and files:
![]() Users—This button brings up a display showing the names of connected users, the network address and login time, and information about resources being used. You can use this dialog box to send messages to users or to disconnect one or all users from the service.
Users—This button brings up a display showing the names of connected users, the network address and login time, and information about resources being used. You can use this dialog box to send messages to users or to disconnect one or all users from the service.
![]() Volumes—This button displays a dialog box showing the volumes you have set up to share with FPNW clients, showing connected users, the connection time, and information about file opens. You also can use buttons in this dialog box to disconnect one or all users.
Volumes—This button displays a dialog box showing the volumes you have set up to share with FPNW clients, showing connected users, the connection time, and information about file opens. You also can use buttons in this dialog box to disconnect one or all users.
![]() Files—This button displays information about each open file, the user who opened it, locking information, and the path to the file. You can use buttons in this dialog box to close a file or all files currently open.
Files—This button displays information about each open file, the user who opened it, locking information, and the path to the file. You can use buttons in this dialog box to close a file or all files currently open.
Microsoft Directory Synchronization Services (MSDSS)
This utility improves on Directory Service Manager for NetWare (DSMN) but is for use with the Active Directory instead of the Windows NT 4.0 SAM database. MSDSS provides for a one-way synchronization with NetWare 3.x binderies and the Active Directory (AD). MSDSS also gives you the capability for either one- or two-way support for synchronization between NDS and AD. Finally, MSDSS allows you to create a file that can be used by the File Migration Utility (FMU), discussed later in this chapter, so that NetWare trustee rights and ACLs are propagated to Windows servers when you decide to move files from NetWare servers to complete the migration to Windows.
However, to use MSDSS there are a few prerequisites:
![]() MSDSS can be installed only on a Windows server acting in the role of a domain controller. Remember that domain controllers contain the Active Directory database, and it is this database that stores user account/password information that is to be kept synchronized.
MSDSS can be installed only on a Windows server acting in the role of a domain controller. Remember that domain controllers contain the Active Directory database, and it is this database that stores user account/password information that is to be kept synchronized.
![]() You will need to obtain a copy of Novell’s Client for Windows. If you’ve just upgraded a Windows NT 4.0 server that had the previous version of Novell’s client installed, you won’t need a new copy. The old copy will be upgraded during the Windows Server upgrade process. If you need to get a copy of the Novell client, you can obtain one from
You will need to obtain a copy of Novell’s Client for Windows. If you’ve just upgraded a Windows NT 4.0 server that had the previous version of Novell’s client installed, you won’t need a new copy. The old copy will be upgraded during the Windows Server upgrade process. If you need to get a copy of the Novell client, you can obtain one from www.novell.com/download/index.html.
Novell has released several versions of its client for each version of Windows. Because differences exist from one version to another, read the release notes supplied with the file you download from Novell and follow the instructions for installing the client. For the most part, you simply need to extract the files to a temporary directory and run a setup program that takes only a few minutes, after which you’ll need to reboot the server.
Note
If you have already installed Microsoft’s Client Service for NetWare, you’ll get a prompt when you try to install Novell’s client. When asked whether you want to remove Microsoft’s version, answer Yes to continue the installation of Novell’s version of the client. The two are not compatible.
When the server reboots, you are presented with the Novell logon box instead of the familiar Windows logon box.
When using MSDSS to perform synchronization between NDS and AD, you create sessions that specify the NDS and corresponding AD objects that will be kept in sync. You can create a one-way session in which changes made to the Active Directory object will be propagated to the NDS object. However, one-way synchronization does not work in reverse. That is, with a one-way synchronization, changes made to an NDS object do not get copied back to AD. In this type of setup, you should use the Active Directory administrative tools and utilities to perform directory management. From a migration standpoint, this allows you to keep NDS on the network while you gradually educate your network administrators on using the AD tools. After your staff is comfortable using AD, you can use MSDSS to migrate all the required NDS information to AD, and then decommission the NDS servers.
Installing MSDSS
To install MSDSS after you’ve installed the NetWare client from Novell, follow these steps:
1. Insert the SFU CD into your local CD-ROM drive.
2. Click Start, Programs, Accessories, Windows Explorer.
3. In the left pane of the Explorer, double-click My Computer. The SFU CD shows up in the left pane of the Explorer display.
4. Double-click the SFU icon. You see two folders, one named FPNW and one named MSDSS. Double-click MSDSS.
5. Inside the MSDSS folder, you now see an MSDSS icon that is used to start the Windows Installer. Double-click the icon.
6. The Windows Installer copies files to your system directory, and you then are prompted to reboot the computer.
After you’ve installed MSDSS, you’ll find that the Active Directory server now has a new program in the Administrative Tools folder called Directory Synchronization.
Creating One-Way Synchronization Sessions
You create sessions that define the synchronization between NDS and AD objects. The objects must be container objects, such as organizational units (OUs), and not individual leaf objects, such as a single user in the AD. Before you start the New Session Wizard, you should decide which NDS and AD container objects you want to synchronize. This does not create these objects for you. For example, suppose you have an existing NDS object that contains user accounts for the manufacturing department of your business that you want to eventually migrate to AD. You should create a new OU and give it a meaningful name before you start the New Session Wizard. Or you can simply choose to use a container object that already exists in your AD database.
To create a one-way synchronization session, follow these steps:
1. Click Start, Programs, Administrative Tools, and then Directory Synchronization. The Microsoft Management Console (MMC) snap-in called MSDSS pops up on your screen.
2. In the left pane of the MMC, you can right-click on MSDSS and select New Session from the menu that appears. Alternatively, you can click once on MSDSS in the left pane, select the Action menu, and then select All Tasks, New Session (see Figure 54.13).
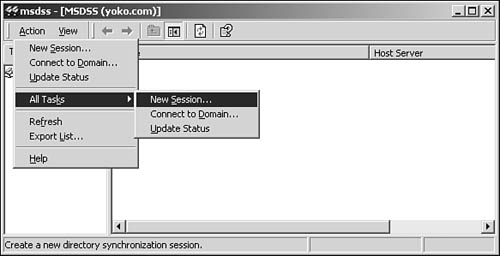
Figure 54.13. Use the MSDSS MMC snap-in to create a new session for synchronization.
3. The New Session Wizard pops up and displays information about the task that you are about to start. That is, you will migrate objects from NDS to AD and, if you want, establish a synchronization schedule. Click the Next button.
4. The New Session Wizard prompts you to select either NDS or a Bindery as the source for the initial migration using a drop-down menu (see Figure 54.14). Under this menu, you can elect to perform a one-way or two-way synchronization, or to simply do a one-time migration from the NDS or bindery source to AD.
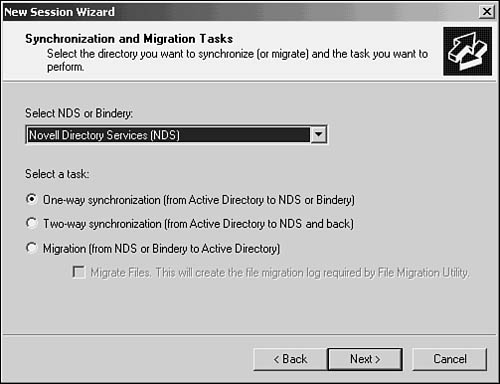
Figure 54.14. Select NDS or Bindery, and then choose to perform synchronization or a one-time migration.
5. Select the radio button for One-Way Synchronization (from Active Directory to NDS or Bindery), and then click Next to continue.
6. The next dialog box lets you select the AD container and the domain controller that stores information about this session, and is responsible for performing the synchronization tasks (see Figure 54.15). Click Next to continue.
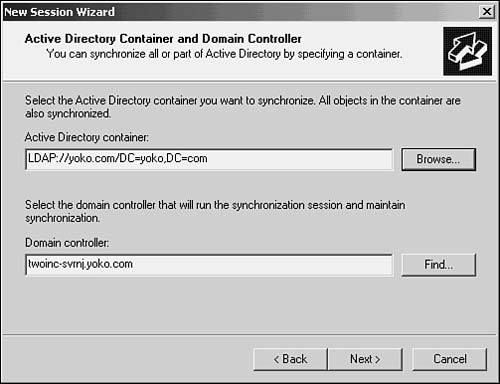
Figure 54.15. Enter the AD container object that will be used for this synchronization session (or click the Browse button to find one), and then enter the domain controller that will manage this session.
Note
If any container objects are child objects to the AD container (organizational unit) you select for synchronization, synchronization will be performed for the selected container object and all of its child container objects as well. If you want to enter the container object in the Active Directory Container field, use the LDAP URL syntax instead of using the Browse button—for example, LDAP://yoko.com/DC=yoko,DC=com. In the Domain Controller field, the server on which you are running the New Session Wizard is the default. Click the Find button if you want to search for another domain controller in your network to use instead. For more information about LDAP, container objects, organizational units, and so on, see Chapter 30, “Using the Active Directory.”
7. Next, a similar dialog box prompts you to enter the name of the NDS container object that you want to synchronize with the AD object you selected in step 6. Again, the NDS container must already exist, and any child objects of the container also are synchronized with the AD container object. The Browse button can be used, or you can use the NDS or bindery syntax to specify the NDS container object—for example, NDS://Tree1/O=ono/OU=mfg for an NDS object or NWCOMPAT://servername for a bindery server. Enter an NDS username and password that can be used to access the NDS object or bindery, and click Next.
The remaining dialog boxes for the New Session Wizard prompt you to do several things. First, the Initial Reverse Synchronization dialog box can be used if you want to import NDS objects into the Active Directory (a reverse synchronization) after the wizard finishes. Using this dialog box, you first can import NDS information so that you do not have to enter it manually into AD. Because we’re just setting up a one-way synchronization, this initial reverse synchronization can be used to populate your AD database with NDS objects that then will be managed using AD administrative tools and utilities.
Because NDS passwords cannot be imported into AD during a reverse synchronization, you can select one of the following methods to set user passwords for user accounts that are initially added to AD during a reverse synchronization:
![]() Set passwords to blank—The first time a user logs on to AD, the user will not have to specify a password and can set the password to a value he wants. Note that this leaves your migrated user accounts vulnerable to security problems unless properly coordinated. If you use this method, follow up to be sure that each user has logged in and changed his password.
Set passwords to blank—The first time a user logs on to AD, the user will not have to specify a password and can set the password to a value he wants. Note that this leaves your migrated user accounts vulnerable to security problems unless properly coordinated. If you use this method, follow up to be sure that each user has logged in and changed his password.
![]() Set passwords to the username—This is the default. Again, be sure to follow up and be sure that user passwords are changed after the initial migration.
Set passwords to the username—This is the default. Again, be sure to follow up and be sure that user passwords are changed after the initial migration.
![]() Set passwords to a random value—A random value is chosen for each account. A file is created in the directory
Set passwords to a random value—A random value is chosen for each account. A file is created in the directory systemrootSystem32Directory SynchronizationSession Logs that contains the user account names and the random passwords that were created. The file has an extension of .pwd, and after the synchronization process is finished, you can look in the Event Viewer to get the name of the file. Using this method, a help-desk technician can distribute passwords to users in a more secure manner than using the other options in this list.
![]() Set all passwords to the same value that you specify—All accounts have the same password. Once again, follow up to be sure that users change their password to a different value.
Set all passwords to the same value that you specify—All accounts have the same password. Once again, follow up to be sure that users change their password to a different value.
The default is to set all the user account passwords imported into AD to the user account’s username.
Another dialog box can be used to create specific mappings between AD and NDS objects. This can be useful when the child objects of an AD container object are not organized under the parent object in the same order as they are in the AD object. You can create an object mapping table that stores these relationships.
The New Session Wizard finally asks you to enter a name for this session, which you can use later to manage the session, or make changes to it. After you enter a name to use for the session, click the Finish button.
Creating Two-Way Synchronization Sessions
In the preceding section, you learned how to create a one-way synchronization that could be used to import NDS objects into the Active Directory. From that point forward, you should use the AD administrative tools to manage the objects. However, you also can use the New Session Wizard to set up a two-way synchronization process. To do so, use the same Directory Synchronization utility found in the Administrative Tools folder, and start the New Session Wizard. When the Synchronization and Migration Tasks dialog box pops up (refer to Figure 54.14), select two-way synchronization (from Active Directory to NDS and back) instead of the one-way synchronization.
You will have to supply similar information for the AD and NDS containers, as well as access information, just like you did for a one-way synchronization. You also can choose to perform an initial reverse synchronization, or you can elect to do this later.
One-Time Migration
Using a one- or two-way synchronization enables you to import NDS objects into AD so that you can manage your network resources (users, printers, and so on) using the administrative tools designed to work with the Active Directory. After you no longer have any need to keep NDS servers on your network, you can use the one-time migration option to simply import the data from NDS (or from bindery servers). The process is just about the same as a one-way synchronization, but after you have imported the data, changes made to objects in the Active Directory will not be propagated back to the NDS or bindery servers. Using the synchronization method, you can gradually migrate your network from NDS to AD. Using the one-time migration option, you can complete the process and turn off your NDS servers.
Again, you use the MMC MSDSS snap-in Directory Synchronization that is found in the Administrative Tools folder to begin a one-time migration. Use the New Session Wizard, as described earlier, to start the process. However, when the Synchronization and Migration Tasks dialog box appears (refer to Figure 54.14), select the Migration (from NDS or Bindery to Active Directory) radio button. You’ll have to supply the same type of access information for the AD and NDS objects that will be migrated, and you can select an additional option: Migrate files from the NDS or Bindery servers to Windows 2000 servers. The check box for this function, also shown in Figure 54.14, does not actually perform the file migration, but instead creates a file that is used by the File Migration Utility, which we’ll get to next. When you’ve decided it’s time to get rid of those NDS servers, use this option to create the file, and then invoke the File Migration Utility.
File Migration Utility (FMU)
This is the second tool that Services for NetWare 5.0 provides that you can use only on Windows 2000 Server. FMU is used to migrate files and directories from NetWare volumes to Windows 2000 disks, while keeping intact security permissions. You can use this tool with both the IPX/SPX and TCP/IP protocols.
When you migrate files from NDS to Windows 2000, the MSDSS utility discussed in the preceding sections can be used to create a file that FMU uses to maintain user and group relationships and rights associated with files and directories. Before using FMU, be sure to read these sections! MSDSS maps organizational units (OUs) and organizations from NDS to the Active Directory by creating local security groups for every NDS OU and organization.
FMU is installed when you install MSDSS. To start the actual file migration process, click Start, Programs, Administrative Tools, and then File Migration Utility. The File Migration Utility Wizard, shown in Figure 54.16, pops up and performs some preliminary functions. When it has finished, the Next button becomes available. Click Next and you’ll see a large property sheet that has tabs (see Figure 54.17), each of which can be used to perform a step in the migration process.
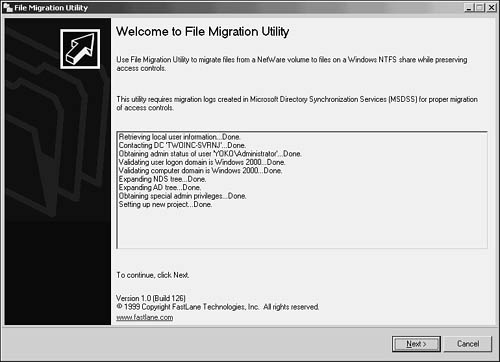
Figure 54.16. The File Migration Utility performs a few preliminary functions before you begin the migration process.
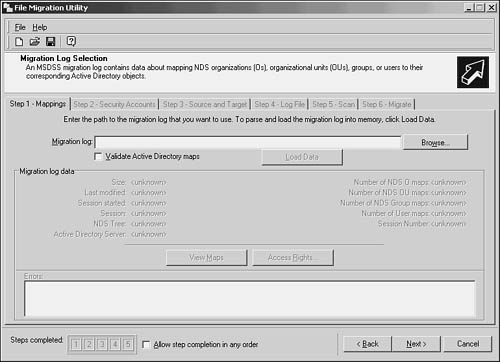
Figure 54.17. The File Migration Utility steps you through the migration process.
In the Step 1 tab, you must enter the full path for the migration log that you created using MSDSS. You can use the Browse button to locate the file if you don’t recall where it was created. After you locate the file, click the Load Data button to read in the file. Note that at the bottom of the screen you’ll see a display called Steps Completed, with boxes numbered 1 through 5. If you do not have time to complete the entire migration process in one session, or if you have to stop and rethink the process, you can look here to see what you’ve done so far. You can use the Allow Step Completion in Any Order check box if you want to perform steps out of order. Each time you click the Next button you move to another step. Using this check box, you can bring up any of the steps. The View Maps and Access Rights buttons enable you to view how access rights are mapped between Windows 2000 and NetWare access rights. This might be necessary, for example, if you have a file that has the NDS Modify right associated with it. By default, this maps to the Windows Read right. You can change this to the Write right if you want to by using the Access Rights button.
Click the Next button to continue.
Note
The default location for the migration log that MSDSS creates is systemrootSystem32Directory SynchronizationSession Logs. Look for the log file on the same server on which you performed a one-time migration.
The Step 2 tab shows you the Active Directory account that you used to log in to the Windows 2000 server (see Figure 54.18). Use the NetWare Connections button to show any current connections you have made to NetWare resources. If you have yet to log on to NDS or a bindery server, use the Log On to Novell button to do so at this time. Enter the required NDS or bindery account name and password, and click Next.
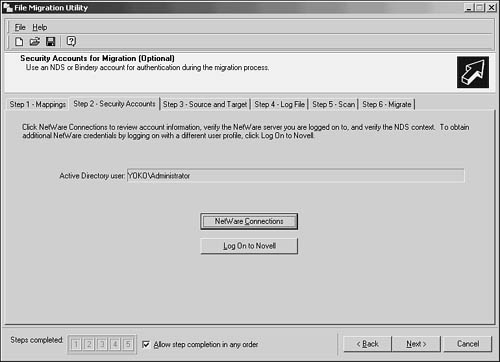
Figure 54.18. In Step 2 you review your Windows logon and can log on to the Novell network if you have not yet done so.
Step 3 enables you to select the source and target of the migration task (see Figure 54.19). Use this step to select the NDS or bindery volume or directories that you want to migrate to the Windows 2000 server. Under Target, select the Windows 2000 file shares or directories that will be used as the location for the files to be migrated. When you’ve finished making selections, click on Map and then, of course, click the Next button.
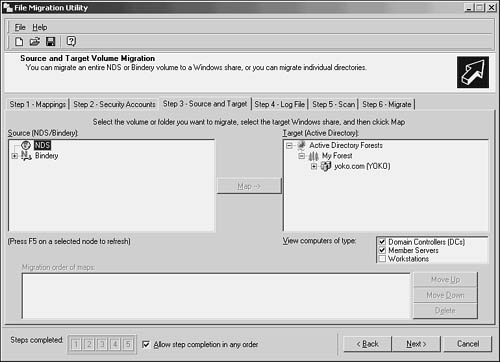
Figure 54.19. In Step 3 you select the source and target for the files and directories you want to migrate.
Step 4 enables you to create a log file and select options for generating the log file that will be created during the migration process (see Figure 54.20). Use the check box labeled Enable Logs, and then you can fill in the remaining fields shown in this figure.
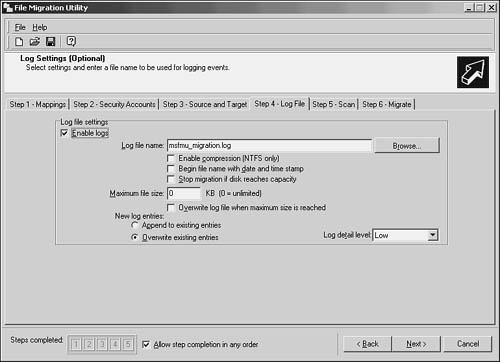
Figure 54.20. You can configure how the log file will be generated during the migration using Step 4.
If the migration will involve a lot of files, you can help reduce the size of the log file by using the Enable Compression (NTFS only) check box. If you want to append a date and timestamp in the logfile to determine when a file was actually migrated, use the next check box. The Stop Migration If Disk Reaches Capacity check box does just what it says!
You also can set a maximum size for the log file in the Maximum File Size field, or leave it at the default of zero to allow the file to grow to any size. If you set a value for this field, the check box underneath it, Overwrite Log File When Maximum Size Is Reached, should be used so that the process will continue if the log file exceeds the size you set.
The radio buttons under New Log Entries enable you to elect to either append new entries or overwrite existing entries when you use the same log file to perform migrations at different times. The Log Detail Level drop-down menu enables you to select the amount of information that is logged for each file. When you’ve finished configuring the log file, click Next to proceed to the next step.
Step 5 is used to scan the volumes and directories you selected as sources from NDS or NetWare for the migration (see Figure 54.21). Click the Scan button and the program counts the directories and the files within them, and checks that the correct access rights are associated with each volume (or directory/file).

Figure 54.21. Step 5 allows you to perform a scan to check for errors before you do the actual migration.
If any errors occur, you can choose to continue and simply use a manual method for copying the files or directories. However, if a large number of errors is encountered, the FMU utility will stop and you’ll need to rethink your migration. Go back to the previous steps in the process to see whether you’ve entered any incorrect information or ignored access rights required to access the NDS or bindery data.
Another thing that can cause errors during the migration process is opened or locked files on the NetWare server. You might want to perform Steps 1 through 5 and save the actual migration (Step 6) until a time when you can obtain downtime for your NetWare servers to ensure that all files and directories that are to be migrated are accessible. For example, to perform the migration, you must be logged on to the Windows 2000 server with an account that is a member of the Domain Admins group.
Finally, when you are ready to perform the actual data transfer, Step 6 enables you to start the process. On the Step 6 tab (see Figure 54.22), click the Migrate button. Depending on how much data is to be transferred from NetWare to Windows 2000, the process can take just a few minutes or many hours.
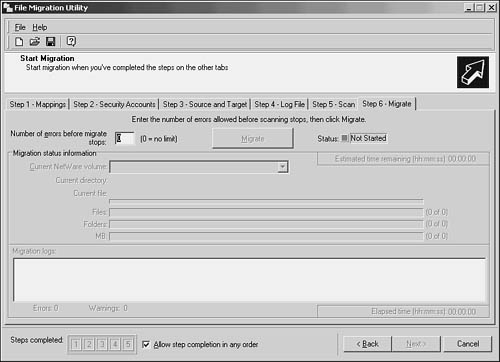
Figure 54.22. Use Step 6 to perform the actual file migration.
After you’ve migrated your files to Windows 2000 servers, you should perform testing to be sure that your clients can connect to the Windows 2000 servers and that the files and directories are set up as you planned. After everything checks out, consider the migration a success and decommission those NDS servers!